1. Introduction to ServletContext
- When the web container starts, it creates a ServletContext object for each web application, which represents the current web application.
- Multiple Servlets Share Data through ServletContext Objects
- Getting Initialization Parameters of web Applications
- Implementation of Request Forwarding with ServletContext
- Reading resource files using ServletContext objects
2. Implementing data sharing through servletContext object
1. Get ServletContext through this to share data
//Store data
response.setCharacterEncoding("UTF-8");
ServletContext context = this.getServletContext();
String username="learn java The lightning man";
context.setAttribute("name",username);
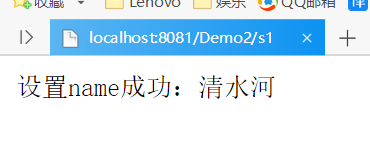
response.getWriter().print("Set up name Success:"+username);//Read data
response.setCharacterEncoding("UTF-8");
ServletContext context = this.getServletContext();
String name = (String) context.getAttribute("name");
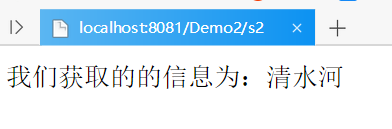
response.getWriter().print("The information we get is:"+name);2. Operation results
3. Read the Web Site Configuration File through the servletContext Object
1. Create a new properties file
driver=com.mysql.jdbc.Driver
username=root
password=123456
url=jdbc:mysql://localhost:3306/smbms
2. Write servlet classes
//Get the path to the configuration file
String realPath = this.getServletContext().getRealPath(
        "WEB-INF/classes/resources/database.properties");
System.out.println("Access path:"+realPath);

Properties properties = new Properties();
FileInputStream is = new FileInputStream(realPath);

//Loading file streams into configuration file objects
properties.load(is);

String driver = properties.getProperty("driver");
String username = properties.getProperty("username");
String password = properties.getProperty("password");
String url = properties.getProperty("url");

//Response to Web pages
response.getWriter().print(driver);
response.getWriter().print(username);
response.getWriter().print(password);
response.getWriter().print(url);
3. Configure web.xml
<servlet>
    <servlet-name>ServletTest03</servlet-name>
    <servlet-class>com.kuang.servlet.ServletTest03</servlet-class>
</servlet>
<servlet-mapping>
    <servlet-name>ServletTest03</servlet-name>
    <url-pattern>/s3</url-pattern>
</servlet-mapping>
4. Visit View
localhost: 8080/demo02/s3

4. Simple Verification Code
       //Automatically refresh web pages
        response.setHeader("refresh","2");

        //Verification code is a picture. We need to make a picture.
        BufferedImage image = new BufferedImage(100,30,BufferedImage.TYPE_3BYTE_BGR);

        //Write something in the picture
        Graphics2D graphics = image.createGraphics();
        graphics.setColor(Color.red);
        String num = String.valueOf(newRandom());
        graphics.drawString(num,10,10);

        //Find ways to let browsers know that we're giving a picture
        response.setContentType("image/jpg");

        //Let the website open the picture
        ImageIO.write(image,"jpg",response.getOutputStream());
    }

    //Generating Random Numbers
    public int newRandom(){
        int num = (int)(Math.random()*9+1)*100000;
        return num;
    }