Ideas for solving high concurrency:
1: Hardware
Hardware can use F5-bigIp
2: Software can use load balancing nginx to achieve load balancing strategy:
(1) polling, load balancer forwards requests to the back web server in turn. (2) ip hash, the same address client, always requests the same host.
(3) Connect the load balancer at least to which server has the lowest load.
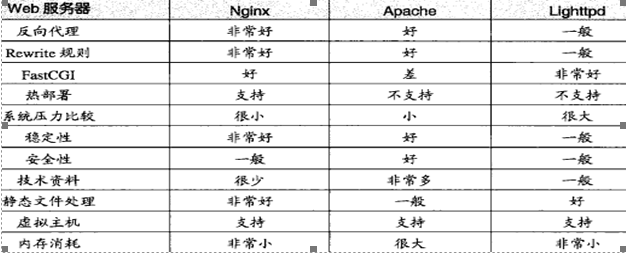
nginx versus apache:
apache: It has perfect functions, a long history and abundant module support. It belongs to a heavyweight product and consumes more memory.
Disadvantage: Processing each php is resource-intensive, resulting in a high concurrency that consumes server resources and fails to process more requests.
lighttpd: low memory overhead, low cpu occupancy, good performance, rich modules and other characteristics, lightweight web server.
nginx: Provide resources, save cpu, so it can handle more requests in high concurrency, high-end can reach 30,000 to 50,000 concurrency.
Comparison map:
So how to install nginx?
//Create user groups
groupadd  www
//Add user
useradd  -g www -s /usr/sbin/nologin www
//Decompressing nginx software
tar -zvxf nginx.tar.gz
cd nginx
//Execution configuration
./configure --user=www --group=www --prefix=/usr/local/nginx --with-http_stub_status_module --with-http_ssl_module
//Perform compilation and installation
make && make install
//Execute / usr/local/nginx/sbin/nginx file
/usr/local/nginx/sbin/nginx
//Test for successful startup
ps aux | grep nginx
//*************************************************
//Do not stop nginx services, reload configuration files
nginx  –s reload
//Check configuration files for errors
nginx  –t
//View Nginx compile-time parameters
nginx  -V

//Host configuration:

cd /usr/local/nginx/conf/
//Editing configuration files
vim nginx.conf
//Configure site information in http
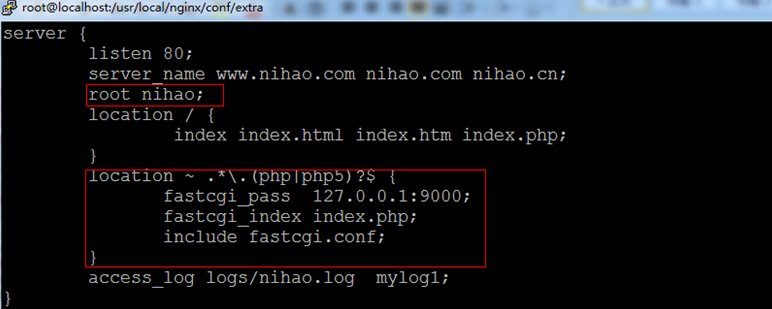
The configuration is as follows:

 //After modifying the configuration file, the reload configuration file is executed
  /usr/local/nginx/sbin/nginx –s reload
Log management
There are two main instructions related to nginx logs. One is log_format, which is used to
Set the format of the log, and the other is access_log, which specifies the storage path, format and cache size of the log file.
The location of the two instructions in the nginx configuration file can be between http {} or between virtual hosts, that is, between server {} and two braces.
1. Use log_format to format the log
log_format Format Name Format Style
For example:
log_format  main  '$remote_addr - $remote_user [$time_local] "$request" '
                  '$status $body_bytes_sent "$http_referer" '
                '"$http_user_agent" "$http_x_forwarded_for"';
In the log format style:
$remote_addr and $http_x_forwarded_for are used to record the IP address of the client
remote_user is used to record the user name of the remote client and $time_local is used to record the access time and time zone.
The $request is used to record the request URL and HTTP protocol; the $status is used to record the request status, such as 200 when successful and 404 when the page is not found;
body_bytes_sent is used to record the main content size of the file sent to the client.
http_referer is used to record which page link was accessed from.
http_user_agent is used to record information about client browsers.
2. Specify log file storage path with access_log instruction
Nginx allows different logs for different servers. (Some web servers do not support it, such as lighttp) access_Log
logs/access_8080.log mylog;
Declare log location log format;
Installation of mysql
//Create a mysql group and add a mysql user to the group
groupadd mysql
//Add a user
useradd mysql -q mysql
//Unzip mysql
tar -zvxf mysql
//Execution configuration
./configure --prefix=/usr/local/mysql \
    --with-charset=utf8 \
    --with-extra-charsets=gbk,gb2312,binary
//Perform compilation and installation
make && make install
//Copy mysql configuration file
cp support-files/my
//Initialize mysql
./bin/mysql_install_db --user=mysql \
    --datadir=/usr/local/mysql/data
//Once the initialization is successful, a new data directory is created under the installation directory, which stores the initialized data.


//Modify the permission settings in mysql
chown -R root
chfrp  -R mysql
chown  -R mysql data
//Setting the root user password of mysql
use mysql
//Set password
update user set password=PASSWORD('root') where user='root'
//Clear the permission cache so that changes take effect immediately.
flush privileges
Install php Software
tar -zvxf php.tar.gz
//Configuration -- enable-fpm This option indicates that the program runs independently.
./configure --prefix=/usr/local/php --with-mysql=/usr/local/mysql  --enable-fpm

//Compilation and installation
 make && make install
//Copy the php.ini configuration file to the specified directory. Note that the configuration file is in the decompressed PHP directory.
cp  php.ini-development  /usr/local/php/lib/php.ini
//Go into the php.ini configuration file and modify the time zone.
data.timezone = PRC
//Start the php service
 /usr/local/php/sbin/php-fpm
//If the following prompt occurs during startup, indicating that the php-fpm.conf configuration file does not exist, enter the / usr/local/php/etc/directory
cp php-fpm.conf.default php-fpm.conf
Compiling php and nginx integration
Under the conf directory under the nginx installation directory, there is a fastcgi.conf file as a file connected to php and nginx.
vim /usr/local/nginx/conf/nginx.conf
Open the nihao.conf subconfiguration file under the conf directory / extra directory.
location ~ .*.(php|php5)?$
{
fastcgi_pass 127.0.0.1:9000;
# fastcgi (managing PHP)
fastcgi_index index.php;
include fastcgi.conf;
}
Reload the configuration file of nginx;
/usr/local/nginx/sbin/nginx-s reload