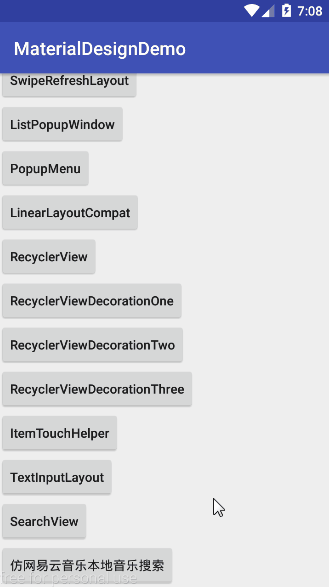
I. Brief Introduction
SearchView is a compatibility control in the v7 package. It can be used alone or in conjunction with menu+toolbar. This article explores SearchView in a second way. Finally, we will achieve the effect of "imitating the local music search of Netease Cloud Music" through code actual combat, which will completely unlock the UI customization and query function of SearchView.
II. Conventional use
* This article focuses on SearchView, so the use of Toolbar and notes will not be too much reflected in this article, if you need to know Baidu or directly view the Demo source code (source code in the end).
1. Configuration in menu's xml file
To work with menu, you must configure one of the item s in menu's xml file with the actionViewClass attribute, such as:
<?xml version="1.0" encoding="utf-8"?>
<menu xmlns:android="http://schemas.android.com/apk/res/android"
      xmlns:app="http://schemas.android.com/apk/res-auto"
      xmlns:tools="http://schemas.android.com/tools">
    <item
        android:id="@+id/menu_search"
        android:orderInCategory="100"
        android:title="search"
        app:actionViewClass="android.support.v7.widget.SearchView"
        app:showAsAction="always"
        />
    ...
</menu>
The difference between this item and ordinary item is that it uses the app:actionViewClass attribute (note app: start!!!). The SearchView in the compatibility control is used here, so take the value "android.support.v7.widget.SearchView". Among them, the title setting will not take effect (usually set the title item, long press will have pop-up prompt text), it doesn't matter to remove it here.
2. Get SearchView in onCreateOptionsMenu()
We know that menu calls back the onCreateOptionsMenu(Menu menu) method in Activity when it is created. Menu objects can be obtained by this method. SearchView is an actionView of item in Menu. ActionView can be obtained by Menu ItemCompat, so SearchView can be obtained by Menu objects.
@Override
public boolean onCreateOptionsMenu(Menu menu) {
    getMenuInflater().inflate(R.menu.search_view, menu);
    MenuItem searchItem = menu.findItem(R.id.menu_search);
    //Get SearchView through MenuItem
    mSearchView = (SearchView) MenuItemCompat.getActionView(searchItem);
    ...
    return super.onCreateOptionsMenu(menu);
}
Here you can see the effect:

3. Setting SearchView
Default expand search box
The search box on the home page is expanded by default, and the same effect can be achieved by using SearchView. In addition, SearchView has three default unfolding settings. The effect is slightly different. Please observe them carefully with comments and pictures.
/*------------------ SearchView There are three default ways to expand the search box, the difference is as follows: --------------------------------------------------------------------------------------------------------------*/
//Set the search box to expand the display directly. There is a magnifying glass on the left (in the search box) and a fork on the right to close the search box.
mSearchView.setIconified(false);
//Set the search box to expand the display directly. There is a magnifying glass on the left (outside the search box) and a fork on the right (without fork) to close the search box after input.
mSearchView.setIconifiedByDefault(false);
//Set the search box to expand the display directly. Is there a magnifying glass on the left (in the search box)? No fork on the right can close the search box without fork after input
mSearchView.onActionViewExpanded();
The order of effect is as follows:

General settings for SearchView
//Set maximum width
mSearchView.setMaxWidth(500);
//Set whether to display the submit button when the search box expands
mSearchView.setSubmitButtonEnabled(true);
//Setting input box prompts
mSearchView.setQueryHint("hint");
It's easier to look directly at the effect:
SearchView event listening
SearchView provides rich event monitoring. Generally, there are click events to open the search box button, click events to clear or close the search box button, and search box text change events.
//Click on the back fork button when the search box expands
mSearchView.setOnCloseListener(new SearchView.OnCloseListener() {
    @Override
    public boolean onClose() {
        Toast.makeText(getApplicationContext(), "Close", Toast.LENGTH_SHORT).show();
        return false;
    }
});
//The click event of the search icon button (the button that opens the search box)
mSearchView.setOnSearchClickListener(new View.OnClickListener() {
    @Override
    public void onClick(View v) {
        Toast.makeText(getApplicationContext(), "Open", Toast.LENGTH_SHORT).show();
    }
});
//Search box text change monitoring
mSearchView.setOnQueryTextListener(new SearchView.OnQueryTextListener() {
    @Override
    public boolean onQueryTextSubmit(String s) {
        Log.e("CSDN_LQR", "TextSubmit : " + s);
        return false;
    }

    @Override
    public boolean onQueryTextChange(String s) {
        Log.e("CSDN_LQR", "TextChange --> " + s);
        return false;
    }
});
It's also easy to see the effect directly.
These are the usual method calls and attribute settings provided by SearchView to developers, but this can not meet our development needs, because most designers in development according to regardless of Material Design design specifications, so in most cases need to customize SearchView's style according to UI design draft, which is relatively complex. Now we will learn SearchView through actual combat. Style customization to meet our development needs.
III. Actual combat
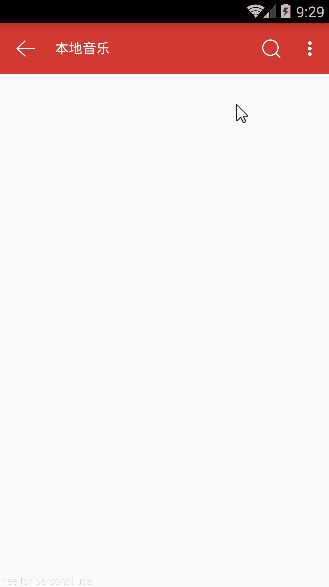
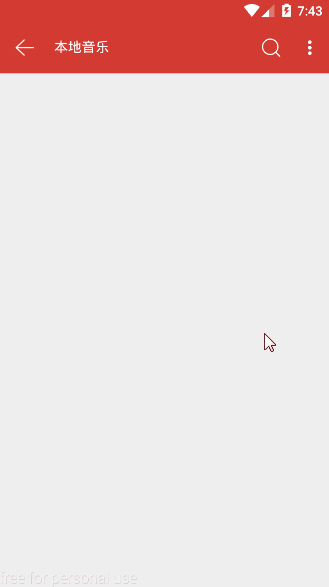
Imitate Netease cloud music local music search, first look at the effect, and then start the actual combat:

1. Setting up Toolbar
1) Create the layout activity_search_view2.xml of the interface
Specify the height, navigation Icon, title, font, etc. of the Toolbar
<?xml version="1.0" encoding="utf-8"?>
<LinearLayout xmlns:android="http://schemas.android.com/apk/res/android"
              xmlns:app="http://schemas.android.com/apk/res-auto"
              android:layout_width="match_parent"
              android:layout_height="match_parent"
              android:orientation="vertical">

    <android.support.v7.widget.Toolbar
        android:id="@+id/toolbar"
        style="@style/Toolbar.MyStyle"
        android:layout_width="match_parent"
        android:layout_height="?attr/actionBarSize"
        android:background="?attr/colorPrimary"
        app:navigationIcon="@mipmap/lg"
        app:popupTheme="@style/ThemeOverlay.AppCompat.Light"
        app:title="Local music"
        app:titleTextAppearance="@style/Toolbar.TitleText"
        app:titleTextColor="@android:color/white"/>
</LinearLayout>
The Toolbar.MyStyle that style points to is to set the distance between the title and Navigation Icon, and the Toolbar.TitleText that title Text Appearance points to is to set the text size of the title.
Create a custom style for Toolbar in style.xml
<!--Title and NavigationIcon Distance-->
<style name="Toolbar.MyStyle" parent="Base.Widget.AppCompat.Toolbar">
    <item name="contentInsetStart">0dp</item>
    <item name="contentInsetStartWithNavigation">0dp</item>
</style>

<!--Toolbar Title text size-->
<style name="Toolbar.TitleText" parent="TextAppearance.Widget.AppCompat.Toolbar.Title">
    <item name="android:textSize">15sp</item>
</style>
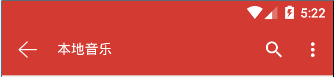
If not, the effect is not good. The distance between the title of Navigation Icon and Toolbar looks very large. Here's the difference between before and after the title of Navigation Icon and Toolbar.

2) Setting the theme for removing ActionBar
Create an ActionBar-free theme in Style.xml and set the theme background color
<style name="AppTheme.NoActionBar2" parent="AppTheme">
    <item name="colorPrimary">#D33A31</item>
    <item name="colorPrimaryDark">#D33A31</item>
    <item name="windowActionBar">false</item>
    <item name="windowNoTitle">true</item>
    <!--Set up menu in item Icon color-->
    <item name="android:textColorSecondary">#ffffff</item>
</style>
Without textColorSecondary, the default item icon for menu is black. Here's the difference before and after the setting:

Setting Themes for Activity
<?xml version="1.0" encoding="utf-8"?>
<manifest xmlns:android="http://schemas.android.com/apk/res/android"
          package="com.lqr.materialdesigndemo">

    <application
        ...
        android:theme="@style/AppTheme">
        ...

        <activity
            android:name=".SearchViewActivity2"
            android:screenOrientation="portrait"
            android:theme="@style/AppTheme.NoActionBar2"/>
    </application>
</manifest>
3) The code for setting up Toolbar in Activity is as follows:
public class SearchViewActivity2 extends AppCompatActivity {

    @Override
    protected void onCreate(@Nullable Bundle savedInstanceState) {
        super.onCreate(savedInstanceState);
        setContentView(R.layout.activity_search_view2);
        // Use Toolbar instead of actionbar
        Toolbar toolbar = (Toolbar) findViewById(R.id.toolbar);
        setSupportActionBar(toolbar);
    }
    ...
}
2. Setting Menu
1) Create menu layout search_view.xml
Compared with the previous code, only a few more item s were added.
<?xml version="1.0" encoding="utf-8"?>
<menu xmlns:android="http://schemas.android.com/apk/res/android"
      xmlns:app="http://schemas.android.com/apk/res-auto"
      xmlns:tools="http://schemas.android.com/tools">
    <item
        android:id="@+id/menu_search"
        android:orderInCategory="100"
        android:title="search"
        app:actionViewClass="android.support.v7.widget.SearchView"
        app:showAsAction="always"
        />
    <item
        android:id="@+id/scan_local_music"
        android:icon="@mipmap/lv"
        android:orderInCategory="100"
        android:title="Scanning local music"
        app:showAsAction="never"
        />
    <item
        android:id="@+id/select_sort_way"
        android:icon="@mipmap/lt"
        android:orderInCategory="100"
        android:title="Selection of Sorting Method"
        app:showAsAction="never"
        />
    <item
        android:id="@+id/get_cover_lyrics"
        android:icon="@mipmap/lq"
        android:orderInCategory="100"
        android:title="Get cover lyrics"
        app:showAsAction="never"
        />
    <item
        android:id="@+id/imporve_tone_quality"
        android:icon="@mipmap/lw"
        android:orderInCategory="100"
        android:title="Upgrade the sound quality"
        app:showAsAction="never"
        />
</menu>
2) The code for setting up Menu in Activity is as follows:
public class SearchViewActivity2 extends AppCompatActivity {

    private SearchView mSearchView;
    ...
    @Override
    public boolean onCreateOptionsMenu(Menu menu) {
        getMenuInflater().inflate(R.menu.search_view, menu);
        MenuItem searchItem = menu.findItem(R.id.menu_search);

        //Get SearchView through MenuItem
        mSearchView = (SearchView) MenuItemCompat.getActionView(searchItem);

        return super.onCreateOptionsMenu(menu);
    }

    // Let menus display icons and text at the same time
    @Override
    public boolean onMenuOpened(int featureId, Menu menu) {
        if (menu != null) {
            if (menu.getClass().getSimpleName().equalsIgnoreCase("MenuBuilder")) {
                try {
                    Method method = menu.getClass().getDeclaredMethod("setOptionalIconsVisible", Boolean.TYPE);
                    method.setAccessible(true);
                    method.invoke(menu, true);
                } catch (Exception e) {
                    e.printStackTrace();
                }
            }
        }
        return super.onMenuOpened(featureId, menu);
    }
}
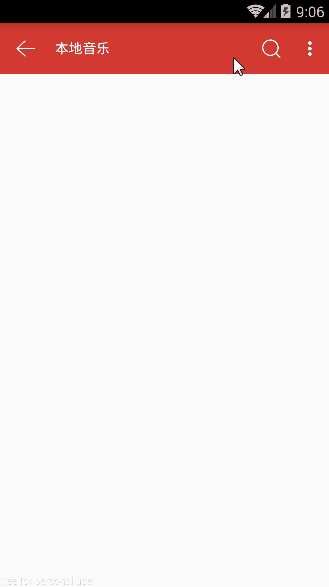
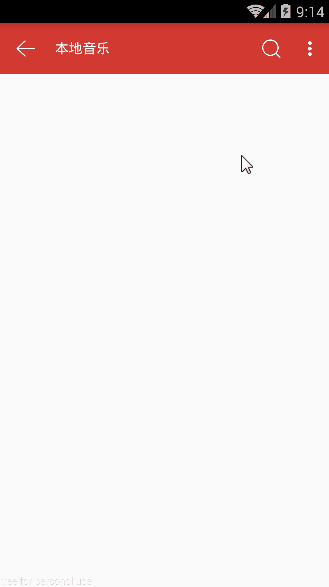
At this point, in addition to the SearchView, the overall layout effect is basically achieved:
3. Customize SearchView Style
The following style customizations to be implemented are:
Here's the point. Let's analyze it first. SearchView itself does not provide methods such as "Close Search Box" and "Set Search Icon on the Left of Search Box", so it needs to customize style in other ways.
Consider:
If the layout structure of SearchView is realized by xml layout file, then some or all of the controls can be obtained by SearchView.findViewById (); if the control is added dynamically by code, then we can get the control we need by reflection, and then style the control.
Conclusion:
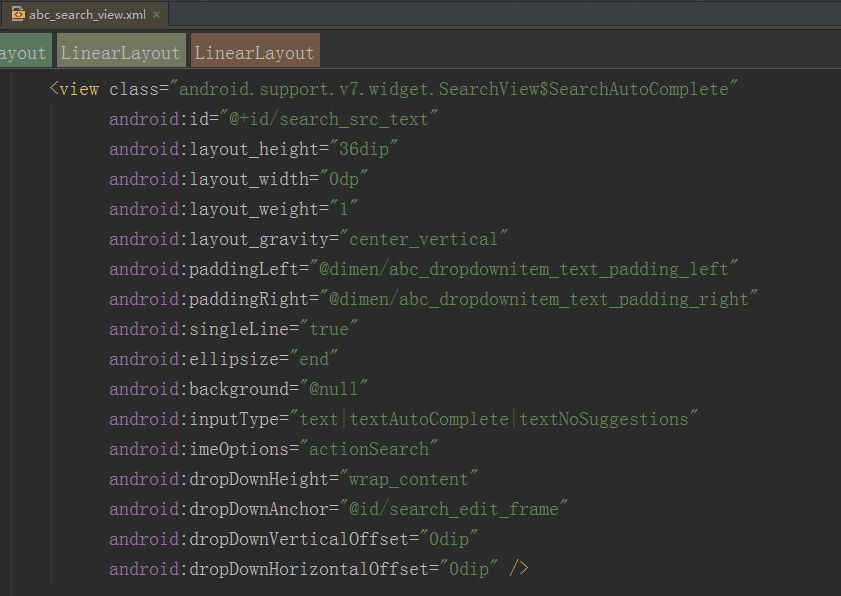
The implementation proves that the layout structure of SearchView is realized by using XML layout file named abc_search_view.xml, and basically every control has an id, so that you can get the required control to realize style customization.
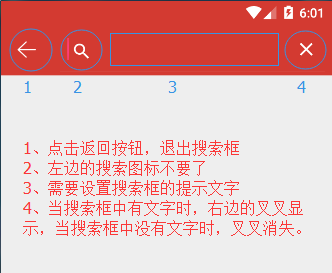
1) Click the Return button to exit the search box (if the search box is displayed)
SearchView itself does not provide a way to close the search box (I haven't found it anyway). But there happens to be an onCloseClicked() method in SearchView to close the search box. We can call this method by reflection. First, we can understand what this method does. The code of onCloseClicked() is as follows:
void onCloseClicked() {
    Editable text = this.mSearchSrcTextView.getText();
    //If there is text in the search box, clear the text
    if(TextUtils.isEmpty(text)) {
        if(this.mIconifiedByDefault && (this.mOnCloseListener == null || !this.mOnCloseListener.onClose())) {
            this.clearFocus();
            this.updateViewsVisibility(true);
        }
    }
    //Otherwise close the search box
    else {
        this.mSearchSrcTextView.setText("");
        this.mSearchSrcTextView.requestFocus();
        this.setImeVisibility(true);
    }
}
Consider that when the search box is displayed, press the Toolbar's return button to close the search box, or else close the current interface. Because the search box also has an id, we can get the search box control through the ID to judge the hidden state of the current search box. Combined with the onCloseClicked() method inside SearchView, the click event code of the Toolbar return button can be written as follows:
public class SearchViewActivity2 extends AppCompatActivity {

    private SearchView mSearchView;
    private SearchView.SearchAutoComplete mSearchAutoComplete;

    @Override
    protected void onCreate(@Nullable Bundle savedInstanceState) {
        super.onCreate(savedInstanceState);
        setContentView(R.layout.activity_search_view2);
        ...
        //Toolbar Return Button Click Event
        toolbar.setNavigationOnClickListener(new View.OnClickListener() {
            @Override
            public void onClick(View v) {
                if (mSearchAutoComplete.isShown()) {
                    try {
                        //If there is text in the search box, it will empty the text first, but Netease Cloud Music closes the search box directly when it clicks the return key.
                        mSearchAutoComplete.setText("");
                        Method method = mSearchView.getClass().getDeclaredMethod("onCloseClicked");
                        method.setAccessible(true);
                        method.invoke(mSearchView);
                    } catch (Exception e) {
                        e.printStackTrace();
                    }
                } else {
                    finish();
                }
            }
        });
    }

    @Override
    public boolean onCreateOptionsMenu(Menu menu) {
        getMenuInflater().inflate(R.menu.search_view, menu);
        MenuItem searchItem = menu.findItem(R.id.menu_search);

        //Get SearchView through MenuItem
        mSearchView = (SearchView) MenuItemCompat.getActionView(searchItem);
        //Get the search box control by id
        mSearchAutoComplete = (SearchView.SearchAutoComplete) mSearchView.findViewById(R.id.search_src_text);

        return super.onCreateOptionsMenu(menu);
    }

    ...
}
2) Hide the search icon on the left of the search box
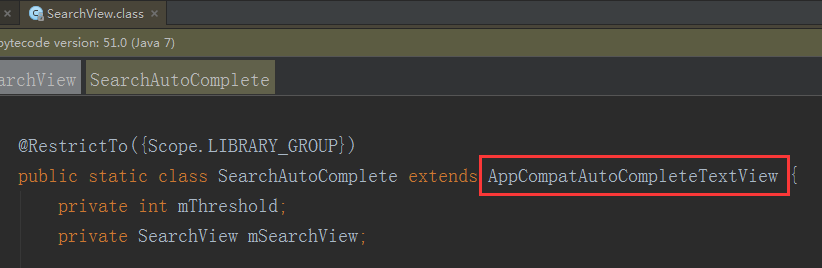
The search icon on the left side of the search box is not a control, so you can't get it by id, but the good thing is that you can modify all the icons of SearchView by setting style. The method is also simple, just create a style (named Widget.SearchView here) that inherits from Widget.AppCompat.SearchView, and then replace the attributes that need to be modified. Take a look at the parent of Widget.AppCompat.SearchView, Base.Widget.AppCompat.SearchView:
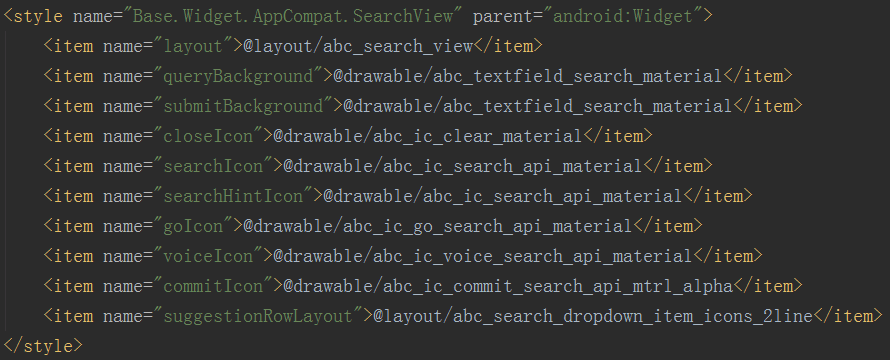
As you can see, this parent style provides almost all of the Icon attributes in SearchView, which means that icon customization can be extensible. Where layout specifies the layout of SearchView, the original layout is abc_search_view.xml, and we generally do not move this property.
Here we just need to remove the icon on the left side of the search box (i.e. search HintIcon) and set it to @null. Modify the Widget.SearchView theme in the style file as follows:
<! - No ActionBar theme, custom SearchView style - >
<style name="AppTheme.NoActionBar2" parent="AppTheme">
    ...
    <! - Introduce SearchView's custom style - >
    <item name="searchViewStyle">@style/Widget.SearchView</item>
</style>

<style name="Widget.SearchView" parent="Widget.AppCompat.SearchView">
    <! - Modify the search box prompt text - >
    <item name="defaultQuery Hint">Search for local songs </item>
    <! - Modify the icon of the search button that opens the search box - >
    <item name="searchIcon">@mipmap/m5</item>
    <! - Modify the search button icon on the left side of the search box - >
    <item name="searchHintIcon">@null</item>
</style>

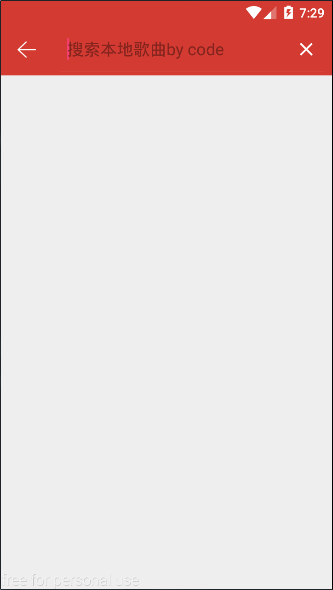
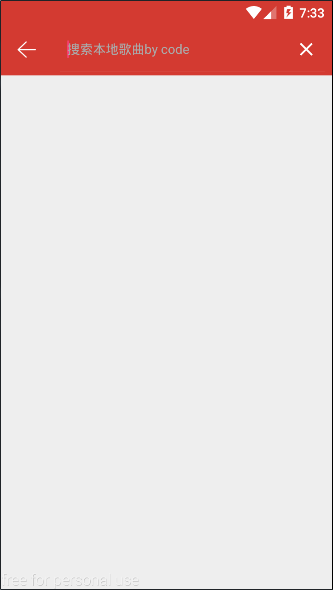
3) The prompt text for setting the search box
Modify the text content of the prompt
There are two ways to modify the SearchView style, one is to modify the defaultQueryHint property of Widget.AppCompat.SearchView in the previous step, and the other is to call setQueryHint() of SearchView to modify it. Both ways can be used. If both ways are used to set the prompt of the search box, the final content of the prompt will be based on the code setting.
@Override
public boolean onCreateOptionsMenu(Menu menu) {
    getMenuInflater().inflate(R.menu.search_view, menu);
    MenuItem searchItem = menu.findItem(R.id.menu_search);

    //Get SearchView through MenuItem
    mSearchView = (SearchView) MenuItemCompat.getActionView(searchItem);
    mSearchAutoComplete = (SearchView.SearchAutoComplete) mSearchView.findViewById(R.id.search_src_text);

    //Modify prompt text by code
    mSearchView.setQueryHint("Search for local songs by code");

}
Modify the prompt text style
SearchView also does not provide any way to directly modify the style of the prompt text in the search box, but since we can get the search box control through id, it is not a problem to set the style of the prompt text. The code is as follows:
@Override
public boolean onCreateOptionsMenu(Menu menu) {
    getMenuInflater().inflate(R.menu.search_view, menu);
    MenuItem searchItem = menu.findItem(R.id.menu_search);

    //Get SearchView through MenuItem
    mSearchView = (SearchView) MenuItemCompat.getActionView(searchItem);
    mSearchAutoComplete = (SearchView.SearchAutoComplete) mSearchView.findViewById(R.id.search_src_text);
    mSearchView.setQueryHint("Search for local songs by code");

    //Set input box prompt text style
    mSearchAutoComplete.setHintTextColor(getResources().getColor(android.R.color.darker_gray));
    mSearchAutoComplete.setTextColor(getResources().getColor(android.R.color.background_light));
    mSearchAutoComplete.setTextSize(14);

    return super.onCreateOptionsMenu(menu);
}
4) Display the fork on the right side of the search box according to whether there is any text in the search box.
This is a bit like the effect of searchView.onActionViewExpanded(). The only difference is that the search box cannot be expanded by default. What should we do? By looking at the source code of onActionViewExpanded(), you can find that setIconified(false)!!! Recalling that setIconified(false) itself has the effect of allowing the search box to expand by default, does this mean that just change the setIconified(false) of onActionViewExpanded() to setIconified(true)? The answer is yes. And there is no need to rewrite SearchView, because onActionViewExpanded() and setIconified(true) can be used together, as long as the two methods are invoked in turn to achieve this effect, the code is as follows:
@Override
public boolean onCreateOptionsMenu(Menu menu) {
    getMenuInflater().inflate(R.menu.search_view, menu);
    MenuItem searchItem = menu.findItem(R.id.menu_search);

    //Get SearchView through MenuItem
    mSearchView = (SearchView) MenuItemCompat.getActionView(searchItem);
    mSearchAutoComplete = (SearchView.SearchAutoComplete) mSearchView.findViewById(R.id.search_src_text);
    mSearchView.setQueryHint("Search for local songs by code");

    //Set input box prompt text style
    mSearchAutoComplete.setHintTextColor(getResources().getColor(android.R.color.darker_gray));
    mSearchAutoComplete.setTextColor(getResources().getColor(android.R.color.background_light));
    mSearchAutoComplete.setTextSize(14);

    //Set the search box to display forks when there are words, and hide forks when there are no words.
    mSearchView.onActionViewExpanded();
    mSearchView.setIconified(true);

    //Modify the interval between search box controls (just to get closer to the search box of Netease Cloud Music in detail)
    LinearLayout search_edit_frame = (LinearLayout) mSearchView.findViewById(R.id.search_edit_frame);
    ViewGroup.MarginLayoutParams params = (ViewGroup.MarginLayoutParams) search_edit_frame.getLayoutParams();
    params.leftMargin = 0;
    params.rightMargin = 0;
    search_edit_frame.setLayoutParams(params);
    return super.onCreateOptionsMenu(menu);
}
4. Implementing search prompt function
We have learned the UI customization of SearchView above, and we will continue to improve the effect of SearchView SearchView SearchView SearchView SearchView SearchView SearchView SearchView SearchView SearchView SearchView Search Tips by SearchView itself or by combining ListView (Recycler View should be the same, not tried yet).
1) Pop-up Search Tips
SearchView's own search box is a subclass of AutoCompleteTextView, with pictures and facts.
AutoCompleteTextView can implement text completion prompts by setting adapters, so the search box in SearchView can do the same, but SearchView provides the setSuggestions Adapter () method to set adapters directly for the search box. It is important to note that this adapter must be used with the Cursor object of the database, for example:
mSearchView.setSuggestionsAdapter(new SimpleCursorAdapter(SearchViewActivity2.this, R.layout.item_layout, cursor, new String[]{"name"}, new int[]{R.id.text1}));
In general, the requirement of development is to input keywords while displaying search results, so we need to monitor the text input of the search box, query the database once the text changes, update the search results, so the code can be written as follows:
// Listen for text changes in search boxes
mSearchView.setOnQueryTextListener(new SearchView.OnQueryTextListener() {
    @Override
    public boolean onQueryTextSubmit(String s) {
        return false;
    }

    @Override
    public boolean onQueryTextChange(String s) {
        Cursor cursor = TextUtils.isEmpty(s) ? null : queryData(s);
        // Do not create adapters frequently. If the adapter already exists, you only need to update the cursor object in the adapter.
        if (mSearchView.getSuggestionsAdapter() == null) {
            mSearchView.setSuggestionsAdapter(new SimpleCursorAdapter(SearchViewActivity2.this, R.layout.item_layout, cursor, new String[]{"name"}, new int[]{R.id.text1}));
        } else {
            mSearchView.getSuggestionsAdapter().changeCursor(cursor);
        }

        return false;
    }
});
For the use of SimpleCursor Adapter, you are not familiar with Baidu to learn, see the effect below:
It can be found that when the first word "a" is input, there is no response. When the second word "a" is input, a list pop-up window pops up. This is because AutoComplete TextView itself defaults to trigger the query action on the condition that at least two words in the control are needed. If we want to modify it to trigger the query as long as one word, we can do so:
- Get the SearchView search box control
- Call setThreshold() to set the number of words that trigger the query
Code directly:
@Override
public boolean onCreateOptionsMenu(Menu menu) {
    getMenuInflater().inflate(R.menu.search_view, menu);
    MenuItem searchItem = menu.findItem(R.id.menu_search);

    //Get SearchView through MenuItem
    mSearchView = (SearchView) MenuItemCompat.getActionView(searchItem);
    mSearchAutoComplete = (SearchView.SearchAutoComplete) mSearchView.findViewById(R.id.search_src_text);
    ...
    //Set the minimum number of characters to trigger the query (default 2 characters to trigger the query)
    mSearchAutoComplete.setThreshold(1);
}
Look at the effect again:
Now that the pop-up search function is finished, the code implementation of item_layout.xml and queryData() method for item layout is pasted below.
① item_layout.xml
<?xml version="1.0" encoding="utf-8"?>
<LinearLayout xmlns:android="http://schemas.android.com/apk/res/android"
              android:layout_width="match_parent"
              android:layout_height="match_parent"
              android:orientation="vertical">

    <TextView
        android:id="@+id/text1"
        android:layout_width="match_parent"
        android:layout_height="wrap_content"
        android:gravity="center_vertical"
        android:minHeight="?android:attr/listPreferredItemHeightSmall"
        android:paddingLeft="10dp"
        android:paddingRight="10dp"
        android:textAppearance="?android:attr/textAppearanceListItemSmall"
        android:textColor="@android:color/black"/>
</LinearLayout>
② queryData()
Simply create a database (music.db), there is a tb_music table in the library, there are two fields of _id and name in the table, and then fill in the data, query the data, relatively simple, there is no more explanation here.
private Cursor queryData(String key) {
    SQLiteDatabase db = SQLiteDatabase.openOrCreateDatabase(getFilesDir() + "music.db", null);
    Cursor cursor = null;
    try {
        String querySql = "select * from tb_music where name like '%" + key + "%'";
        cursor = db.rawQuery(querySql, null);
    } catch (Exception e) {
        e.printStackTrace();
        String createSql = "create table tb_music (_id integer primary key autoincrement,name varchar(100))";
        db.execSQL(createSql);

        String insertSql = "insert into tb_music values (null,?)";
        for (int i = 0; i < Cheeses.sCheeseStrings.length; i++) {
            db.execSQL(insertSql, new String[]{Cheeses.sCheeseStrings[i]});
        }

        String querySql = "select * from tb_music where name like '%" + key + "%'";
        cursor = db.rawQuery(querySql, null);
    }
    return cursor;
}
2) Combining ListView to Realize Search Tips
Although the search prompt has been implemented above, the local search results of Netease Cloud Music are not pop-up, but are presented in the form of lists under SearchView. To achieve this effect, SearchView must be used together with ListView. Actually, this is not difficult, because the adapter set by AutoComplete TextView is the same as the adapter set by ListView, so just set the adapter above to ListView.
// Listen for text changes in search boxes
mSearchView.setOnQueryTextListener(new SearchView.OnQueryTextListener() {
    @Override
    public boolean onQueryTextSubmit(String s) {
        return false;
    }

    @Override
    public boolean onQueryTextChange(String s) {
        Cursor cursor = TextUtils.isEmpty(s) ? null : queryData(s);
        // Setting or updating the adapter for ListView
        setAdapter(cursor);
        return false;
    }
});

private void setAdapter(Cursor cursor) {
    if (mLv.getAdapter() == null) {
        SimpleCursorAdapter adapter = new SimpleCursorAdapter(SearchViewActivity2.this, R.layout.item_layout, cursor, new String[]{"name"}, new int[]{R.id.text1});
        mLv.setAdapter(adapter);
    } else {
        ((SimpleCursorAdapter) mLv.getAdapter()).changeCursor(cursor);
    }
}
That's it. Although it's ugly in style, what about it?~