Building a map with Gmapping
Introduction to Gmapping function package
See the wiki website Gmapping function package . it includes topics and parameters of subscription and publication of Gmapping function package.
Some preparations for using the Gmapping function package
According to the official website, Gmapping subscribes to two topics: tf and scan
/tf
tf refers to coordinate transformation, which represents the relative position relationship of each component of robot. For Gmapping, it needs three tf: radar, robot base coordinate and odometer
Radar and robot base coordinates
There are two ways to publish radar and robot coordinates.
The first one is to build robot model through urdf, and then write a launch file to load the model file and release the robot status information to tf. urdf is a method of robot modeling, see urdf wiki official website
An example launch file is as follows:
<?xml version="1.0"?>
<launch>
    <!--param name="/use_sim_time" value="true"/ -->
    <arg name="model" />
    <!-- Loading robot model parameters -->
    <param name="robot_description" command="$(find xacro)/xacro --inorder $(find robot_description)/src/urdf/robot_model.xacro" />

    <!-- Set up GUI Parameters, displaying joint control plug-ins -->
    <param name="use_gui" value="false"/>

    <!-- Function joint_state_publisher Nodes, publishing robot joint status  -->
    <node name="joint_state_publisher" pkg="joint_state_publisher" type="joint_state_publisher" />

    <!-- Function robot_state_publisher Nodes, publishing tf  -->
    <node name="robot_state_publisher" pkg="robot_state_publisher" type="state_publisher" />

    <!-- Function rviz Visual interface -->
    <node name="rviz" pkg="rviz" type="rviz"  />
</launch>
The second is to call tf API and write code to publish tf. See for details tf API wiki official website.
Odometer
The odometer publishes the coordinate transformation from base link to odom, where base link is the robot base coordinate mentioned above, and odom is a fixed coordinate in the world coordinate system. The odometer reflects the trajectory of the robot, which is calculated by the speed and time of the robot, so the release of the odometer is actually to continuously release the speed and time information of the robot.
The time information can be calculated by ROS, and the speed information needs to be combined with the actual situation of the robot. Generally, the motor encoder feeds the speed back to the control board of the motor driver, and then the control board issues it to ROS.
Taking Arduino Uno as the driving board, the example code of odometer is as follows:
/*
 * rosserial Planar Odometry Example
 */

#include <ros.h>
#include <ros/time.h>
#include <tf/tf.h>
#include <tf/transform_broadcaster.h>

ros::NodeHandle  nh;

geometry_msgs::TransformStamped t;
tf::TransformBroadcaster broadcaster;

double x = 1.0;
double y = 0.0;
double theta = 1.57;

char base_link[] = "/base_link";
char odom[] = "/odom";

void setup()
{
  nh.initNode();
  broadcaster.init(nh);
}

void loop()
{
  // drive in a circle
  double dx = 0.2;
  double dtheta = 0.18;
  x += cos(theta)*dx*0.1;
  y += sin(theta)*dx*0.1;
  theta += dtheta*0.1;
  if(theta > 3.14)
    theta=-3.14;

  // tf odom->base_link
  t.header.frame_id = odom;
  t.child_frame_id = base_link;

  t.transform.translation.x = x;
  t.transform.translation.y = y;

  t.transform.rotation = tf::createQuaternionFromYaw(theta);
  t.header.stamp = nh.now();

  broadcaster.sendTransform(t);
  nh.spinOnce();

  delay(10);
}
/scan
/What is published in scan is the information of lidar sensor, which is used to describe the surrounding obstacles.
The release of this topic needs to be combined with the data of lidar itself. For the message format, please refer to wiki official website
The code example for the release topic is as follows
#include <ros/ros.h>
#include <sensor_msgs/LaserScan.h>

int main(int argc, char** argv){
  ros::init(argc, argv, "laser_scan_publisher");

  ros::NodeHandle n;
  ros::Publisher scan_pub = n.advertise<sensor_msgs::LaserScan>("scan", 50);

  //A real application would pull the following data from their laser driver
  unsigned int num_readings = 100;
  double laser_frequency = 40;
  double ranges[num_readings];
  double intensities[num_readings];

  int count = 0;
  ros::Rate r(1.0);
  while(n.ok()){
    //generate some fake data for our laser scan,
    //Populate the dummy laser data with values that increase by one every second.
    for(unsigned int i = 0; i < num_readings; ++i){
      ranges[i] = count;
      intensities[i] = 100 + count;
    }
    ros::Time scan_time = ros::Time::now();

    //populate the LaserScan message,
    //Create a scan_msgs::LaserScan message and fill it with the data
    //that we've generated in preparation to send it over the wire.
    sensor_msgs::LaserScan scan;
    scan.header.stamp = scan_time;
    scan.header.frame_id = "laser_frame";
    scan.angle_min = -1.57;
    scan.angle_max = 1.57;
    scan.angle_increment = 3.14 / num_readings;
    scan.time_increment = (1 / laser_frequency) / (num_readings);
    scan.range_min = 0.0;
    scan.range_max = 100.0;

    scan.ranges.resize(num_readings);
    scan.intensities.resize(num_readings);
    for(unsigned int i = 0; i < num_readings; ++i){
      scan.ranges[i] = ranges[i];
      scan.intensities[i] = intensities[i];
    }

    //Publish the message over ROS
    scan_pub.publish(scan);
    ++count;
    r.sleep();
  }
}
Using the gamma Ping Feature Pack
When the / tf and / scan topics are ready, we can use a launch file to use the Gmapping feature pack.
An example launch file is as follows:
<?xml version="1.0"?>
<launch>
	<!--Run robot model -- >
	<include file="$(find robot_description)/launch/display.launch" />

	<!--Publish odom-->
	<node name="odom_pub" pkg="odom_pub"  type="odom_pub_node">

	<!--Run lidar-->
	<node name="lidar"   pkg="lidar"  type="lidar_node">

	<!--Run Gmapping-->
	<node name="slam_gmapping" pkg="gmapping" type="slam_gmapping" output="screen">
    	<remap from="scan" to="/scan"/>
	</node>
</launch>
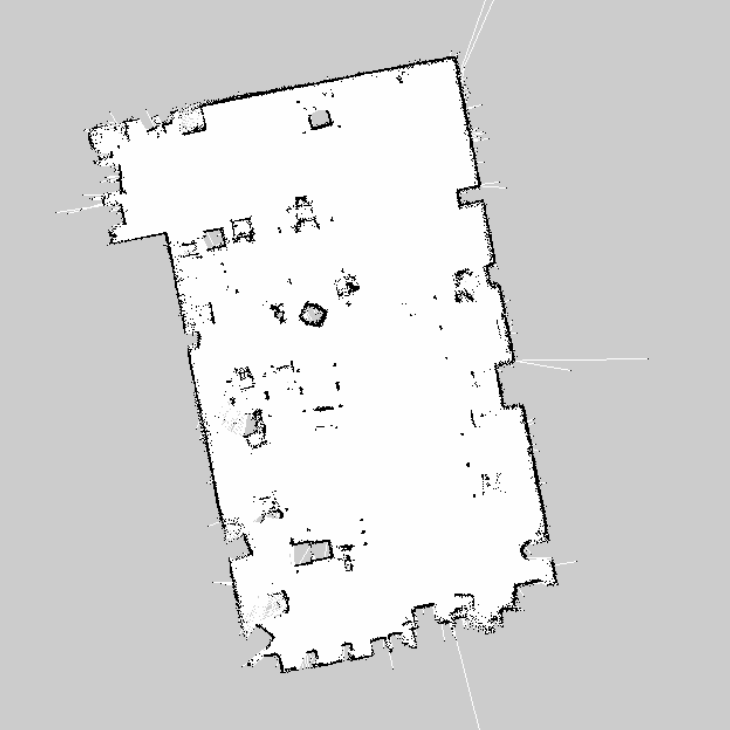
Map obtained
After running Gmapping, enter rviz to see the real-time process shown in the figure. After the map is built, you can use the map server function package to save the map. The command to use the map server is as follows:
rosrun map_server map_saver map:=/<Map Topic> -f PATH_TO_YOUR_FILE/mymap
After saving, you get a grid as shown below