This article mainly introduces how to upgrade RocketMQ cluster from the original master-slave synchronization to the master-slave switch.
First, it introduces the core configuration attributes related to the master-slave switch of the DLedger multi replica, that is, the RocketMQ master-slave switch. Then it tries to build a master-slave synchronous cluster, and then smoothly upgrade from the original RocketMQ cluster to the DLedger cluster, and simply tests the master-slave switch function.
1. Detailed explanation of the core configuration parameters of RocketMQ DLedger multi copy master-slave switch
The main configuration parameters are as follows:
- enableDLegerCommitLog Whether DLedger is enabled, that is, whether RocketMQ master-slave switch is enabled. The default value is false. If the master-slave switch needs to be turned on, the value needs to be set to true.
- dLegerGroup It is recommended that the raft group to which the node belongs be consistent with the broker name, such as broker-a.
- dLegerPeers For cluster node information, the example configuration is as follows: n0-127.0.0.1:40911;n1-127.0.0.1:40912;n2-127.0.0.1:40913. Multiple nodes are separated by English colons. A single entry follows the legersleefid IP: port, where the port is used for internal communication of the ledger.
- dLegerSelfId Current node id. It is taken from the beginning of the entry in legerPeers, that is, n0 in the above example. It should be emphasized that only the first character can be English, and other characters need to be configured as numbers.
- storePathRootDir The storage root directory of the DLedger log file. In order to support smooth upgrade, this value is set to a different directory than the storePathCommitLog.
2. Build master-slave synchronization environment
First, we build a traditional master-slave synchronization architecture, pour a certain amount of data into the cluster, and then upgrade to the DLedger cluster.
It's not difficult to build a rocketmq master-slave synchronization cluster on a Linux server, so this article will not introduce the process in detail, just post the relevant configuration.
The deployment structure of the experimental environment is primary and primary. The deployment diagram is as follows:
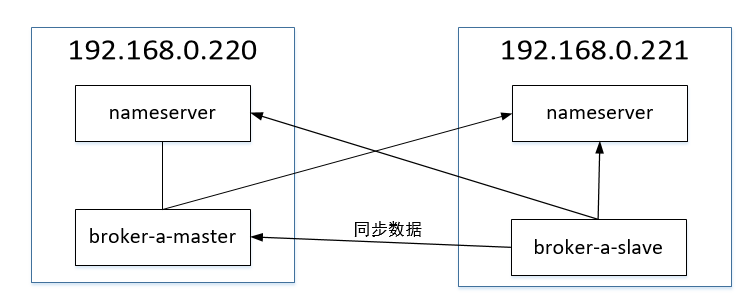
Next, I will focus on the broker configuration file. The broker configuration file on 220 is as follows:
brokerClusterName = DefaultCluster
brokerName = broker-a
brokerId = 0
deleteWhen = 04
fileReservedTime = 48
brokerRole = ASYNC_MASTER
flushDiskType = ASYNC_FLUSH
brokerIP1=192.168.0.220
brokerIP2=192.168.0.220
namesrvAddr=192.168.0.221:9876;192.168.0.220:9876
storePathRootDir=/opt/application/rocketmq-all-4.5.2-bin-release/store
storePathCommitLog=/opt/application/rocketmq-all-4.5.2-bin-release/store/commitlog
autoCreateTopicEnable=false
autoCreateSubscriptionGroup=false
The configuration file of broker on 221 is as follows:
brokerClusterName = DefaultCluster
brokerName = broker-a
brokerId = 1
deleteWhen = 04
fileReservedTime = 48
brokerRole = SLAVE
flushDiskType = ASYNC_FLUSH
brokerIP1=192.168.0.221
brokerIP2=192.168.0.221
namesrvAddr=192.168.0.221:9876;192.168.0.220:9876
storePathRootDir=/opt/application/rocketmq-all-4.5.2-bin-release/store
storePathCommitLog=/opt/application/rocketmq-all-4.5.2-bin-release/store/commitlog
autoCreateTopicEnable=false
autoCreateSubscriptionGroup=false
The related startup commands are as follows:
nohup bin/mqnamesrv  /dev/null  2>&1 &
nohup bin/mqbroker -c conf/broker.conf  /dev/null  2>&1 &
The cluster information after installation is as shown in the figure:

3. Upgrade master-slave synchronous cluster to DLedger
3.1 deployment architecture
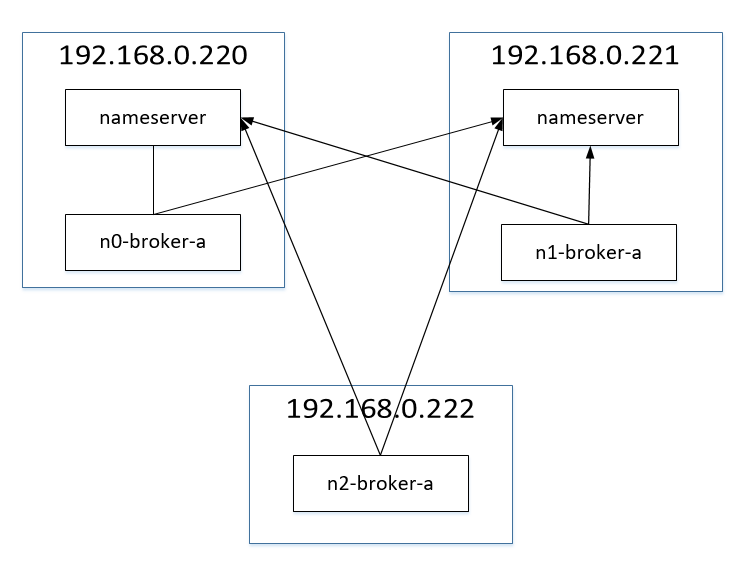
At least three machines are needed for a DLedger cluster. Therefore, another machine needs to be introduced to build a DLedger cluster. The deployment structure is as follows:
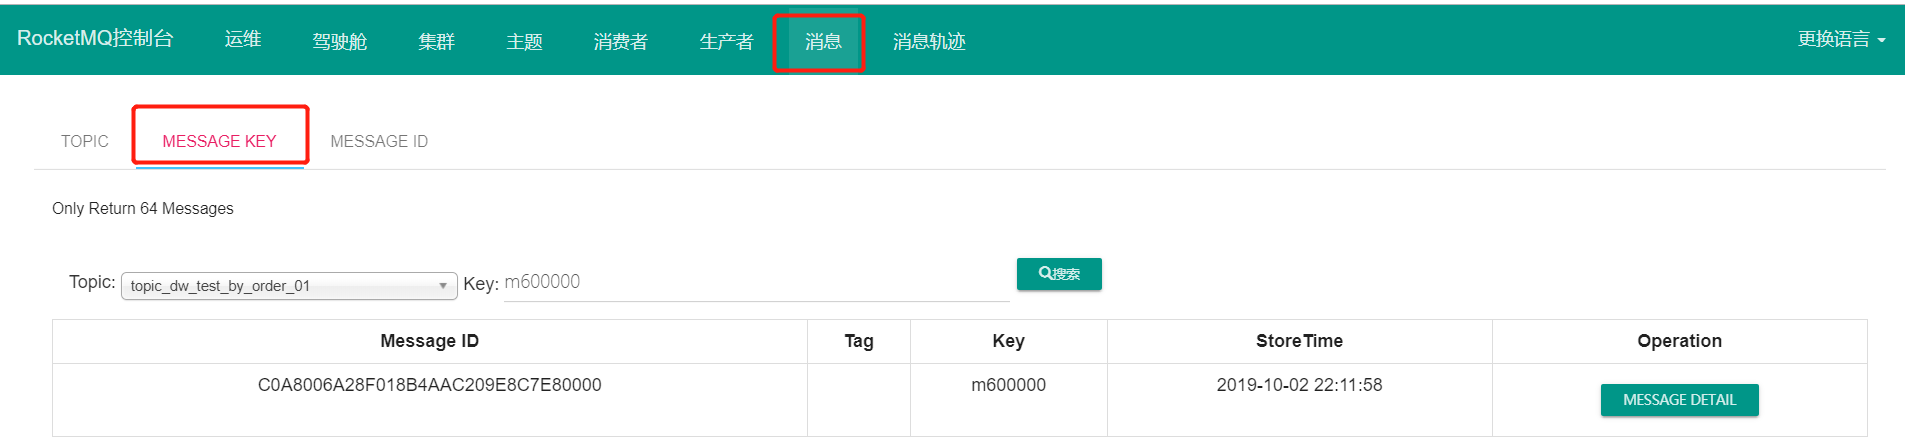
From the master-slave synchronous cluster to the DLedger cluster, users are most concerned about whether the upgraded cluster can be compatible with the original data, that is, whether the original stored messages can be found by the message consumer, or even query. In order to facilitate subsequent verification, I first added a message (set the key of the message) to the mq cluster, which is easy to query, using the following program.
public class Producer {
    public static void main(String[] args) throws MQClientException, InterruptedException {
        DefaultMQProducer producer = new DefaultMQProducer("producer_dw_test");
        producer.setNamesrvAddr("192.168.0.220:9876;192.168.0.221:9876");
        producer.start();
        for(int i =600000; i < 600100; i ++) {
            try {
                Message msg = new Message("topic_dw_test_by_order_01",null , "m" + i,("Hello RocketMQ" + i ).getBytes(RemotingHelper.DEFAULT_CHARSET));
                SendResult sendResult = producer.send(msg);
               //System.out.printf("%s%n", sendResult);
            } catch (Exception e) {
                e.printStackTrace();
                Thread.sleep(1000);
            }
        }
        producer.shutdown();
        System.out.println("end");
    }
}
The query results of the message are as follows:
3.2 upgrade steps
Step 1: copy the rocketmq of 192.168.0.220 to 192.168.0.222. You can use the following command to operate. On 192.168.0.220, type the following command:
scp -r rocketmq-all-4.5.2-bin-release/ root@192.168.0.222:/opt/application/rocketmq-all-4.5.2-bin-release
>Warm tip: in the example, because the version is the same, in the actual process, the version needs to be upgraded, so you need to download the latest version first, and then copy the store directory of the old cluster to the store directory of the new cluster completely.
Step 2: add the configuration attributes related to the dledger in the broker.conf configuration file of the three servers in turn.
The 192.168.0.220 broker configuration file is as follows:
brokerClusterName = DefaultCluster
brokerId = 0
deleteWhen = 04
fileReservedTime = 48
brokerRole = ASYNC_MASTER
flushDiskType = ASYNC_FLUSH
brokerIP1=192.168.0.220
brokerIP2=192.168.0.220
namesrvAddr=192.168.0.221:9876;192.168.0.220:9876
storePathRootDir=/opt/application/rocketmq-all-4.5.2-bin-release/store
storePathCommitLog=/opt/application/rocketmq-all-4.5.2-bin-release/store/commitlog
autoCreateTopicEnable=false
autoCreateSubscriptionGroup=false
# Properties related to the ledger
enableDLegerCommitLog=true
storePathRootDir=/opt/application/rocketmq-all-4.5.2-bin-release/store/dledger_store
dLegerGroup=broker-a
dLegerPeers=n0-192.168.0.220:40911;n1-192.168.0.221:40911;n2-192.168.0.222:40911
dLegerSelfId=n0
192.168.0.221 the broker configuration file is as follows:
brokerClusterName = DefaultCluster
brokerName = broker-a
brokerId = 1
deleteWhen = 04
fileReservedTime = 48
brokerRole = SLAVE
flushDiskType = ASYNC_FLUSH
brokerIP1=192.168.0.221
brokerIP2=192.168.0.221
namesrvAddr=192.168.0.221:9876;192.168.0.220:9876
storePathRootDir=/opt/application/rocketmq-all-4.5.2-bin-release/store
storePathCommitLog=/opt/application/rocketmq-all-4.5.2-bin-release/store/commitlog
autoCreateTopicEnable=false
autoCreateSubscriptionGroup=false
# Configuration properties related to the ledger
enableDLegerCommitLog=true
storePathRootDir=/opt/application/rocketmq-all-4.5.2-bin-release/store/dledger_store
dLegerGroup=broker-a
dLegerPeers=n0-192.168.0.220:40911;n1-192.168.0.221:40911;n2-192.168.0.222:40911
dLegerSelfId=n1
192.168.0.222 the broker configuration file is as follows:
brokerClusterName = DefaultCluster
brokerName = broker-a
brokerId = 0
deleteWhen = 04
fileReservedTime = 48
brokerRole = ASYNC_MASTER
flushDiskType = ASYNC_FLUSH
brokerIP1=192.168.0.222
brokerIP2=192.168.0.222
namesrvAddr=192.168.0.221:9876;192.168.0.220:9876
storePathRootDir=/opt/application/rocketmq-all-4.5.2-bin-release/store
storePathCommitLog=/opt/application/rocketmq-all-4.5.2-bin-release/store/commitlog
autoCreateTopicEnable=false
autoCreateSubscriptionGroup=false
# Configuration related to the ledger
enableDLegerCommitLog=true
storePathRootDir=/opt/application/rocketmq-all-4.5.2-bin-release/store/dledger_store
dLegerGroup=broker-a
dLegerPeers=n0-192.168.0.220:40911;n1-192.168.0.221:40911;n2-192.168.0.222:40911
dLegerSelfId=n2
>Warm tip: legerSelfId is n0, n1, n2 respectively. In the real production environment, the storePathRootDir and storePathCommitLog in the broker configuration file try to use a separate root directory, so that their disk utilization will not affect each other.
Step 3: copy all files under store/config to the congfig directory of the ledger store.
cd /opt/application/rocketmq-all-4.5.2-bin-release/store/
cp config/* dledger_store/config/
>Warm tip: this step can be copied according to the directory configured according to the time.
Step 4: start three broker s in turn.
nohup bin/mqbroker -c conf/broker.conf /dev/null 2>&1 &
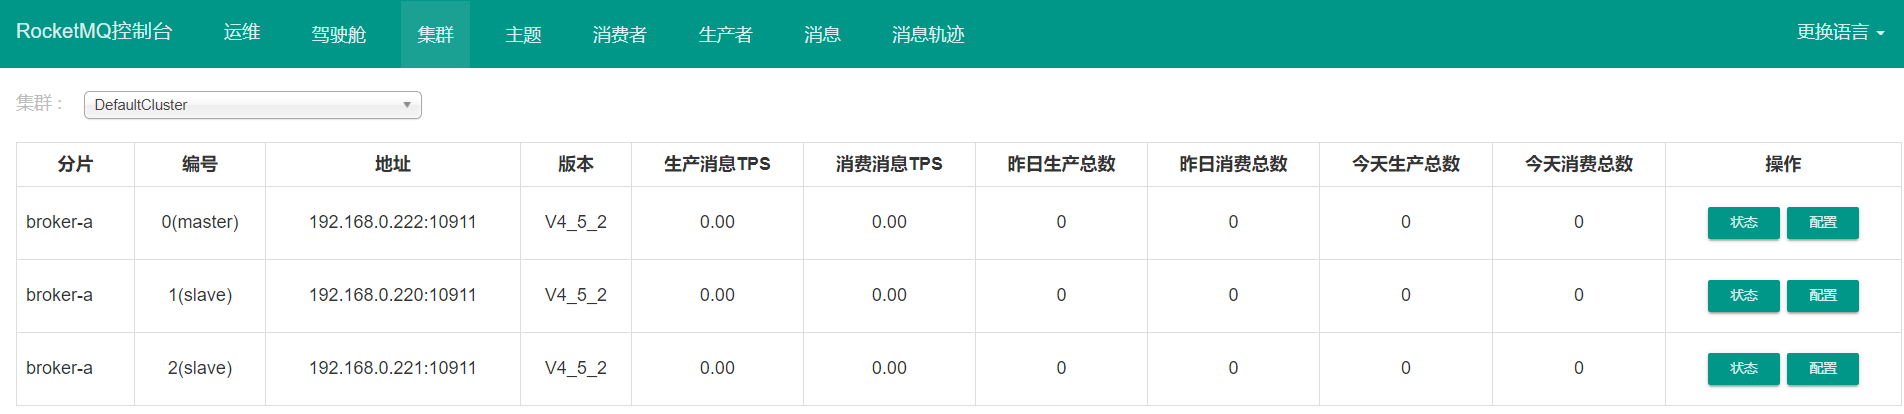
If the startup is successful, the cluster information you see in the rocketmq console is as follows:
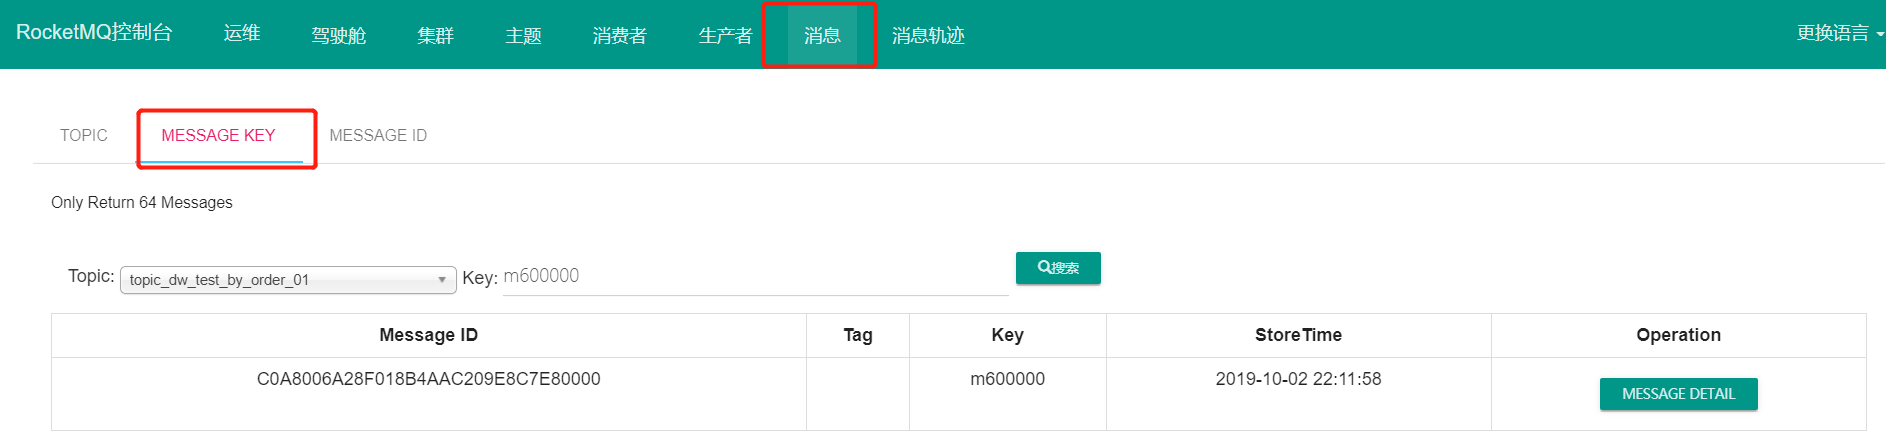
3.3 verification message sending and message searching
First of all, we need to verify whether the messages before upgrading can be found. Then we need to find the message with the key of m600000. The search result is as shown in the figure:
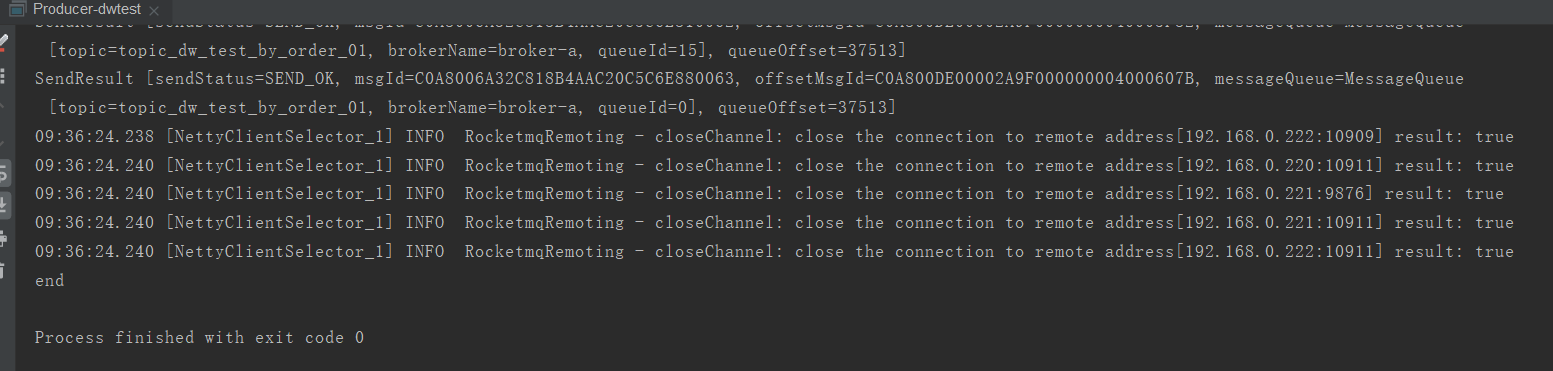
Then let's test the message sending. The test code is as follows:
public class Producer {
    public static void main(String[] args) throws MQClientException, InterruptedException {
        DefaultMQProducer producer = new DefaultMQProducer("producer_dw_test");
        producer.setNamesrvAddr("192.168.0.220:9876;192.168.0.221:9876");
        producer.start();
        for(int i =600200; i < 600300; i ++) {
            try {
                Message msg = new Message("topic_dw_test_by_order_01",null , "m" + i,("Hello RocketMQ" + i ).getBytes(RemotingHelper.DEFAULT_CHARSET));
                SendResult sendResult = producer.send(msg);
                System.out.printf("%s%n", sendResult);
            } catch (Exception e) {
                e.printStackTrace();
                Thread.sleep(1000);
            }
        }
        producer.shutdown();
        System.out.println("end");
    }
}
The results are as follows:
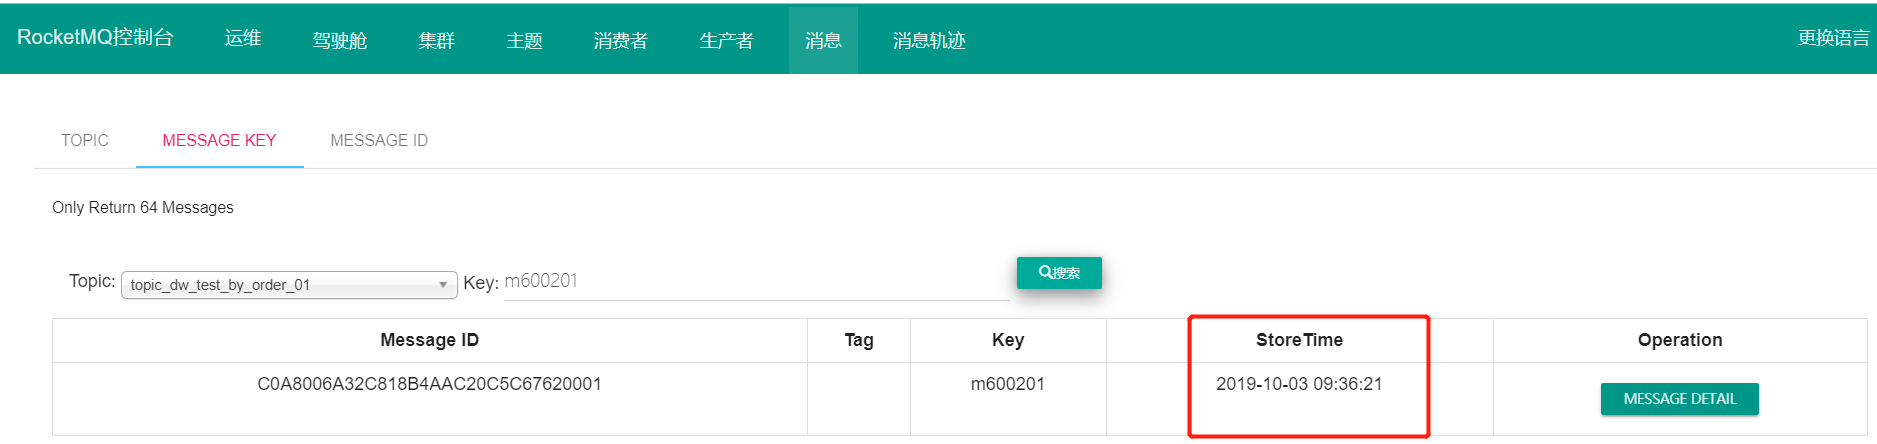
Go to the console to query the message again, and the result shows that the new message can also be queried.
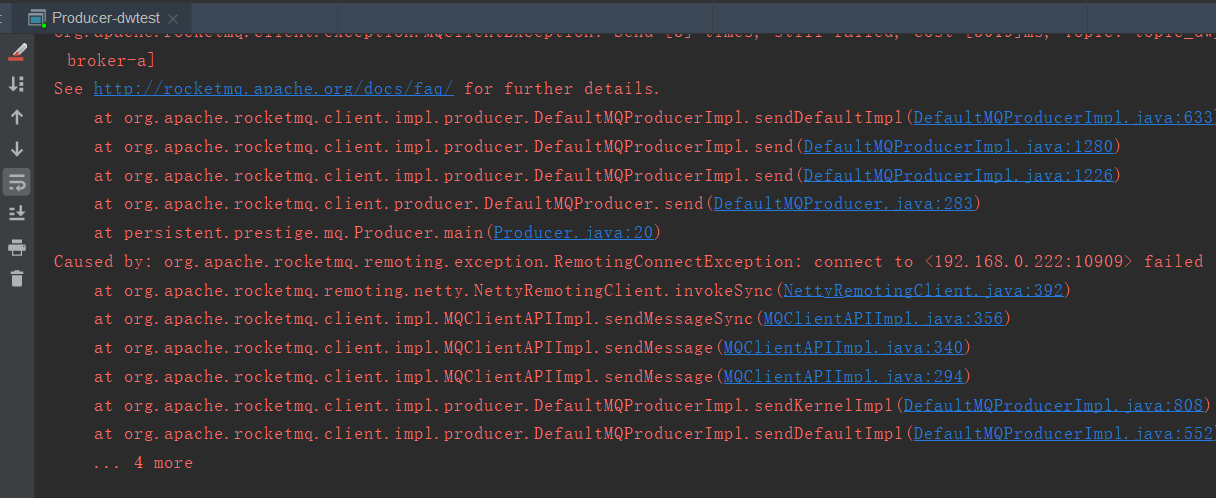
Finally, let's verify whether the message sending will be affected when the primary node goes down.
In the process of sending a message, close the primary node. The screenshot is as follows:
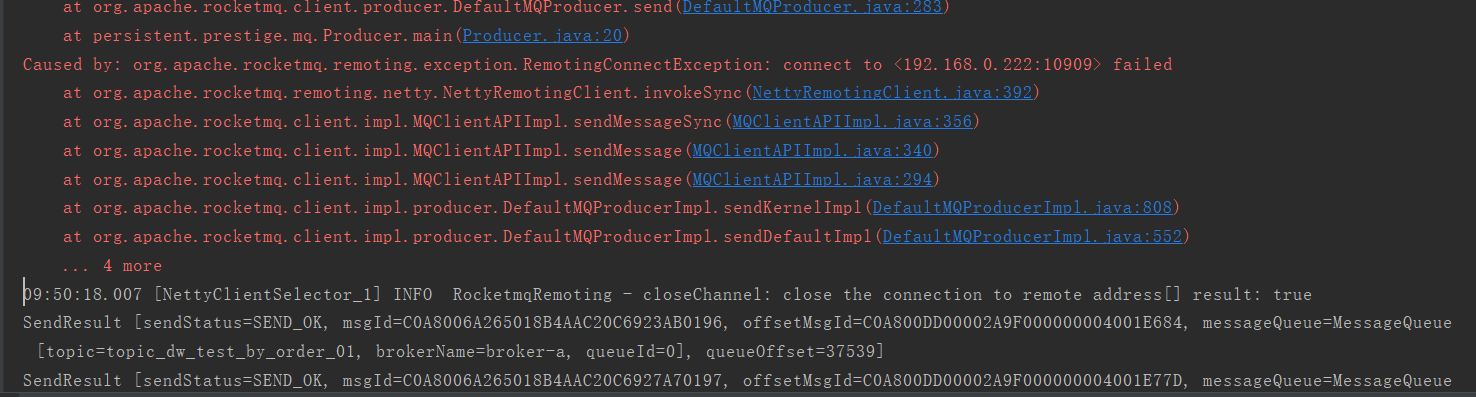
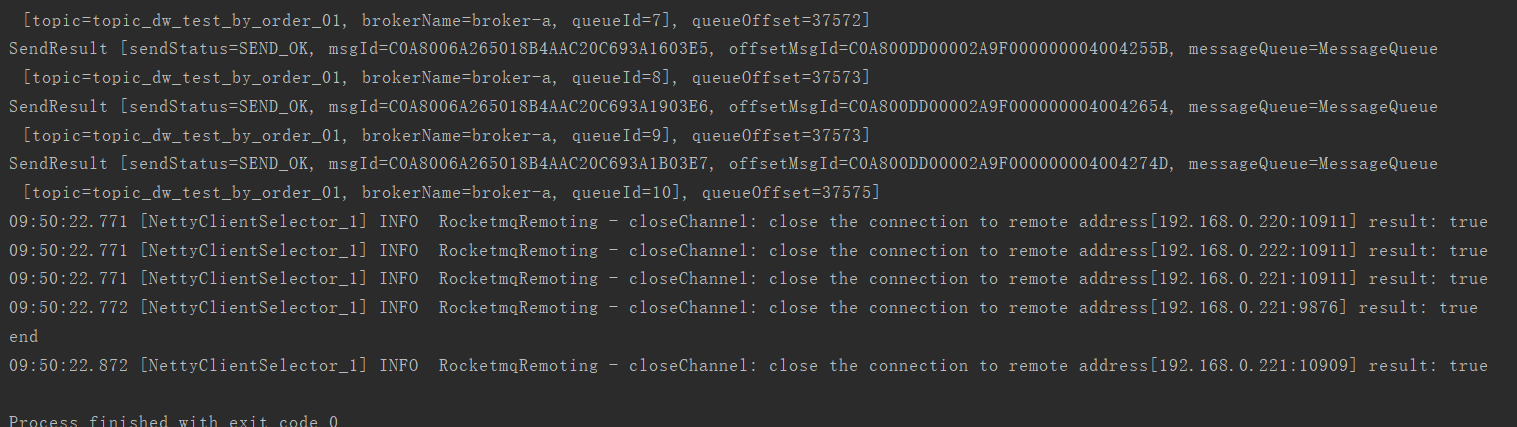
Let's look at the status of the cluster:

Wait for the replication group to complete the primary server election again before continuing with message sending.
>Warm tip: because this example is one master and one slave, the message is not available during the election. However, in the real production environment, the deployment architecture is multi master and slave. That is, during the leader election of a replication group, other replication groups can take over the replication group to complete the sending of messages and realize the high availability of message services.
DLedger related logs are stored in the broker default.log file by default.
This article has been introduced here. If you feel that this article is helpful to you, I would like to give you a compliment. Thank you.
The author's brief: the author of "RocketMQ technology insider", RocketMQ community sermons, maintains the public number: middleware interest circle, focusing on JAVA collection, JAVA and contract, Netty, Dubbo, RocketMQ, Mybatis, Elasticsearch, Netty. You can scan the following QR code to interact with the author.