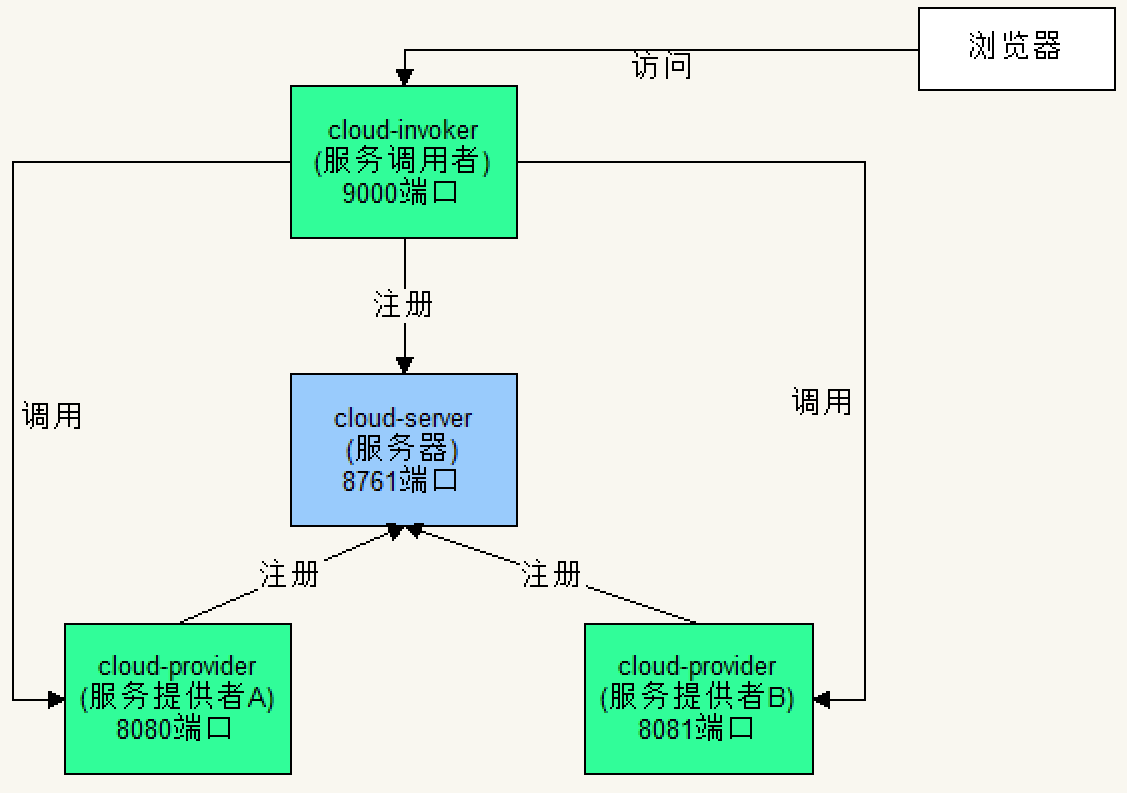
Spring Cloud integrates Ribbon and Eureka to realize load balancing of clients.
An example is implemented below, as shown in the figure below.
I. server side
1. Create project
Development tool: IntelliJ idea February 3, 2019
Create a new spring boot project named "cloud server" in IDEA, select 2.1.10 for spring boot version, and check "spring cloud discovery - >
Eureka Server. After creation, the pom.xml configuration file automatically adds the latest stable version dependency of spring cloud. Currently, it is Greenwich.SR3.
The complete content of pom.xml is as follows:
<?xml version="1.0" encoding="UTF-8"?>
<project xmlns="http://maven.apache.org/POM/4.0.0" xmlns:xsi="http://www.w3.org/2001/XMLSchema-instance"
         xsi:schemaLocation="http://maven.apache.org/POM/4.0.0 https://maven.apache.org/xsd/maven-4.0.0.xsd">
    <modelVersion>4.0.0</modelVersion>
    <parent>
        <groupId>org.springframework.boot</groupId>
        <artifactId>spring-boot-starter-parent</artifactId>
        <version>2.1.10.RELEASE</version>
        <relativePath/> <!-- lookup parent from repository -->
    </parent>
    <groupId>com.example</groupId>
    <artifactId>cloud-server</artifactId>
    <version>0.0.1-SNAPSHOT</version>
    <name>cloud-server</name>
    <description>Demo project for Spring Boot</description>

    <properties>
        <java.version>1.8</java.version>
        <spring-cloud.version>Greenwich.SR3</spring-cloud.version>
    </properties>

    <dependencies>
        <dependency>
            <groupId>org.springframework.cloud</groupId>
            <artifactId>spring-cloud-starter-netflix-eureka-server</artifactId>
        </dependency>

        <dependency>
            <groupId>org.springframework.boot</groupId>
            <artifactId>spring-boot-starter-test</artifactId>
            <scope>test</scope>
        </dependency>
    </dependencies>

    <dependencyManagement>
        <dependencies>
            <dependency>
                <groupId>org.springframework.cloud</groupId>
                <artifactId>spring-cloud-dependencies</artifactId>
                <version>${spring-cloud.version}</version>
                <type>pom</type>
                <scope>import</scope>
            </dependency>
        </dependencies>
    </dependencyManagement>

    <build>
        <plugins>
            <plugin>
                <groupId>org.springframework.boot</groupId>
                <artifactId>spring-boot-maven-plugin</artifactId>
            </plugin>
        </plugins>
    </build>

</project>
2. Modify the configuration application.yml
server:
  port: 8761
eureka:
  client:
    register-with-eureka: false
    fetch-registry: false
3. Modify the startup code CloudServerApplication.java
Add annotation @ EnableEurekaServer
package com.example.cloudserver;

import org.springframework.boot.SpringApplication;
import org.springframework.boot.autoconfigure.SpringBootApplication;
import org.springframework.cloud.netflix.eureka.server.EnableEurekaServer;

@SpringBootApplication
@EnableEurekaServer
public class CloudServerApplication {

    public static void main(String[] args) {
        SpringApplication.run(CloudServerApplication.class, args);
    }

}
II. Service provider
1. Create project
Create a new spring boot project in IDEA, with the exception of the name "cloud provider", the other steps are the same as above.
2. Modify the configuration application.yml
spring:
  application:
    name: cloud-provider
eureka:
  instance:
    hostname: localhost
  client:
    serviceUrl:
      defaultZone: http://localhost:8761/eureka/
3. Modify the startup code CloudProviderApplication.java
Add the annotation @ EnableEurekaClient;
Let the class read the console input at startup and decide which port to use to start the server;
Add a controller method for testing.
package com.example.cloudprovider;

//import org.springframework.boot.SpringApplication;
import org.springframework.boot.autoconfigure.SpringBootApplication;
import org.springframework.boot.builder.SpringApplicationBuilder;
import org.springframework.cloud.netflix.eureka.EnableEurekaClient;
import org.springframework.web.bind.annotation.RequestMapping;
import org.springframework.web.bind.annotation.RestController;

import javax.servlet.http.HttpServletRequest;
import java.util.Scanner;

@SpringBootApplication
@EnableEurekaClient
@RestController
public class CloudProviderApplication {

    public static void main(String[] args) {
        //SpringApplication.run(CloudProviderApplication.class, args);
        Scanner scan = new Scanner(System.in);
        String port = scan.nextLine();
        new SpringApplicationBuilder(CloudProviderApplication.class).properties("server.port=" + port).run(args);
    }

    @RequestMapping("/")
    public String index(HttpServletRequest request) {
        return request.getRequestURL().toString();
    }
}
III. service caller
1. Create project
Create a new spring boot project in IDEA, with the exception of the name "cloud invoker", and the other steps are the same as above.
2. Modify the configuration application.yml
server:
  port: 9000
spring:
  application:
    name: cloud-invoker
eureka:
  instance:
    hostname: localhost
  client:
    serviceUrl:
      defaultZone: http://localhost:8761/eureka/
3. Modify the startup code CloudInvokerApplication.java
Add the annotation @ EnableDiscoveryClient.
package com.example.cloudinvoker;

import org.springframework.boot.SpringApplication;
import org.springframework.boot.autoconfigure.SpringBootApplication;
import org.springframework.cloud.client.discovery.EnableDiscoveryClient;

@SpringBootApplication
@EnableDiscoveryClient
public class CloudInvokerApplication {

    public static void main(String[] args) {
        SpringApplication.run(CloudInvokerApplication.class, args);
    }

}
4. There are two ways to configure the Ribbon: code and profile
Mode 1: use code
(1) create a new custom load rule class MyRule.java
The load balancer interface of Ribbon defines the operation of the server, which is mainly used for server selection.
Call the getAllServers method of ILoadBalancer to return all servers, here only the first server is returned.
package com.example.cloudinvoker;

import com.netflix.loadbalancer.ILoadBalancer;
import com.netflix.loadbalancer.IRule;
import com.netflix.loadbalancer.Server;

import java.util.List;

public class MyRule implements IRule {

    private ILoadBalancer iLoadBalancer;

    @Override
    public Server choose(Object o) {
        List<Server> servers = iLoadBalancer.getAllServers();
        System.out.println("Custom server rule class, output server information:");
        for(Server s: servers){
            System.out.println(" " + s.getHostPort());
        }
        return servers.get(0);
    }

    @Override
    public void setLoadBalancer(ILoadBalancer iLoadBalancer) {
        this.iLoadBalancer = iLoadBalancer;
    }

    @Override
    public ILoadBalancer getLoadBalancer() {
        return this.iLoadBalancer;
    }
}
(2) create a new Ping class MyPing.java
The load balancer provides a ping mechanism to Ping the server at regular intervals to determine whether the server is alive or not.
The implementation class of the IPing interface is responsible for this work.
package com.example.cloudinvoker;

import com.netflix.loadbalancer.IPing;
import com.netflix.loadbalancer.Server;

public class MyPing implements IPing {

    @Override
    public boolean isAlive(Server server) {
        System.out.println("custom Ping Class, server information:" + server.getHostPort() + ",Status:" + server.isAlive());
        return true;
    }
}
(3) create a new configuration class MyConfig.java
package com.example.cloudinvoker.config;

import com.example.cloudinvoker.MyPing;
import com.example.cloudinvoker.MyRule;
import com.netflix.loadbalancer.IPing;
import com.netflix.loadbalancer.IRule;
import org.springframework.context.annotation.Bean;

public class MyConfig {
    @Bean
    public IRule getRule(){
        return new MyRule();
    }
    @Bean
    public IPing getPing(){
        return new MyPing();
    }
}
(4) create a new configuration class CloudProviderConfig.java
package com.example.cloudinvoker.config;

import org.springframework.cloud.netflix.ribbon.RibbonClient;

@RibbonClient(name = "cloud-provider", configuration = MyConfig.class)
public class CloudProviderConfig {
}
Mode 2: use profile
Comment out the two configuration classes of method 1, and add the following configuration at the end of application.yml
cloud-provider:
  ribbon:
    NFLoadBalancerRuleClassName: com.example.cloudinvoker.MyRule
    NFLoadBalancerPingClassName: com.example.cloudinvoker.MyPing
    listOfServers: http://localhost:8080/,http://localhost:8081/
5. Add controller InvokerController.java
package com.example.cloudinvoker;

import org.springframework.cloud.client.loadbalancer.LoadBalanced;
import org.springframework.context.annotation.Bean;
import org.springframework.context.annotation.Configuration;
import org.springframework.http.MediaType;
import org.springframework.web.bind.annotation.RequestMapping;
import org.springframework.web.bind.annotation.RequestMethod;
import org.springframework.web.bind.annotation.RestController;
import org.springframework.web.client.RestTemplate;

@RestController
@Configuration
public class InvokerController {

    @LoadBalanced
    @Bean
    public RestTemplate getRestTemplate(){
        return new RestTemplate();
    }

    @RequestMapping(value="/router", method = RequestMethod.GET,produces = MediaType.APPLICATION_JSON_VALUE)
    public String router(){
        RestTemplate restTemplate = getRestTemplate();
        //Call service by name
        String json = restTemplate.getForObject("http://cloud-provider/", String.class);
        return json;
    }
}
6, test
(1) start the server.
(2) start two service providers, and input 8080 and 8081 respectively in the console to start.
(3) start the service caller.
(4) the browser visits http://localhost:9000/router and refreshes the page several times. The results are as follows:
http://localhost:8081/
Service caller project IDEA console timing output:
Custom server rule class, output server information:
 localhost:8081
 localhost:8080
Custom Ping class, server information: localhost:8081, status: true
Custom Ping class, server information: localhost:8080, status: true