Foreword: I am also a novice, writing this article is intended to throw a brick to attract jade, I hope some gods can come to see where I have shortcomings, help me answer questions and solve difficulties! If you have just contacted a small partner, you can also make progress together...
First of all, before reading this blog, you need to master the following skills:
1. You are an Android development engineer, and you are eager to change the moudle layer in your project.
2. You have a certain understanding of the decoupling idea of java, and the foundation is relatively solid.
3. You need to know something about Android's okHttp3, such as interceptors.
4. Have some knowledge of Retrofit, at least I have written Demo tests myself.
5. What does RetroLamada know about Java 1.8
6. Have some knowledge of RxJava and what changes have been made to upgrade 1.x to 2.x
7. Skillful mastery of google's Gson
8. To what I said above, you are sure that you have achieved it. Of course, it doesn't matter if you haven't. I'll talk about it bit by bit later.
First paste one maven Warehouse Address, convenient for you to query the latest versions of various libraries in the current maven warehouse.
And then it's github address of RxJava As the saying goes, any problem you don't understand can be solved by querying the source code. People's comments give you a clear understanding. English level determines your height.
And then it's The github address of Retrofit Personally, I have always preferred Retrofit as a web loading framework. The English translation of Retrofit is improved, updated and innovated. I think they prefer the third translation when they name it, haha.................................................
Also github address of okHttp okHttp is a sharp tool in Android development after it was abandoned by HttpClient Android (of course, it can't be said to be abandoned, it can't be used). It's simple and convenient, but it's a little hard to use the native language. It can be said to be like a tiger with Retrofit.
Okay, so much nonsense, let's get to the point!
First is my project structure chart.

Writing this is roughly divided into the following steps. List them first and then talk about them step by step.
- 1 Dependent Inversion
- 2. Encapsulate BaseActivity and App (Actually, everyone has their own ideas at this stage, I just suggest that it be written, and the shortcomings are pointed out)
- 2 interceptors and custom Observer under 3.net package
- HttpResult class under 4 bean package (written for your own interface)
- Four classes under the 5 api package
Generally divided into the above steps, don't worry, let me pour a cup of tea slowly.
1. Dependent import
    //okhttp
    compile 'com.squareup.okhttp3:okhttp:3.7.0'
    compile 'com.squareup.okio:okio:1.12.0'
    compile 'com.squareup.okhttp3:logging-interceptor:3.7.0'
    //gson
    compile 'com.google.code.gson:gson:2.8.0'
    //retrofit2
    compile 'com.squareup.retrofit2:retrofit:2.2.0'
    compile 'com.squareup.retrofit2:converter-gson:2.2.0'
    compile 'com.squareup.retrofit2:converter-scalars:2.2.0'
    compile 'com.squareup.retrofit2:adapter-rxjava2:2.2.0'
    //rxJava
    compile'io.reactivex.rxjava2:rxjava:2.0.1'
    compile'io.reactivex.rxjava2:rxandroid:2.0.1'
Let me introduce the specific uses of the above dependencies in turn.
The following three okhttp annotations
The first two don't need to be talked about. Naturally, you know that the first version of okhttp should not be less than 3.4.1. The specific reason is not clear to me. Please let me know if you know the reason. The third one, as its name implies, is the log interceptor provided by okhttp itself, so that we can output okhttp information in the console.
Four of the following are the Retrofit2 annotations
The first is to let Retrofit support gson. The second is to let Retrofit support gson. After adding this, we can generate the JavaBean we want directly. The third is A Converter which supports converting strings and both primitives and their boxed types to text/plain bodies. I understand that I'm not going to play with a knife in front of the public. After all, I'm the slag of level 4, 425 points. The last one is what Retrofit adapts to RxJava2 must add.
The following two RxJava annotations
The first is RxJava and the second is RxJava adapting Android.
Note: I don't need to talk nonsense under the gson annotation.
2. Encapsulating BaseActivity and App
Because I've used Contentext of Application many times in my project, and Application is also used in places where Context is needed in my tool class, so I'll just write it down as follows.
public class App extends Application{

    public static Application INSTANCE;
    @Override
    public void onCreate() {
        super.onCreate();
        INSTANCE = this;
        T.register(this);
        NetUtils.register(this);
    }
}
Next, I paste my T class, which mainly does some Toast work.
/**
 * Toast Unified Management Category
 */
public class T {
    public static Context mContext;
    private static Toast toast;


    private T() {
        /* cannot be instantiated */
        throw new UnsupportedOperationException("cannot be instantiated");
    }


    public static void register(Context context) {
        mContext = context;
    }

    /**
     * Short-time display of Toast
     */
    public static void showShort(CharSequence message) {
        if (mContext==null){
            throw new RuntimeException("unRegister Context in Application");
        }
        if (toast != null) {
            toast.cancel();
        }
        toast = Toast.makeText(mContext, message, Toast.LENGTH_LONG);
        toast.setText(message);
        toast.show();
    }

    public static void showShort(int resId) {
        if (mContext==null){
            throw new RuntimeException("unRegister Context in Application");
        }
        if (toast != null) {
            toast.cancel();
        }
        toast = Toast.makeText(mContext, mContext.getString(resId), Toast.LENGTH_LONG);
        toast.setText(mContext.getString(resId));
        toast.show();
    }

}
Friendship Tip: After customizing App, don't forget to add the sentence "android:name=".App"under the application node of Manifest.xml!
Next is my own BaseActivity
/**
 * Created by ziabo on 2017/5/9.
 * Activity Base class of
 */

public abstract class BaseActivity extends AppCompatActivity{

    private CompositeDisposable mCompositeDisposable;
    private ApiService mApiService;

    @Override
    protected void onCreate(@Nullable Bundle savedInstanceState) {
        super.onCreate(savedInstanceState);
        if (mApiService == null){
            mApiService = ApiService.getApiService();
        }
        setContentView(initContentView());
        initUIAndListener();
        initData();
    }

    /**
     * Setting layout
     */
    protected abstract int initContentView();

    /**
     * Initialize UI and Listener
     */
    protected abstract void initUIAndListener();

    /**
     * Initialization data
     */
    protected abstract void initData();

    /**
     * Manage all established links and empty mComposite Disposable in onDestroy
     */
    protected void addDisposable(Disposable disposable){
        if (mCompositeDisposable==null){
            mCompositeDisposable = new CompositeDisposable();
        }
        mCompositeDisposable.add(disposable);
    }

    @Override
    protected void onDestroy() {
        if (mCompositeDisposable != null){
            mCompositeDisposable.clear();
        }
        super.onDestroy();
    }
}
There are some things you can't understand. Don't worry. Just look at my three protected abstract methods first. These three methods are compulsory to be implemented by subclasses. When our Activity is written, it's like the following. It's more concise and clear.
public class TestActivity extends BaseActivity{
    @Override
    public int initContentView() {
        return 0;//Put your Layout id here.
    }

    @Override
    protected void initUIAndListener() {

    }

    @Override
    protected void initData() {

    }
}
Note: We must pay attention to the sequence of execution of methods!
3. net package with two interceptors and custom Observer
Speaking of interceptors, I have to mention the power of okHttp. One interceptor is called when sending a request, the other is called when the result is returned with jsonString. Their respective uses will be discussed in detail below! First, I will add the code.
RequestInterceptor
/**
 * Class name: Prerequest interceptor, which intercepts and processes okhttp requests before they are made
 */
public class RequestInterceptor implements Interceptor {

    @Override
    public Response intercept(Chain chain) throws IOException {
        Request original = chain.request();
        //Request customization: add request header
        Request.Builder requestBuilder = original
                .newBuilder()
                .addHeader("Content-Type", "application/x-www-form-urlencoded; charset=UTF-8");
        //Setting cookie s
//        String cookie= App.getCookie();
//        If (StringUtil. checkStr (cookie){//cookie blank check
//            requestBuilder.addHeader("Cookie", cookie);
//        }

        //In the case of post, the request body is customized: add parameters uniformly, and the get request is demonstrated here, so no processing is done.
        if (original.body() instanceof FormBody) {
            FormBody.Builder newFormBody = new FormBody.Builder();
            FormBody oidFormBody = (FormBody) original.body();
            for (int i = 0; i < oidFormBody.size(); i++) {
                newFormBody.addEncoded(oidFormBody.encodedName(i), oidFormBody.encodedValue(i));
            }
        //Append uniform parameters here when post requests
//            String client = Constants.CONFIG_CLIENT;
//
//            newFormBody.add("client", client);

            requestBuilder.method(original.method(), newFormBody.build());
        }
        return chain.proceed(requestBuilder.build());
    }
}
The commentary in it is quite complete for the individual. What questions can be asked in detail again?! ____________
ResponseInterceptor
/**
 * Result interceptor, the execution time of this class is when the result is returned, returns a json String, and processes some special characters in it.
 * Mainly used to deal with some background bug s, such as the following three cases declared in a unified replacement for: null
 */
public class ResponseInterceptor implements Interceptor {
    private String emptyString = ":\"\"";
    private String emptyObject = ":{}";
    private String emptyArray = ":[]";
    private String newChars = ":null";

    @Override
    public Response intercept(Chain chain) throws IOException {

        Request request = chain.request();
        Response response = chain.proceed(request);
        ResponseBody responseBody = response.body();
        if (responseBody != null) {
            String json = responseBody.string();
            MediaType contentType = responseBody.contentType();
            if (!json.contains(emptyString)) {
                ResponseBody body = ResponseBody.create(contentType, json);
                return response.newBuilder().body(body).build();
            } else {
                String replace = json.replace(emptyString, newChars);
                String replace1 = replace.replace(emptyObject, newChars);
                String replace2 = replace1.replace(emptyArray, newChars);
                ResponseBody body = ResponseBody.create(contentType, replace2);
                return response.newBuilder().body(body).build();
            }
        }
        return response;
    }
}
This comment seems to be quite complete, haha...
HttpObserver I'll talk about when I talk about the api package!!!
HttpResult class under bean package
Generally speaking, the structure requested by our interface is roughly the same.
{
    "code":"noError",
    "data":{
        "banner":Array[3]
    },
    "msg":"",
    "result":true
}
Next, let's look at the HttpResult class I did for this interface.
/**
 * Created by ziabo on 2017/5/9.
 * T Is the type of data passed in
 */

public class HttpResult<T> {

    public String code;
    public String msg;
    public boolean result;
    public T data;
}
This is handwritten. The following is automatically generated by GsonFormat. The toString method is added by myself to facilitate printing. I declare all variables as easy access to public.
/**
 * Created by ziabo on 2017/5/9.
 * This is an entity class, in which only the data we are concerned about are processed uniformly.
 */

public class DataBean {

    /**
     * nextPage : 1
     * count : 6
     * pageSize : 20
     * prevPage : 1
     * currentPage : 1
     * pageNum : 1
     * healthInfo : [{"img":"http://test2.mb.zkrj.com/wlstatic/image/2017-03-30/0394155040297634.png","formatCreateDate":"03-30","formatUpdateDate":"04-01","index":1,"updateTime":"2017-04-01 16:01:44","title":""AccountuntId", "accountId", "4024028817aa35350855838383838383838383838383838383835432dd0154545494a0edd80000", "subTitle", "knowledge", "create Time", "2012017-03-30 16:19:19:34", "publish": true"admiAccountId":::"4024024024028817d545454324024024024024028888888817545454545454549494tea tea 0accoaccoaccoaccoaccoaccoaccoaccoaccoaccoaccoaccoaccoaccountId 80000"","1:::::::"ID ID ID ID ID ID":"8a8a9a9a9a9a9aaaa35353508085b180180838383/test2.mb.zkrj.com/wlstatic / Image/2017-03-30/1143420851997416.jpeg,""formatCreateDate,""03-30,""formatUpdate Date,""04-01,""index,""2,""update Time,""2017-04-01 15:59:24,""title,""What are you talking about? "AccountId": "4028817d549332dd0154933232dd015494a0edd80000", "subTitle"","diabetes","createTime","2017-03-30 16:12:03","2017-03-30 16:12:03","publish":"true,"admin AccountId": "4024028817d54549332dd01549494a0ededd80000"","admin AccountId""":"4024024024024024028817d54549332dd015454949494a0ededd80000"":::::::::: 1,"ID"::::id ":::::::::::id::::::::::::::::::::mb.zkrj.com/wlstatic/image/2017-03- 30/7490881972132133794.jpeg ","format CreateDate","03-30","format Update Date","03-30","format Update Date":"04-01","index ":::::::::::::::::::::: 3,"updateTime":"2017-04-01 15:56:56:56:22","title":"Healthy Exercise Kicking Shuttlers","accountId":::::::::"4028817d54933232dd01549494a0ed80000","Tisubtle""""""","Hyperhypertension""","CreateTime::::"""", "2017-03-30-30-30-16:16:58"4028 817d549332dd01545494a00edd80000 "," orders ":::" orders ": 1," ID ":" 8a9a35085b180e49015b180e4901015e4483c400a8 ","account "::" zkrj "},{"img":http://test2.mb.zkrj.com/static/image/2017-03-30/8457606060424241414141414141419624.jpeg", "CreateformatteDate":"03-30", "formatdate Date Date":"formatteUpdate date date date":::::"formatteupdate update update update update index"::::::::::::::""""""2017-04-01 15:54:19","title":"diabetes mellitus" Definition and prevention of foot disease ","accountId","4028817d54939332dd01545494a0edd80000","subTitle","diabetes","subTitle tle","createTime","2017-03-30 11:59:50","publish":"true,"admin AccountId": "4028817d549332dd015494949494a0ed80000", "publish account Id"","admin AccountId":"402881717d5493325432dd01549494949494a0d80000"", "1:::::::::::::::::::::::::::::::::::::::::::::::::::::p://test2.mb.zkrj.com / wlstatic/image/2017-03-30/4638045747699966.jpeg","formatCreateDate","03-27","formatUpdate Date","04-01","index","5","update Time","2017-04-01 15:50:28","title","everyday trifles are not trivial","accountId","4028817d5432dd015494a0d80000","Title","CreateTime","2017-03-27","publications","2010:05". H ": true" adminAccountId ":::" 4028817d549332dd01545494a0ed80000 ":" orders "::::::::::::::::::::::::::::::::::::::::::::::::::::::::::::::::::::::::::::::::::::://test2.mb.zkrj.com/wlstatic/static/image/2017-04-04-01/96060660606068686161616161pepepepepepepepepeformatteDate":::::::::::::::::::::04-01","index": 6", "updateTime": "2017-04-01" 14:57:04","title""","title"", "Bath remember five no", "accountId", "4028817d54939332dd0454549494a0edd80000", "subTitle", "diabetes", "createTime", "2017-03-27 11:10:10", "diabetes", "createTime", "2017-03-27 11:10", "publish": "true" admin AccountId","admin AccountId":"40288171717d545493323232dd015454949494949494949494a0ed80000","orders""","1","orders","id","8a9aaaa3508085a3508085b09097e0909101010101010101010101010]
     */

    public int nextPage;
    public int count;
    public int pageSize;
    public int prevPage;
    public int currentPage;
    public int pageNum;
    public List<HealthInfoBean> healthInfo;

    public static class HealthInfoBean {
        /**
         * img : http://test2.mb.zkrj.com/wlstatic/image/2017-03-30/0394155040297634.png
         * formatCreateDate : 03-30
         * formatUpdateDate : 04-01
         * index : 1
         * updateTime : 2017-04-01 16:01:44
         * title : The extreme of tea will turn against the extreme.
         * accountId : 4028817d549332dd015494a0edd80000
         * subTitle : knowledge
         * createTime : 2017-03-30 16:19:34
         * publish : true
         * adminAccountId : 4028817d549332dd015494a0edd80000
         * orders : 1
         * id : 8a9a35085b180e49015b1e4c604800ad
         * account : zkrj
         */

        public String img;
        public String formatCreateDate;
        public String formatUpdateDate;
        public int index;
        public String updateTime;
        public String title;
        public String accountId;
        public String subTitle;
        public String createTime;
        public boolean publish;
        public String adminAccountId;
        public int orders;
        public String id;
        public String account;

        @Override
        public String toString() {
            return "HealthInfoBean{" +
                    "img='" + img + '\'' +
                    ", formatCreateDate='" + formatCreateDate + '\'' +
                    ", formatUpdateDate='" + formatUpdateDate + '\'' +
                    ", index=" + index +
                    ", updateTime='" + updateTime + '\'' +
                    ", title='" + title + '\'' +
                    ", accountId='" + accountId + '\'' +
                    ", subTitle='" + subTitle + '\'' +
                    ", createTime='" + createTime + '\'' +
                    ", publish=" + publish +
                    ", adminAccountId='" + adminAccountId + '\'' +
                    ", orders=" + orders +
                    ", id='" + id + '\'' +
                    ", account='" + account + '\'' +
                    '}';
        }
    }

    @Override
    public String toString() {
        return "DataBean{" +
                "nextPage=" + nextPage +
                ", count=" + count +
                ", pageSize=" + pageSize +
                ", prevPage=" + prevPage +
                ", currentPage=" + currentPage +
                ", pageNum=" + pageNum +
                ", healthInfo=" + healthInfo +
                '}';
    }
}
All we need to do when we use it is the whole JavaBean.
HttpResult < DataBean > These people speak a lot on the Internet, I believe they know what they have done, let alone say more!
Four classes under the api package (and HttpObserver not mentioned above)
This is the core of the whole part. It's relatively difficult to understand, but when you understand it, you'll find that it's clear.
First, ApiInterface
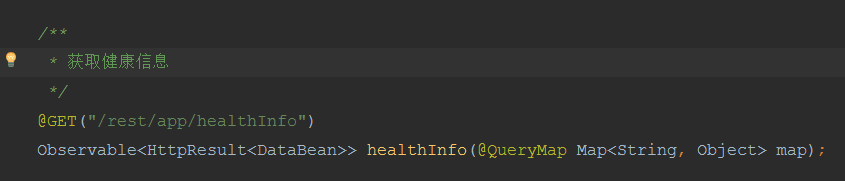
/**
 * Created by ziabo on 2017/5/9.
 * Where you don't know, you can study Retrofit carefully.
 */
public interface ApiInterface {

    /**
     * Access to health information
     */
    @GET("/rest/app/healthInfo")
    Observable<HttpResult<DataBean>> healthInfo(@QueryMap Map<String, Object> map);

}
Don't be afraid to leave my painter in a hurry. Here's an illustration. Here's a brief introduction.
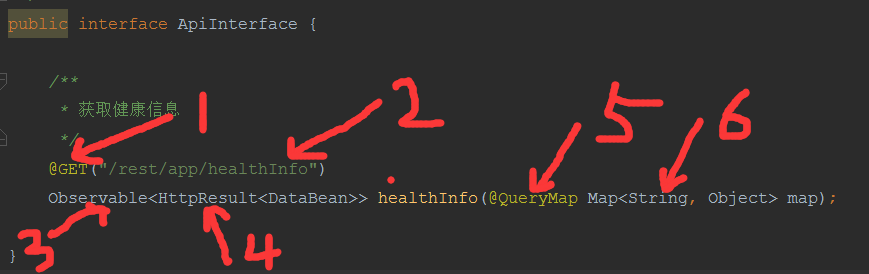
1 specifies that the current request mode is GET request (because I really don't have an appropriate interface, which is provided by a friend of mine. Thank you very much).
2 Fill in the section besides BaseUrl
3 Here is a big difference from the original Retrofit, but also the essence. Knowing RxJava definitely knows what Observable is. There are no more explanations here.
4 Ibid., why is it written like this?
5 Retrofit stipulates in GET requests and does not explain much.
6 The key of this map is String and value is Object. You can put any data type.
At this point, some people may ask, since there is an interface, then what is the implementation class of the interface? Principles of Retrofit You can learn one or two, four words, dynamic agent through this blog! (Actually, I don't know why.... Thank you for the author of this blog.@ Alexclin I saved a lot of effort, haha)
SchedulersTransformer
As the name implies: Scheduler, after code interpretation, here and RxJava 1.x is very different.
/**
 * Created by ziabo on 2017/5/9.
 * thread scheduler
 */

public class SchedulersTransformer{

    public static <T>ObservableTransformer<T,T> io_main(){
        return upstream ->
                upstream.subscribeOn(Schedulers.io())
                .unsubscribeOn(Schedulers.io())
                .observeOn(AndroidSchedulers.mainThread());
    }
}
Because the code has part of Lamada, let me roughly say < T > Observable Transformer < T, T > This is the type we need to return. Click to see the source code is Observable Transformer < Upstream, Downstream >. When we return, we will implement an Observable Transformer's internal apply method, Observable Sour. CE < Downstream > apply (Observable < Upstream > upstream); all he did was to do some processing of the Observable we entered, and what exactly did he do? Let's look at the code specifically, subscribe On (Schedulers. io ()) which means to establish a connection on the io thread (use this term temporarily here, because subscription is old). It's not very comfortable. The meaning of unsubscribeOn(Schedulers.io()) is to disconnect the io thread. The meaning of observeOn (Android Schedulers. mainThread ()) is to specify that the callback thread is the main thread of Android, that is, the UI thread we often call it.
HttpResultFunc
This class is also written for interfaces.
/**
 * Created by ziabo on 2017/5/9.
 * Class Description: Used to unify the status of Http and strip the data part of HttpResult back to subscriber
 * @param <T> data Partial data model
 */

public class HttpResultFunc<T> implements Function<HttpResult<T>,T>{

    @Override
    public T apply(HttpResult<T> tHttpResult) throws Exception {
        if (!tHttpResult.result){//Suppose the request succeeds when the result is true.
            if (tHttpResult.msg!=null){//Toast error message in case of request failure
                Toast.makeText(App.INSTANCE, tHttpResult.msg, Toast.LENGTH_SHORT).show();
            }
        }
        return tHttpResult.data;
    }
}
This is put in the map operator of RxJava. Its function is to strip the data from the public area for processing and convert the data into the type of DataBean we want. In this way, only the data that we really care about in successful callbacks are dealt with in a unified way. Look at the annotations in detail. That's roughly what I wrote. You can also do your own operation according to your own business logic!
ApiService
This category is the most important place after all the preparations have been finished. Seeing here, you may be tired. At this time, you can get up and move, have a cup of coffee to refresh yourself, and come back to see here after sorting out your ideas.
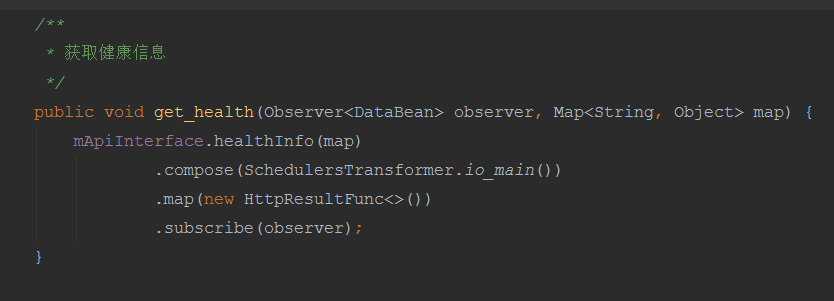
/**
 * Created by ziabo on 2017/5/9.
 * ApiService
 */

public class ApiService {

    private ApiInterface mApiInterface;

    private ApiService() {
        //HTTP log
        HttpLoggingInterceptor httpLoggingInterceptor = new HttpLoggingInterceptor();
        httpLoggingInterceptor.setLevel(HttpLoggingInterceptor.Level.BODY);

        //RequestInterceptor
        RequestInterceptor requestInterceptor = new RequestInterceptor();

        //ResponseInterceptor
        ResponseInterceptor responseInterceptor = new ResponseInterceptor();

        //OkHttpClient
        OkHttpClient.Builder builder = new OkHttpClient.Builder()
                .connectTimeout(20, TimeUnit.SECONDS)
                .addInterceptor(requestInterceptor)
                .addInterceptor(responseInterceptor);
//      Whether to log through your current global constant control of debug
        if (Constants.DEBUG_MODE) {
            builder.addInterceptor(httpLoggingInterceptor);
        }
        OkHttpClient mOkHttpClient = builder.build();

        //Retrofit
        Retrofit mRetrofit = new Retrofit.Builder()
                .client(mOkHttpClient)
                .addConverterFactory(GsonConverterFactory.create())
                .addCallAdapterFactory(RxJava2CallAdapterFactory.create())
                .baseUrl("http://Tes2.mb.zkrj.com/")// Replace it with your own BaseUrl
                .build();

        mApiInterface = mRetrofit.create(ApiInterface.class);
    }

    //Single case
    private static class SingletonHolder {
        private static final ApiService INSTANCE = new ApiService();
    }

    //Single case
    public static ApiService getApiService() {
        return SingletonHolder.INSTANCE;
    }

    /**
     * Access to health information
     */
    public void get_health(Observer<DataBean> observer, Map<String, Object> map) {
        mApiInterface.healthInfo(map)
                .compose(SchedulersTransformer.io_main())
                .map(new HttpResultFunc<>())
                .subscribe(observer);
    }

}
The Constants class is the constant pool in our whole project. Here I will focus on the following method.
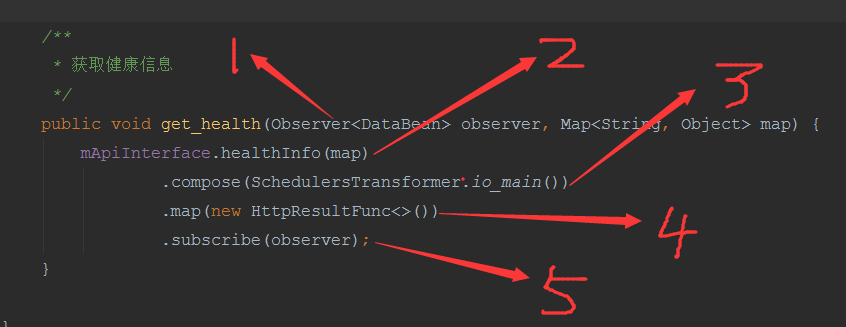
Does the arrow look better than above this time? Haha.
1 This is an observer in RxJava 2.x, similar to 1.x SubScriber. If you want to check it out, you'll know.
Call of method of 2 ApiInterface interface
3 compose operator, Baidu search a lot, not much explanation, concepts 1.x and 2.x basically no change.
4 map operator, ibid.
5. Connect
HttpObserver
This is at the end, because this is the last step in the whole framework shaping! No crap, just code it.
/**
 * Created by ziabo on 2017/5/9.
 * Implementation class of interface after result callback
 * If you are interested, you can refer to http://reactivex.io/documentation/observable.html here.
 */

public abstract class HttpObserver<R> implements Observer<R> {

    private Disposable mDisposable;

    /**
     * Call and generate Disposable objects when creating links
     * @param d Link state object
     */
    @Override
    public void onSubscribe(Disposable d) {
        mDisposable = d;
        getDisposable(d);
    }


    /**
     * When the result of the request is called back, it will be called many times.
     * @param r Return results, prompted when no network
     */
    @Override
    public void onNext(R r) {
        if (!NetUtils.isConnected()) {
            if (mDisposable!=null && !mDisposable.isDisposed()){
                mDisposable.dispose();
            }
            T.showShort("Please check the network connection and try again!");
        }
        onSuccess(r);
    }

    public abstract void onSuccess(R r);

    /**
     * When there is an exception, we will go here and put it in onFinished();
     */
    @Override
    public void onError(Throwable e) {
        onFinished();
        if (e instanceof HttpException || e instanceof ConnectException || e instanceof SocketTimeoutException || e instanceof TimeoutException){
            onNetworkException(e);
        }else {
            onUnknownException(e);
        }
    }

    /**
     * No matter success or failure, there will be a trip here, so add on Finished ();
     */
    @Override
    public void onComplete() {
        onFinished();
    }

    /**
     * Callbacks after the end of the request, whether successful or unsuccessful, are usually not logically coded and are often used to write ProgressBar dismiss
     */
    public abstract void onFinished();

    /**
     * Exposing Disposable to Subclasses
     */
    public abstract void getDisposable(Disposable disposable);

    private void onNetworkException(Throwable e) {
        e.printStackTrace();
        T.showShort("Failed to retrieve data. Check network status");
    }

    private void onUnknownException(Throwable e) {
        e.printStackTrace();
    }
}
Notes are written in detail, there are many areas to be improved, I hope you can see valuable comments!
Finally, let me say two more sentences.
This library was developed by a friend of mine. I just upgraded the Rx Java part on this basis. There are many powerful places about Rx Java 2. X that I haven't used yet. I hope to mention it to you with some ideas. Thank you first.
The advantage of this library is that when you have decided on a new api elsewhere, you only need to do the following two steps as long as you know the data structure:
Add an interface to ApiInterface as shown in Figure 1
Add a method to ApiService as shown in Figure 1
Write this directly when calling:
private void getData() {
        Map<String,Object> map = new HashMap<>();
        map.put("currentPage",1);
        map.put("pageSize",20);
        ApiService.getApiService().get_health(new HttpObserver<DataBean>() {
            @Override
            public void onSuccess(DataBean dataBean) {
                T.showShort(dataBean.toString());
                Log.d("MainActivity", dataBean.toString());
            }

            @Override
            public void onFinished() {
                //Normally nothing is done.
            }

            @Override
            public void getDisposable(Disposable disposable) {
                addDisposable(disposable);
            }
        },map);
    }
Afterword: After two days, this blog is finally over! I hope you don't be stingy to give me at least a compliment, just look good at my typesetting!
Project source code later I will upload to github, patiently wait, welcome Tucao!