🌂 preface
As we all know, react is a one-way data flow, so it is relatively simple to transfer data, and the relationship between father and son is relatively clear. However, if we want to transfer more complex data, using react alone is not enough. Therefore, we need to use redux for more complex data transmission.
In the following article, we will explain the workflow of redux from introduction to advanced.
Ding! Start the redux journey~ 👏
☂️ 1, Basic knowledge
1. Redux concept Brief
For react, it is a lightweight framework that does not look at layers. If you want to use it to transfer data, you should first pass it from parent to child, and then slowly pass it up layer by layer.
However, if we use Redux, if we want the data of a component, the data of this component will be stored in the store for management through redux. Then, through the store, the data is transferred to the following components step by step.
It is worth noting that we can regard Redux as a combination of Reducer and Flux.
2. Redux workflow
Redux is actually a data layer framework, which puts all data in the store. Let's look at a picture first:
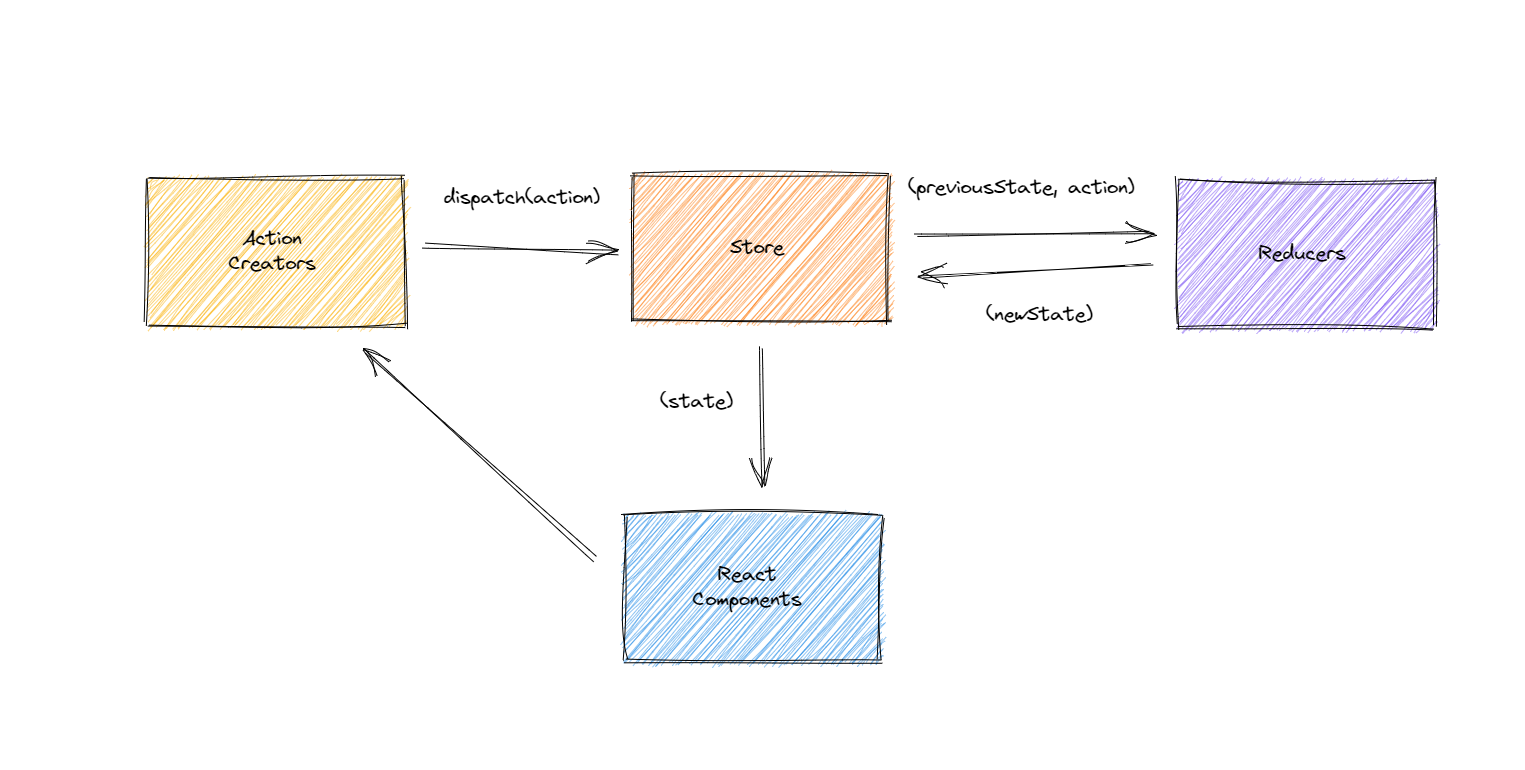
You can see the middle store, which stores all the data. Continue to look at the downward arrow of the store. Then, each component should get data from the store.
Let's use an example to sort out the whole picture, as follows:
- ① There is a store on the whole picture, which stores all data, that is, the public area for storing data;
- ② For each component, data should be taken from the store;
- ③ Suppose there is a scenario where we want to borrow books in the library. Then we can understand the react Component as the borrower. After that, the borrower has to go to the librarian to borrow the book. The transfer of data in the process of borrowing books can be regarded as Action Creators, which can be understood as the sentence "what book do you want to borrow".
- ④ Action creations go to the store. At this time, we regard the store as a librarian, but the librarian can't remember the data of all books. Generally speaking, it needs a record book. If you want to borrow any kind of book, she should check it first; Or if you want to return any books, she should also check where they need to be put back.
- ⑤ At this time, we need to communicate with reducers. We can regard reducers as a record book. The librarian uses this record book to record the required data. The store administrator knows what data should be given to the Components of the borrower through the reducer.
🎃 2, TodoList page layout using Antd
1. Using Antd in a project
Open the official website of ant design 👉 antd official website portal First, let's introduce it into the project. The specific steps are as follows:
The first step is to install antd. The command is as follows:
npm install antd --save
The second step is to introduce styles. The code is as follows:
import 'antd/dist/antd.css'; // or 'antd/dist/antd.less'
2. Using Antd to implement the basic layout of TodoList
First, we create a new file named TodoList.js in the src folder of the project. The specific codes are as follows:
import React, { Component } from 'react';
import 'antd/dist/antd.css';
import { Input, Button, List } from 'antd';

const data = [
  'Racing car sprays burning fuel into crowd.',
  'Japanese princess to wed commoner.',
  'Australian walks 100km after outback crash.',
  'Man charged over missing wedding girl.',
  'Los Angeles battles huge wildfires.',
];

class TodoList extends Component {
  render() {
    return (
      <div style={{marginTop: '10px', marginLeft: '10px'}}>
        <div>
          <Input placeholder="todo info" style={{ width: '300px' }} />
          <Button type="primary">Submit</Button>
        </div>
        <List
          bordered
          dataSource={data}
          renderItem={item => <List.Item>{item}</List.Item>}
        />
      </div>
    )
  }
}

export default TodoList;
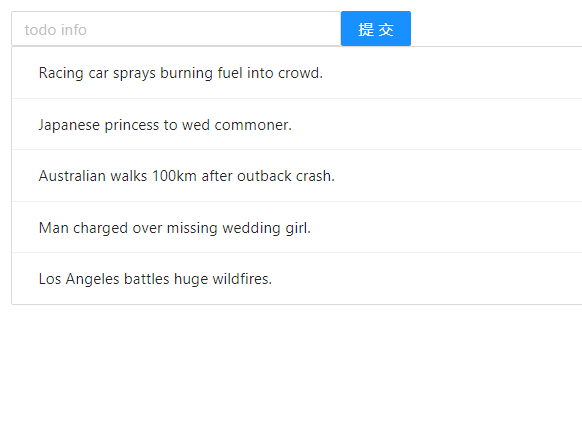
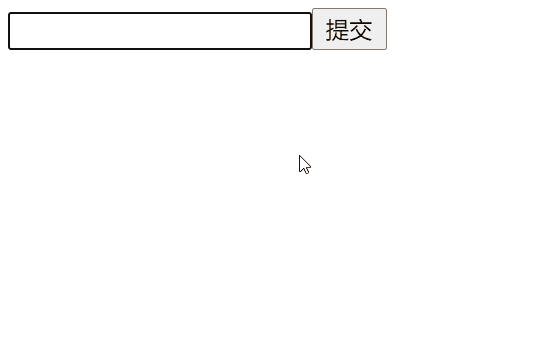
At this time, the display effect of the browser is:
3. Create a store in redux
(1) Create store
Next, let's create a store in the project. First, create a new folder named store under the src folder of the project. Next, under the store folder, we create a new file named index.js. The specific codes are as follows:
import { createStore } from "redux";
import reducer from './reducer';

const store = createStore(reducer);

export default store;
Then, continue to create a new file under the store folder, named reducer.js. The specific codes are as follows:
const defaultStore = {
  inputValue: '',
  list: []
};

export default (state = defaultStore, action) => {
  return state;
}
Thus, we have created the store in the project.
(2) Using store in a project
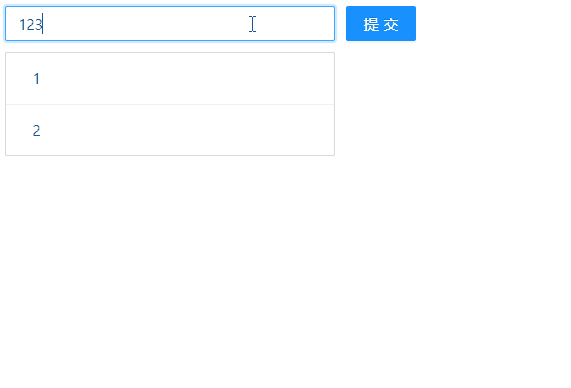
After creating the store, we will initially use the store in the project to see the effect. First, add the data in the store. First, transform the reducer.js file in the store. The specific code is as follows:
const defaultStore = {
  inputValue: '123',
  list: [1, 2]
};

export default (state = defaultStore, action) => {
  return state;
}
Then transform TodoList.js. The specific codes are as follows:
import React, { Component } from 'react';
import 'antd/dist/antd.css';
import { Input, Button, List } from 'antd';
import store from './store';

class TodoList extends Component {
  constructor(props) {
    super(props);
      this.state = store.getState()
  }
  render() {
    return (
      <div style={{marginTop: '10px', marginLeft: '10px'}}>
        <div>
          <Input placeholder={this.state.inputValue} style={{ width: '300px' }} />
          <Button type="primary">Submit</Button>
        </div>
        <List
          bordered
          dataSource={this.state.list}
          renderItem={item => <List.Item>{item}</List.Item>}
        />
      </div>
    )
  }
}

export default TodoList;
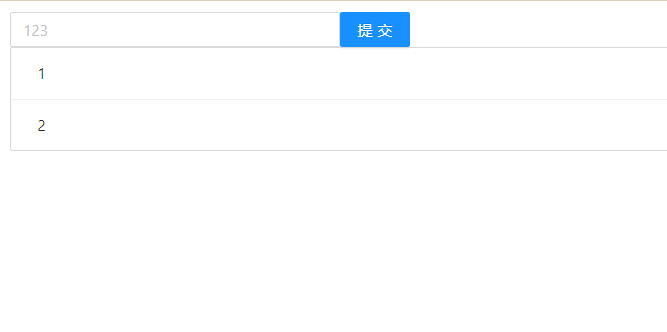
At this time, the display effect of the browser is:
🧵 3, Writing of Action and Reducer - adding functions
1. Main page content transformation
Next, we use action and reducer to pass the data of this component before and after. First, transform the TodoList.js file. The specific codes are as follows:
import React, { Component } from 'react';
import 'antd/dist/antd.css';
import { Input, Button, List } from 'antd';
import store from './store';

class TodoList extends Component {
  constructor(props) {
    super(props);
    this.state = store.getState()
    this.handleInputChange = this.handleInputChange.bind(this)
    this.handleStoreChange = this.handleStoreChange.bind(this)
    this.handleBtnClick = this.handleBtnClick.bind(this)
    store.subscribe(this.handleStoreChange)
  }
  render() {
    return (
      <div style={{marginTop: '10px', marginLeft: '10px'}}>
        <div>
          <Input
            value={this.state.inputValue}
            placeholder="todo info"
            style={{ width: '300px', marginRight: '10px'}}
            onChange={this.handleInputChange}
          />
          <Button type="primary" onClick={this.handleBtnClick}>Submit</Button>
        </div>
        <List
          style={{marginTop: '10px', width: '300px'}}
          bordered
          dataSource={this.state.list}
          renderItem={item => <List.Item>{item}</List.Item>}
        />
      </div>
    )
  }

  handleInputChange(e) {
    // In react, an action is in the form of an object
    // The purpose of type is to tell react that you can help me change the value of input, which is the following value, that is, e.target.value
    const action = {
      type: 'change_input_value',
      value: e.target.value
    }
    store.dispatch(action)
    // console.log(e.target.value)
  }

  handleStoreChange() {
    // When you perceive that the data in the store has changed, call the store.getState method to retrieve the data from the store again,
    // Then call setState to replace the data in the current store
    this.setState(store.getState())
  }

  handleBtnClick() {
    const action = {
      type: 'add_todo_item'
    }
    store.dispatch(action)
  }
}

export default TodoList;
Next, let's analyze the above code. First, each action will bind the corresponding event first, and then create an action in the event. For the created action, it aims to tell react to help the action change a value, and this value is its bound value.
Finally, when the action is finished, its data needs to be stored in the store. So it is processed through store.dispatch(action) to transfer the action data to the store.
2. Change the data in the action
For the initial value of action, it is fixed. But sometimes we want to modify the value in the action, so we need to use reducer. Now, let's transform the reducer.js file so that the input box can input values freely. At the same time, click the submit button to add the list. The specific codes are as follows:
const defaultStore = {
  inputValue: '123',
  list: [1, 2]
};

// reducer can receive state, but it must not modify state
const reducer = (state = defaultStore, action) => {
  if (action.type === 'change_input_value') {
    const newState = JSON.parse(JSON.stringify(state));
    newState.inputValue = action.value;
    return newState;
  }
  if (action.type === 'add_todo_item') {
    const newState = JSON.parse(JSON.stringify(state));
    newState.list.push(newState.inputValue);
    newState.inputValue = '';
    console.log(newState);
    return newState;
  }
  return state;
}
export default reducer;
3. store data transformation
Next, let's look at the content of index.js in the store folder. We need to make a simple transformation. The specific code is as follows:
import { createStore } from "redux";
import reducer from './reducer';

const store = createStore(
  reducer,
  window.__REDUX_DEVTOOLS_EXTENSION__ && window.__REDUX_DEVTOOLS_EXTENSION__()
);

export default store;
In addition to reducer, we also need to add window__ REDUX_ DEVTOOLS_ EXTENSION__ && window.__ REDUX_ DEVTOOLS_ EXTENSION__ () pass it in and call this method.
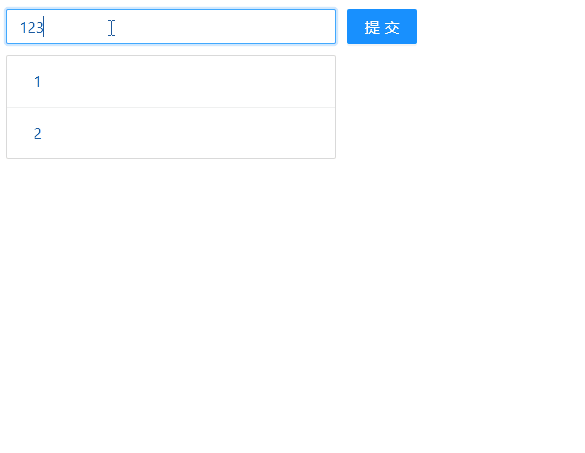
Finally, let's take a look at the display effect of the browser:
🧶 4, Use Redux to delete TodoList
1. Event binding for components
We have implemented the add function above. Now, let's continue to implement the delete function to delete the data of the clicked items every time we click each item. First, bind the corresponding event in TodoList.js file. The specific code is as follows:
import React, { Component } from 'react';
import 'antd/dist/antd.css';
import { Input, Button, List } from 'antd';
import store from './store';

class TodoList extends Component {
  constructor(props) {
    // The above existing codes are omitted here
  }
  render() {
    return (
      {/* The above existing codes are omitted here */}
        <List
          style={{marginTop: '10px', width: '300px'}}
          bordered
          dataSource={this.state.list}
          renderItem={(item, index) => <List.Item onClick={this.handleItemDelete.bind(this, index)}>{item}</List.Item>}
        />
      </div>
    )
  }

  // The above existing codes are omitted here

  handleItemDelete(index) {
    const action = {
      type: 'delete_todo_item',
      index
    }
    store.dispatch(action);
  }
}

export default TodoList;
2. Data communication in reducer
Next, we communicate the data in the reducer.js file. The specific codes are as follows:
const defaultStore = {
  inputValue: '123',
  list: [1, 2]
};

// reducer can receive state, but it must not modify state
const reducer = (state = defaultStore, action) => {
  // The above existing codes are omitted here

  if (action.type === 'delete_todo_item') {
    const newState = JSON.parse(JSON.stringify(state));
    newState.list.splice(action.index, 1);
    return newState;
  }
  return state;
}
export default reducer;
Now let's look at the display effect of the browser:
👓 5, Logical induction
1. Split of ActionTypes
In TodoList.js above, you can see that we often operate action s. At the same time, suppose that if we write a letter wrong, the process of troubleshooting is always difficult to locate.
Therefore, one thing we need to do is to split ActionTypes.
First, we add a new file named actionTypes.js in the store folder. The specific codes are as follows:
export const CHANGE_INPUT_VALUE = 'change_input_value';
export const ADD_TODO_ITEM = 'add_todo_item';
export const DELETE_TODO_ITEM = 'delete_todo_item';
Secondly, transform the content under TodoList.js. The specific codes are as follows:
import {
  CHANGE_INPUT_VALUE,
  ADD_TODO_ITEM,
  DELETE_TODO_ITEM
} from './store/actionTypes'

class TodoList extends Component {

  handleInputChange(e) {
    const action = {
      type: CHANGE_INPUT_VALUE,
      value: e.target.value
    }
    store.dispatch(action)
  }

  handleStoreChange() {
    this.setState(store.getState())
  }

  handleBtnClick() {
    const action = {
      type: ADD_TODO_ITEM
    }
    store.dispatch(action)
  }

  handleItemDelete(index) {
    const action = {
      type: DELETE_TODO_ITEM,
      index
    }
    store.dispatch(action);
  }
}

export default TodoList;
Finally, transform the reducer.js file. The specific codes are as follows:
import {
  CHANGE_INPUT_VALUE,
  ADD_TODO_ITEM,
  DELETE_TODO_ITEM
} from './actionTypes';

const defaultStore = {
  inputValue: '123',
  list: [1, 2]
};

const reducer = (state = defaultStore, action) => {
  if (action.type === CHANGE_INPUT_VALUE) {
    const newState = JSON.parse(JSON.stringify(state));
    newState.inputValue = action.value;
    return newState;
  }
  if (action.type === ADD_TODO_ITEM) {
    const newState = JSON.parse(JSON.stringify(state));
    newState.list.push(newState.inputValue);
    newState.inputValue = '';
    console.log(newState);
    return newState;
  }
  if (action.type === DELETE_TODO_ITEM) {
    const newState = JSON.parse(JSON.stringify(state));
    newState.list.splice(action.index, 1);
    return newState;
  }
  return state;
}
export default reducer;
By changing_ input_ value , add_todo_item and delete_ todo_ Integrate item and integrate it into actionTypes.js file, so that we can better troubleshoot if we encounter wrong letters.
2. Use actionCreator to create actions uniformly
In TodoList.js above, you can see that for several bound events, we always create actions frequently. Repetitive operation is the most taboo thing in the program. Therefore, we need to use actionCreator to uniformly manage actions and make the logic more unified and complete.
First, we create a new file in the store folder, named actionCreators.js. The specific codes are as follows:
import { CHANGE_INPUT_VALUE, ADD_TODO_ITEM, DELETE_TODO_ITEM } from "./actionTypes";

export const getInputChangeAction = (value) => ({
  type: CHANGE_INPUT_VALUE,
  value: value
});

export const getAddItemAction = (value) => ({
  type: ADD_TODO_ITEM
});

export const getDeleteItemAction = (index) => ({
  type: DELETE_TODO_ITEM,
  index: index
});
Go on, let's transform TodoList.js. The specific codes are as follows:
import { getInputChangeAction, getAddItemAction, getDeleteItemAction } from './store/actionCreators'

class TodoList extends Component {

  handleInputChange(e) {
    const action = getInputChangeAction(e.target.value);
    store.dispatch(action)
  }

  handleBtnClick() {
    const action = getAddItemAction();
    store.dispatch(action)
  }

  handleItemDelete(index) {
    const action = getDeleteItemAction(index);
    store.dispatch(action);
  }
}

export default TodoList;
By unifying the operations in action into actionCreators.js, the final logic is more unified.
👔 6, Some summary of Redux
Here, we summarize some of the above knowledge points, as follows
1. Three principles of Redux design and use
The design and use of Redux follows the following three principles:
- Store must be unique 👉 That is, there must be only one store in the whole application;
- Only store can change its content 👉 That is, the store is not updated by the reducer, but the store updates its own data after getting the data from the reducer; Therefore, let's go back to the reducer.js file above. In react, things such as state.inputValue = = = a value are not allowed to happen, that is, it cannot be assigned directly.
- Reducer must be a pure function 👉 The so-called pure function, that is, given a fixed input, there must be a fixed output without any side effects. Returning to the reducer.js file above, you can see that the state is fixed and the action is fixed, so the final returned new state is naturally fixed.
2. Core API of Redux
Let's review some core API s of Redux. First look at the following figure:
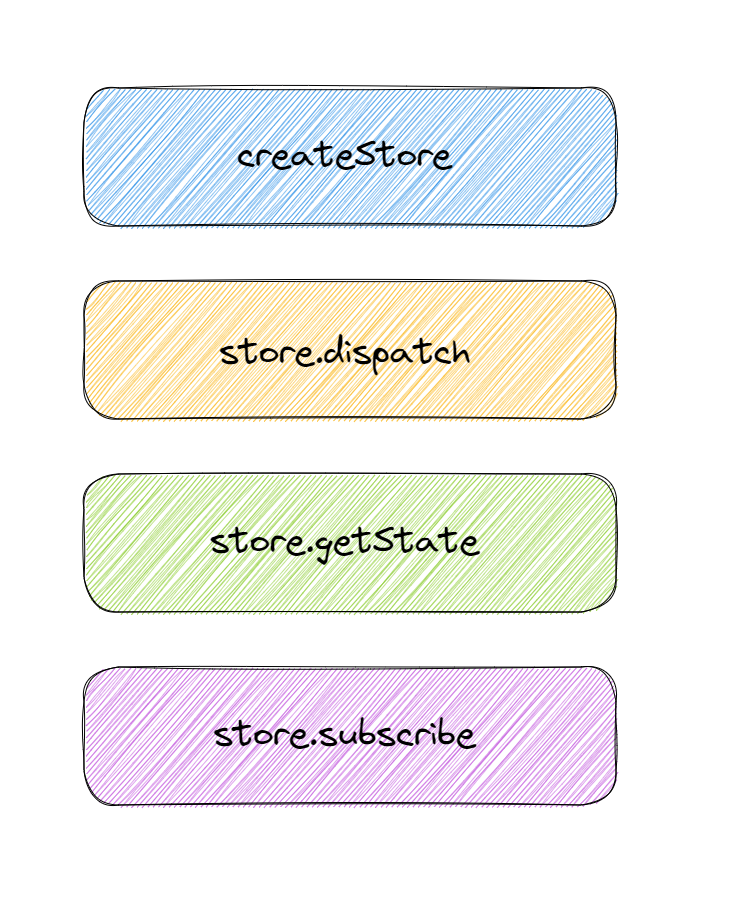
Now let's review the role of these core API s. The details are as follows:
- createStore -- can help us create a store;
- store.dispatch - the dispatch method helps us dispatch actions, and this action will be passed to the store;
- store.getState -- the getState method helps us get all the data;
- Store.subscribe - Subscribe helps us subscribe to store changes. As long as the store changes, the callback function received by store.subscribe will be executed.
👝 7, Splitting of advanced components
1. Split of UI component and container component
In the above code, we have basically completed the function of TodoList. However, have you found that in TodoList.js file, page rendering and page logic writing are put together.
Often in actual development, we will directly split the UI component and container component. The UI component is dedicated to the rendering of the page, while the container component is responsible for the logic of the page.
Let's split it. First, we now add a new file under the src folder, named todolitsui. JS. The specific codes are as follows:
import React, { Component } from 'react';
import 'antd/dist/antd.css';
import { Input, Button, List } from 'antd';

class TodoListUI extends Component {
    render() {
        return (
            <div style={{ marginTop: '10px', marginLeft: '10px' }}>
                <div>
                    <Input
                        value={this.props.inputValue}
                        placeholder="todo info"
                        style={{ width: '300px', marginRight: '10px' }}
                        onChange={this.props.handleInputChange}
                    />
                    <Button type="primary" onClick={this.props.handleBtnClick}>Submit</Button>
                </div>
                <List
                    style={{ marginTop: '10px', width: '300px' }}
                    bordered
                    dataSource={this.props.list}
                    renderItem={(item, index) => <List.Item onClick={() => { this.props.handleItemDelete(index) }}>{item}</List.Item>}
                />
            </div>
        )
    }
}

export default TodoListUI;
Continue, let's transform the contents of the TodoList.js file. The specific codes are as follows:
import React, { Component } from 'react';

import store from './store';
import { getInputChangeAction, getAddItemAction, getDeleteItemAction } from './store/actionCreators';
import TodoListUI from './TodoListUI';

class TodoList extends Component {
    constructor(props) {
        super(props);
        this.state = store.getState()
        this.handleInputChange = this.handleInputChange.bind(this)
        this.handleStoreChange = this.handleStoreChange.bind(this)
        this.handleBtnClick = this.handleBtnClick.bind(this)
        this.handleItemDelete = this.handleItemDelete.bind(this)
        store.subscribe(this.handleStoreChange)
    }
    render() {
        return (
            <TodoListUI
                inputValue={this.state.inputValue}
                list={this.state.list}
                handleInputChange={this.handleInputChange}
                handleBtnClick={this.handleBtnClick}
                handleItemDelete={this.handleItemDelete}
            />
        )
    }

    handleInputChange(e) {
        const action = getInputChangeAction(e.target.value);
        store.dispatch(action)
    }

    handleStoreChange() {
        this.setState(store.getState())
    }

    handleBtnClick() {
        const action = getAddItemAction();
        store.dispatch(action)
    }

    handleItemDelete(index) {
        const action = getDeleteItemAction(index);
        store.dispatch(action);
    }
}

export default TodoList;
As you can see, we separate the content of the page and put it into the todolitsui.js file, so that it can only do rendering. In this way, we will successfully split the UI component and the logical component.
2. Stateless component
With the UI component, let's look at another component, stateless component. The so-called stateless component means that there is no logic in the whole page. When there is only one render function, we can call it a stateless component.
How to define stateless components??
We can define a function that takes a parameter, props. The specific code of todolitsui.js file is as follows:
import React from 'react';
import { Input, Button, List } from 'antd';

const TodoListUI = (props) => {
    return (
        <div style={{ marginTop: '10px', marginLeft: '10px' }}>
            <div>
                <Input
                    value={props.inputValue}
                    placeholder="todo info"
                    style={{ width: '300px', marginRight: '10px' }}
                    onChange={props.handleInputChange}
                />
                <Button type="primary" onClick={props.handleBtnClick}>Submit</Button>
            </div>
            <List
                style={{ marginTop: '10px', width: '300px' }}
                bordered
                dataSource={props.list}
                renderItem={(item, index) => <List.Item onClick={() => { props.handleItemDelete(index) }}>{item}</List.Item>}
            />
        </div>
    )
}

export default TodoListUI;
When an ordinary function has only render function, we can replace the ordinary component with a stateless component. Then why do you want to make such a replacement?
If we change to only one function, the program only needs to run this function and do this thing. In other words, if we use class, there is an object behind its class, and this object has many life cycle functions, etc., which is not so pure. Therefore, we define stateless components to make components more pure.
🎩 8, Redux initiates asynchronous requests
1. Sending asynchronous request data in Redux
Often in actual projects, we always need to request interface data with the backend and send AJAX requests. What should I do if I want to request back-end interface data in react?
First, let's request data under TodoList.js. The specific codes are as follows:
import { getInputChangeAction, getAddItemAction, getDeleteItemAction, initListAction } from './store/actionCreators';

class TodoList extends Component {
	componentDidMount() {
        axios.get('./list.json').then((res) => {
            const data = res.data;
            const action = initListAction(data);
            store.dispatch(action);
        })
    }
}
Next, modify the actionTypes.js code. The details are as follows:
export const CHANGE_INPUT_VALUE = 'change_input_value';
export const ADD_TODO_ITEM = 'add_todo_item';
export const DELETE_TODO_ITEM = 'delete_todo_item';
export const INIT_LIST_ACTION = 'init_list_action';
Continue, we encapsulate action in actionCreators.js. The specific codes are as follows:
import { CHANGE_INPUT_VALUE, ADD_TODO_ITEM, DELETE_TODO_ITEM, INIT_LIST_ACTION } from "./actionTypes";

export const getInputChangeAction = (value) => ({
  type: CHANGE_INPUT_VALUE,
  value: value
});

export const getAddItemAction = (value) => ({
  type: ADD_TODO_ITEM
});

export const getDeleteItemAction = (index) => ({
  type: DELETE_TODO_ITEM,
  index: index
});

export const initListAction = (data) => ({
  type: INIT_LIST_ACTION,
  data: data
})
Finally, modify the reducer.js code. The specific codes are as follows:
import {
  CHANGE_INPUT_VALUE,
  ADD_TODO_ITEM,
  DELETE_TODO_ITEM,
  INIT_LIST_ACTION
} from './actionTypes';

const defaultStore = {
  inputValue: '123',
  list: [1, 2, 3]
};

// reducer can receive state, but it must not modify state
const reducer = (state = defaultStore, action) => {
  if (action.type === CHANGE_INPUT_VALUE) {
    const newState = JSON.parse(JSON.stringify(state));
    newState.inputValue = action.value;
    return newState;
  }
  if (action.type === INIT_LIST_ACTION) {
    const newState = JSON.parse(JSON.stringify(state));
    newState.list = action.data;
    return newState;
  }
  if (action.type === ADD_TODO_ITEM) {
    const newState = JSON.parse(JSON.stringify(state));
    newState.list.push(newState.inputValue);
    newState.inputValue = '';
    console.log(newState);
    return newState;
  }
  if (action.type === DELETE_TODO_ITEM) {
    const newState = JSON.parse(JSON.stringify(state));
    newState.list.splice(action.index, 1);
    return newState;
  }
  return state;
}
export default reducer;
Thus, we have implemented the AJAX request through axios. Please let it get the data.
2. Redux thunk Middleware
(1) Solve what problem
In the above example, we successfully initiated a request for the data of the interface. The above situation is a relatively simple example, but we often encounter complex examples in the actual scene.
Therefore, we hope that when we encounter asynchronous requests or have very complex logic, we can move them out to other files for management.
At this time, Redux thunk middleware is needed to solve the problem. Next, let's look at how to use Redux thunk middleware?
(2) How to use
Step 1: install Redux thunk. The specific commands are as follows:
npm i redux-thunk -D
Step 2: introduce Redux thunk. Often in actual debugging, we will use Redux devtools to debug the project store. But what if we introduce both Redux devtools and Redux thunk middleware? Process in the store|index.js file. The specific codes are as follows:
// The compose function comes from redux
import { createStore, applyMiddleware, compose } from "redux";
import reducer from './reducer';
import thunk from 'redux-thunk';

const composeEnhancers =
  window.__REDUX_DEVTOOLS_EXTENSION_COMPOSE__ ?
    window.__REDUX_DEVTOOLS_EXTENSION_COMPOSE__({}) : compose;

const enhancer = composeEnhancers(
  applyMiddleware(thunk)
);

const store = createStore(
  reducer,
  enhancer
);

export default store;
Through this form of coding, our store not only supports devtools under windows, that is, we can debug the store, but also successfully introduce Redux thunk.
Step 3: extract asynchronous logic. First, modify the code of TodoList.js. The details are as follows:
import { getTodoList, getInputChangeAction, getAddItemAction, getDeleteItemAction } from './store/actionCreators';

class TodoList extends Component {
	componentDidMount() {
        // action here is a function
        const action = getTodoList();
        // Only when thunk is used can action be passed in the form of function
        store.dispatch(action);
    }
}
Next, modify the code of actionCreators.js. The specific codes are as follows:
// getTodoList is a function
// Functions generated in this form can receive the dispatch method directly
export const getTodoList = () => {
  return (dispatch) => {
    axios.get('./list.json').then((res) => {
      const data = res.data;
      // The action here is an object
      const action = initListAction(data);
      dispatch(action);
    })
  }
}
Let's explain the above two codes as follows:
After configuring the Redux thunk environment, it enables us to write asynchronous code in action! Why do you say that?
- In the past, when we created an action, it could only be a JS object. Now, after using Redux thunk, even if getTodoList() returns not an object but a function, we can send the function to the store through store.dispatch().
- Then why can you send the function to? Because I used Redux thunk.
Go on, let's talk about specific implementation steps 👇:
- First, let the store in TodoList.js execute the action function. The action function comes from getTodoList() in actionCreators.js.
- For getTodoList(), what it needs to do is to request json data and obtain json data.
- After obtaining the data, to change the data in the store, first create an action, which is used to provide the call to store.dispatch(). However, how does store.dispatch() get it? In the function we return, we will automatically receive the store.dispatch() method. So, just dispatch the action through the dispatch(action).
- In other words, Redux thunk enables us to create or support action s in the form of a function.
(3) Why use Redux thunk?
After reading the above explanation, I believe you will know the wonders of Redux thunk. So why use Redux thunk? 👇
If asynchronous functions are used in the life cycle of a component, the logic of the component will become more and more complex and the content of the component will become more and more. Therefore, we usually split this complex asynchronous logic for separate management. Now, with the help of Redux thunk middleware, we split the asynchronous logic into actionCreators.js for separate management. Thus, the code is more standardized and unified.
(4) What is Redux thunk middleware?
With the foreshadowing of the above content, let's return to the source of middleware and talk about the principle of Redux thunk middleware.
The so-called middleware certainly means who is in the middle with whom. Let's look at a picture first:
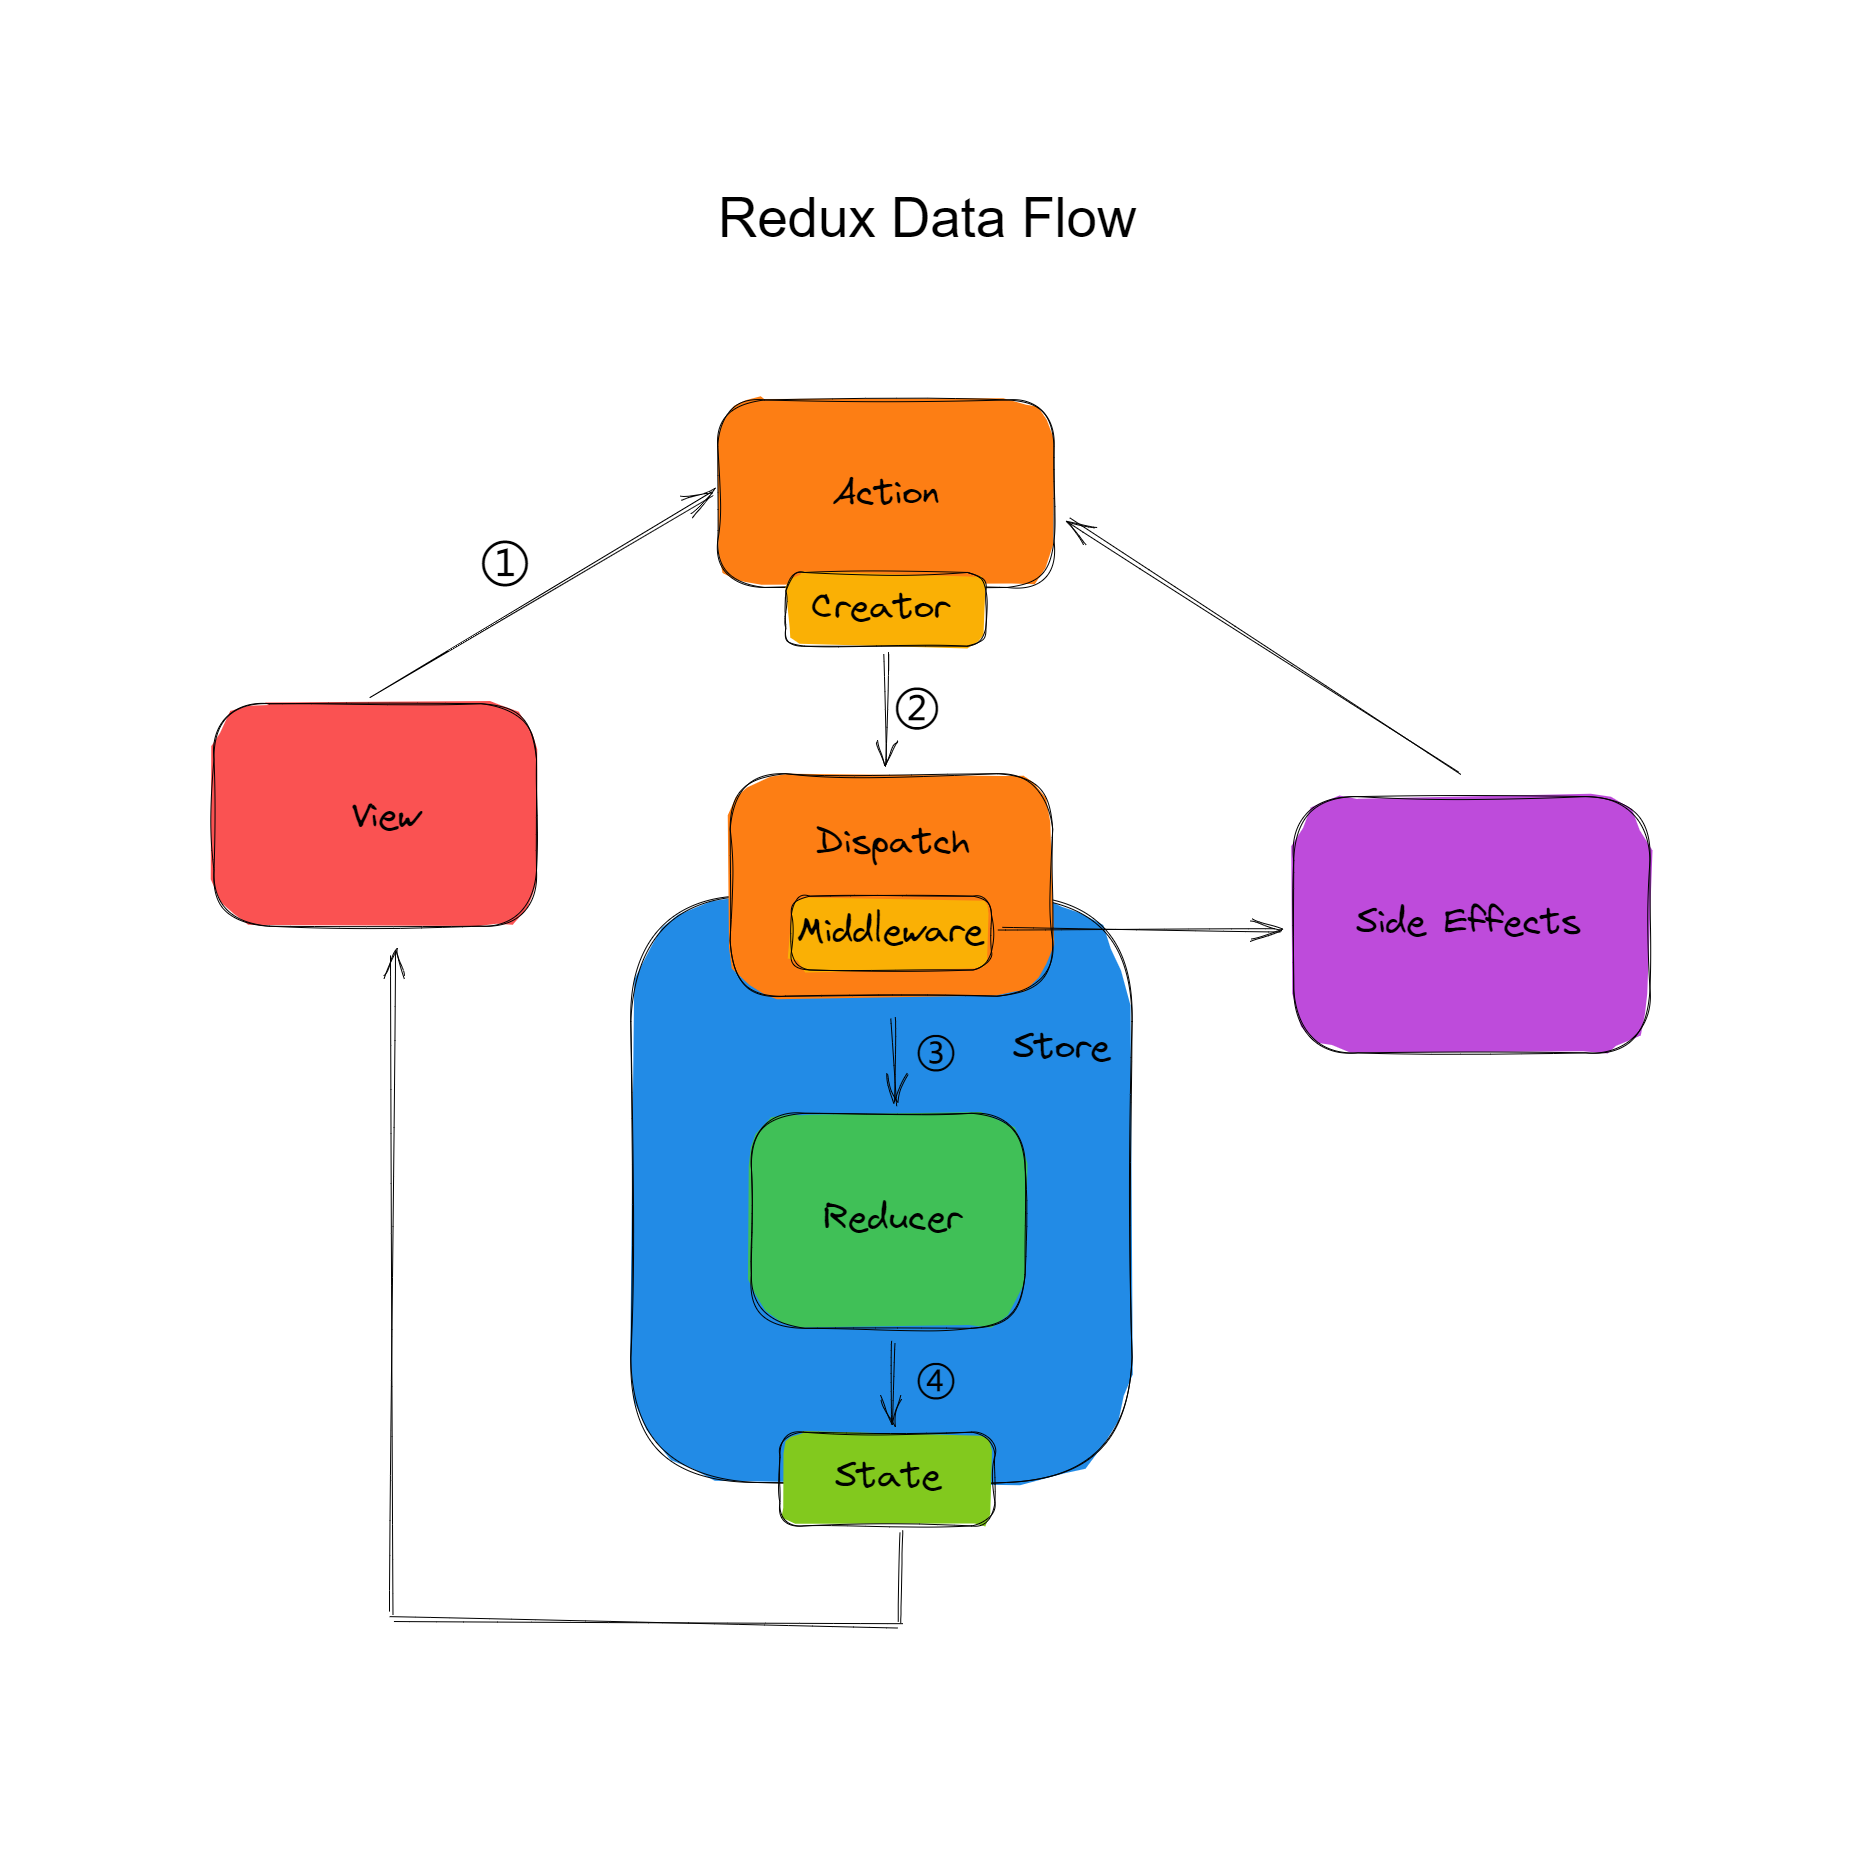
The middle of Redux middleware refers to the relationship between action and store.
As we said before, in redux, an action can only be an object. Because it is an object, it is sent directly to the store. Now, when we use redux thunk, action can be a function. So why can it be a function?
Looking at the above figure, it is not difficult to find that the action submits the data to the store through the dispatch method. Moreover, there is a dispatch method between action and store. The middleware we call is actually the encapsulation and upgrading of the dispatch method.
For the original dispatch method, it receives a JS object and passes it to the store.
But if we pass a function, the dispatch will be upgraded. Dispatch does not directly pass the function to the store. It will execute the corresponding function through the Redux thunk middleware, and then call the store when it needs to be called.
💼 9, Other middleware of Redux
1,Redux-logger
There are many redux middleware. For example, redux logger can record the log of each action distribution. How does it record?
Every time it calls an action, it will pass the action to the store through the dispatch method. Then, we can upgrade the dispatch to not only pass the action to the store, but also print it through console.log before each delivery. In this case, We wrote a Redux logger middleware, which can print the action in our console when we distribute the action.
2,Redux-saga
(1) What is Redux saga
In today's projects, the popular middleware includes not only Redux thunk, Redux logger, but also reudx saga, which is also widely used.
Reudx saga is also a middleware to solve the asynchronous problem in react. Different from Redux thunk, Redux thunk uses asynchronous operations into action s. The design idea adopted by Redux saga is to separate the asynchronous logic and put it into another file for management. How to use Redux saga middleware?
(2) How to use Redux Saga
We upgraded the TodoList component above. The first is the store|index.js file. The specific codes are as follows:
import { createStore, applyMiddleware, compose } from "redux";
import reducer from './reducer';
import createSagaMiddleware from 'redux-saga';
import todoSagas from './sagas';

const sagaMiddleware = createSagaMiddleware()
const composeEnhancers =
  window.__REDUX_DEVTOOLS_EXTENSION_COMPOSE__ ?
  window.__REDUX_DEVTOOLS_EXTENSION_COMPOSE__({}) : compose;
const enhancer = composeEnhancers(sagaMiddleware(sagaMiddleware));

const store = createStore(reducer, enhancer);
sagaMiddleware.run(todoSagas);

export default store;
In this file, the main thing is to do a good job in the basic configuration. Here are the main points to note:
- Introduce createSagaMiddleware;
- Then use const sagaMiddleware = createSagaMiddleware() to introduce it;
- Use apllyMiddleware to use this middleware;
- After using the middleware, we created saga.js.
Next, we create saga.js in the store folder. The specific codes are as follows:
import { takeEvery, put } from 'redux-saga/effects';
import { initListAction } from './actionCreators';
import { GET_INIT_LIST } from './actionTypes';
import axios from 'axios';

function getInitList() {
  try {
    const res = yield axios.get('./list.json');
    const action = initListAction(res.data);
    yield put(action);
  } catch (e) {
    console.log('list.json Network request failed');
  }
}

function* mySaga() {
  // Use takeEvery to capture the action s distributed each time
  yield takeEvery(GET_INIT_LIST, getInitList);
}

export default mySaga;
For saga.js, there are several points to note:
- In saga.js, we must export a generator function. In this function, we write some logic. The logic is that when the action type we receive is GET_INIT_LIST, then we will execute the getInitList method.
- getInitList() method is a function that will help us get the data. After getting the data, create a new action from the data and distribute the action to the store through yield put(action).
Let's look at the content in actionTypes.js. The specific codes are as follows:
// CHANGE_INPUT_VALUE,ADD_TODO_ITEM,DELETE_TODO_ITEM,INIT_LIST_ACTION
export const GET_INIT_LIST = 'get_init_list';
Next, we come to TodoList.js. The specific codes are as follows:
import { getInputChangeAction, getAddItemAction, getDeleteItemAction, getInitList } from './store/actionCreators';

class TodoList extends Component {

    // n many contents are omitted here

    componentDidMount() {
        const action = getInitList();
        store.dispatch(action);
    }
}

export default TodoList;
Finally, store|actionCreators.js. The specific codes are as follows:
import { GET_INIT_LIST, CHANGE_INPUT_VALUE, ADD_TODO_ITEM, DELETE_TODO_ITEM, INIT_LIST_ACTION } from "./actionTypes";

// n many contents are omitted here

export const getInitList = () => ({
  type: GET_INIT_LIST
});
In TodoList.js, we create an action and send it to the store.
🛵 10, React Redux
1. What is react Redux
After learning react, we learned redux. If we combine them, what is react Redux?
In fact, it is a third-party module, which makes it easier for us to use redux in react.
2. Use of react Redux
(1) Install react Redux
Similarly, let's take the TodoList component as an example to see the use of react redux. First, create a new react project and install react redux. The specific commands are as follows:
npm install react-redux
(2) Project directory
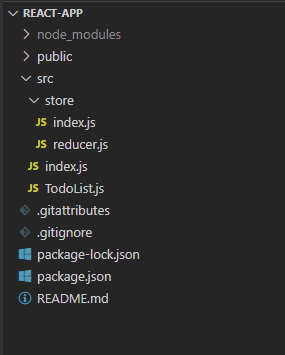
Let's look at the project directory first. See the following figure for details:
(3) Core content
First, mount the TodoList component on the page. The contents of src|index.js file are as follows:
import React from 'react';
import ReactDOM from 'react-dom';
import TodoList from './TodoList';
import { Provider } from 'react-redux';
import store from './store';


const App = (
  // Indicates that all components in the Provider have the ability to obtain the store
  <Provider store={store}>
    <TodoList />
  </Provider>
)

ReactDOM.render(App, document.getElementById('root'));
Provider is the first core API provided by react. It aims to show that all components in the provider have the ability to obtain the store.
The second step is to write the contents of src|TodoList.js. The specific codes are as follows:
import React from 'react';
import { connect } from 'react-redux';

const TodoList = (props) => {
  const { inputValue, list, changeInputValue, handleClick, handleDelete } = props;
  return (
    <div>
      <div>
        <input value={inputValue} onChange={ changeInputValue }/>
        <button onClick={ handleClick }>Submit</button>
      </div>
      <ul>
        {
          list.map((item, index) => {
            return <li onClick={handleDelete} key={index}>{ item }</li>
          })
        }
      </ul>
    </div>
  )
}

const mapStateToProps = (state) => {
  return {
    inputValue: state.inputValue,
    list: state.list
  }
}

// store, dispatch, props
const mapDispatchToProps = (dispatch) => {
  return {
    changeInputValue(e) {
      const action = {
        type: 'change_input_value',
        value: e.target.value
      };
      // console.log(action.value)
      dispatch(action);
    },
    handleClick() {
      const action = {
        type: 'add_item'
      }
      dispatch(action);
    },
    handleDelete() {

    }
  }
}

// Let's connect TodoList and store
// TodoList is a UI component. connect combines the UI component with the business logic in front. The contents in the front brackets can be called container components
export default connect(mapStateToProps, mapDispatchToProps)(TodoList);
In the above code, we should pay attention to connect in react redux.
connect means connection, so who connects with whom? TodoList and store are connected. The connection between them requires a mapping relationship, which is in mapStateToProps.
In mapStateToProps, state refers to the data in the store. The data in the store is mapped to props, and then we can obtain the data in the store through this.props.xxx.
Step 3: create a reducer. It is written under src|store|reducer.js. The specific code is as follows:
const defaultState = {
  inputValue: '',
  list: []
}

export default (state = defaultState, action) => {
  if (action.type === 'change_input_value') {
    const newState = JSON.parse(JSON.stringify(state));
    newState.inputValue = action.value;
    return newState;
  }
  if (action.type === 'add_item') {
    const newState = JSON.parse(JSON.stringify(state));
    newState.list.push(newState.inputValue);
    newState.inputValue = '';
    return newState;
  }
  return state;
}
Put the data in the store into the reducer for recording.
Step 4: pass the reducer to the store. It is written under src|store|index.js. The specific code is as follows:
import { createStore } from 'redux';
import reducer from './reducer';

const store = createStore(reducer);

export default store;
We make a deep copy of the content stored in the reducer and send it back to the store. In this way, a closed loop of data transmission is formed.
Finally, let's take a look at the display effect of the browser:
Compared with using middleware, the use of react redux is more intuitive and concise. In actual projects, both redux middleware and react redux are worth using for state management.
It should be noted that the differences between redux middleware and react redux can be distinguished. As for which type to use in the project, just decide according to the current project scenario!
🚦 11, Conclusion
In the above article, we explained the three principles of Redux design and use, as well as some core API s in redux. In addition, we also learned Redux middleware, Redux thunk and Redux saga. At the same time, I also learned another content of state management, react redux.
Here, the introduction of redux is finished! I wonder if you have a new understanding of redux?
🐣 One More Thing
(: recommended in previous periods)
👉Explore react and use react to realize a todoList function
👉react only stays on the surface? Five knowledge points will take you to sort out advanced knowledge
(: Fan Wai Pian)
- Pay attention to the official account of Monday's research room. For the first time, you should pay attention to quality articles, and even more, "offer is coming".
- If you think this article is helpful to you, you might as well like it and support it~~ 😉
- The above is the whole content of this article! See you next time! 👋👋👋