The notes of this article are from the video of dark horse Shang Silicon Valley https://www.bilibili.com/video/BV1Rv41177Af , relevant information can be obtained in the comment area.
1. Introduction to NoSQL database
1.1.NoSQL database overview
(1) NoSQL (Not Only SQL), that is, "not just SQL", generally refers to non relational databases.
(2) NoSQL does not rely on business logic storage, but is stored in a simple key value mode. Therefore, it greatly increases the expansion ability of the database.
(3) NoSQL features: it does not follow SQL standards, does not support ACID, and far exceeds the performance of SQL.
1.2.NoSQL applicable scenarios
(1) Highly concurrent reading and writing of data
(2) Massive data reading and writing
(3) For high data scalability
1.3.NoSQL not applicable scenario
(1) Transaction support required
(2) sql based structured query storage, dealing with complex relationships, requires Ad hoc query
(3) Situations where sql is not needed and sql is not used
1.4. Common NoSQL databases
1.4.1.Memcache

(1) NoSql database that appeared very early
(2) The data is in memory and is generally not persistent
(3) It supports simple key value mode and single type
(4) Generally, it is a database that is secondary persistent as a cache database
1.4.2.Redis

(1) It covers almost most functions of Memcached
(2) The data is in memory and supports persistence. It is mainly used for backup and recovery
(3) In addition to supporting the simple key value mode, it also supports the storage of a variety of data structures, such as list, set, hash, zset, etc.
(4) Generally, it is a database that is secondary persistent as a cache database
1.4.3.MongoDB

(1) High performance, open source, schema free document database
(2) The data is in memory. If the memory is insufficient, save the infrequent data to the hard disk
(3) Although it is a key value mode, it provides rich query functions for value (especially json)
(4) Support binary data and large objects
(5) It can replace RDBMS and become an independent database according to the characteristics of data. Or with RDBMS to store specific data.
2. Introduction to redis
2.1. Overview of redis
(1) Redis is an open-source key value storage system. Its function is similar to Memcached, but it supports relatively more value types, including string (string), list (linked list), set (set), zset(sorted set -- ordered set) and hash (hash type). These data types support push/pop, add/remove, intersection, union, difference and richer operations, and these operations are atomic. On this basis, redis supports sorting in different ways.
(2) Like memcached, Redis caches data in memory to ensure efficiency. The difference is that Redis periodically writes the updated data to the disk or writes the modification operation to the additional record file, and realizes master-slave synchronization on this basis.
(3) Redis is a single thread + multiple I/O multiplexing technology
Multiplexing refers to using a thread to check the ready status of multiple file descriptors (sockets). For example, call the select and poll functions to pass in multiple file descriptors. If one file descriptor is ready, it will return. Otherwise, it will be blocked until timeout. After the ready state is obtained, the real operation can be performed in the same thread or start thread execution (such as using thread pool).
2.2.Redis application scenario
2.2.1. Cache with relational database
(1) High frequency, hot access data, reduce database I/O operation;
(2) Distributed architecture for session sharing;
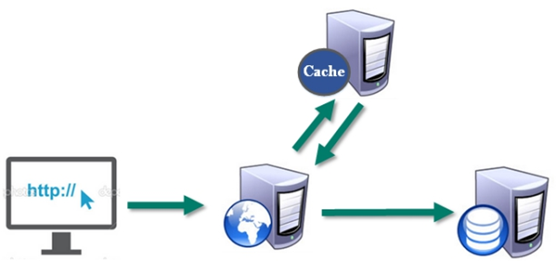
2.1.2. Various data structures store persistent data
2.3.Redis installation
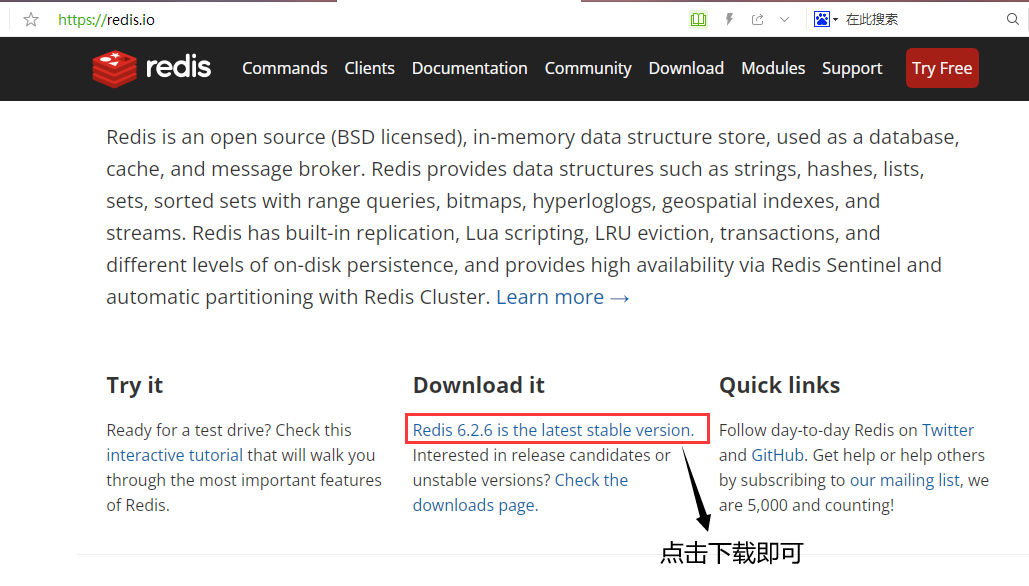
2.3.1. Download Redis installation package
(1) Redis official website: https://redis.io/
(2) Redis Chinese official website: http://www.redis.cn/
(3) Download the installation package (the version shown below is 6.2.1 for Linux)
2.3.2. Installation steps
(1) Prepare the Redis installation package under the / opt directory of Linux (CentOS7.7 is used here)

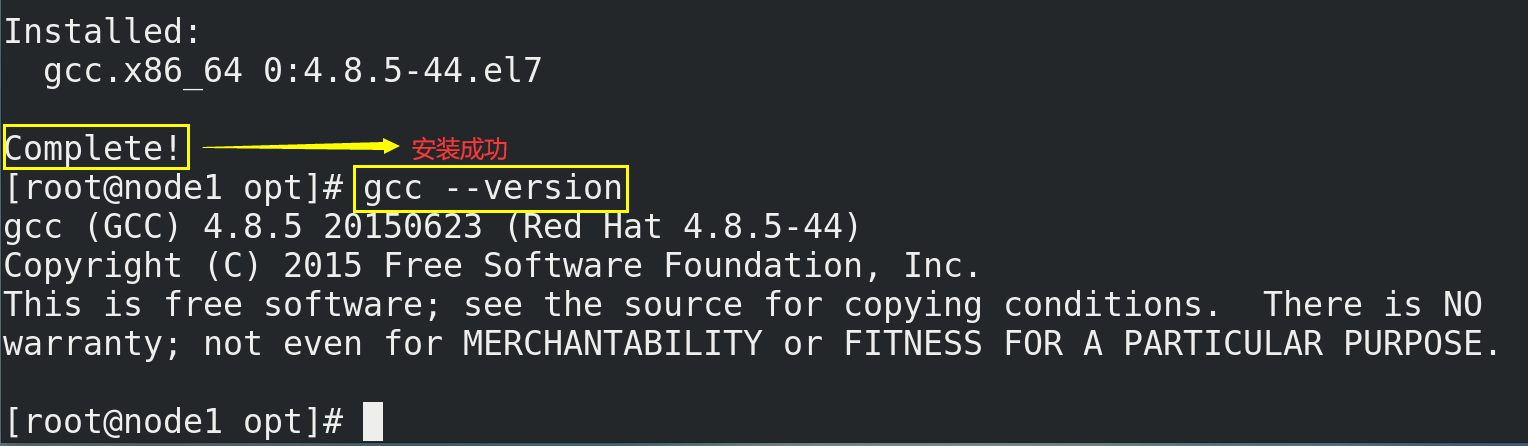
(2) Install the compilation environment of C language, that is, download and install the latest version of gcc compiler (if you need to uninstall the old version of GCC, you can refer to This article)
# View gcc version commands
gcc --version
# Installation command
yun install gcc

For y/n selection during installation, enter y.
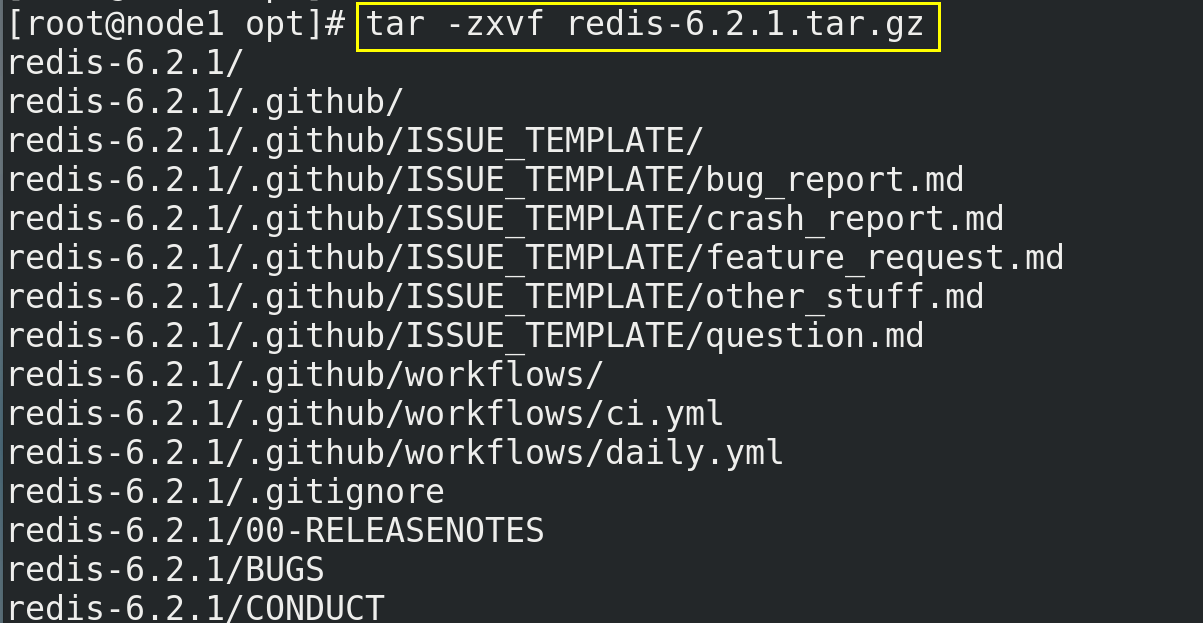
(3) Unzip the installation package
# Decompression command
tar -zxvf redis-6.2.1.tar.gz
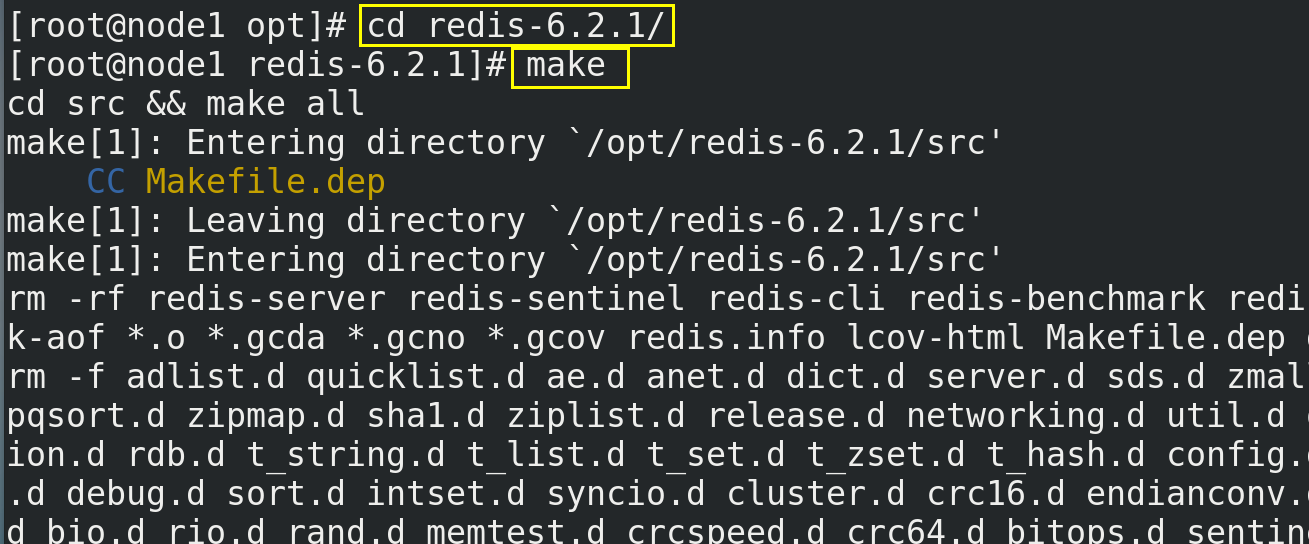
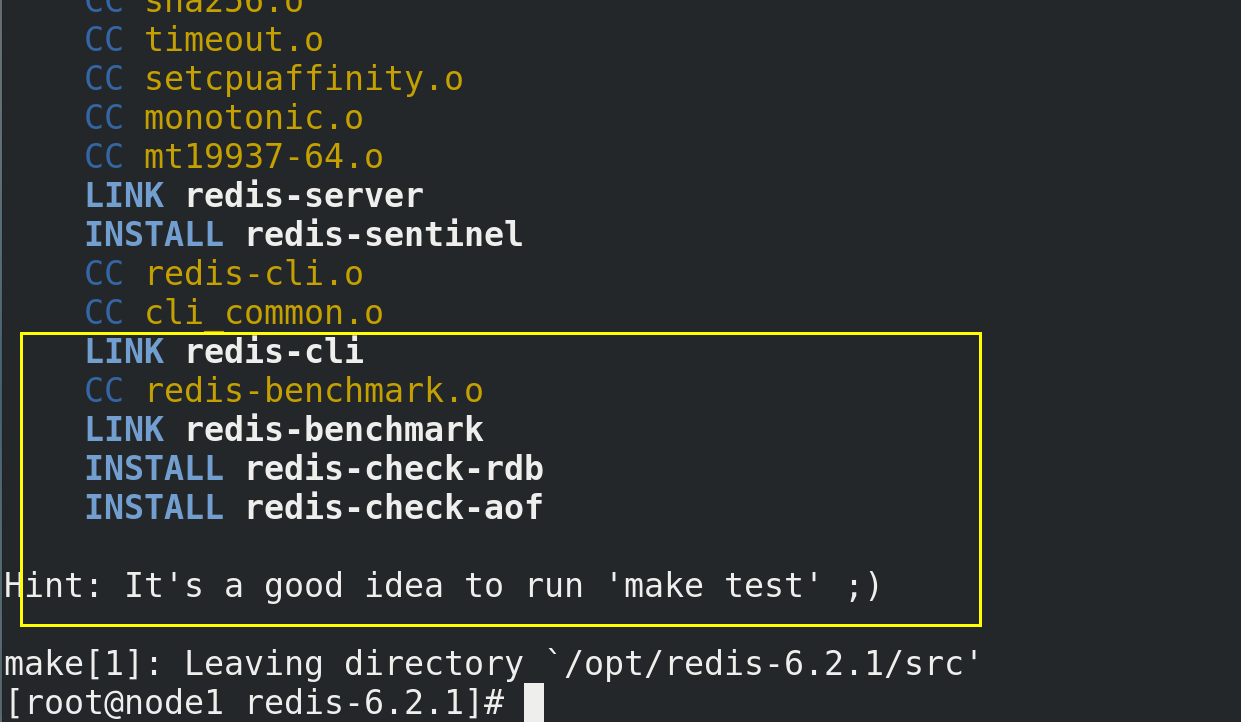
(4) After decompression, enter the directory redis-6.2.1 and compile it with the make command
cd redis-6.2.1/
make
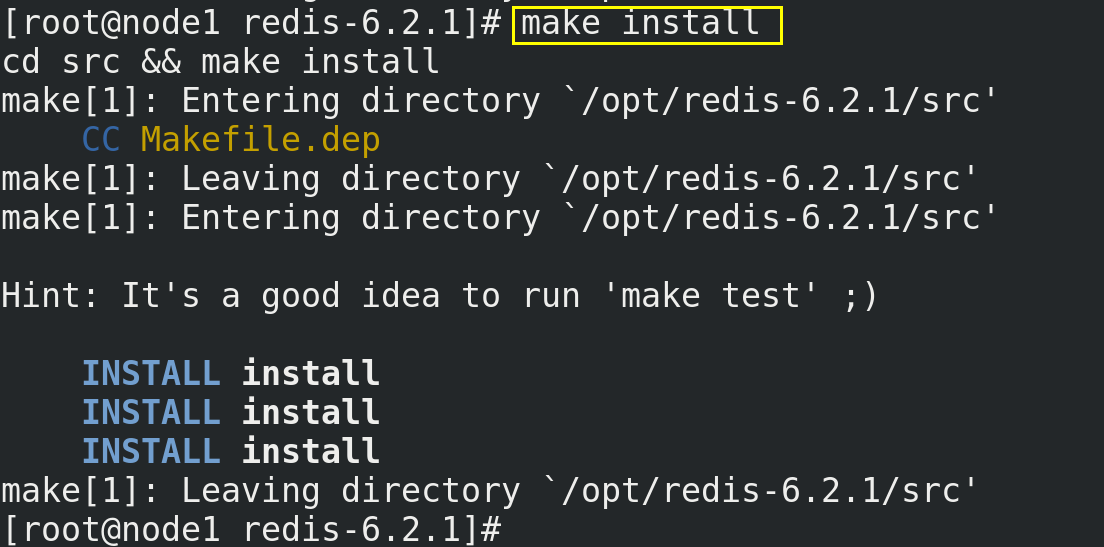
(5) Use the command make install to install
make install
(6) Verify whether Redis is successfully installed
# /usr/local/bin is the installation directory
cd /usr/local/bin
ll
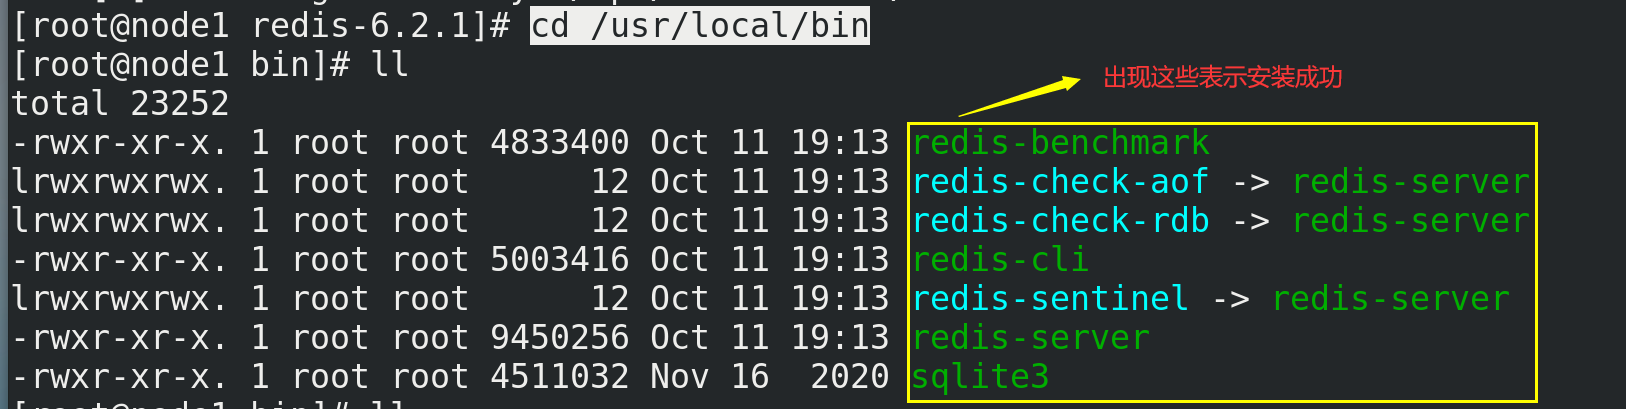
| redis-benchmark | Performance test tool |
|---|---|
| redis-check-aof | Fix the problematic AOF file |
| redis-check-dump | Fix the problem dump.rdb file |
| redis-sentinel | Redis cluster usage |
| redis-server | Redis server startup command |
| redis-cli | Client operation portal |
2.4.Redis startup
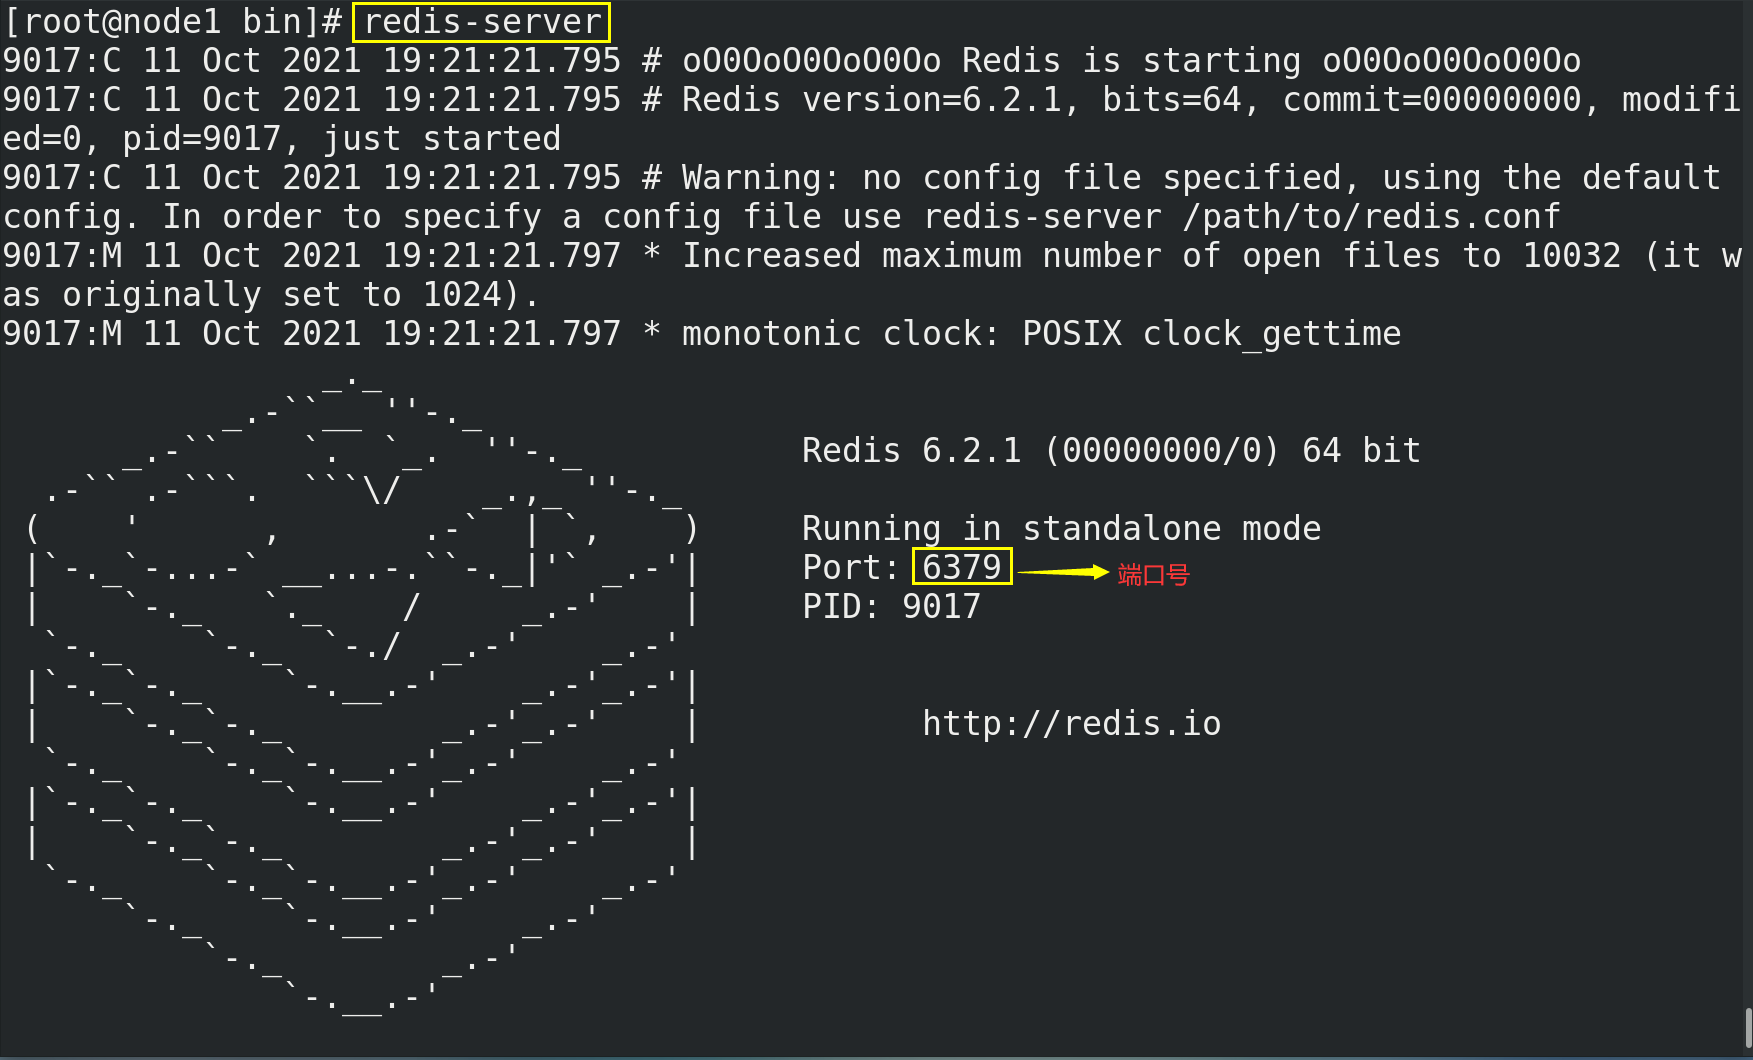
2.4.1. Foreground startup (not recommended)
# The disadvantage of the foreground start command is that the command line window cannot be closed, otherwise the server will stop
redis-server
2.4.2. Background startup (recommended)
(1) Back up redis.conf and copy a copy of redis.conf in / opt/redis-6.2.1 / directory to other directories

(2) Change the background startup setting daemon no to yes

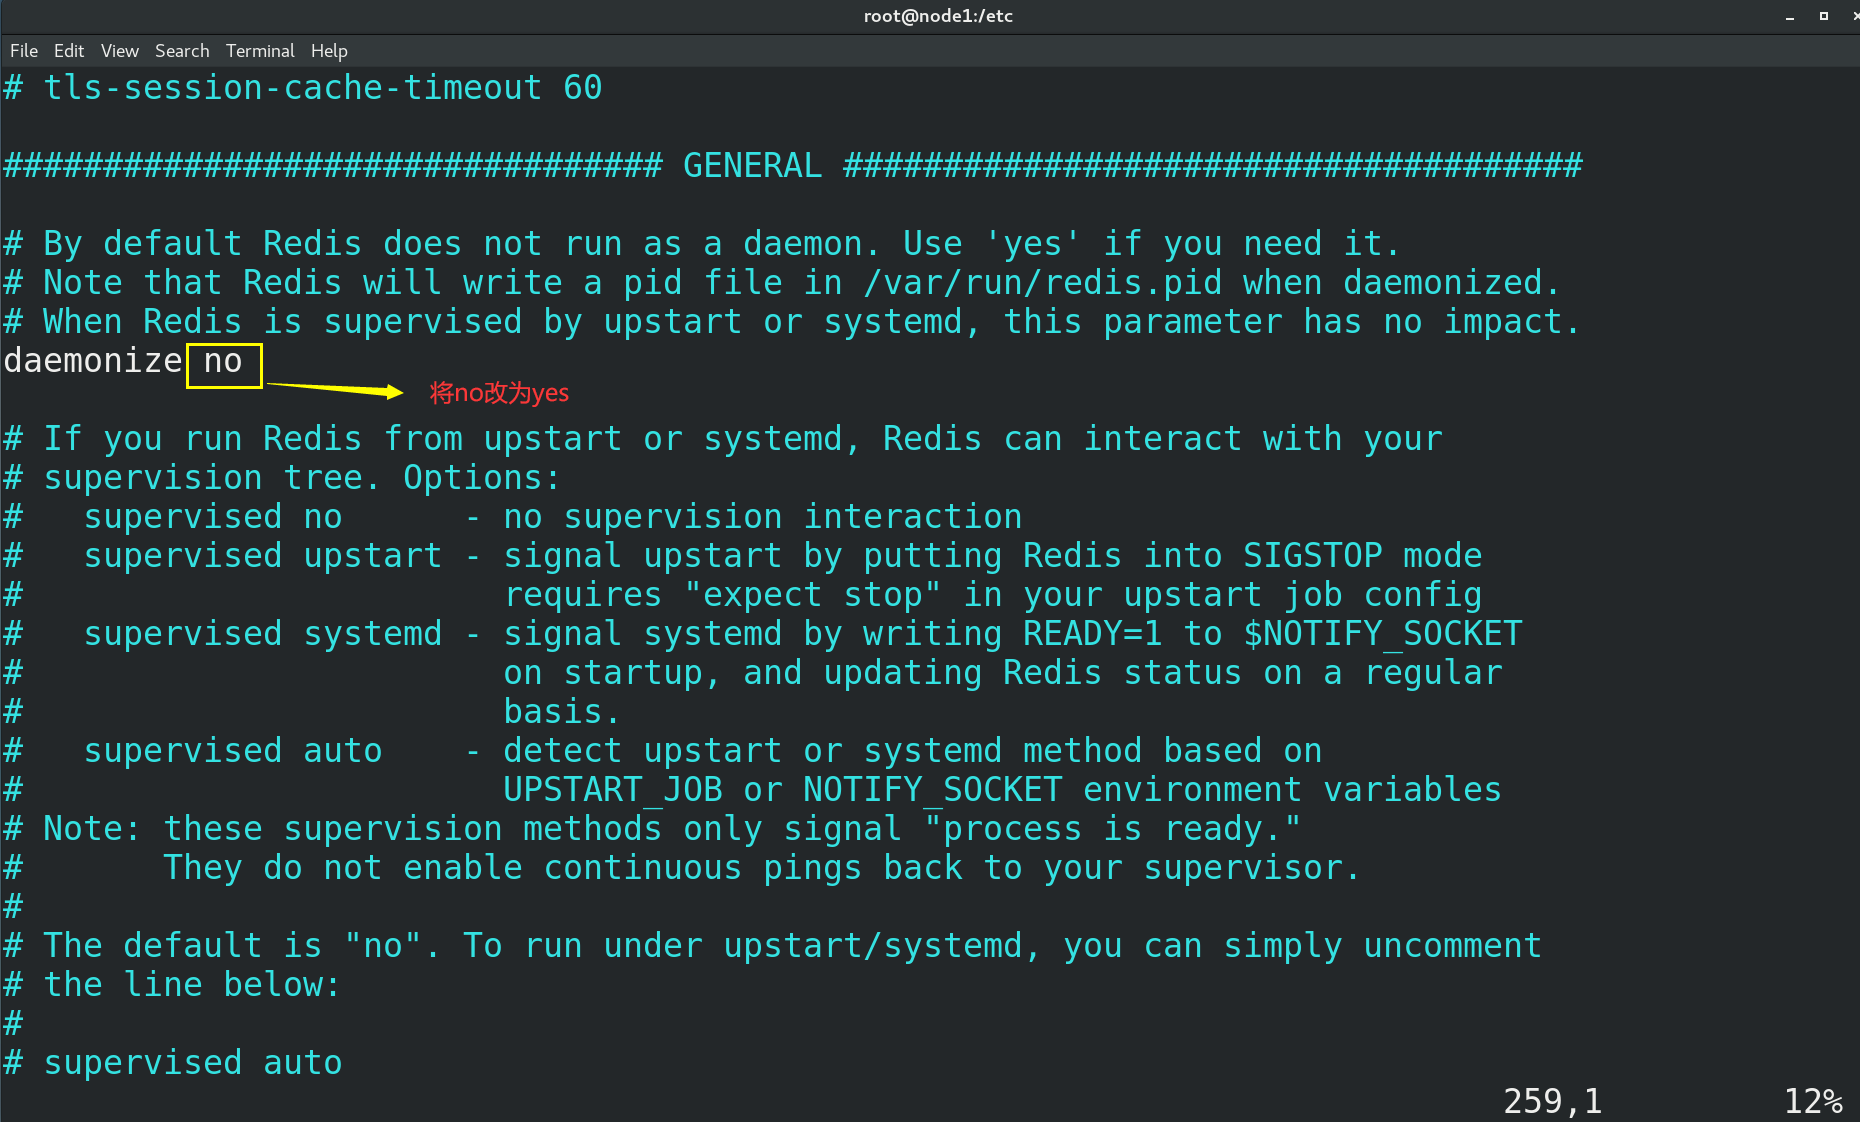
(3) Start Redis
cd /usr/local/bin
# Start Redis
redis-server /etc/redis.conf
# View Redis operation information
ps -ef | grep redis

(4) Access Redis with client
redis-cli
# Test verification
ping

(5) Close Redis
① Use the command shutdown to shut down
shutdown

② Close Redis by killing the Redis process
ps -ef | grep redis
# Redis process ID needs to be found first
kill -9 9498

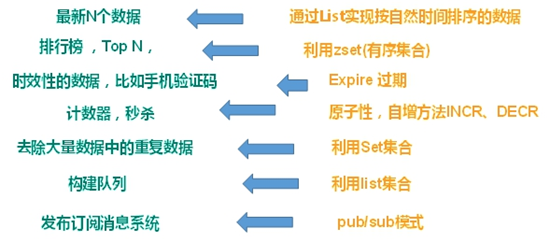
3. Five commonly used data types
Before understanding the five common data types of Redis, you need to know some commands related to Redis keys. In addition, if you want to view more commands of Redis, you can refer to http://doc.redisfans.com/.
# View all keys in the current library (you can also use fuzzy query, such as keys k *, that is, query the keys starting with the letter K)
keys *

# Add key value pair
set <key> <value>

# Determine whether a key exists
exists <key>

# View the type of key
type <key>

# Delete the specified key data
del <key>

# Select non blocking deletion according to value (only delete keys from the keyspace metadata, and the real deletion will be performed in subsequent asynchronous operations)
unlink <key>

# Set the expiration time for the given key, in seconds
expire <key> <sec>

# Check the number of seconds left for the key to expire, - 1 means it will never expire, - 2 means it has expired
ttl <key>

# Switch databases. Redis has 16 databases by default, which is similar to an array. Its subscript starts from 0. Library 0 is used by default initially
select <dbid>

# View the number of key s in the current database
dbsize

# Empty current library
flushdb

# Empty all libraries
flushall
3.1.Redis String (String)
3.1.1. Introduction
(1) as like as two peas, String is the most basic type of Redis, and can be understood as a type exactly like Memcached, and a key corresponds to a value.
(2) The string type is binary safe, which means that Redis's string can contain any data, such as jpg pictures or serialized objects.
(3) String type is the most basic data type of Redis. The maximum size of string value in a Redis can be 512M.
3.1.2. Common commands
# Add a key value pair (if the key exists, overwrite the original value; if the key does not exist, add the key value pair)
set <key> <value>

# Query corresponding key value
get <key>

# Append the given < value > to the end of the original value
append  <key> <value>

# The key value can be set only when the key does not exist
setnx  <key> <value>

# Get the length of the value value corresponding to the key
strlen  <key>

# Increase the numeric value stored in the key by 1 (you can only operate on numeric values. If it is empty, the new increment is 1)
incr <key>

# Subtract 1 from the numeric value stored in the key (you can only operate on numeric values. If it is empty, the new increment is - 1)
decr <key>

#Increase or decrease the numerical value stored in key to customize the step size
incrby / decrby <key> <step>

# Set one or more key value pairs at the same time
mset  <key1> <value1> <key2> <value2> ......

# Get one or more value s at the same time
mget <key1> <key2> <key3> ......

# Set one or more key value pairs at the same time. The setting can be successful only if all the given keys do not exist (atomicity, if one fails, it will fail)
msetnx <key1> <value1> <key2> <value2> ......

# Get the range of values
getrange  <key> <Starting position> <End position>

# Overwrite the string value stored in < key > with < value >, starting from < start position > (the index starts from 0)
setrange  <key> <Starting position> <value>

# Set the expiration time in seconds while setting the key value
setex  <key> <Expiration time> <value>

# Trade in new, set the new value and get the old value at the same time
getset <key> <value>
3.1.3. Data structure
(1) The data structure of String is Simple Dynamic String (abbreviated as SDS), which is a String that can be modified. The internal structure is similar to ArrayList in Java. The method of pre allocating redundant space is adopted to reduce the frequent allocation of memory.

(2) As shown in the above figure, the internal space capacity actually allocated for the current string is generally higher than the actual string length len. When the string length is less than 1M, the expansion is to double the existing space. If it exceeds 1M, only 1M more space will be expanded at a time. In addition, it should be noted that the maximum length of the string is 512M.
3.2.Redis List
3.2.1. Introduction
(1) Redis list is a simple string list, sorted by insertion order. You can add an element to the head (left) or tail (right) of the list. In addition, the list in redis is single key multi value.
(2) The bottom layer of the list is actually a two-way linked list, which has high operation performance at both ends. The performance of the middle node through index subscript operation will be poor.

3.2.2. Common commands
# Insert one or more values from left / right
lpush/rpush  <key> <value1> <value2> <value3> ......

# Pop up a value from left / right
lpop/rpop  <key>

# The elements are obtained according to the index subscript (from left to right), in the reverse order of insertion
lrange <key> <start> <stop>

# Pop up a value from the right of the < key1 > list and insert it to the left of the < key2 > list
rpoplpush  <key1> <key2>

# Get all the values in the list key (the first on the left of 0, - the first on the right of 1, 0-1 means all)
lrange <key> 0 -1

# Get elements by index subscript (left to right)
lindex <key> <index>

# Get list length
llen <key>

# Insert < newvalue > before / after < value >
linsert <key> before/after <value> <newvalue>

# Delete n values from the left (from left to right)
lrem <key> <n> <value>

# Replace the value whose index is the index of the list key with value
lset <key> <index> <value>
3.2.3. Data structure
(1) The data structure of List is quickList.
(2) First, when there are few list elements, a continuous memory storage will be used. This structure is ziplost, that is, compressed list. It stores all the elements next to each other and allocates a continuous piece of memory. When there is a large amount of data, it will be changed to quicklist. Because the additional pointer space required by ordinary linked lists is too large, it will waste space. For example, only int type data is stored in this list, and two additional pointers prev and next are required in the structure.

(3) Redis combines the linked list and zipplist to form a quicklist. That is to string multiple ziplist s using bidirectional pointers. This not only meets the fast insertion and deletion performance, but also does not appear too much spatial redundancy.
3.3.Redis Set
3.3.1. Introduction
(1) The external functions provided by Redis set are similar to those provided by List. They are all List functions, but its special feature is that set can automatically eliminate duplication. When a List data needs to be stored and duplicate data is not desired, set is a good choice, and set provides an important interface to judge whether a member is in a set set, This is also not provided by List.
(2) Redis's Set is an unordered Set of string type. Its bottom layer is actually a hash table with null value, so the complexity of adding, deleting and searching is O(1).
3.3.2. Common commands
# Add one or more elements to the collection < key >, and the existing elements will be ignored
sadd <key> <value1> <value2> ......

# Fetch all values of the set < key >
smembers <key>

# Judge whether the set < key > contains the < value > value. If yes, it returns 1 and if not, it returns 0
sismember <key> <value>

# Returns the number of elements in the set < key >
scard <key>

# Delete one or more elements in the set < key >
srem <key> <value1> <value2> ......

# Randomly spit out a value from the set < key >
spop <key>

# Randomly take n values from the set < key > (they will not be deleted from the set)
srandmember <key> <n>

# Moves a value in a set from one set to another
smove <source> <destination> value

# Returns the intersection element of two collections
sinter <key1> <key2>

# Returns the union element of two collections
sunion <key1> <key2>

# Returns the difference element of two sets (key1 but not key2)
sdiff <key1> <key2>
3.3.3. Data structure
(1) The Set data structure is a dict dictionary, which is implemented with a hash table.
(2) The internal implementation of HashSet in Java uses HashMap, but all values point to the same object. Redis's Set structure is the same. It also uses a hash structure internally. All values point to the same internal value.
3.4.Redis hash
3.4.1. Introduction
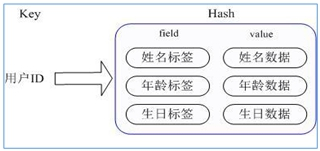
(1) Redis hash is a collection of key value pairs.
(2) Redis hash is a mapping table of field and value of string type. Hash is especially suitable for storing objects. It is similar to map < string, Object > in Java.
(3) The user ID is the searched key. The stored value user object contains name, age, birthday and other information. If it is stored in an ordinary key/value structure, there are mainly two storage methods:
① Each time a user's attribute is modified, it needs to be deserialized first, and then serialized back, which is expensive.

② User ID data redundancy
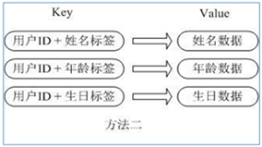
(4) The corresponding attribute data can be operated through key (user ID) + field (attribute tag). There is no need to store data repeatedly, and there will be no problems of serialization and concurrent modification control.
3.4.2. Common commands
# Assign < value > to the < field > key in the < key > set, for example: hset user:1001 id 1
hset <key> <field> <value>

# Fetch value from < field > of < key > Set
hget <key> <field>

# Batch setting hash values
hmset <key1> <field1> <value1> <field2> <value2>......

# Check whether the given field exists in the hash table < key >
hexists <key> <field>

# Lists all field s of the hash set
hkeys <key>

# List all value s of the hash set
hvals <key>

# Add an increment of 1 / - 1 to the value of the field in the hash table < key >
hincrby <key> <field> <increment>

# Set the value of the field in the hash table key to value (if and only if the field does not exist)
hsetnx <key> <field> <value>
3.4.3. Data structure
There are two data structures corresponding to the Hash type: ziplost (compressed list) and hashtable (Hash table). When the field value length is short and the number is small, use ziplist; otherwise, use hashtable.
3.5.Redis ordered set Zset (sorted set)
3.5.1. Introduction
(1) Redis ordered set Zset is very similar to ordinary set. It is a string set without duplicate elements. The difference is that each member of the ordered set is associated with a score, which is used to sort the members of the set from the lowest score to the highest score. The members of the collection are unique, but the scores can be repeated.
(2) Because the elements are ordered, you can also quickly obtain a range of elements according to score or position. Accessing the intermediate elements of an ordered set is also very fast, so you can use an ordered set as a smart list without duplicate members.
3.5.2. Common commands
# Add one or more elements and their score values to the ordered set < key >
zadd <key> <score1> <value1> <score2> <value2>......

# Returns the elements in the ordered set < key > with subscripts between < start > ~ < stop > (with WITHSCORES, scores and values can be returned to the result set)
zrange <key> <start> <stop> [WITHSCORES]

# Returns all members in the ordered set < key > whose score value is between min and max (including those equal to min or max). The members of the ordered set are arranged in the order of increasing score value (from small to large).
zrangebyscore <key> minmax [withscores] [limit offset count]

# Ditto, change to order from large to small.
zrevrangebyscore key maxmin [withscores] [limit offset count]
3.5.3. Data structure
(1) Zset is a very special data structure provided by Redis. On the one hand, it is equivalent to the Java data structure map < string, double >, which can give each element value a weight score. On the other hand, it is similar to TreeSet. The internal elements will be sorted according to the weight score to get the ranking of each element, You can also get the list of elements through the scope of score.
(2) The underlying layer of Zset uses two data structures:
① hash is used to associate the element value with the weight score to ensure the uniqueness of the element value. The corresponding score value can be found through the element value.
② Jump table. The purpose of jump table is to sort the element value and obtain the element list according to the range of score.
4.Redis configuration file
The previously customized configuration file directory is: / etc/redis.conf, and some configurations will be introduced below.
4.1.Units
Some basic measurement units are defined at the beginning of the configuration file. Redis only supports bytes, not bit s, and is not case sensitive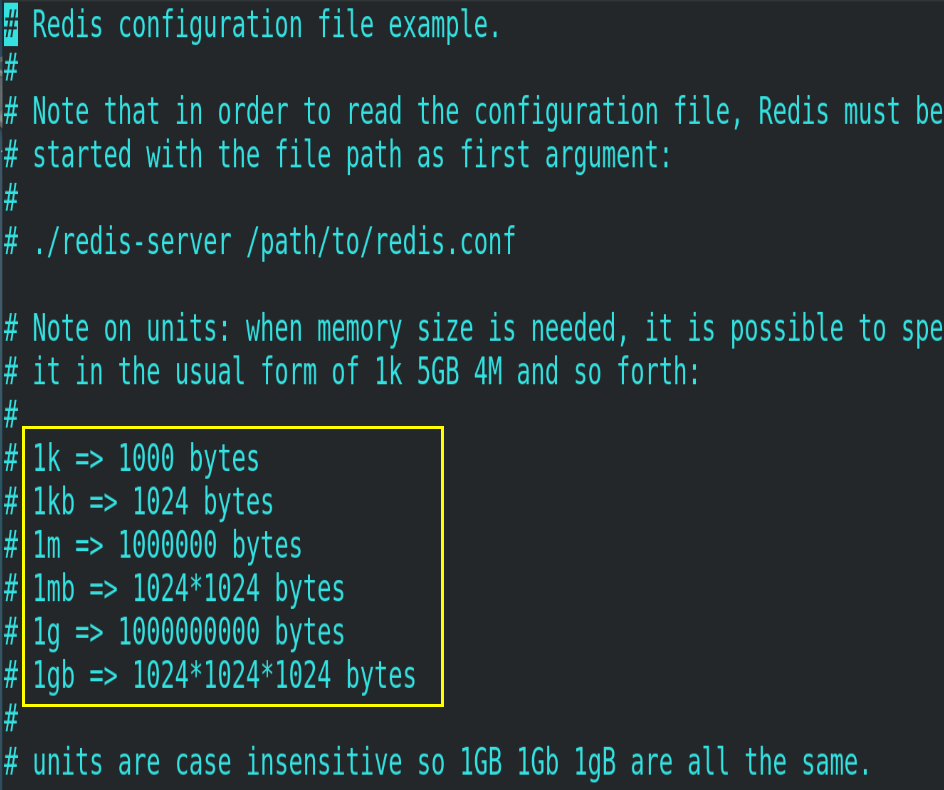
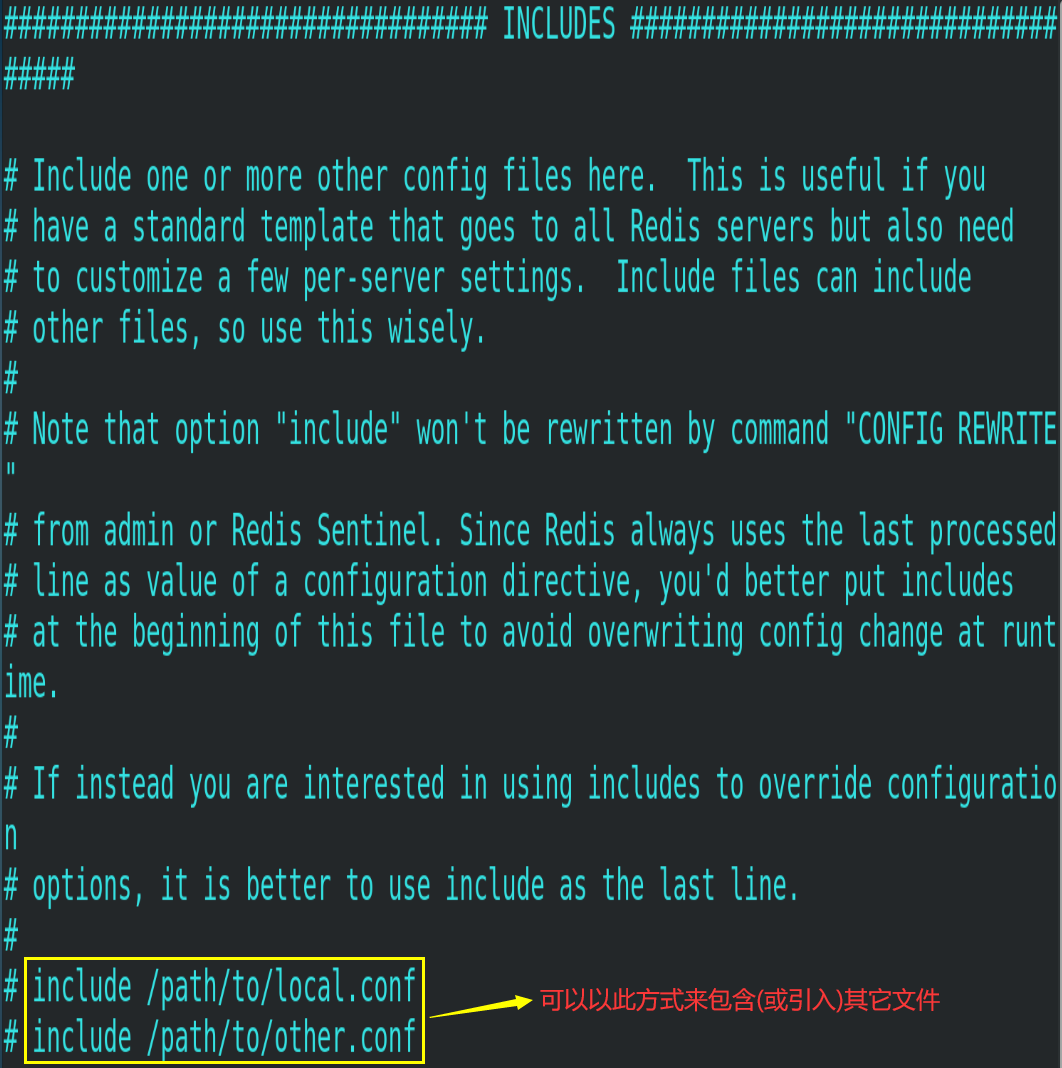
4.2.INCLUDES
Similar to include in jsp, the common configuration file can be extracted in the case of multiple instances.
4.3. Network related configuration
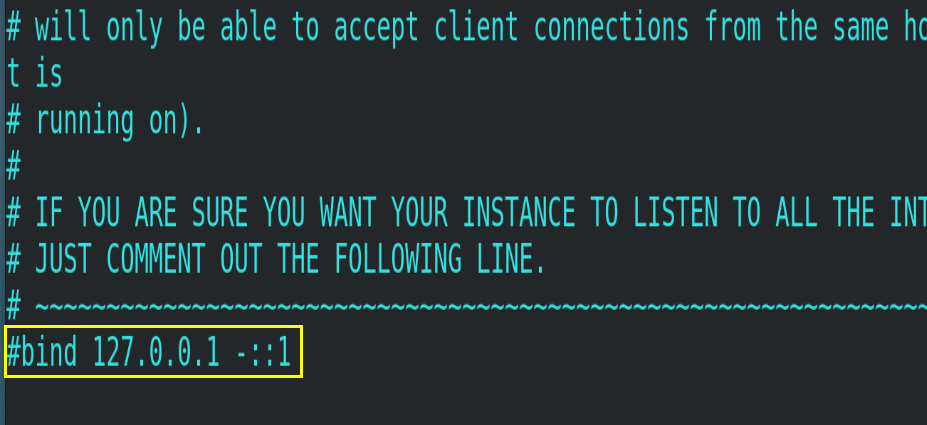
4.3.1.bind
The default configuration is bind=127.0.0.1, which means that only local access requests can be accepted. If the configuration is not written, it means that access to any IP address is unrestricted. In the production environment, the address of the application server must be written, and the server needs remote access, so it needs to be commented out
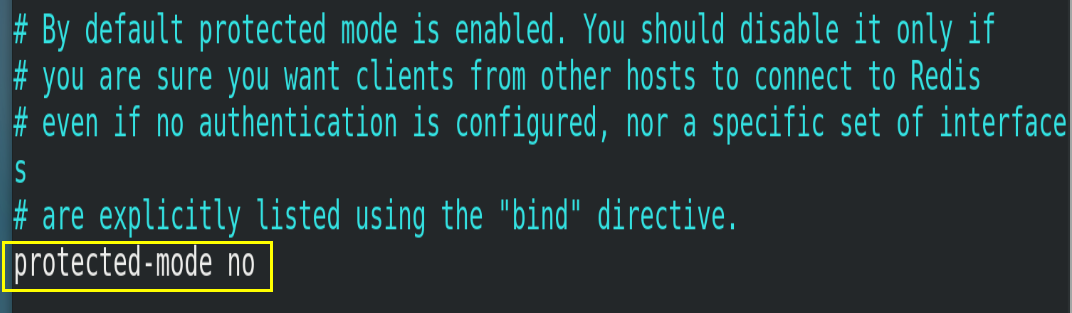
4.3.2.protected-mode
Protected mode, that is, protected mode. If protected mode is enabled, Redis is only allowed to accept local responses without setting bind ip and password. Here, you need to set protected mode to no.
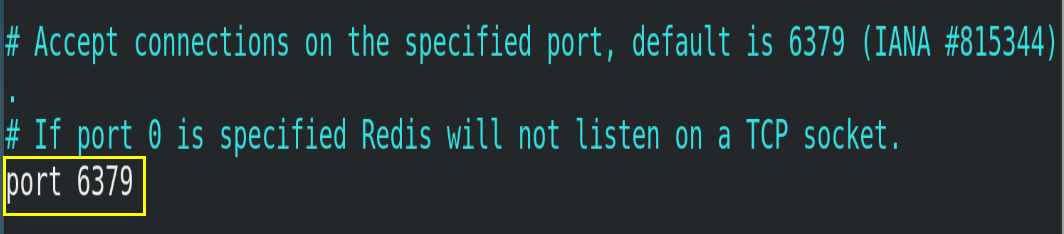
4.3.3.Port
Redis's default port number is 6379, which does not need to be modified.
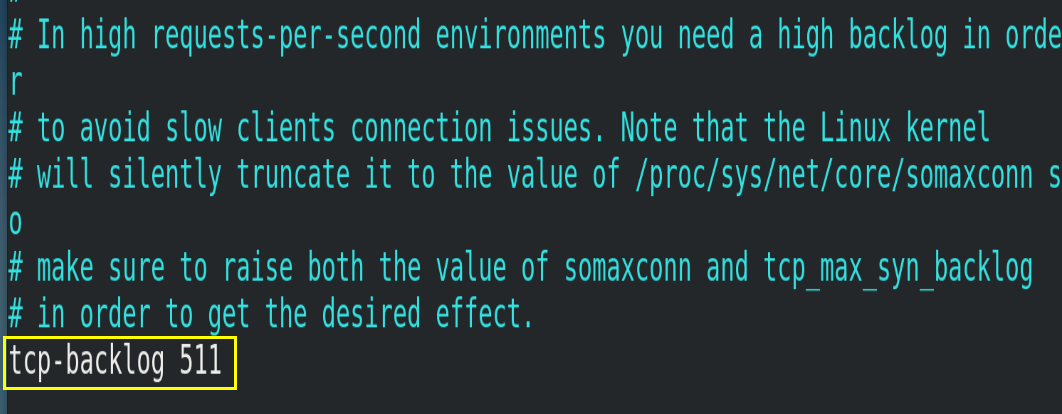
4.3.4.tcp-backlog
Set the tcp backlog. The backlog is a connection queue. The total of the backlog queues = the queue that has not completed three handshakes + the queue that has completed three handshakes. In a high concurrency environment, a high backlog value is required to avoid the problem of slow client connection. Note that the Linux kernel will reduce this value to the value of / proc/sys/net/core/somaxconn (128), so confirm to increase / proc/sys/net/core/somaxconn and / proc/sys/net/ipv4/tcp_max_syn_backlog (128) two values to achieve the desired effect.
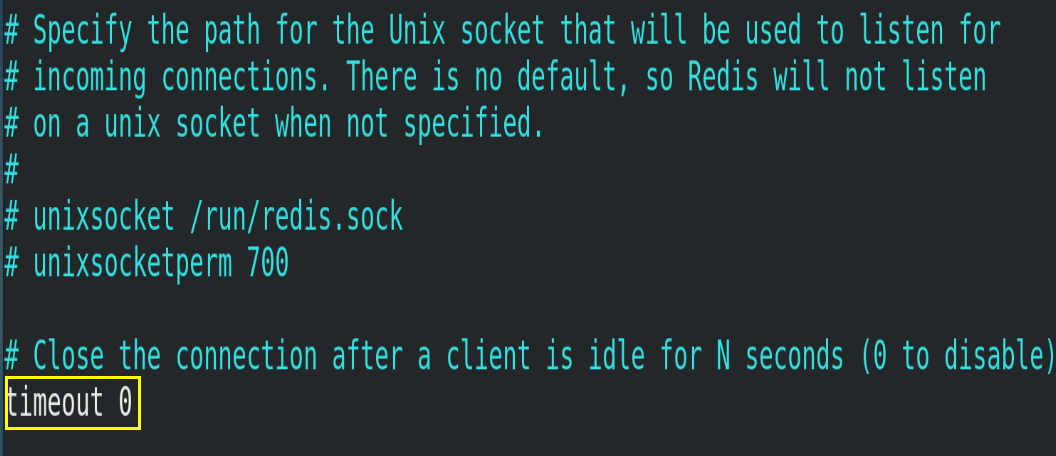
4.3.5.timeout
How many seconds does an idle client stay closed? 0 means that the function is closed, that is, it will never be closed.
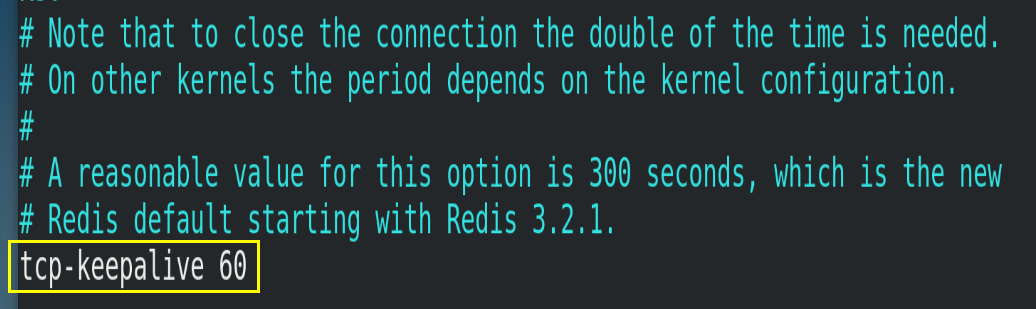
4.3.6.tcp-keepalive
A heartbeat detection for accessing the client. It is detected every n seconds, in seconds. If it is set to 0, Keepalive detection will not be performed. It is recommended to set it to 60.
4.4.GENERAL
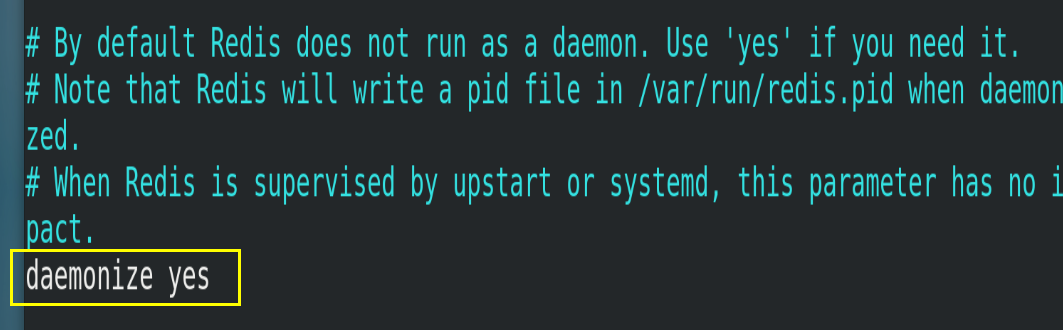
4.4.1.daemonize
Whether it is a background process, set to yes (daemon, background startup)
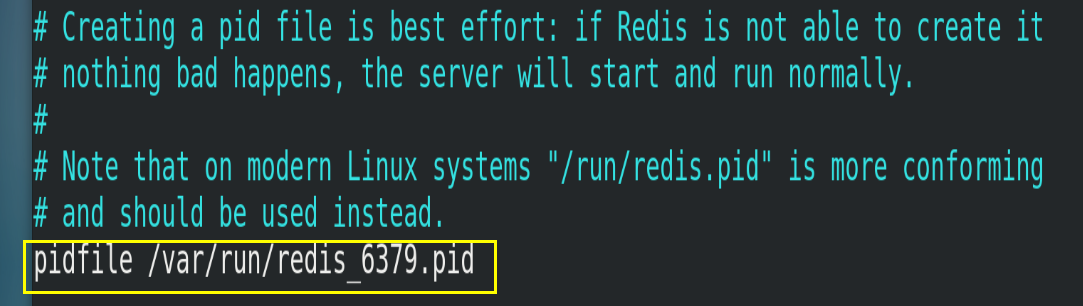
4.4.2.pidfile
The location where the pid file is stored. Each instance will produce a different pid file.
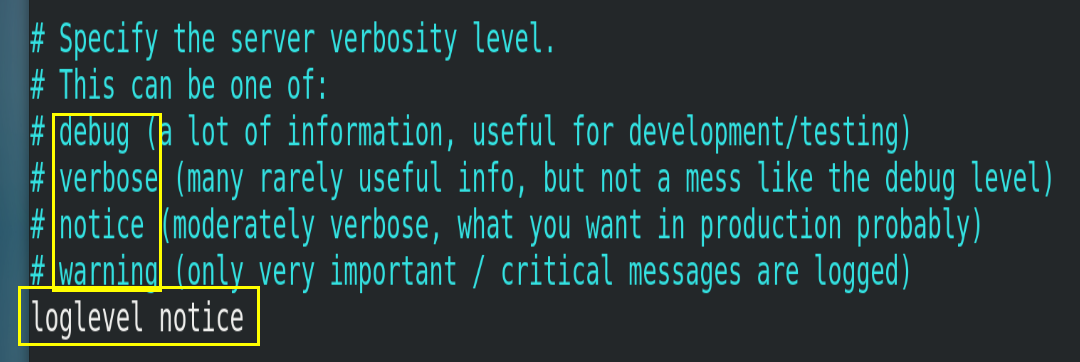
4.4.3.loglevel
Specify the logging level. Redis supports four levels in total: debug, verbose, notice and warning. The default is notice.
4.4.4.logfile
Log file name

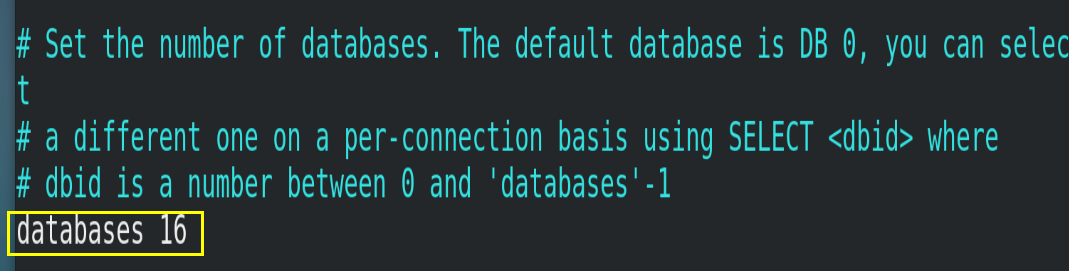
4.4.5.databases
Set the number of libraries to 16 by default, and the default database is 0. You can use the select < dbid > command to specify the database id on the connection.
5. Publish and subscribe to redis
5.1. Publish and subscribe
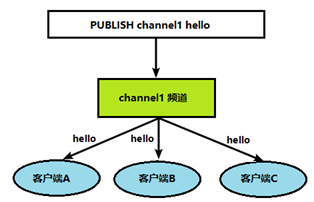
(1) Redis publish / subscribe (pub/sub) is a message communication mode: the sender (pub) sends messages and the subscriber (sub) receives messages.
(2) Redis client can subscribe to any number of channels.
The client can subscribe to channels, as shown in the figure below:
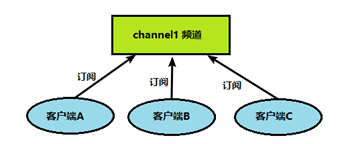
When a message is published to this channel, the message will be sent to the subscribed client
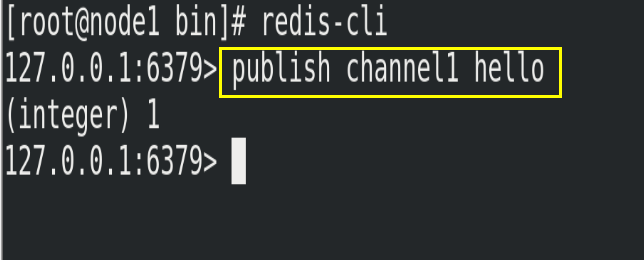
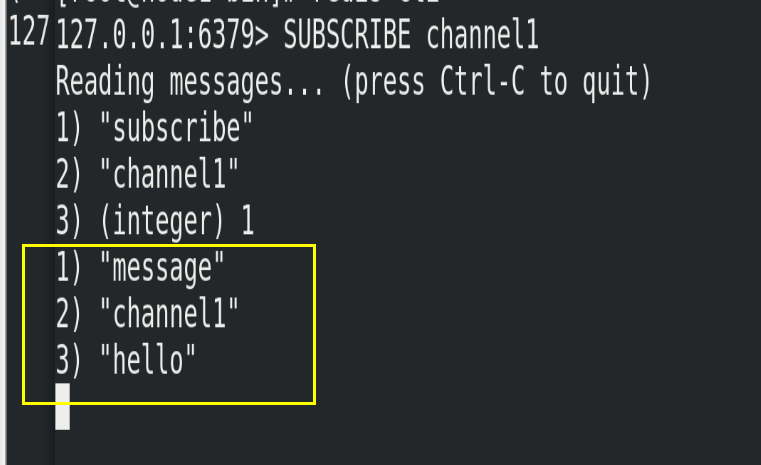
5.2. Publish subscribe command line implementation
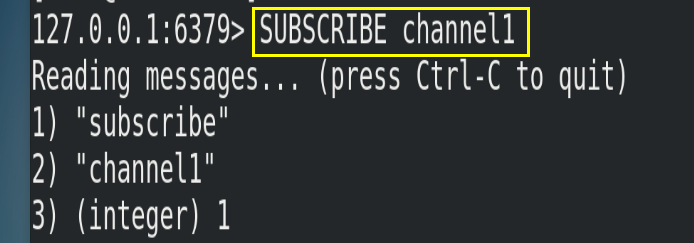
(1) Open a client subscription to channel1
SUBSCRIBE channel1
(2) Open another client and publish the message hello to channel1
publish channel1 hello
(3) Open the first client to see the sent message
6.Redis6 new data type
6.1.Bitmaps
6.1.1. Introduction
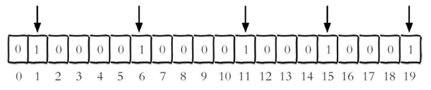
Modern computers use binary (bit) as the basic unit of information, and one byte is equal to 8 bits. For example, the "abc" string is composed of 3 bytes, but it is actually represented in binary when stored in the computer. The ASCII codes corresponding to "abc" are 97, 98 and 99 respectively, and the corresponding binaries are 0110001, 01100010 and 01100011 respectively, as shown in the figure below:

Rational use of operation bits can effectively improve memory utilization and development efficiency. However, it should be noted that:
(1) Bitmaps itself is not a data type. In fact, it is a string (key value), but it can operate on the bits of the string.
(2) Bitmaps provides a separate set of commands, so the methods of using bitmaps and strings in Redis are different. Bitmaps can be imagined as an array in bits. Each cell of the array can only store 0 and 1. The subscript of the array is called offset in bitmaps.

6.1.2. Common commands
6.1.2.1.setbit
(1) Format
# Set the value (0 or 1) of an offset in Bitmaps, and the offset (offset) starts from 0
setbit <key> <offset> <value>
(2) Example
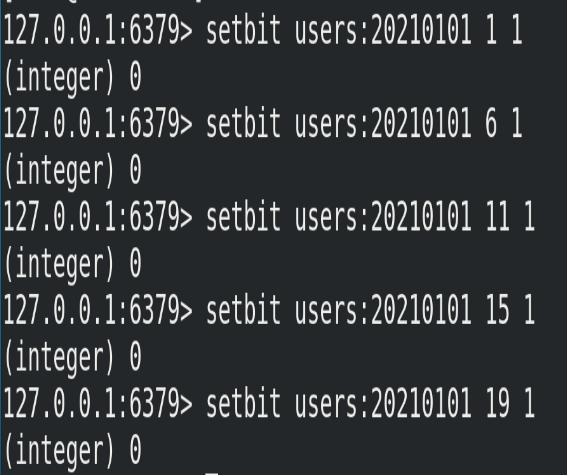
Whether each independent user has visited the website is stored in Bitmaps. The accessed user is recorded as 1, the user who has not visited is recorded as 0, and the offset is used as the user id. Set the value of the offset bit of the key (calculated from 0). Assuming that 20 users with userid=1, 6, 11, 15 and 19 have visited the website, the current Bitmaps initialization results are as follows:
In addition, the following points should be noted:
① The user id of many applications starts with a specified number (e.g. 10000). Directly matching the user id with the offset of Bitmaps is bound to cause some waste. The common practice is to subtract the specified number from the user id every time you do setbit operation.
② When initializing Bitmaps for the first time, if the offset is very large, the whole initialization process will be slow, which may cause Redis blocking.
6.1.2.2.getbit
(1) Format
# Gets the value of an offset in Bitmaps
getbit <key> <offset>
(2) Instance
Get whether the user with id=8 has visited on January 1, 2021, and return 0 to indicate that he has not visited:

6.1.2.3.bitcount
(1) Format
# Counts the number of strings with a bit value of 1 from start byte to end byte
bitcount <key> [start end]
(2) Example
① Calculate the number of independent access users on January 1, 2021

② Start and end represent the number of start and end bytes. The following operation calculates the number of independent access users whose user id is between the first byte and the third byte. The corresponding user IDs are 11, 15 and 19.

6.1.2.4.bitop
(1) Format
# bitop is a composite operation. It can perform and (intersection), or (Union), not (non), xor (xor) operations of multiple Bitmaps and save the results in destkey
bitop  and(or/not/xor) <destkey> [key...]
(2) Example
The userid of the website visited on November 3, 2020 is 0,1,4,9.
The userid of the website visited on November 4, 2020 is 1,2,5,9.
① Calculate the number of users who have visited the website in two days
# unique:users:and:20201104_03 is the target Bitmaps
bitop and unique:users:and:20201104_03 unique:users:20201103 unique:users:20201104

② Calculate the number of users who have visited the website on any day (for example, monthly activity is similar). You can use or union
# unique:users:or:20201104_03 is the target Bitmaps
bitop or unique:users:or:20201104_03 unique:users:20201103 unique:users:20201104
6.1.3. Comparison between bitmaps and set
(1) Assuming that the website has 100 million users and 50 million users independently visit every day, if the collection type and Bitmaps are used to store the active users every day, the table can be obtained
| data type | Space occupied by each user id | Number of users to store | Total memory |
|---|---|---|---|
| Collection type | 64 bit | 50000000 | 64 bit * 50000000 = 400MB |
| Bitmaps | 1 bit | 100000000 | 1 bit * 100000000 = 12.5MB |
(2) Obviously, using Bitmaps in this case can save a lot of memory space, especially over time.
| data type | one day | one month | a year |
|---|---|---|---|
| Collection type | 400MB | 12GB | 144GB |
| Bitmaps | 12.5MB | 375MB | 4.5GB |
(3) However, Bitmaps is not a panacea. If the website has few independent users every day, for example, only 100000 (a large number of zombie users), the comparison between the two is shown in the table below. Obviously, it is not appropriate to use Bitmaps at this time, because most of the bits are 0.
| data type | Space occupied by each userid | Number of users to store | Total memory |
|---|---|---|---|
| Collection type | 64 bit | 100000 | 64 bit * 100000 = 800KB |
| Bitmaps | 1 bit | 100000000 | 1 bit * 100000000 = 12.5MB |
6.2.HyperLogLog
6.2.1. Introduction
(1) In our work, we often encounter functional requirements related to statistics, such as Statistics website PV (PageView page visits), which can be easily realized by using incr and incrby of Redis. But how to solve the problems such as UV (unique visitor), the number of independent IP S and the number of search records that need to be de duplicated and counted? This problem of finding the number of non repeating elements in a set is called the cardinality problem.
(2) There are many solutions to the cardinality problem:
① The data is stored in the MySQL table, and distinct count is used to calculate the number of non duplicates
② Use the hash, set, bitmaps and other data structures provided by Redis to process
The above scheme results are accurate, but with the continuous increase of data, the occupied space is becoming larger and larger, which is impractical for very large data sets.
(3) Can a certain degree of accuracy be reduced to balance the storage space? Redis launched hyperlog. Redis HyperLogLog is an algorithm for cardinality statistics. The advantage of HyperLogLog is that when the number or volume of input elements is very, very large, the space required to calculate the cardinality is always fixed and very small.
(4) In Redis, each hyperlog key only needs 12 KB of memory to calculate the cardinality of nearly 2 ^ 64 different elements. This is in sharp contrast to a collection where the more elements consume more memory when calculating the cardinality. However, because HyperLogLog only calculates the cardinality based on the input elements and does not store the input elements themselves, HyperLogLog cannot return the input elements like a collection.
(5) What is cardinality? For example, if the dataset {1, 3, 5, 7, 5, 7, 8}, the cardinality set of the dataset is {1, 3, 5, 7, 8}, and the cardinality (non repeating elements) is 5. Cardinality estimation is to quickly calculate the cardinality within the acceptable error range.
6.2.2. Common commands
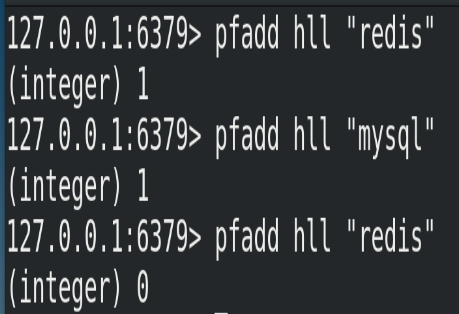
6.2.2.1.pfadd
(1) Format
# Adds the specified element to the hyperlog
pfadd <key> <element> [element...]
(2) Example
Add all elements to the specified hyperlog data structure. If the approximate cardinality estimated by HLL changes after executing the command, it returns 1; otherwise, it returns 0.
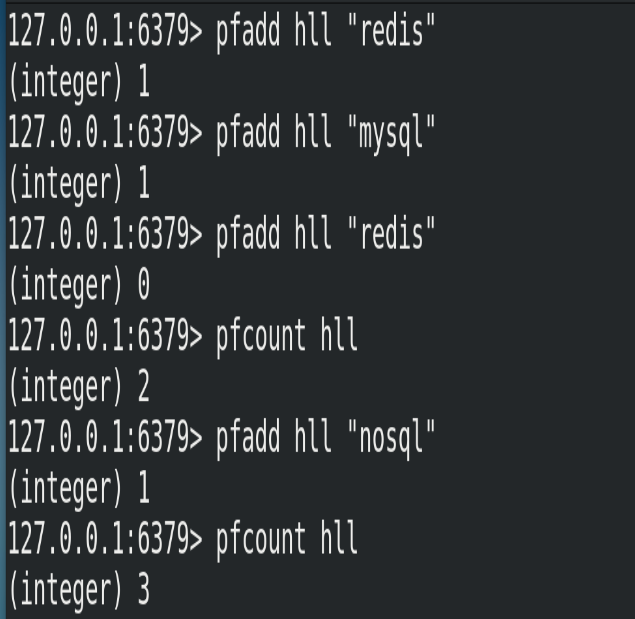
6.2.2.2.pfcount
(1) Format
# To calculate the approximate cardinality of HLL, multiple hlls can be calculated. For example, HLL can be used to store daily UVs, and 7-day UVs can be used to calculate a week's UVs
pfcount <key> [key ...]
(2) Example
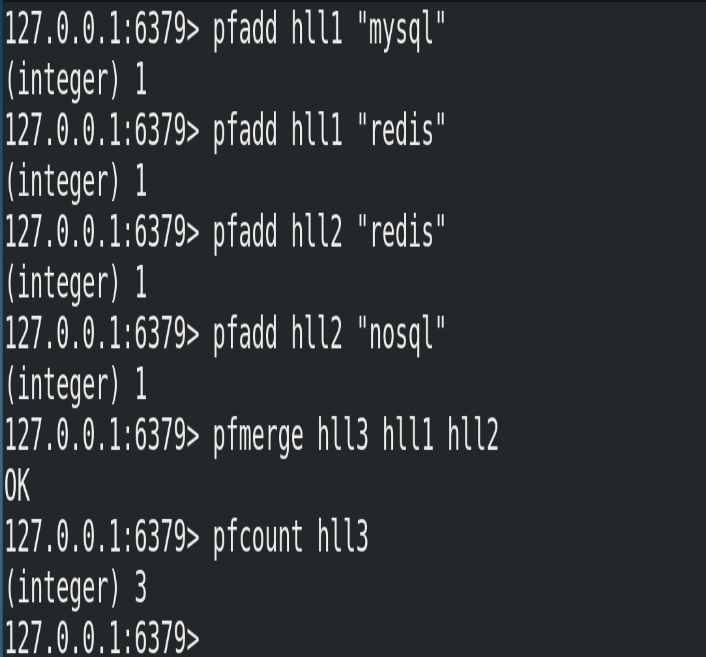
6.2.2.3.pfmerge
(1) Format
# The merged results of one or more hlls are stored in another HLL. For example, monthly active users can use daily active users to consolidate and calculate
pfmerge <destkey> <sourcekey> [sourcekey ...]
(2) Example
6.3.Geospatial
6.3.1. Introduction
Redis 3.2 adds support for Geo types. GEO, or Geographic, is the abbreviation of Geographic information. This type is the two-dimensional coordinate of the element, which is longitude and latitude on the map. Based on this type, redis provides common operations such as longitude and latitude setting query, range query, distance query, longitude and latitude Hash, etc.
6.3.2. Common commands
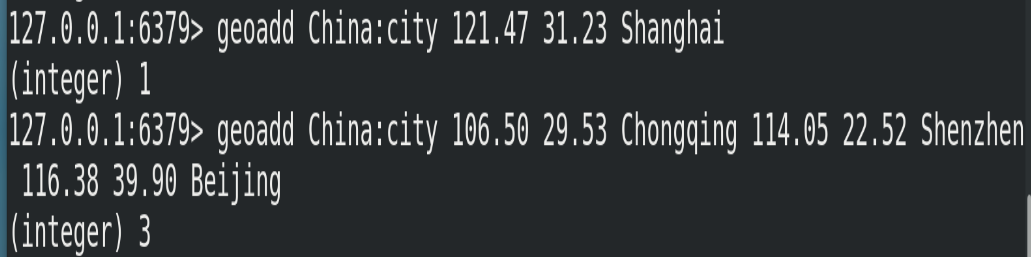
6.3.2.1.geoadd
(1) Format
# Add geographic location (longitude, latitude, name)
geoadd <key> <longitude> <latitude> <member> [longitude latitude member...]
(2) Example
In addition, the following points should be noted:
① The two poles cannot be added directly. Generally, the city data will be downloaded and imported directly through the Java program at one time.
② The effective longitude is from - 180 degrees to 180 degrees. The effective latitude ranges from -85.05112878 degrees to 85.05112878 degrees.
③ When the coordinate position exceeds the specified range, the command will return an error.
④ The added data cannot be added again.
6.3.2.2.geopos
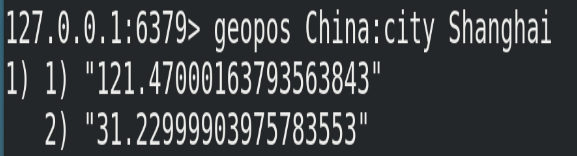
(1) Format
# Gets the coordinate value of the specified region
geopos <key> <member> [member...]
(2) Example
6.3.2.3.geodist
(1) Format
# Gets the linear distance between two positions
# Company:
# m: Indicates in meters [default]
# km: expressed in kilometers
# mi: expressed in miles
# ft: expressed in feet
 If the user does not explicitly specify the unit parameter, then GEODIST The default unit is meters
geodist <key> <member1> <member2>  [m|km|ft|mi ]
(2) Example

6.3.2.4.georadius
(1) Format
# Take the given latitude and longitude as the center to find out the elements within a certain radius
georadius <key> <longitude> <latitude> radius  m|km|ft|mi
(2) Example

7.Jedis
7.1.Jedis introduction
Jedis is a Java connection development tool officially recommended by Redis.
7.2.Jedis common operation
7.2.1. Connection test
(1) Create a file named jedis in the IDEA_ maven project of redisdemo
(2) Import related dependencies in pom.xml
<dependencies>
	<!--Jedis-->
    <dependency>
        <groupId>redis.clients</groupId>
        <artifactId>jedis</artifactId>
        <version>3.2.0</version>
    </dependency>
    <!--unit testing -->
    <dependency>
        <groupId>junit</groupId>
        <artifactId>junit</artifactId>
        <version>4.12</version>
        <scope>compile</scope>
    </dependency>
</dependencies>
(3) The test code is as follows:
package com.atguigu.jedis;

import redis.clients.jedis.Jedis;

public class JedisDemo1{
    public static void main(String[] args) {
        /*
            Create Jedis object
            (1)."192.168.88.100":Host IP address
            (2).6379:Redis Port number
        * */
        Jedis jedis = new Jedis("192.168.88.100",6379);
        //Test connection
        String value = jedis.ping();
        //If PONG is output, the connection is successful
        System.out.println(value);
    }
}
(4) Precautions for connecting to Redis:
① In Redis configuration file redis.conf, comment out bind 127.0.0.1 and set protected mode to no.
② If the firewall in Linux is turned on, the connection may not succeed
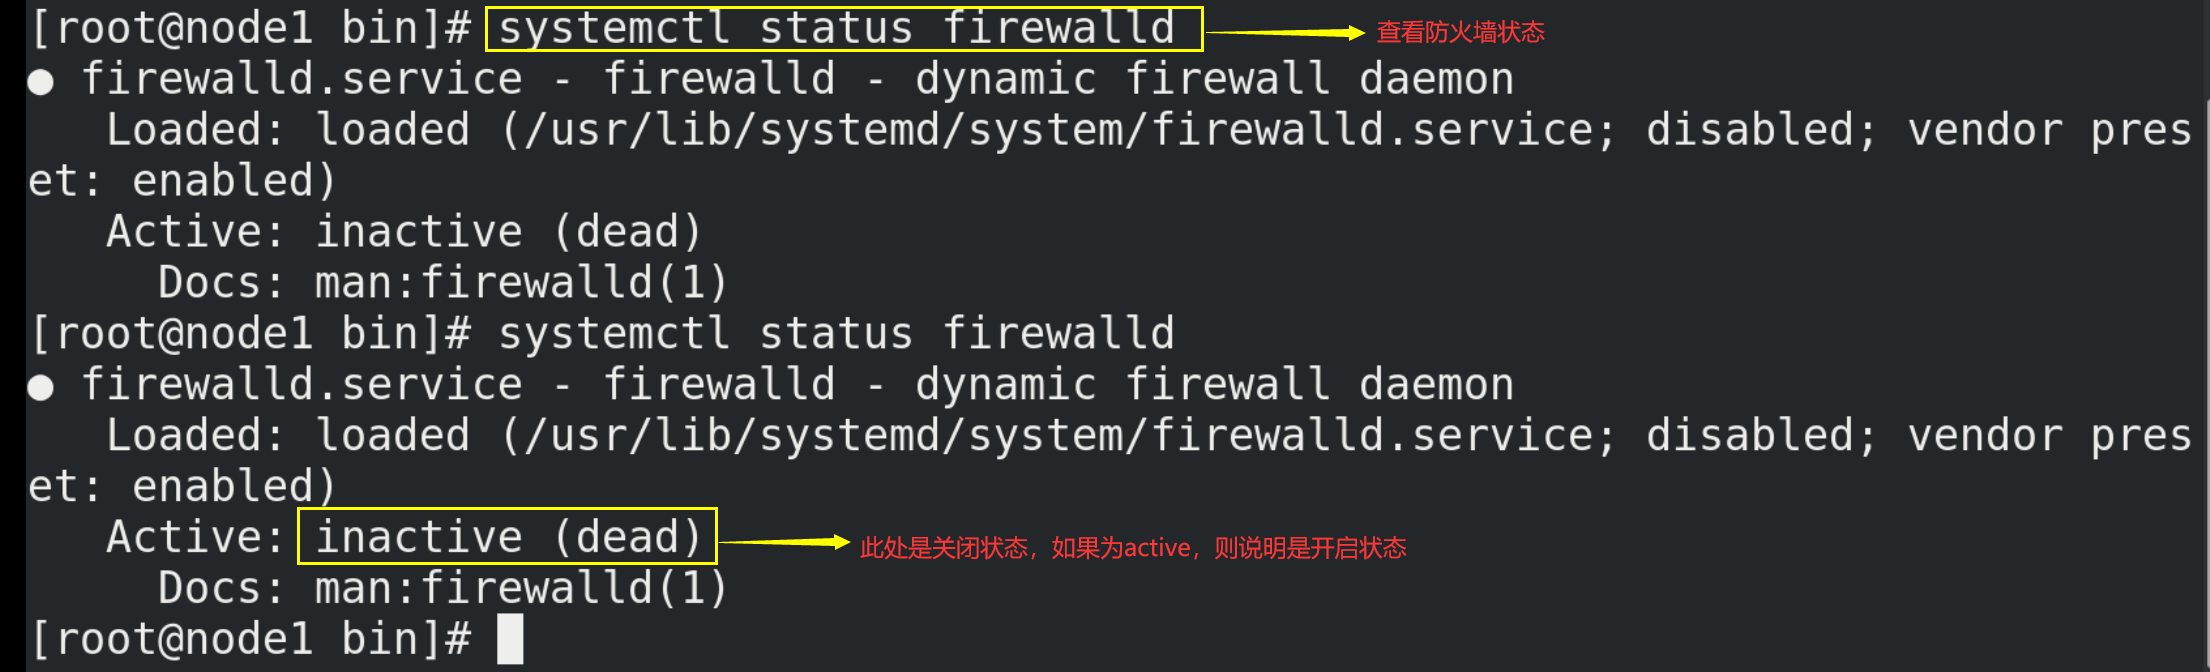
At this time, close the firewall, and the command is as follows:
systemctl stop firewalld
7.2.2. Operation related data types
(1)Jedis-API: Key
@Test
public void keyDemo(){
    //Create Jedis object
    Jedis jedis = new Jedis("192.168.88.100",6379);

    jedis.set("k1", "v1");
    jedis.set("k2", "v2");
    jedis.set("k3", "v3");
    Set<String> keys = jedis.keys("*");
    System.out.println(keys.size());
    for (String key : keys) {
        System.out.println(key);
    }

    System.out.println(jedis.exists("k1"));
    System.out.println(jedis.ttl("k1"));
    System.out.println(jedis.get("k1"));
    //Close Jedis
    jedis.close();
}
(2)Jedis-API: String
@Test
public void stringDemo(){
    //Create Jedis object
    Jedis jedis = new Jedis("192.168.88.100",6379);
    jedis.mset("str1","v1","str2","v2","str3","v3");
    System.out.println(jedis.mget("str1","str2","str3"));
    //Close Jedis
    jedis.close();
}
(3)Jedis-API: List
 @Test
public void listDemo(){
    //Create Jedis object
    Jedis jedis = new Jedis("192.168.88.100",6379);
    jedis.lpush("mylist","v1","v2","v3","v4");
    List<String> list = jedis.lrange("mylist",0,-1);
    for (String element : list) {
        System.out.println(element);
    }
    //Close Jedis
    jedis.close();
}
(4)Jedis-API: Set
@Test
public void setDemo(){
    //Create Jedis object
    Jedis jedis = new Jedis("192.168.88.100",6379);
    jedis.sadd("orders", "order01");
    jedis.sadd("orders", "order02");
    jedis.sadd("orders", "order03");
    jedis.sadd("orders", "order04");
    Set<String> smembers = jedis.smembers("orders");
    jedis.srem("orders", "order02");
    for (String order : smembers) {
        System.out.println(order);
    }
    //Close Jedis
    jedis.close();
}
(5)Jedis-API: Hash
@Test
public void hashDemo(){
    //Create Jedis object
    Jedis jedis = new Jedis("192.168.88.100",6379);

    jedis.hset("hash1","userName","lisi");
    System.out.println(jedis.hget("hash1","userName"));
    Map<String,String> map = new HashMap<String,String>();
    map.put("telphone","13810169999");
    map.put("address","atguigu");
    map.put("email","abc@163.com");
    jedis.hmset("hash2",map);
    List<String> result = jedis.hmget("hash2", "telphone","email");
    for (String element : result) {
        System.out.println(element);
    }
    //Close Jedis
    jedis.close();
}
(6)Jedis-API: Zset
@Test
public void zsetDemo(){
    //Create Jedis object
    Jedis jedis = new Jedis("192.168.88.100",6379);
    jedis.zadd("zset01", 100d, "z3");
    jedis.zadd("zset01", 90d, "l4");
    jedis.zadd("zset01", 80d, "w5");
    jedis.zadd("zset01", 70d, "z6");

    Set<String> zrange = jedis.zrange("zset01", 0, -1);
    for (String e : zrange) {
        System.out.println(e);
    }
	//Close Jedis
    jedis.close();
}
7.3.Jedis example - mobile phone verification code
7.3.1. Functional requirements
(1) Enter the mobile phone number and click send to randomly generate a 6-digit code, which is valid within 2 minutes;
(2) Enter the verification code and click verification to return success or failure;
(3) Each mobile phone number can only be entered 3 times a day;
7.3.2. Function realization
package com.atguigu.jedis;
import org.junit.Test;
import redis.clients.jedis.Jedis;
import java.util.Random;
public class PhoneCode {
//Analog verification code transmission
@Test
public void testVerifyCode(){
//Simulate sending verification code to the mobile phone with mobile phone number 139731795
sendCode("139731795");
}
//Analog verification code verification
@Test
public void testSendCode(){
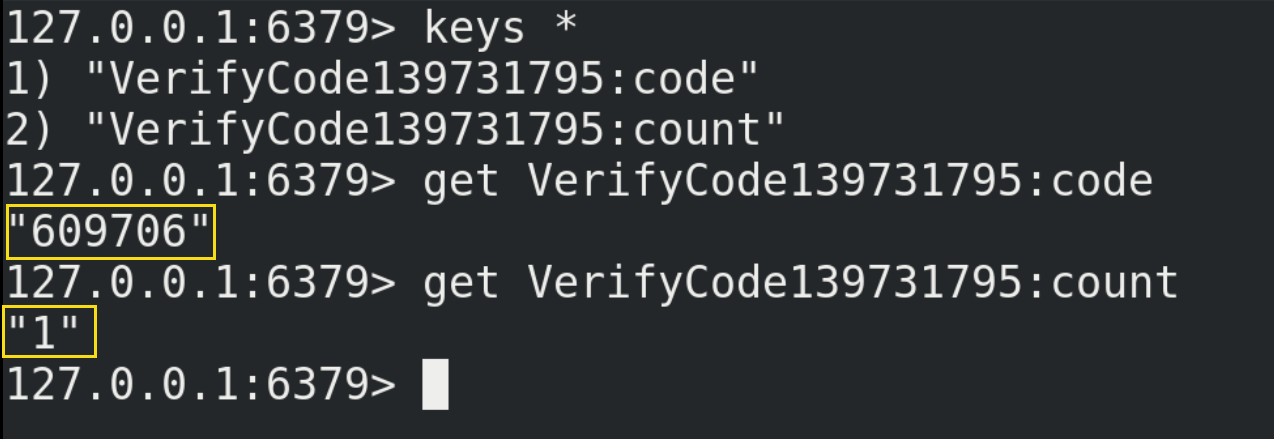
//After sending the verification code to the mobile phone with mobile number 139731795, you can query its verification code in Redis and bring it back to verifyCode() for verification
verifyCode("139731795","609706");
}
//1. Randomly generate 6-digit verification code
public String getCode(){
String code = "";
Random random = new Random();
for(int i=-0;i<6;i++){
//nextInt(int num): returns an integer of type int with a value of [0,num) at random
int rand = random.nextInt(10);
//Splice the generated numbers to the end of the code
code+=rand;
}
return code;
}
//2. Each mobile phone can only send three times a day. Put the verification code into redis and set the expiration time to 120s
public void sendCode(String phone) {
//Connect to redis
Jedis jedis = new Jedis("192.168.88.100",6379);
//Splice key
//Number of times sent by mobile phone key
String countKey = "VerifyCode"+phone+":count";
//Verification code key
String codeKey = "VerifyCode"+phone+":code";
//Each phone can only send three times a day
String count = jedis.get(countKey);
if(count == null) {
//No transmission times, first transmission
//Set the sending times to 1
jedis.setex(countKey,24*60*60,"1");
} else if(Integer.parseInt(count)<=2) {
//Sending times + 1
jedis.incr(countKey);
} else if(Integer.parseInt(count)>2) {
//Send three times, no more
System.out.println("It has been sent more than three times today");
jedis.close();
return;
}
//Send verification code to redis
String vcode = getCode();
jedis.setex(codeKey,120,vcode);
//Close Jedis
jedis.close();
}
//3. Verification code
public void verifyCode(String phone,String code) {
//Get the verification code from redis
Jedis jedis = new Jedis("192.168.88.100",6379);
//Verification code key
String codeKey = "VerifyCode"+phone+":code";
String redisCode = jedis.get(codeKey);
//judge
if(redisCode.equals(code)) {
System.out.println("success");
}else{
System.out.println("fail");
}
//Close Jedis
jedis.close();
}
}
8.Redis and SpringBoot integration
8.1. Integration steps
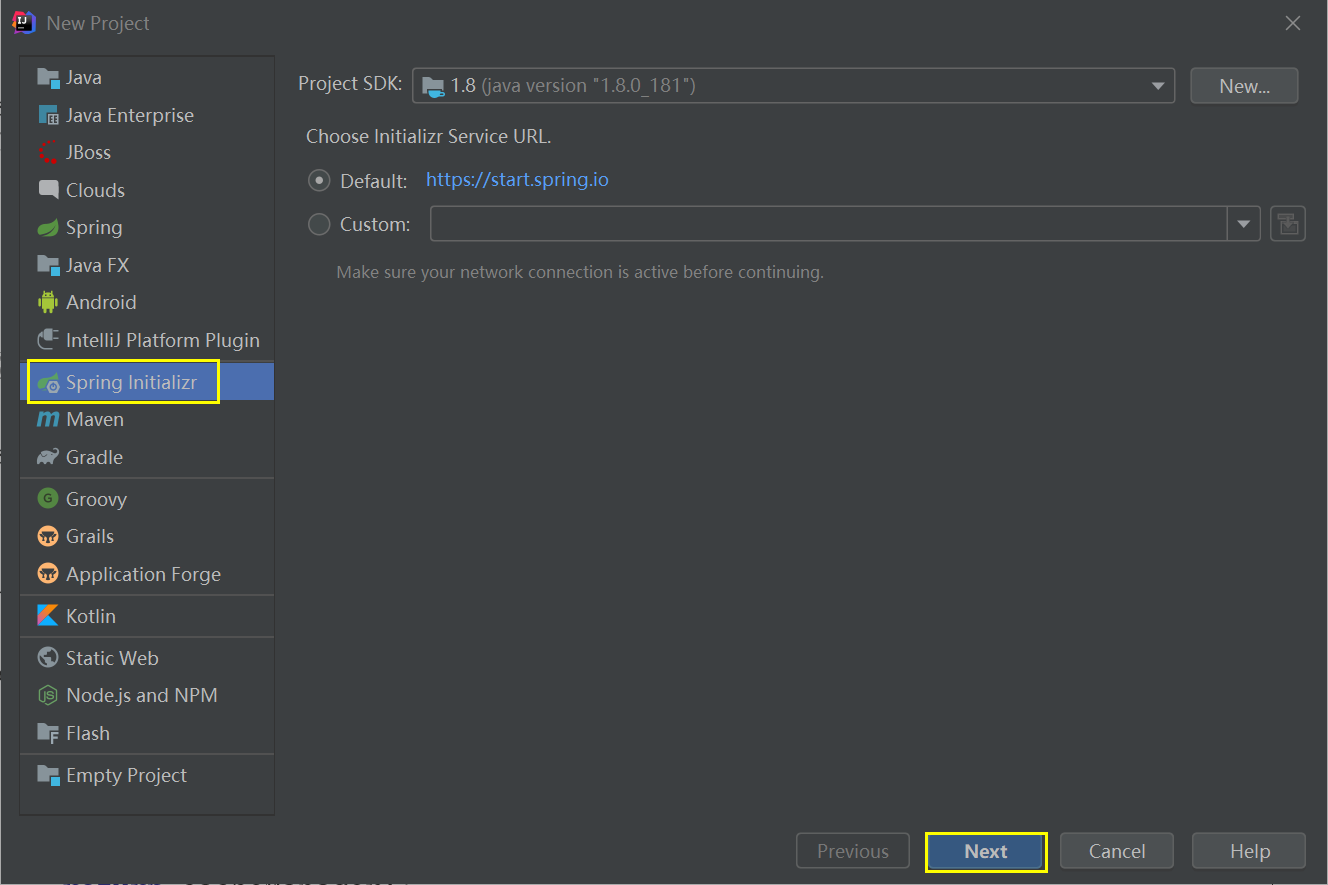
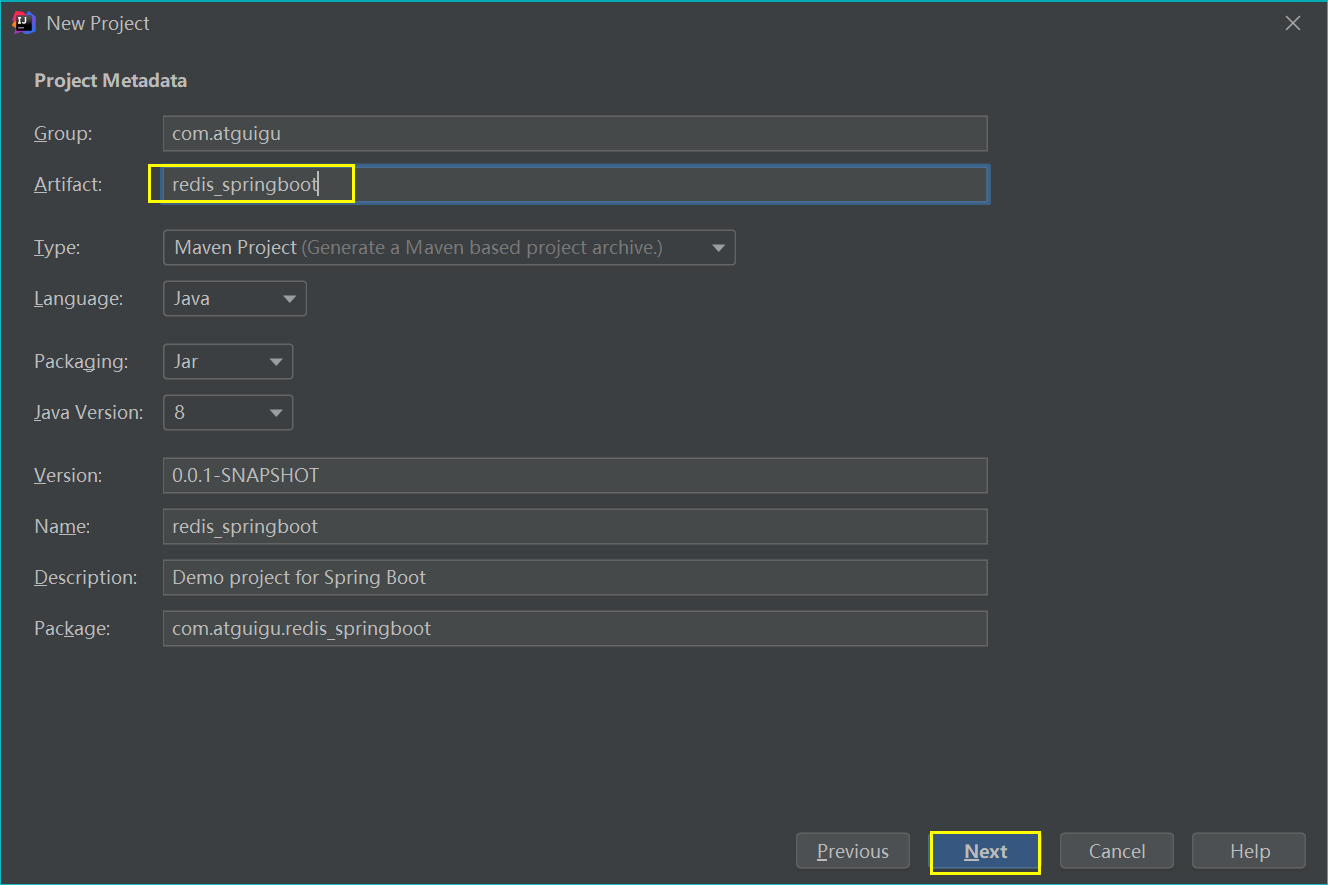
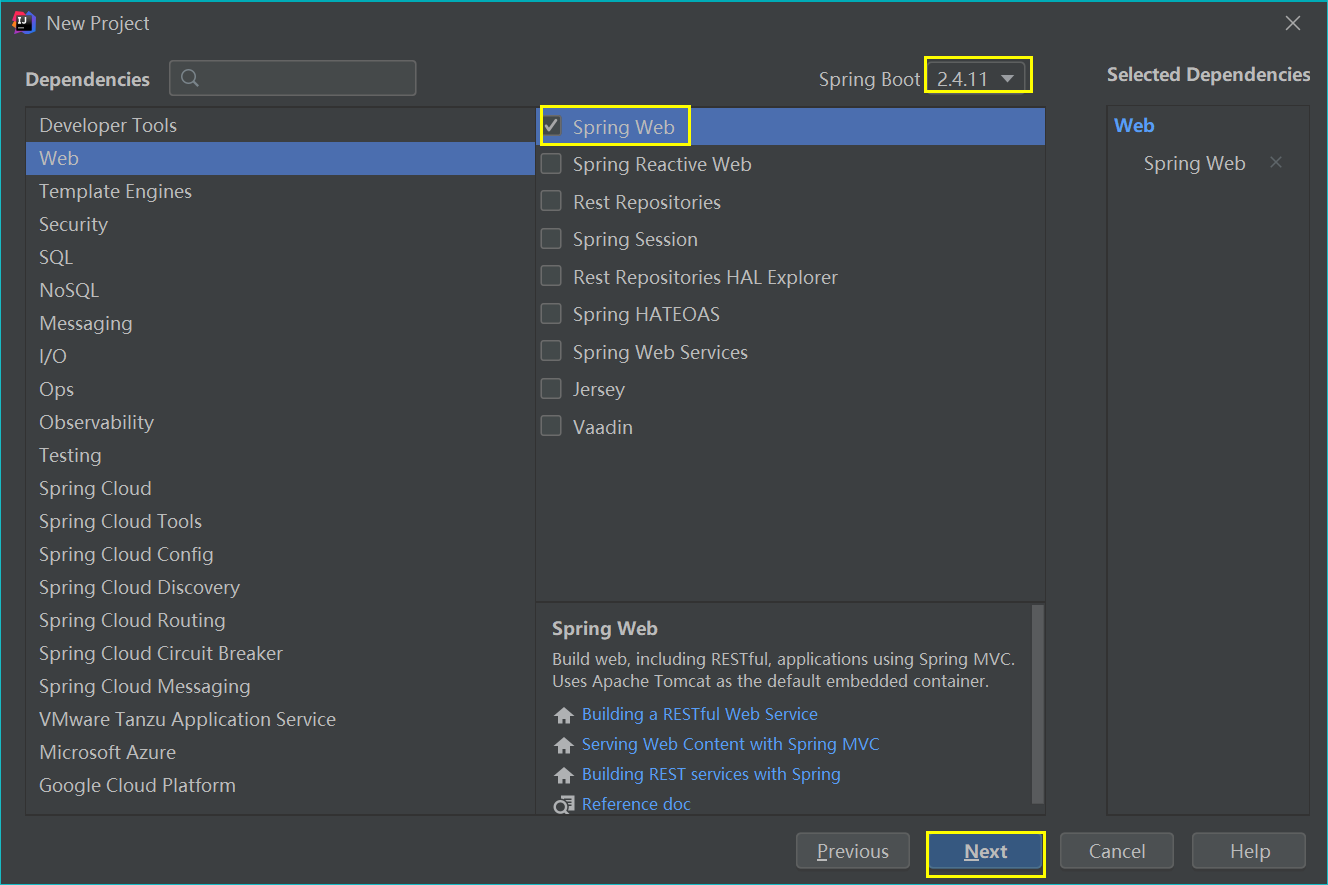
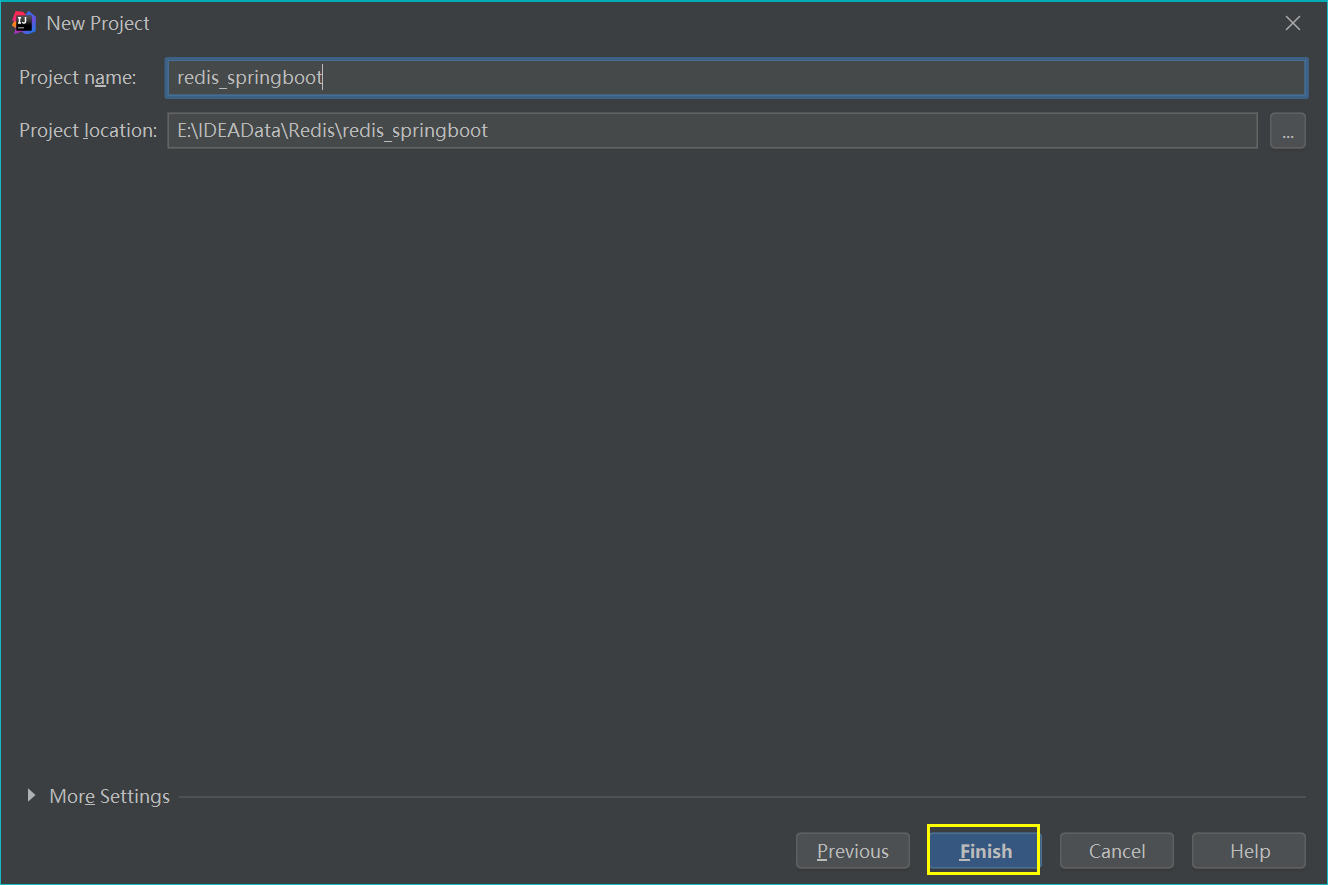
(1) Create a SpringBoot project in IDEA
(2) Import related dependencies in pom.xml
<!-- redis -->
<dependency>
    <groupId>org.springframework.boot</groupId>
    <artifactId>spring-boot-starter-data-redis</artifactId>
</dependency>
<!-- spring2.X integrate redis what is needed common-pool2-->
<dependency>
    <groupId>org.apache.commons</groupId>
    <artifactId>commons-pool2</artifactId>
    <version>2.6.0</version>
</dependency>
(3) Configure in the SpringBoot global configuration file application.properties
# Redis server address (configured according to the actual situation)
spring.redis.host=192.168.88.100
# Redis server connection port
spring.redis.port=6379
# Redis database index (0 by default)
spring.redis.database= 0
# Connection timeout (MS)
spring.redis.timeout=1800000
# Maximum number of connections in the connection pool (negative value indicates no limit)
spring.redis.lettuce.pool.max-active=20
# Maximum blocking waiting time (negative number indicates no limit)
spring.redis.lettuce.pool.max-wait=-1
# Maximum free connections in the connection pool
spring.redis.lettuce.pool.max-idle=5
# Minimum free connections in connection pool
spring.redis.lettuce.pool.min-idle=0
(4) Create a configuration class RedisConfig (the writing method is relatively fixed)
package com.atguigu.redis_springboot.config;

import com.fasterxml.jackson.annotation.JsonAutoDetect;
import com.fasterxml.jackson.annotation.PropertyAccessor;
import com.fasterxml.jackson.databind.ObjectMapper;
import org.springframework.cache.CacheManager;
import org.springframework.cache.annotation.CachingConfigurerSupport;
import org.springframework.cache.annotation.EnableCaching;
import org.springframework.context.annotation.Bean;
import org.springframework.context.annotation.Configuration;
import org.springframework.data.redis.cache.RedisCacheConfiguration;
import org.springframework.data.redis.cache.RedisCacheManager;
import org.springframework.data.redis.connection.RedisConnectionFactory;
import org.springframework.data.redis.core.RedisTemplate;
import org.springframework.data.redis.serializer.Jackson2JsonRedisSerializer;
import org.springframework.data.redis.serializer.RedisSerializationContext;
import org.springframework.data.redis.serializer.RedisSerializer;
import org.springframework.data.redis.serializer.StringRedisSerializer;

import java.time.Duration;

@EnableCaching
@Configuration
public class RedisConfig extends CachingConfigurerSupport {

    @Bean
    public RedisTemplate<String, Object> redisTemplate(RedisConnectionFactory factory) {
        RedisTemplate<String, Object> template = new RedisTemplate<>();
        RedisSerializer<String> redisSerializer = new StringRedisSerializer();
        Jackson2JsonRedisSerializer jackson2JsonRedisSerializer = new Jackson2JsonRedisSerializer(Object.class);
        ObjectMapper om = new ObjectMapper();
        om.setVisibility(PropertyAccessor.ALL, JsonAutoDetect.Visibility.ANY);
        om.enableDefaultTyping(ObjectMapper.DefaultTyping.NON_FINAL);
        jackson2JsonRedisSerializer.setObjectMapper(om);
        template.setConnectionFactory(factory);
        //key serialization method
        template.setKeySerializer(redisSerializer);
        //value serialization
        template.setValueSerializer(jackson2JsonRedisSerializer);
        //value hashmap serialization
        template.setHashValueSerializer(jackson2JsonRedisSerializer);
        return template;
    }

    @Bean
    public CacheManager cacheManager(RedisConnectionFactory factory) {
        RedisSerializer<String> redisSerializer = new StringRedisSerializer();
        Jackson2JsonRedisSerializer jackson2JsonRedisSerializer = new Jackson2JsonRedisSerializer(Object.class);
        //Solve the problem of query cache conversion exception
        ObjectMapper om = new ObjectMapper();
        om.setVisibility(PropertyAccessor.ALL, JsonAutoDetect.Visibility.ANY);
        om.enableDefaultTyping(ObjectMapper.DefaultTyping.NON_FINAL);
        jackson2JsonRedisSerializer.setObjectMapper(om);
        // Configure serialization (solve the problem of garbled code), and the expiration time is 600 seconds
        RedisCacheConfiguration config = RedisCacheConfiguration.defaultCacheConfig()
                .entryTtl(Duration.ofSeconds(600))
                .serializeKeysWith(RedisSerializationContext.SerializationPair.fromSerializer(redisSerializer))
                .serializeValuesWith(RedisSerializationContext.SerializationPair.fromSerializer(jackson2JsonRedisSerializer))
                .disableCachingNullValues();
        RedisCacheManager cacheManager = RedisCacheManager.builder(factory)
                .cacheDefaults(config)
                .build();
        return cacheManager;
    }
}
8.2. Testing
(1) Write the controller method for testing
package com.atguigu.redis_springboot.controller;

import org.springframework.beans.factory.annotation.Autowired;
import org.springframework.data.redis.core.RedisTemplate;
import org.springframework.web.bind.annotation.GetMapping;
import org.springframework.web.bind.annotation.RequestMapping;
import org.springframework.web.bind.annotation.RestController;

@RestController
@RequestMapping("/redisTest")
public class RedisController {

    @Autowired
    private RedisTemplate redisTemplate;

    @GetMapping()
    public String testRedis(){
        //Add key value pairs to Redis
        redisTemplate.opsForValue().set("name","lucy");
        String name = (String)redisTemplate.opsForValue().get("name");
        return name;
    }
}
(2) Start SpringBoot in the SpringBoot startup class, and then enter it in the browser address bar http://localhost:8080/redisTest The test results are as follows:

9.Redis transaction
9.1. Introduction to redis transaction
(1) Redis transaction definition
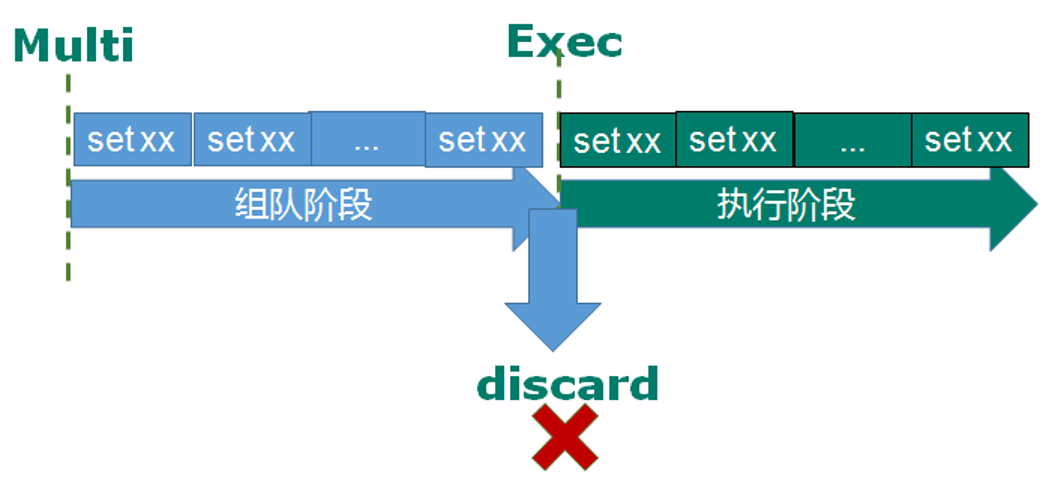
Redis transaction is a separate isolation operation: all commands in the transaction will be serialized and executed sequentially. During the execution of the transaction, it will not be interrupted by command requests sent by other clients. The main function of redis transaction is to concatenate multiple commands to prevent other commands from jumping in the queue.
(2) Three features of Redis transaction
① Separate isolation operation: all commands in the transaction will be serialized and executed sequentially. During the execution of the transaction, it will not be interrupted by command requests sent by other clients.
② There is no concept of isolation level: the commands in the queue will not be actually executed until they are committed, because any instructions will not be actually executed before the transaction is committed.
③ Atomicity is not guaranteed: if a command fails to execute in a transaction, the subsequent commands will still be executed without rollback.
9.2.Redis transaction related commands
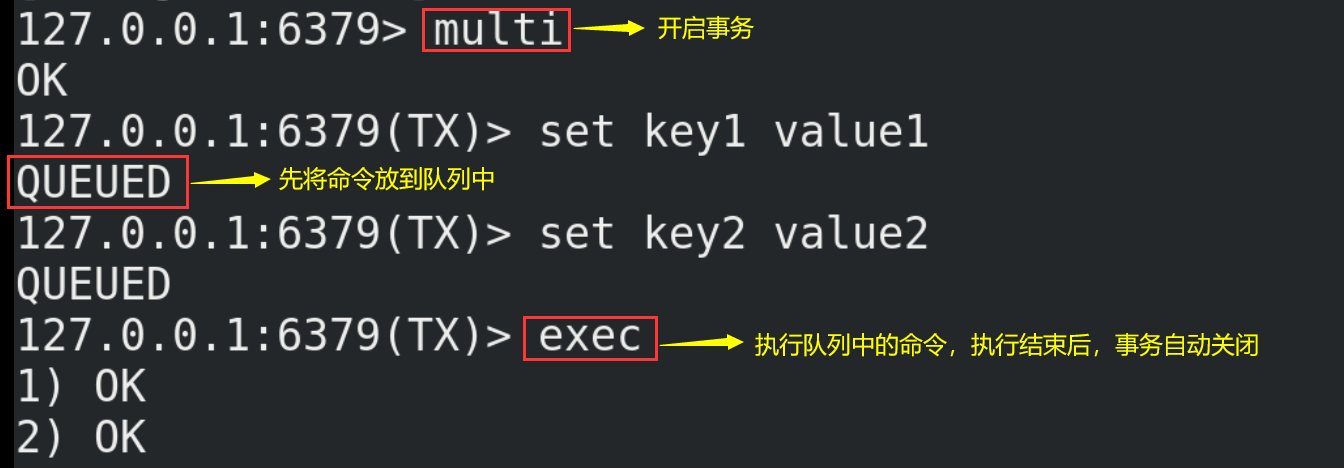
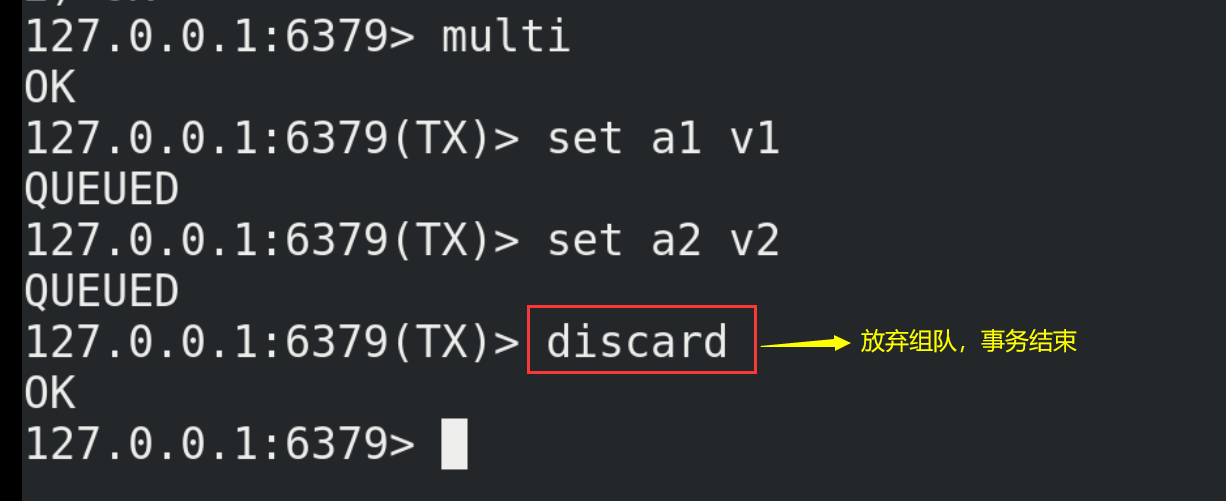
(1) Redis transaction related commands include multi, exec and discard.
(2) Starting from entering the Multi command, the entered commands will enter the command queue in turn, but will not be executed until entering Exec. Redis will execute the commands in the previous command queue in turn. The process of forming a queue can be abandoned by discard ing.
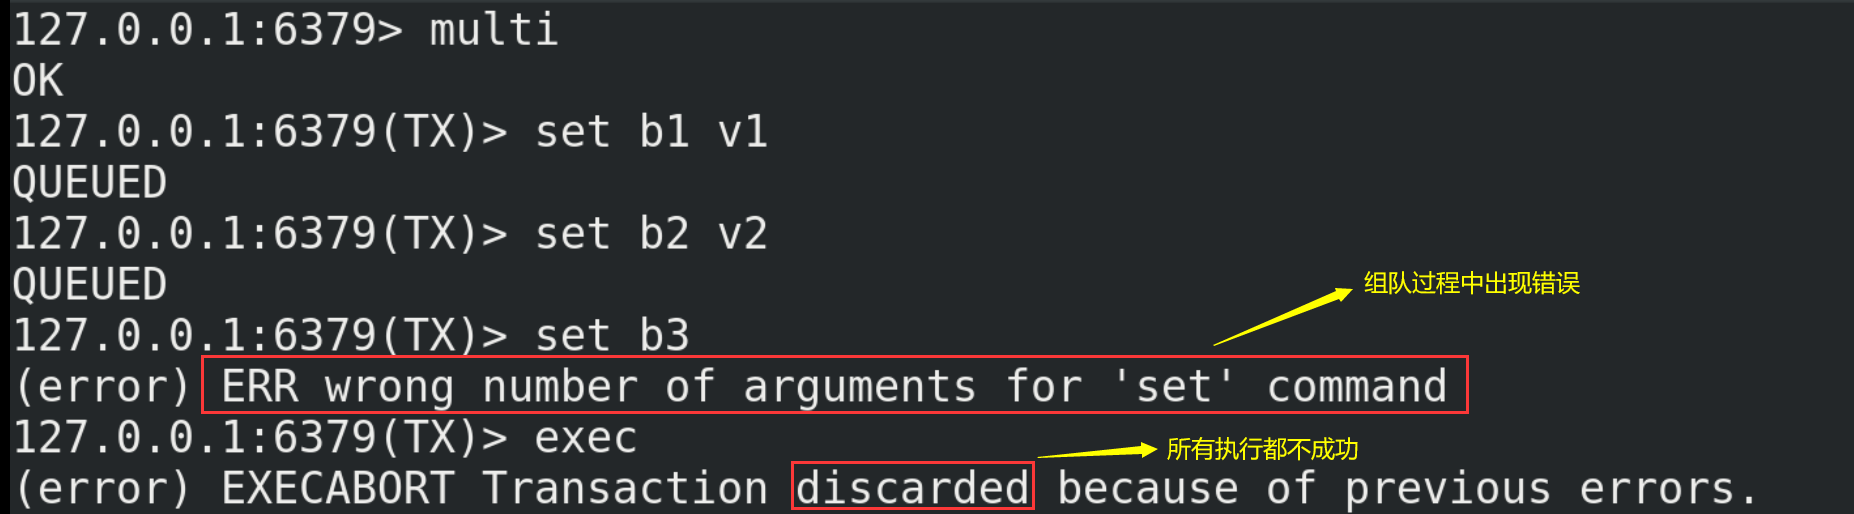
(3) Let's take a look at the case
9.3. Error handling of transactions
The error handling of Redis transactions is generally divided into the following two cases:
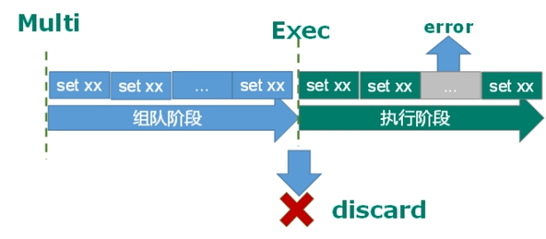
(1) If a command in the queue has a report error, all queues in the whole queue will be cancelled when it is executed.

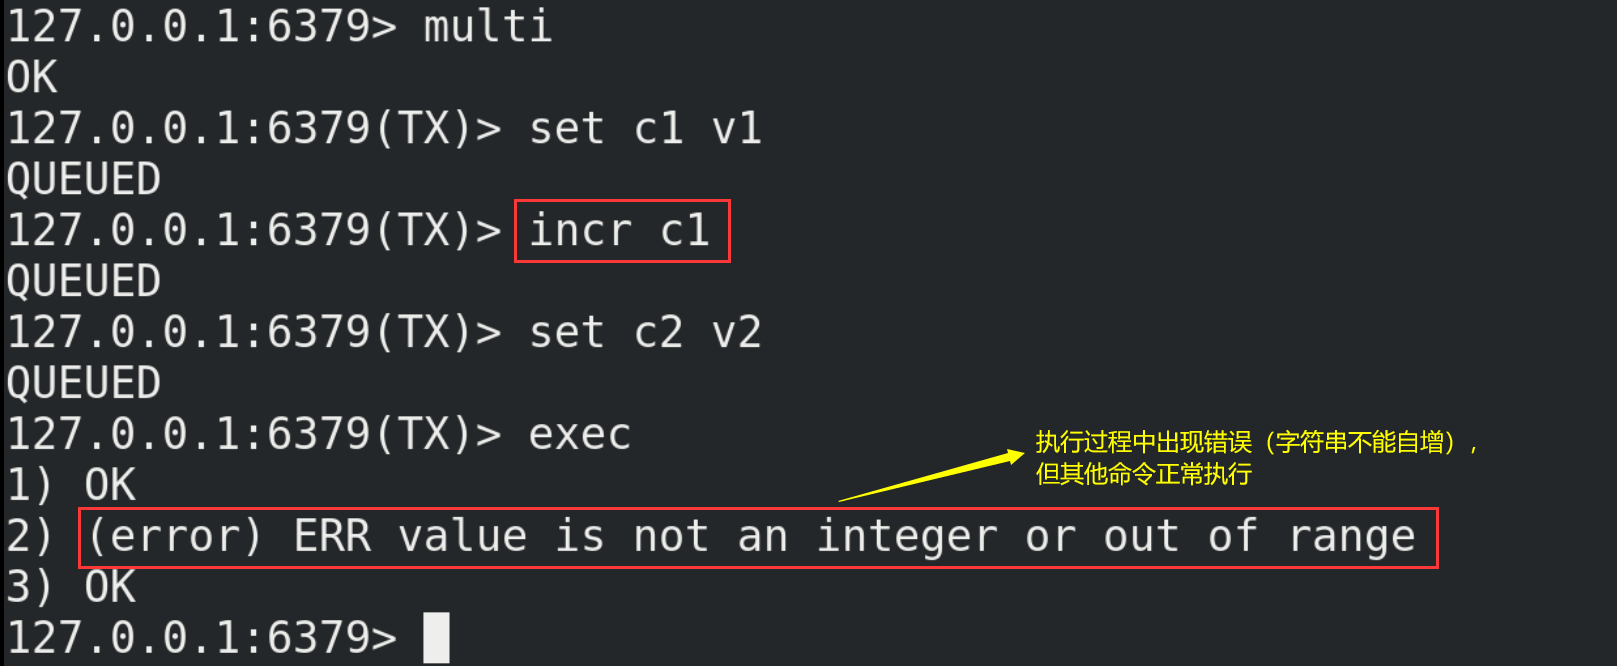
(2) If an error is reported in a command in the execution phase, only the error reported command will not be executed, while other commands will be executed and will not be rolled back.
9.4. Conflict of affairs
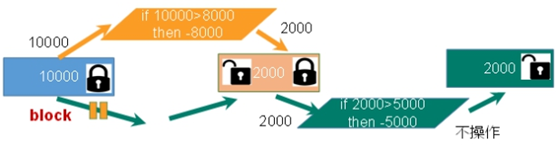
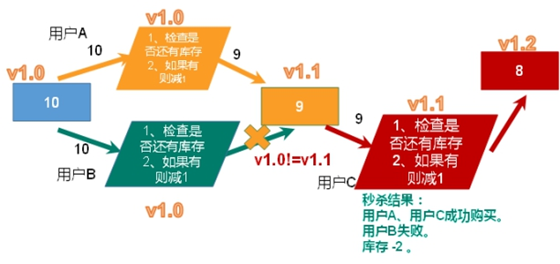
9.4.1. Examples
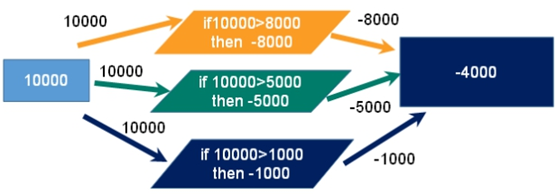
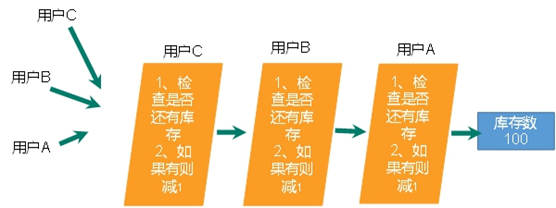
Scenario: two people have your account (10000 yuan in the account), three of you go to the double 11 shopping at the same time, and each of you is prepared to spend 8000 yuan, 5000 yuan and 1000 yuan respectively. If the process is not controlled, the following situations will occur (assuming):
9.4.2. Lock
Pessimistic Lock As the name suggests, it is very pessimistic. Every time you go to get the data, you think others will modify it, so you lock it every time you get the data, so that others will block the data until they get the lock. Many such locking mechanisms are used in traditional relational databases, such as row lock, table lock, read lock, write lock, etc. they are locked before operation Lock.
9.4.3. Optimistic lock
(1) Optimistic Lock As the name suggests, it is optimistic. Every time you go to get the data, you think others will not modify it, so you won't lock it. However, when updating, you will judge whether others have updated the data during this period. You can use mechanisms such as version number. Optimistic locking is suitable for multi read applications, which can improve throughput. Redis uses this check and set machine The system implements the of transactions.
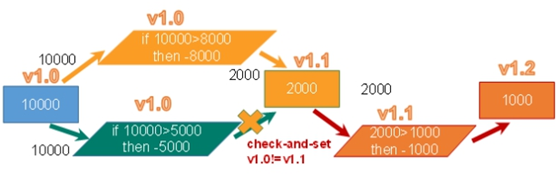
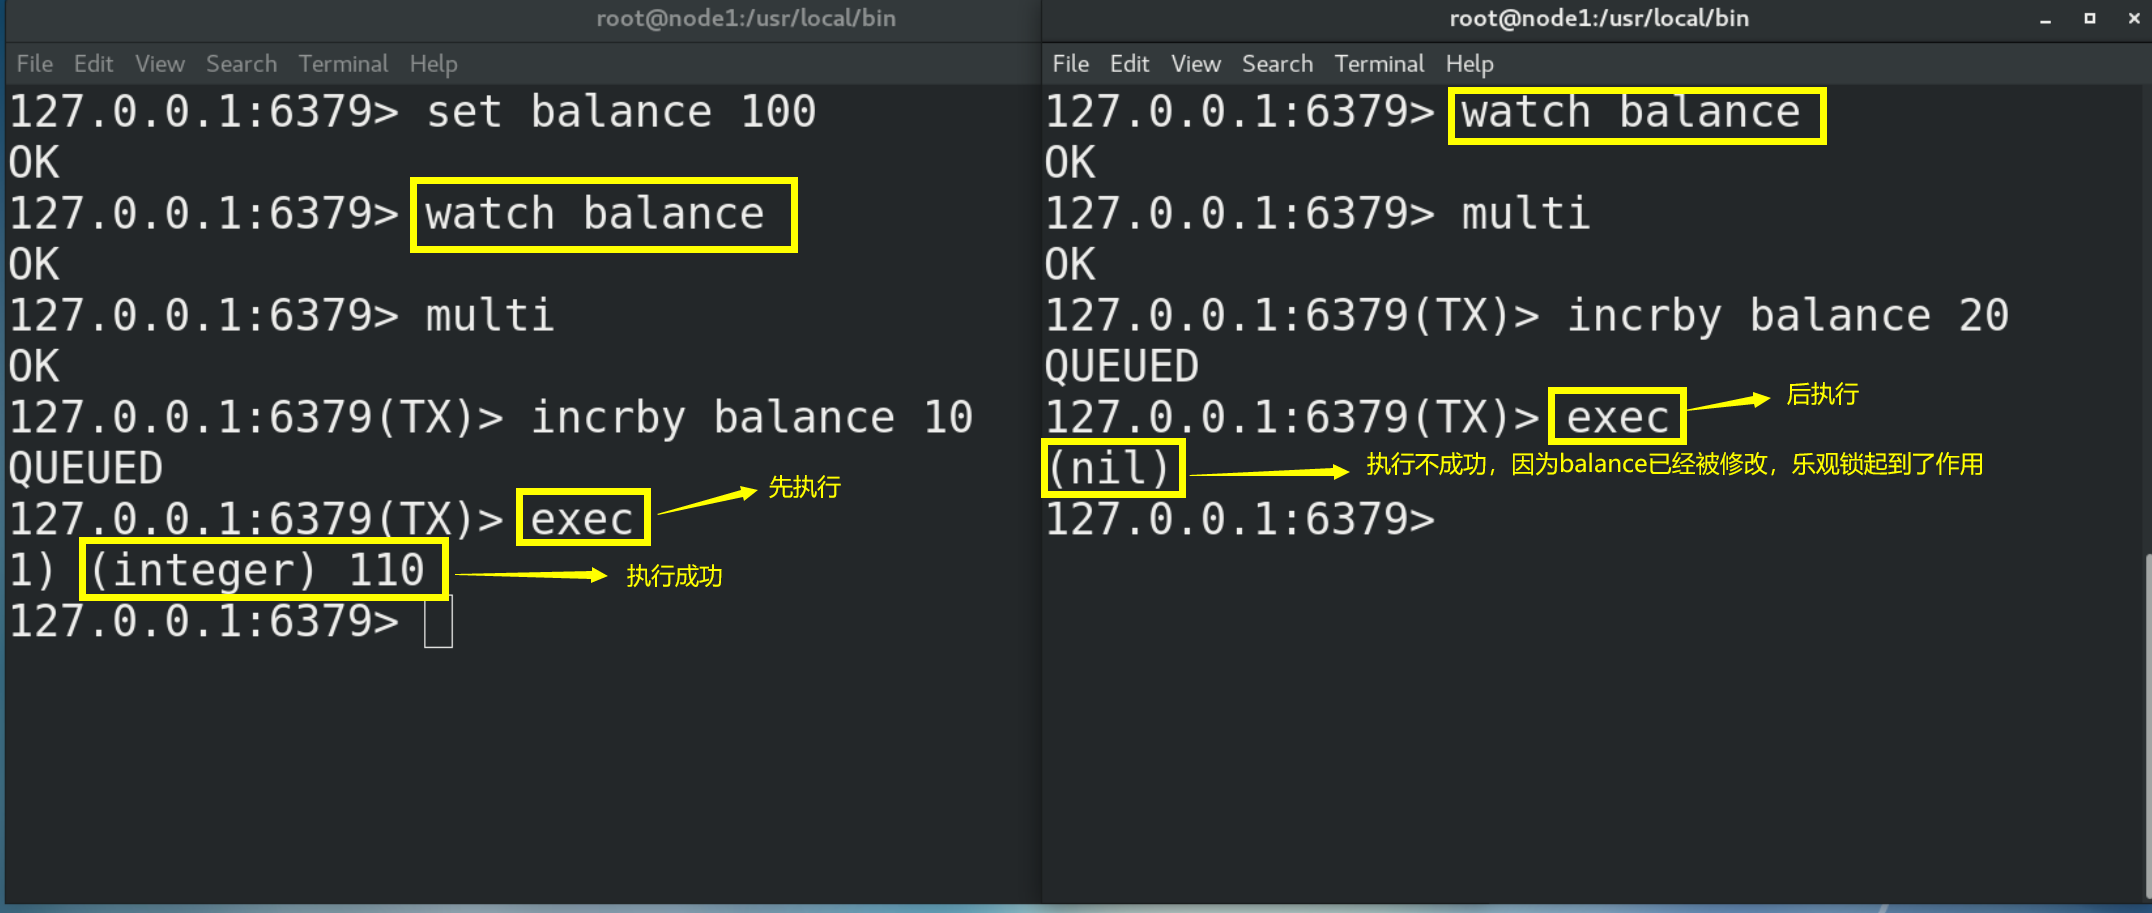
(2) Here is an example of optimistic locking
# Monitor one or more keys. If the monitored key is modified by other commands before the transaction is executed, the transaction will be interrupted
watch key [key...]
# Cancel the monitoring of all key s by the watch command. If the exec command or discard command is executed first after the watch command is executed, there is no need to execute the unwatch command
unwatch
10.Redis transaction - second kill case
10.1. Simple second kill
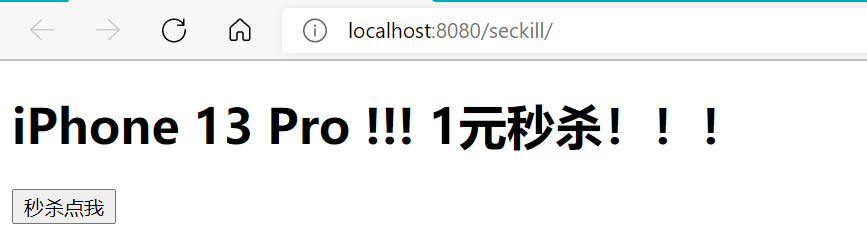
Front end second kill page
<%@ page language="java" contentType="text/html; charset=UTF-8" pageEncoding="UTF-8"%>
<!DOCTYPE html PUBLIC "-//W3C//DTD HTML 4.01 Transitional//EN" "http://www.w3.org/TR/html4/loose.dtd">
<html>
	<head>
		<meta http-equiv="Content-Type" content="text/html; charset=UTF-8">
		<title>Insert title here</title>
	</head>
<body>
	<h1>iPhone 13 Pro !!!  1 Yuan second kill!!!</h1>

	<form id="msform" action="${pageContext.request.contextPath}/doseckill" enctype="application/x-www-form-urlencoded">
		<input type="hidden" id="prodid" name="prodid" value="0101">
		<input type="button"  id="miaosha_btn" name="seckill_btn" value="Kill me"/>
	</form>

</body>
	<script  type="text/javascript" src="${pageContext.request.contextPath}/script/jquery/jquery-3.1.0.js"></script>
	<script  type="text/javascript">
	$(function(){
		$("#miaosha_btn").click(function(){
			var url=$("#msform").attr("action");
			 $.post(url,$("#msform").serialize(),function(data){
				if(data=="false"){
					alert("It's all gone" );
					$("#miaosha_btn").attr("disabled",true);
				}
			} );
		})
	})
	</script>
</html>
Back end core code
package com.atguigu;
import java.io.IOException;
import redis.clients.jedis.Jedis;
public class SecKill_redis {
//Second kill process
public static boolean doSecKill(String uid,String prodid) throws IOException {
//1.uid and prodid non null judgment
if(uid == null || prodid == null) {
return false;
}
//2. Connect to redis
Jedis jedis = new Jedis("192.168.88.100",6379);
//3. Splicing key
//3.1 inventory key
String kcKey = "sk:"+prodid+":qt";
//3.2 second kill successful user key
String userKey = "sk:"+prodid+":user";
//4. Obtain the inventory. If the inventory is null, the second kill has not started yet
String kc = jedis.get(kcKey);
if(kc == null) {
System.out.println("The second kill hasn't started yet, please wait");
jedis.close();
return false;
}
// 5. Judge whether the user repeats the second kill operation
if(jedis.sismember(userKey, uid)) {
System.out.println("The second kill has been successful. You can't repeat the second kill");
jedis.close();
return false;
}
//6. Judge if the commodity quantity and inventory quantity are less than 1, the second kill is over
if(Integer.parseInt(kc)<=0) {
System.out.println("The second kill is over");
jedis.close();
return false;
}
//7. Second kill process
//7.1 inventory-1
jedis.decr(kcKey);
//7.2 add successful users to the list
jedis.sadd(userKey,uid);
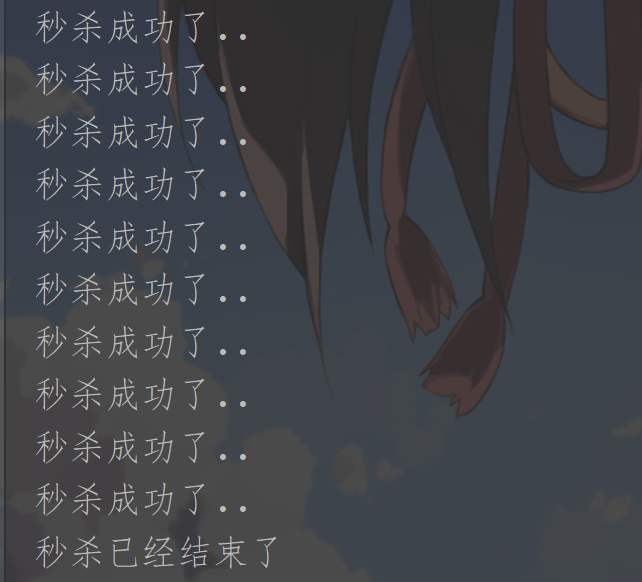
System.out.println("The second kill succeeded..");
jedis.close();
return true;
}
}
Set the inventory to 10 in Redis
set sk:0101:qt 10
The test results are as follows:

10.2. Second kill concurrent simulation
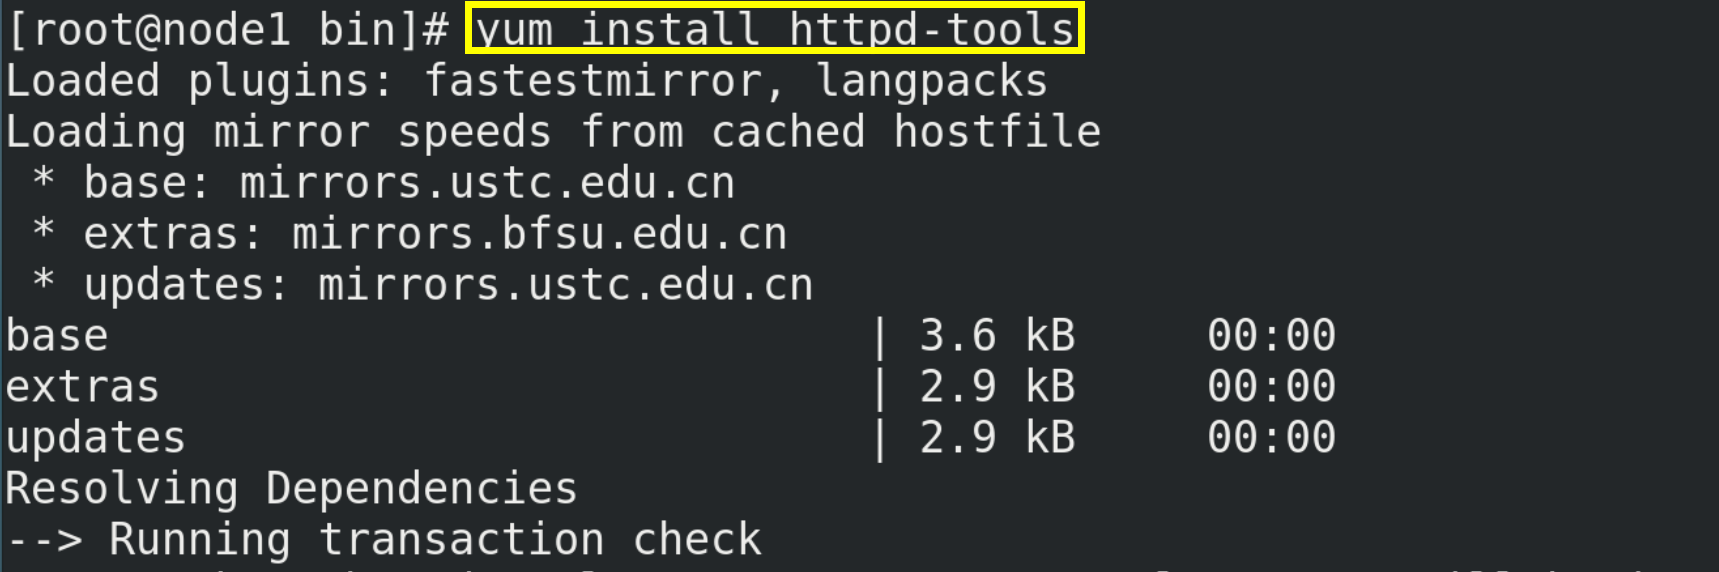
10.2.1. Installation tools ab
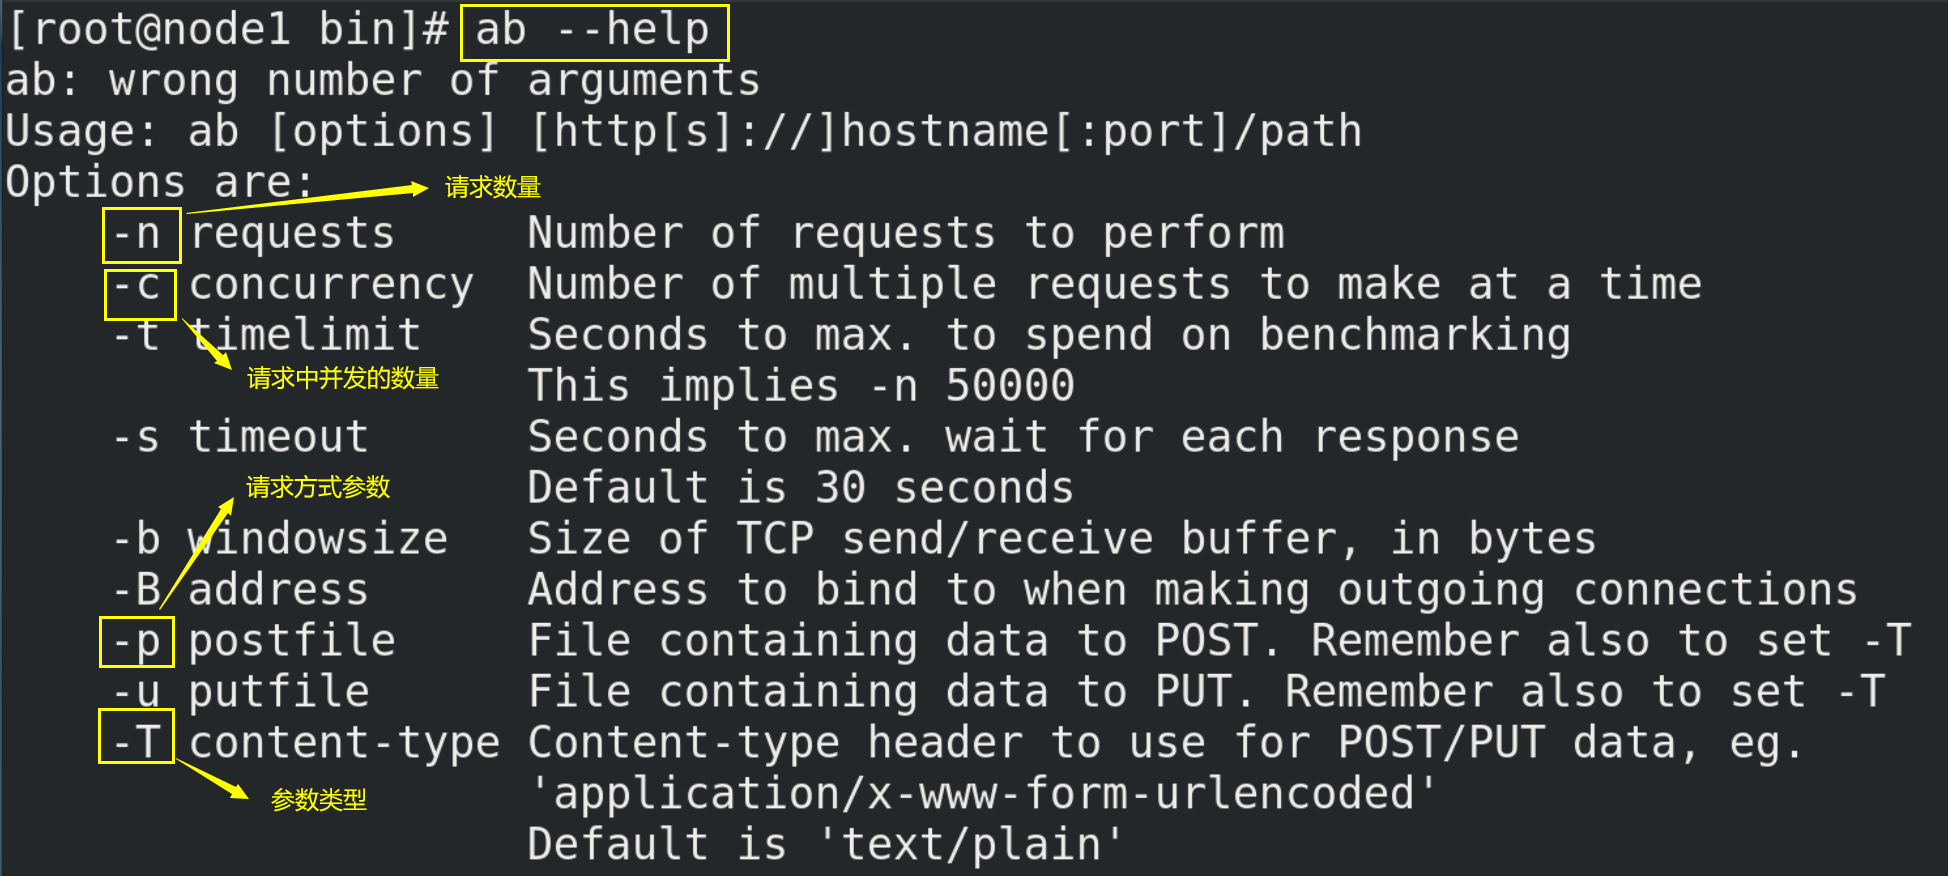
# Installation tool ab
yum install httpd-tools
# View help manual
ab --help
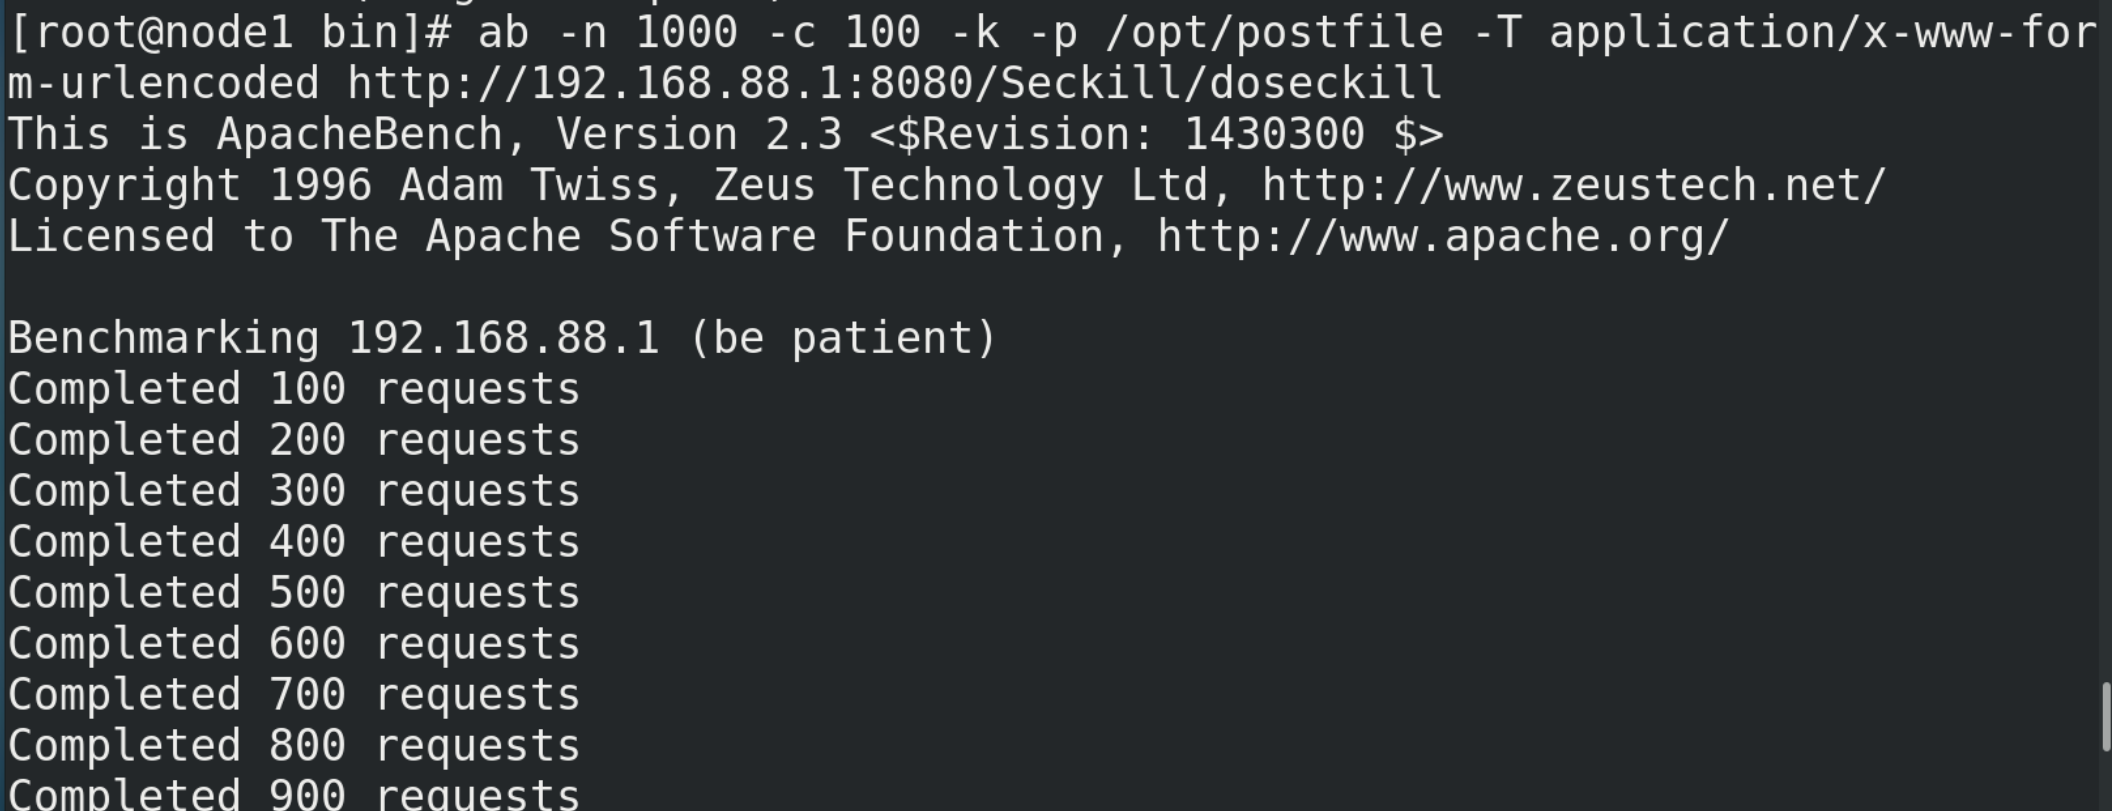
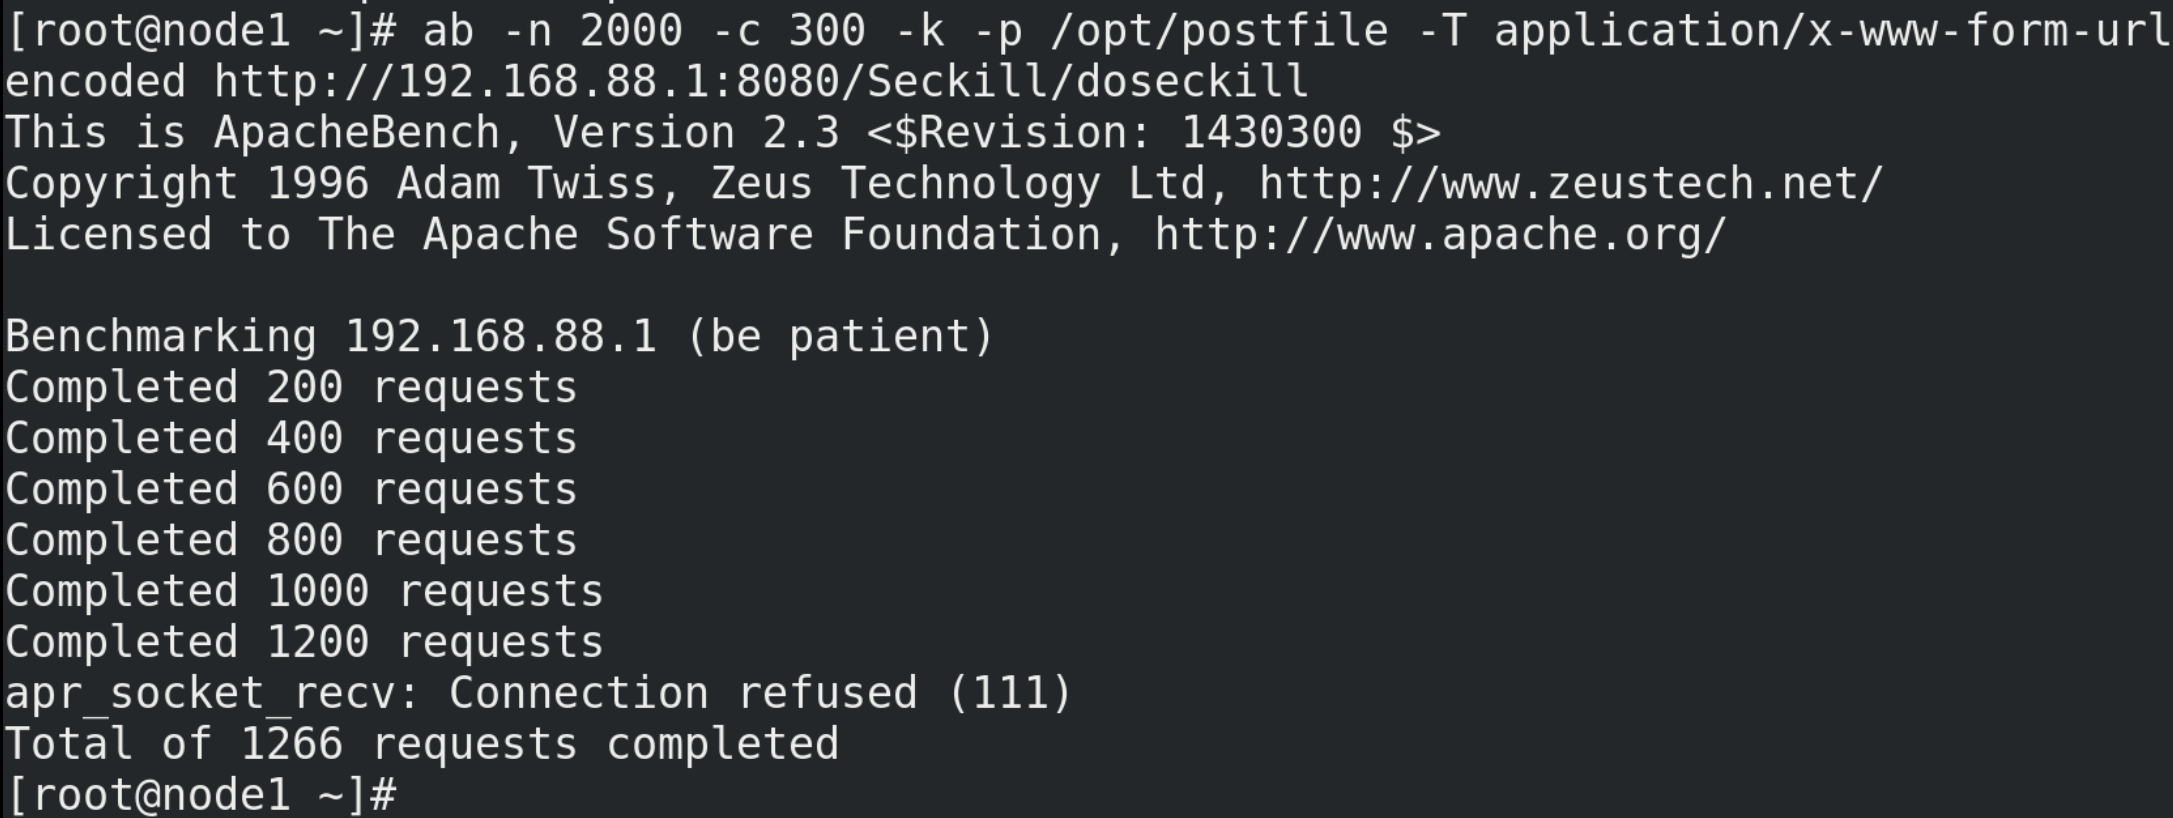
10.2.2. Test with ab
# Test command (you need to prepare the postfile file in the / opt directory in advance, with the content of "prodid = 0101 &", simulate the form submission parameters, and end with the symbol &)
ab -n 1000 -c 100 -p ~/opt/postfile -T application/x-www-form-urlencoded http://192.168.88.1:8080/Seckill/doseckill
There are at least two errors in this concurrent simulation:
It should be noted that connection failure or timeout may occur when using ab tool for simulation, mainly including the following points:
① The firewall function in windows is on, which may intercept Linux requests;
② The number of simulated requests is too large, resulting in timeout (configuring Jedis connection pool can solve this problem to a certain extent);
10.2.3. Configure Jedis connection pool
(1) The code of the connection pool tool class is as follows:
package com.atguigu;

import redis.clients.jedis.Jedis;
import redis.clients.jedis.JedisPool;
import redis.clients.jedis.JedisPoolConfig;

//Save the consumption caused by each connection to the redis service, and reuse the connected instances
public class JedisPoolUtil {
	private static volatile JedisPool jedisPool = null;

	private JedisPoolUtil() {
	}

	//Using singleton mode
	public static JedisPool getJedisPoolInstance() {
		if (null == jedisPool) {
			synchronized (JedisPoolUtil.class) {
				if (null == jedisPool) {
					JedisPoolConfig poolConfig = new JedisPoolConfig();
					poolConfig.setMaxTotal(200);
					poolConfig.setMaxIdle(32);
					poolConfig.setMaxWaitMillis(100*1000);
					poolConfig.setBlockWhenExhausted(true);
					poolConfig.setTestOnBorrow(true);  // ping  PONG

					jedisPool = new JedisPool(poolConfig, "192.168.88.100", 6379, 60000 );
				}
			}
		}
		return jedisPool;
	}

	public static void release(JedisPool jedisPool, Jedis jedis) {
		if (null != jedis) {
			jedisPool.returnResource(jedis);
		}
	}
}
The connection pool parameters are as follows:
| MaxTotal | Control how many jedis instances can be allocated to a pool, and obtain them through pool.getResource(); If the value is - 1, it means no restriction; If the pool has allocated MaxTotal jedis instances, the status of the pool is exhausted |
|---|---|
| maxIdle | Controls the maximum number of jedis instances in idle status in a pool |
| MaxWaitMillis | Indicates the maximum number of milliseconds to wait when a jedis instance is browsed. If the waiting time exceeds, the JedisConnectionException will be thrown directly |
| testOnBorrow | Whether to check the connection availability (ping()) when obtaining a jedis instance; If true, all the jedis instances are available |
(2) The code for modifying the backend connection to Redis is as follows:
//2. Connect to redis
//Jedis jedis = new Jedis("192.168.88.100",6379);
//Get jedis object through connection pool
JedisPool jedisPoolInstance = JedisPoolUtil.getJedisPoolInstance();
Jedis jedis = jedisPoolInstance.getResource();
10.3. Solve the oversold problem
(1) Here we can consider using the optimistic lock mentioned above to solve the oversold problem.
The code after using optimistic lock is as follows:
package com.atguigu;

import java.io.IOException;
import java.util.HashSet;
import java.util.List;
import java.util.Set;

import org.apache.commons.pool2.impl.GenericObjectPoolConfig;
import org.slf4j.LoggerFactory;

import ch.qos.logback.core.rolling.helper.IntegerTokenConverter;
import redis.clients.jedis.HostAndPort;
import redis.clients.jedis.Jedis;
import redis.clients.jedis.JedisCluster;
import redis.clients.jedis.JedisPool;
import redis.clients.jedis.JedisPoolConfig;
import redis.clients.jedis.ShardedJedisPool;
import redis.clients.jedis.Transaction;

public class SecKill_redis {

	public static void main(String[] args) {
		Jedis jedis =new Jedis("192.168.44.168",6379);
		System.out.println(jedis.ping());
		jedis.close();
	}

	//Second kill process
	public static boolean doSecKill(String uid,String prodid) throws IOException {
		//1.uid and prodid non null judgment
		if(uid == null || prodid == null) {
			return false;
		}

		//2. Connect to redis
		//Jedis jedis = new Jedis("192.168.44.168",6379);
		//Get jedis object through connection pool
		JedisPool jedisPoolInstance = JedisPoolUtil.getJedisPoolInstance();
		Jedis jedis = jedisPoolInstance.getResource();

		//3. Splicing key
		//3.1. Inventory key
		String kcKey = "sk:"+prodid+":qt";
		//3.2. Successful second kill user key
		String userKey = "sk:"+prodid+":user";

		//Monitor inventory
		jedis.watch(kcKey);

		//4. Obtain the inventory. If the inventory is null, the second kill has not started yet
		String kc = jedis.get(kcKey);
		if(kc == null) {
			System.out.println("The second kill hasn't started yet, please wait");
			jedis.close();
			return false;
		}

		//5. Judge whether the user repeats the second kill operation
		if(jedis.sismember(userKey, uid)) {
			System.out.println("The second kill has been successful. You can't repeat the second kill");
			jedis.close();
			return false;
		}

		//6. Judge if the commodity quantity and inventory quantity are less than 1, the second kill is over
		if(Integer.parseInt(kc)<=0) {
			System.out.println("The second kill is over");
			jedis.close();
			return false;
		}

		//7. Second kill process
		//Use transaction
		Transaction multi = jedis.multi();

		//Team operation
		multi.decr(kcKey);
		multi.sadd(userKey,uid);

		//implement
		List<Object> results = multi.exec();

		if(results == null || results.size()==0) {
			System.out.println("The second kill failed....");
			jedis.close();
			return false;
		}

		//7.1 inventory-1
		//jedis.decr(kcKey);
		//7.2 add successful users to the list
		//jedis.sadd(userKey,uid);

		System.out.println("The second kill succeeded..");
		jedis.close();
		return true;
	}
}
10.4. Solve inventory remaining problems
10.4.1. Problem demonstration
(1) The previous inventory was set to 10. Now the inventory is set to 500.
flushdb
set sk:0101:qt 500
(2) Test again
# Test command
ab -n 2000 -c 300 -p ~/opt/postfile -T application/x-www-form-urlencoded http://192.168.88.1:8080/Seckill/doseckill
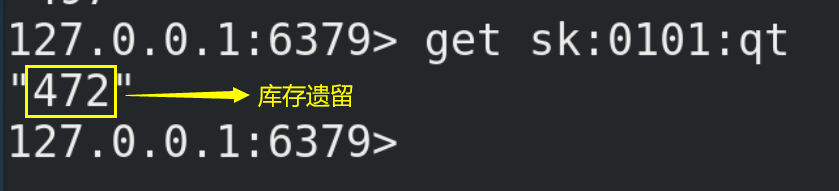
(3) The inventory legacy problem is caused by optimistic lock because
10.4.2. Problem solving
(1) Lua script
Lua is a lightweight and compact scripting language, which is written in standard C language and open in the form of source code. Its design purpose is to be embedded in the application, so as to provide flexible expansion and customization functions for the application.
(2) Advantages of Lua script in Redis:
① Write complex or multi-step redis operations into a script and submit them to redis for execution at one time, so as to reduce the number of repeated connections to redis and improve performance.
② LUA scripts are similar to redis transactions. They have certain atomicity and will not be cut in line by other commands. They can complete some redis transactional operations.
③ Use Lua script to eliminate users and solve the oversold problem.
④ After Redis version 2.6, the contention problem is solved through Lua script. In fact, Redis uses its single thread feature to solve the multi task concurrency problem by means of task queue.
(3) Embed Lua's corresponding script into java code:
package com.atguigu;

import java.io.IOException;
import java.util.HashSet;
import java.util.List;
import java.util.Set;

import org.apache.commons.pool2.impl.GenericObjectPoolConfig;
import org.slf4j.LoggerFactory;

import ch.qos.logback.core.joran.conditional.ElseAction;
import redis.clients.jedis.HostAndPort;
import redis.clients.jedis.Jedis;
import redis.clients.jedis.JedisCluster;
import redis.clients.jedis.JedisPool;
import redis.clients.jedis.JedisPoolConfig;
import redis.clients.jedis.ShardedJedisPool;
import redis.clients.jedis.Transaction;

public class SecKill_redisByScript {

	private static final  org.slf4j.Logger logger =LoggerFactory.getLogger(SecKill_redisByScript.class) ;

	public static void main(String[] args) {
		JedisPool jedispool =  JedisPoolUtil.getJedisPoolInstance();

		Jedis jedis=jedispool.getResource();
		System.out.println(jedis.ping());

		Set<HostAndPort> set=new HashSet<HostAndPort>();

	//	doSecKill("201","sk:0101");
	}

	static String secKillScript ="local userid=KEYS[1];\r\n" +
			"local prodid=KEYS[2];\r\n" +
			"local qtkey='sk:'..prodid..\":qt\";\r\n" +
			"local usersKey='sk:'..prodid..\":usr\";\r\n" +
			"local userExists=redis.call(\"sismember\",usersKey,userid);\r\n" +
			"if tonumber(userExists)==1 then \r\n" +
			"   return 2;\r\n" +
			"end\r\n" +
			"local num= redis.call(\"get\" ,qtkey);\r\n" +
			"if tonumber(num)<=0 then \r\n" +
			"   return 0;\r\n" +
			"else \r\n" +
			"   redis.call(\"decr\",qtkey);\r\n" +
			"   redis.call(\"sadd\",usersKey,userid);\r\n" +
			"end\r\n" +
			"return 1" ;

	static String secKillScript2 =
			"local userExists=redis.call(\"sismember\",\"{sk}:0101:usr\",userid);\r\n" +
			" return 1";

	public static boolean doSecKill(String uid,String prodid) throws IOException {

		JedisPool jedispool =  JedisPoolUtil.getJedisPoolInstance();
		Jedis jedis=jedispool.getResource();

		 //String sha1=  .secKillScript;
		String sha1=  jedis.scriptLoad(secKillScript);
		Object result= jedis.evalsha(sha1, 2, uid,prodid);

		  String reString=String.valueOf(result);
		if ("0".equals( reString )  ) {
			System.err.println("Empty!!");
		}else if("1".equals( reString )  )  {
			System.out.println("Rush purchase succeeded!!!!");
		}else if("2".equals( reString )  )  {
			System.err.println("The user has robbed!!");
		}else{
			System.err.println("Panic buying exception!!");
		}
		jedis.close();
		return true;
	}
}
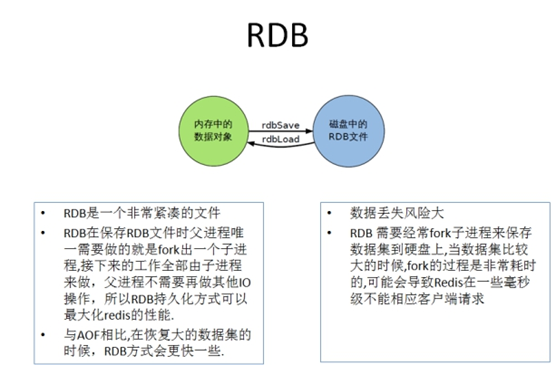
11.Redis persistence - RDB
11.1.RDB introduction
(1) RDB (Redis DataBase), that is, write the data set Snapshot in memory to disk within the specified time interval, that is, the jargon Snapshot. When it is restored, it reads the Snapshot file directly into memory. For other details, please refer to the Chinese official website: http://www.redis.cn/topics/persistence.html.
(2) Redis will separately create (fork) a sub process for persistence. It will first write the data to a temporary file. After the persistence process is completed, redis will use this temporary file to replace the last persistent file. In the whole process, the main process does not perform any I/O operations, which ensures high performance. If large-scale data recovery is required and the integrity of data recovery is not very sensitive, RDB method is more efficient than AOF method. The disadvantage of RDB is that the data after the last persistence may be lost.
(3) The advantages of RDB are as follows:
① Suitable for large-scale data recovery
② The requirements for data integrity and consistency are not high, so it is more suitable for use
③ Save disk space
④ Fast recovery
(4) The disadvantages of RDB are as follows:
① During fork(), a copy of the data in memory is cloned, and about twice the expansion needs to be considered
② Although Redis uses the copy on write technology in fork(), it still consumes performance when the data is huge.
③ A backup is performed at a certain interval during the backup cycle, so if Redis fails to work abnormally, all modifications after the last snapshot will be lost.
(5) RDB is enabled by default. The command to dynamically stop RDB is:
# A null value is given after save, which means that the save policy is disabled
redis-cli config set save ""
(6) Small summary
11.2.RDB persistence process
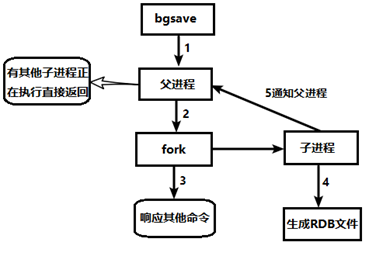
11.3.fork()
(1) The function of fork() is to copy a process that is the same as the current process. The values of all data (variables, environment variables, program counters, etc.) of the new process are consistent with those of the original process, but it is a brand-new process and serves as a child process of the original process.
(2) In Linux programs, fork() will produce a child process exactly the same as the parent process, but the child process will often exec system calls. For efficiency reasons, Linux has introduced "copy on write technology".
(3) In general, the parent process and the child process share the same section of physical memory. Only when the contents of each section of the process space change, the contents of the parent process will be copied to the child process.
11.4.RDB related configuration
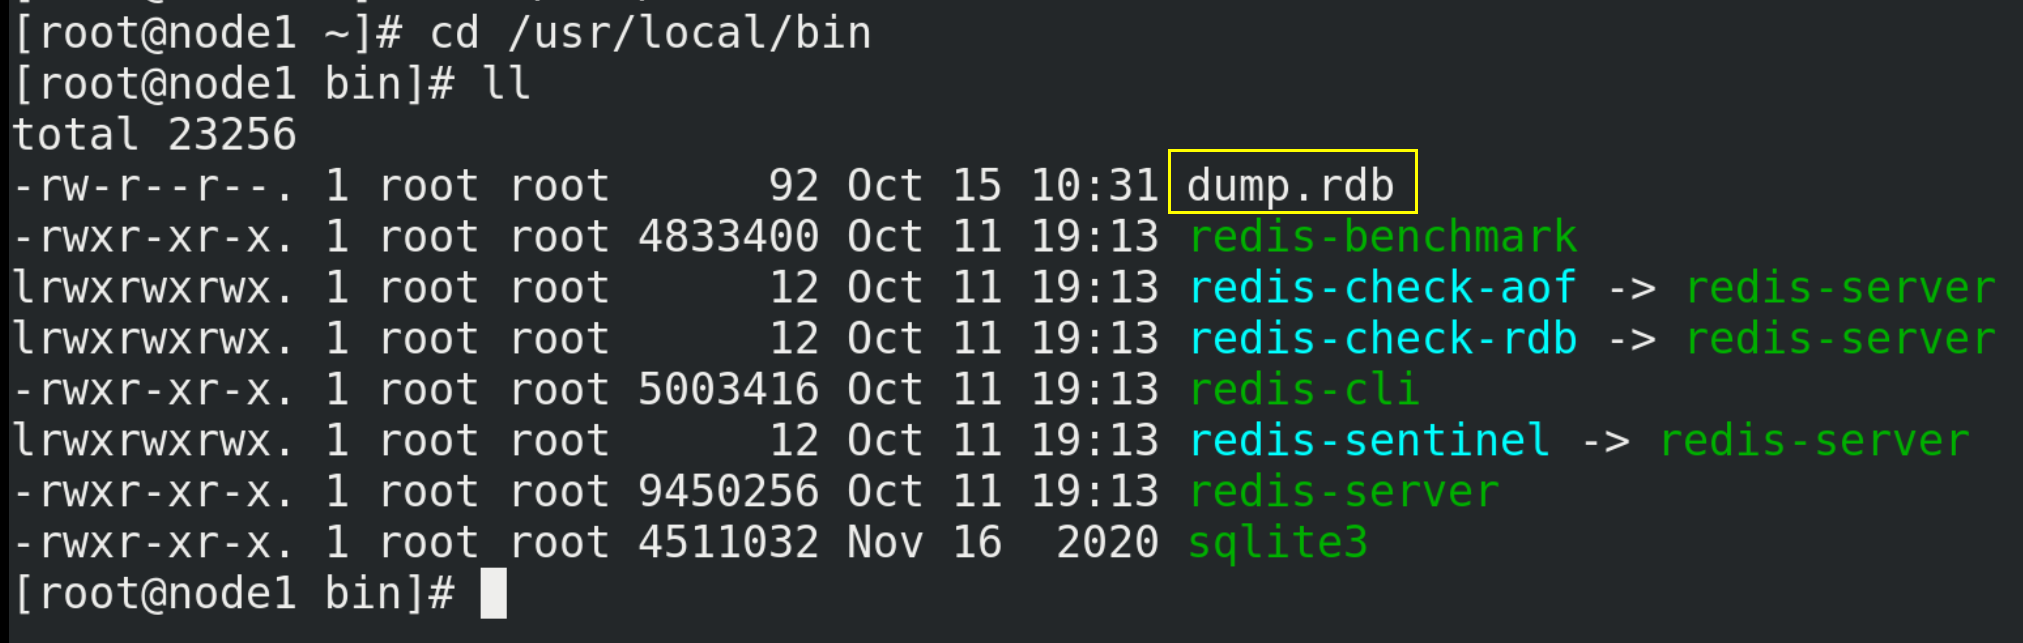
11.4.1.dump.rdb snapshot file
(1) dump.rdb is automatically generated by the Redis server. By default, the Redis server program will automatically traverse the database every once in a while, and write the memory snapshot in a file called "dump. RDB". The file name can be viewed and configured in the Redis configuration file redis.conf.

(2) The save path of dump.rdb file defaults to the directory where the command line is located when Redis is started.

11.4.2. Snapshot configuration
(1) Snapshot saving policy

(2)stop-writes-on-bgsave-error
If Redis cannot write to the disk, turn off the write operation of Redis directly. It is recommended to set it to yes.

(3) rdbcompression -- compressed file
For snapshots stored on disk, you can set whether to compress storage. If so, redis will use LZF algorithm for compression. If you do not want to consume CPU for compression, you can turn this function off. It is recommended to set it to yes.

(4) dbchecksum -- check integrity
After storing snapshots, redis can also use the CRC64 algorithm for data verification, but this will increase the performance consumption by about 10%. If you want to get the maximum performance improvement, you can turn off this function and set it to yes.

11.4.3. Snapshot configuration command
(1)save
Just keep it, whatever else. When all blocking occurs, it needs to be saved manually, which is not recommended.
(2)gbsave
Redis will perform snapshot operations asynchronously in the background, and can also respond to client requests.
(3)lastsave
Gets the time of the last successful snapshot execution.
12.Redis persistence - AOF
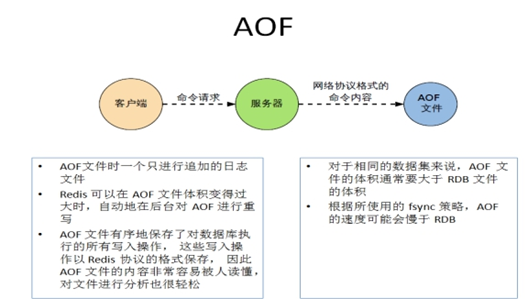
12.1.AOF introduction
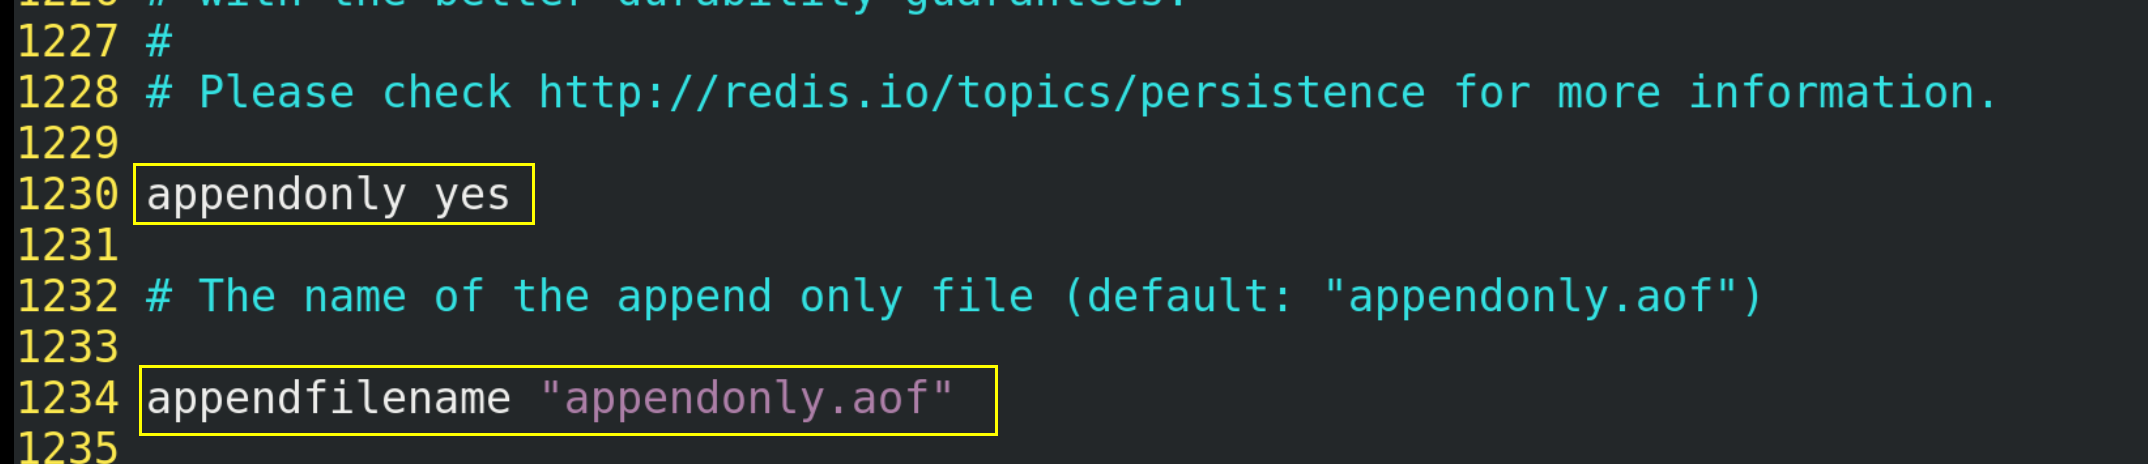
(1) AOF (Append Only File) records each write operation in the form of a log (incremental save), records all write instructions executed by redis (read operations are not recorded), and only appends files but cannot overwrite files. Redis will read the file and rebuild data at the beginning of startup, in other words, When redis restarts, execute the write instruction from front to back according to the contents of the log file to complete the data recovery.
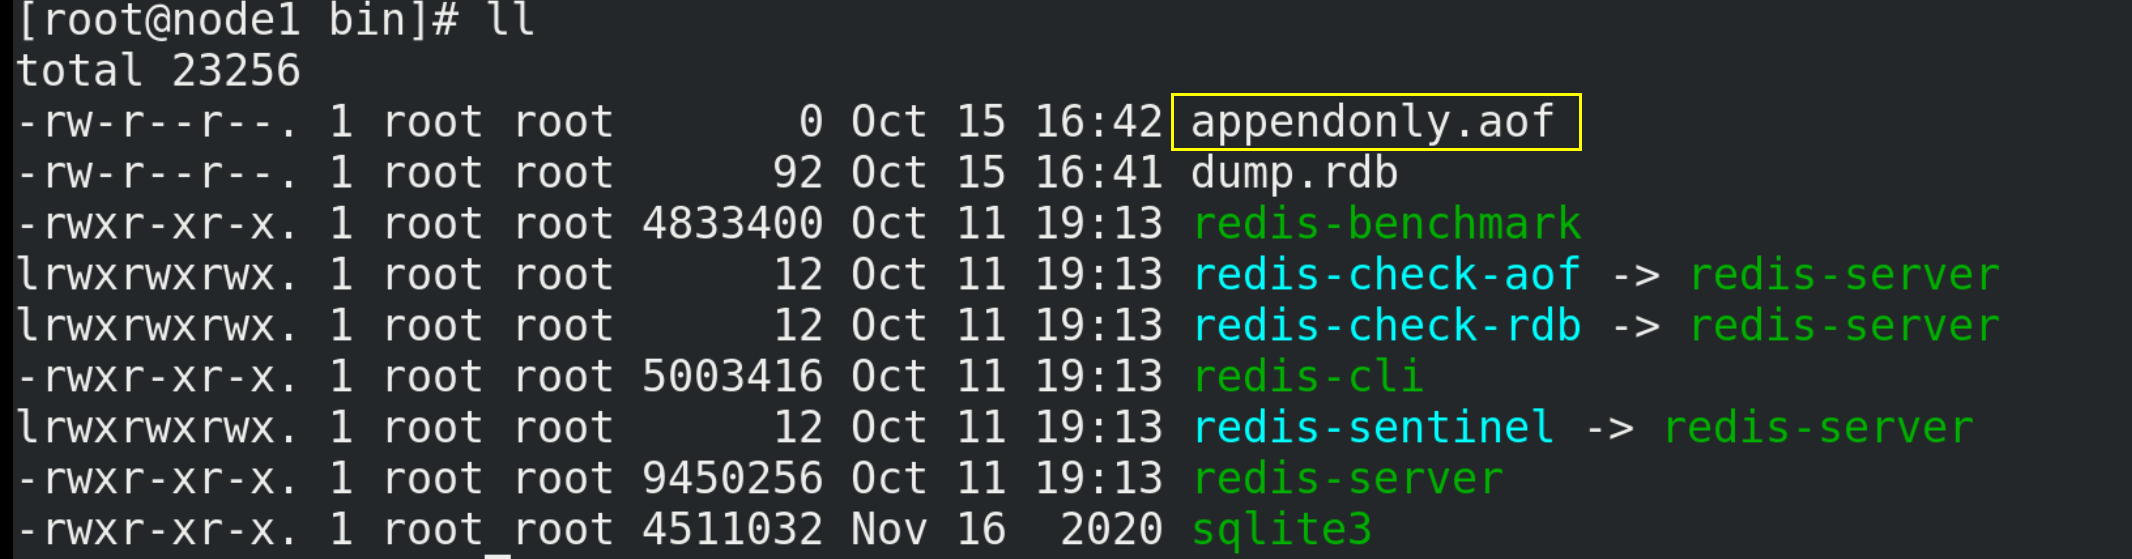
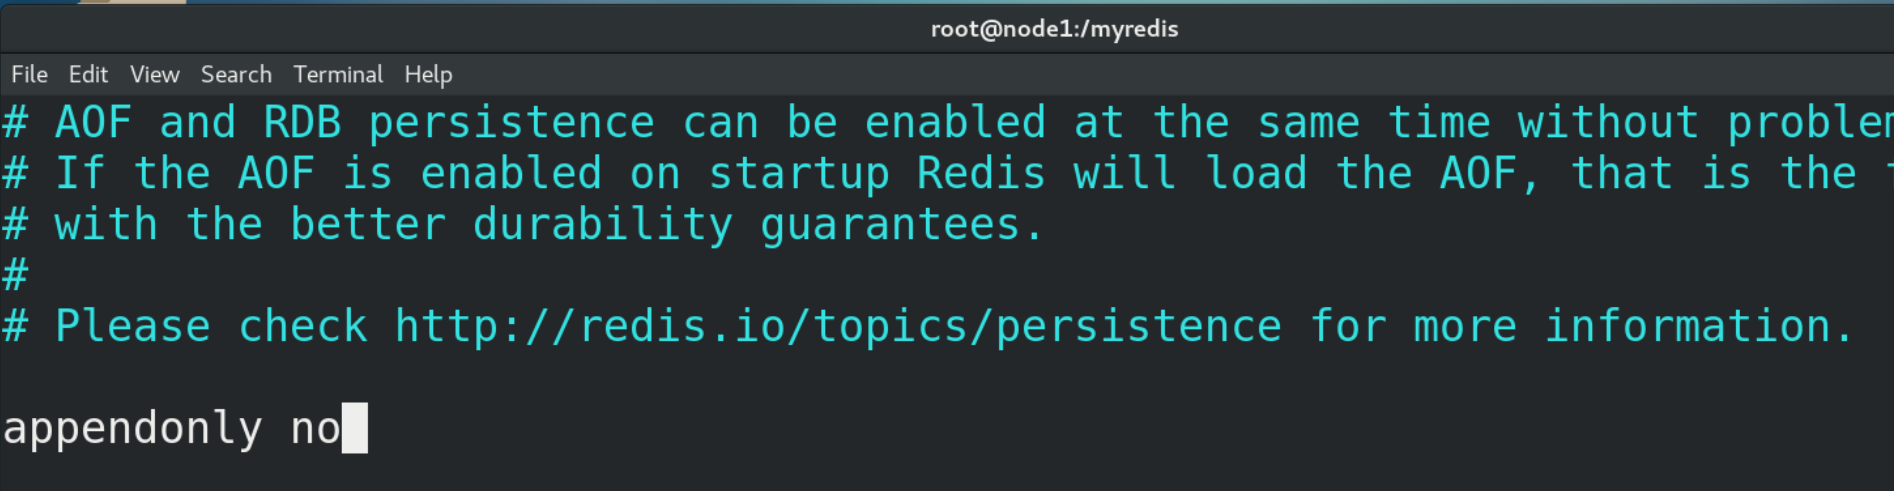
(2) Aof is not turned on by default and needs to be turned on manually (change "no" in "appendonly no" to "yes" in the configuration file redis.conf). In addition, the AOF file name is appendonly.aof by default, and its saving path is consistent with that of the RDB file.
(3) When AOF and RDB are enabled at the same time, the system takes the data of AOF by default (data will not be lost)
(4) The advantages of AOF are as follows:
① The backup mechanism is more robust and the probability of data loss is lower.
② The readable log text is robust through the operation of AOF, which can deal with misoperation.

(5) The disadvantages of AOF are as follows:
① It takes more disk space than RDB.
② Restore backup is slow.
③ If each read and write is synchronized, there is a certain performance pressure.
④ There are some cases where the Bug cannot be recovered.
(6) Small summary
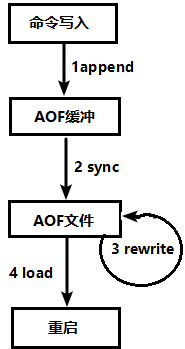
12.2.AOF persistence process
(1) The request write command of the client will be appended to the AOF buffer by append;
(2) The AOF buffer synchronizes the operation sync to the AOF file on the disk according to the AOF persistence policy [always, everysec, no];
(3) When the AOF file size exceeds the rewriting policy or manual rewriting, the AOF file will be rewritten and the AOF file capacity will be compressed;
(4) When the Redis service is restarted, the write operation in the AOF file will be re load ed to achieve the purpose of data recovery;
12.3.AOF recovery
(1) Although the backup mechanism and performance of AOF are different from RDB, the operations of backup and recovery are the same as RDB. The backup files are copied, and then copied to the Redis working directory when recovery is needed. The system is loaded when the system is started.
(2) Normal recovery
① Copy a copy of the aof file with data and save it to the corresponding directory (view Directory: config get dir)
② Restart Redis and then reload it to recover normally
(3) Abnormal recovery
① If the AOF file is damaged, recover it through / usr / local / bin / redis check AOF – fix appendonly.aof
② Back up the bad AOF file
③ Restart Redis and then reload it to recover normally
12.4. Selection of AOF and RDB
(1) The official recommendation is to enable both.
(2) If you are not sensitive to data, you can use RDB alone from the menu.
(3) AOF alone is not recommended because bugs may occur.
(4) If you only do pure memory caching, you can not use it.
13.Redis master-slave replication
13.1. General
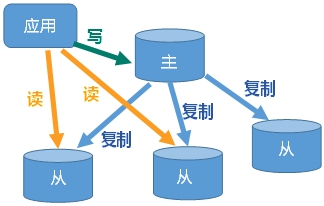
(1) Master Slave replication: Master / Slave mechanism that automatically synchronizes the host data to the standby machine according to the configuration and policy after the host data is updated. The master is mainly write and the Slave is mainly read.
(2) Function:
① Read write separation, performance expansion;
② Rapid disaster recovery;
13.2. Realization
The following implementation is the case of one master and two slaves. Other situations such as one master and three slaves can be implemented by referring to the following steps.
(1) Create / myredis folder
cd /myredis
(2) Copy the Redis configuration file redis.con in the / etc directory to the / myredis directory
cp /etc/redis.conf /myredis/redis.conf
(3) Close AOF in / myredis/redis.conf, that is, set appendonly to no
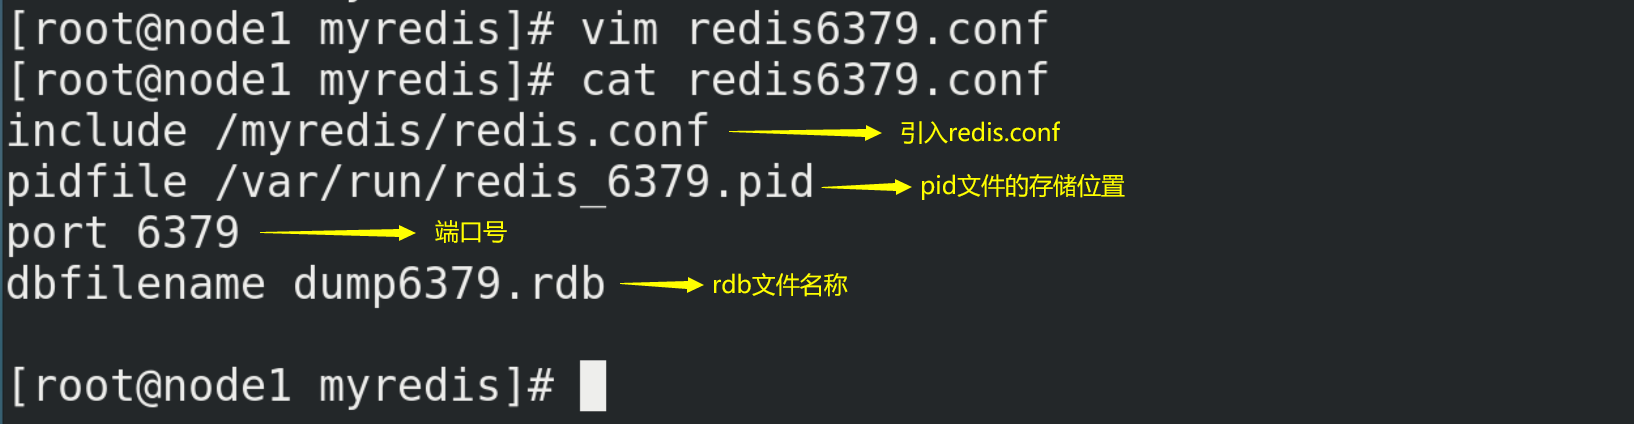
(4) Configure one master and two slaves, and create three configuration files (redis6379.conf, redis6380.conf, redis6381.conf)
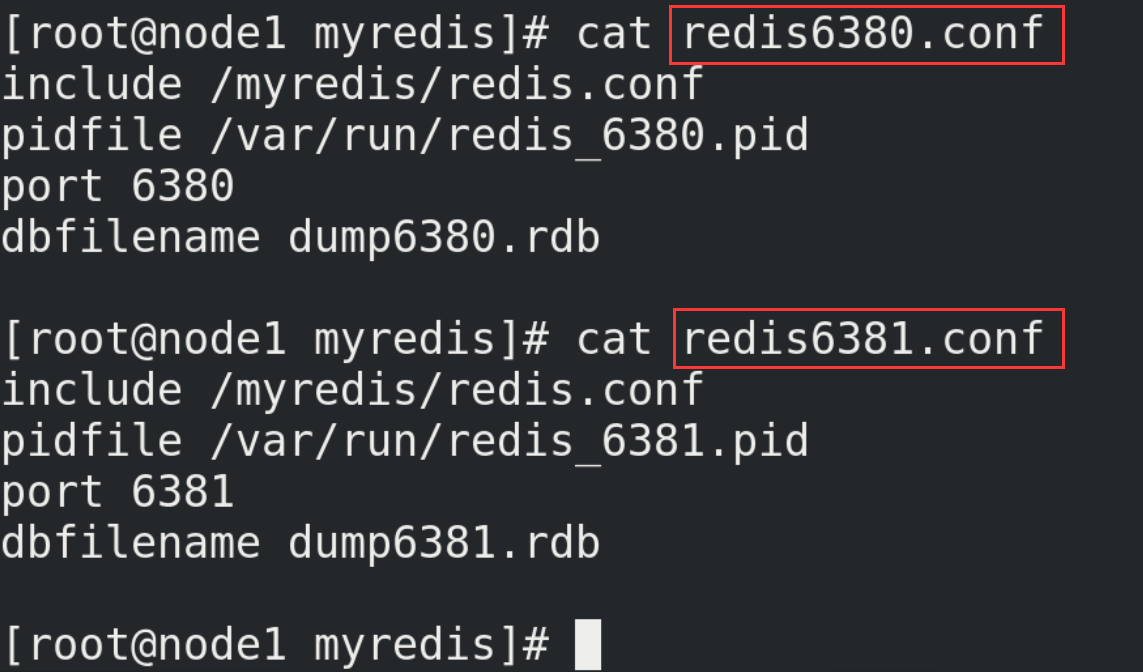
# Create redis6379.conf in / myredis directory
vim redis6379.conf

# Then write the following in redis6379.conf
include /myredis/redis.conf
pidfile /var/run/redis_6379.pid
port 6379
dbfilename dump6379.rdb

# For convenience, redis6379.conf is copied in duplicate, renamed redis6380.conf and redis6381.conf respectively, and the contents are modified
include /myredis/redis.conf
pidfile /var/run/redis_6380.pid
port 6380
dbfilename dump6380.rdb

include /myredis/redis.conf
pidfile /var/run/redis_6381.pid
port 6381
dbfilename dump6381.rdb
(5) Start three Redis servers and check their operation
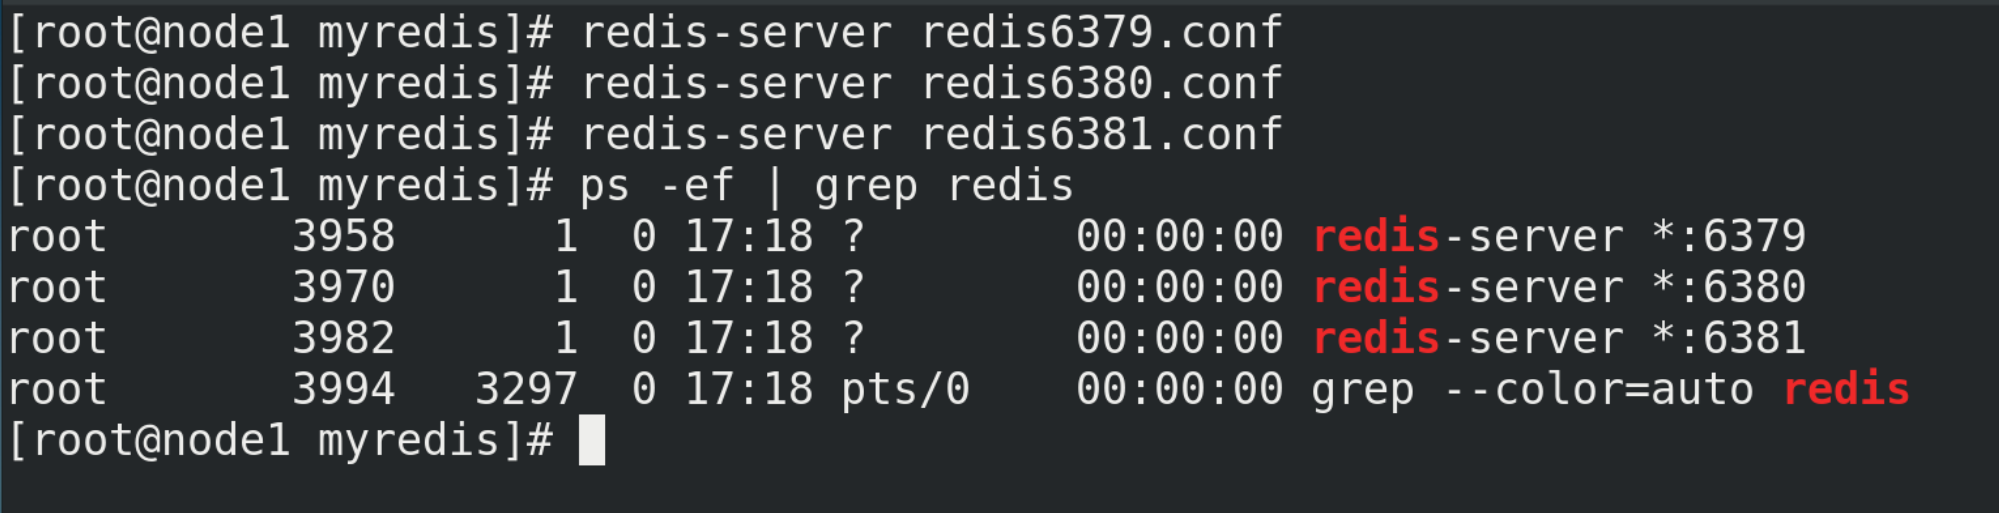
redis-server redis6379.conf
redis-server redis6380.conf
redis-server redis6381.conf

redis-cli -p Port number
info replication
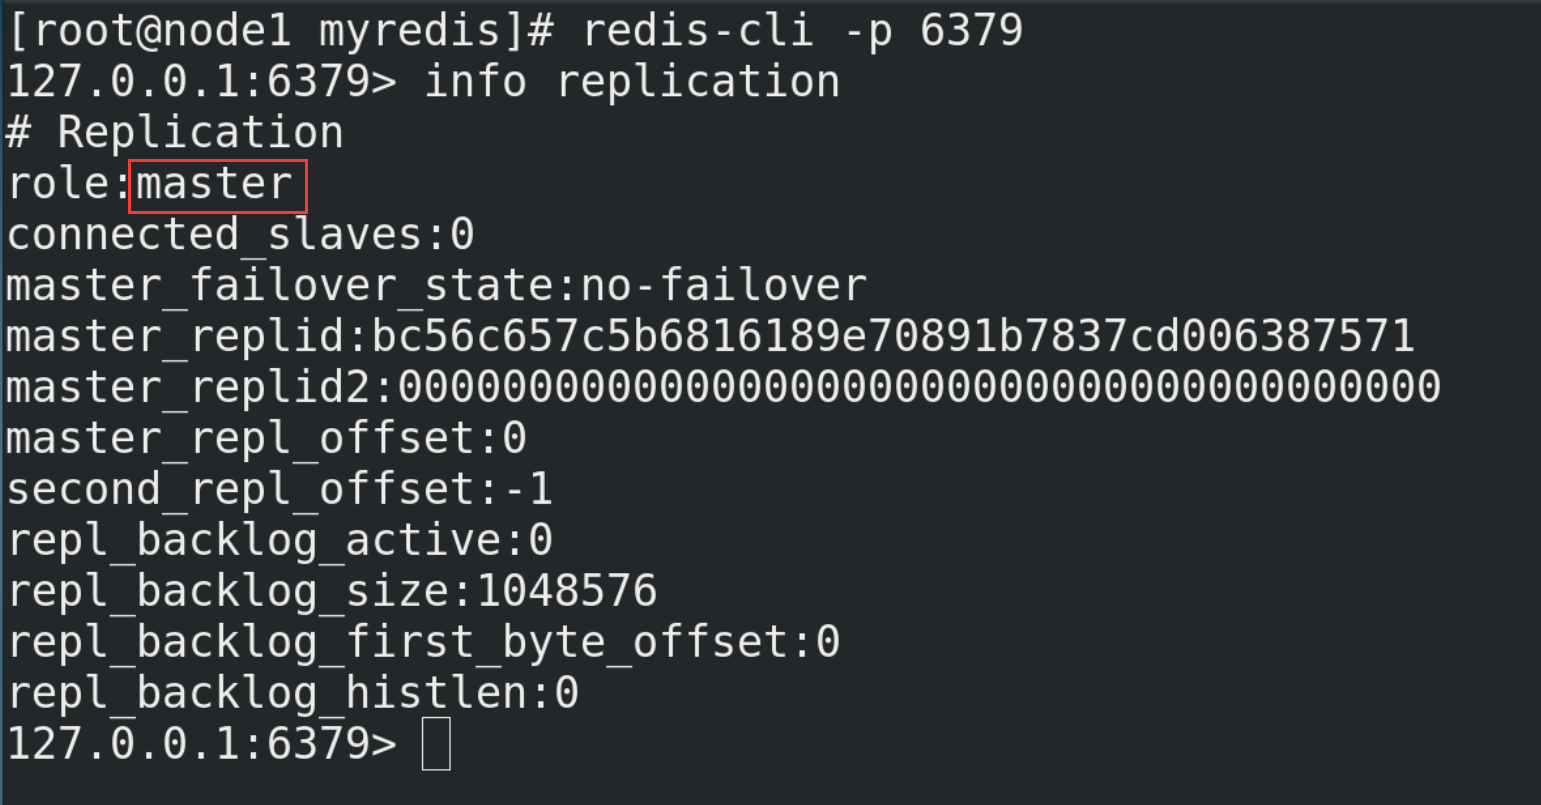
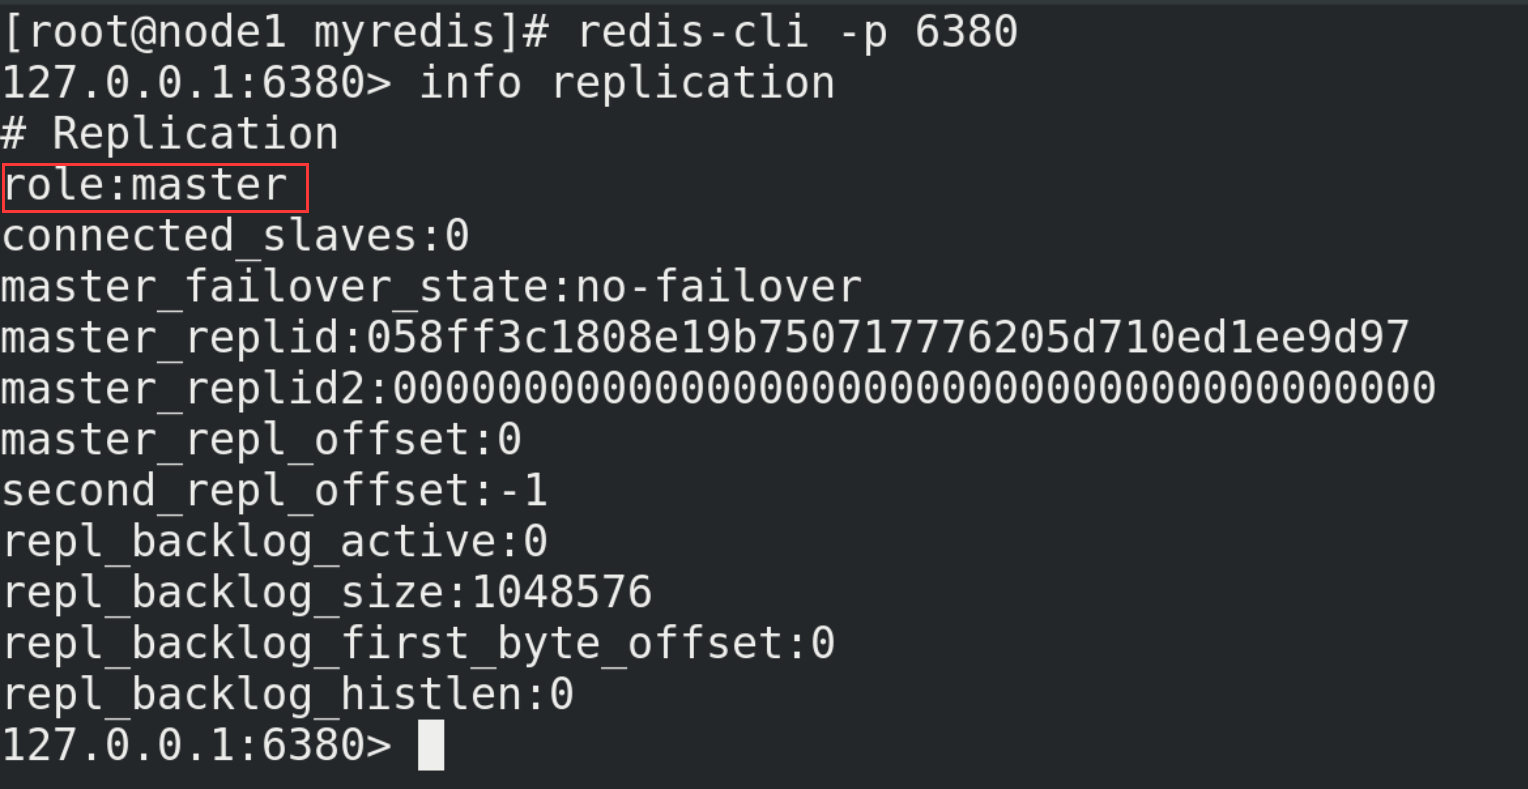
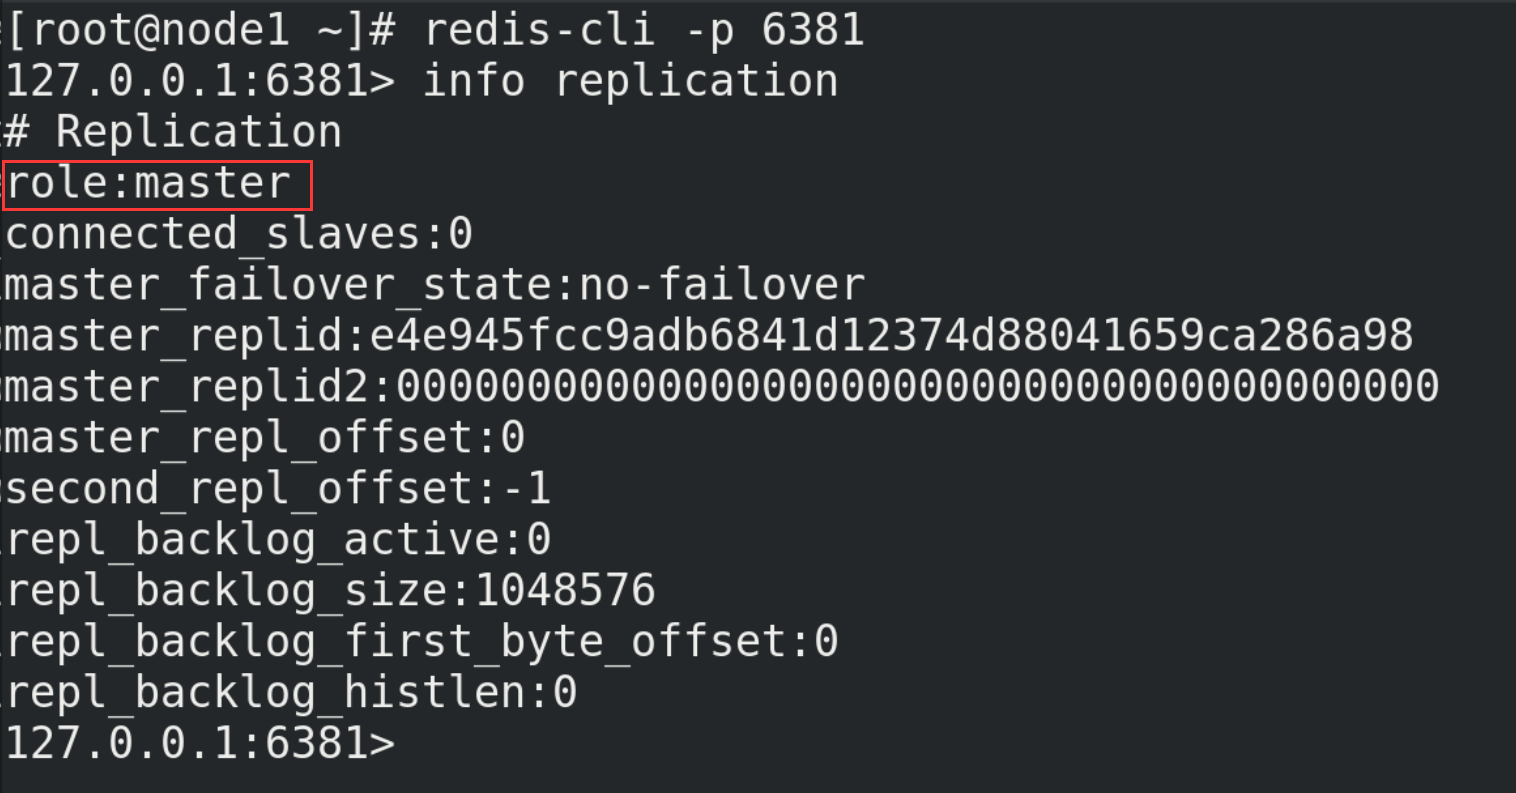
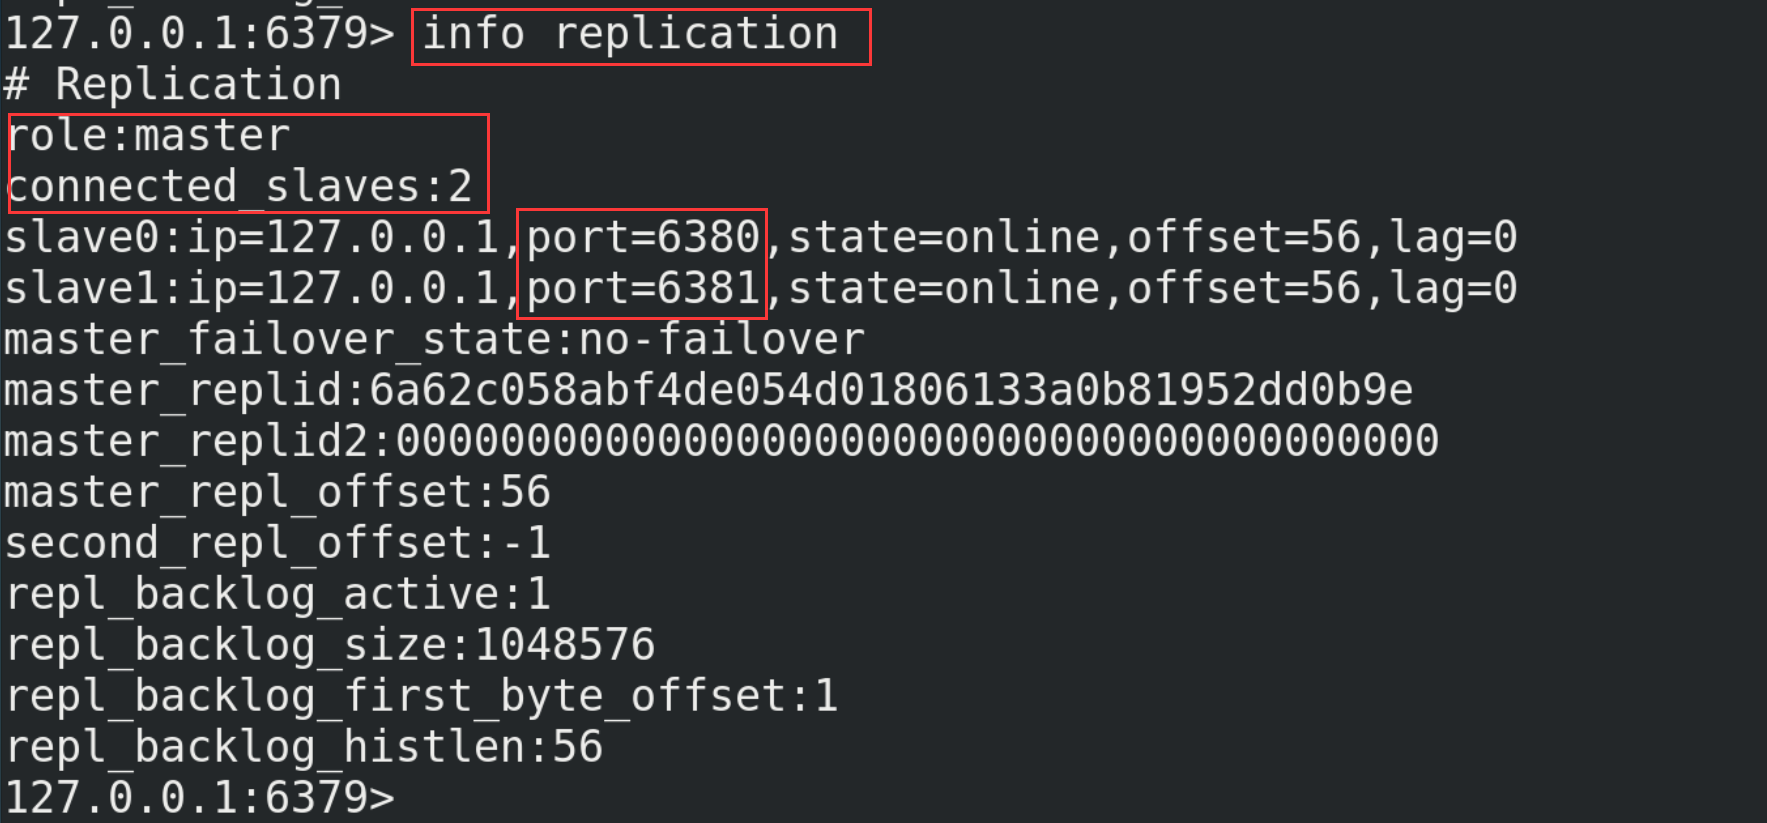
(6) With slave (Library) but not master (Library)
# The current server becomes the slave server of an instance
slaveof <ip> <port>

# Execute the following commands on 6380 and 6381 (127.0.0.1 is the ip of the main server, and 6379 is its port number)
slaveof 127.0.0.1 6379
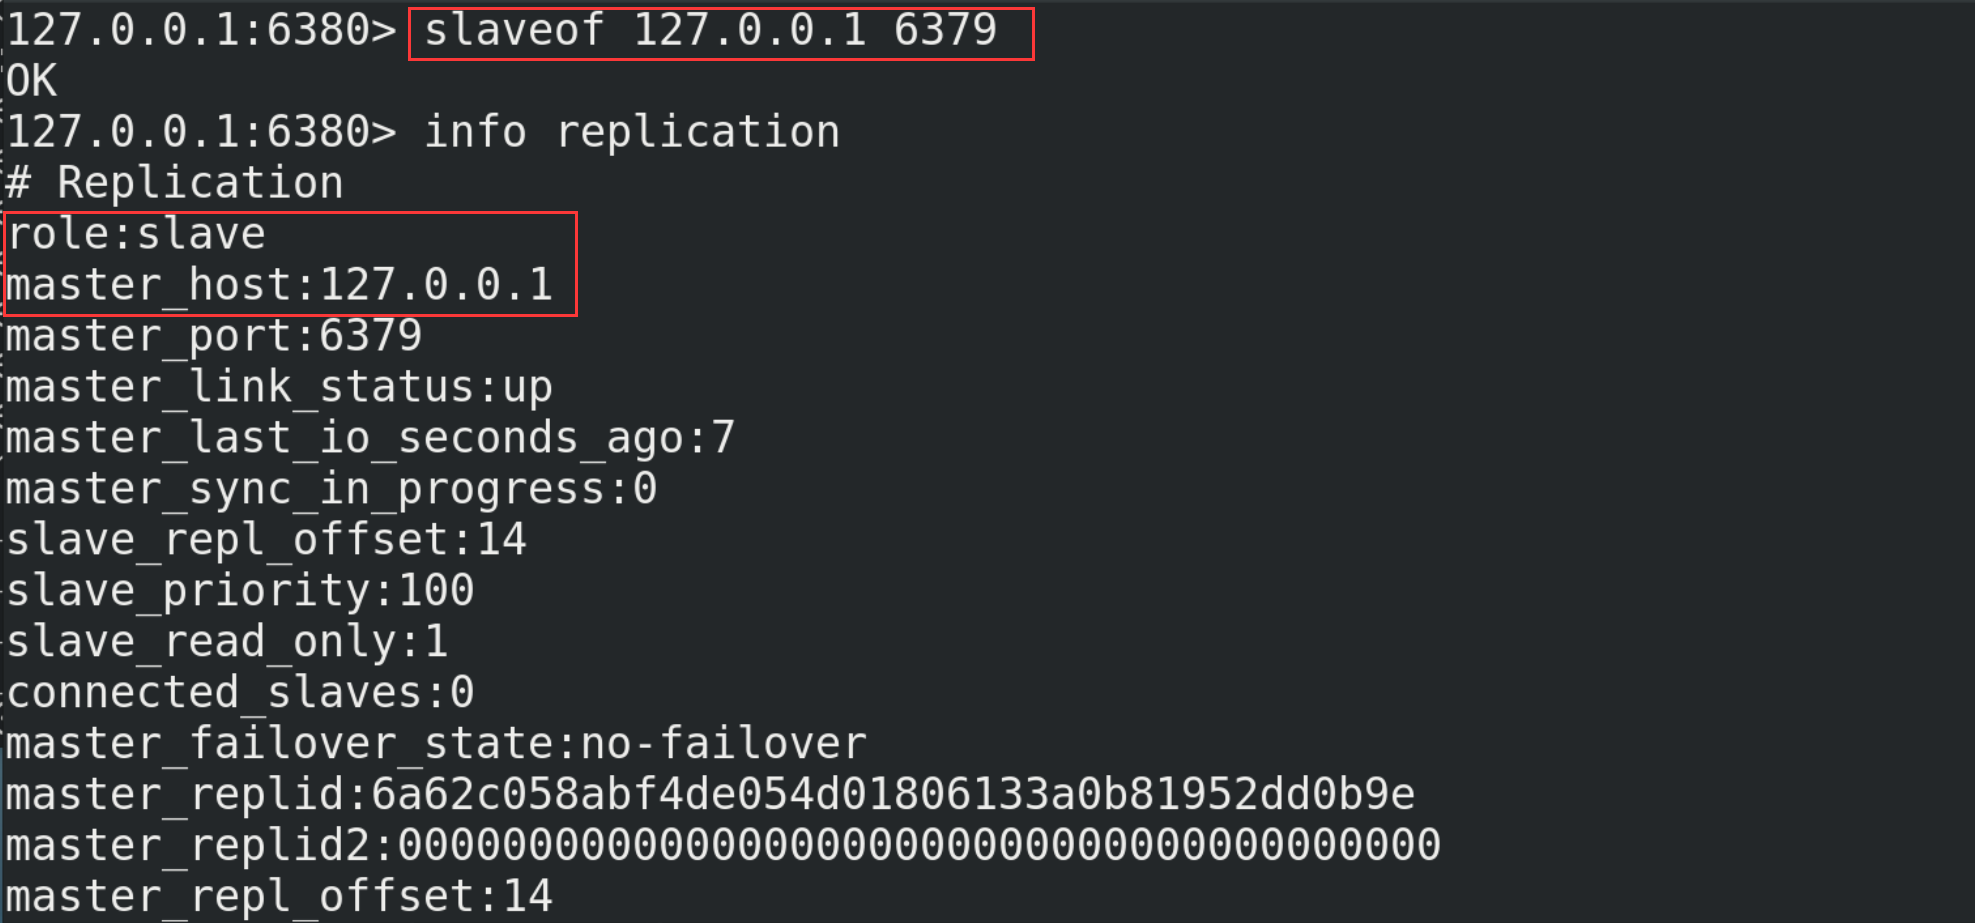
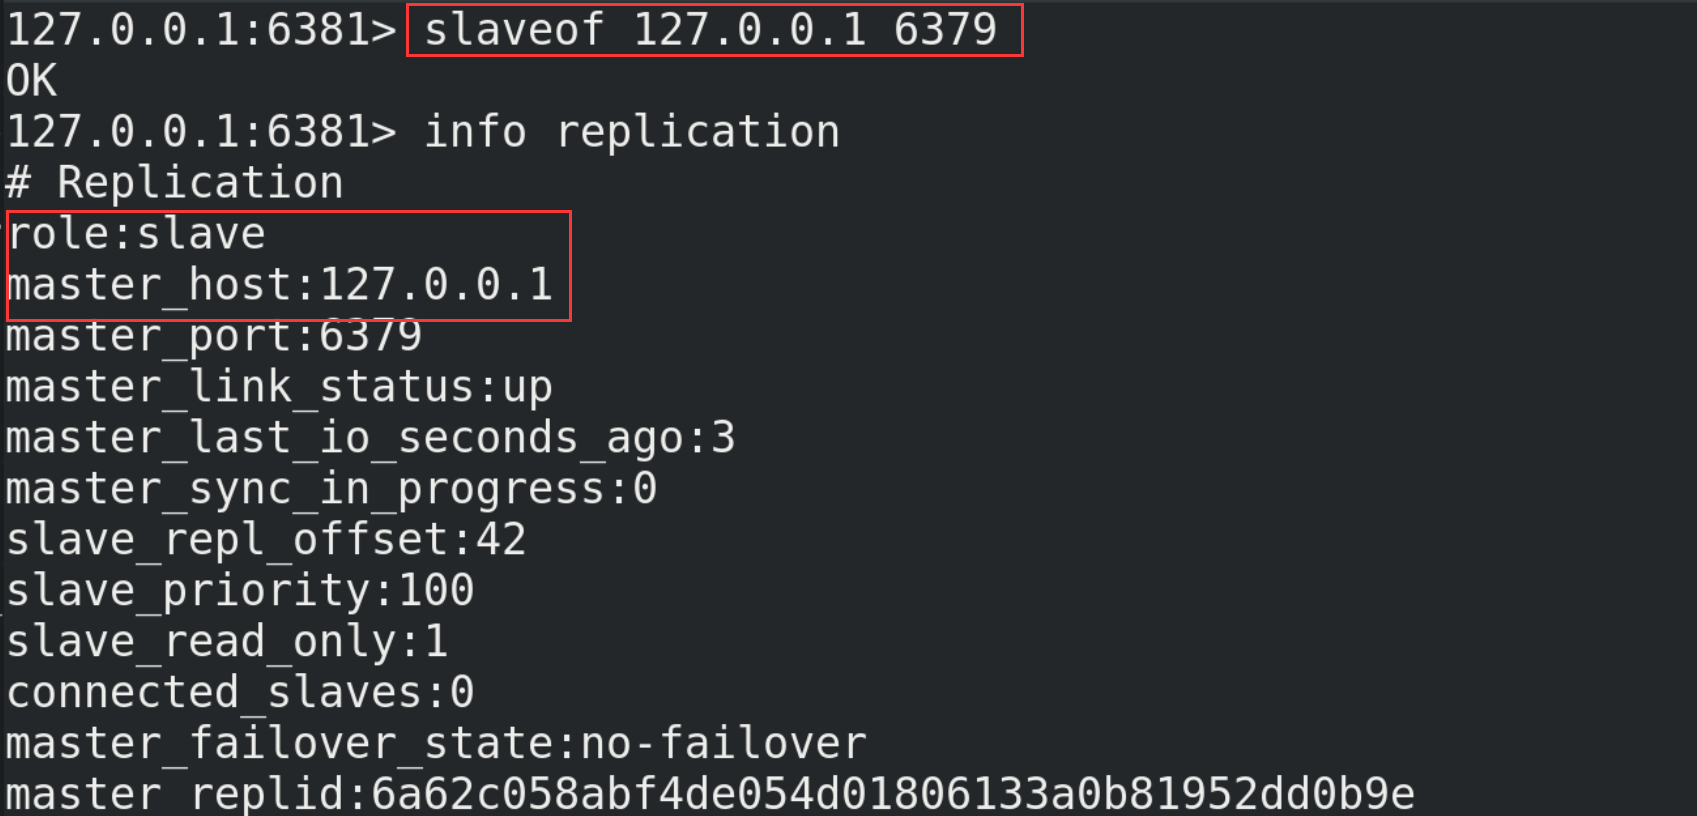
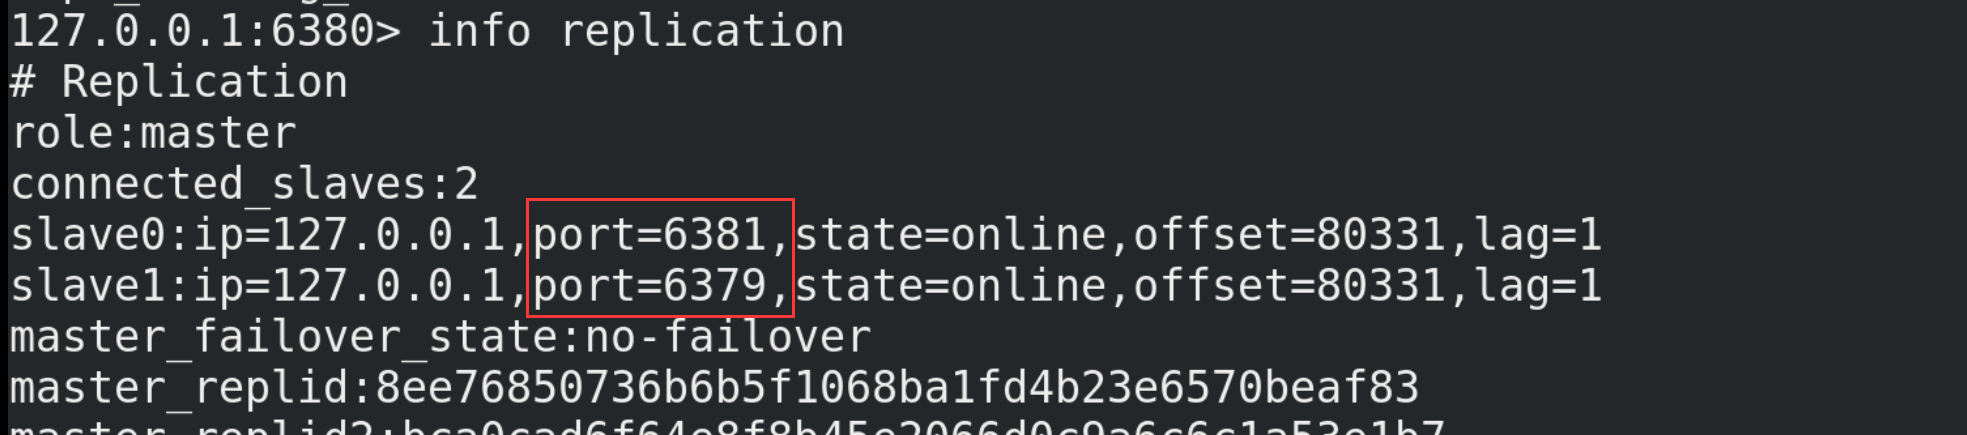
Check the operation of the host again. At this time, it is found that the host with port number 6379 already has two slaves (6380 and 6381)
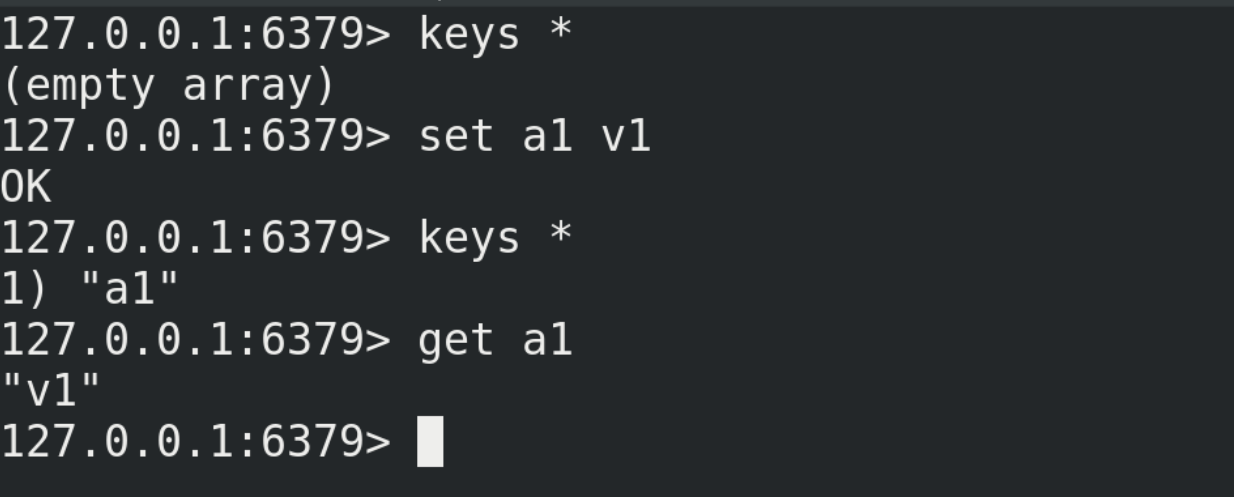
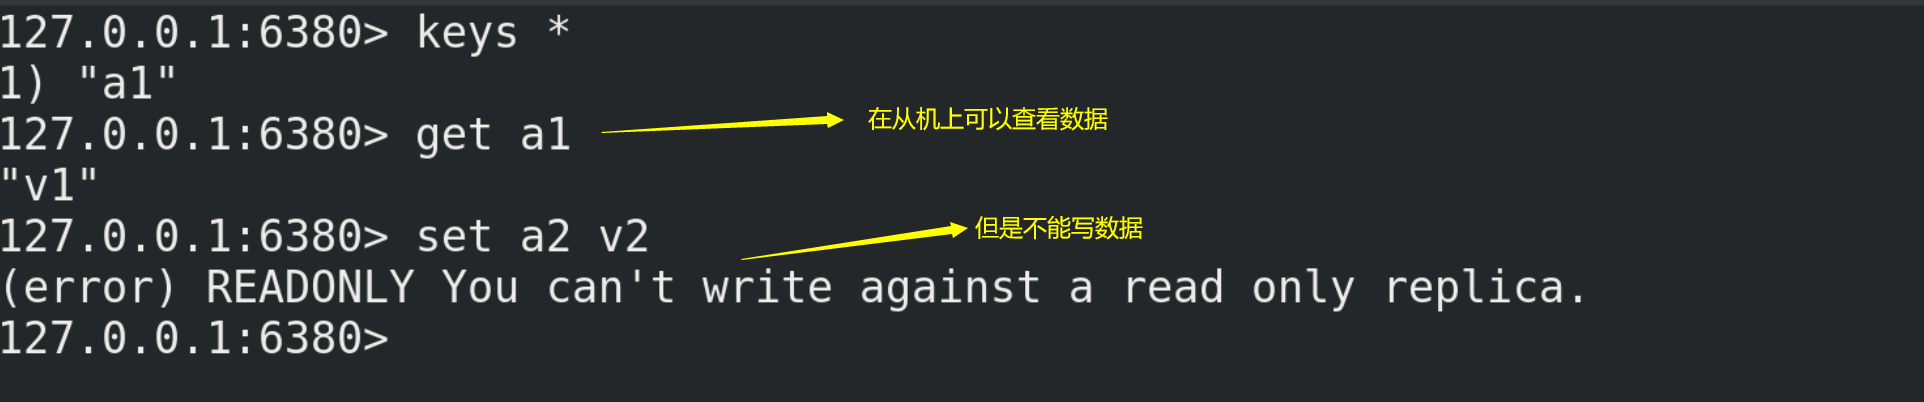
(7) Testing
① Write data on the host and view it on the slave
② Data cannot be written on the slave
13.3. Replication principle
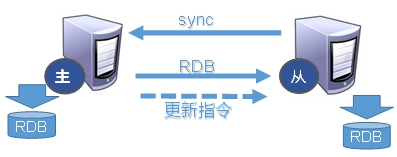
(1) Master slave replication process
① After the slave is connected to the master server, the slave server sends a data synchronization message to the master service;
② The master server receives the synchronization message sent from the slave server, persistent the master server data, send the new rdb file to the slave server, and get the rdb from the server for reading;
③ Each time the master server performs a write operation, it synchronizes data with the slave server.
(2) Replication delay
Since all write operations are performed on the master first and then synchronized to the slave, there is a certain delay in synchronizing from the master to the slave machine. When the system is very busy, the delay problem will become more serious, and the increase in the number of slave machines will also make this problem more serious.
13.4. Three special cases
13.4.1. One master and two servants
(1) If the host goes down, it will automatically return to its previous state after restart without any other modification. When writing data again, the slave can still read the data.
(2) If the slave machine goes down, it will be disconnected from the previous host after restarting again and become an independent host. At this time, you need to use the slaveof command to declare the host again, and then you can read the data again.
13.4.2. Passing from generation to generation
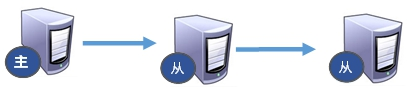
The previous slave can be the master of the next slave. The slave can also receive connection and synchronization requests from other slaves. As the next master in the chain, this slave can effectively reduce the write pressure of the master, decentralize and reduce the risk. But the disadvantage is also very obvious. Once a slave goes down, the subsequent slave cannot be backed up.
13.4.3. Focus on objectivism
When a Master goes down, the subsequent slave can be immediately upgraded to master without any modification. Use the command slave of no one to change the slave to the master.
13.5. Sentinel mode
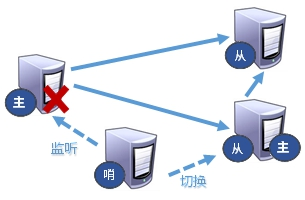
13.5.1. Introduction
Sentinel mode can be understood as an automatic version of anti guest mode, which can monitor whether the host fails in the background. If it fails, it will automatically convert from the library to the main library according to the number of votes.
13.5.2. Use steps
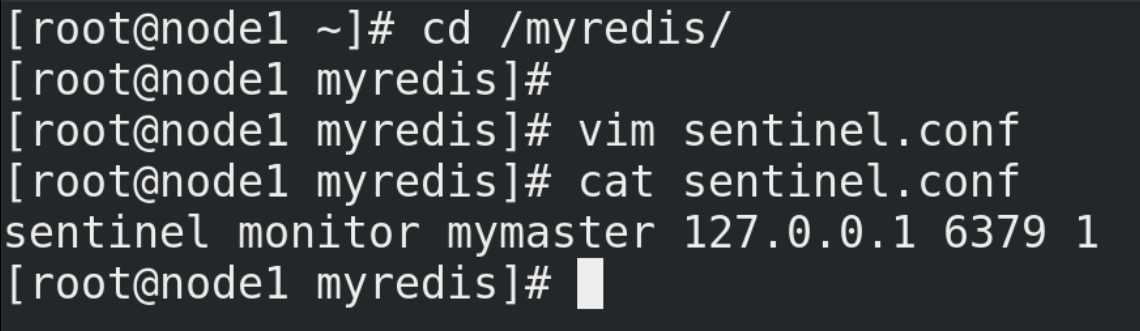
(1) Create a sentinel.conf file in the / myredis directory (the name cannot be wrong)
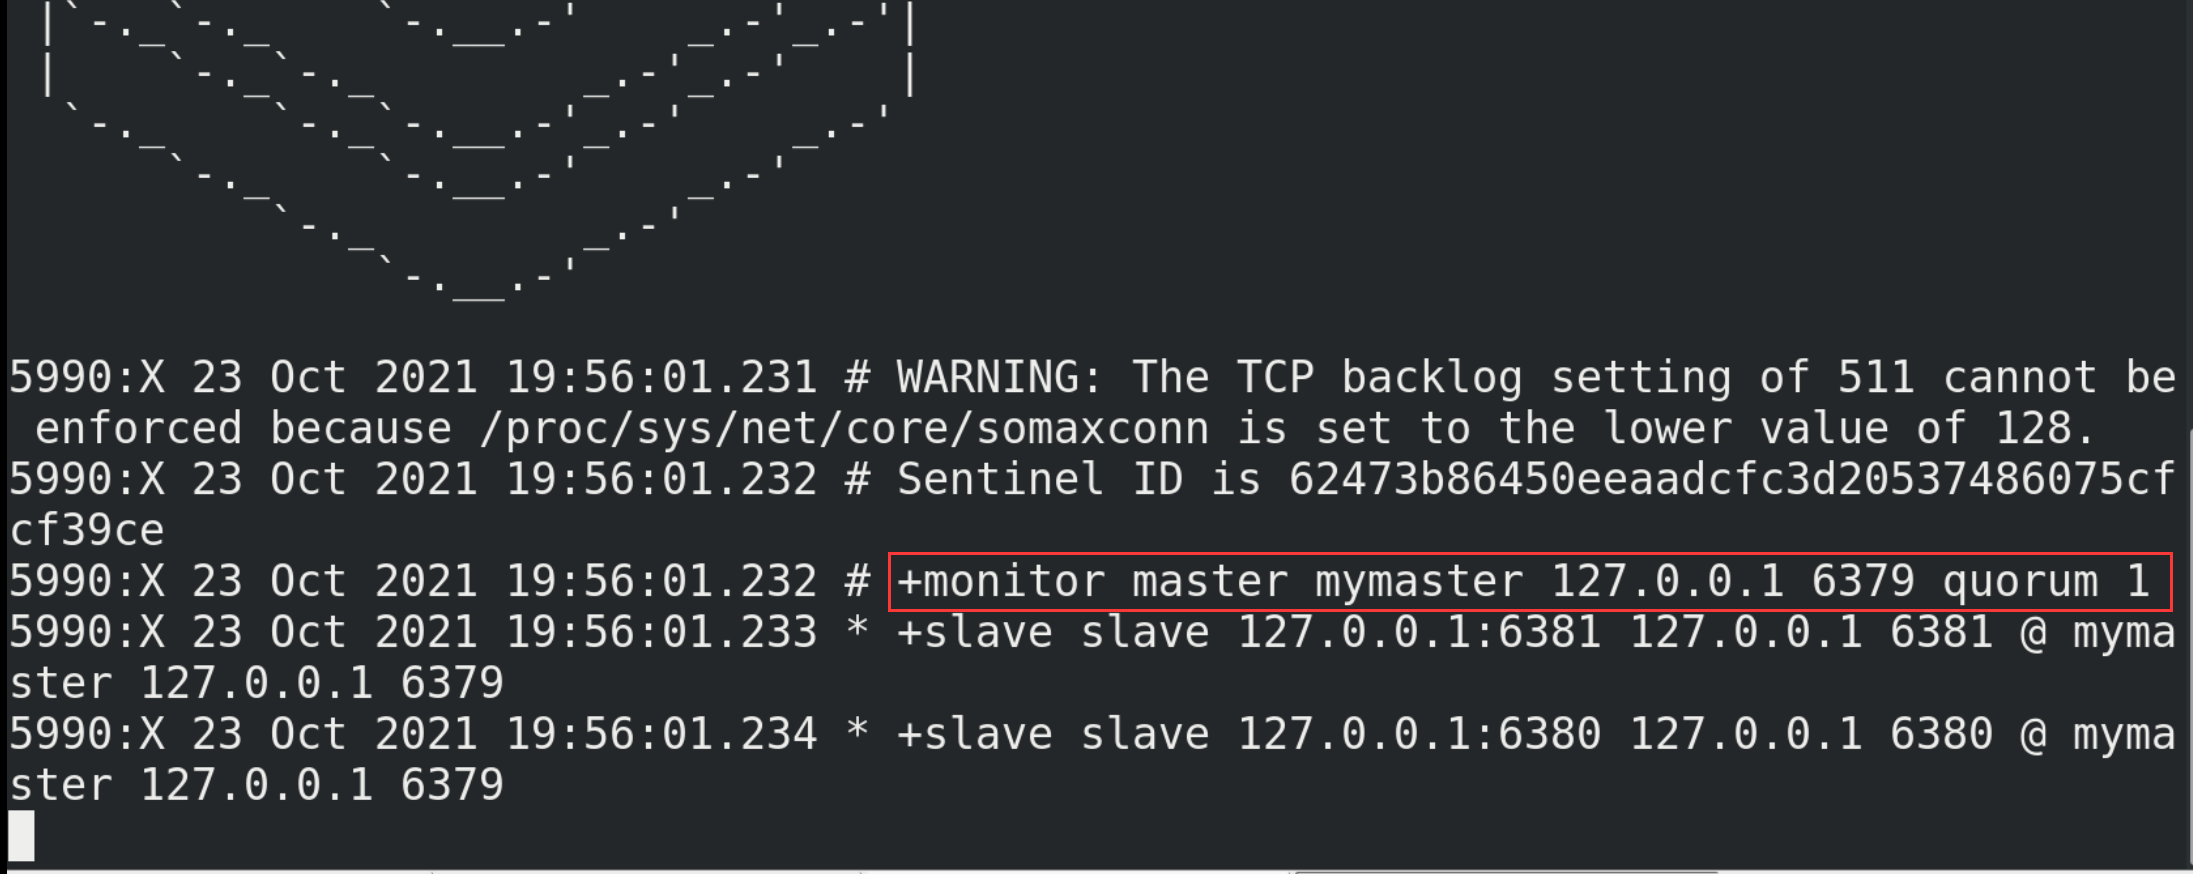
cd /myreddis
vim sentinel.conf

# Configure sentinel in sentinel.conf
sentinel monitor mymaster 127.0.0.1 6379 1
# Where mymaster is the server name of the monitoring object, and 1 is the number of sentinels agreeing to migrate
(2) Start the sentry
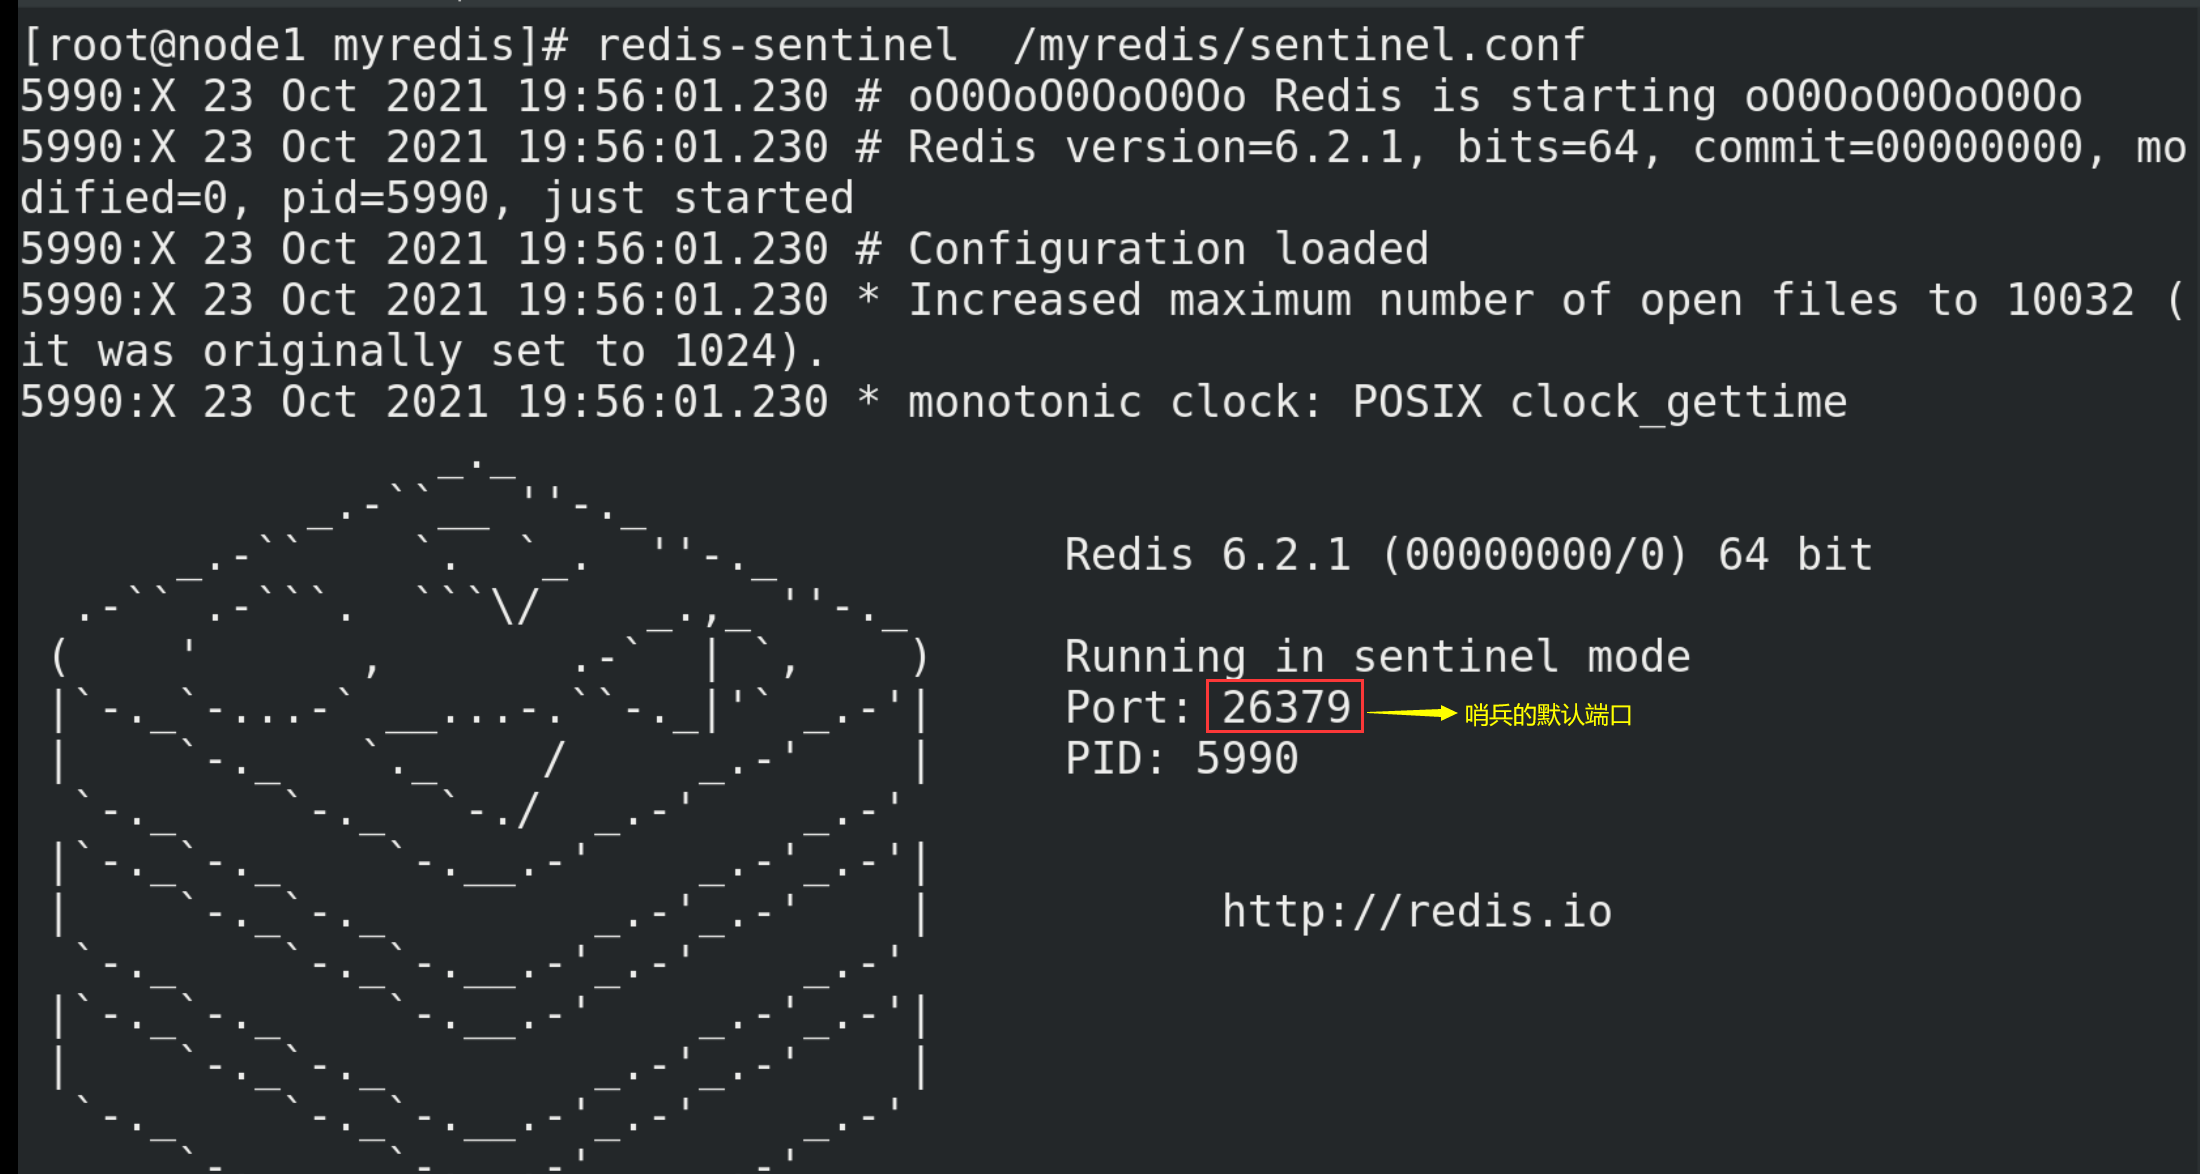
# Start command
redis-sentinel  /myredis/sentinel.conf
(3) Testing
① Simulate that the host (port number 6379) is down, that is, shut down the host with the command shutdown.
② Wait a moment and observe the information printed by the sentry:
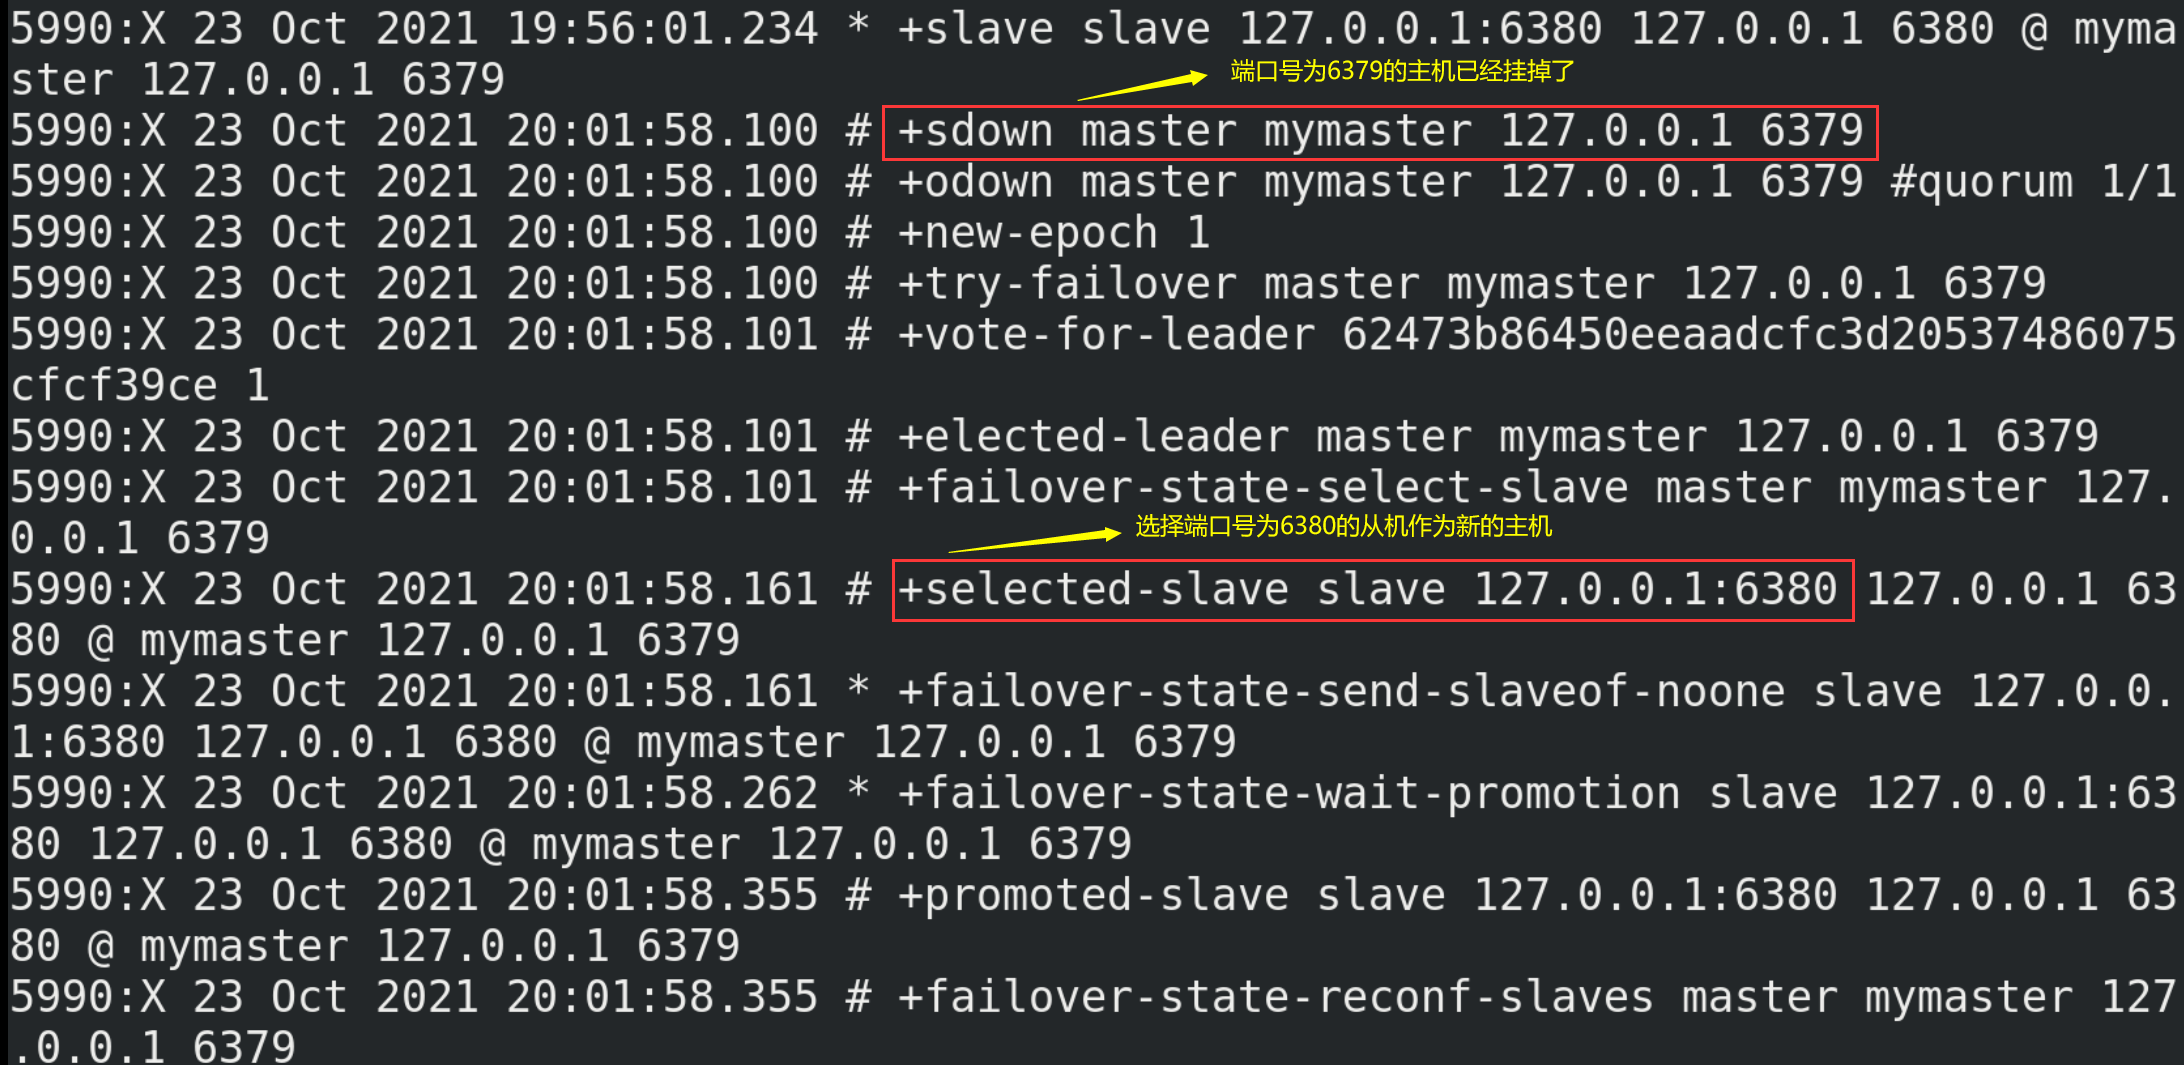
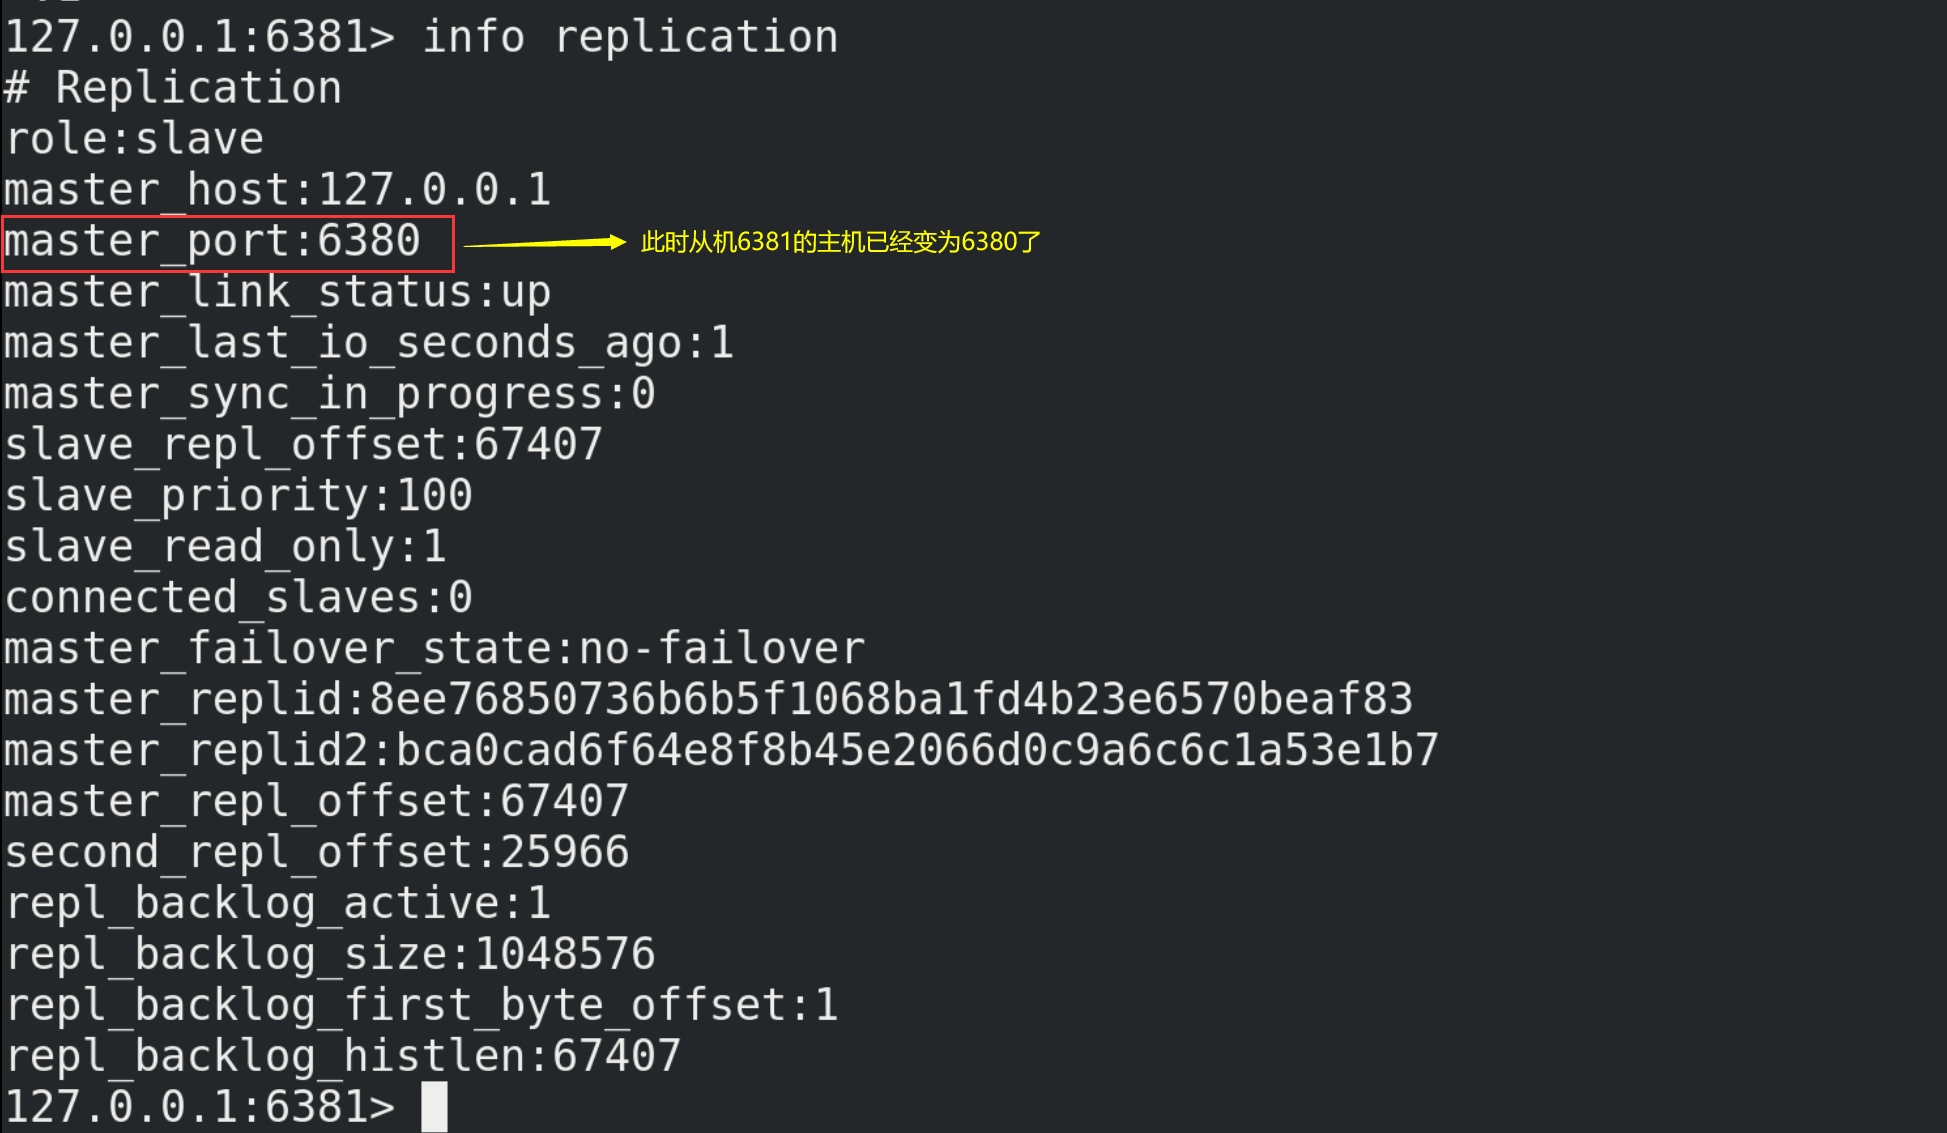
③ Observe the operation information of the slave 6381. At this time, the host changes from 6379 to 6380
④ When you restart 6379 again, it will become a slave of 6380
13.5.4. Fault recovery
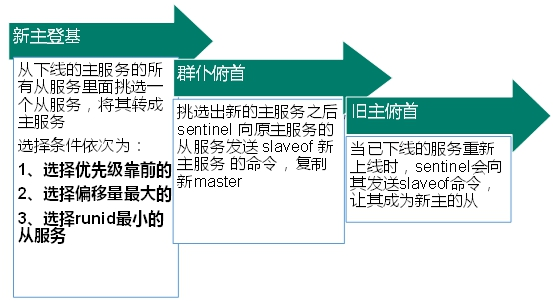
(1) In the redis.conf configuration file, the priority is replica priority 100 by default. The smaller the value, the higher the priority;
(2) Offset is a measure of how much data is synchronized with the original host;
(3) After each redis instance is started, a 40 bit runid will be randomly generated;
In addition, an example of identifying master-slave in Java code is as follows:
private static JedisSentinelPool jedisSentinelPool=null;

public static  Jedis getJedisFromSentinel(){
	if(jedisSentinelPool==null){
	    Set<String> sentinelSet=new HashSet<>();
	    sentinelSet.add("192.168.11.103:26379");

	    JedisPoolConfig jedisPoolConfig =new JedisPoolConfig();
	    jedisPoolConfig.setMaxTotal(10); //Maximum number of available connections
		jedisPoolConfig.setMaxIdle(5); //Maximum idle connections
		jedisPoolConfig.setMinIdle(5); //Minimum number of idle connections
		jedisPoolConfig.setBlockWhenExhausted(true); //Connection exhausted wait
		jedisPoolConfig.setMaxWaitMillis(2000); //waiting time
		jedisPoolConfig.setTestOnBorrow(true); //Test the connection ping pong

		jedisSentinelPool=new JedisSentinelPool("mymaster",sentinelSet,jedisPoolConfig);
		return jedisSentinelPool.getResource();
	}else{
		return jedisSentinelPool.getResource();
    }
}
14.Redis cluster
14.1. General
(1) Problem introduction
How to expand Redis when its capacity is insufficient? How does Redis allocate concurrent write operations? In addition, the master-slave mode, firewood transmission mode and host downtime lead to changes in the ip address. The configuration in the application needs to modify the corresponding host address, port and other information. It was previously solved by proxy host, but Redis 3.0 provides a solution. That is, decentralized cluster configuration.
(2) Cluster definition
① Redis cluster realizes the horizontal expansion of redis, that is, start n redis nodes, distribute and store the whole database in these n nodes, and each node stores 1/N of the total data.
② Redis cluster provides a certain degree of availability through partition. Even if some nodes in the cluster fail or cannot communicate, the cluster can continue to process command requests.
(3) Advantages and disadvantages of cluster
Advantages: capacity expansion, pressure sharing and no center configuration are relatively simple
Disadvantages:
① The implementation of multi key operation is complex;
② Multi key Redis transactions are not supported;
③ Lua scripts are not supported either;
④ Due to the late emergence of the cluster scheme, many companies have adopted other cluster schemes, while the proxy or client fragmentation scheme needs overall migration rather than gradual transition to redis cluster, which is more complex;
14.2. Building clusters
Note: due to the limitations of the actual situation, the following construction is only a simulation effect!
(1) Use the master-slave directory / myredis above to delete all rdb files in this directory first (to prevent interference with the following steps)
# Delete all files starting with dump63 in the current directory
rm -rf dump63*
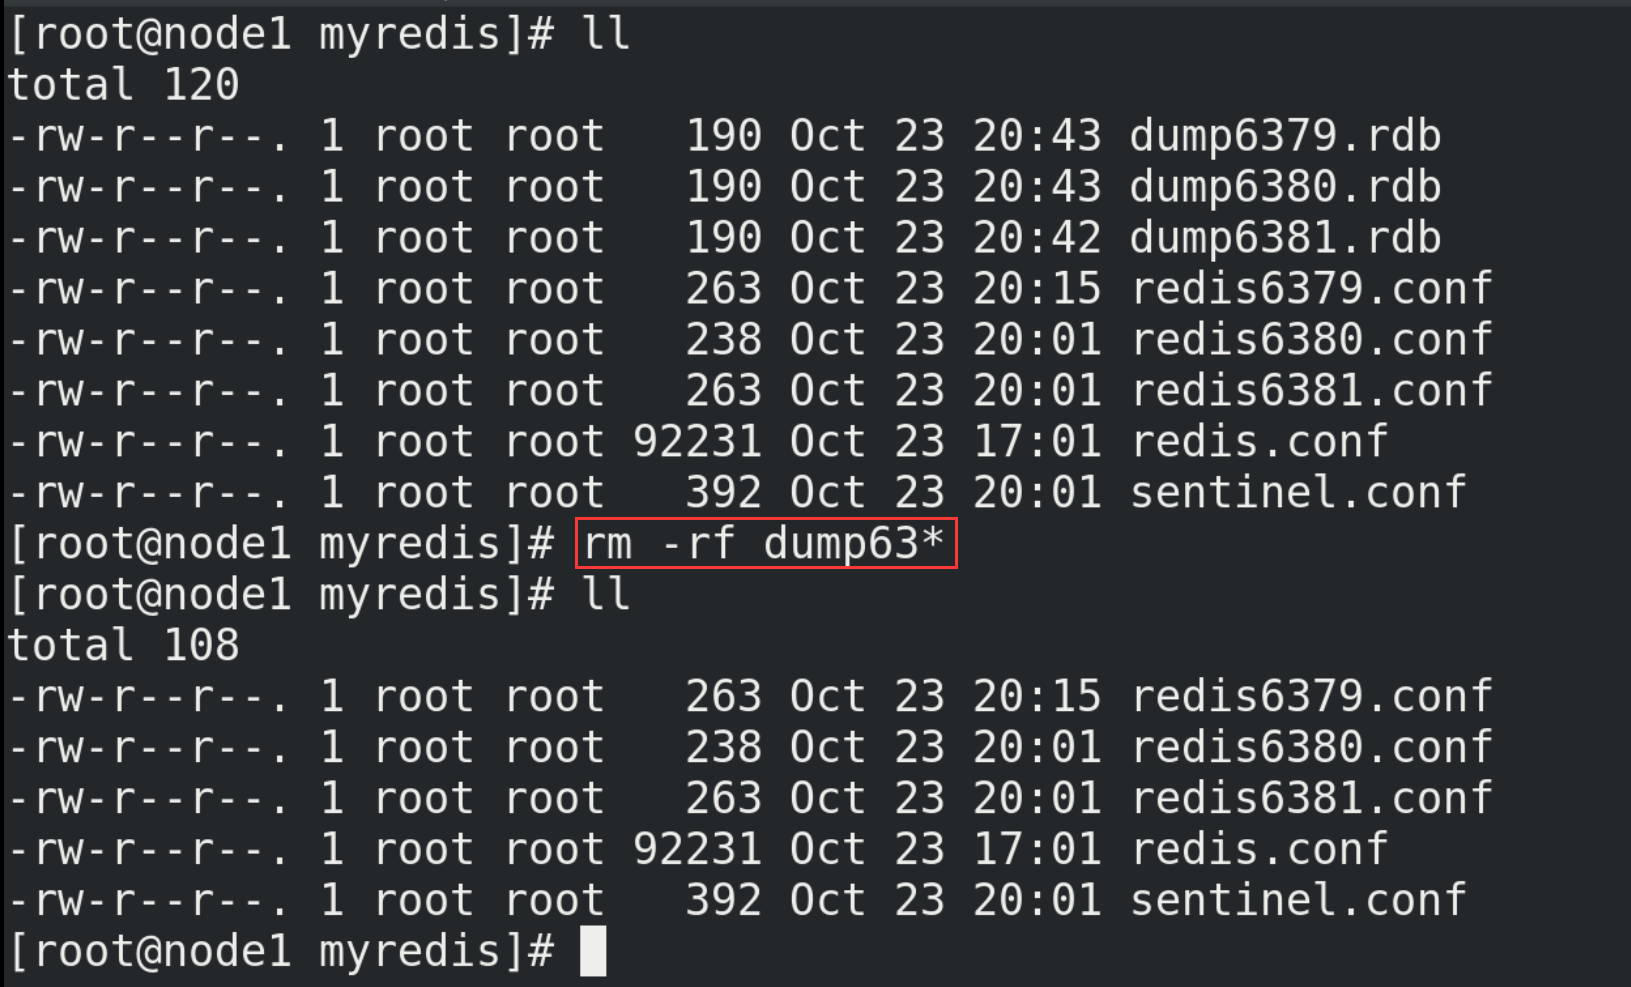
(2) Modify the content in redis6379.conf
# Change the content in redis6379.conf to the following (note is unnecessary)
include /myredis/redis.conf
pidfile "/var/run/redis_6379.pid"
port 6379
dbfilename "dump6379.rdb"

cluster-enabled yes   # Open cluster mode
cluster-config-file nodes-6379.conf  # Set node profile name
cluster-node-timeout 15000  # Set the node loss time. After that time (MS), the cluster will automatically switch between master and slave.
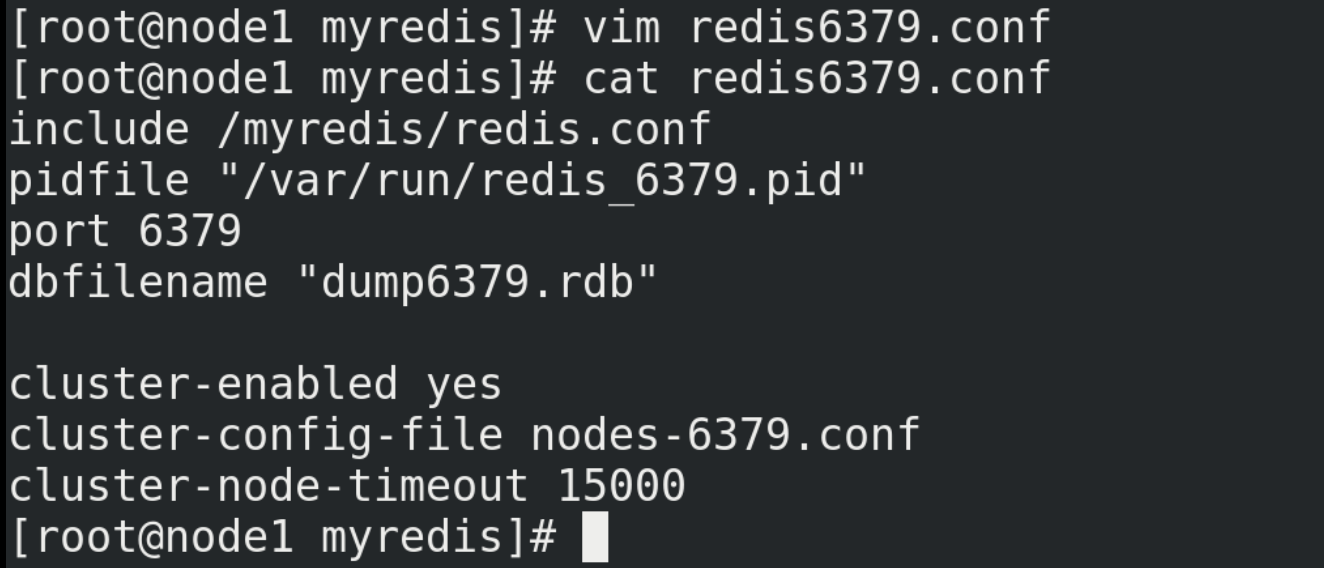
(3) Delete redis6380.conf and redis6381.conf
rm -rf redis6380.conf
rm -rf redis6381.conf

(4) Copy 5 copies of redis6379.conf file to the current directory, named redis6380.conf, redis6381.conf, redis6389.conf, redis6390.conf and redis6391.conf respectively
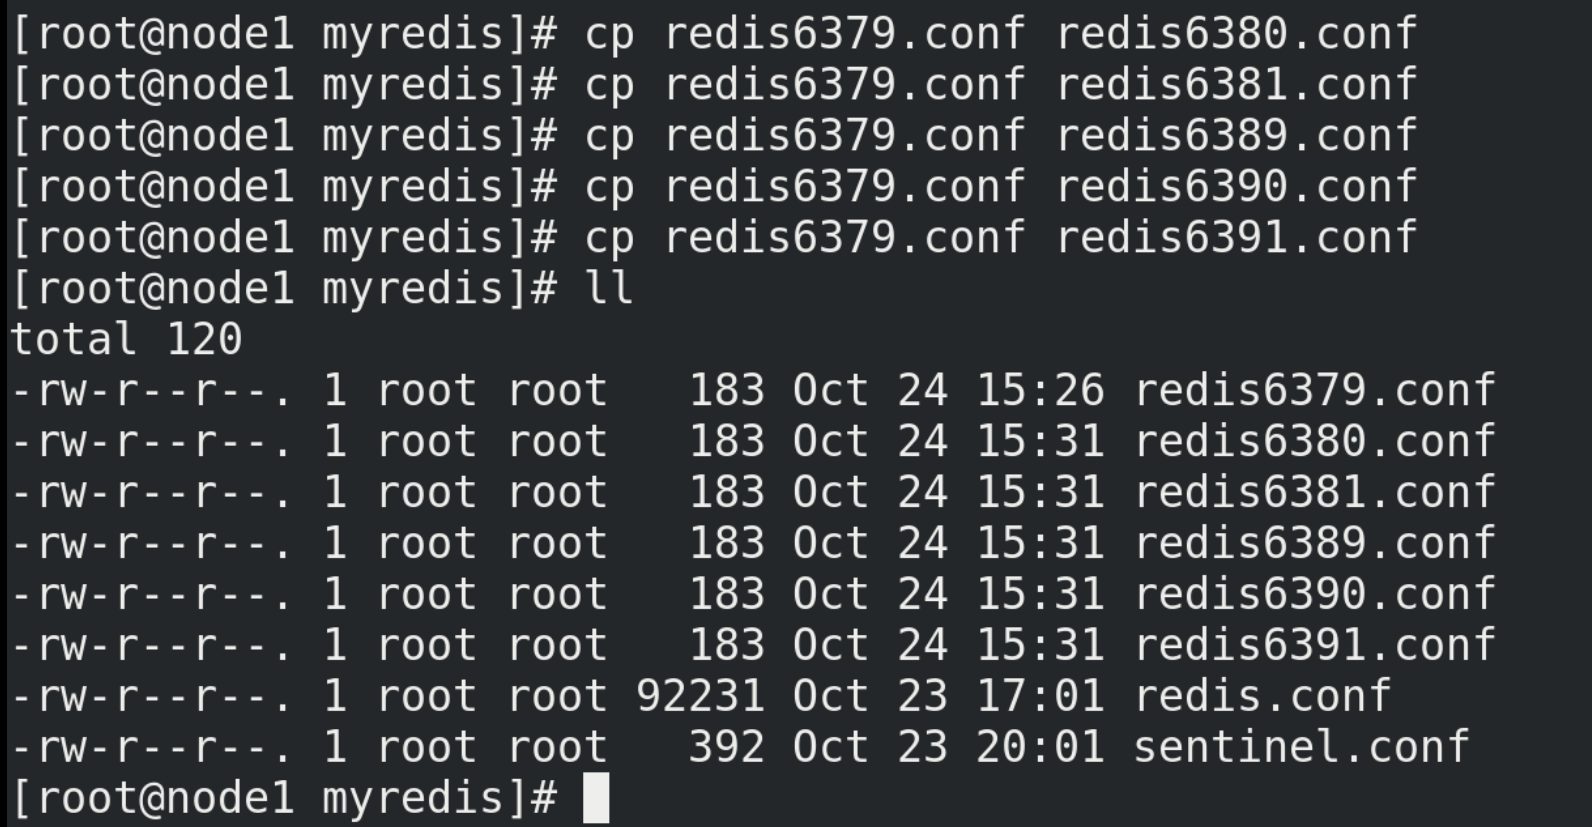
(5) Modify the five newly copied files above. Take redis6380.conf as an example, change 6379 in the file content to 6380 in batch, and the specific command is% s/6379/6380 (the remaining four files can be modified according to this rule)
%s/6379/6380
%s/6379/6381
%s/6379/6389
%s/6379/6390
%s/6379/6391
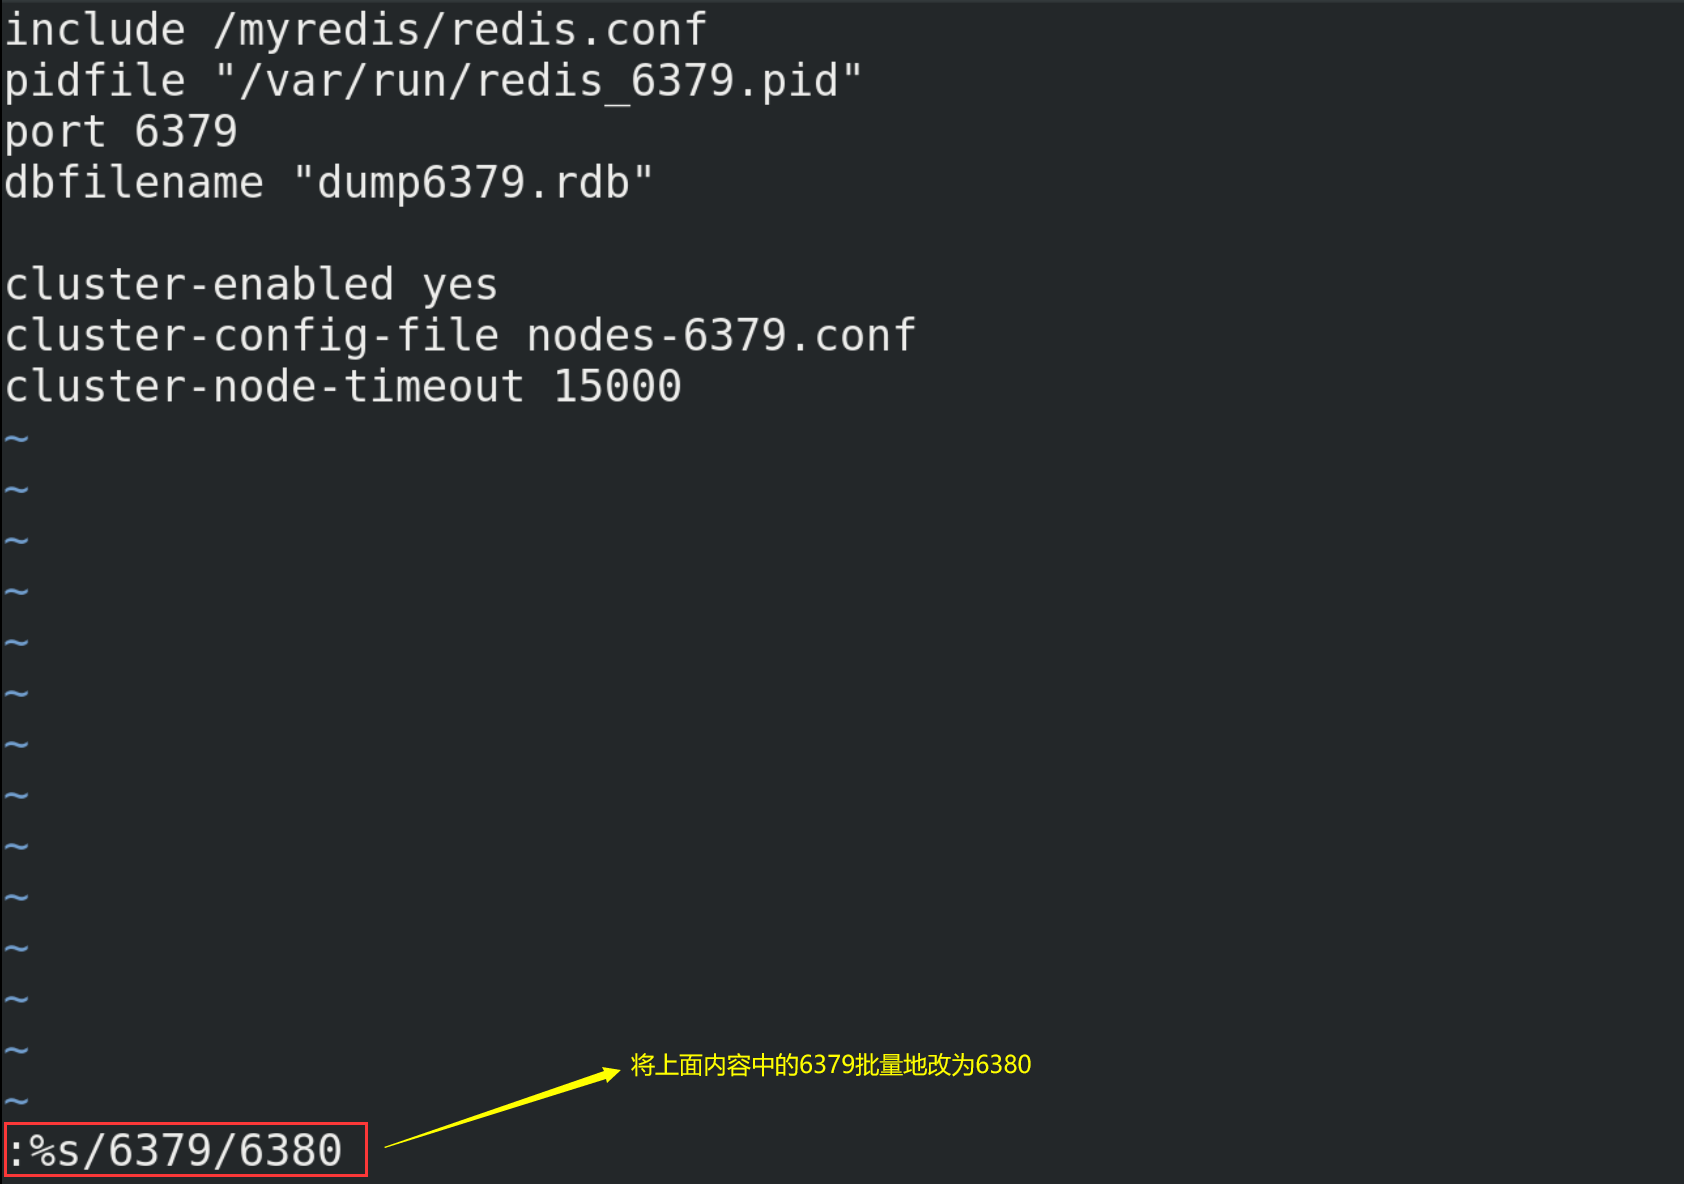
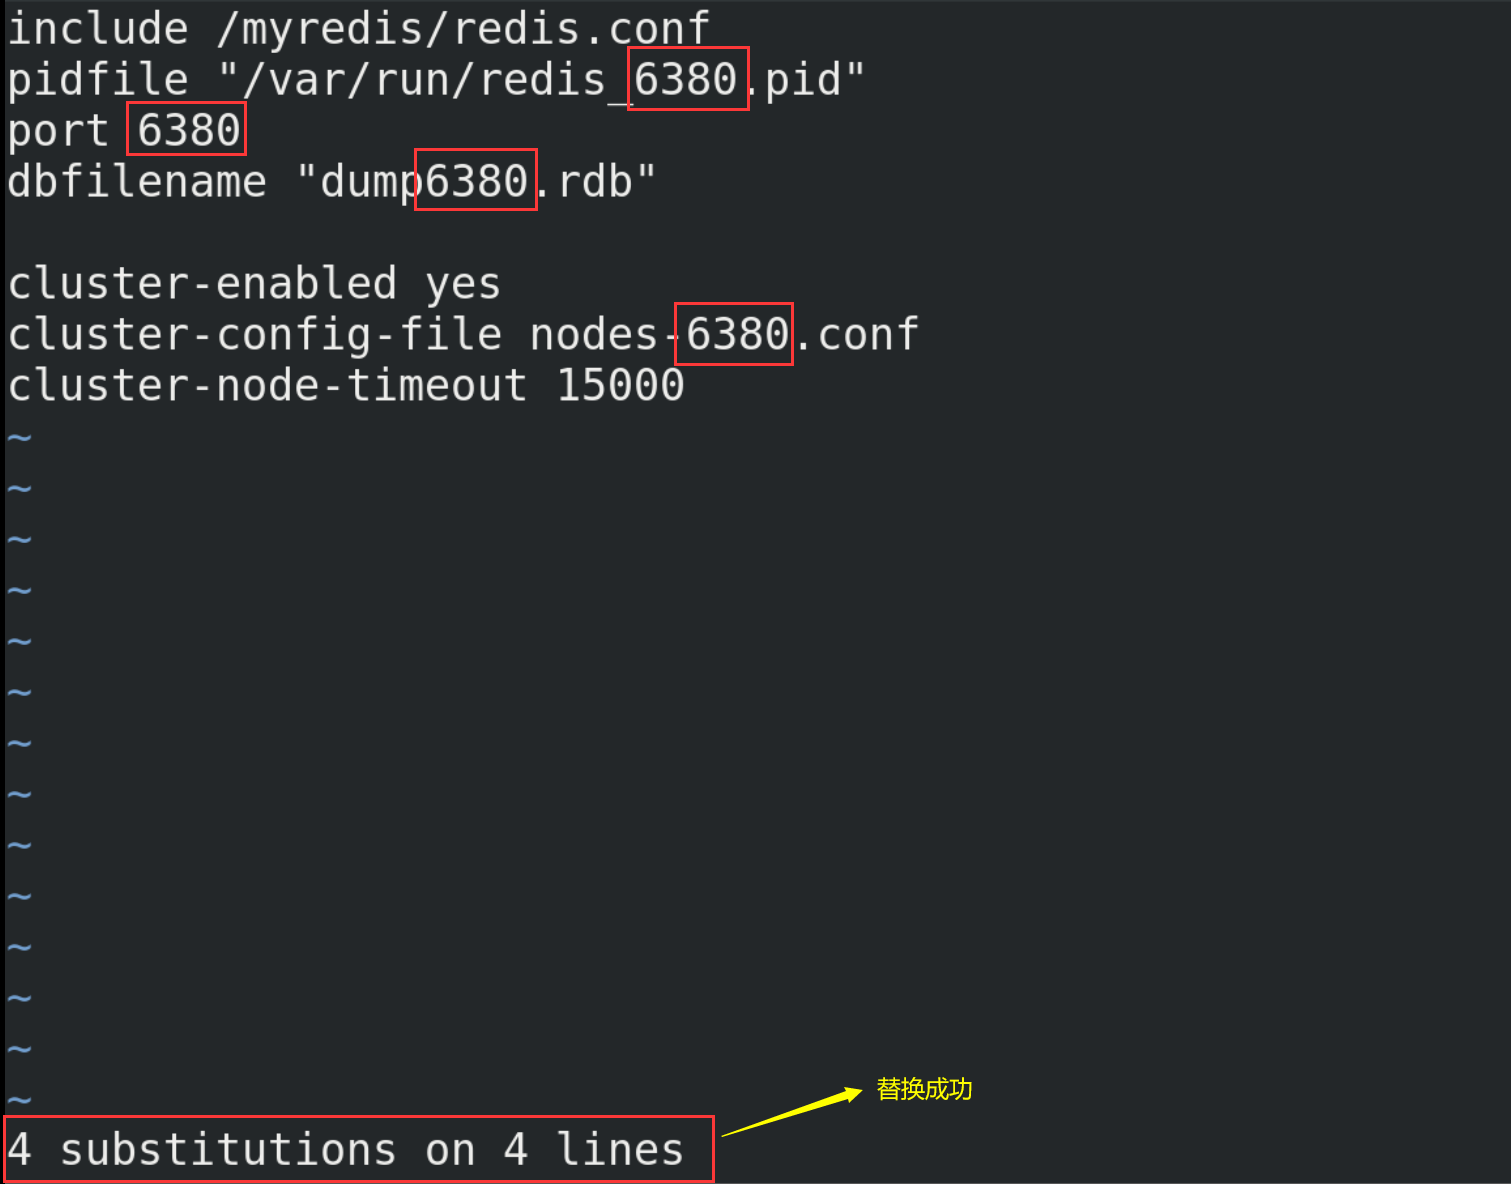
(6) Start the six redis services
redis-server redis6379.conf
redis-server redis6380.conf
redis-server redis6381.conf
redis-server redis6389.conf
redis-server redis6390.conf
redis-server redis6391.conf

(7) Combine the six nodes into a cluster
① Before combining, please ensure that the nodes-xxxx.conf file is generated normally after all redis instances are started.
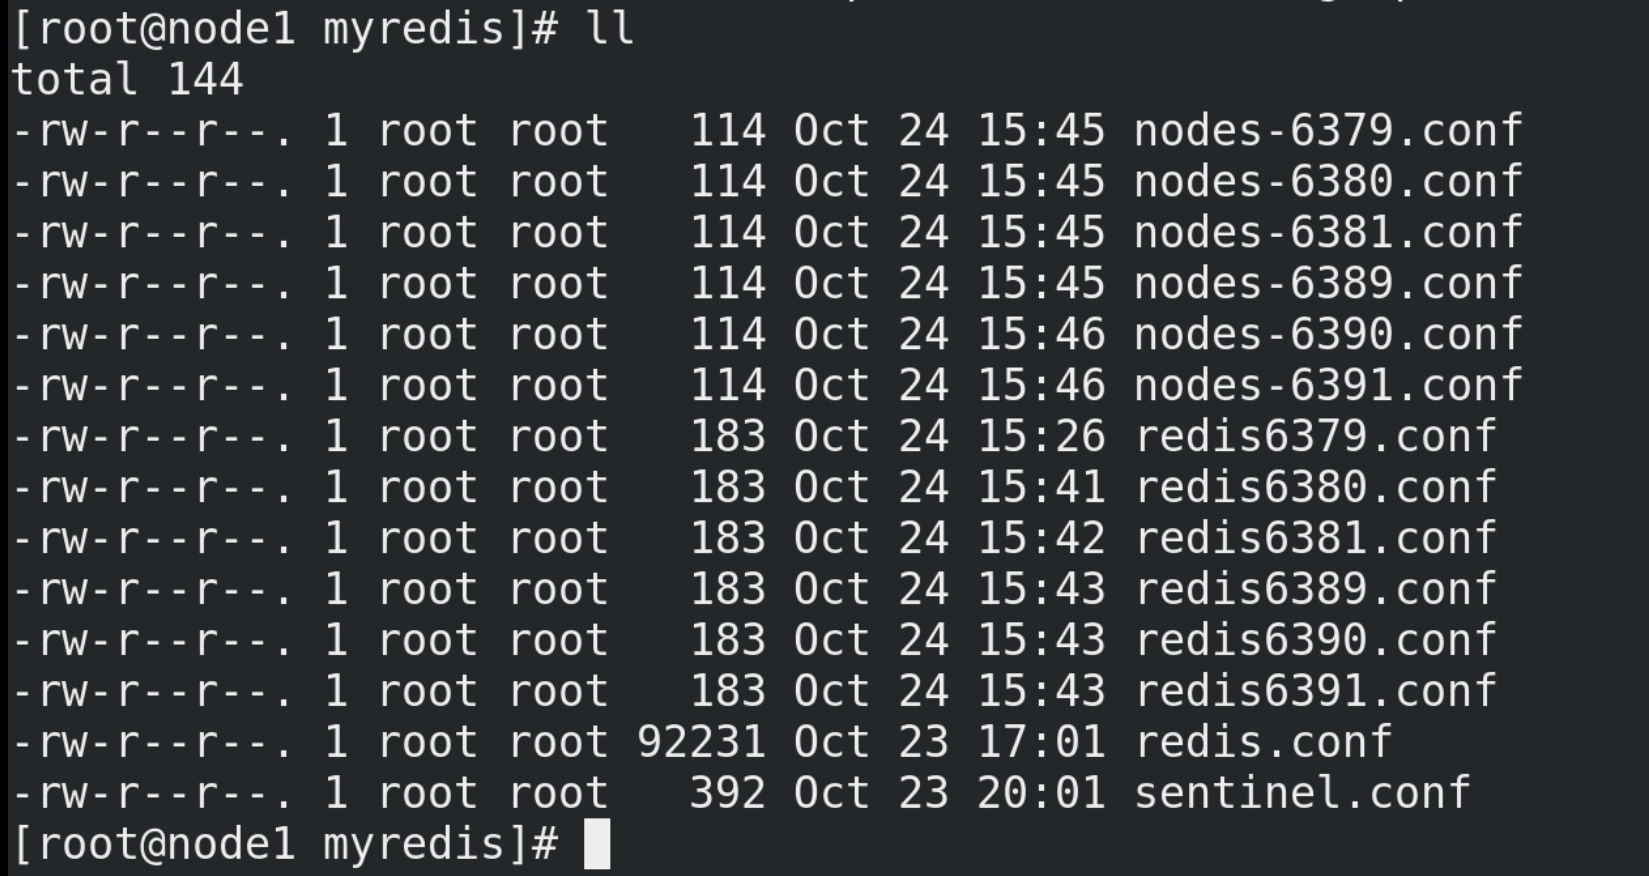
② Enter the / opt/redis-6.2.1/src / directory
cd /opt/redis-6.2.1/src/
Execute the following command in the / opt/redis-6.2.1/src / directory
# --replicas 1: configure the cluster in the simplest way, one host and one slave, exactly three groups.
# 192.168.88.100 is the IP address of this machine
redis-cli --cluster create --cluster-replicas 1 192.168.88.100:6379 192.168.88.100:6380 192.168.88.100:6381 192.168.88.100:6389 192.168.88.100:6390 192.168.88.100:6391
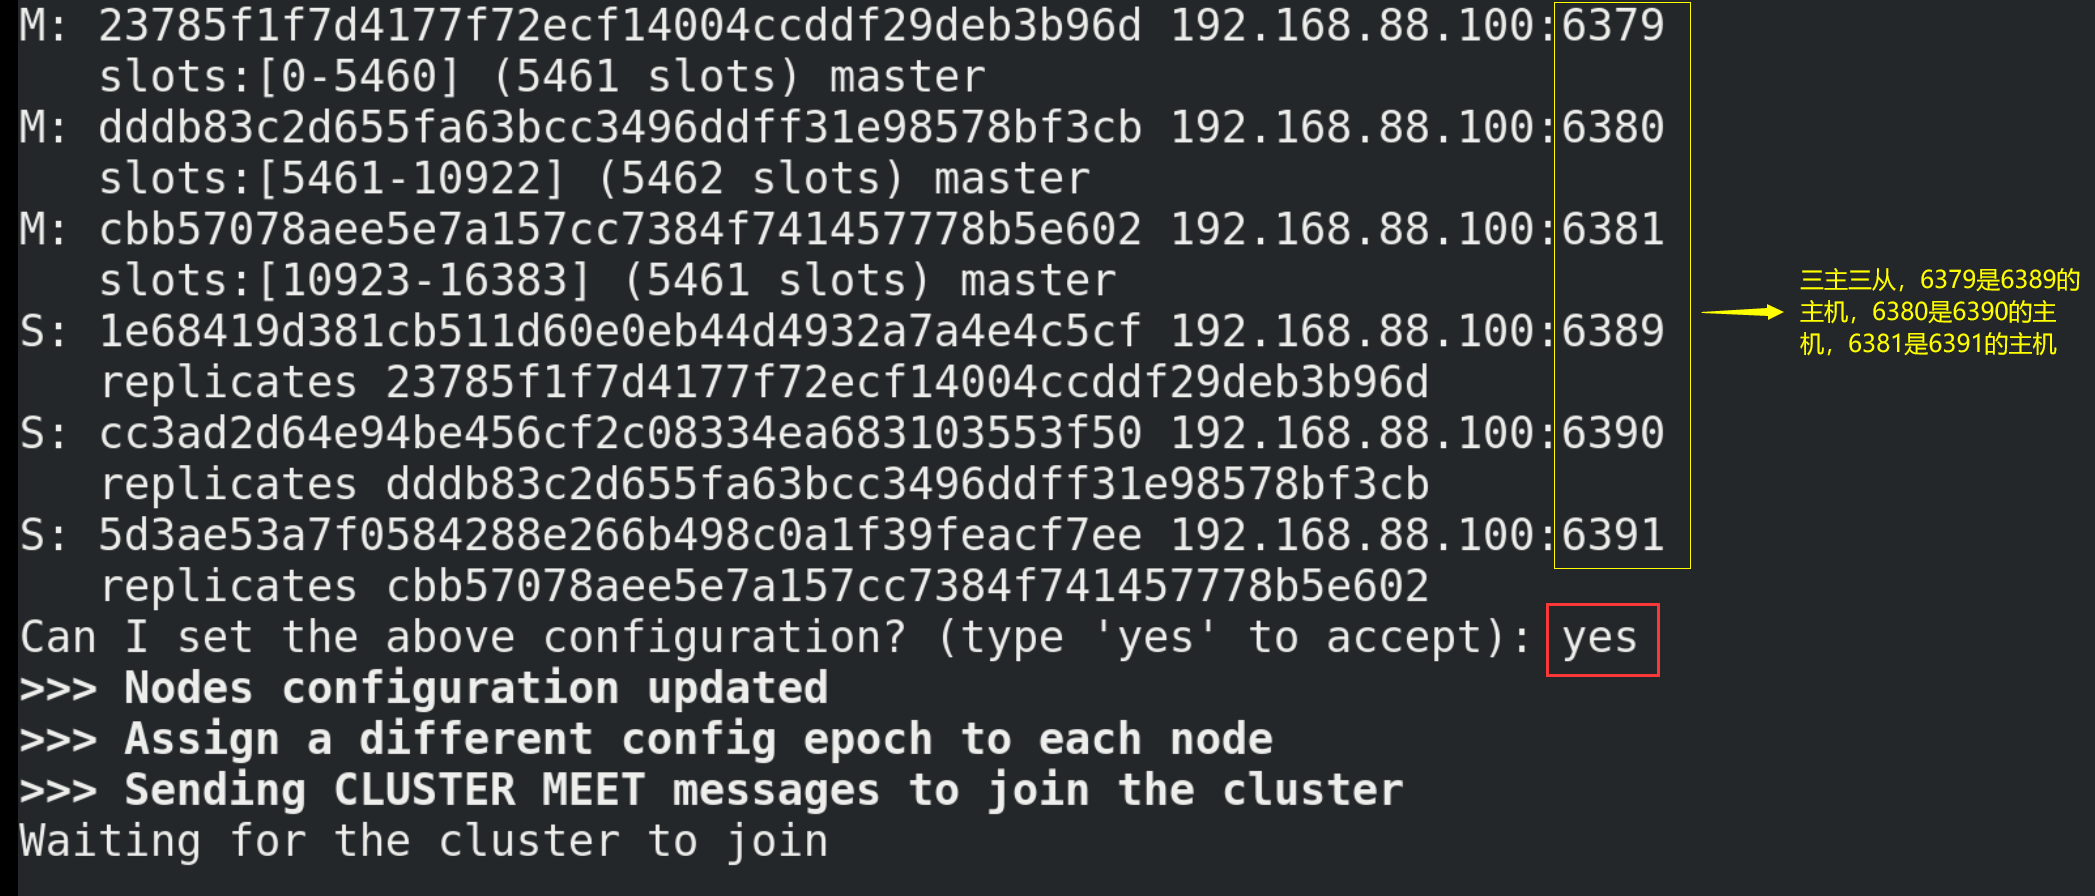
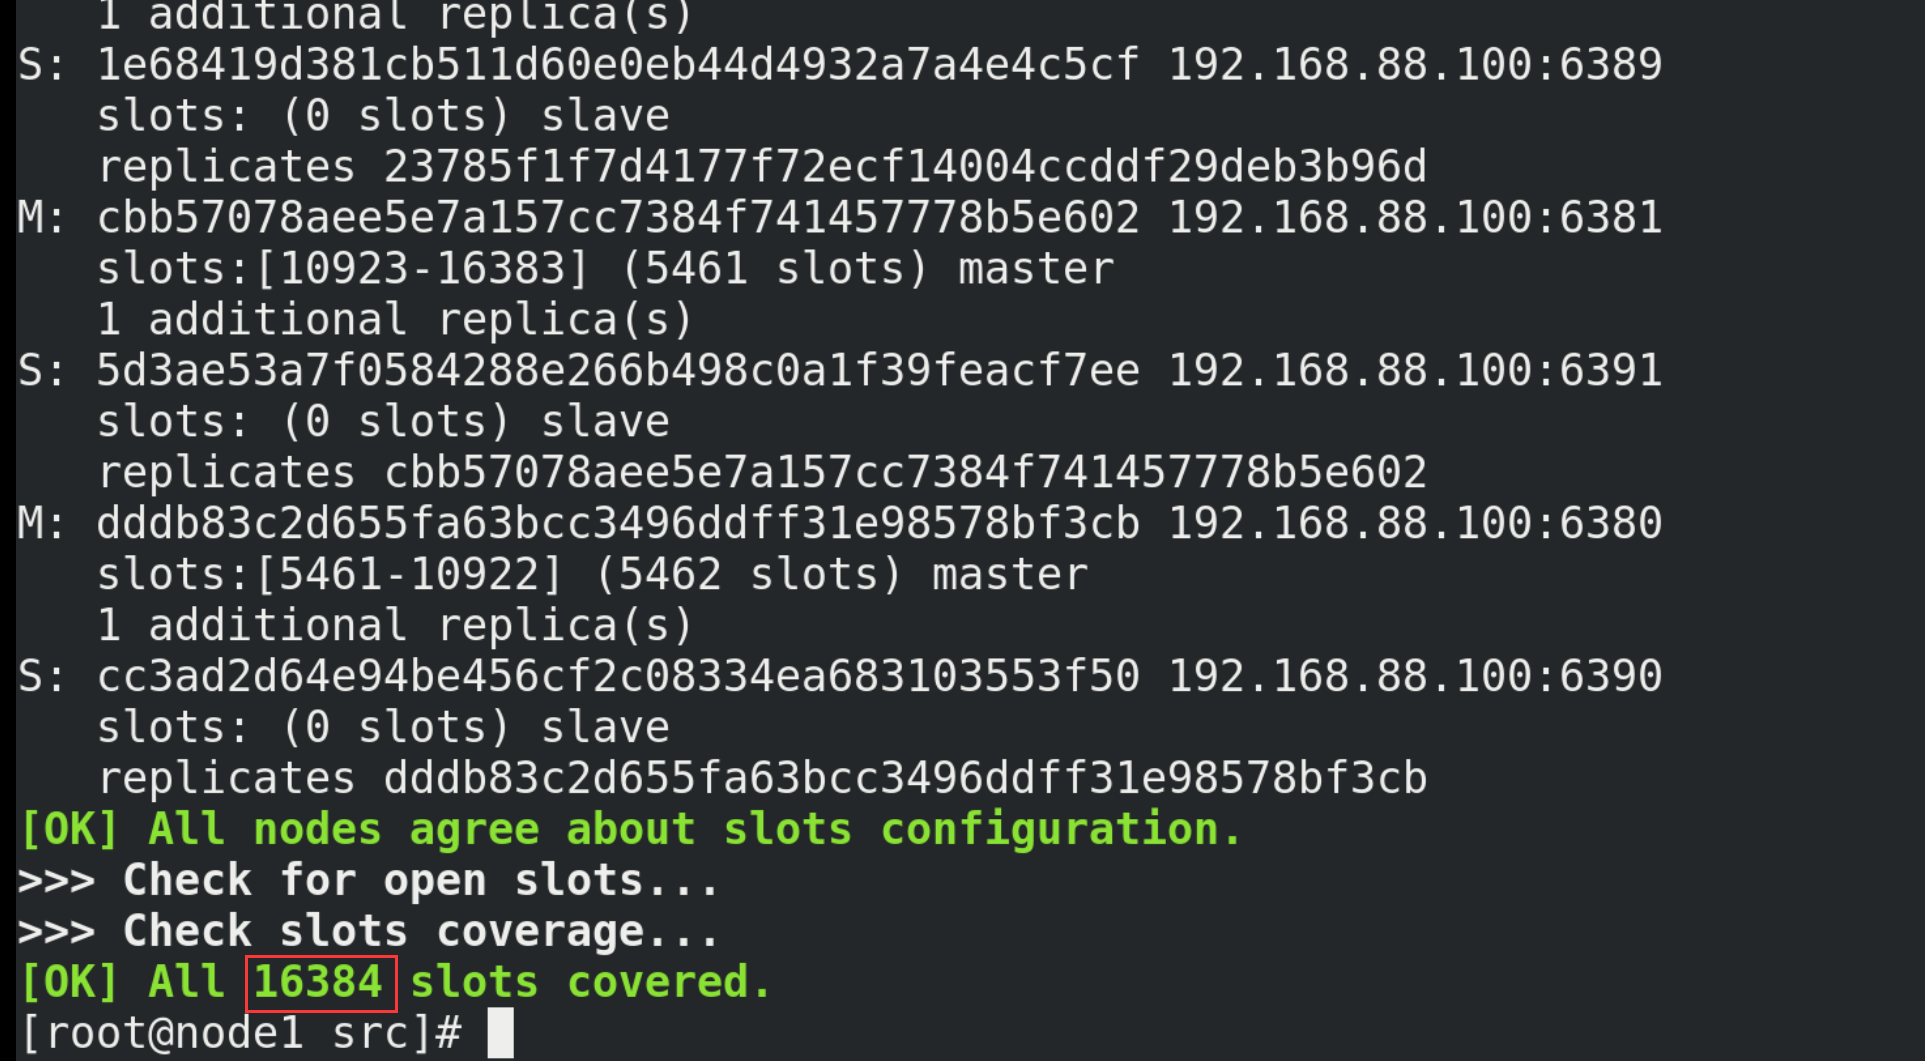
(8) Testing
# Cluster policy connection (- c) is adopted, and the port number can be any of 6379, 6380 and 6381
redis-cli -c -p 6379
# View cluster information
cluster nodes
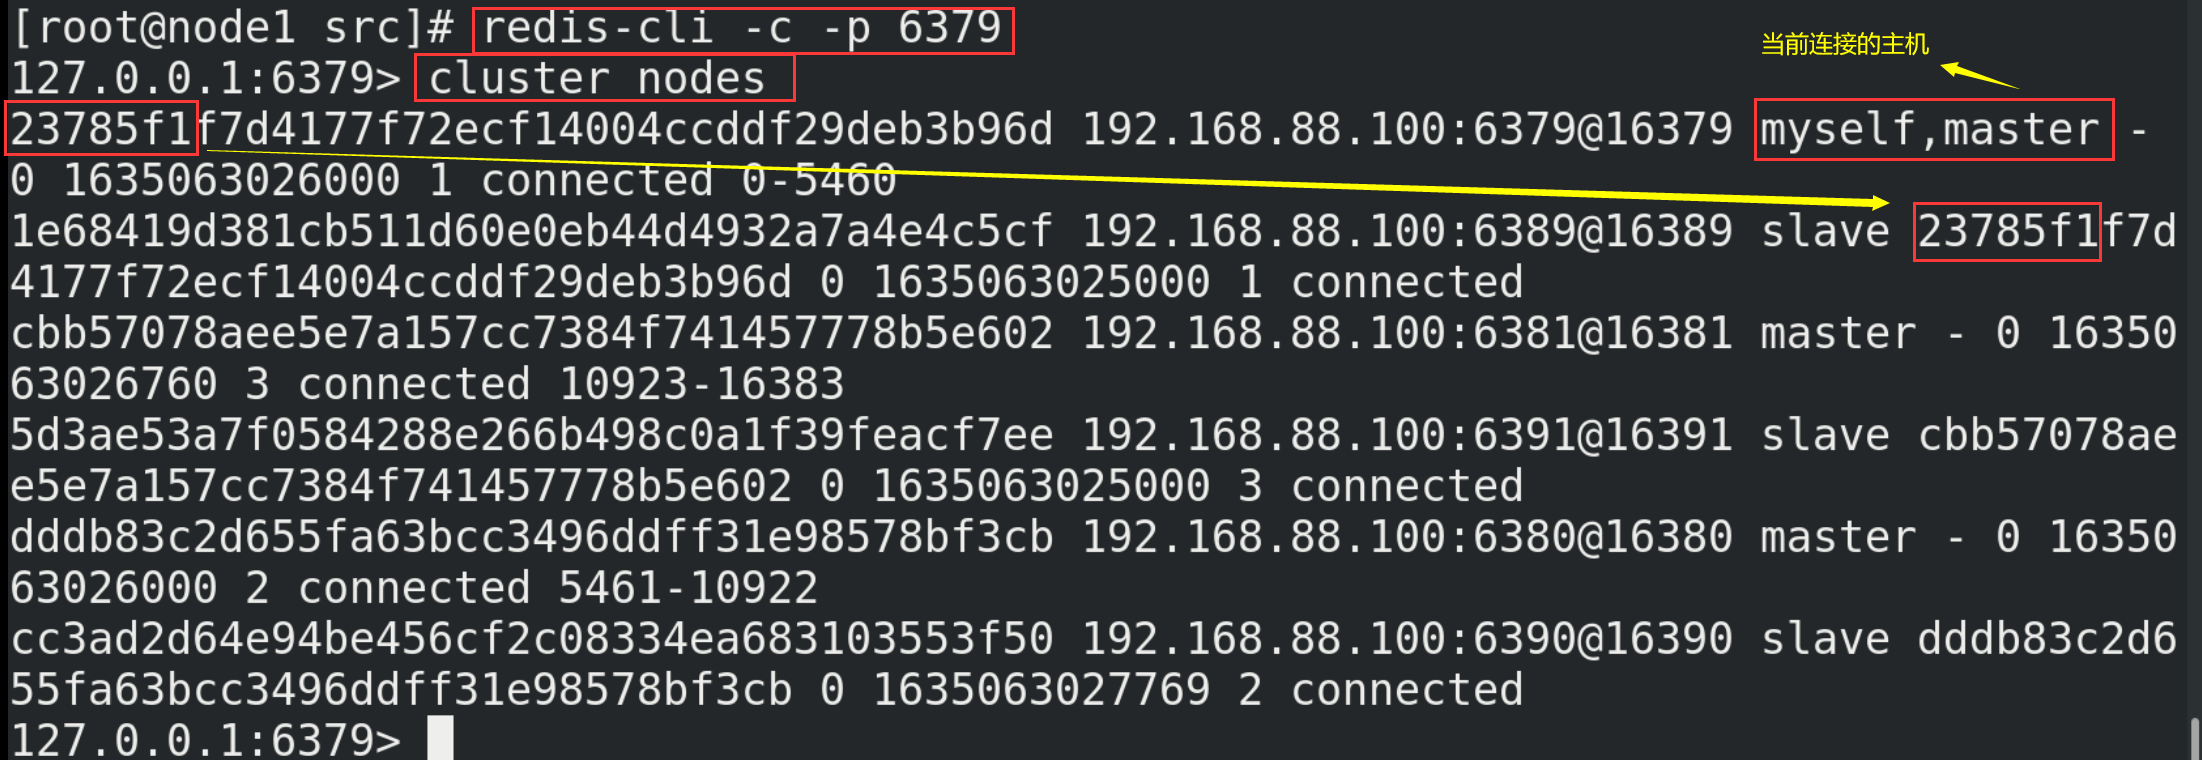
14.3. Cluster operation
(1) How does Redis Cluster allocate these six nodes?
A cluster must have at least three master nodes. The option -- cluster replicas 1 indicates that you want to create a slave node for each master node in the cluster. The allocation principle shall try to ensure that each master database runs at different IP addresses, and each slave database and master database are not at the same IP address.
(2) What are slots?

① A Redis cluster contains 16384 hash slot s, and each key in the database belongs to one of these 16384 slots. The cluster uses the formula CRC16(key)% 16384 to calculate which slot the key belongs to. The CRC16(key) statement is used to calculate the CRC16 checksum of the key.
② Each node in the cluster is responsible for processing a portion of the slots. For example, the cluster built above has three master nodes, so node 6379 is responsible for processing slots 0 to 5460, node 6380 is responsible for processing slots 5461 to 10922, and node 6381 is responsible for processing slots 10923 to 16383.
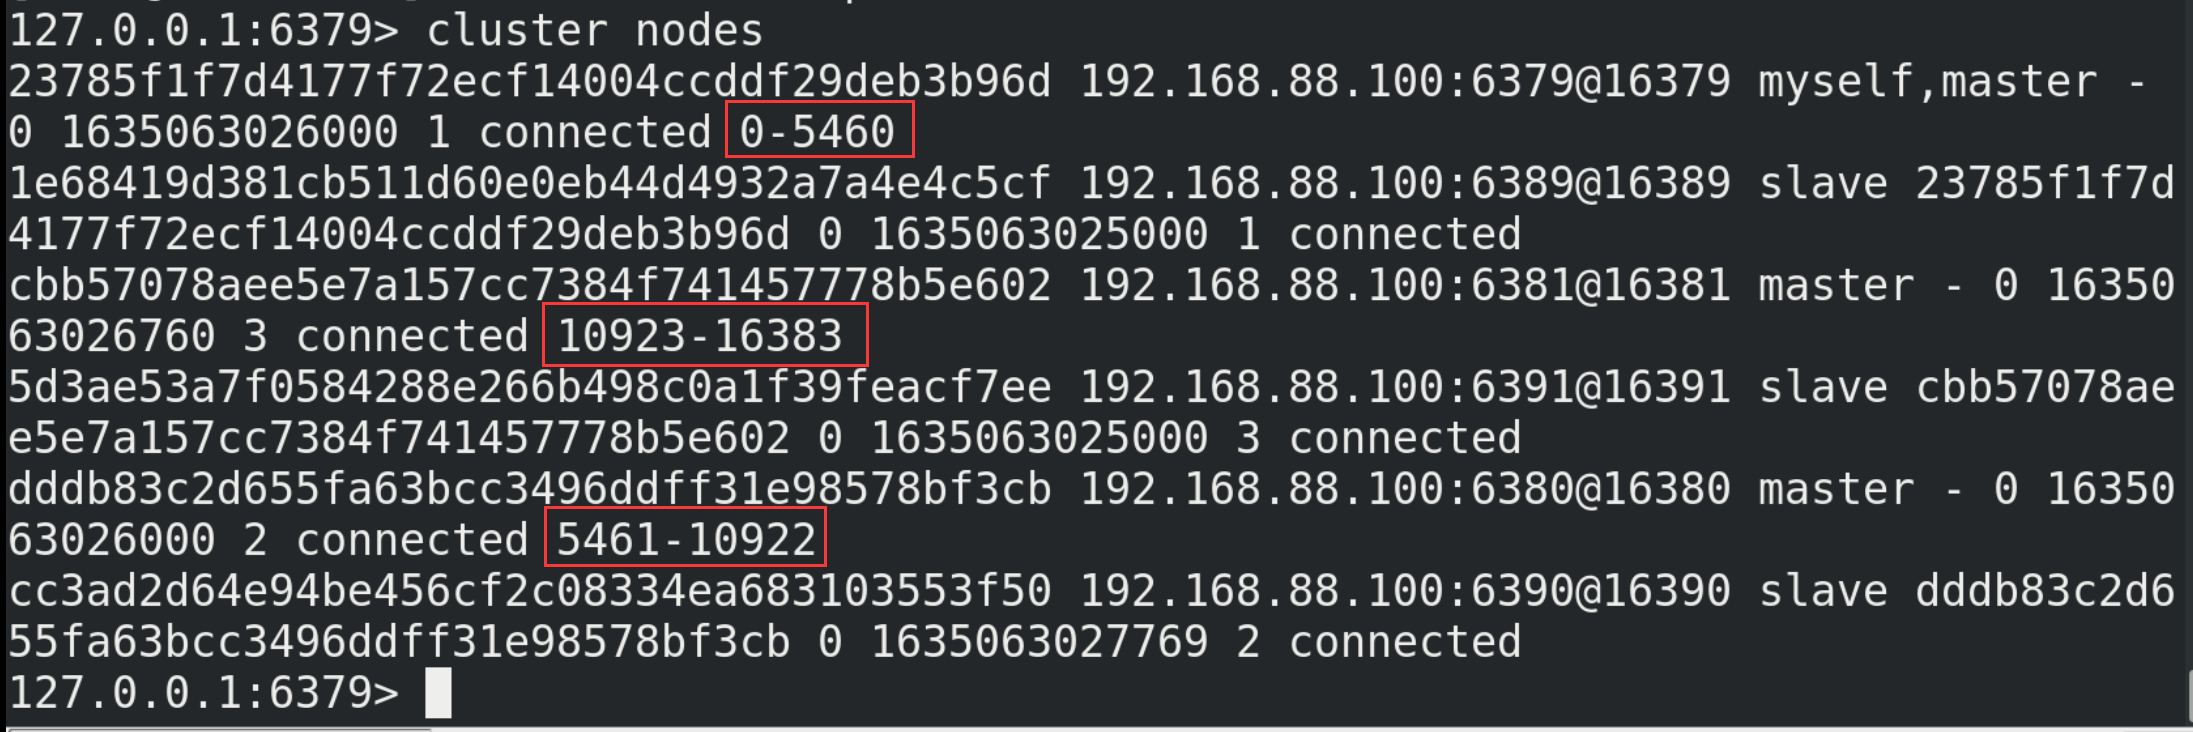
(3) Write value in cluster
① Write one key at a time
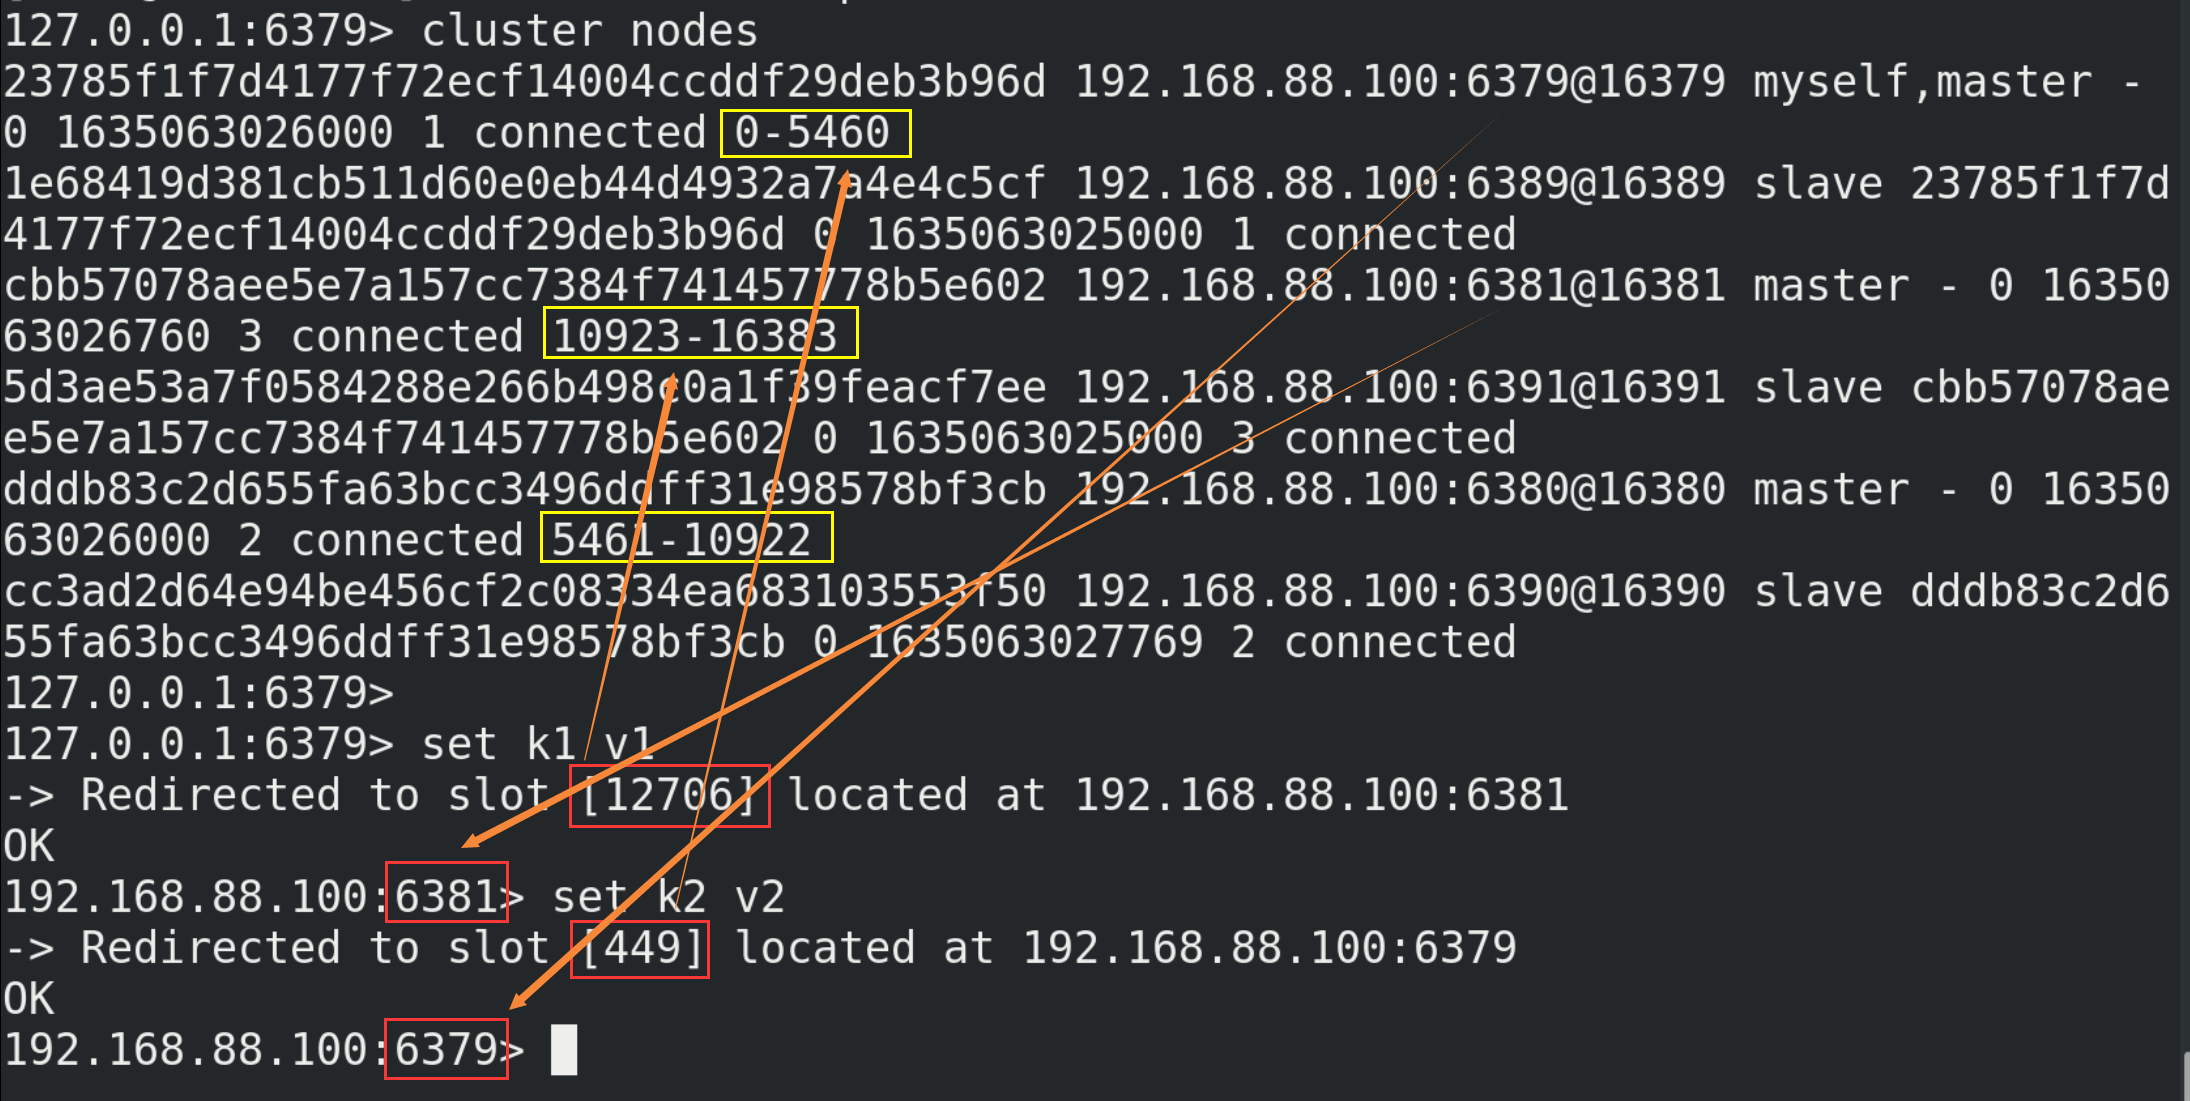
② Write multiple key s at a time
Because the key value is not under a slot, mget, mset and other multi key operations cannot be used directly. However, you can define the concept of group through {}, so that the key value pairs with the same content in {} in the key can be placed in a slot.

(4) Query values in the cluster
# Returns the key in the count slot
cluster getkeysinslot <slot> <count>
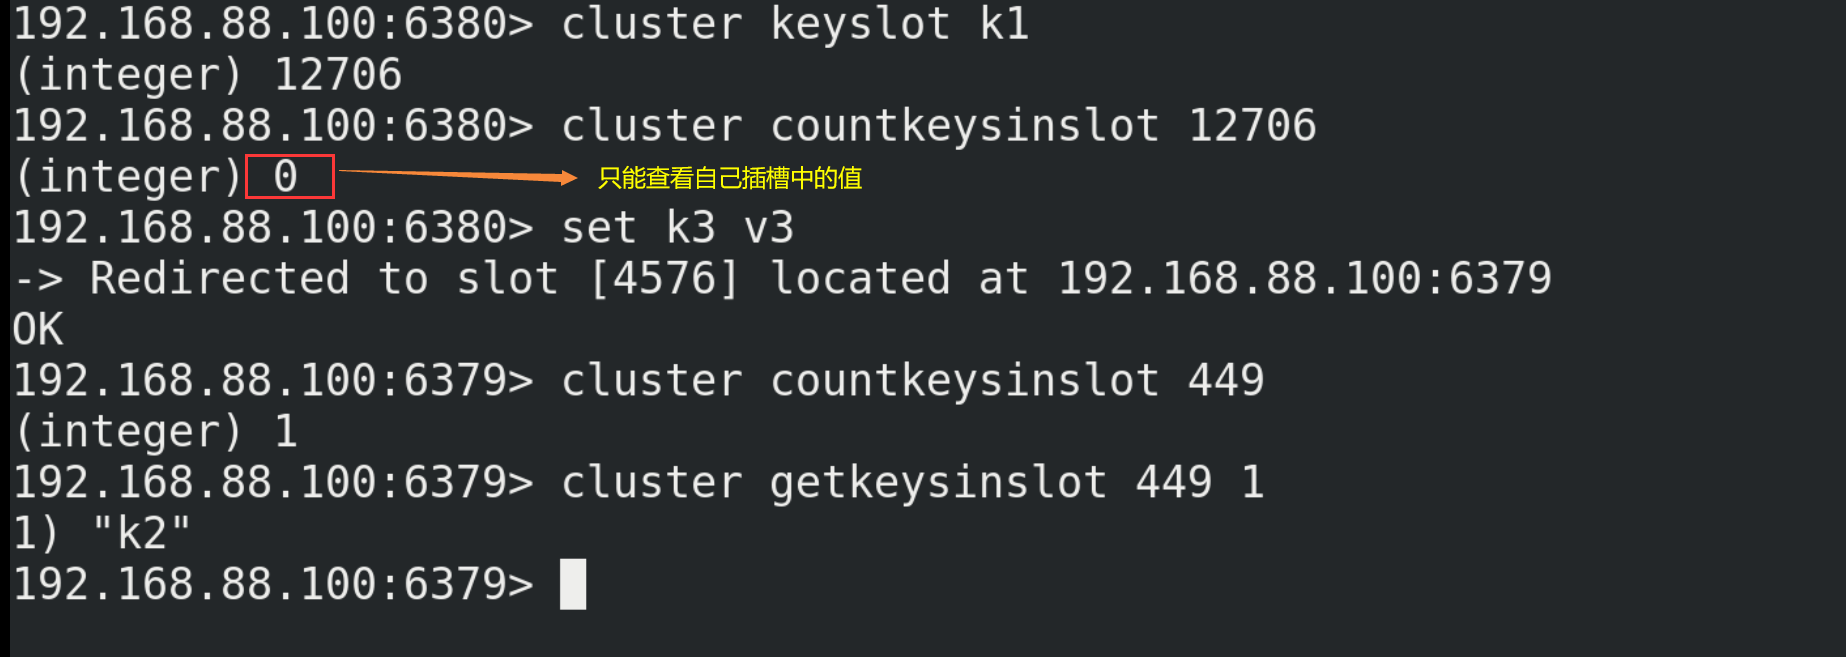
14.4. Fault recovery
(1) When one of the three hosts (e.g. host a) hangs up, its corresponding slave (e.g. slave a) will replace the host and become a new host. When the originally hung host a is restarted, it will become a slave of A.
(2) If the master and slave of a slot hang up, and the parameter cluster require full coverage in redis.conf is yes, then the whole cluster hangs up; If the master and slave of a slot are suspended and the cluster require full coverage is no, the data of the slot cannot be used or stored.
14.5. Jedis development of cluster
Even if the host is not connected, the cluster will automatically switch the host storage. Host write, slave read. There is no centralized master-slave cluster, that is, data written from any host can be read from other hosts.
public class JedisClusterTest {
  public static void main(String[] args) {
     Set<HostAndPort>set =new HashSet<HostAndPort>();
     set.add(new HostAndPort("192.168.88.100",6379));
     JedisCluster jedisCluster=new JedisCluster(set);
     jedisCluster.set("k1", "v1");
     System.out.println(jedisCluster.get("k1"));
  }
}
15.Redis application problem solving
15.1. Cache penetration
15.1.1. Problem description
Cache penetration means that the data requested by the user continuously does not exist in the cache or database, such as the data with id "- 1" or the data with id is extremely large and does not exist. At this time, the user is likely to be an attacker, which will cause excessive pressure on the database.
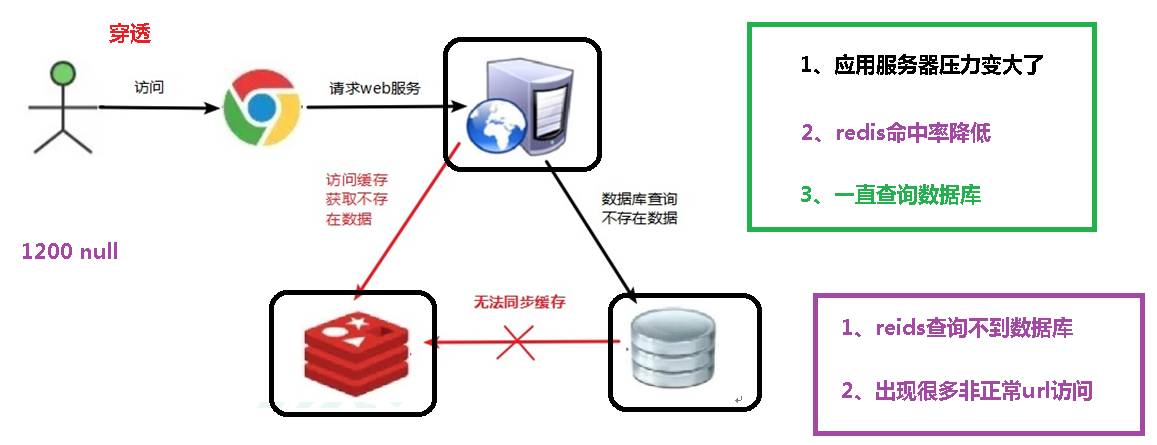
15.1.2. Solution
(1) Cache for null values:
If the data returned by a query is empty (whether the data does not exist or not), we still cache the empty result (null). Set the expiration time of the empty result to be very short, generally no more than five minutes.
(2) Set accessible list (white list):
Use the bitmaps type to define an accessible list. The list id is used as the offset of bitmaps. Each access is compared with the id in bitmaps. If the access id is not in bitmaps, it is intercepted and access is not allowed.
(3) Using Bloom filter:
Bloom Filter was proposed by bloom in 1970. It is actually a long binary vector (bitmap) and a series of random mapping functions (hash function). Bloom filters can be used to retrieve whether an element is in a collection. Its advantage is that the spatial efficiency and query time are far more than the general algorithm, but its disadvantage is that it has a certain false recognition rate and deletion difficulty. Hash all possible data into a large enough bitmaps, and a certain non-existent data will be intercepted by the bitmaps, so as to avoid the query pressure on the underlying storage system.
(4) Real time monitoring:
When it is found that the hit rate of Redis begins to decrease rapidly, it is necessary to check the access objects and data, and cooperate with the operation and maintenance personnel to set the blacklist restriction service.
15.2. Buffer breakdown
15.2.1. Problem description
Cache breakdown means that there is no data in the cache but there is some data in the database (generally, the cache time of the data expires). At this time, due to a large number of concurrent requests, the data is not read in the read cache at the same time, and the data is fetched from the database at the same time, resulting in an instantaneous increase in the pressure of the database.

15.2.2. Solution
(1) Preset hot data:
Before the peak visit of redis, store some popular data in redis in advance to increase the duration of these popular data key s.
(2) Real time adjustment:
The on-site monitoring data is popular, and the expiration time of the key is adjusted in real time.
(3) Use locks:
① When the cache fails (it is judged that the value is empty), instead of immediately loading dB, use some operations of the cache tool with the return value of successful operations (such as SETNX of Redis) to set a mutex key.
③ When the operation returns success, perform the operation of load db, reset the cache, and finally delete the mutex key;
④ When the operation returns a failure, it is proved that there is a thread in load db. The current thread sleeps for a period of time and then retries the whole get cache method.
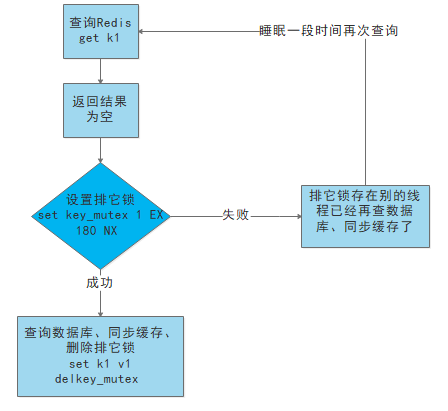
15.3. Cache avalanche
15.3.1. Problem description
Cache avalanche refers to the massive expiration of data in the cache, and the huge amount of query data causes excessive pressure on the database. The difference between cache avalanche and cache breakdown is that the former is for many key caches, while the latter is for one key.
15.3.2. Solution
(1) Build multi-level cache architecture:
nginx cache + redis cache + other caches (ehcache, etc.)
(2) Use locks or queues:
Lock or queue is used to ensure that a large number of threads will not read and write to the database at one time, so as to avoid a large number of concurrent requests falling on the underlying storage system in case of failure (not applicable to high concurrency).
(3) Set expiration flag to update cache:
Record whether the cached data has expired (set the advance amount). If it has expired, it will trigger another thread to update the cache of the actual key in the background.
(4) Spread cache expiration time:
For example, you can add a random value based on the original expiration time, such as 1-5 minutes, so that the repetition rate of the expiration time of each cache will be reduced, and it is difficult to cause collective failure events.
15.4. Distributed lock
15.4.1. Problem description
(1) With the needs of business development, after the system deployed by the original single machine is evolved into a distributed cluster system, because the distributed system is multi-threaded, multi process and distributed on different machines, this will invalidate the concurrency control lock strategy under the original single machine deployment. The simple Java API can not provide the ability of distributed lock. In order to solve this problem, a cross JVM mutual exclusion mechanism is needed to control the access of shared resources, which is the problem to be solved by distributed locking.
(2) At present, the mainstream implementation schemes of distributed lock are as follows:
① Implementation of distributed lock based on Database
② Cache based (e.g. Redis, etc.)
③ Based on Zookeeper
Redisd has the highest performance and Zookeeper has the highest reliability.
15.4.2. Use Redis command to realize distributed lock
set <key> <value> NX|XX EX|PX second|millisecond
| NX | Set the key only when the key does not exist. SET key value NX has the same effect as SETNX key value |
|---|---|
| EX second | Set the expiration time of the key to second seconds, and the effect of SET key value EX second is the same as that of set key second value |
| PX millisecond | Set the expiration time of the key to millisecond. The SET key value PX millisecond effect is equivalent to PSETEX key millisecond value |
| XX | Set the key only when the key already exists |
15.4.3. Implementing distributed locks using Java code
(1) The specific codes are as follows:
@RestController
@RequestMapping("/redisTest")
public class RedisController {

    @Autowired
    private RedisTemplate redisTemplate;

    @GetMapping("testLock")
    public void testLock(){
        //1 get lock, setne
        Boolean lock = redisTemplate.opsForValue().setIfAbsent("lock", "111");
        //2. Successfully obtain the lock and query the value of num
        if(lock){
            Object value = redisTemplate.opsForValue().get("num");
            //2.1 judge whether num is empty return
            if(StringUtils.isEmpty(value)){
                return;
            }
            //2.2 convert value to int
            int num = Integer.parseInt(value+"");
            //2.3 add 1 to the num of redis
            redisTemplate.opsForValue().set("num", ++num);
            //2.4 release lock, del
            redisTemplate.delete("lock");

        }else{
            //3. Failed to acquire the lock. Acquire it again every 0.1 seconds
            try {
                Thread.sleep(100);
                testLock();
            } catch (InterruptedException e) {
                e.printStackTrace();
            }
        }
    }
}
Initialize the value of num to 0.
Use ab tool for pressure test, and the command is as follows:
ab -n 1000 -c 100 http://192.168.88.1:8080/redisTest/testLock
Look at the value of num again and the result is 100.
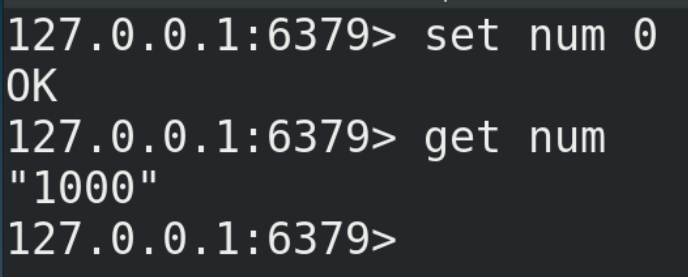
(2) Code optimization -- using UUID to prevent accidental deletion of locks
@GetMapping("testLock")
public void testLock(){
    String uuid = UUID.randomUUID().toString();
    //1 get lock, setne
    Boolean lock = redisTemplate.opsForValue().setIfAbsent("lock", uuid,3, TimeUnit.SECONDS);
    //2. Successfully obtain the lock and query the value of num
    if(lock){
        Object value = redisTemplate.opsForValue().get("num");
        //2.1 judge whether num is empty return
        if(StringUtils.isEmpty(value)){
            return;
        }
        //2.2 convert value to int
        int num = Integer.parseInt(value+"");
        //2.3 add 1 to the num of redis
        redisTemplate.opsForValue().set("num", ++num);
        //2.4 release lock, del
        redisTemplate.delete("lock");
        //Judge whether the comparison uuid values are the same
        String lockUuid = (String)redisTemplate.opsForValue().get("lock");
        if(lockUuid.equals(uuid)){
            redisTemplate.delete("lock");
        }
    }else{
        //3. Failed to acquire the lock. Acquire it again every 0.1 seconds
        try {
            Thread.sleep(100);
            testLock();
        } catch (InterruptedException e) {
            e.printStackTrace();
        }
    }
}
(3) Code optimization - LUA script ensures atomicity of deletion
@RestController
@RequestMapping("/redisTest")
public class RedisTestController {

    @Autowired
    private RedisTemplate redisTemplate;

    @GetMapping("testLockLua")
    public void testLockLua() {
        //1 declare a uuid and put it as a value into the value corresponding to our key
        String uuid = UUID.randomUUID().toString();
        //2 define a lock: lua script can use the same lock to delete!
        String skuId = "25"; // Access item 100008348542 with skuId 25
        String locKey = "lock:" + skuId; // Locked is the data of each commodity

        // 3 acquire lock
        Boolean lock = redisTemplate.opsForValue().setIfAbsent(locKey, uuid, 3, TimeUnit.SECONDS);

        // The first one: no code is written between lock and expiration time.
        // redisTemplate.expire("lock",10, TimeUnit.SECONDS);// Set expiration time
        // If true
        if (lock) {
            // Start of executed business logic
            // Get num data in cache
            Object value = redisTemplate.opsForValue().get("num");
            // If it is empty, return directly
            if (StringUtils.isEmpty(value)) {
                return;
            }
            // Not empty, if there is an exception here! Then delete fails! In other words, the lock will always exist!
            int num = Integer.parseInt(value + "");
            // Put num + 1 into the cache each time
            redisTemplate.opsForValue().set("num", String.valueOf(++num));
            /*Use lua script to lock*/
            // Defining lua scripts
            String script = "if redis.call('get', KEYS[1]) == ARGV[1] then return redis.call('del', KEYS[1]) else return 0 end";
            // Using redis to execute lua
            DefaultRedisScript<Long> redisScript = new DefaultRedisScript<>();
            redisScript.setScriptText(script);
            // Set the return value type to Long
            // Because when deleting the judgment, the returned 0 is encapsulated as a data type. If it is not encapsulated, the String type is returned by default,
            // Then there will be an error between the returned string and 0.
            redisScript.setResultType(Long.class);
            // The first is a script, the second is the key to be judged, and the third is the value corresponding to the key.
            redisTemplate.execute(redisScript, Arrays.asList(locKey), uuid);
        } else {
            // Other threads waiting
            try {
                // sleep
                Thread.sleep(1000);
                // After waking up, call the method.
                testLockLua();
            } catch (InterruptedException e) {
                e.printStackTrace();
            }
        }
    }

    @GetMapping("testLock")
    public void testLock(){
        String uuid = UUID.randomUUID().toString();
        //1 get lock, setne
        Boolean lock = redisTemplate.opsForValue().setIfAbsent("lock", uuid,3, TimeUnit.SECONDS);
        //2. Successfully obtain the lock and query the value of num
        if(lock){
            Object value = redisTemplate.opsForValue().get("num");
            //2.1 judge whether num is empty return
            if(StringUtils.isEmpty(value)){
                return;
            }
            //2.2 convert value to int
            int num = Integer.parseInt(value+"");
            //2.3 add 1 to the num of redis
            redisTemplate.opsForValue().set("num", ++num);
            //2.4 release lock, del
            //Judge whether the comparison uuid values are the same
            String lockUuid = (String)redisTemplate.opsForValue().get("lock");
            if(lockUuid.equals(uuid)) {
                redisTemplate.delete("lock");
            }
        }else{
            //3. Failed to acquire the lock. Acquire it again every 0.1 seconds
            try {
                Thread.sleep(100);
                testLock();
            } catch (InterruptedException e) {
                e.printStackTrace();
            }
        }
    }
}
15.4.4. Summary
In order to ensure the availability of distributed locks, we should ensure that the implementation of locks meets the following four conditions at least:
(1) Mutex. At any time, only one client can hold the lock.
(2) No deadlock occurs. Even if one client crashes while holding the lock without actively unlocking, it can ensure that other subsequent clients can lock.
(3) Whoever unties the bell must tie it. Locking and unlocking must be the same client. The client cannot unlock the lock added by others.
(4) Locking and unlocking must be atomic.
16.Redis6 new features
16.1.ACL
16.1.1. Introduction
Redis ACL is the abbreviation of Access Control List. This function allows some connections to be restricted according to executable commands and accessible KEYS. Before Redis 5, redis security rules only had password control, and high-risk commands were adjusted through rename, such as flushdb, KEYS *, shutdown, etc. Redis6 provides the function of ACL to control the user's permissions more finely:
(1) Access rights: user name and password
(2) Executable commands
(3) Operable KEY
16.1.2. Relevant orders
(1) acl list: displays a list of user permissions
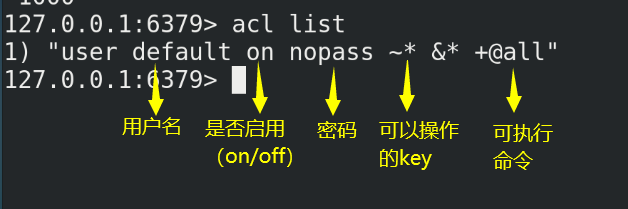
(2)acl cat
① View add permission instruction categories
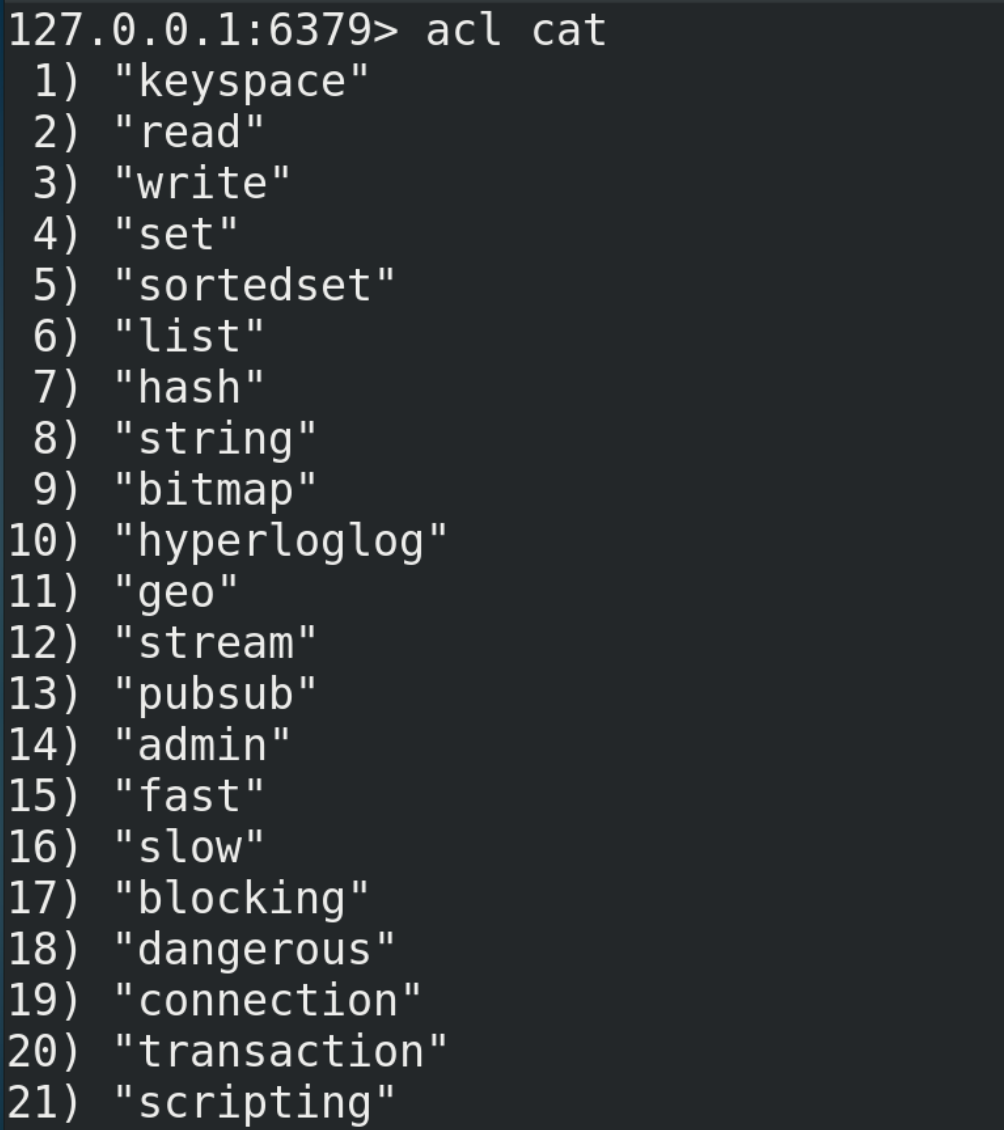
② Add the parameter type name to view the specific commands under the type, such as acl cat string
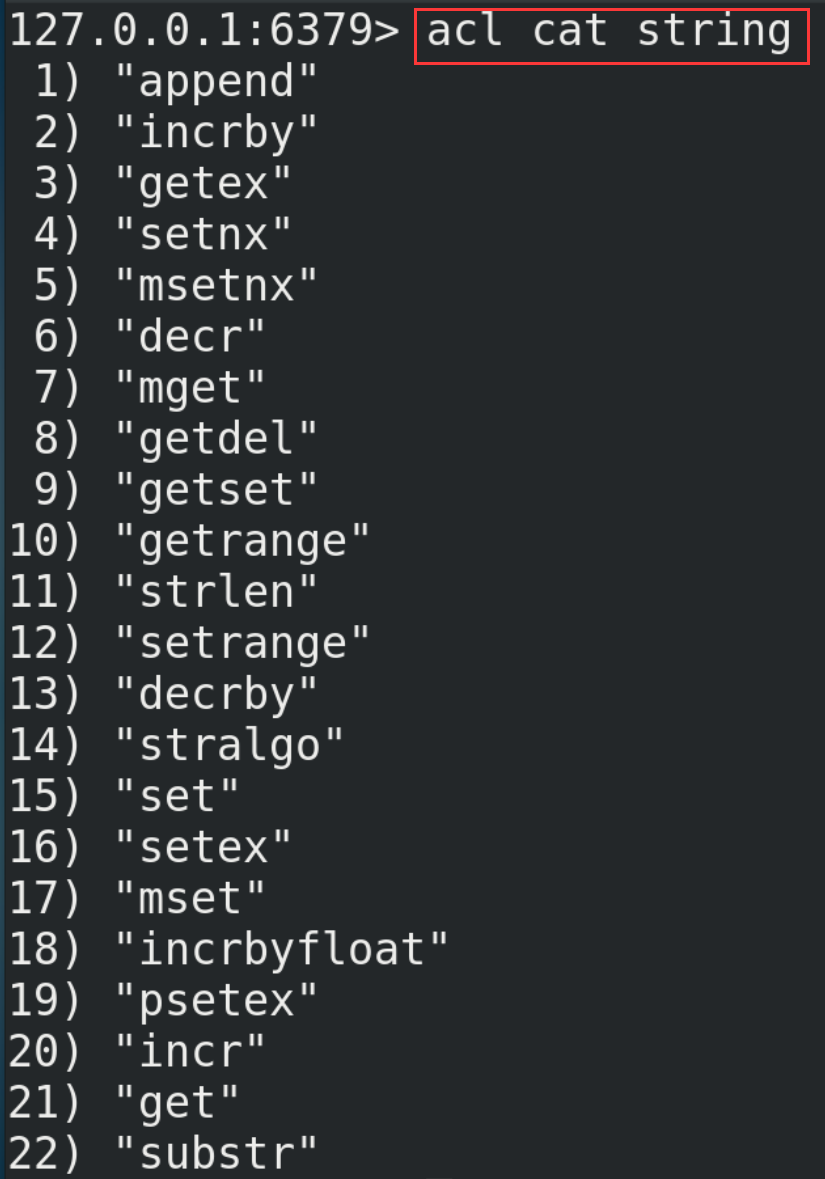
(3) acl whoami: view the current user

(4)acl setuser
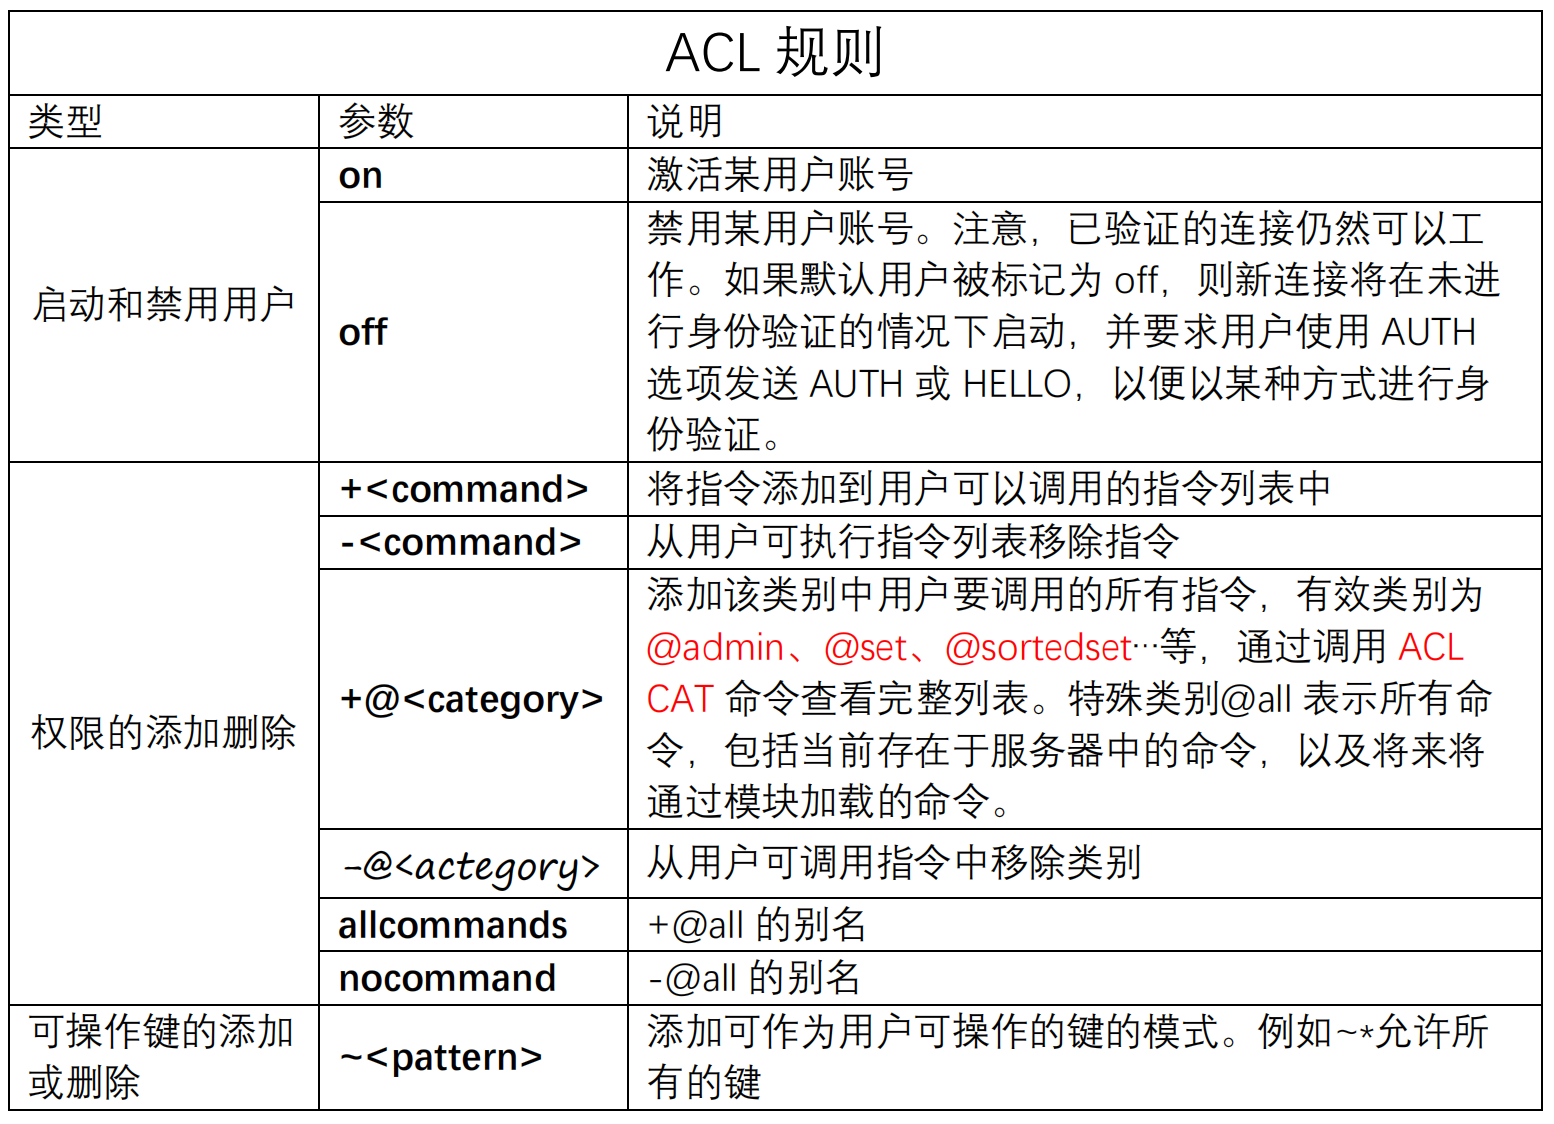
① Create a new user (default permissions)
acl setuser <username>

The above example does not specify any rules. If the user does not exist, the default attribute of just created will be used to create the user. If the user already exists, the above command will not perform any operation.
② Users with user name, password, ACL permission and enabled
acl setuser mary on >password ~cached:* +get

Switch users and verify permissions
# Switch users
auth mary password

16.2.I/O multithreading
16.2.1. Introduction
Redis6 supports multithreading, but it does not mean that redis bid farewell to single threading. I/O multithreading refers to the multithreading of the network I/O interaction processing module of the client interaction part, rather than the multithreading of executing commands. Redis6 still executes commands in a single thread.
16.2.2. Principle architecture
(1) Redis6 adds multithreading, but it is somewhat different from Memcached, which implements multithreading from I/O processing to data access. The multi-threaded part of redis is only used to process the reading and writing of network data and protocol parsing, and the execution of commands is still single thread. The reason for this design is that it does not want to be complicated by multithreading. It needs to control the concurrency of key, Lua, transaction, LPUSH/LPOP, etc. The overall design is as follows:
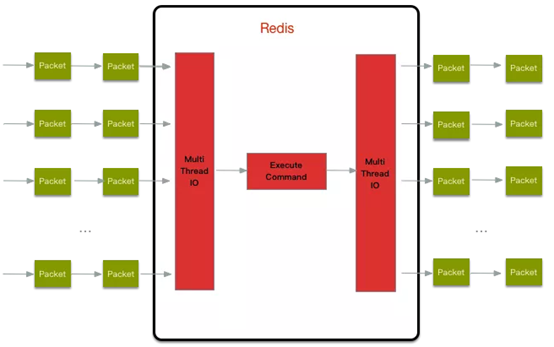
(2) In addition, multithreaded I/O is not enabled by default, and needs to be manually configured in the redis.conf configuration file
# Turn on I/O multithreading
io-threads-do-reads yes
# Number of multiple threads
io-threads 4
16.3. Tools support Cluster
In previous versions of redis, if you want to build a cluster, you need to install the ruby environment separately. Redis 5 integrates the functions of redis-trib.rb into redis cli. In addition, the official redis benchmark tool starts to support the cluster mode, and performs pressure testing on multiple slices through multithreading.
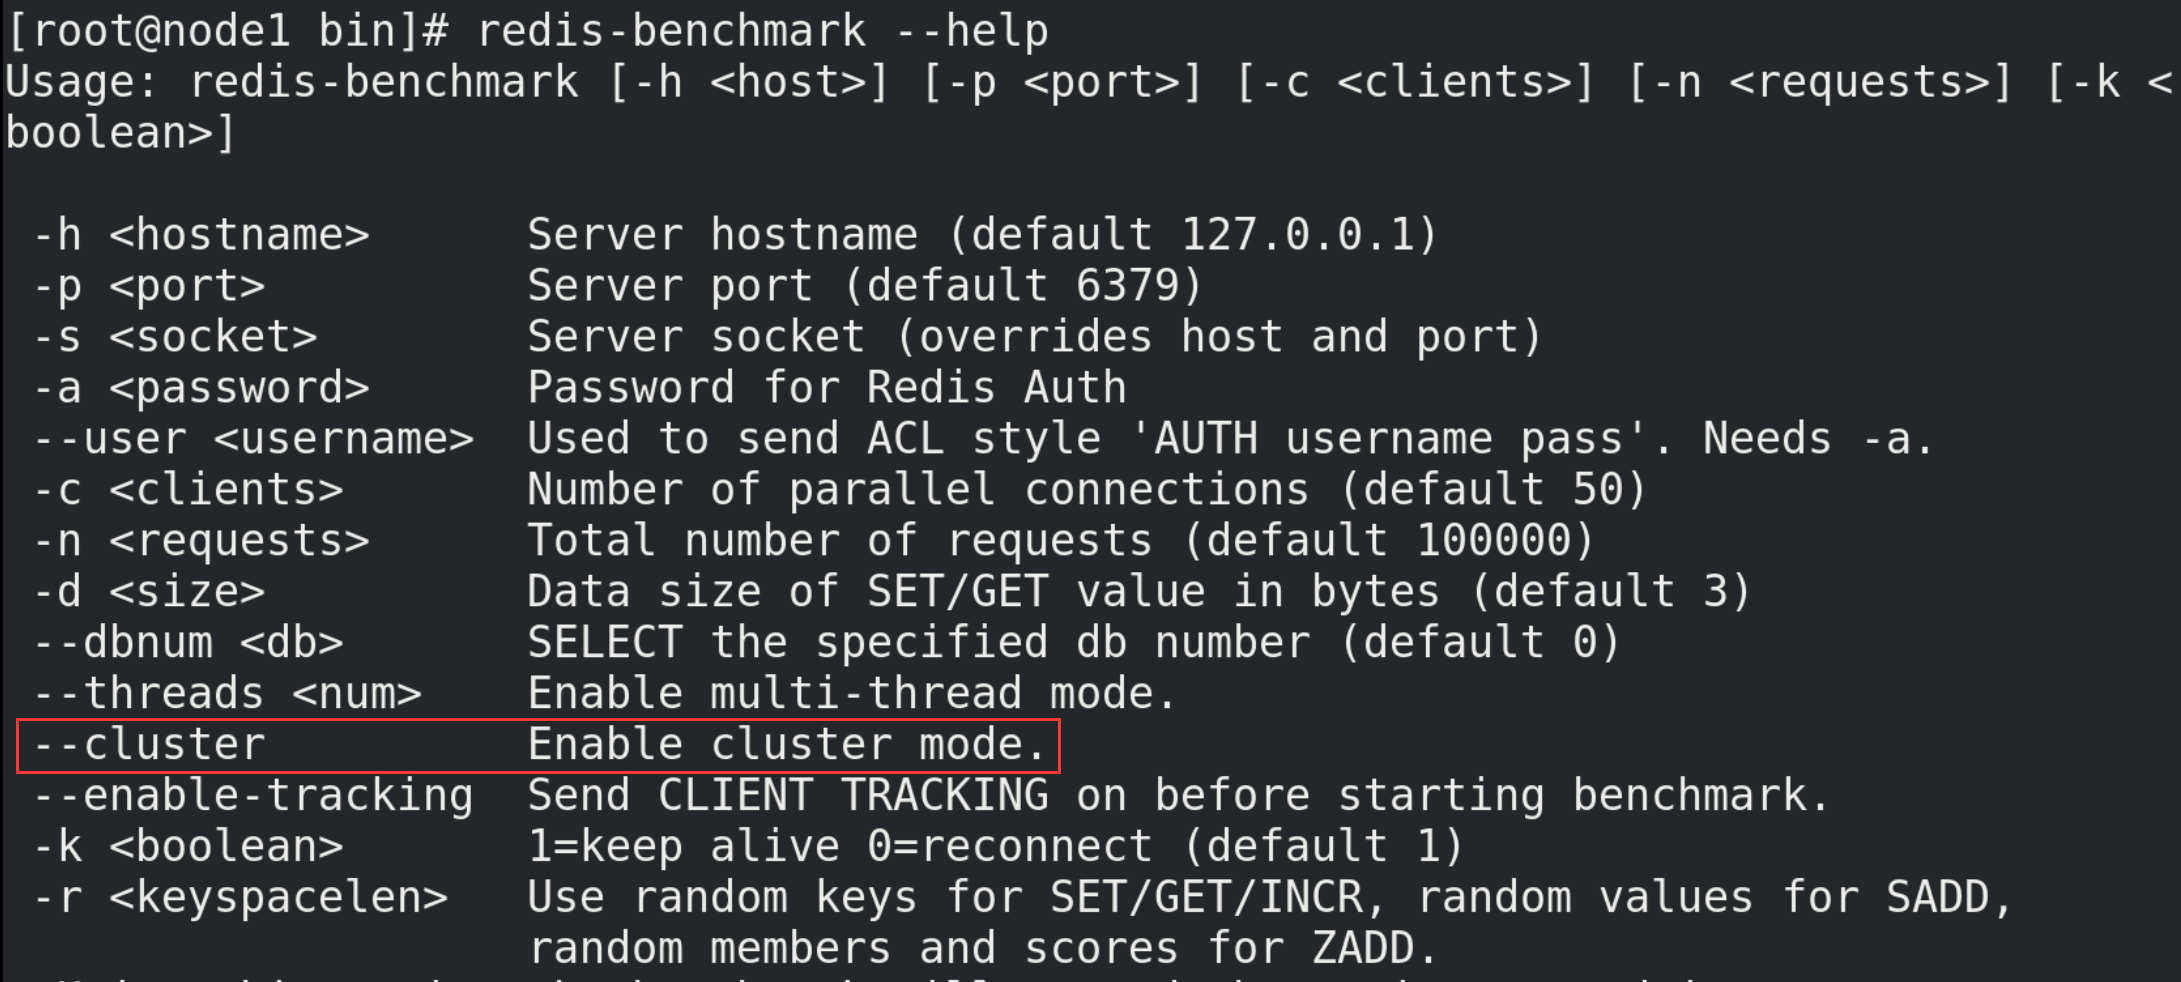
16.4.Redis6 other new functions
(1) RESP3 new Redis communication protocol:
Optimize communication between server and client
(2) Client side caching:
Client cache function based on RESP3 protocol. In order to further improve the performance of the cache, the data frequently accessed by the client is cached to the client. Reduce TCP network interaction.
(3) Proxy cluster proxy mode:
The Proxy function enables the cluster to have the same access mode as a single instance, reducing the threshold for developers to use the cluster. However, it should be noted that the agent does not change the functional limitations of the cluster, and unsupported commands will not be supported, such as multi Key operations across slot s.
(4)Modules API
The development of module API in Redis 6 has made great progress, because Redis Labs used redis module from the beginning in order to develop complex functions. Redis can become a framework that uses Modules to build different systems without writing from scratch and then requiring BSD license. Redis was an open platform for writing various systems from the beginning.