Redis Sentinel is a distributed system. You can run multiple Sentinel processes in one architecture. These processes use the gossip protocols to receive information about whether the primary server is offline, and use the agreement protocols to decide whether to perform automatic failover, And which slave server to choose as the new master server.
Although Redis Sentinel is released as a separate executable file, it is actually just a Redis server running in a special mode. You can start Redis Sentinel by giving the -- sentinel option when starting a normal Redis server.
Sentinel system is used to manage multiple Redis servers (instance s). The system performs the following three tasks:
1. Monitoring: Sentinel constantly checks that your primary and secondary servers are functioning properly.
2. Notification: Sentinel can send notifications to administrators or other applications through API when there is a problem with a monitored Redis server.
3. Automatic failover: when a master server fails to work normally, Sentinel will start an automatic failover operation, which will upgrade one of the slave servers of the failed master server to a new master server, and change the other slave servers of the failed master server to copy the new master server; When the client tries to connect to the failed primary server, the cluster will also return the address of the new primary server to the client, so that the cluster can use the new primary server instead of the failed server.
To configure
When the master fails to replace the master and becomes the new master, the master automatically becomes the slave after it starts. In fact, it is the same as Mysql's dual master mode. Redis sentinel needs to use redis sentinel program and sentinel.conf configuration file.
mkdir -p /usr/local/redis

mkdir -p /usr/local/redis/6379

mkdir -p /usr/local/redis/6380

mkdir -p /usr/local/redis/redis_cluster
Main configuration
vim redis_6379.conf
daemonize yes

pidfile /usr/local/redis/6379/redis_6379.pid

port 6379

tcp-backlog 128

timeout 0

tcp-keepalive 0

loglevel notice

logfile ""

databases 16

save 900 1    ###save

save 300 10

save 60 10000

stop-writes-on-bgsave-error yes

rdbcompression yes

rdbchecksum yes

dbfilename dump.rdb   ###dbfile

dir "/usr/local/redis/6379"

masterauth "123456"

requirepass "123456"

slave-serve-stale-data yes

slave-read-only yes

repl-diskless-sync no

repl-diskless-sync-delay 5

repl-disable-tcp-nodelay no

slave-priority 100

appendonly yes

appendfilename "appendonly.aof"

appendfsync everysec

no-appendfsync-on-rewrite no

auto-aof-rewrite-percentage 100

auto-aof-rewrite-min-size 64mb

aof-load-truncated yes

lua-time-limit 5000

slowlog-log-slower-than 10000

slowlog-max-len 128

latency-monitor-threshold 0

notify-keyspace-events ""

hash-max-ziplist-entries 512

hash-max-ziplist-value 64

list-max-ziplist-entries 512

list-max-ziplist-value 64

set-max-intset-entries 512

zset-max-ziplist-entries 128

zset-max-ziplist-value 64

hll-sparse-max-bytes 3000

activerehashing yes

client-output-buffer-limit normal 0 0 0

client-output-buffer-limit slave 256mb 64mb 60

client-output-buffer-limit pubsub 32mb 8mb 60

hz 10

aof-rewrite-incremental-fsync yes
vim sentinel_1.conf
Sentry file configuration
port 6000

dir "/usr/local/redis/sentinel"

# Daemons mode

daemonize yes

protected-mode no

logfile "/usr/local/sentinel/sentinel.log"
From configuration
vim redis_6380.conf
daemonize yes

pidfile "/usr/local/redis/6380/redis_6380.pid"

port 6380

tcp-backlog 128

timeout 0

tcp-keepalive 0

loglevel notice

logfile ""

databases 16

save 900 1

save 300 10

save 60 10000

stop-writes-on-bgsave-error yes

rdbcompression yes

rdbchecksum yes

dbfilename "dump.rdb"

dir "/usr/local/redis/6380"

masterauth "123456"

requirepass "123456"

slave-serve-stale-data yes

slave-read-only yes

repl-diskless-sync no

repl-diskless-sync-delay 5

repl-disable-tcp-nodelay no

slave-priority 100

appendonly yes

appendfilename "appendonly.aof"

appendfsync everysec

no-appendfsync-on-rewrite no

auto-aof-rewrite-percentage 100

auto-aof-rewrite-min-size 64mb

aof-load-truncated yes

lua-time-limit 5000

slowlog-log-slower-than 10000

slowlog-max-len 128

latency-monitor-threshold 0

notify-keyspace-events ""

hash-max-ziplist-entries 512

hash-max-ziplist-value 64

list-max-ziplist-entries 512

list-max-ziplist-value 64

set-max-intset-entries 512

zset-max-ziplist-entries 128

zset-max-ziplist-value 64

hll-sparse-max-bytes 3000

activerehashing yes

client-output-buffer-limit normal 0 0 0

client-output-buffer-limit slave 256mb 64mb 60

client-output-buffer-limit pubsub 32mb 8mb 60

hz 10

aof-rewrite-incremental-fsync yes
vim sentinel_2.conf
#sentinel port

port 6000

#Work path, pay attention not to repeat the path with the master

dir "/usr/local/sentinel"

# Daemons mode

daemonize yes

protected-mode no

# Indicates the log file name

logfile "/usr/local/sentinel/sentinel.log"
1. The application connects to the sentinel port and connects to the specific primary replica by specifying a different master name.
2. Only the master replica ip and port in the master-slave replication need to be configured in the sentinel configuration file. When the master-slave switches, the sentinel will automatically change the master replica ip in the sentinel configuration file to the new master replica ip.
3. A sentinel configuration file can be configured to monitor multiple master-slave replications at the same time.
4. A single sentinel can be used for master-slave fault monitoring. However, if there is only one sentinel process, if the process runs in error or the network is blocked, the master-slave switch of redis cluster cannot be realized (single point problem); < quorum > this two represents the number of votes. When two sentinels think that a master is no longer available, they will trigger a failover to really think that the master is no longer available. (each sentinel in the sentinel cluster also communicates with each other through the mission protocol); therefore, a reasonable configuration should be to start multiple sentinel processes at the same time, and it is better to start them in different servers.
5. Note that the needs of mymaster are unique in the whole network environment, and sentinels will automatically establish association relationship through the master name as long as the network environment is connected.
Start redis
1. Master and slave should start
src/redis-server redis.conf
2. Log in to 6380 to establish master-slave relationship
redis-cli -p 6380

slaveof 192.168.137.40 6379
Sentinel allocation
Both the master and slave sentinels need to be started, and they can also be started through the redis server mode, such as "redis server sentinel.conf -- sentinel"
1. Start the sentry
src/redis-sentinel sentinel.conf
2. Log in Sentry (both sentries need to log in for execution), and add master-slave monitoring information
redis-cli -p 6000
sentinel monitor mymaster 192.168.137.40 6379 2

sentinel set mymaster down-after-milliseconds 5000

sentinel set mymaster failover-timeout 15000

sentinel set mymaster auth-pass 123456
Start error handling
Error 1:
WARNING overcommit_memory is set to 0! Background save may fail under low memory condition. To fix this issue add 'vm.overcommit_memory = 1' to /etc/sysctl.conf and then reboot or run the command 'sysctl vm.overcommit_memory=1' for this to take effect.
Two solutions (overcommit? Memory)
2. Echo 1 > / proc / sys / VM / overcommit "memory takes effect without starting the machine
Overcommit "memory parameter description:
/proc/sys/vm/overcommit_memory
Optional values: 0, 1, 2.
0 indicates that the kernel will check whether there is enough available memory for the process to use; if there is enough available memory, the memory application is allowed; otherwise, the memory application fails and the error is returned to the application process.
1, indicating that the kernel allows all physical memory to be allocated, regardless of the current memory state.
2, which means that the kernel is allowed to allocate more memory than the sum of all physical memory and swap space
Note: when redis dump s data, it will fork out a subprocess. In theory, the memory occupied by the child process is the same as that of the parent. For example, the memory occupied by the parent is 8G. At this time, 8G of memory should also be allocated to the child. If the memory is not affordable, the down machine or IO load of redis server will be too high and the efficiency will be reduced. Therefore, the optimized memory allocation policy here should be set to 1 (indicating that the kernel is allowed to allocate all physical memory regardless of the current memory state).
It also involves Overcommit and OOM.
What is Overcommit and OOM
In Unix, when a user process uses the malloc() function to apply for memory, if the return value is NULL, the process knows that there is no available memory space, and will do the corresponding processing work. Many processes print error messages and exit.
Linux uses another way of processing. It replies "yes" to most requests for memory so that it can run more and larger programs. Because memory is not used immediately after memory application. This technique is called Overcommit.
When there is not enough memory, an oom killer (OOM = out of memory) occurs. It chooses to kill some processes (user processes, not kernel threads) to free memory.
Strategy of Overcommit
There are three strategies for overcommit under Linux (documentation / VM / overcommit Accounting):
0. Heuristic strategy. Reasonable overcommit will be accepted and unreasonable overcommit will be rejected.
1. Any overcommit will be accepted.
2. When the memory allocated by the system exceeds swap+N% * physical RAM(N% is determined by VM. Overcommit ratio), the commit will be rejected.
The policy of overcommit is set through vm.overcommit'u memory.
The percentage of overcommit is set by vm.overcommit ratio.
# echo 2 > /proc/sys/vm/overcommit_memory
# echo 80 > /proc/sys/vm/overcommit_ratio
When the oom killer happens, linux will choose which processes to kill
The function to select a process is the oom? Badness function (in mm / oom? Kill. C), which calculates the number of points (0-1000) for each process.
The higher the number of points, the more likely the process is to be killed.
The number of points in each process is related to the oom score adj, and the oom score adj can be set (- 1000 min, 1000 max).
Error 2:
WARNING: The TCP backlog setting of 511 cannot be enforced because /proc/sys/net/core/somaxconn is set to the lower value of 128.
echo 511 > /proc/sys/net/core/somaxconn
Error 3:
16433:X 12 Jun 14:52:37.734 * Increased maximum number of open files to 10032 (it was originally set to 1024).
By default, the newly installed linux is only 1024. When the load is large, errors often occur: too many open files
ulimit -a: use to view all limits of the current system
vim /etc/security/limits.conf
Add at the end of the file
* soft nofile 65535

* hard nofile 65535
Execute su or close the connection again and execute ulimit -a to view the modified results.
Failover mechanism
1. After starting the cluster, the cluster program will add the configuration of connecting to the master in the redis file of the slave database by default
# Generated by CONFIG REWRITE

slaveof 192.168.137.40 6379
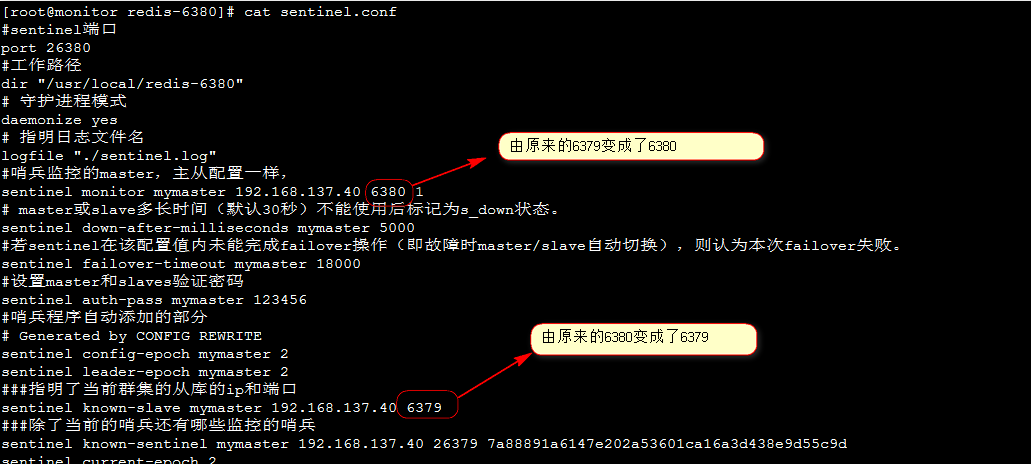
2. After starting the cluster, the cluster program will add the cluster information in the sentinel.conf file of the master and slave by default
Main:
port 26379

dir "/usr/local/redis-6379"

# Daemons mode

daemonize yes

# Indicates the log file name

logfile "./sentinel.log"

sentinel monitor mymaster 192.168.137.40 6379 1

sentinel down-after-milliseconds mymaster 5000

sentinel failover-timeout mymaster 18000

sentinel auth-pass mymaster 123456

# Generated by CONFIG REWRITE

sentinel config-epoch mymaster 0

sentinel leader-epoch mymaster 1

sentinel known-slave mymaster 192.168.137.40 6380

sentinel known-sentinel mymaster 192.168.137.40 26380 c77c5f64aaad0137a228875e531c7127ceeb5c3f

sentinel current-epoch 1
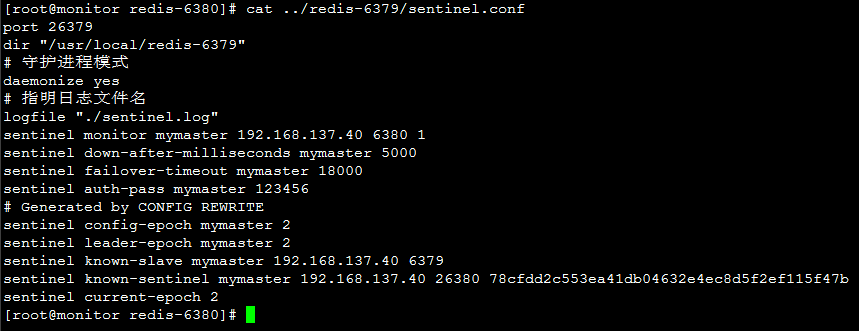
From:
#sentinel port

port 26380

#Work path

dir "/usr/local/redis-6380"

# Daemons mode

daemonize yes

# Indicates the log file name

logfile "./sentinel.log"

#The master of sentinel monitoring is the same as the master-slave configuration. When the master-slave is switched, 6379 will become the current master port,

sentinel monitor mymaster 192.168.137.40 6379 1

# How long does the master or slave last (30 seconds by default) and mark it as "s" down.

sentinel down-after-milliseconds mymaster 5000

#If sentinel fails to complete the failover operation within the configuration value (i.e. master/slave automatic switch in case of failure), it is considered that this failover fails.

sentinel failover-timeout mymaster 18000

#Set master and slave authentication password

sentinel auth-pass mymaster 123456

#Automatically added part of sentinel program

# Generated by CONFIG REWRITE

sentinel config-epoch mymaster 0

sentinel leader-epoch mymaster 1

###Indicates the ip and port of the slave Library of the current cluster, which will change when the master and slave switch

sentinel known-slave mymaster 192.168.137.40 6380

###In addition to the current sentinels, what other sentinels are there to monitor

sentinel known-sentinel mymaster 192.168.137.40 26379 7a88891a6147e202a53601ca16a3d438e9d55c9d

sentinel current-epoch 1
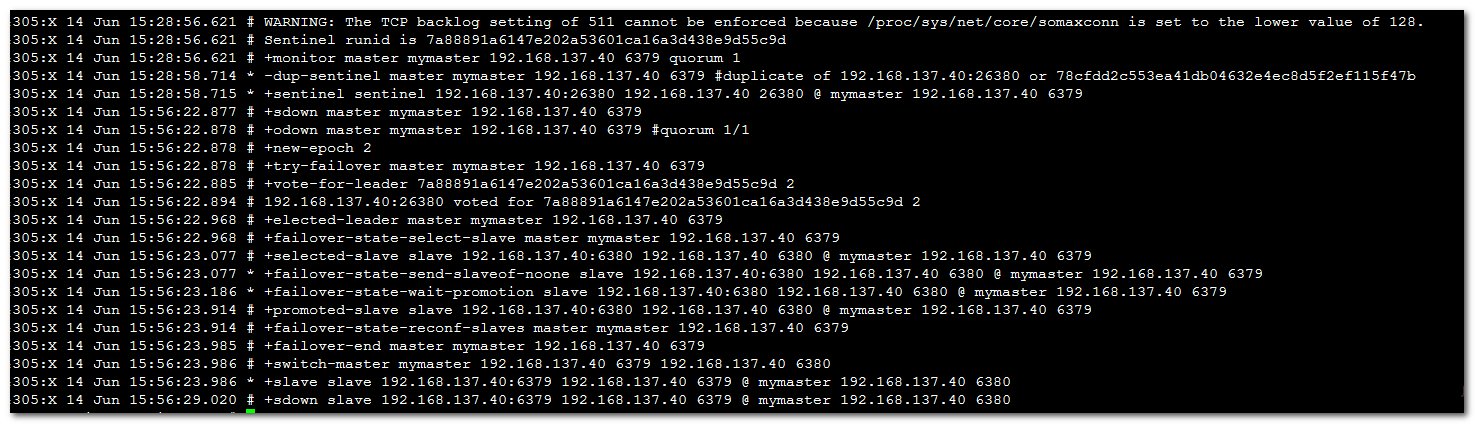
Simulate main fault
[root@monitor redis-6380]# ps -ef|grep redis

root       4171      1  0 14:20 ?        00:00:15 /usr/local/redis-6379/src/redis-server *:6379

root       4175      1  0 14:20 ?        00:00:15 /usr/local/redis-6380/src/redis-server *:6380

root       4305      1  0 15:28 ?        00:00:05 /usr/local/redis-6379/src/redis-sentinel *:26379 [sentinel]

root       4306      1  0 15:28 ?        00:00:05 /usr/local/redis-6380/src/redis-sentinel *:26380 [sentinel]

root       4337   4144  0 15:56 pts/1    00:00:00 grep redis

[root@monitor redis-6380]# kill -9 4171

[root@monitor redis-6380]# ps -ef|grep redis

root       4175      1  0 14:20 ?        00:00:15 /usr/local/redis-6380/src/redis-server *:6380

root       4305      1  0 15:28 ?        00:00:05 /usr/local/redis-6379/src/redis-sentinel *:26379 [sentinel]

root       4306      1  0 15:28 ?        00:00:05 /usr/local/redis-6380/src/redis-sentinel *:26380 [sentinel]

root       4339   4144  0 15:56 pts/1    00:00:00 grep redis

[root@monitor redis-6380]#
From the sentry profile, you can see that the current master database has changed
summary
The sentinel ports 26379 and 26380 of redis can't be connected with the client software. The client software can only directly connect with ports 6379 and 6380. Using sentinel monitoring when the master fails, it will automatically switch from master to slave, and when the master is started, it will become slave. It has been seen that only one sentinel 26379 is configured, which can not guarantee the high availability of sentinel program itself.
The above is the details of how to realize master-slave failover in Redis sentinel mode
For more information, please visit: