1. Comparison of Redis cluster schemes
Sentinel mode
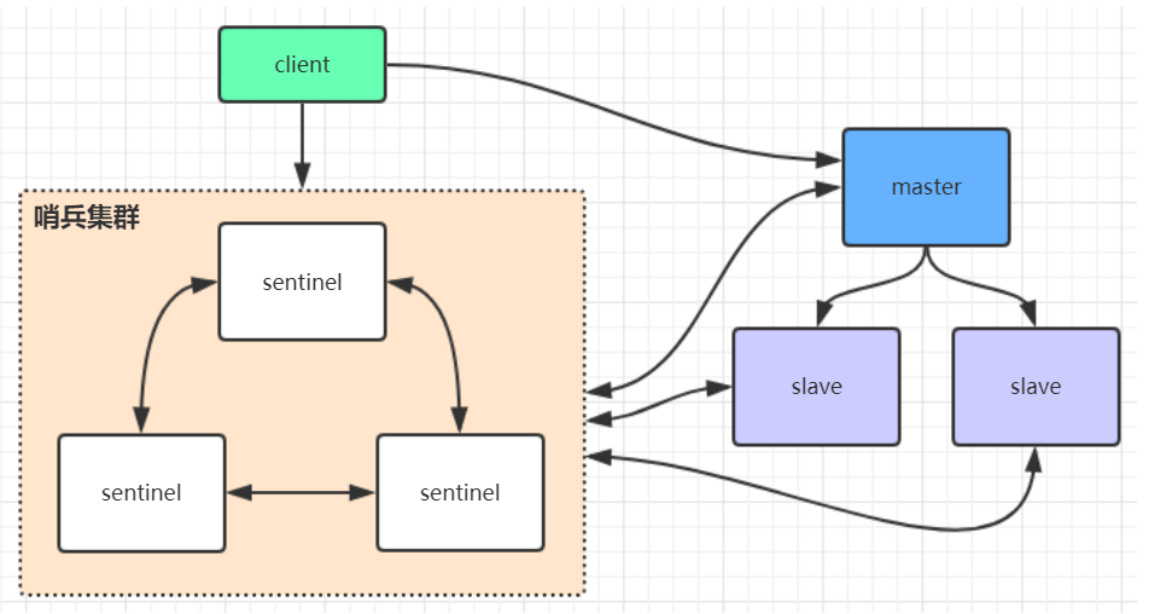
Before redis 3.0, the cluster is usually implemented by using sentinel tool to monitor the status of the master node. If the master node is abnormal, it will make a master-slave switch. Taking a slave as the master, the sentinel configuration is slightly complex, and the performance and high availability are average, especially at the moment of master-slave switching
Access transient
In the sentinel mode, there is only one master node to provide external services, which can not support high concurrency, and the memory of a single master node should not be set too large, otherwise the persistent file will be too large, affecting the efficiency of data recovery or master-slave synchronization. The memory is generally set to about 8G, no more than 10G.
High availability cluster mode
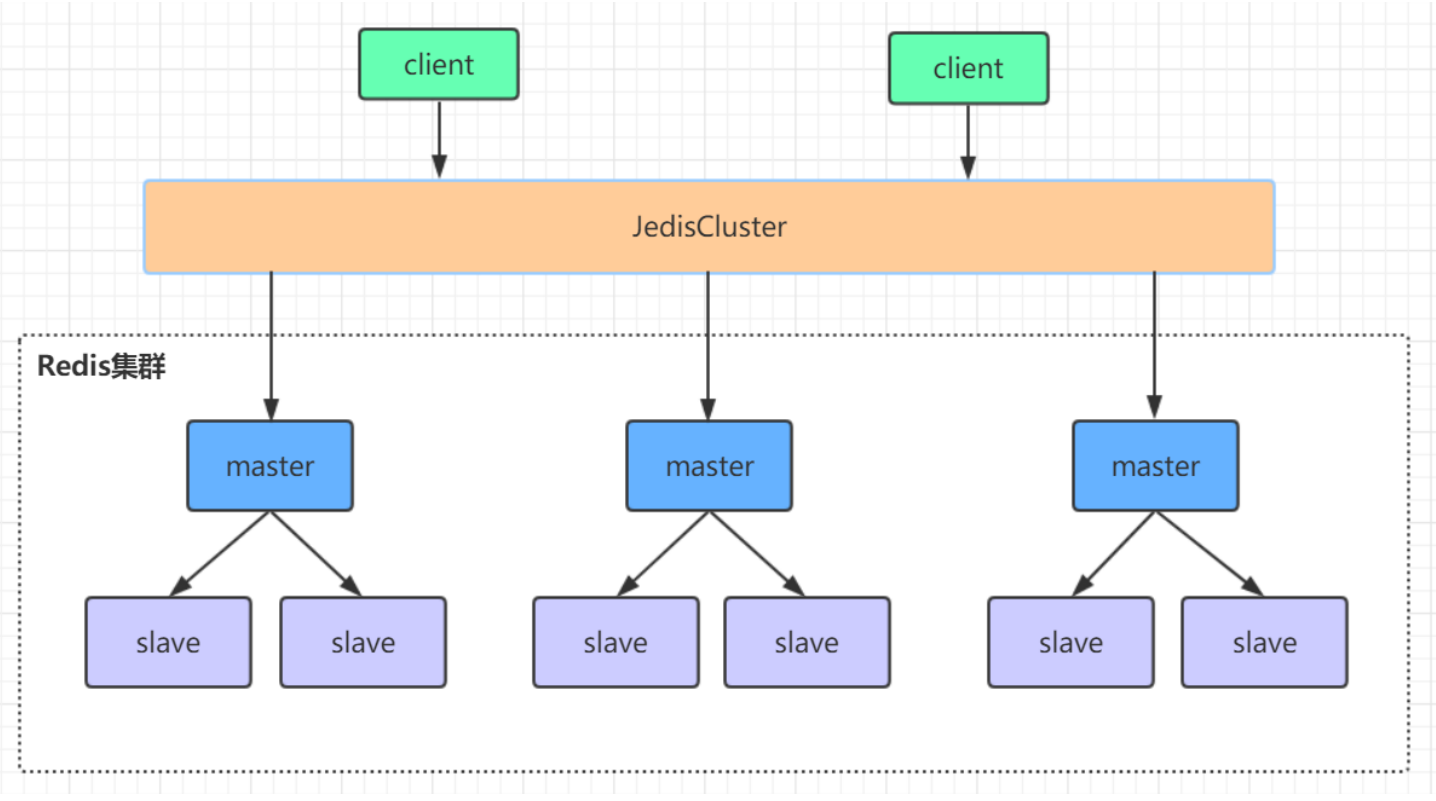
A redis cluster consists of multiple
Distributed server group composed of master-slave node group
, it has
Replication, high availability, and fragmentation
characteristic. Redis cluster can complete node removal and failover without sentinel sentinel. Each node needs to be set into a cluster mode. This cluster mode has no central node and can be expanded horizontally, according to the official text
The scale can be linearly extended to tens of thousands of nodes(
No more than 1000 nodes are officially recommended
). redis cluster
Performance and high availability are better than previous versions of sentinel mode, and the cluster configuration is very simple.
2. Redis high availability cluster construction
redis cluster setup
redis cluster needs
At least three master nodes
Here, we set up three master nodes and another slave node for each master, a total of six redis nodes. Here, we deploy six redis instances with three machines, one master and one slave for each machine. The steps to set up a cluster are as follows:
Step 1: on the first machine/usr/local Create folder under redis‐cluster,Then create two folders under them, as follows
(1)mkdir ‐p /usr/local/redis‐cluster 3
(2)mkdir 8001 8004 45

Step 2: put the previous redis.conf configuration file copy Under to 8001, modify the following:
(1)daemonize yes 7
(2)port 8001(Set the port number of each machine separately)
(3)pidfile /var/run/redis_8001.pid # Write the pid process number to the pidfile configuration file
(4)dir /usr/local/redis‐cluster/8001/(Specify the storage location of data files. You must specify different directory locations, or you will lose data)
(5)cluster‐enabled yes(Start cluster mode)
(6)cluster‐config‐file nodes‐8001.conf(Cluster node information file, here 800 x Best and port Corresponding (upper)
(7)cluster‐node‐timeout 10000
 (8)# bind 127.0.0.1 (bind is bound to the ip of the network card of the machine. If multiple network cards can be configured with multiple ip, it represents which network card ip of the machine the client is allowed to access. Bind can not be configured in the intranet. Just comment it out.)
 (9)protected‐mode no (Turn off protection mode)
 (10)appendonly yes
 If you want to set the password, you need to add the following configuration:
 (11)requirepass zhuge (set up redis Access password)
 (12)masterauth zhuge (Set the access password between cluster nodes, consistent with the above)

Step 3: the modified configuration file, copy To 8004, modify the port numbers in Items 2, 3, 4 and 6, which can be replaced by batch:
:%s/Source string/Destination string/g

Step 4: the other two machines also need to do the above steps. The second machine uses 8002 and 8005, and the third machine uses 8003 and 8006

Step 5: start 6 redis Instance, and then check whether it is started successfully
(1)/usr/local/redis‐5.0.3/src/redis‐server /usr/local/redis‐cluster/800*/redis.conf 27 (2)ps ‐ef | grep redis Check whether the startup is successful

Step 6: use redis‐cli Create entire redis colony(redis5 Previous versions of clustering relied on ruby script redis‐trib.rb realization) 30 # 1 in the following command represents creating a slave server node for each created master server node
# To execute this command, you need to confirm that the redis instances between the three machines can access each other. You can simply turn off the firewall of all machines first. If you do not turn off the firewall, you need to open the redis service port and the cluster node mission communication port 16379 (1W is added to the redis port number by default)
# Turn off firewall
# systemctl stop firewalld # Temporarily turn off the firewall
# systemctl disable firewalld # Prohibit startup
# Note: the following command to create a cluster should not be copied directly. There may be a problem with the space code in it, which may lead to unsuccessful cluster creation (1) / usr/local/redis ‐ cli ‐ a zhuge ‐ cluster create ‐ cluster ‐ replicas 1 192.168.0.61:8001 192.168.0.62:8002 192.168.0.63:8003 192.168.0.61:8004 192.168.0.62:8005 192. 168.0.63:8006

Step 7: verify the cluster:
(1)Connect to any client:./redis‐cli ‐c ‐h ‐p (‐a Access the server password,‐c Indicates the cluster mode, specifying ip (address and port number)
 For example:/usr/local/redis‐5.0.3/src/redis‐cli ‐a zhuge ‐c ‐h 192.168.0.61 ‐p 800*
(2)Verify: cluster info(View cluster information) cluster nodes(View node list)
(3)Perform data operation verification
(4)To shut down a cluster, you need to shut it down one by one. Use the command:
 /usr/local/redis‐5.0.3/src/redis‐cli ‐a zhuge ‐c ‐h 192.168.0.60 ‐p 800* shutdown
3. Java operation redis cluster
With the java client of redis, jedis can operate the above clusters. The maven coordinates referring to the jedis version are as follows:
 <dependency>
     <groupId>redis.clients</groupId>
     <artifactId>jedis</artifactId>
     <version>2.9.0</version>
 </dependency>
The code for accessing redis cluster written in Java is very simple, as shown below:
public class JedisClusterTest {
 public static void main(String[] args) throws IOException {

 JedisPoolConfig config = new JedisPoolConfig();
 config.setMaxTotal(20);
 config.setMaxIdle(10);
 config.setMinIdle(5);

 Set<HostAndPort> jedisClusterNode = new HashSet<HostAndPort>();
 jedisClusterNode.add(new HostAndPort("192.168.0.61", 8001));
 jedisClusterNode.add(new HostAndPort("192.168.0.62", 8002));
 jedisClusterNode.add(new HostAndPort("192.168.0.63", 8003));
 jedisClusterNode.add(new HostAndPort("192.168.0.61", 8004));
 jedisClusterNode.add(new HostAndPort("192.168.0.62", 8005));
 jedisClusterNode.add(new HostAndPort("192.168.0.63", 8006));

 JedisCluster jedisCluster = null;
 try {
     //connectionTimeout: refers to the connection waiting time for connecting to a url
     //soTimeout: refers to the return waiting time of the last url connected to get the response
     jedisCluster = new JedisCluster(jedisClusterNode, 6000, 5000, 10, "zhuge", config);
     System.out.println(jedisCluster.set("cluster", "zhuge"));
     System.out.println(jedisCluster.get("cluster"));
 } catch (Exception e) {
     e.printStackTrace();
 } finally {
     if (jedisCluster != null)
     jedisCluster.close();
 }
}
}
See the example project: Redis sentinel cluster for the Spring Boot integration Redis connection code of the cluster
1. Introduce related dependencies:
<dependency>
    <groupId>org.springframework.boot</groupId>
    <artifactId>spring‐boot‐starter‐data‐redis</artifactId>
</dependency>

<dependency>
    <groupId>org.apache.commons</groupId>
    <artifactId>commons‐pool2</artifactId>
</dependency>
springboot project core configuration:
server:
    port: 8080

spring:
    redis:
        database: 0
        timeout: 3000
        password: zhuge
        cluster:
            nodes:   192.168.0.61:8001,192.168.0.62:8002,192.168.0.63:8003,192.168.0.61:8004,192.168.0. 62:8005,192.168.0.63:8006
            lettuce:
                    pool:
                    max‐idle: 50
                    min‐idle: 10
                    max‐active: 100
                    max‐wait: 1000
4. Principle analysis of Redis cluster
Redis Cluster divides all data into 16384 slots, and each node is responsible for part of the slots. The slot information is stored in each node. When the client of Redis Cluster connects to the cluster, it will also get a copy of the slot configuration information of the cluster and cache it locally. In this way, when the client wants to find a key, it can directly locate the target node. At the same time, because the slot information may be inconsistent between the client and the server, a correction mechanism is also needed to verify and adjust the slot information.
Slot location algorithm
By default, Cluster will hash the key value using crc16 algorithm to get an integer value, and then use this integer value to model 16384 to get the specific slot position.
HASH_SLOT = CRC16(key) mod 16384
Jump relocation
When the client sends an instruction to a wrong node, the node will find that the slot where the key of the instruction is located is not managed by itself. At this time, it will send a special jump instruction to the client, carry the node address of the target operation, and tell the client to connect to this node to obtain data. After receiving the instruction, the client will not only jump to the correct node for operation, but also synchronously update and correct the local slot mapping table cache. All subsequent keys will use the new slot mapping table.

Communication mechanism between Redis cluster nodes
There are two ways to maintain cluster metadata (cluster node information, master-slave roles, number of nodes, data shared by each node, etc.): centralized
And mission. The redis cluster nodes communicate with each other using the gossip protocol.
Centralized:
The advantage is that the metadata can be updated and read with good timeliness. Once the metadata changes, it will be updated to the centralized storage immediately, and other nodes can immediately perceive it when reading; The disadvantage is that the update pressure of all metadata is concentrated in one place, which may lead to the storage pressure of metadata. Many middleware use zookeeper to centrally store metadata.
gossip:
The gossip protocol contains a variety of messages, including ping, pong, meet, fail, and so on.
meet
: a node sends a meet to the newly added node to join the cluster, and then the new node will start to communicate with other nodes;
ping
: each node will frequently send pings to other nodes, including its own status and its own maintained cluster metadata. They exchange metadata with each other through pings (similar to their perceived addition and removal of cluster nodes, hash slot information, etc.);
pong
: the return of ping and meet messages, including their own status and other information, can also be used for information broadcasting and updating;
fail
: after a node judges the failure of another node, it sends a failure to other nodes to notify other nodes that the specified node is down.
The advantage of gossip protocol is that metadata updates are scattered rather than concentrated in one place. Update requests will be sent to all nodes to update. There is a certain delay and reduces the pressure; The disadvantage is that metadata updates are delayed, which may lead to some lag in some operations of the cluster.
10000 port for gossip communication
Each node has a dedicated port for inter node gossip communication, that is, the port number of its own service + 10000, such as 7001, so the port used for inter node communication is 17001. Each node will send ping messages to other nodes at regular intervals, and the other nodes will return a pong message after receiving the ping message.
Network jitter
The real-world computer room network is often not calm, and they often have all kinds of small problems. For example, network jitter is a very common phenomenon. Suddenly, some connections become inaccessible, and then quickly return to normal.
To solve this problem, Redis Cluster provides an option
clusternodetimeout
, which means that when a node loses contact for a timeout, it can be considered that the node has failed and needs to be switched from master to slave. Without this option, network jitter will lead to frequent master-slave switching (data re replication).
Analysis of Redis cluster election principle
When a slave finds that its master is in the FAIL state, it attempts to Failover in order to become a new master. Because the suspended master may have multiple slaves, there is a process in which multiple slaves compete to become the master node. The process is as follows:
1.slave finds that its master becomes FAIL
2. Add 1 to the cluster currentEpoch recorded by yourself and broadcast FAILOVER_AUTH_REQUEST information
3. When other nodes receive this information, only the master responds, judges the legitimacy of the requester, and sends FAILOVER_AUTH_ACK: only one ack is sent for each epoch
4. Try the slave of failover to collect the failover returned by the master_ AUTH_ ACK
5.slave received
ack of more than half of the Masters
Then it becomes a new master (this explains why the cluster needs at least three master nodes. If there are only two, when one of them hangs, only one master node can not be elected successfully)
6.slave broadcasts Pong messages to notify other cluster nodes.
The slave node does not attempt to initiate an election as soon as the master node enters the FAIL state, but there is a certain delay. A certain delay ensures that we wait for the FAIL state to propagate in the cluster. If the slave attempts an election immediately, other masters may not be aware of the FAIL state and may refuse to vote
• delay calculation formula:
DELAY = 500ms + random(0 ~ 500ms) + SLAVE_RANK * 1000ms
•SLAVE_RANK indicates the rank of the total amount of data that this slave has copied from the master. The smaller the rank, the newer the replicated data. In this way, the slave with the latest data will launch the election first (theoretically).
Data loss of cluster brain fissure
The redis cluster does not have more than half of the mechanism, and there will be brain crack. After the brain crack is caused by network partition, multiple master nodes provide external write services. Once the network partition is restored, one of the master nodes will become a slave node, and a large amount of data will be lost.
The circumvention method can add parameters to the redis configuration (this method can not completely avoid data loss. Refer to the cluster leader election mechanism):
1
min
‐
replicas
‐
to
‐
write
1
//
Write data successfully and synchronize at least
slave
Quantity, which can imitate more than half of the mechanism configuration. For example, a total of three nodes in the cluster can be configured with 1
, plus
leader
namely
2
, more than half
be careful
: this configuration will affect the availability of the cluster to a certain extent. For example, if there are less than one slave, the cluster can not provide services even if the leader is normal. Specific scenarios need to be weighed and selected.
Is the cluster complete to provide external services
When the redis.conf configuration cluster require full coverage is no, it means that the cluster is still available when the master database responsible for a slot goes offline and there is no corresponding slave database for fault recovery. If yes, the cluster is unavailable.
Why does the Redis cluster need at least three master nodes and the recommended number of nodes is odd?
Because the election of a new master requires the consent of more than half of the cluster master nodes to be successful. If there are only two master nodes, when one of them hangs, the conditions for electing a new master cannot be met. An odd number of master nodes can save one node on the basis of meeting the election conditions. For example, compared with a cluster of four master nodes, if you have one master node, you can elect a new master node. If you have two master nodes, you can't elect a new master node, Therefore, the odd number of master nodes is more from the perspective of saving machine resources.
Redis cluster support for batch operation commands
For the native batch operation commands of multiple keys such as mset and mget, the redis cluster only supports the case that all keys fall in the same slot. If multiple keys must be operated on the redis cluster with the mset command, you can add {XX} before the key, so that the parameter data fragment hash will only calculate the value in braces, This ensures that different keys can fall into the same slot. An example is as follows:
1 mset {user1}:1:name zhuge {user1}:1:age 18Assuming that the hash slot values calculated by name and age are different, but this command is executed in the cluster, redis will only use user1 in braces to calculate the hash slot, so the calculated slot values must be the same, and they can all fall in the same slot in the end.
Sentinel leader election process when a master server is considered offline by a sentinel, the sentinel will negotiate with other sentinels to select sentinel leaders for failover. Each sentinel that finds that the master server goes offline can ask other sentinels to choose themselves as the leader of the sentinel. The election is on a first come, first served basis. At the same time, each sentinel will automatically add a configuration era (election cycle) for each election, and only one sentinel leader will be selected in each era. If all
More than half
The sentinel of elects a sentinel as the leader. After that, the sentinel performs a failover operation and elects a new master from the surviving slave. This election process is very similar to the master election of the cluster.
There is only one sentinel node in the sentinel cluster. The master and slave of redis can also run normally and elect a master. If the master hangs up, the only sentinel node is the sentinel leader, and a new master can be elected normally.
However, for high availability, it is generally recommended to deploy at least three sentinel nodes. Why recommend an odd number of sentinel nodes? The principle is similar to that of an odd number of master nodes in a cluster.