Introduction of Master and Subordinate
1. Master-Subordinate-Usage
Like MySQL, redis support master-slave synchronization, as well as a master-slave and multilevel slave structure.
The primary-slave architecture is designed for purely redundant backups, and for improved read performance, such as performance-intensive SORT s that can be borne by the slave server.
Master-slave synchronization of redis is asynchronous, which means that master-slave synchronization does not affect the main logic or degrade the processing performance of redis.
In a master-slave architecture, you can consider turning off the data persistence capabilities of the master server and allowing only the slave to persist, which can improve the processing performance of the master server.
2. Principle of Master-Slave Synchronization
Master-Slave-Synchronization Principle
 The SYNC command is issued from the server to the master server, and when the master server receives the command, it calls the BGSAVE command to create a subprocess dedicated to data persistence, that is, to write the master server's data to an RDB file.During data persistence, write instructions executed by the primary server are cached in memory.
When the BGSAVE instructions are executed, the master server sends the persisted RDB file to the slave server, receives it from the server, stores it on disk, and reads it into memory.When this action is complete, the master server sends the cached write instructions during this time to the slave server in the format of the redis protocol.

Additionally, it is important to note that even if multiple SYNC instructions are sent from the server at the same time, the primary server only executes BGSAVE once, and then sends the persisted RDB files to multiple secondary servers.

After version 2.8, redis supports a more efficient incremental synchronization strategy, which greatly reduces the cost of restoring disconnected connections.The primary server maintains a buffer in memory that stores the content that will be sent to the slave server.After a network transient occurs between the slave server and the master server, the slave server attempts to connect to the master server again, and once the connection is successful, the master server sends incremental content to the slave server.

Incremental synchronization requires server-side support for new PSYNC instructions.This directive is available only after redis-2.8.
BGSAVE directive:
Save data from the current database to disk asynchronously in the background.
The BGSAVE command returns to OK immediately after execution, and Redis fork outputs a new child process that continues to process client requests while the child process saves data to disk and then exits.
3. Deploy three machines redis - master-slave synchronization
redis-master----192.168.246.202
redis-slave-1-----192.168.246.203
redis-slave-2-----192.168.246.204
1.First three servers will redis Deployment complete.
2.edit master Of redis configuration file:
[root@redis-master ~]# cd /data/application/redis/
[root@redis-master redis]# vim redis.conf

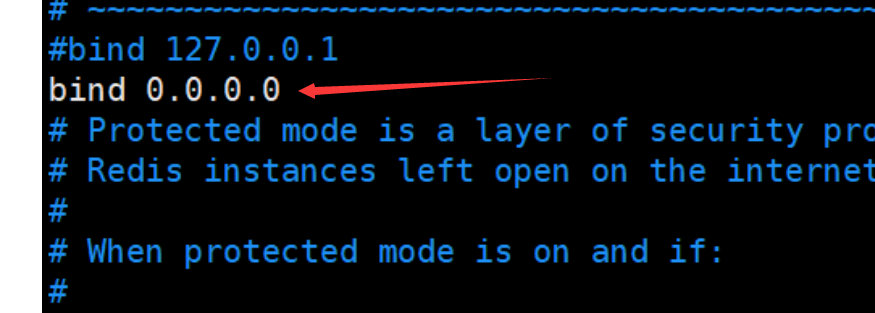
Turn off protected-mode mode mode, where external networks can access directly
Turn on protected-mode protection mode, configure bind ip or set access password
3.Start primary node redis service
[root@redis-master src]# cd /data/application/redis/src
[root@redis-master src]# . /redis-server.. /redis.conf &loads the configuration information in this file
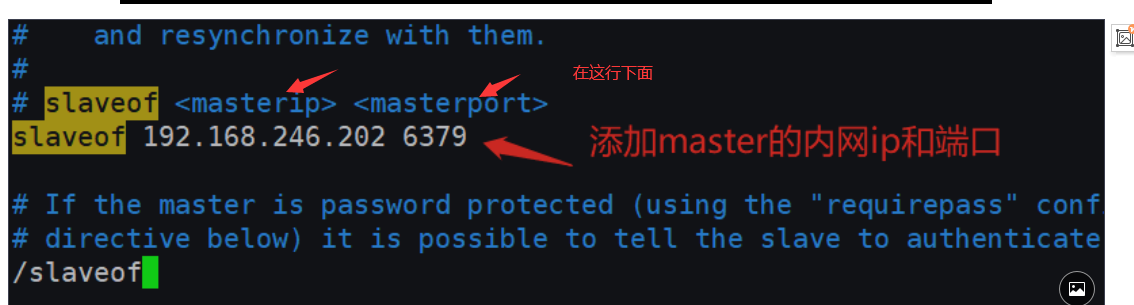
4.modify slave1 Profile:
[root@redis-slave-1 ~]# cd /data/application/redis/
[root@redis-slave-1 redis]# vim redis.conf - - Modify as follows:
5.Start from Node 1 redis service
[root@redis-slave-1 ~]# cd /data/application/redis/src/
[root@redis-slave-1 src]# ./redis-server ../redis.conf &
6.modify slave2 Profile
[root@redis-slave-2 ~]# cd /data/application/redis/
[root@redis-slave-2 redis]# vim redis.conf - Modify as from Node 1
7.Start from Node 2 redis service
[root@ansible-web2 ~]# cd /data/application/redis/src/
[root@ansible-web2 src]# ./redis-server ../redis.conf &
9.Test Master-Slave
1.stay master Execute above
[root@redis-master redis]# cd src/
[root@redis-master src]# ./redis-cli
127.0.0.1:6379> ping
PONG
127.0.0.1:6379> set name jack
OK
127.0.0.1:6379> get name
"jack"
127.0.0.1:6379>

2.In slave-1 and slave-2 Execute above:
[root@redis-slave-1 redis]# cd src/
[root@redis-slave-1 src]# ./redis-cli
127.0.0.1:6379> ping
PONG
127.0.0.1:6379> get name
"jack"
127.0.0.1:6379>
[root@redis-slave-2 src]# ./redis-cli
127.0.0.1:6379> ping
PONG
127.0.0.1:6379> get name
"jack"
127.0.0.1:6379>
//View replication status
master Execution:
127.0.0.1:6379> info replication
# Replication
role:master
connected_slaves:2
slave0:ip=192.168.246.203,port=6379,state=online,offset=490,lag=0
slave1:ip=192.168.246.204,port=6379,state=online,offset=490,lag=1
==============================================================================
slave Execute above:
127.0.0.1:6379> info replication
# Replication
role:slave
master_host:192.168.246.202
master_port:6379
master_link_status:up
Note: Write operations are generally disabled by default from the server: slave-read-only yes

