Redis details (7) - cluster
Before version 3.0 of redis, high availability (HA) can be achieved through Redis Sentinel. After version 3.0, Redis Cluster was officially launched. Its main purpose is to achieve data sharding, but it can also achieve ha, which is currently recommended by the government.
In the Redis Sentinel mode, each node needs to save a full amount of data, with more redundancy. In the Redis Cluster mode, each partition only needs to save a part of the data. For the memory database, it is still necessary to minimize the redundancy. In the case of too much data, fault recovery takes a long time. In addition, memory is too expensive...
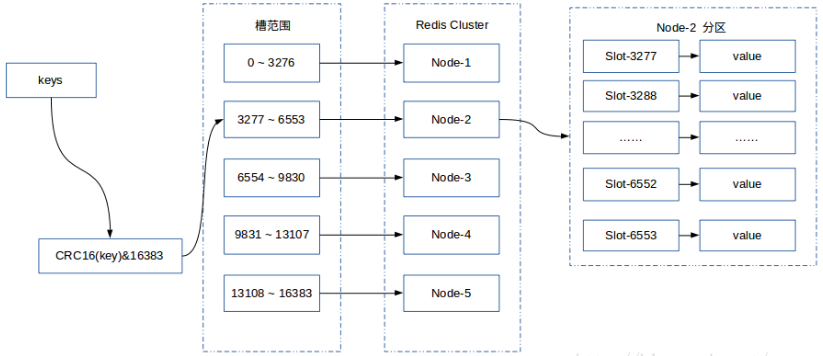
The specific implementation details of Redis Cluster adopt the concept of Hash slots. The cluster will allocate 16384 slots in advance and assign them to specific service nodes. Through CRC16(key)%16384 operation on Key, we can get the corresponding slot, so as to forward the read and write operations to the corresponding service nodes of the slot. When new nodes are added or removed, these slots and their corresponding data are migrated. Under this kind of design, we can easily expand or shrink the capacity dynamically, and individuals tend to this cluster mode.
Portal: Official introduction to Redis Cluster
Of course, the two modes can also be used together for the high availability implementation scheme, but they are relatively complex and not recommended.
Build a cluster:
Redis Cluster cluster requires at least three master nodes. In this paper, three master nodes and three slave nodes will be deployed in the way of single machine and multiple instances. Six node instances use different ports and working directories respectively
1. First, create a new redis cluster directory under the redis installation directory / usr/local/redis-4.0.6, and then create six new subdirectories under the directory, 800180028003800480058006. At this time, the directory structure is as follows:
[root@VM_0_15_centos redis-cluster]# pwd
/usr/local/redis-4.0.6/redis-cluster
[root@VM_0_15_centos redis-cluster]# ll
total 24
drwxr-xr-x 2 root root 4096 Jul  7 18:42 8001
drwxr-xr-x 2 root root 4096 Jul  7 18:42 8002
drwxr-xr-x 2 root root 4096 Jul  7 18:42 8003
drwxr-xr-x 2 root root 4096 Jul  7 18:42 8004
drwxr-xr-x 2 root root 4096 Jul  7 18:42 8005
drwxr-xr-x 2 root root 4096 Jul  7 18:42 8006
2. Copy the redis.conf file under the redis installation directory / usr/local/redis-4.0.6 to the 8001 folder, and modify the following configuration:
daemonize yes #Turn on background operation
port 8001 #Work port
bind 172.16.0.15 #Bind the internal network of IP, we must set up old fellow iron, do not use 127.0.0.1.
dir /usr/local/redis-cluster/8001/ #The specified working directory, RDB and AOF persistent files will be placed in this directory. Different instances must be configured with different working directories
cluster-enabled yes #Enable cluster mode
cluster-config-file nodes-8001.conf #The name of the generated cluster configuration file, which will be automatically generated after the cluster is successfully built, is in the working directory
cluster-node-timeout 5000 #The discovery time of node downtime can be understood as the time of upgrading from node to primary node after the primary node is down
appendonly yes #Turn on AOF mode
pidfile /var/run/redis_8001.pid #Directory of pid file
3. Copy the redis.conf file under the 8001 folder to the other five directories, and modify the port, dir, and cluster config file attributes
Here you can use the sed command to quickly modify
[root@VM_0_15_centos redis-cluster]# sed -i 's/8001/8002/g' 8002/redis.conf
[root@VM_0_15_centos redis-cluster]# sed -i 's/8001/8003/g' 8003/redis.conf
[root@VM_0_15_centos redis-cluster]# sed -i 's/8001/8004/g' 8004/redis.conf
[root@VM_0_15_centos redis-cluster]# sed -i 's/8001/8005/g' 8005/redis.conf
[root@VM_0_15_centos redis-cluster]# sed -i 's/8001/8006/g' 8006/redis.conf
4. Since the command redis trib is needed to create a cluster, it depends on Ruby and RubyGems, so we need to install it first
[root@VM_0_15_centos redis-cluster]# yum install ruby
[root@VM_0_15_centos redis-cluster]# yum install rubygems
[root@VM_0_15_centos redis-cluster]# gem install redis --version 3.3.3
5. After Ruby installation, we start six nodes
[root@VM_0_15_centos redis-4.0.6]# ./src/redis-server redis-cluster/8001/redis.conf
[root@VM_0_15_centos redis-4.0.6]# ./src/redis-server redis-cluster/8002/redis.conf
[root@VM_0_15_centos redis-4.0.6]# ./src/redis-server redis-cluster/8003/redis.conf
[root@VM_0_15_centos redis-4.0.6]# ./src/redis-server redis-cluster/8004/redis.conf
[root@VM_0_15_centos redis-4.0.6]# ./src/redis-server redis-cluster/8005/redis.conf
[root@VM_0_15_centos redis-4.0.6]# ./src/redis-server redis-cluster/8006/redis.conf
6. Check if the service is working properly
[root@VM_0_15_centos redis-4.0.6]# ps -ef|grep redis
root     20290     1  0 18:33 ?        00:00:02 ./src/redis-server *:8001 [cluster]
root     20295     1  0 18:33 ?        00:00:02 ./src/redis-server *:8002 [cluster]
root     20300     1  0 18:33 ?        00:00:02 ./src/redis-server *:8003 [cluster]
root     20305     1  0 18:33 ?        00:00:02 ./src/redis-server *:8004 [cluster]
root     20310     1  0 18:33 ?        00:00:02 ./src/redis-server *:8005 [cluster]
root     20312     1  0 18:33 ?        00:00:02 ./src/redis-server *:8006 [cluster]
root     22913 15679  0 19:31 pts/2    00:00:00 grep --color=auto redis
ok, all six nodes have been started normally.
7. Start cluster creation
[root@VM_0_15_centos redis-4.0.6]# ./src/redis-trib.rb create --replicas 1 172.16.0.15:8001 172.16.0.15:8002 172.16.0.15:8003 172.16.0.15:8004 172.16.0.15:8005 172.16.0.15:8006
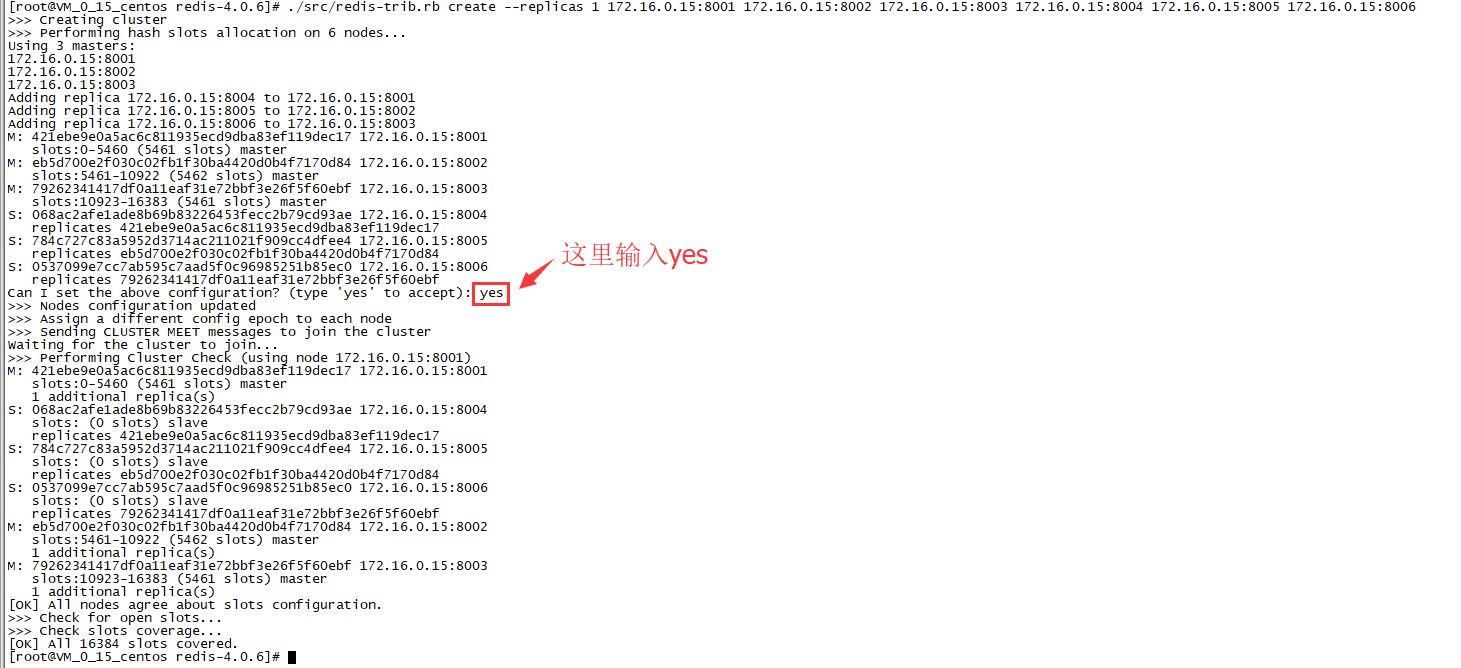
From the console, you can see that the cluster has been created, so let's go to the 8001 node to see the cluster node status
172.16.0.15:8001> cluster nodes
068ac2afe1ade8b69b83226453fecc2b79cd93ae 172.16.0.15:8004@18004 slave 421ebe9e0a5ac6c811935ecd9dba83ef119dec17 0 1531008204920 4 connected
784c727c83a5952d3714ac211021f909cc4dfee4 172.16.0.15:8005@18005 slave eb5d700e2f030c02fb1f30ba4420d0b4f7170d84 0 1531008203000 5 connected
0537099e7cc7ab595c7aad5f0c96985251b85ec0 172.16.0.15:8006@18006 slave 79262341417df0a11eaf31e72bbf3e26f5f60ebf 0 1531008204419 6 connected
421ebe9e0a5ac6c811935ecd9dba83ef119dec17 172.16.0.15:8001@18001 myself,master - 0 1531008204000 1 connected 0-5460
eb5d700e2f030c02fb1f30ba4420d0b4f7170d84 172.16.0.15:8002@18002 master - 0 1531008203000 2 connected 5461-10922
79262341417df0a11eaf31e72bbf3e26f5f60ebf 172.16.0.15:8003@18003 master - 0 1531008203419 3 connected 10923-16383
The console information shows that there are three master nodes and three slave nodes in the current cluster, indicating that our cluster has been successfully built
So far, the Redis Cluster has been built!