Environment: A Linux Virtual Machine
Redis version: redis-4.0.1
1. Download and decompress
cd /opt/redis
wget http:http://download.redis.io/releases/redis-4.0.1.tar.gz
tar -zxvf redis-4.0.1.tar.gz
2. Compile and Install
Be sure to enter the decompression directory and use the command make, or you will report an error: make:* No targets specified and no makefile found.
cd /opt/redis/redis-4.0.1
make && make install
3. Creating Cluster Nodes
In order to deploy 6 nodes on one server and 3 master and 3 slave, master and slave will be deployed on two servers. Copy redis.conf to these six folders.
cd /opt/redis
mkdir redis-cluster
cd redis-cluster
mkdir 7000 7001 7002 7003 7004 7005
cp ../redis.conf 7000
cp ../redis.conf 7001
cp ../redis.conf 7002
cp ../redis.conf 7003
cp ../redis.conf 7004
cp ../redis.conf 7005
redis.conf is configured as follows, and the rest of the folders are changed accordingly
bind 127.0.0.1                  //The default is 127.0.0.1, which needs to be changed to server IP, otherwise other servers will not be able to access after the cluster is built.
port 7000                       //Ports, in other configurations change to corresponding ports: 7001, 7002, 7003, 7004, 7005
daemonize yes                   //redis background operation
cluster-enabled yes             //Open cluster
cluster-config-file nodes_7000.conf //Configuration of the cluster, automatically generated under 7000 folders after startup
cluster-node-timeout 15000      //Request timeout, default 15 seconds
appendonly yes                  //Open aof log and record one log for each write operation
4. Start redis nodes
First, copy redis-tribe.rb to / usr/local/bin. redis-tribe.rb has the following functions
1. create: Create clusters
2. check: Check the cluster
3. info: View cluster information
4. fix: fix clusters
5. reshard: Online migration slot
6. rebalance: balancing the number of slot s in the cluster
7. add-node: Add new nodes to the cluster
8. del-node: Delete nodes from the cluster
9. set-timeout: Set timeout for heartbeat connections between cluster nodes
10. call: Execute commands on all nodes of the cluster
11. import: Import external redis data into the cluster
redis-server redis-cluster/7000/redis.conf
redis-server redis-cluster/7001/redis.conf
redis-server redis-cluster/7002/redis.conf
redis-server redis-cluster/7003/redis.conf
redis-server redis-cluster/7004/redis.conf
redis-server redis-cluster/7005/redis.conf

##View redis startup
ps -ef | grep redis
root     31510     1  0 16:20 ?        00:00:13 redis-server 127.0.0.1:7000 [cluster]
root     31517     1  0 16:20 ?        00:00:13 redis-server 127.0.0.1:7001 [cluster]
root     31523     1  0 16:20 ?        00:00:13 redis-server 127.0.0.1:7002 [cluster]
root     31528     1  0 16:20 ?        00:00:13 redis-server 127.0.0.1:7003 [cluster]
root     31533     1  0 16:20 ?        00:00:13 redis-server 127.0.0.1:7004 [cluster]
root     31538     1  0 16:20 ?        00:00:13 redis-server 127.0.0.1:7005 [cluster]
5. Installing Ruby
redis-trib.rb is implemented in ruby, so you need to install Ruby and the connection between Ruby and redis
yum -y install ruby ruby-devel rubygems rpm-build
gem install redis
Where gem install redis execution will report an error: redis require Ruby version >= 2.2.2
Online review found that centos default support for ruby is 2.0.0, so you need to install rvm to upgrade Ruby Version to 2.2.3
# 1,install curl
sudo yum install curl

# 2,install RVM
curl -L get.rvm.io | bash -s stable
## perhaps
curl -sSL https://get.rvm.io | bash -s stable

### Installation of RVM may fail, and access to rvm.io sites may be walled.
Downloading https://github.com/rvm/rvm/archive/1.29.3.tar.gz
Downloading https://github.com/rvm/rvm/releases/download/1.29.3/1.29.3.tar.gz.asc
gpg: Signature made Mon Sep 11 04:59:21 2017 CST using RSA key ID BF04FF17
gpg: Can't check signature: No public key
Warning, RVM 1.26.0 introduces signed releases and automated check of signatures when GPG software found. Assuming you trust Michal Papis import the mpapis public key (downloading the signatures).

GPG signature verification failed for '/usr/local/rvm/archives/rvm-1.29.3.tgz' - 'https://github.com/rvm/rvm/releases/download/1.29.3/1.29.3.tar.gz.asc'! Try to install GPG v2 and then fetch the public key:

    gpg2 --recv-keys 409B6B1796C275462A1703113804BB82D39DC0E3

or if it fails:

    command curl -sSL https://rvm.io/mpapis.asc | gpg2 --import -

the key can be compared with:

    https://rvm.io/mpapis.asc
    https://keybase.io/mpapis

NOTE: GPG version 2.1.17 have a bug which cause failures during fetching keys from remote server. Please downgrade or upgrade to newer version (if available) or use the second method described above.


### You can start withgitWarehouse download and installationRVM,Then execute the following command
#### Install mpapis public key (might need `gpg2` and or `sudo`)
gpg --keyserver hkp://keys.gnupg.net --recv-keys 409B6B1796C275462A1703113804BB82D39DC0E3

#### Download the installer
curl -O https://raw.githubusercontent.com/rvm/rvm/master/binscripts/rvm-installer
curl -O https://raw.githubusercontent.com/rvm/rvm/master/binscripts/rvm-installer.asc

#### Verify the installer signature (might need `gpg2`), and if it validates...
gpg --verify rvm-installer.asc &&

#### Run the installer
bash rvm-installer stable

#### If it appears: gpg-keyserver, replace it with the following command (I didn't appear, so I didn't use it)
curl -sSL https://rvm.io/mpapis.asc | gpg --import -

### RVM installed, prompt
  * First you need to add all users that will be using rvm to 'rvm' group,
    and logout - login again, anyone using rvm will be operating with `umask u=rwx,g=rwx,o=rx`.

  * To start using RVM you need to run `source /etc/profile.d/rvm.sh`
    in all your open shell windows, in rare cases you need to reopen all shell windows.
## Execute source/etc/profile.d/rvm.sh
source /etc/profile.d/rvm.sh

# 3,See RVM The repository aggregates known ruby Edition
rvm list known

# 4,install ruby 2.3.3
rvm install 2.3.3

# 5,Use the new version
rvm use 2.3.3

# 6,Default version of device
rvm remove 2.0.2

# 7,Uninstall known versions
rvm --version

# 8,Reinstall redis,Establishment and ruby Connection
gem install redis
6. Creating Clusters
redis-trib.rb create --replicas 1 127.0.0.1:7000 127.0.0.1:7001 127.0.0.1:7002 127.0.0.1:7003 127.0.0.1:7004 127.0.0.1:7005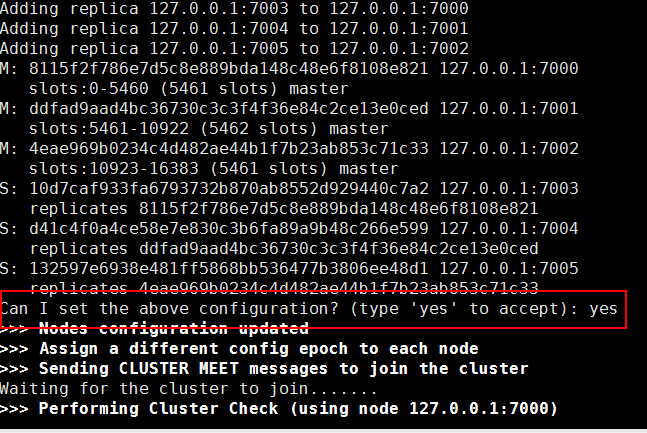
Enter yes, override the default configuration, and the installation is successful.
7. Cluster testing
Connect 7001 nodes 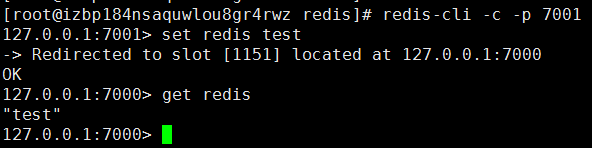
Redirected to slot [1151] located at 127.0.0.1:7000 refers to the successful deployment of the cluster, which can get from 7000 nodes to set at 7001 nodes.
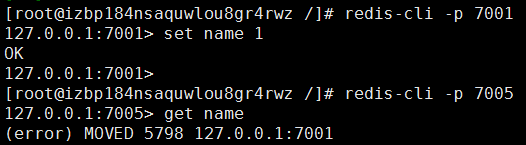
However, the following errors will occur at other nodes: (error) MOVED 5798 127.0.0.1:7001
Because the connection command redis-cli is not added-c, it cannot connect to the cluster.
Close redis command or kill
redis-cli -h 127.0.0.1 -p 7000 shutdown