Blog Outline:
I. Redis cluster related concepts
II. Deployment of Redis cluster
- 1. Deployment environment
- 2. Configure Redis instance
- 3. Configure multiple Redis instances of node06 host
- 4. The host node01 is installed and configured with the running environment of ruby to facilitate the management of Redis cluster
- 5. Configure each node in the cluster
- 6. Manage Redis cluster with ruby installation command
- 7. Add the 6380 instance of node06 to the Redis cluster
- 8. Assign slave nodes to the newly added master
- 9. Delete the primary node
I. Redis cluster related concepts
Redis supports cluster since version 3.0. It adopts the hash slot method, which can integrate multiple redis instances to form a cluster, that is, to store data on multiple nodes in the cluster.
Redis cluster is a decentralized structure. In a cluster, the identity of each master is equal. Each node saves data and the status of the whole cluster, and knows the slot that other nodes are responsible for. It also sends heartbeat information regularly, which can sense abnormal nodes in the cluster in a timely manner, and decide whether the node is unavailable by voting. If the number of votes is If more than half of the nodes in the cluster are considered unavailable, it is precisely because of this feature that redis cluster should be deployed with at least three or more nodes.
There are master and slave roles in the cluster. Slots (slots) are allocated between master roles. Slot point numbers are 0-16383 (16384 in total).
By default, each cluster node has two TCP ports listening, one is 6379 (used to listen for access connections of clients), and the other is 16379 (used for node communication between clusters). Note that the firewall needs to release traffic from both ports.
All data of Redis is saved in memory, and then saved to disk asynchronously from time to time (this is called "semi persistent mode"); every data change can also be written into an append only file(aof) (this is called "fully persistent mode").
Redis provides two methods for persistence: one is RDB persistence (the principle is to periodically record the dump of redis's database in memory to RDB persistence on disk); the other is AOF (append only file) persistence (the principle is to write redis's operation logs to files in an additional way)
Advantages and disadvantages of RDB
Advantages of RDB semi persistence:
- It only contains one file, which is good for file backup;
- Disaster recovery is faster than aof;
- Maximize performance. For Redis's service process, the only thing it needs to do when it starts persistence is to fork out subprocesses, and then the subprocesses complete the persistence work, which can greatly avoid the service process from executing IO operations.
- Compared with AOF mechanism, if the data set is too large, the start-up efficiency of RDB will be higher.
Disadvantages of RDB semi persistence: - Because RDB assists in data persistence through fork subprocesses, if the data set is large, it may cause the whole service to stop for several hundred milliseconds, or even one second.
Advantages and disadvantages of AOF
Advantages of AOF full persistence:
- High availability of data can be guaranteed;
- In the process of writing, there will be downtime in time, and the existing content in the log file will not be damaged. If there is downtime in the process of writing, it can be solved by Redis check AOF tool after restarting Redis;
- If the log is too large, Redis can automatically enable the rewrite mechanism to generate new files to store aof logs;
- This mechanism can bring higher data security and data persistence. Redis provides three synchronization strategies, i.e. synchronization per second, synchronization per modification and non synchronization.
Disadvantages of AOF full persistence: - For the same number of data sets, AOF files are usually larger than RDB files. RDB can recover large data sets faster than AOF;
- According to different synchronization policies, AOF is often slower than RDM in running efficiency. In a word, the efficiency of synchronization policy per second is relatively high, and the efficiency of synchronization disable policy is as efficient as RDB.
If RDB and AOF exist at the same time, AOF mode is preferred.
II. Deployment of Redis cluster
1. The environment is as follows:

There are six centos servers in the above. Three master servers correspond to one slave (you can also configure multiple Redis instances on one server, but do not use master slave on the same physical server. You can use the cross master slave mode for master-slave replication. The so-called cross is that the master is on node01, but the corresponding slave is on node02, node02, and the slave corresponding to the master is on node03 , and the slave corresponding to node03 is on node01. The advantage of doing this is to avoid the whole cluster crash caused by the physical server's downtime. Here is just a hint, just do your own research.
In order to show that multiple Redis instances are configured on the same host, multiple Redis instances will be configured on node06, and the other nodes will each be responsible for one Redis instance.
Before the next configuration, please download The source package I provided (in fact, the version deployed here is redis 4.0, which is a little lower, and some convenient configurations cannot be carried out. Please refer to my article below Deploy Redis 5.0's Bo Wen.
2. Configure Redis instance
Here is an example of node01 configuration. Other nodes can simply copy the configuration.
[root@node01 ~]# ls | grep redis    #Use the rz command in xshell to upload the package I provided, as follows:
redis-4.0.14.tar.gz
[root@node01 ~]# tar zxf redis-4.0.14.tar.gz -C /usr/local/    #Unpacking
[root@node01 ~]# cd /usr/local/    #Switch to the specified path
[root@node01 local]# mv redis-4.0.14 redis     #Change directory name
[root@node01 local]# cd redis/    #Switch to the unzipped directory
[root@node01 redis]# make && make install     #No configuration required, just compile and install
[root@node01 redis]# ./utils/install_server.sh   #Initialize Redis
#All initialization options remain default, just press enter all the way to confirm
#It is to confirm the listening port, configuration file, log file, pid storage path and other information
 .............#Omit part of the content
Successfully added to chkconfig!
Successfully added to runlevels 345!
Starting Redis server...
Installation successful!
#If the above content appears, the initialization is successful
#Next, some optimizations are carried out as follows:
[root@node01 redis]# echo "512" > /proc/sys/net/core/somaxconn
[root@node01 redis]# echo "vm.overcommit_memory = 1" >> /etc/sysctl.conf
[root@node01 redis]# sysctl -p
vm.overcommit_memory = 1
[root@node01 redis]# echo "never" > /sys/kernel/mm/transparent_hugepage/enabled
[root@node01 redis]# vim /etc/redis/6379.conf        #Edit the configuration file as follows
bind 0.0.0.0          #Find the uncommented line and change it to 0.0.0.0
daemonize yes    #If there is an annotation symbol, you need to delete it for it to take effect
cluster-enabled yes
cluster-node-timeout 5000
appendonly yes
#After modification, save to exit.
[root@node01 redis]# /etc/init.d/redis_6379 restart    #Restart Redis service
[root@node01 redis]# netstat -anpt | grep redis   #Make sure ports 6379 and 16379 are listening
On other node servers, the above configurations are performed in order, except for the host node06, because the configuration of multiple Redis instances of a single host will be shown later on node06.
3. Configure multiple Redis instances of node06 host
On node06, I will configure it to run multiple Redis database instances, so the configuration of node06 is not exactly the same as that of the previous five nodes. Please configure it carefully.
[root@node06 ~]# tar zxf redis-4.0.14.tar.gz -C /usr/local/
[root@node06 ~]# cd /usr/local/
[root@node06 local]# mv redis-4.0.14 redis
[root@node06 local]# cd redis/
[root@node06 redis]# make && make install    #No initialization required after compilation and installation
[root@node06 redis]# redis-server    #Start viewing items to be optimized
#The optimized configuration of the previous nodes is obtained from the prompt after the command is executed
#Next, optimize the configuration of these tips!
[root@node06 redis]# echo "512" > /proc/sys/net/core/somaxconn
[root@node06 redis]# echo "vm.overcommit_memory = 1" >> /etc/sysctl.conf
[root@node06 redis]# sysctl -p
vm.overcommit_memory = 1
[root@node06 redis]# echo "never" > /sys/kernel/mm/transparent_hugepage/enabled
[root@node06 redis]# vim redis.conf     #Edit the following template profiles in the current directory
bind 0.0.0.0
port 6379
daemonize yes        #Turn on the background daemons to run in the background
cluster-enabled yes        #Open cluster
cluster-node-timeout 5000     #Timeout between cluster nodes, in milliseconds
appendonly yes       #Whether to enable synchronization to disk
appendfilename "appendonly-6379.aof"     #Name of aof log
#After editing, save to exit
[root@node06 redis]# mkdir -p /usr/local/redis-cluster/{6379..6382}
#The above is to run several Redis instances, just create a few directories. Here I name the directory with the port number of the instance (I plan to run four Redis instances for the time being)
#The following is a copy of the modified configuration file to the specified directory
[root@node06 redis]# cp redis.conf /usr/local/redis-cluster/6379/
[root@node06 redis]# cp redis.conf /usr/local/redis-cluster/6380/
[root@node06 redis]# cp redis.conf /usr/local/redis-cluster/6381/
[root@node06 redis]# cp redis.conf /usr/local/redis-cluster/6382/
#Next, change the port number corresponding to the Redis instance in the copied configuration files
[root@node06 redis]# cd /usr/local/redis-cluster/
[root@node06 redis-cluster]# sed -i s/6379/6380/g 6380/redis.conf
[root@node06 redis-cluster]# sed -i s/6379/6381/g 6381/redis.conf
[root@node06 redis-cluster]# sed -i s/6379/6382/g 6382/redis.conf
[root@node06 redis-cluster]# cd 6379    #Switch to 6379 directory
[root@node06 6379]# redis-server redis.conf     #Start the configuration file in this directory
101582:C 04 Nov 23:37:04.988 # oO0OoO0OoO0Oo Redis is starting oO0OoO0OoO0Oo
101582:C 04 Nov 23:37:04.988 # Redis version=4.0.14, bits=64, commit=00000000, modified=0, pid=101582, just started
101582:C 04 Nov 23:37:04.988 # Configuration loaded
#The next step is to start each instance in turn
[root@node06 6379]# cd ../6380
[root@node06 6380]# redis-server redis.conf
[root@node06 6380]# cd ../6381
[root@node06 6381]# redis-server redis.conf
[root@node06 6381]# cd ../6382
[root@node06 6382]# redis-server redis.conf
[root@node06 6382]# netstat -anpt | grep redis    #View the listening status of Redis related ports
The information returned from the above view of Redis port monitoring is as follows:

4. The host node01 is installed and configured with the running environment of ruby to facilitate the management of Redis cluster
[root@node01 ~]# yum -y install rpm-build openssl openssl-devel  #Installation dependency
[root@node01 ~]# ls | egrep  "gem|ruby"     #Upload the following two packages to the host node01
redis-3.3.0.gem
ruby-2.3.1.tar.gz
[root@node01 ~]# tar zxf ruby-2.3.1.tar.gz -C /usr/src    #Unpacking
[root@node01 ~]# cd /usr/src/ruby-2.3.1/     #Enter the unzipped directory
[root@node01 ruby-2.3.1]#  ./configure --prefix=/usr/local/ruby && make && make install   #Compile and install for a long time
#Here is a soft connection to the generated command
[root@node01 ruby-2.3.1]# ln -sf /usr/local/ruby/bin/* /usr/local/bin/
[root@node01 ruby-2.3.1]# ln -sf /usr/local/redis/src/redis-trib.rb /usr/local/bin/
[root@node01 ruby-2.3.1]# cd      #Go back to the directory where the. gem file is located
[root@node01 ~]# gem install redis-3.3.0.gem   #Execute this command
Successfully installed redis-3.3.0
Parsing documentation for redis-3.3.0
Installing ri documentation for redis-3.3.0
Done installing documentation for redis after 0 seconds
1 gem installed
#Return the above information to indicate success
5. Configure each node in the cluster
[root@node01 ~]# redis-cli -p 6379     #Log in to the local Redis instance
#Here are the nodes participating in the cluster to be added to the cluster
127.0.0.1:6379> CLUSTER MEET 192.168.20.3 6379
OK
127.0.0.1:6379> CLUSTER MEET 192.168.20.4 6379
OK
127.0.0.1:6379> CLUSTER MEET 192.168.20.5 6379
OK
127.0.0.1:6379> CLUSTER MEET 192.168.20.6 6379
OK
127.0.0.1:6379> CLUSTER MEET 192.168.20.7 6379
OK
127.0.0.1:6379> set a b         #Although the node is added, the data cannot be added because there is no hash slot assigned
(error) CLUSTERDOWN Hash slot not served
127.0.0.1:6379> CLUSTER INFO     #View the status of the cluster
cluster_state:fail        #It was a failure.
192.168.20.3:6379> exit
#Next, assign slot points to nodes in the cluster
#It must be distributed carefully. Once the distribution is wrong, it will be very troublesome
#Although I could change "add" to "del" in the command, I failed
#Be sure to allocate 0 to 16383 completely, preferably equally
#Just assign the node as the master node. Here, node01 to node03 are the master nodes
[root@node01 ~]# redis-cli -h 192.168.20.2 -p 6379 cluster addslots {0..5461}
OK
[root@node01 ~]# redis-cli -h 192.168.20.3 -p 6379 cluster addslots {5462..10922}
OK
[root@node01 ~]# redis-cli -h 192.168.20.4 -p 6379 cluster addslots {10923..16383}
OK
[root@node01 ~]# redis-cli -p 6379 -c       #Enter the cluster, need to add "- c" option
127.0.0.1:6379> CLUSTER NODES       #View node information in the cluster
#Next, bind each slave node to the master
#node04 is the slave node of node01, node05 is the slave node of node02, and the 6379 instance of node06 is the slave node of node03
#Which slave node needs to be configured, which instance needs to be logged in to
127.0.0.1:6379> CLUSTER NODES     #You can execute this command first to view the ID of the corresponding node so that you can specify
[root@node01 ~]# redis-cli -h 192.168.20.5 -p 6379   #Log in to node04
192.168.20.5:6379> CLUSTER REPLICATE 5cd3d0eec161a7bcc785202397fd8363074ae9c2
#The ID of node01 node is specified above
OK
192.168.20.5:6379> exit    #Exit instance
[root@node01 ~]# redis-cli -h 192.168.20.6 -p 6379    #Log in to node05
192.168.20.6:6379> CLUSTER REPLICATE e2de936c380eb2239f0a349dcbfba5daa74fa1d7
#Node ID of node02 is specified above
OK
192.168.20.6:6379> exit   #Exit instance
[root@node01 ~]# redis-cli -h 192.168.20.7 -p 6379   #Log in to the 6379 instance of node06
192.168.20.7:6379> CLUSTER REPLICATE dd03b02213df3a91608d1f4ae8080c37f4790d7c
#Above is the node ID of the specified node03
OK
192.168.20.7:6379> exit
After configuration, you can view the node information of the cluster again. You will find that the master and slave correspond to each other, as follows:

At this point, the cluster can read and write data normally, as follows:
[root@node01 ~]# redis-cli -h 192.168.20.2 -p 6379 -c    #Log in to the cluster
192.168.20.2:6379> set b c
OK
6. Manage Redis cluster with ruby installation command
[root@node01 ~]# redis-trib.rb check 127.0.0.1:6379 #Check the status of the cluster
The information returned by the above command is as follows: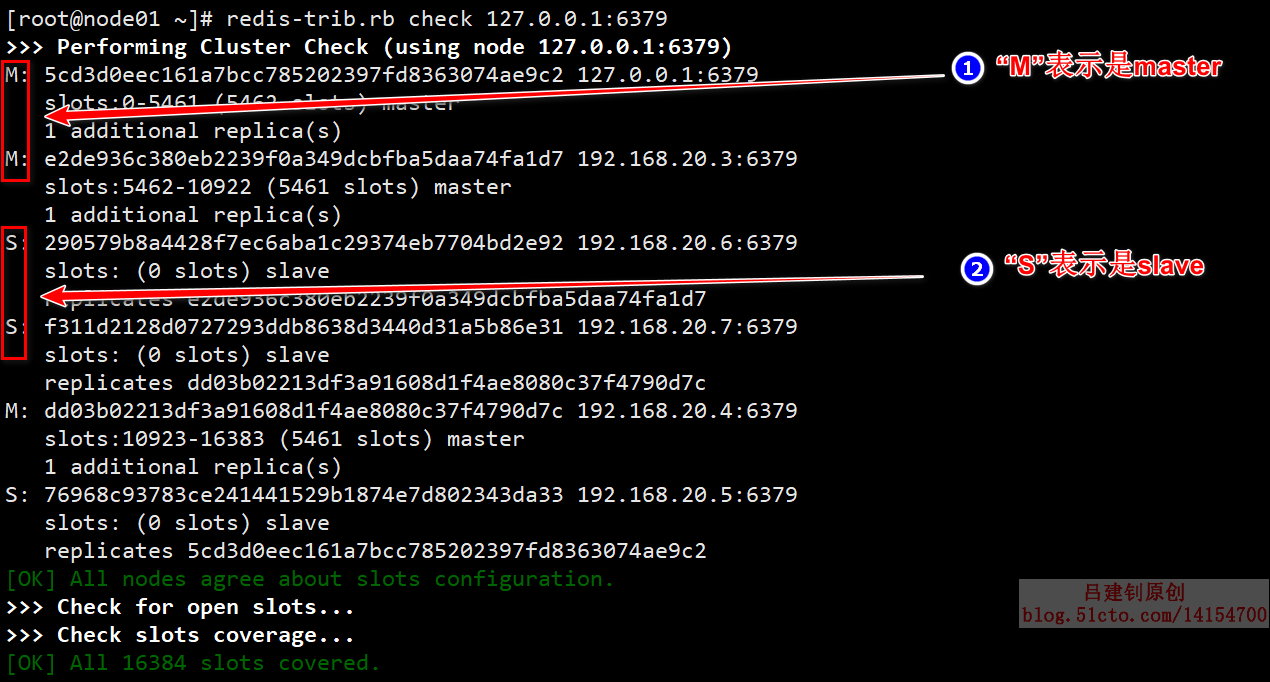
7. Add the 6380 instance of node06 to the Redis cluster
1) add node
[root@node01 ~]# redis-trib.rb add-node 192.168.20.7:6380 192.168.20.2:6379
#When adding nodes, no other configuration will be added. After joining the cluster by default, the role is master
The returned prompt message is as follows to indicate success:

2) after adding nodes, corresponding slot points need to be allocated
In order for a cluster to operate normally, all slot points must be allocated, so when new nodes are added, they need to be allocated slot points again, as follows:
[root@node01 ~]# redis-trib.rb check 127.0.0.1:6379    #When executing this command to confirm the newly added node, master
[root@node01 ~]# redis-trib.rb reshard 192.168.20.2:6379   #Specify the cluster address and port
How many slots do you want to move (from 1 to 16384)? 4096
#If there are four master s, the average value is 4096, so enter 4096 here
What is the receiving node ID? 010752fb2527317a938fcb5b4e73822db805b3a1
#Specifies the ID of the receiving node, that is, the instance 6380 on the newly added node06 host
Source node #1:all   #Specify the slot point assignment from which node, enter "all" here to select all nodes
Do you want to proceed with the proposed reshard plan (yes/no)? yes    #Enter "yes" to confirm
At this point, the new node is added and the corresponding slot points are allocated, but... There is no slave node, so next, assign a slave node to the newly added master.
8. Assign slave nodes to the newly added master
There are two ways to allocate slave nodes: one is to automatically bind to the master without the slave node, and the other is to directly specify the master to which the slave node is bound. Write down both ways here.
#Method 1:
[root@node01 ~]# redis-trib.rb add-node --slave 192.168.20.7:6381 192.168.20.7:6380
#Add 6381 instance on node06 to the cluster as slave
#Note that the returned information must not be in red, which means there is an error
[root@node01 ~]# redis-trib.rb check 192.168.20.2:6379
#Check whether the newly added slave is bound to the 6380master instance of node06
#Mode two:
[root@node01 ~]# redis-trib.rb add-node --slave --master-id 010752fb2527317a938fcb5b4e73822db805b3a1 192.168.20.7:6382 192.168.20.2:6380
#The ID specified in the above command is the ID of the master of the 6380 instance, and is directly specified as the slave node of the 6380 instance
[root@node01 ~]# redis-trib.rb check 192.168.20.2:6379
#Viewing the cluster status, you can see that the master 6380 has two slave s, both of which are newly added above
9. Delete the primary node
The operation of deleting the master node is actually to reverse the operation of adding the master node. You need to assign the slot points on the master node to be deleted to other masters before you can perform the operation. After deleting the master node, the slave corresponding to the master node will also be transferred to the new master along with the slots.
Here is an example of removing the 6380 instance on node06.
#Remove slot point on 6380 instance
[root@node01 ~]# redis-trib.rb reshard 192.168.20.2:6379   #Specify the cluster listening address
How many slots do you want to move (from 1 to 16384)? 4096   #Enter how many slots to delete
What is the receiving node ID? 5cd3d0eec161a7bcc785202397fd8363074ae9c2
#What is specified here is who is assigned the slot on the primary node after the primary node is deleted? Here is the ID of the 6379 instance of node02
Source node #1:010752fb2527317a938fcb5b4e73822db805b3a1
#Which master node do you want to delete? The specified ID is the ID of 6380 instance on node06
Source node #2:done    #Enter done to end
Do you want to proceed with the proposed reshard plan (yes/no)? yes
#Enter "yes" for confirmation
#After removing the slot point, next remove the 6380 instance from the cluster as follows:
[root@node01 ~]# redis-trib.rb del-node 192.168.20.2:6379 010752fb2527317a938fcb5b4e73822db805b3a1
#The ID of the 6380 instance is specified above
At this point, the 6380 instance has been completely removed from the cluster, and the slave corresponding to it has also become the slave of node02 along with the transfer of slot points to node02. Now look at the cluster information. The master of node02 should have three slaves.
————————Thank you for reading————————