Linux system, Apache, Mysql, PHP
Ensure the existing development environment package before installing the configuration
[root@localhost ~]# yum -y install pcre-devel zlib-devel links
Turn off selinux and iptables
[root@localhost ~]# vi /etc/selinux/config  # Modify the configuration file and turn off the selinux function
SELINUX=disabled    # Set to disabled
#SELINUXTYPE=targeted  # Comment the item, add at the beginning of the line#
[root@localhost ~]# systemctl stop firewalld  #Turn off firewall temporarily
[root@localhost ~]# systemctl disable firewalld  #Turn off firewall permanently
[root@localhost html]# cd /var/www/html/  #Web page store
First, install Apache and related dependency package ape-*
[root@localhost ~]# yum -y install httpd
[root@localhost ~]# systemctl start httpd  ##Open httpd service
[root@localhost ~]# ss -tunl | grep 80 ##Verification
tcp    LISTEN     0      128                   :::80                   :::*
[root@localhost ~]# vi /etc/httpd/conf/httpd.conf  ##Modify profile
[root@localhost html]# yum -y install apr-*
[root@localhost html]# cd /var/www/html/  #Web page store
Verification
At this time, if you open the browser and the server's Internet IP address, you can see the apache test page
Install mysql
However, the MySQL database software is removed from the default program list and replaced with mariadb. In the Linux configuration tutorial, mariadb is mostly installed, because centos7 regards mariadb as MySQL by default, and all of them need to be downloaded according to MySQL needs
Check whether the linked library file is installed and checked with the command before installation
[root@localhost ~]# rpm -qa | grep libaio
[root@localhost ~]#
The linked library file is not found in the system after running the command
Install related packages
[root@localhost ~]# yum -y install libaio-devel.x86_64
[root@localhost ~]# yum -y install numactl
There are two solutions:
First, install mariadb
Second, Download MySQL server from the official website
It is recommended to install it from the official website
Check if there is maradb, if so, uninstall it
root@localhost ~]# rpm -qa | grep mariadb
mariadb-libs-5.5.35-3.el7.x86_64
[root@localhost ~]# rpm -e --nodeps mariadb-libs-5.5.35-3.el7.x86_64
[root@localhost ~]# rpm -qa | grep mariadb
Check whether mysql user group and user exist, if not, create
[root@localhost ~]# cat /etc/group | grep mysql
[root@localhost ~]# cat /etc/passwd |grep mysql
[root@localhost ~]# groupadd mysql
[root@localhost ~]# useradd -r -g mysql mysql
Download Mysql installation package for Linux from official website
[root@localhost ~]# wget https://dev.mysql.com/get/Downloads/MySQL-5.7/mysql-5.7.24-linux-glibc2.12-x86_64.tar.gz
Find Mysql installation package in the directory where wget command is executed or your upload directory: Mysql-5.7.24-linux-glibc2.12-x86_.tar.gz
Execute the unzip command:
[root@localhost ~]# tar -xzvf mysql-5.7.24-linux-glibc2.12-x86_64.tar.gz
[root@localhost ~]# ls
anaconda-ks.cfg                      mysql-5.7.24-linux-glibc2.12-x86_64.tar.gz
mysql-5.7.24-linux-glibc2.12-x86_64
After decompression, you can see that there is an additional decompression file in the current directory, move the file to / usr/local /, and change the folder name to mysql.
If mysql already exists under / usr/local /, please change the existing mysql file to a different name, otherwise the following steps may not proceed correctly
[root@localhost ~]# mv mysql-5.7.24-linux-glibc2.12-x86_64 /usr/local/
[root@localhost ~]# cd /usr/local/
[root@localhost local]# mv mysql-5.7.24-linux-glibc2.12-x86_64/ mysql
Create data directory in / usr/local/mysql directory
[root@localhost local]# mkdir /usr/local/mysql/data
Change the user groups, users and permissions of all directories and folders under mysql directory
[root@localhost local]# chown mysql:mysql /usr/local/mysql/
[root@localhost local]# chmod 755 /usr/local/mysql/
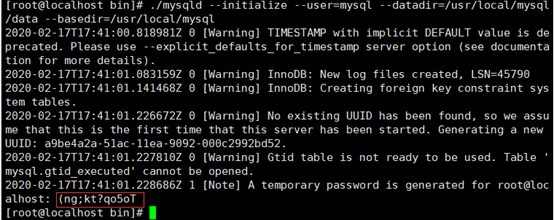
Compile, install and initialize mysql. Remember to initialize the password at the end of the output log (database administrator temporary password). Record the string after the end of the log at root@localhost:, which is the MySQL administrator temporary login password
[root@localhost local]# cd /usr/local/mysql/bin/
[root@localhost bin]# ./mysqld --initialize --user=mysql --datadir=/usr/local/mysql/data --basedir=/usr/local/mysql
 Edit the configuration file my.cnf and add the configuration as follows
[root@localhost bin]# vi /etc/my.cnf
[mysqld]
datadir=/usr/local/mysql/data
port=3306
sql_mode=NO_ENGINE_SUBSTITUTION,STRICT_TRANS_TABLES
sysbolic-links=0
max_connections=400
innodb_file_per_table=1
lower_case_table_name=1
Start mysql server
[root@localhost /]# /usr/local/mysql/support-files/mysql.server start
Note: if an error is reported, check whether mysql and mysqld services exist. If so, end the process, add a soft connection, and restart the mysql service
[root@localhost bin]# ps -ef|grep mysqlps -ef|grep mysqld
[root@localhost bin]# ps -ef|grep mysqld
[root@localhost bin]# kill -9
[root@localhost bin]# ln -s /usr/local/mysql/support-files/mysql.server /etc/init.d/mysql
[root@localhost bin]# ln -s /usr/local/mysql/bin/mysql /usr/bin/mysql
[root@localhost bin]# service mysql restart
Log in to mysql and change the password (the password is the temporary password generated in step 5)
[root@localhost bin]# mysql -u root -p
Enter password:
mysql>set password for root@localhost = password('yourpass');
Query OK, 0 rows affected, 1 warning (0.00 sec)
Open remote connection
mysql>use mysql;
msyql>update user set user.Host='%' where user.User='root';
mysql>flush privileges;

Set automatic startup
1,Copy service files to init.d Under and rename to mysql
[root@localhost /]# cp /usr/local/mysql/support-files/mysql.server /etc/init.d/mysqld
2,Give executable permission
[root@localhost /]# chmod +x /etc/init.d/mysqld
3,Add service
[root@localhost /]# chkconfig --add mysqld
4,Show service list
[root@localhost /]# chkconfig --list
Install PHP
PHP MySQL PHP mbstring is installed
[root@localhost ~]# yum -y install php php-mysql php-mbstring
Test, create php file in / var/www/html
[root@localhost html]# vi index.php
<?php
  phpinfo();
?>
For browser access, ip/index.php should be able to see the PHP configuration

