The flexibility of RecyclerView, and of course some of the most basic usages, has been appreciated through simple learning in the previous issue, so let's work together to learn the use of RecyclerView's splitting lines.
Believe that some careful classmates have found that there are slight gaps between List lists implemented with RecyclerView and ListView lists implemented with RecyclerView, and that there is no line separating the item s, resulting in no obvious separation between them, but they are often needed in actual development.
Since RecyclerView does not support attributes such as divider, we need to figure out how to do it ourselves.There are two main implementations, and they are learned separately next.
1. Set display interval for background
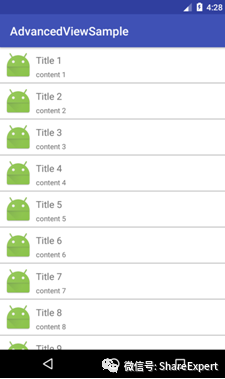
Add a black background to RecyclerView first, then add a white background to each item and set an interval of 1 DP so that the background gap will naturally be used as a dividing line.
Make simple changes based on the previous issue, and the modified recyclerview_layout.xml file code is as follows:
<?xml version="1.0" encoding="utf-8"?>
<LinearLayout xmlns:android="http://schemas.android.com/apk/res/android"
              android:orientation="vertical"
              android:layout_width="match_parent"
              android:layout_height="match_parent">

    <android.support.v7.widget.RecyclerView
        android:id="@+id/recyclerview"
        android:background="#5000"
        android:layout_width="wrap_content"
        android:layout_height="wrap_content"/>
</LinearLayout>
The modified recyclerview_item.xml file code is as follows:
<RelativeLayout xmlns:android="http://schemas.android.com/apk/res/android"
                android:layout_width="wrap_content"
                android:layout_height="wrap_content"
                android:background="#fff"
                android:layout_marginBottom="1dp"
                android:padding="6dp" >

    <ImageView
        android:id="@+id/icon_img"
        android:layout_width="wrap_content"
        android:layout_height="wrap_content"
        android:layout_centerVertical="true"
        android:layout_marginRight="6dp"
        android:contentDescription="null"
        android:src="@mipmap/ic_launcher" />

    <TextView
        android:id="@+id/title_tv"
        android:layout_width="match_parent"
        android:layout_height="wrap_content"
        android:layout_toRightOf="@id/icon_img"
        android:layout_alignParentTop="true"
        android:layout_marginTop="5dp"
        android:gravity="center_vertical"
        android:text="Title"
        android:textSize="16sp" />

    <TextView
        android:id="@+id/content_tv"
        android:layout_width="match_parent"
        android:layout_height="wrap_content"
        android:layout_toRightOf="@id/icon_img"
        android:layout_alignParentRight="true"
        android:layout_below="@id/title_tv"
        android:layout_marginTop="5dp"
        android:text="content"
        android:textSize="12sp" />

</RelativeLayout>
The code elsewhere remains unchanged. Rerun the program and you will see the splitter line shown in the following figure.
2. Custom dividing lines
The first implementation above is very simple, but sometimes it is not enough to meet the actual requirements, which requires the use of custom splitters.
Do you remember the role of the ItemDecoration class mentioned in the previous period?The RecyclerView class also provides an addItemDecoration method through which we can add split lines.
First, we customize a drawable file, recyclerview_item_divider, which will be learned later. This is not covered much here. The code is as follows:
<?xml version="1.0" encoding="utf-8"?>
<shape xmlns:android="http://schemas.android.com/apk/res/android"
       android:shape="rectangle">
    <gradient
        android:centerColor="#ff00ff00"
        android:endColor="#ff0000ff"
        android:startColor="#ffff0000"
        android:type="linear" />
    <size android:height="1dp"/>
</shape>
Since RecyclerView.ItemDecoration is an abstract class, you need to customize an implementation class that is a good implementation for adding split lines to RecyclerView.Create a new RecyclerViewItemDivider class with the following code:
package com.jinyu.cqkxzsxy.android.advancedviewsample.view;

import android.content.Context;
import android.graphics.Canvas;
import android.graphics.Rect;
import android.graphics.drawable.Drawable;
import android.support.v7.widget.RecyclerView;
import android.view.View;

/**
 * @Creator Xinlu
 * @Describe the Android zero basics introductory to proficiency series of tutorials
 * ShareExpert
 */
public class RecyclerViewItemDivider extends RecyclerView.ItemDecoration {
    private Drawable mDrawable;

    public RecyclerViewItemDivider(Context context, int resId) {
        mDrawable = context.getResources().getDrawable(resId);
    }

    @Override
    public void onDrawOver(Canvas c, RecyclerView parent, RecyclerView.State state) {
        int left = parent.getPaddingLeft();
        int right = parent.getWidth() - parent.getPaddingRight();
        int childCount = parent.getChildCount();
        for (int i = 0; i < childCount; i++) {
            View child = parent.getChildAt(i);
            RecyclerView.LayoutParams params = (RecyclerView.LayoutParams) child.getLayoutParams();
            int top = child.getBottom() + params.bottomMargin;
            int bottom = top + mDrawable.getIntrinsicHeight();
            mDrawable.setBounds(left, top, right, bottom);
            mDrawable.draw(c);
        }
    }

    @Override
    public void getItemOffsets(Rect outRect, View view, RecyclerView parent,
                               RecyclerView.State state) {
        outRect.set(0, 0, 0, mDrawable.getIntrinsicWidth());
    }
}
Then add a custom splitter line to RecyclerView with the following local code:
        // Settings Manager
        LinearLayoutManager layoutManager = new LinearLayoutManager(this);
        mRecyclerView.setLayoutManager(layoutManager);
        // Custom Split Line
        RecyclerView.ItemDecoration itemDecoration = new RecyclerViewItemDivider(this,
                R.drawable.recyclerview_item_divider);
        mRecyclerView.addItemDecoration(itemDecoration);
        // Setting this option can improve performance if you can determine that the height of each item is fixed
        mRecyclerView.setHasFixedSize(true);
The rest of the code remains unchanged. Run the program again to see the effect of the interface shown in the following figure.
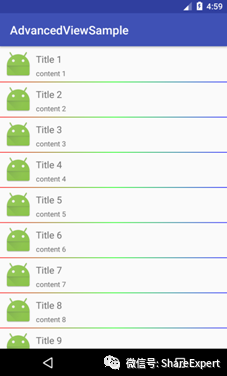
You can see that custom splitters are more flexible, flexible and dazzling, and can be customized to suit your needs.
The custom splitting lines learned above are only suitable for vertical lists, since horizontal lists and grid layouts have multiple subviews on each row, and an ItemDecoration class needs to be redefined, this is not covered much.
This is the first place to be here today. If you have any questions, please leave a message to discuss them together. Also, welcome to join the Android zero basic technology discussion group, WeChat, and grow together!
This article is copyright owned by ShareExpert, the WeChat Public Number ShareExpert. If you need to reprint it, please contact the author for authorization, and hereby declare!
Share past summaries:
Android Zero Basic Section 1: The Past and Present of Android
Android Zero Foundation Getting Started Section 2: Android System Architecture and Application Components
Introduction to Android Zero Foundation Section 3: Take you to chat about the Android development environment
Introduction to Android Zero Foundation Section 4: Correctly install and configure JDK, and Gao Fu Shuai takes the first step
Android Zero Foundation Getting Started Section 5: Make good use of ADT Bundle to meet the goddess easily
Android Zero Foundation Getting Started Section 6: Configuration optimization SDK Manager, formal dating goddess
Android Zero Basic Section 7: Set up an Android simulator and start a sweet journey
Android Zero Basic Section 8: HelloWorld, the starting point of my first trip
Android Zero Basic Section 9: Android is a real application, you can develop without knowing the code
Android Zero Foundation Getting Started Section 10: Developing IDE upgrade, Android Studio finally arrived
Introduction to Android Zero Foundation Section 11: Simple steps to take you flying and run the Android Studio project
Android Zero Basic Section 12: Familiarize yourself with the Android Studio interface and start selling
Android Zero Basic Section 13: Android Studio Personalized Configuration, Creating Developer Tools
Android Zero Basic Section 14: Entering the Rocket Age with High Speed Genymotion
Android Zero Foundation Getting Started Section 15: Master Android Studio project structure and sail
Android Zero Basic Section 16: Overview of user interface development for Android
Android Zero Basic Section 17: TextView Textbox
Android Zero Basic Section 18: Input Box EditText
Introduction to Android Zero Foundation Section 19: Button
Section 20: Introduction to Android Zero Foundation: Checkbox CheckBox and RadioButton radio buttons
Android Zero Foundation Getting Started Section 21: Switch components ToggleButton and Swich
Android Zero Foundation Getting Started Section 22: Image View ImageView
Android Zero Foundation Getting Started Section 23: Image Button ImageButton and ZoomButton ZoomButton
Android Zero Foundation Getting Started Section 24: Custom View is easy to use to create your own controls
Section 25: Introduction to Android Zero Foundation: Simple and most commonly used LinearLayout linear layout
Android Zero Foundation Getting Started Section 26: Two alignments, layout_gravity and gravity, differ greatly
Android Zero Foundation Getting Started Section 27: Use padding and margin correctly
Section 28: Introduction to zero basics for Android: Easily master RelativeLayout relative layout
Android Zero Foundation Getting Started Section 29: Make good use of TableLayout table layout
Android Zero Foundation Getting Started Section 30: Two minutes of FrameLayout frame layout
Android Zero Foundation Getting Started Section 31: AbsoluteLayout Absolute Layout Layout
Android Zero Foundation Getting Started Section 32: New GridLayout Grid Layout Layout
Android Zero Foundation Getting Started Section 33: Overview of Android event handling
Android Zero Foundation Getting Started Section 34: Listen-based event handling in Android
Section 35: Introduction to Android Zero Foundation: Callback-based event handling in Android
Android Zero Foundation Getting Started Section 36: Handling of Android System Events
Android Zero Basic Section 37: First Identity ListView
Section 38: Introduction to Android Zero Foundation: Beginning with Adapter
Android Zero Foundation Introduction Section 39: ListActivity and Custom List Items
Android Zero Foundation Getting Started Section 40: Customize ArrayAdapter
Android Zero Foundation Getting Started Section 41: Using SimpleAdapter
Android Zero Foundation Getting Started Section 42: Customize BaseAdapter
Android Zero Foundation Getting Started Section 43: ListView optimization and use at the beginning and end of the list
Android Zero Foundation Getting Started Section 44: ListView Data Dynamic Update
Android Zero Basic Section 45: Grid View GridView
Android Zero Foundation Getting Started Section 46: List Option Box Spinner
Android Zero Foundation Getting Started Section 47: AutoComplete TextView Textbox
Android Zero Basic Section 48: Collapsible List Expandable ListView
Android Zero Foundation Getting Started Section 49: AdapterViewFlipper Picture Roadcasting
Android Zero Foundation Getting Started Section 50: StackView card stacking
Section 51: Introduction to Android Zero Foundation: Progress Bar ProgressBar
Android Zero Foundation Getting Started Section 52: Customize the cool ProgressBar progress bar
Android Zero Foundation Getting Started Section 53: Drag Bar SeekBar and Star Rating Bar
Android Zero Foundation Getting Started Section 54: ViewSwitcher, a view switching component
Section 55: Introduction to Android Zero Foundation: ImageSwitcher and TextSwitcher
Android Zero Foundation Getting Started Section 56: Flip View Flipper
Android Zero Foundation Getting Started Section 57: DatePicker and TimePicker selectors
Android Zero Foundation Introduction Section 58: Number Picker
Android Zero Foundation Introduction Section 59: Three common Clock clock components
Android Zero Foundation Getting Started Section 60: Calendar View CalendarView and Timer Chronometer
Android Zero Foundation Getting Started Section 61: ScrollView ScrollView
Android Zero Foundation Getting Started Section 62: SearchView Search Box Component
Android Zero Foundation Getting Started Section 63: A TabHost Tab worth learning from
Android Zero Foundation Getting Started Section 64: Unveil the True Face of RecyclerView Lushan