Practice content
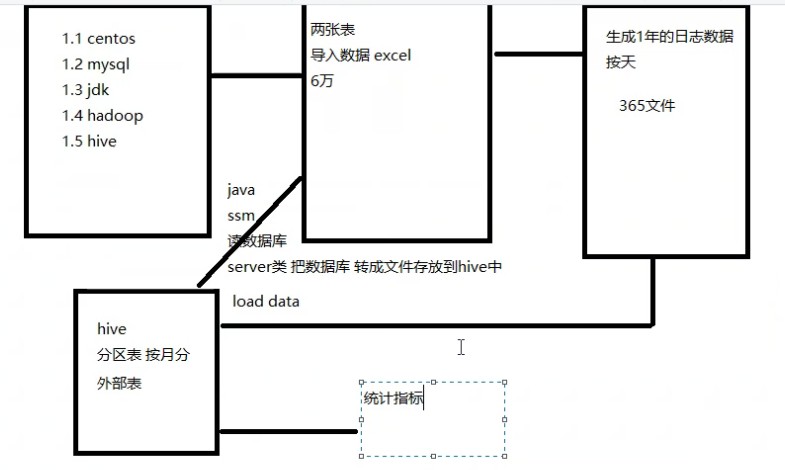
1. Install centos
- VI / etc / sysconfig / network scripts / ifcfg-ens33 modify the network configuration file
BOOTPROTO=static

IPADDR=192.168.100.128~200     Virtual machine IP Address. The last bit is between 128 and 200

NETMASK=255.255.255.0              Subnet mask

GATEWAY=192.168.100.2              Default gateway    install CentOS There are in the network interface when installing, and record it when installing

DNS1=114.114.114.114				 DNS Domain name system( System) (Domain Name System) It is composed of parser and domain name server.

DNS2=8.8.8.8
-
vi /etc/hostname modify the host name, delete the original, and write only one host name
-
vi /etc/hosts configure host name and ip address mapping. Write ip address first and then host name
-
Restart systemctl restart network
-
Install editor yum install -y vim
-
Install downloader yum install -y wget
yum replace domestic source
website: https://www.cnblogs.com/mrma/p/12883328.html
backups
cd /etc/yum.repos.d/

mv CentOS-Base.repo CentOS-Base.repo_bak
- Alibaba cloud yum source:
wget -O /etc/yum.repos.d/CentOS-Base.repo http://mirrors.aliyun.com/repo/Centos-7.repo
-
yum clean all
-
yum makecache
Turn off firewall
systemctl stop firewalld

systemctl disable firewalld
2. Install JDK
- Upload installation package to linux
- Unzip it to the appropriate location, create a folder, put it in the folder and rename it
tar -zxvf jdk-8u251-linux-x64.tar.gz
mkdir /opt/soft
mv jdk1.8.0_251/ /opt/soft/jdk180
- Configure environment variable / etc/myprofile
#JAVA_HOME
export JAVA_HOME=/opt/soft/jdk180
export PATH=$PATH:$JAVA_HOME/bin
export CLASSPATH=.:$JAVA_HOME/jre/lib/rt.jar:$JAVA_HOME/lib/dt.jar:$JAVA_HOME/lib/tools.jar
- Then execute
source /etc/profile
- Test for successful installation
java -version
3. Install mysql
- Check whether mariadb of linux is uninstalled. If not, mysql has not been installed
rpm -qa | grep mariadb
- If it is installed, uninstall the mariadb database. If it is not installed, the following operations are not required
rpm -e --nodeps `rpm -qa | grep mariadb`
- Enter the / opt / directory
wget -i -c http://dev.mysql.com/get/mysql57-community-release-el7-10.noarch.rpm
yum -y install mysql57-community-release-el7-10.noarch.rpm
yum -y install mysql-community-server
- Modify / etc/my.cnf file to solve Chinese garbled code
stay socket=/var/lib/mysql/mysql.sock Add below
character-set-server=utf8

Add at the end
[client]
default-character-set=utf8
[mysql]
default-character-set=utf8
- start-up
service mysqld restart
systemctl start  mysqld.service
- Get temporary password
pwdinfo=`grep "password" /var/log/mysqld.log | grep -wF "temporary password"`
passwd=${pwdinfo#*localhost:}
passwd=$(echo $passwd)
- Execute password change statement
mysql -uroot -p$passwd --connect-expired-password -e "set global validate_password_policy=0"
mysql -uroot -p$passwd --connect-expired-password -e "set global validate_password_length=1"
mysql -uroot -p$passwd --connect-expired-password -e "ALTER USER 'root'@'localhost' IDENTIFIED BY 'okok'"
- Modify remote login
mysql -uroot -pokok -e "GRANT ALL PRIVILEGES ON *.* TO 'root'@'%' IDENTIFIED BY 'okok' WITH GRANT OPTION"
mysql -uroot -pokok -e "flush privileges"
4. Install Hadoop 260 standalone cdh
- Unzip it to the appropriate location, create a folder, put it in the folder and rename it
tar -zxvf hadoop-2.6.0-cdh5.14.2.tar.gz
mv hadoop-2.6.0-cdh5.14.2 /opt/soft/hadoop260
- Modify hadoop-env.sh core-site.xml under / etc/hadoop
hadoop-env.sh take java Change the reference path of to an absolute path
export JAVA_HOME=/opt/soft/jdk180
core-site.xml Add the following configuration
<configuration>
        <property>
                <name>fs.defaultFS</name>
                <value>hdfs://192.168.100.130:9000</value>
        </property>
        <property>
                <name>hadoop.tmp.dir</name>
                <value>/opt/soft/hadoop260/tmp</value>
        </property>
        <property>
                <name>hadoop.proxyuser.root.groups</name>
                <value>*</value>
        </property>
        <property>
                <name>hadoop.proxyuser.root.hosts</name>
                <value>*</value>
        </property>
        <property>
                <name>hadoop.proxyuser.root.users</name>
                <value>*</value>
        </property>

</configuration>
- Modify hdfs-site.xml
Add the following configuration
<configuration>
        <property>
                <name>dfs.relication</name>
                <value>1</value>
        </property>

</configuration>
- Copy cp mapred-site.xml.template mapred-site.xml and rename it
cp mapred-site.xml.template mapred-site.xml
 Add the following configuration
<configuration>
        <property>
                <name>mapreduce.framework.name</name>
                <value>yarn</value>
        </property>
</configuration>
- Modify yarn-site.xml
Add the following configuration
<configuration>
        <property>
                <name>yarn.resourcemanager.localhost</name>
                <value>localhost</value>
        </property>

        <property>
                <name>yarn.nodemanager.aux-services</name>
                <value>mapreduce_shuffle</value>
        </property>
</configuration>
- Modify / etc/profile
increase hadoop route
#hadoop environment
export HADOOP_HOME=/opt/soft/hadoop260
export HADOOP_MAPRED_HOME=$HADOOP_HOME
export HADOOP_COMMON_HOME=$HADOOP_HOME
export HADOOP_HDFS_HOME=$HADOOP_HOME
export YARN_HOME=$HADOOP_HOME
export HADOOP_COMMON_LIB_NATIVE_DIR=$HADOOP_HOME/lib/native
export PATH=$PATH:$HADOOP_HOME/sbin:$HADOOP_HOME/bin
export HADOOP_INSTALL=$HADOOP_HOME
- source /etc/profile
- hadoop namenode -format
- start-all.sh or start-dfs.sh start-yarn.sh
- Test 192.168.100.130:50070
- stop-all.sh close or stop-dfs.sh stop-yarn.sh
SSH password free login
A pair of passes generates a pair of public and private keys. The private key is kept by itself and the public key is given to others. If there is a public key, the machine with the private key does not need a password
It can be in any path
ssh-keygen -t rsa -P ''   ---Then enter
ls -al //View hidden file.ssh
cd .ssh
ssh-copy-id root@hd01   ---Then you need to enter the password
 notes:hd01 Is the host name
5. Install Hive1.1.0cdh
- Unzip it to the appropriate location, create a folder, put it in the folder and rename it
tar -zxvf hive-1.1.0-cdh5.14.2.tar.gz
mv hive-1.1.0-cdh5.14.2 /opt/soft/hive110
- Go to cd /opt/soft/hive110/conf
- New file hive-site.xml mkdir hive-site.xml
Add the following <?xml version="1.0" encoding="UTF-8" standalone="no"?> <?xml-stylesheet type="text/xsl" href="configuration.xsl"?> <configuration> <property> <name>hive.metastore.warehouse.dir</name> <value>/hive110/warehouse</value> </property> <property> <name>hive.metastore.local</name> <value>false</value> </property> <!-- If remote mysql If the database needs to be written to the remote database here IP or hosts --> <property> <name>javax.jdo.option.ConnectionURL</name> <value>jdbc:mysql://192.168.100.130:3306/hive?useSSL=false&createDatabaseIfNotExist=true&characterEncoding=UTF-8</value> </property> <property> <name>javax.jdo.option.ConnectionDriverName</name> <value>com.mysql.jdbc.Driver</value> </property> <property> <name>javax.jdo.option.ConnectionUserName</name> <value>root</value> </property> <property> <name>javax.jdo.option.ConnectionPassword</name> <value>okok</value> </property> <property> <name>hive.server2.authentication</name> <value>NONE</value> </property> <property> <name>hive.server2.thrift.client.user</name> <value>root</value> </property> <property> <name>hive.server2.thrift.client.password</name> <value>root</value> </property> </configuration>
- Download the mysql driver package and save it in / opt/soft/hive110/lib
mv mysql-connector-java-5.1.38.jar /opt/soft/hive110/lib/
- Configure environment variable / etc/profile
#hive environment
export HIVE_HOME=/opt/soft/hive110
export PATH=$PATH:$HIVE_HOME/bin
- source /etc/profile
- initialization
schematool -dbType mysql -initSchema
When you enter hive, note that hadoop should be started in advance
First enter the command in a window
hive --service hiveserver2
 Background startup method:nohup hive --service hiveserver2 &
Then open another window
- hive exit: exit;
- beeline -u jdbc:hive2://192.168.100.200:10000/mydemo this is a connection exit as java:! q
Command line mode
hive -e 'show databases'
hive -e 'select * from mydemo.userinfos'
6. Install zeppelin081
- Find a suitable place to unzip and rename
tar -zxvf zeppelin-0.8.1-bin-all.tgz
mv zeppelin-0.8.1-bin-all /opt/soft/zeppelin081
- Enter the directory cd /opt/soft/zeppelin081/conf
- To modify the configuration file, first copy zeppelin-site.xml.template and rename it to zeppelin-site.xml
cp zeppelin-site.xml.template zeppelin-site.xml

Add as follows
<property>
  <name>zeppelin.helium.registry</name>
  <value>helium</value>
</property>

Other configuration files can modify the default port number or not
<property>
  <name>zeppelin.server.port</name>
  <value>8000</value>
  <description>Server port.</description>
</property>
- cp zeppelin-env.sh.template zeppelin-env.sh
add to JAVA_HOME and HADOOP_CONF_DIR  (Specify your own java and hadoop Installation directory)
export JAVA_HOME=/opt/soft/jdk180
export HADOOP_CONF_DIR=/opt/hadoop260/etc/hadoop
- Modify / etc/profile and configure environment variables
#zeppelin environment
export ZEPPELIN_HOME=/opt/soft/zeppelin081
export PATH=$PATH:$ZEPPELIN_HOME/bin
-
source /etc/profile
-
Start: zeppelin-daemon.sh start
-
Browser access 192.168.100.190:8080
-
Close: zeppelin-daemon.sh stop
-
Configure hive interpreter
- There is no default hive interpreter in Zepplin, but we can add it through the jdbc interpreter.
- Copy hive-site.xml to zeppelin-0.8.1-bin-all/conf
cp /opt/soft/hive110/conf/hive-site.xml /opt/soft/zeppelin081/conf/
- Copy jar package: copy the following two jar packages to interperter under the zeppelin installation directory
/opt/soft/hadoop313/share/hadoop/common/hadoop-common-3.1.3.jar
/opt/soft/hive312/jdbc/hive-jdbc-3.1.2-standalone.jar
(If installed cdh Version, jar There are in the bag cdh (version number)
cp /opt/soft/hadoop260/share/hadoop/common/hadoop-common-2.6.0-cdh5.14.2.jar /opt/soft/zeppelin081/interpreter/jdbc/

cp /opt/soft/hive110/lib/hive-jdbc-1.1.0-cdh5.14.2-standalone.jar /opt/soft/zeppelin081/interpreter/jdbc/
-
Configure integrated hive in web interface
-
In the upper right corner, anonymous -- > interpreter -- > create creates an integrated environment called hive
-
default.driver org.apache.hive.jdbc.HiveDriver
default.url jdbc:hive2://192.168.42.200:10000
default.user hive
Click save and restart the hive interpreter
-