This article is reproduced in front-end _Logic's blog.
Original address: http://blog.csdn.net/lx376693576/article/details/54602957
Written in: 2017-1-18
The first half: react+redux framework configuration from scratch to normal operation (part one)
Start using react and redux in your project
The basic directory structure of the project:
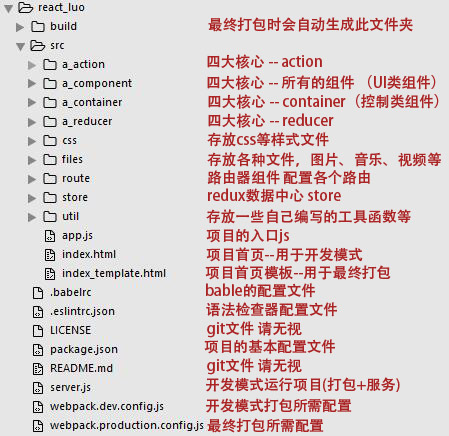
Because upload the project to Git So there are some additional files and the project name is different from the previous one.
Note: Why is it named a_action, a_component? Just for convenience, the four folders will rank first, and the four folders are the most used in development.
1. Configure app.js
Configuration entry js file:
import React from 'react'; // The react core, where jsx is used, needs this
import ReactDOM from 'react-dom';   // Requirements for rendering components
import {Provider} from 'react-redux'; // The bridge between react and redux is the Provider
import { Router, browserHistory } from 'react-router'; // Routing component

// babel itself can only convert ES6 grammar, but new functions such as Map, Set, Generator added to ES6 will not be converted, so this plug-in is needed.
import 'babel-polyfill';

// Introducing sotre, we will configure it later
import store from './store';

// All CSS can be imported into the entry file.
import 'antd/dist/antd.less'; // This is the style file of the Ant Golden Wear ui framework
import './css/css.css'; // This is our custom css file

import AppRoutes from './route';    // All defined routes

// Here's how to create the root component
// It introduces store, route, browser History
// Here we use browser History, which means that routing is jumped by url address changes (e.g. www.test.com/home)
// You can also use hashHistory, which means that routing is jumped by anchor changes (for example, www.test.com/ home)
ReactDOM.render(
  <Provider store={store}>
    <Router routes={AppRoutes} history={browserHistory} queryKey={false} />
  </Provider>,
  document.getElementById('app-root') //  This app-root is a div written in index.html with the id app-root
);
- 1
- 2
- 3
- 4
- 5
- 6
- 7
- 8
- 9
- 10
- 11
- 12
- 13
- 14
- 15
- 16
- 17
- 18
- 19
- 20
- 21
- 22
- 23
- 24
- 25
- 26
- 27
- 28
- 1
- 2
- 3
- 4
- 5
- 6
- 7
- 8
- 9
- 10
- 11
- 12
- 13
- 14
- 15
- 16
- 17
- 18
- 19
- 20
- 21
- 22
- 23
- 24
- 25
- 26
- 27
- 28
2. Configuring store
Create index.js under src/store with the following contents:
import { createStore, applyMiddleware } from 'redux';
import ReduxThunk from 'redux-thunk';   // Middleware, with which asynchronous action can be supported
import RootReducer from '../a_reducer'; // All reducer s

// Create store
const store = createStore(RootReducer, applyMiddleware(ReduxThunk));

export default store;
- 1
- 2
- 3
- 4
- 5
- 6
- 7
- 8
- 9
- 1
- 2
- 3
- 4
- 5
- 6
- 7
- 8
- 9
3. Configuring route
Create index.js in src/route:
import React from 'react'; // react core
import { Route, Redirect, IndexRedirect } from 'react-router'; // What you need to create route

/* Here are some of our own container definitions introduced as routing pages */
// The container root is very important. We will configure it later.
import RootContainer from '../a_container/root';
import TestContainer from '../a_container/home'; // container on a home page

export default (
  <Route path="/" component={RootContainer}> // All access, jump to rootContainer
    <IndexRedirect to="/home" /> // Components loaded by default, such as accessing www.test.com, automatically jump to www.test.com/home.
    <Route path="/home" component={TestContainer} /> // A routing address, accessing www.test.com/home, will jump to this
    <Redirect from='*' to='/'  /> // All other undefined access paths jump to the root path, such as access to www.test.com/abc, but if we don't define / abc, we jump to www.test.com automatically, and www.test.com jumps to www.test.com/home automatically.
  </Route>
);
- 1
- 2
- 3
- 4
- 5
- 6
- 7
- 8
- 9
- 10
- 11
- 12
- 13
- 14
- 15
- 16
- 1
- 2
- 3
- 4
- 5
- 6
- 7
- 8
- 9
- 10
- 11
- 12
- 13
- 14
- 15
- 16
4. Write a root Container as a wrapper for all components
Create src/a_container/root/index.js
import React, { PropTypes as P } from 'react'; // React and ProTypes
import { connect } from 'react-redux'; // The connect method is used to create controller components, where data and behavior are managed by redux

/* Parameters that need to be mounted on redux */
const mapStoreStateToProps = (state) => ({
  dispatch: state.dispatch,
});

/* Creating components */
class RootContainer extends React.Component {
  constructor(props) {
    super(props);
  }

  render() {
    // This component is a package component, and all routing jump pages are loaded into this component in the form of this.props.children.
    return (
      <div className="boss">
        {this.props.children}
      </div>
    );
  }
}

/* Code type checking */
RootContainer.propTypes = {
  dispatch: P.func,
  children: P.any,
};

export default connect(mapStoreStateToProps)(RootContainer);
- 1
- 2
- 3
- 4
- 5
- 6
- 7
- 8
- 9
- 10
- 11
- 12
- 13
- 14
- 15
- 16
- 17
- 18
- 19
- 20
- 21
- 22
- 23
- 24
- 25
- 26
- 27
- 28
- 29
- 30
- 31
- 32
- 1
- 2
- 3
- 4
- 5
- 6
- 7
- 8
- 9
- 10
- 11
- 12
- 13
- 14
- 15
- 16
- 17
- 18
- 19
- 20
- 21
- 22
- 23
- 24
- 25
- 26
- 27
- 28
- 29
- 30
- 31
- 32
5. Write a component for testing
Create src/a_compont/test/index.js:
import React, { PropTypes as P } from 'react'; // Introducing React and ProTypes
// PropTypes are used to check the props parameter type, whether or not, preferably with

/* Create a component as a class */
class Com extends React.Component {
  constructor(props) {
    super(props);
    this.state = {
    };
  }

  /* Triggered when component initialization is complete */
  componentDidMount() {
  }

  /* Rendering Components */
  render() {
    return (
      <div>
        <span>{this.props.value}</span>
        <button onClick={() => this.props.onClick(this.props.value)}>click</button>
      </div>
    );
  }
}

/* The following is a type check of the prop data involved in this component. If the type does not match, a warning will be issued. */
Com.propTypes = {
  value: P.number,
  onClick: P.func,
};

export default Com;
- 1
- 2
- 3
- 4
- 5
- 6
- 7
- 8
- 9
- 10
- 11
- 12
- 13
- 14
- 15
- 16
- 17
- 18
- 19
- 20
- 21
- 22
- 23
- 24
- 25
- 26
- 27
- 28
- 29
- 30
- 31
- 32
- 33
- 34
- 1
- 2
- 3
- 4
- 5
- 6
- 7
- 8
- 9
- 10
- 11
- 12
- 13
- 14
- 15
- 16
- 17
- 18
- 19
- 20
- 21
- 22
- 23
- 24
- 25
- 26
- 27
- 28
- 29
- 30
- 31
- 32
- 33
- 34
The above is a simple pure ui component. The rendered effect is that there is a span and a button in the page. The button binds an event, and the entity of the event needs its parent to pass it on.
this.props.value in span also needs to be passed to him by the parent.
6. Write a container for testing
Create src/a_container/home/index.js:
// Various plug-ins required
import React, { PropTypes as P } from 'react';
import { connect } from 'react-redux';
import { Link } from 'react-router';

// All required components
import Test from '../../a_component/test'; // Introduce the components created in Step 4


// action required for this page
import appAction from '../../a_action/app-action'; // Create later

// All variables ultimately to be managed by redux
const mapStoreStateToProps = (state) => ({
  dispatch: state.dispatch,
  testvalue: state.app.inputvalue,
});


// Ultimately, all action s to be managed by redux
// Define which methods will become action s
const mapDispatches = (dispatch) => ({
  fn: {
    onTestAdd: (v) => {
      dispatch(appAction.onTestAdd(v));
    },
  },
});

// Creating components
class HomePageContainer extends React.Component {
  constructor(props) {
    super(props);
    this.state = {
    };
  }

  render() {
    return (
      <div>
        <Test
          value={this.props.testvalue}
          onClick={this.props.fn.onTestAdd}
        />
      </div>
    );
  }
}

// ==================
// PropTypes
// ==================

HomePageContainer.propTypes = {
  dispatch: P.func,
  fn: P.object,
  testvalue: P.number,
  location: P.any, // The location object contains all kinds of information in the browser url and is automatically introduced into the current component, which can be removed if not needed.
};

export default connect(mapStoreStateToProps, mapDispatches)(HomePageContainer);
- 1
- 2
- 3
- 4
- 5
- 6
- 7
- 8
- 9
- 10
- 11
- 12
- 13
- 14
- 15
- 16
- 17
- 18
- 19
- 20
- 21
- 22
- 23
- 24
- 25
- 26
- 27
- 28
- 29
- 30
- 31
- 32
- 33
- 34
- 35
- 36
- 37
- 38
- 39
- 40
- 41
- 42
- 43
- 44
- 45
- 46
- 47
- 48
- 49
- 50
- 51
- 52
- 53
- 54
- 55
- 56
- 57
- 58
- 59
- 60
- 61
- 62
- 63
7. Create an action
Create src/a_action/app_action.js
export default class AdviserActions {
  // This method is triggered when the user clicks the button
  static onTestAdd(num) {
    return { // This return actually triggers the action, and Redux automatically triggers the corresponding method in reducer
      type: 'TEST::add', // Corresponding to type in reducer
      payload: num + 1,
    };
  }
}
- 1
- 2
- 3
- 4
- 5
- 6
- 7
- 8
- 9
- 10
- 1
- 2
- 3
- 4
- 5
- 6
- 7
- 8
- 9
- 10
8. Create root reducer
Because reducer can create many, but only one can be passed to redux, create a root reduer that combines all the other reducers.
Create src/a_reducer/index.js
/*
 * The Reducer is the root reducer, which is used to combine all reducers in App.
 * Because there must be only one store and one reducer in Redux,
 * So use combineReducers to combine multiple reducer s
 */

import { combineReducers } from 'redux';
import { routerReducer } from 'react-router-redux';

/* Here are our custom reducer s */
import appReducer from './app-reducer'; // This will be created later

/* Combine all reducer s into one using the official combineReducers */
const RootReducer = combineReducers({
  // Note that you must add routing: routerReducer, which is a connection for redux and react-router
  routing: routerReducer,
  // Other reducers
  app: appReducer, // The naming here relates to the name of the reducer corresponding to the state in the container.
});

export default RootReducer;
- 1
- 2
- 3
- 4
- 5
- 6
- 7
- 8
- 9
- 10
- 11
- 12
- 13
- 14
- 15
- 16
- 17
- 18
- 19
- 20
- 21
- 22
- 1
- 2
- 3
- 4
- 5
- 6
- 7
- 8
- 9
- 10
- 11
- 12
- 13
- 14
- 15
- 16
- 17
- 18
- 19
- 20
- 21
- 22
9. Create a custom reducer
Create src/a_reducer/app-reducer.js
const initState = {
  inputvalue: 0, // initial value
};

/* action The corresponding processing method is used to update the data in the state */
const actDefault = (state) => state;

const testAdd = (state, action) => {
  const { payload } = action;
  // At the beginning, inputvalue,Here will be the latest payload Cover the original value
  return Object.assign({}, state, {
    inputvalue: payload,
  });
};

const reducerFn = (state = initState, action) => {
  switch (action.type) {
  // matching type To execute the corresponding method, action Returns the corresponding type,The corresponding method is executed here.
  case 'TEST::add':
    return testAdd(state, action);
  default:
    return actDefault(state, action);
  }
};

export default reducerFn;
- 1
- 2
- 3
- 4
- 5
- 6
- 7
- 8
- 9
- 10
- 11
- 12
- 13
- 14
- 15
- 16
- 17
- 18
- 19
- 20
- 21
- 22
- 23
- 24
- 25
- 26
- 27
- 1
- 2
- 3
- 4
- 5
- 6
- 7
- 8
- 9
- 10
- 11
- 12
- 13
- 14
- 15
- 16
- 17
- 18
- 19
- 20
- 21
- 22
- 23
- 24
- 25
- 26
- 27
In this way, everything needed is created and a closed loop is formed.
The user clicks on the button in the page.
Click events are bound to the button.
The click event is finally executed in step 5. Container The onTestAdd method in
(4) The onTestAdd method is defined in the app-action.js created in step 6.
_. This method sends out an action after the value of the parameter + 1, and redux automatically calls reducer.
(5) The type of this action is TEST:: add, and there is a corresponding type in reducer.
_So the method corresponding to the corresponding type is executed, and the latest value is overwritten by the value in the original state, so the value is changed.
_, react will automatically re-render the page, so you can see that the value in the page has been added 1
So far, we have configured a basic react+redux framework, which needs to write a lot of components and logic in the development.
The advantages of this system are:
(1) Component reuse
(2) Focus on data, only care about data changes, not event triggers, etc.