Let's take a look at a simple demo
//app.js
import React, {Component} from 'react';
import {StyleSheet, Button, View} from 'react-native';
import TestView from './src/testView'

export default class App extends Component {
  state = {bgColor:'red'};

  changeBgc = () => {
    this.setState({bgColor:'yellow',});
    setTimeout(()=>{this.setState({bgColor:'red',});},2000);
  }

  render() {
    return (
      <View style={styles.container}>
        <Button color="#841584 "title =" click me "onpress = {this. Changebgc} / >
        <TestView bgColor={this.state.bgColor} />
      </View>
    );
  }
}

const styles = StyleSheet.create({
  container: {
    flex: 1,
    justifyContent: 'center',
    alignItems: 'center',
    backgroundColor: '#F5FCFF',
  },
});

//textView.js
import React, {Component} from 'react';
import {Text, View} from 'react-native';

export default class TestView extends Component {
    render () {
        return (
            <View style={{backgroundColor:this.props.bgColor,padding:50}}>
                <Text>hello, redux</Text>
            </View>
        );
    }
}
The effect is to click the button button in the parent component to modify the background color of the child component. It's easy to use the state and props of redux.
Let's see how to use redux. For the sake of convenience, it is implemented in the simplest way. The actual project should not be written in this way.
//app.js
import React, {Component} from 'react';
import {createStore} from 'redux';
import {Provider} from 'react-redux'
import {StyleSheet, Button, View} from 'react-native';
import TestView from './src/testView'

reducer = (state = {bgColor:'red'}, action) => {
  switch(action.type) {
    case 'change':
      return Object.assign({}, state, {bgColor:'yellow'});
    case 'resume':
      return Object.assign({}, state, {bgColor:'red'});
    default:
      return state;
  }
}
let store = createStore(reducer);//store manages all States of the app
export default class App extends Component {

  changeBgc = () => {
    store.dispatch({type:'change'});
    setTimeout(()=>{store.dispatch({type:'resume'});;},2000);
  }

  render() {
    return (
      <Provider store={store}>
      <View style={styles.container}>
        <Button color="#841584 "title =" click me "onpress = {this. Changebgc} / >
        <TestView />
      </View>
      </Provider>
    );
  }
}

//textView.js
import React, {Component} from 'react';
import {Text, View} from 'react-native';
import {connect} from 'react-redux';

class TestView extends Component {
    render () {
        return (
            <View style={{backgroundColor:this.props.bgColor,padding:50}}>
                <Text>hello, redux</Text>
            </View>
        );
    }
}
//Use the connect method to associate the attributes in the store to the props of the current component
export default connect(state => ({
    bgColor: state.bgColor,
}))(TestView)
As mentioned above, we use redux to achieve the same effect as the previous code. But the code looks more complex than before.
Don't worry. Take a look at this example
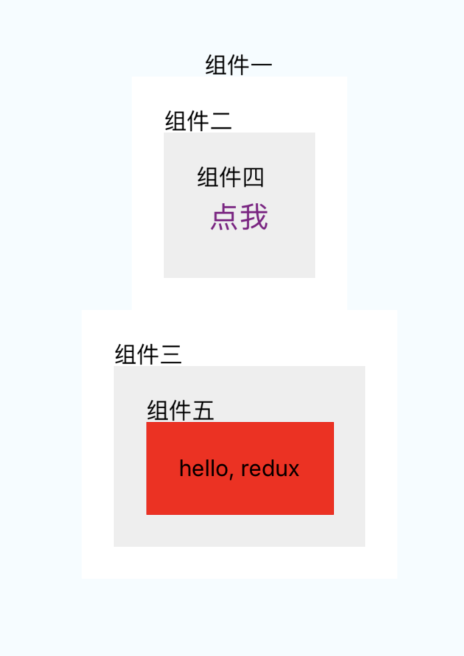
It is required to click the button in component 4 to change the background color of TextView in component 5. Because of the nesting of components, a simple effect becomes very complex (state and callback layers are required).
See how to implement it with redux
//app.js
import React, {Component} from 'react';
import {createStore} from 'redux';
import {Provider} from 'react-redux'
import {StyleSheet, Text, View} from 'react-native';
import TestView from './src/testView';
import TestView1 from './src/testView1';

reducer = (state = {bgColor:'red'}, action) => {
  switch(action.type) {
    case 'change':
      return Object.assign({}, state, {bgColor:'yellow'});
    case 'resume':
      return Object.assign({}, state, {bgColor:'red'});
    default:
      return state;
  }
}
let store = createStore(reducer);//store manages all States of the app
export default class App extends Component {

  render() {
    return (
      <Provider store={store}>
      <View style={styles.container}>
        <Text>Component 1</Text>
        <TestView />
        <TestView1 />
      </View>
      </Provider>
    );
  }
}

const styles = StyleSheet.create({
  container: {
    flex: 1,
    justifyContent: 'center',
    alignItems: 'center',
    backgroundColor: '#F5FCFF',
  },
});


//testView.js
import React, {Component} from 'react';
import {Text, View} from 'react-native';
import SubButtonView from './subButtonView';

export default class TestView extends Component {
    render () {
        return (
            <View style={{backgroundColor:'#ffffff',padding:20,}}>
                <Text>Module two</Text>
                <SubButtonView />
            </View>
        );
    }
}


//testView1.js
import React, {Component} from 'react';
import {Text, View} from 'react-native';
import SubTextView from './subTextView';

export default class TestView1 extends Component {
    render () {
        return (
            <View style={{backgroundColor:'#ffffff',padding:20,}}>
                <Text>Module three</Text>
                <SubTextView />
            </View>
        );
    }
}


//subButtonView.js
import React, {Component} from 'react';
import {Button, View, Text} from 'react-native';
import {connect} from 'react-redux';

class SubButtonView extends Component {
    changeBgc = () => {
        this.props.dispatch({type:'change'});
        setTimeout(()=>{this.props.dispatch({type:'resume'});},2000);
    }
    render () {
        return (
            <View style={{backgroundColor:'#eeeeee',padding:20,}}>
                <Text>Module four</Text>
                <Button color="#841584 "title =" click me "onpress = {this. Changebgc} / >
            </View>
        );
    }
}
export default connect(state => ({
}))(SubButtonView)


//subTextView.js
import React, {Component} from 'react';
import {Text, View} from 'react-native';
import {connect} from 'react-redux';

class SubButtonView extends Component {
    render () {
        return (
            <View style={{backgroundColor:'#eeeeee',padding:20,}}>
                <Text>Module five</Text>
                <Text style={{backgroundColor:this.props.bgColor,padding:20,}}>hello, redux</Text>
            </View>
        );
    }
}
//Use the connect method to associate the attributes in the store to the props of the current component
export default connect(state => ({
    bgColor: state.bgColor,
}))(SubButtonView)
It can be seen that with redux, the management of app status becomes easier.