From: http://blog.csdn.net/u011965040/article/details/53331859?LocationNum=15&fps=1
Development Environment Preparation
First you have to set up React Native for Android The development environment has not been built for reference: React Native for Android Windows Environment Setup
New Android Native Project with Android Studio
I created a native project called ReactNativeDemo.
Integrate React Native into Native Projects
Use the Windows command line to execute the following three commands under the project root directory (ReactNativeDemo folder):
npm init
npm install --save react react-native
curl -o .flowconfig https://raw.githubusercontent.com/facebook/react-native/master/.flowconfig- 1
- 2
- 3
- 1
- 2
- 3
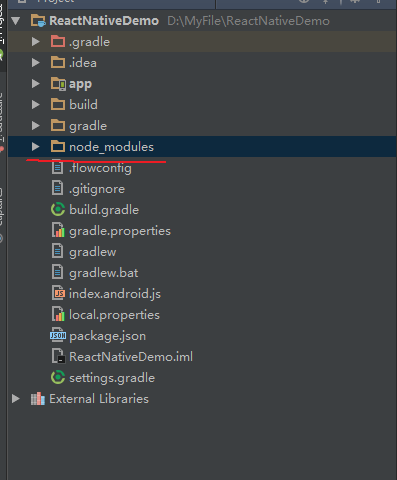
This creates a node_modules folder (module) in the project root directory (ReactNativeDemo folder) and adds a React Native dependency.
Interpretation of the three commands above
npm init


Note:
Filling in the name is not possible by default, as shown by the diagram. It requires that you do not have uppercase letters and that you do not start with numbers.
The entry point fills in the entry file name, which defaults to index.js. The entry file we created is index.android.js, so fill in index.android.js.Just fill in a name that matches your own defined entry file name.(
Other items can be filled in according to your needs.
This step will result in a file named package.json in the root directory of the project. We also need to modify our package.json file:
Add "start" under the "scripts" node: "node_modules/react-native/local-cli/cli.js start".
 "scripts": {
    "test": "echo \"Error: no test specified\" && exit 1",
    "start": "node node_modules/react-native/local-cli/cli.js start"
}- 1
- 2
- 3
- 4
- 1
- 2
- 3
- 4
The test node is automatically generated, we can delete it, and finally my package.json is:
{
  "name": "reactnativedemo",
  "version": "1.0.0",
  "description": "",
  "main": "index.android.js",
  "scripts": {
    "start": "node node_modules/react-native/local-cli/cli.js start"
  },
  "author": "",
  "license": "ISC",
  "dependencies": {
    "react": "^15.4.1",
    "react-native": "^0.38.0"
  }
}- 1
- 2
- 3
- 4
- 5
- 6
- 7
- 8
- 9
- 10
- 11
- 12
- 13
- 14
- 15
- 1
- 2
- 3
- 4
- 5
- 6
- 7
- 8
- 9
- 10
- 11
- 12
- 13
- 14
- 15
npm install –save react react-native


curl -o .flowconfig https://raw.githubusercontent.com/facebook/react-native/master/.flowconfig
curl is an open source file transfer tool that works on the command line using URL syntax.It is widely used in Unix, various Linux distributions, and has DOS and ported versions under Win32 and Win64.(
So the above sentence means to download the.flowconfig file at the corresponding web address.(
When using curl commands under windows, you will be prompted that curl is not an internal or external command, nor an executable or batch command.(
It is cumbersome for us to use curl commands under windows.The solution is that we use the download tool from https://raw.githubusercontent.com/facebook/react-native/master/.flowconfig Download.flowconfig and copy it to the project root directory, or create a new.flowconfig file in the project root directory. Use your browser to access the content of this web address and copy it to the file.
Create index.android.js file
Create an index.android.js file in the project's root directory and copy the following code into it:
'use strict';

import React from 'react';
import {
  AppRegistry,
  StyleSheet,
  Text,
  View
} from 'react-native';

class HelloWorld extends React.Component {
  render() {
    return (
      <View style={styles.container}>
        <Text style={styles.hello}>Welcome!</Text>
      </View>
    )
  }
}
var styles = StyleSheet.create({
  container: {
    flex: 1,
    justifyContent: 'center',
  },
  hello: {
    fontSize: 20,
    textAlign: 'center',
    margin: 10,
  },
});

AppRegistry.registerComponent('HelloWorld', () => HelloWorld);- 1
- 2
- 3
- 4
- 5
- 6
- 7
- 8
- 9
- 10
- 11
- 12
- 13
- 14
- 15
- 16
- 17
- 18
- 19
- 20
- 21
- 22
- 23
- 24
- 25
- 26
- 27
- 28
- 29
- 30
- 31
- 32
- 1
- 2
- 3
- 4
- 5
- 6
- 7
- 8
- 9
- 10
- 11
- 12
- 13
- 14
- 15
- 16
- 17
- 18
- 19
- 20
- 21
- 22
- 23
- 24
- 25
- 26
- 27
- 28
- 29
- 30
- 31
- 32
Add Dependency
Add to build.gradle in the project's root directory:
allprojects {
    repositories {
        jcenter()
        maven {
            //Add a react native dependency, and the url path is written in practice. This article is as follows:
            url "$rootDir/node_modules/react-native/android"
        }
    }
}- 1
- 2
- 3
- 4
- 5
- 6
- 7
- 8
- 9
- 1
- 2
- 3
- 4
- 5
- 6
- 7
- 8
- 9
Note: The Android project default dependency package source is jcenter(), which does not include the latest version of React Native (it is only 0.20.1).(
The new version of React Native is only available in npm, so you need to add a package-dependent source.After compiling, check the External Libraries
The react-native version, if 0.20.1, indicates that maven's dependency source was not added successfully.It's time that maven's path is broken and you need to check it.
Whether the path is correct or not, the correct result is: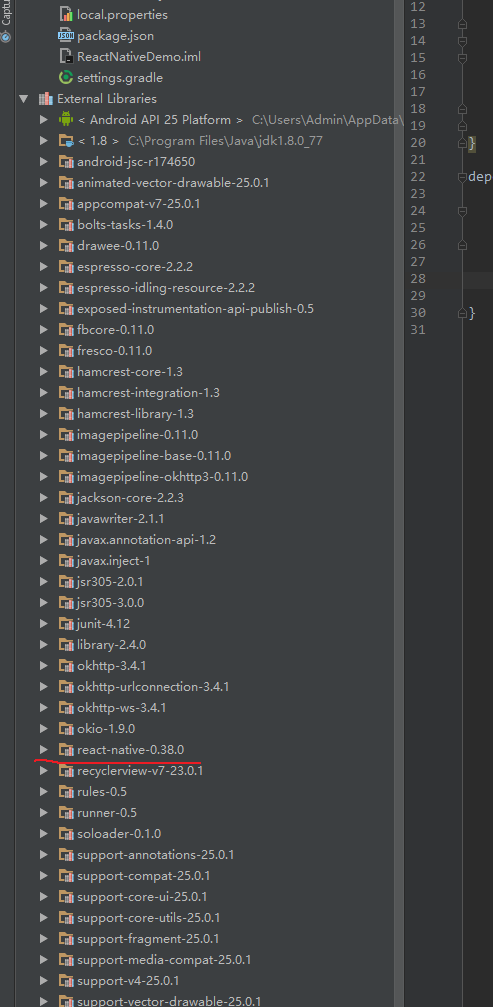
Add to the build.gradle file in the project's module (app):
File Header Add (optional):
apply from: "$rootDir/node_modules/react-native/react.gradle"- 1
- 1
Try adding the above sentence when you can't compile and pass.
 dependencies {
     ...
     compile "com.facebook.react:react-native:+"
}- 1
- 2
- 3
- 4
- 1
- 2
- 3
- 4
If you want to always use a specific version, you need to replace + with the version number of React Native that you have downloaded.
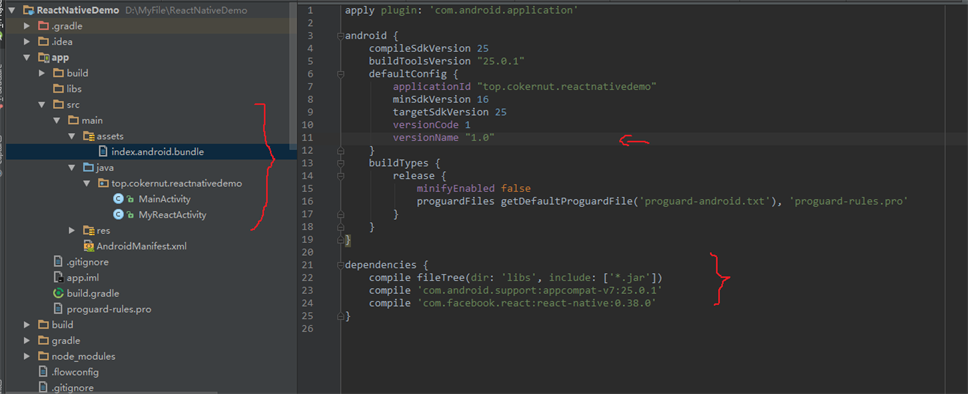
This version number should be the same as the version number of react-native in package.json ("react-native": "^0.38.0").As in this example, 0.38.0:
 dependencies {
     ...
     compile "com.facebook.react:react-native:0.38.0"
}- 1
- 2
- 3
- 4
- 1
- 2
- 3
- 4
Add a native Activity file:
Writing of the official tutorial:
MyReactActivity
import android.app.Activity;
import android.os.Bundle;
import android.view.KeyEvent;
import com.facebook.react.BuildConfig;
import com.facebook.react.ReactInstanceManager;
import com.facebook.react.ReactRootView;
import com.facebook.react.common.LifecycleState;
import com.facebook.react.modules.core.DefaultHardwareBackBtnHandler;
import com.facebook.react.shell.MainReactPackage;
public class MyReactActivity extends Activity implements DefaultHardwareBackBtnHandler {
private ReactRootView mReactRootView;
private ReactInstanceManager mReactInstanceManager;
@Override
protected void onCreate(Bundle savedInstanceState) {
super.onCreate(savedInstanceState);
mReactRootView = new ReactRootView(this);
mReactInstanceManager = ReactInstanceManager.builder()
.setApplication(getApplication())
.setBundleAssetName("index.android.bundle")
.setJSMainModuleName("index.android") //Corresponding index.android.js
.addPackage(new MainReactPackage())
//.setUseDeveloperSupport(BuildConfig.DEBUG)//Developer Support, BuildConfig.DEBUG defaults to false and cannot use the developer menu
.setUseDeveloperSupport(true) //Developer support, set to true when developing, otherwise developer menu cannot be used
.setInitialLifecycleState(LifecycleState.RESUMED)
.build();
//The ReactNativeView here corresponds to the ReactNativeView of AppRegistry.registerComponent ('ReactNativeView', () => ReactNativeView) in index.android.js
mReactRootView.startReactApplication(mReactInstanceManager, "ReactNativeView", null);
setContentView(mReactRootView);
}
@Override
public void invokeDefaultOnBackPressed() {
super.onBackPressed();
}
@Override
protected void onPause() {
super.onPause();
if (mReactInstanceManager != null) {
mReactInstanceManager.onHostPause(this);
}
}
@Override
protected void onResume() {
super.onResume();
if (mReactInstanceManager != null) {
mReactInstanceManager.onHostResume(this, this);
}
}
@Override
protected void onDestroy() {
super.onDestroy();
if (mReactInstanceManager != null) {
mReactInstanceManager.onHostDestroy(this);
}
}
@Override
public void onBackPressed() {
if (mReactInstanceManager != null) {
mReactInstanceManager.onBackPressed();
} else {
super.onBackPressed();
}
}
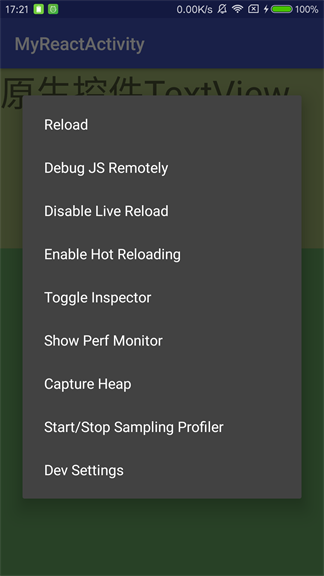
@Override
public boolean onKeyUp(int keyCode, KeyEvent event) {
//When we click on the menu, we open the sender menu and a pop-up window (which requires floating window privileges to display here)
if (keyCode == KeyEvent.KEYCODE_MENU && mReactInstanceManager != null) {
mReactInstanceManager.showDevOptionsDialog();
return true;
}
return super.onKeyUp(keyCode, event);
}
}- 1
- 2
- 3
- 4
- 5
- 6
- 7
- 8
- 9
- 10
- 11
- 12
- 13
- 14
- 15
- 16
- 17
- 18
- 19
- 20
- 21
- 22
- 23
- 24
- 25
- 26
- 27
- 28
- 29
- 30
- 31
- 32
- 33
- 34
- 35
- 36
- 37
- 38
- 39
- 40
- 41
- 42
- 43
- 44
- 45
- 46
- 47
- 48
- 49
- 50
- 51
- 52
- 53
- 54
- 55
- 56
- 57
- 58
- 59
- 60
- 61
- 62
- 63
- 64
- 65
- 66
- 67
- 68
- 69
- 70
- 71
- 72
- 73
- 74
- 75
- 76
- 77
- 78
- 79
- 80
- 81
- 82
- 83
- 84
- 1
- 2
- 3
- 4
- 5
- 6
- 7
- 8
- 9
- 10
- 11
- 12
- 13
- 14
- 15
- 16
- 17
- 18
- 19
- 20
- 21
- 22
- 23
- 24
- 25
- 26
- 27
- 28
- 29
- 30
- 31
- 32
- 33
- 34
- 35
- 36
- 37
- 38
- 39
- 40
- 41
- 42
- 43
- 44
- 45
- 46
- 47
- 48
- 49
- 50
- 51
- 52
- 53
- 54
- 55
- 56
- 57
- 58
- 59
- 60
- 61
- 62
- 63
- 64
- 65
- 66
- 67
- 68
- 69
- 70
- 71
- 72
- 73
- 74
- 75
- 76
- 77
- 78
- 79
- 80
- 81
- 82
- 83
- 84
Be careful:
The official tutorial is written here:
 @Override
protected void onCreate(Bundle savedInstanceState) {
    super.onCreate(savedInstanceState);

    mReactRootView = new ReactRootView(this);
    mReactInstanceManager = ReactInstanceManager.builder()
            .setApplication(getApplication())
            .setBundleAssetName("index.android.bundle")
            .setJSMainModuleName("index.android") //Corresponding index.android.js
            .addPackage(new MainReactPackage())
            //.setUseDeveloperSupport(BuildConfig.DEBUG)//Developer Support, BuildConfig.DEBUG defaults to false and cannot use the developer menu
            .setUseDeveloperSupport(true) //Developer support, set to true when developing, otherwise developer menu cannot be used
            .setInitialLifecycleState(LifecycleState.RESUMED)
            .build();
    //The ReactNativeView here corresponds to the ReactNativeView of AppRegistry.registerComponent ('ReactNativeView', () => ReactNativeView) in index.android.js
    mReactRootView.startReactApplication(mReactInstanceManager, "ReactNativeView", null);
    setContentView(mReactRootView);
}- 1
- 2
- 3
- 4
- 5
- 6
- 7
- 8
- 9
- 10
- 11
- 12
- 13
- 14
- 15
- 16
- 17
- 18
- 1
- 2
- 3
- 4
- 5
- 6
- 7
- 8
- 9
- 10
- 11
- 12
- 13
- 14
- 15
- 16
- 17
- 18
The setUseDeveloperSupport(BuildConfig.DEBUG) method of BuildConfig. DEBUG sets developer support. BuildConfig.DEBUG defaults to false and developer support (developer menu, instant preview, etc.) cannot be used, so we want to change BuildConfig.DEBUG to true.
Another way to write native activities
MyReactNativeActivity
import com.facebook.react.ReactActivity;

public class MyReactNativeActivity extends ReactActivity {
    /**
     * The ReactNativeView here corresponds to the ReactNativeView of AppRegistry.registerComponent ('ReactNativeView', () => Root) in index.android.js
     */
    @Override
    protected String getMainComponentName() {
        return "ReactNativeView";
    }
}- 1
- 2
- 3
- 4
- 5
- 6
- 7
- 8
- 9
- 10
- 11
- 1
- 2
- 3
- 4
- 5
- 6
- 7
- 8
- 9
- 10
- 11
A comparison of two native Activity writings:
First (official example)
The advantage of this writing method is that you can use React Native to write an area of our interface by adding the mReactRootView to the layout using the native layout's addView() method, for example:
activity_my_react.xml
<?xml version="1.0" encoding="utf-8"?>
<LinearLayout xmlns:android="http://schemas.android.com/apk/res/android"
    android:layout_width="match_parent"
    android:layout_height="match_parent"
    android:orientation="vertical">

    <TextView
        android:layout_width="match_parent"
        android:layout_height="200dp"
        android:background="#9DB16D"
        android:textSize="40sp"
        android:text="Native Control TextView" />

    <LinearLayout
        android:id="@+id/layout"
        android:orientation="vertical"
        android:layout_width="match_parent"
        android:layout_height="match_parent"/>
</LinearLayout>- 1
- 2
- 3
- 4
- 5
- 6
- 7
- 8
- 9
- 10
- 11
- 12
- 13
- 14
- 15
- 16
- 17
- 18
- 19
- 1
- 2
- 3
- 4
- 5
- 6
- 7
- 8
- 9
- 10
- 11
- 12
- 13
- 14
- 15
- 16
- 17
- 18
- 19
MyReactActivity Modification
@Override
protected void onCreate(Bundle savedInstanceState) {
    super.onCreate(savedInstanceState);
    setContentView(R.layout.activity_my_react);
    mReactLayout = (LinearLayout) findViewById(R.id.layout);

    mReactRootView = new ReactRootView(this);
    mReactInstanceManager = ReactInstanceManager.builder()
            .setApplication(getApplication())
            .setBundleAssetName("index.android.bundle")
            .setJSMainModuleName("index.android")//Corresponding index.android.js
            .addPackage(new MainReactPackage())
            //.setUseDeveloperSupport(BuildConfig.DEBUG)//Developer Support, BuildConfig.DEBUG defaults to false and cannot use the developer menu
            .setUseDeveloperSupport(true) //Developer support, set to true when developing, otherwise developer menu cannot be used
            .setInitialLifecycleState(LifecycleState.RESUMED)
            .build();
    //The ReactNativeView here corresponds to the ReactNativeView of AppRegistry.registerComponent ('ReactNativeView', () => Root) in index.android.js
    mReactRootView.startReactApplication(mReactInstanceManager, "ReactNativeView", null);
    mReactLayout.addView(mReactRootView);
}- 1
- 2
- 3
- 4
- 5
- 6
- 7
- 8
- 9
- 10
- 11
- 12
- 13
- 14
- 15
- 16
- 17
- 18
- 19
- 20
- 1
- 2
- 3
- 4
- 5
- 6
- 7
- 8
- 9
- 10
- 11
- 12
- 13
- 14
- 15
- 16
- 17
- 18
- 19
- 20
index.android.js
import React, { Component } from 'react';
import {
  View,
  Text,
  StyleSheet
} from 'react-native'

export default class Root extends Component {
  render() {
    return (
      <View style={styles.container}>
        <Text style={styles.welcome}>React Native assembly</Text>
      </View>
    );
  }
}

const styles = StyleSheet.create({
  container: {
    flex: 1,
    justifyContent: 'center',
    alignItems: 'center',
    backgroundColor: '#65A35F',
  },
  welcome: {
    fontSize: 40,
    textAlign: 'center',
    margin: 10,
  }
});

AppRegistry.registerComponent('ReactNativeView', () => Root);- 1
- 2
- 3
- 4
- 5
- 6
- 7
- 8
- 9
- 10
- 11
- 12
- 13
- 14
- 15
- 16
- 17
- 18
- 19
- 20
- 21
- 22
- 23
- 24
- 25
- 26
- 27
- 28
- 29
- 30
- 31
- 32
- 1
- 2
- 3
- 4
- 5
- 6
- 7
- 8
- 9
- 10
- 11
- 12
- 13
- 14
- 15
- 16
- 17
- 18
- 19
- 20
- 21
- 22
- 23
- 24
- 25
- 26
- 27
- 28
- 29
- 30
- 31
- 32
Second
The advantage of this approach is that it is easy to write.However, React Native cannot be used locally for layout.
AndroidManifest.xml correlation
AndroidManifest.xml
<?xml version="1.0" encoding="utf-8"?>
<manifest xmlns:android="http://schemas.android.com/apk/res/android"
    package="top.cokernut.reactnativetonative">

    <uses-permission android:name="android.permission.INTERNET" />
    <uses-permission android:name="android.permission.SYSTEM_ALERT_WINDOW"/>

    <application
        android:allowBackup="true"
        android:name=".MyApplication"
        android:icon="@mipmap/ic_launcher"
        android:label="@string/app_name"
        android:supportsRtl="true"
        android:theme="@style/AppTheme">
        <activity android:name=".MainActivity">
            <intent-filter>
                <action android:name="android.intent.action.MAIN" />
                <category android:name="android.intent.category.LAUNCHER" />
            </intent-filter>
        </activity>
        <activity
            android:name=".MyReactActivity"
            android:label="MyReactActivity">
        </activity>
        <activity
            android:name=".MyReactNativeActivity"
            android:label="MyReactNativeActivity"
            android:theme="@style/Theme.AppCompat.Light.NoActionBar">
        </activity>
        <activity android:name="com.facebook.react.devsupport.DevSettingsActivity" />
    </application>

</manifest>- 1
- 2
- 3
- 4
- 5
- 6
- 7
- 8
- 9
- 10
- 11
- 12
- 13
- 14
- 15
- 16
- 17
- 18
- 19
- 20
- 21
- 22
- 23
- 24
- 25
- 26
- 27
- 28
- 29
- 30
- 31
- 32
- 33
- 1
- 2
- 3
- 4
- 5
- 6
- 7
- 8
- 9
- 10
- 11
- 12
- 13
- 14
- 15
- 16
- 17
- 18
- 19
- 20
- 21
- 22
- 23
- 24
- 25
- 26
- 27
- 28
- 29
- 30
- 31
- 32
- 33
Network permissions:
<uses-permission android:name="android.permission.INTERNET" />- 1
- 1
Suspended window permissions:
<uses-permission android:name="android.permission.SYSTEM_ALERT_WINDOW"/>- 1
- 1
Permission to float window to display:
If you encounter some components of React Native that cannot be used, try adding Theme.AppCompat.Light.NoActionBar as the theme when registering the Activity to see if you can solve the problem because some components depend on this theme:
<activity
    android:name=".MyReactNativeActivity"
    android:label="@string/app_name"
    android:theme="@style/Theme.AppCompat.Light.NoActionBar">
</activity>- 1
- 2
- 3
- 4
- 5
- 1
- 2
- 3
- 4
- 5
Development Setup Interface:
<activity android:name="com.facebook.react.devsupport.DevSettingsActivity" />- 1
- 1
Run application
Start development server
Run at the root of the project:
npm start
This command runs as configured in our package.json:
"scripts": {
    "start": "node node_modules/react-native/local-cli/cli.js start"
},- 1
- 2
- 3
- 1
- 2
- 3
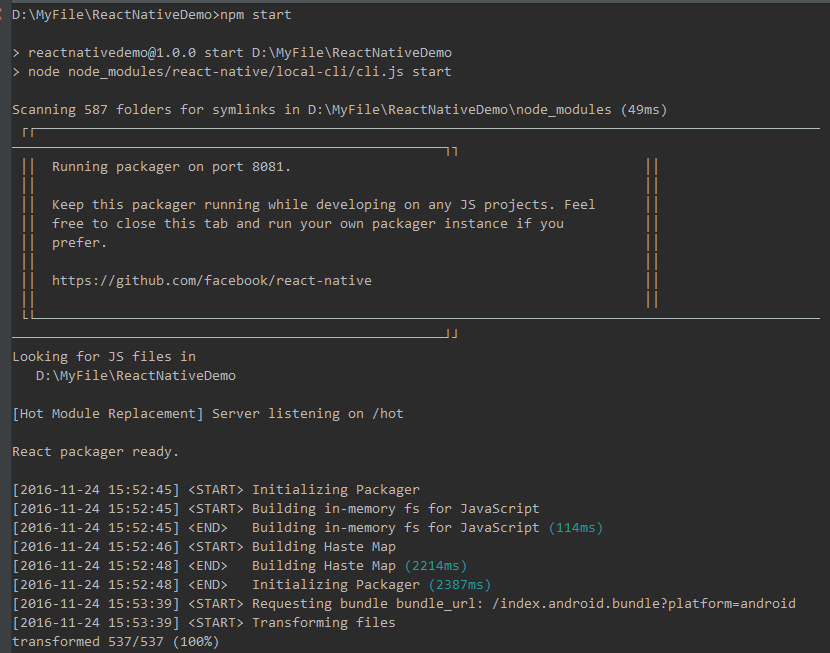
Accessible in browser http://localhost:8081/index.android.bundle?platform=android See if you can see the packaged script.(
The first access usually takes more than a dozen seconds, and you can see the progress bar on the command line.
Build and run your programs
Two methods:
1. Run gradlew installDebug in the project directory on the command line
2. Run the project directly with Android Studio as usual
If you're using Android studio to build for you instead of Gradle w install Debug, make sure you run npm start before installing the app.(
To prevent conflicts between them.(
Effect: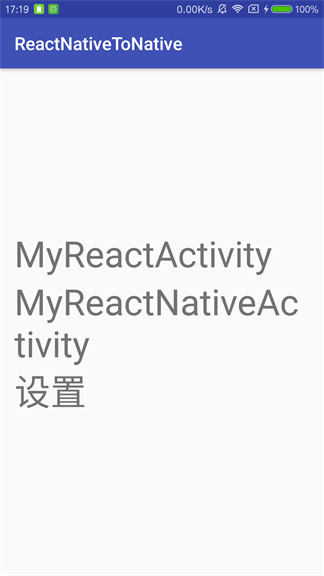
MyReactActivity: 
MyReactNativeActivity: 

Package as a stand-alone installer in Android Studio
You can use Android Studio to create a released version of your App!Simple as creating a published version of a native application before, with one additional step:
Before you package your release, create a bundle file that will be created in the project assets directory and included in your apk package.
Run in your project root directory:
react-native bundle –platform android –dev false –entry-file index.android.js –bundle-output app/src/main/assets/index.android.bundle –assets-dest app/src/main/res/
app/src/main changes to the directory in your project as appropriate, referring to the directory in the assets folder.(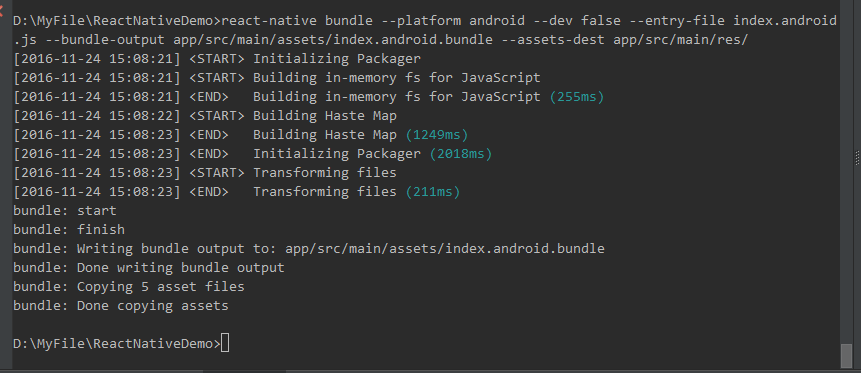
The result is: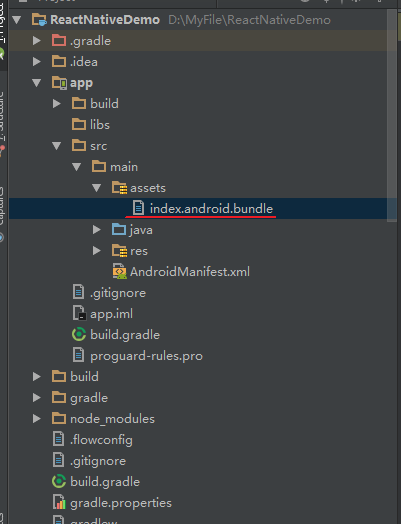
If an error occurs:
ENOENT: no such file or directory
You need to create the assets folder and index.android.bundle in your app module.
Now you can package and publish your application.
Differences between debug mode release mode React Native JS code debugging:
debug mode: modify the js code, open the developer menu, click Reload to see the updated effect, or turn on Live Reload (click Enable Live Reload)
This allows us to modify the js file to automatically Reload as soon as it is saved.
release mode: after modifying the js code, you need to regenerate the index.android.bundle file and click run to see the effect.Because the official version cannot be released
Depending on the local server to update index.android.bundle, the index.android.bundle needs to be packaged into the apk to run.
Update React Naive Version
-
Open the package.json file in the project directory and find react-native under the dependencies module to change the current version number to the latest (or specified) version number, such as:
{ "name": "reactnativedemo", "version": "1.0.0", "description": "", "main": "index.android.js", "scripts": { "start": "node node_modules/react-native/local-cli/cli.js start" }, "author": "", "license": "ISC", "dependencies": { "react": "^15.4.1", "react-native": "^0.38.0" } }- 1
- 2
- 3
- 4
- 5
- 6
- 7
- 8
- 9
- 10
- 11
- 12
- 13
- 14
- 15
- 1
- 2
- 3
- 4
- 5
- 6
- 7
- 8
- 9
- 10
- 11
- 12
- 13
- 14
- 15
The latest version of react-native's npm package is available Here View, or use the npm info react-native command to view.
-
Project root directory execution:
npm install
After installing the latest React Native version, similar warnings may appear as follows:
npm WARN react-native@0.38.0 requires a peer of react@15.4.1 but none was installed.
-
Execute according to warning:
npm install –save react@15.4.1
Update the latest React and the react version under dependencies of package.json under the project will be modified to 15.4.1
-
New versions of npm packages often also contain dynamically generated files that are created by running react-native init
Generated when a project is in progress, such as iOS And Android project files.To update project files for older projects
(Do not re init it), you need to run it from the command line:react-native upgrade
This command checks for the latest project template and then does the following:
- If it is a newly added file, create it directly.
- If the file is the same as the current version, skip.
- If the file is different from the current version, you will be prompted with some options: see the differences, choose to keep your version or overwrite it with a new template.You can press the h key to see all the commands available.
Note: If you have modified the native code, make a backup before you upgrade using upgrade.When the override is complete, use the compare tool to find the differences and move your previously modified code step by step into the new file.
-
Execution:
react-native -v
Check the latest version by following the command above to see if the upgrade was successful!
Problems and Solutions
Can't open developer menu
See if floating window permissions are added to the AndroidManifest.xml file:
<uses-permission android:name="android.permission.SYSTEM_ALERT_WINDOW"/>- 1
- 1
And you want to open the suspended window permission of the application you want to debug on your mobile phone. Different mobile phones open in different ways, you can search for the opening method yourself.
Error'/data/data/package-name/lib-main/libgnustl_shared.so'is 32-bit instead of 64-bit
Cancel all 64-bit.so files and load all 32-bit.so files.
-
Add to build.gradle in the project's root directory:
android.useDeprecatedNdk=true.
-
Add to the build.gradle file in the project's module (app):
android {
    ...
    defaultConfig {
        ...
        ndk {
            abiFilters "armeabi-v7a", "x86"
        }

        packagingOptions {
            exclude "lib/arm64-v8a/librealm-jni.so"
        }
    }
}- 1
- 2
- 3
- 4
- 5
- 6
- 7
- 8
- 9
- 10
- 11
- 12
- 13
- 1
- 2
- 3
- 4
- 5
- 6
- 7
- 8
- 9
- 10
- 11
- 12
- 13
Error: Can not get BatchedBridge, make sure your bundle is packaged correctly
- build mode selected release mode, this error is raised, you can check whether it is debug mode, if not change to debug and try again.
- setUseDeveloperSupport(BuildConfig.DEBUG) method value of ReactInstanceManager is correct, set developer support. BuildConfig.DEBUG defaults to false and developer support (developer menu, instant preview, etc.) cannot be used, so we need to change BuildConfig.DEBUG to true.
error

Solution:
Delete the Android Test and test folders automatically generated by Android Studio, and modify the build.gradle file of the project's module (app):
Before modification:
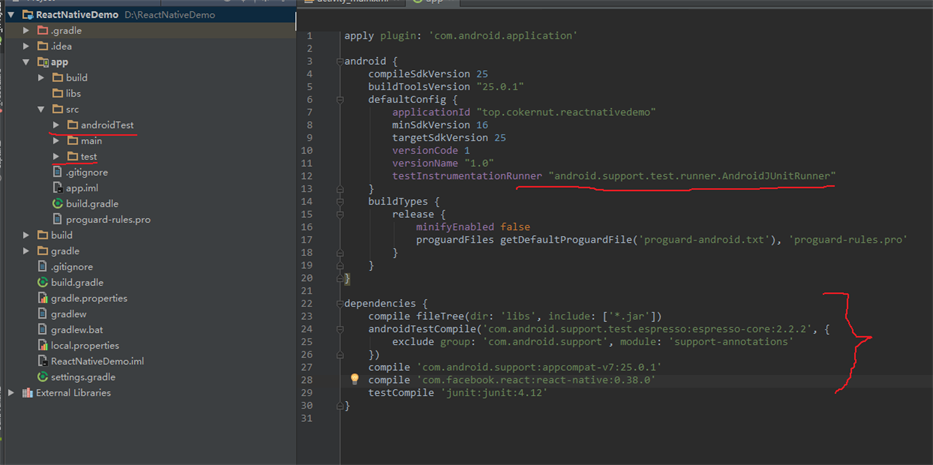
After modification: