With the continuous development and improvement of React Native, more and more companies choose to use React Native instead of iOS/Android to develop some business lines, and many companies using Hybrid technology turn to React Native. Although React Native still has a lot of pits for now, it's perfectly competent for App, which focuses on Application development.
Summary
In iOS application development, due to Apple's strict auditing standards and inefficiency, the release speed of iOS applications is extremely slow, which is unacceptable for most teams, so hot update is particularly important for iOS applications. Not long ago, Apple banned WaxPatch, JSPatch and other thermal repair frameworks, but thankfully React Native, which uses Js thermal updates, seems to have little impact.
As one of the advantages of React Native, it is believed that many people choose to use React Native to develop applications, because React Native has the characteristics of hot update. In the hot update scheme, the well-known Microsoft CodePush, React Native Chinese Network pushy, in the early part of the survey, we refer to Ctrip's jsbundle. Splitting and loading optimization scheme However, this solution needs to change the packaging code and Runtime code of React Native, which is very difficult to implement, and the performance improvement of the application is not obvious, so this solution is not considered for the time being.
Thermal Renewal Principle
React Native's hot update is not as complex as native app updates. React Native's hot update is more like native App version updates. A flowchart is used to illustrate the following:
Hot Update Implementation Scheme
Most of the current projects that choose to use React Native are based on the access of the original projects, namely the so-called hybrid development. In these mixed codes, in order not to increase the difficulty of code (understanding and maintenance), only part of the non-core code RN.
Using React Native for hot update involves the principle of splitting and loading jsbundle.
Use pushy for hot updates
This part comes from Official Documents
Installation command
Run the following commands in your project root directory:
npm install -g react-native-update-cli rnpm
npm install --save react-native-update@For the specific version, see the table below.
react-native link react-native-update
Corresponding Version Table
| React Native version | react-native-update version |
|---|---|
| Less than 0.26 | 1.0.x |
| 0.27 - 0.28 | 2.x |
| 0.29 - 0.33 | 3.x |
| 0.34 - Current version | 4.x |
Note: If RN version is less than 0.29, use rnpm link instead of react-native link command.
For example, if my current React native is version 0.44.3, the command is as follows:
npm install --save react-native-update@4.x
If the react-native link above is successful (both iOS and Android can see dependencies), you can skip this step. Successful results are as follows: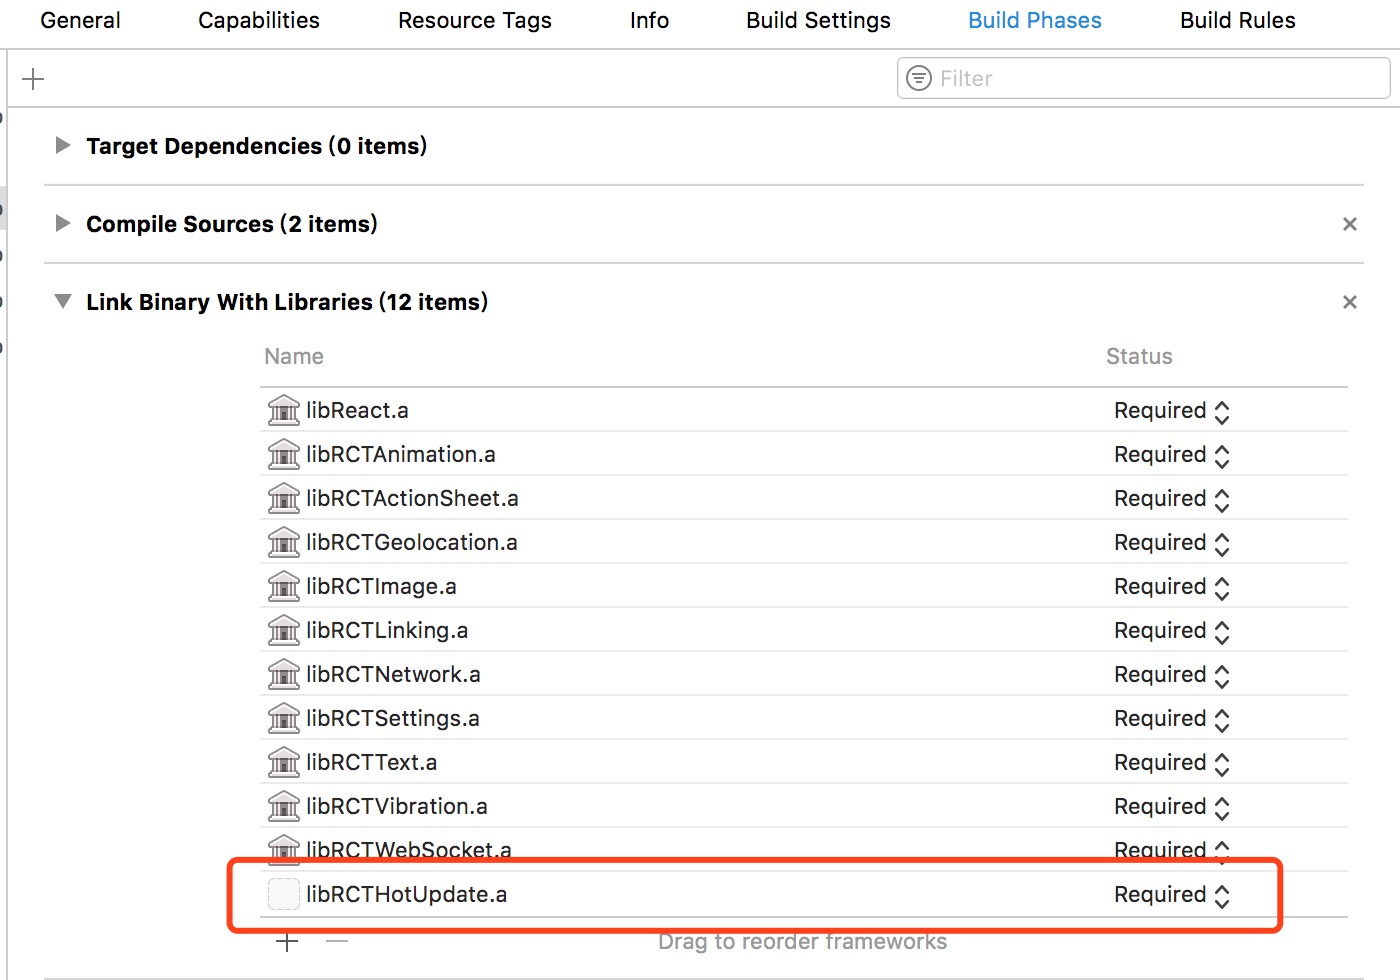
If not, please see the following introduction.
Received Link
iOS
- In Project Navigator in XCode, right-click Libraries Add Files to [your project name]
- Enter node_modules react-native-update IOS and select RCTHotUpdate.xcodeproj`
- In the project navigator in XCode, select your project and add libRCTHotUpdate in Build Phases Link Binary With Libraries.
- Continue to search for Header Search Path in Build Settings and add $(SRCROOT)/. / node_modules/react-native-update/ios
- Run your project (Cmd+R)
android
- Add the following code to android/settings.gradle:
include ':react-native-update'
project(':react-native-update').projectDir = new File(rootProject.projectDir,   '../node_modules/react-native-update/android')
- Add the following code to the dependencies section of android/app/build.gradle: compile project(':react-native-update')
- Check your RN version, if it is 0.29 or above, open android/app/src/main/java/[...]/MainApplication.java, otherwise open android/app/src/main/java/[...]/MainActivity.java. The changes are as follows: Add import cn. reactnative. modules. update. Update Package at the beginning of the file; add new Update Package () in the getPackages() method.
Next you need to configure Bundle
Configure Bundle URL
iOS
Add libz.tbd and libbz 2.1.0.tbd to the Build Phases - > Link Binary with Libraries of the project target. Add the following code to your AppDelegate.m file:
#import "RCTHotUpdate.h"

- (BOOL)application:(UIApplication *)application didFinishLaunchingWithOptions:(NSDictionary *)launchOptions
{
#if DEBUG
  // The original jsCodeLocation
  jsCodeLocation = [NSURL URLWithString:@"http://localhost:8081/index.ios.bundle?platform=ios&dev=true"];
#else
  jsCodeLocation=[RCTHotUpdate bundleURL];
#endif
  // ... other code
}
Android
0.29 and later: Add the following code to your MainApplication:
import cn.reactnative.modules.update.UpdateContext;
public class MainApplication extends Application implements ReactApplication {

  private final ReactNativeHost mReactNativeHost = new ReactNativeHost(this) {
    @Override
    protected String getJSBundleFile() {
        return UpdateContext.getBundleUrl(MainApplication.this);
    }
    // ... other code
  }
}
0.28 and previous versions: Add the following code to your MainActivity:
import cn.reactnative.modules.update.UpdateContext;

public class MainActivity extends ReactActivity {

    @Override
    protected String getJSBundleFile() {
        return UpdateContext.getBundleUrl(this);
    }
    // ... other code
}
ATS exception configuration for iOS
Starting with iOS 9, Apple has asked for a white list of external non-https interfaces in Info.plist to urge developers to deploy the HTTPS protocol. Before our service deploys the HTTPS protocol, Please add the following exceptions to Info. plist. Specific steps are: right-click Info. plist and select open as - source code.
<key>NSAppTransportSecurity</key>
<dict>
    <key>NSExceptionDomains</key>
    <dict>
        <key>reactnative.cn</key>
        <dict>
            <key>NSIncludesSubdomains</key>
            <true/>
            <key>NSExceptionAllowsInsecureHTTPLoads</key>
            <true/>
        </dict>
   </dict>
</dict>
Login and Create Applications
First of all, please Register your account at http://update.reactnative.cn and then run the following command in your project root directory:
$ pushy login
email: <Enter your registered mailbox>
password: <Enter your password>
This will create a. update file under the project folder. Be careful not to upload this file to CVS systems such as Git. You can add a line. update at the end of. gitignore to ignore this file.
The application can be created after login. Note that iOS and Android platforms need to be created separately:
$ pushy createApp --platform ios
App Name: <Enter application name>
$ pushy createApp --platform android
App Name: <Enter application name>
If you have already created an application on the web or elsewhere, you can also choose to apply directly:
$ pushy selectApp --platform ios
1) There are plenty of fish.(ios)
3) Rich Recruitment(ios)

Total 2 ios apps
Enter appId: <Enter the number before the application>
After selecting or creating the application, you will see the update.json file in the folder, which is similar to the following form:
{
    "ios": {
        "appId": 1,
        "appKey": "<A string of random strings>"
    },
    "android": {
        "appId": 2,
        "appKey": "<A string of random strings>"
    }
}
You can safely upload update.json to CVS systems such as Git and share this file with your team without any sensitive information. Of course, before they can use any function, they must first enter pushy login for login. So far, the creation/selection of server-side applications has been successful. Next, we just need to add the corresponding function code on the client side.
Get appKey
When checking for updates, you must provide your appKey, which is stored in update.json and varies according to the platform. You can get it with the following code:
import {
  Platform,
} from 'react-native';

import _updateConfig from './update.json';
const {appKey} = _updateConfig[Platform.OS];
Note: If you don't use the push command line, you can also view two appKey applications from the web side and choose them according to the platform.
Check for updates, download updates
Use the checkUpdate asynchronous function to check whether the current version needs to be updated:
checkUpdate(appKey)
    .then(info => {
    })
There are three cases of returned info:
- {expired: true}: The application package (native part) has expired and needs to go to the application market to download a new version.
- {upToDate: true}: Currently updated to the latest, no updates are required.
- {update: true}: There are currently new versions that can be updated. Info's name and description fields can be used to prompt users, while metaInfo fields can customize other properties (such as silent updates, forced updates, etc.) according to your needs. There are also several fields, including download addresses for complete update packs or patch packs, and react-native-update will first attempt less traffic-intensive updates. Pass the info object to download Update as a parameter. ### Switched version The return value of download Update is a hash string, which is the unique identifier for the current version. You can use the switchVersion function to switch versions immediately (the application will be reloaded immediately at this time), or you can choose to call the switchVersionLater so that the application can load a new version the next time it starts. ### First Start, Roll Back The isFirstTime constant is true at the first boot after each update. You must call Mark Success at any appropriate time before the application exits, otherwise the application will roll back the next time it starts. This mechanism is called "anti-triggering" so that when you start an application and encounter problems at the beginning, it can also resume operation at the next boot.
You can tell by isFirstTime that this is the first launch of the current version, or by isRolledBack that the application has just undergone a rollback operation. And give the user prompt information here.
Attach complete code:
import React, {
  Component,
} from 'react';

import {
  AppRegistry,
  StyleSheet,
  Platform,
  Text,
  View,
  Alert,
  TouchableOpacity,
  Linking,
} from 'react-native';

import {
  isFirstTime,
  isRolledBack,
  packageVersion,
  currentVersion,
  checkUpdate,
  downloadUpdate,
  switchVersion,
  switchVersionLater,
  markSuccess,
} from 'react-native-update';

import _updateConfig from './update.json';
const {appKey} = _updateConfig[Platform.OS];

class MyProject extends Component {
  componentWillMount(){
    if (isFirstTime) {
      Alert.alert('Tips', 'This is the first time the current version has been launched.,Do you want to simulate a startup failure??Failure will roll back to the previous version', [
        {text: 'yes', onPress: ()=>{throw new Error('Simulated Startup Failure,Please restart the application')}},
        {text: 'no', onPress: ()=>{markSuccess()}},
      ]);
    } else if (isRolledBack) {
      Alert.alert('Tips', 'The update just failed,Version rolled back.');
    }
  }
  doUpdate = info => {
    downloadUpdate(info).then(hash => {
      Alert.alert('Tips', 'Download finished,Whether to restart the application?', [
        {text: 'yes', onPress: ()=>{switchVersion(hash);}},
        {text: 'no',},
        {text: 'Next time you start up', onPress: ()=>{switchVersionLater(hash);}},
      ]);
    }).catch(err => {
      Alert.alert('Tips', 'Update failed.');
    });
  };
  checkUpdate = () => {
    checkUpdate(appKey).then(info => {
      if (info.expired) {
        Alert.alert('Tips', 'Your application version has been updated,Please go to the App Store to download the new version.', [
          {text: 'Sure?', onPress: ()=>{info.downloadUrl && Linking.openURL(info.downloadUrl)}},
        ]);
      } else if (info.upToDate) {
        Alert.alert('Tips', 'Your application version is up to date.');
      } else {
        Alert.alert('Tips', 'Check for new version'+info.name+',Whether to download or not?\n'+ info.description, [
          {text: 'yes', onPress: ()=>{this.doUpdate(info)}},
          {text: 'no',},
        ]);
      }
    }).catch(err => {
      Alert.alert('Tips', 'Update failed.');
    });
  };
  render() {
    return (
      <View style={styles.container}>
        <Text style={styles.welcome}>
          //Welcome to Hot Update Service
        </Text>
        <Text style={styles.instructions}>
          //This is version 1 {' n'}
          //Current package version number: {package Version} {' n'}
          //Current version Hash: {current Version |'(empty)'} {' n'}
        </Text>
        <TouchableOpacity onPress={this.checkUpdate}>
          <Text style={styles.instructions}>
            //Click here to check for updates
          </Text>
        </TouchableOpacity>
      </View>
    );
  }
}

const styles = StyleSheet.create({
  container: {
    flex: 1,
    justifyContent: 'center',
    alignItems: 'center',
    backgroundColor: '#F5FCFF',
  },
  welcome: {
    fontSize: 20,
    textAlign: 'center',
    margin: 10,
  },
  instructions: {
    textAlign: 'center',
    color: '#333333',
    marginBottom: 5,
  },
});

AppRegistry.registerComponent('MyProject', () => MyProject);
So far, your application has the ability to detect updates. Next, we need to release the application.
Note that no scripts and resources should be modified from the time the release is uploaded to the official launch of the release, which will affect the update's access to local code, resulting in the version cannot be updated. If you modify scripts or resources before publication, please delete the version uploaded before publication and re-upload it.
Publish iOS applications
Pack the. ipa file according to the normal publishing process (run the device facsimile machine or Generic iOS Device in Xcode, then select Product-Archive from the menu), and then run the following commands:
pushy uploadIpa <your-package.ipa>
Then you can publish your ipa files to the AppStore.
Publishing Android Applications
The process of Android packaging is the same as that of native packaging apk, and then run under the Android folder. / gradlew assembly Release, you can find your application package in android/app/build/outputs/apk/app-release.apk.
Then use the following command to upload the apk for subsequent versions.
pushy uploadApk android/app/build/outputs/apk/app-release.apk
Release Hot Update Version
You can try to modify a line of code (for example, change version 1 to version 2) and then generate a new hot update version.
pushy bundle --platform <ios|android>
Bundling with React Native version:  0.22.2
<Various progress outputs>
Bundled saved to: build/output/android.1459850548545.ppk
Would you like to publish it?(Y/N)
If you want to publish immediately, enter Y at this time. Of course, you can also use pushy publish --platform to release versions in the future.
Uploading [========================================================] 100% 0.0s
Enter version name: <Enter version name, such as 1.0.0-rc>
Enter description: <Input Version Description>
Enter meta info: {"ok":1}
Ok.
Would you like to bind packages to this version?(Y/N)
At this point, the version has been submitted to the update service, but the user can not see the update for the time being. You need to bind a specific package version to this hot update version first.
At this point, enter Y to bind immediately, and you can use pushy update --platform in the future to update users of the corresponding package version. In addition, you can also operate on the web side, simply dragging the corresponding package version under this version.
Offset 0
1) FvXnROJ1 1.0.1 (no package)
2) FiWYm9lB 1.0 [1.0]
Enter versionId or page Up/page Down/Begin(U/D/B) <Input serial number,U/D Page turning,B Back to the beginning, the serial number is in the list above.)Previous figures>

1) 1.0(normal) - 3 FiWYm9lB (Unnamed)

Total 1 packages.
Enter packageId: <Enter the package version number, which is in the list above.)Previous figures>
At this point, the client can use hot updates without updating the relevant version.
Hybrid app thermal update
jsbundle splitting
After packaging and compiling React Native's code, a bundle file will be generated. It should be explained here that jsbundle's decomposition is based on the generated bundle file, which can be divided into two parts (as shown below): one is the basic class library contained by React Native, the other is the business code developed.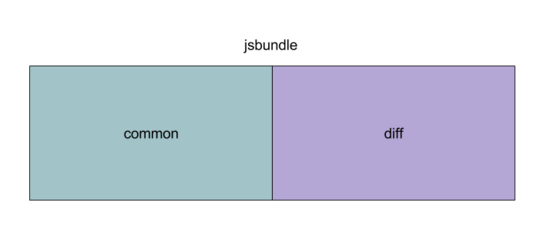
The first thing we need to do is to generate common.bundle, create a new blank.android.js file, and only introduce react and react native in the file.
import React from 'react';
import {} from 'react-native';
Compiled into common.bundle by packaging commands:
react-native bundle --entry-file blank.android.js --bundle-output ~/Desktop/common.bundle --platform android --dev false
Package the complete jsbundle, which will contain all the base class libraries and business code.
Finally, according to the diff algorithm, the two files are divided into diff files, which will generate a binary index.diff file. If there are more than one business code, the corresponding generation of multiple diff files can be.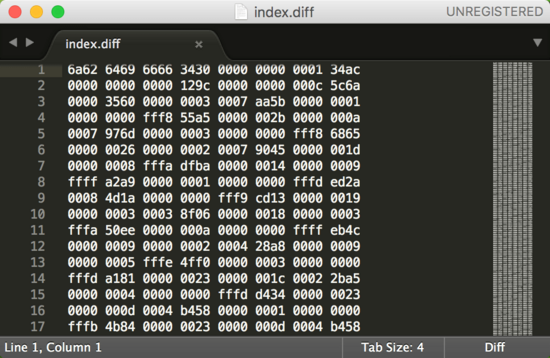
Copy and synthesis of bundle files
After splitting, we need to zip common.bundle and splitted. diff files into assets directory. In order to facilitate version management, we write the version number jsbundle_ < version number >. zip in its file name, such as: jsbundle_1.zip, which is updated every time the zip package is changed to follow the release, and automatically upgrade the version number.
The next thing we need to do is to copy jsbundle_.zip built into assets directory to internal storage, which is recommended here.
In the process of copying, according to the version number of the historical record, we can judge whether we need to execute the copy. After the copy is completed, we merge the common.bundle and *. diff files into a complete bundle file. The file name is *. diff.bundle, for example, index.diff.bundle, which can be loaded according to the module name at the time of loading.
Update of diff file
When it comes to hot updates, just update the diff file directly and synthesize the new full bundle file. Next is the generation and upload of diff files. Here we use a shell script to complete the automatic upload function.
if [ $platform == "android" ]; then
    react-native bundle \
        --entry-file $commonFile.js \
        --bundle-output $androidModuleDir/common.bundle \
        --platform android \
        --dev false

    echo "common.bundle packed!!!"

    react-native bundle \
        --entry-file $module.js \
        --bundle-output $androidModuleDir/$module.android.bundle \
        --platform android \
        --dev false

    echo "$module.android.bundle packed!!!"

    # jar execution file for jbdiff
    chmod +x dmp.jar

    echo "diff start =========>>>"
    java -jar ./dmp.jar $androidModuleDir/common.bundle \
        $androidModuleDir/$module.android.bundle $androidModuleDir/$module.diff
    # Quadratic zip compression
    zip -j $androidModuleDir/$module.diff.zip $androidModuleDir/$module.diff
elfi ...
Modify native code
React Native's bundle file load has changed, so we can't directly use the React Activity provided by sdk. We need to modify the container activity. The transformation part is as follows:
public class MyReactNativeHost extends ReactNativeHost{
    ...
    protected MyReactNativeHost(Application application, String moduleName) {
        super(application);
        mApplication = application;
        mModuleName = moduleName;
    }
    ...
    @Override
    protected ReactInstanceManager createReactInstanceManager() {
        if(getUseDeveloperSupport()){ //To preserve debug capabilities
            return super.createReactInstanceManager();
        }
        String path = JSBundleManager.getJSBundleDirPath(mApplication)
                .concat(mModuleName).concat(".diff.bundle");
        ReactInstanceManager.Builder builder = ReactInstanceManager.builder()
                .setApplication(mApplication)
                .setJSBundleLoader(JSBundleLoader.createFileLoader(path))
                .setUseDeveloperSupport(false)
                .setInitialLifecycleState(LifecycleState.BEFORE_RESUME);
        ...
        return builder.build();
    }
    ...
}
Note: Due to the use of the form of loading bundle files under the file system, bundle files loaded through this form were found in the test process, and the resource files under the res directory could not be read when the picture was loaded. To solve this problem, there are two main solutions: 1. Modify the logic in the js source code and read resources from res; 2. Pack the resources used by React Native locally and publish them with jsbundle_*.zip.
Because of Apple's attitude toward hot update, let's not talk about hot update of ios for the moment. Interested parties can study hot update frameworks such as Jspath by themselves.