React abandons the manual DOM operation which consumes a lot of performance. It uses diff algorithm to change the DOM by changing the control component state and props. When the DOM needs to change, it will first occur on the virtual DOM, rendering the actual part of the change on the real DOM, which can greatly improve the performance.
The components in React can be understood as a state machine in essence, which corresponds the state and output one by one, so that we can compare the intuitive output of the program in different states.
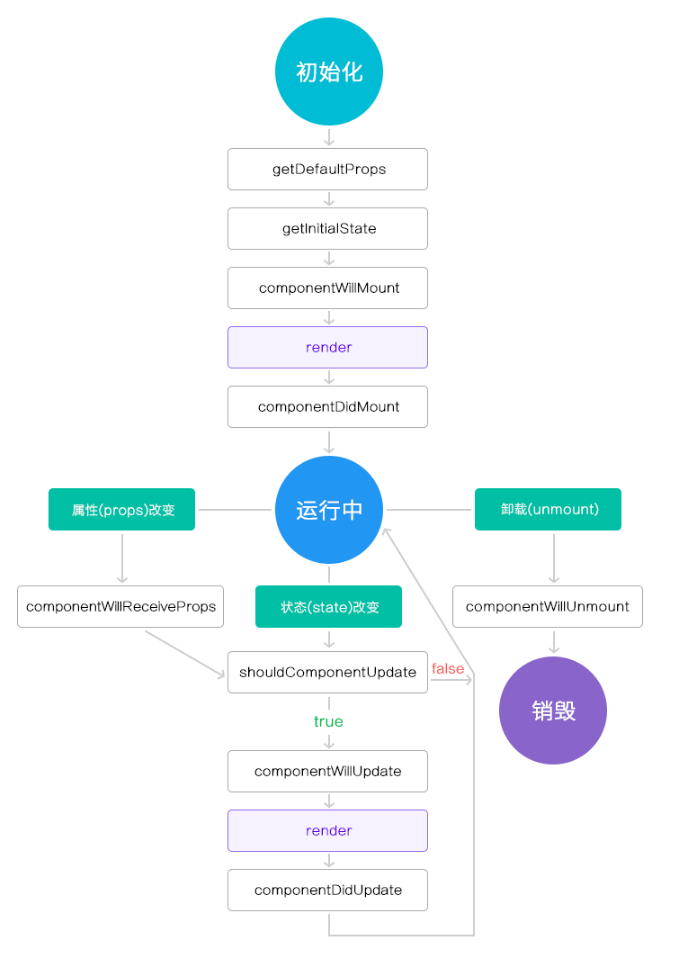
The life cycle of a component consists of three parts: the initialization phase, the running phase, and the destruction phase. React provides different hook functions for developers to use in each phase.
Initialization phase
- getDefaultProps initializes the default value of component attributes and calls them only once. This method returns an object and caches it. Then merge with the props object specified by the parent component and assign this.props as the default property of the component
- getInitialState initializes the state of each instance and the value of the component's state. Its return value is assigned to the component's this.state property
- componentWillMount Before component render, you can modify the state
- render According to the value of state, the virtual DOM structure required by the page is generated and returned.
- componentDidMount When render is completed, the component is triggered when rendering to the page, and the real DOM generated according to the virtual DOM structure is processed accordingly. Within a component, the node of the current component can be obtained by ReactDOM. find DOMNode (this), and then the DOM elements inside can be manipulated as in Web development.
state Attribute introduction:
It is used to store the data needed by the component itself. It can be changed, and every change will cause component updates. This is also one of the key points in ReactJS.
That is to say, every data update is by modifying the value of the state attribute, and then ReactJS will monitor the change of the state attribute. Once the change occurs, it will trigger the render method of the component to update the DOM structure.
Operating Stage
- componentWillReceiveProps When a component receives a new props, it triggers the function. In the modification function, you can usually call this.setState method to complete the modification of the state.
- shouldComponentUpdate This method is used to intercept the new props or state, and then make the final decision whether to update the component according to the pre-set judgment logic.
- componentWillUpdate When the above method intercepts and returns true, it can do some pre-update operations in the method, triggering before rendering, but it cannot modify props and state.
- render According to a series of diff algorithms, the virtual DOM data needed to be updated is generated. (Note: In render, it's better to combine data and templates instead of making logical changes such as state, so that the component structure is clearer.)
- componentDidUpdate This method triggers after component updates have been synchronized to DOM. We often do a DOM operation in this method.
Destruction stage
- componentWillUnmount Before the destruction operation is actually executed, we usually do some work, such as canceling the event binding, removing the corresponding component data structure in the virtual DOM, and destroying some invalid timers. These things can be dealt with in this way.
class Clock extends React.Component {
  constructor(props) {
    super(props);
    this.state = {date: new Date()};
  }

  componentDidMount() {
    this.timerID = setInterval(
      () => this.tick(),
      1000
    );
  }

  componentWillUnmount() {
    clearInterval(this.timerID);
  }

  tick() {
    this.setState({
      date: new Date()
    });
  }

  render() {
    return (
      <div>
        <h1>Hello, world!</h1>
        <h2>It is {this.state.date.toLocaleTimeString()}.</h2>
      </div>
    );
  }
}

ReactDOM.render(
  <Clock />,
  document.getElementById('root')
);
The following diagram can be used to illustrate in detail the triggering sequence of hook functions in the life cycle of React components
Initialize a simple instance
var MyFirstComponent = React.createClass({
  // Call only once and share references between instances
  getDefaultProps: function () {
    // The following console.log() is called when the component is instantiated
    console.log('getDefaultProps, 1');
    return {name: 'Tom'};
  },

  // Initialize the state specific to each instance
  getInitialState: function () {
    console.log('getInitialState, 2');
    return {ready: false};
  },

  // Last chance to modify status before render
  componentWillMount: function () {
    console.log('componentWillMount, 3');
    this.setState({ready: true});
  },

  // Only this.props and this.state can be accessed. There is only one top-level component that cannot modify the state and DOM output.
  render: function () {
    console.log('render, 4');
    return (
      <p ref="textNode">
        Hello, {this.props.name ? this.props.name : 'World'}
        <br/>
        {'' + this.state.ready}
      </p>
    )
  },

  // Triggered after rendering and rendering the real DOM, you can modify the DOM
  componentDidMount: function () {
    console.log('componentDidMount, 5');
  }
});

ReactDOM.render(
  <MyFirstComponent />,
  document.getElementById('example')
);
The results shown in the console are as follows, and the execution order of each function can be seen intuitively. 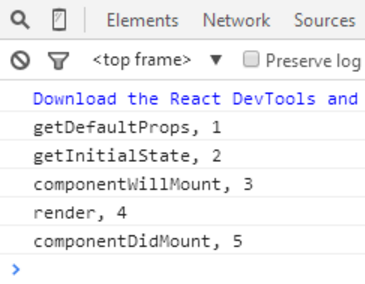
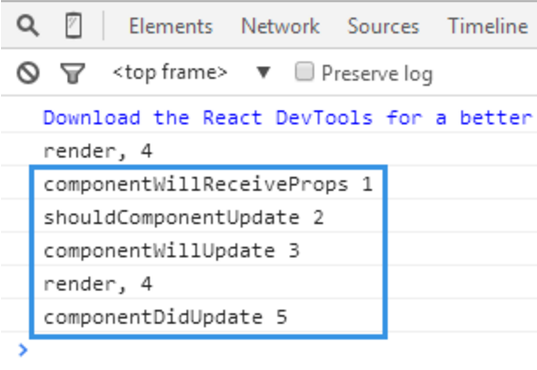
Running a simple example
var ChildComponent = React.createClass({
  // Triggered when a component is about to accept an attribute
  componentWillReceiveProps: function () {
    console.log('componentWillReceiveProps 1');
  },

  // Whether the component needs to be updated or not, returning false prevents render calls
  // This function is generally used with caution and only when performance is tuned.
  shouldComponentUpdate: function () {
    console.log('shouldComponentUpdate 2');
    return true;
  },

  // When a component receives a new props or state, it triggers before rendering.
  // But it can't modify props and state
  componentWillUpdate: function () {
    console.log('componentWillUpdate 3');
  },

  render: function () {
    console.log('render, 4');
    return (
      <p ref="myText">
        Hello, {this.props.name ? this.props.name : 'World'}
      </p>
    )
  },

  // Triggered when the component completes the update rendering to the page after render is completed
  componentDidUpdate: function () {
    console.log('componentDidUpdate 5');
    // For demonstration purposes, jQuery is used here, and the jQuery library needs to be loaded in HTML first.
    $(this.refs.myText).append("\nI'm here!");
  }
});

var ParentComponent = React.createClass({
  // Initialization state
  getInitialState: function () {
    return {name: ''}
  },

  handleChange: function (event) {
    this.setState({name: event.target.value});
  },

  render: function () {
    return (
      <div>
        <ChildComponent name={this.state.name} />
        <input className="form-control" type="text" onChange={this.handleChange} />
      </div>
    );
  }
});

ReactDOM.render(
  <ParentComponent />,
  document.getElementById('example')
);
References( https://facebook.github.io/react/docs/react-component.html)