Component communication
props
Applicable to parent-child component communication
Parent component - > child component
The parent component passes the parameters to be passed to the child component through key={xxx}, and the child component obtains the parameters through this.props.key
import React from 'react'
import Son from './son'
class Father extends React.Component {
  constructor(props) {
    super(props)
  }
  state = {
    info: 'Parent component',
  }
  handleChange = (e) => {
    this.setState({
      info: e.target.value,
    })
  }
  render() {
    return (
      <div>
        <input type='text' value={this.state.info} onChange={this.handleChange} />
        <Son info={this.state.info} />
      </div>
    )
  }
}
export default Father

// Subcomponents
import React from 'react'
interface IProps {
  info?: string
}
class Son extends React.Component<IProps> {
  constructor(props) {
    super(props)
  }
  render() {
    return (
      <div>
        <p>{this.props.info}</p>
      </div>
    )
  }
}
export default Son
Child component - > parent component
Using props callback communication, the parent component passes a callback to the child component. When the event is triggered, the parameters are placed in the callback and brought back to the parent component
// Parent component
import React from 'react'
import Son from './son'
class Father extends React.Component {
  constructor(props) {
    super(props)
  }
  state = {
    info: '',
  }
  callback = (value) => {
    // The value here is brought back by the subcomponent
    this.setState({
      info: value,
    })
  }
  render() {
    return (
      <div>
        <p>{this.state.info}</p>
        <Son callback={this.callback} />
      </div>
    )
  }
}
export default Father

// Subcomponents
import React from 'react'
interface IProps {
  callback: (string) => void
}
class Son extends React.Component<IProps> {
  constructor(props) {
    super(props)
    this.handleChange = this.handleChange.bind(this)
  }
  handleChange = (e) => {
    // Bring parameters back here
    this.props.callback(e.target.value)
  }
  render() {
    return (
      <div>
        <input type='text' onChange={this.handleChange} />
      </div>
    )
  }
}
export default Son
Context
It is suitable for communication between cross level components
// context.js
import React from 'react'
const { Consumer, Provider } = React.createContext(null) //Create context and expose Consumer and Provide
export { Consumer, Provider }

// Parent component
import React from 'react'
import Son from './son'
import { Provider } from './context'
class Father extends React.Component {
  constructor(props) {
    super(props)
  }
  state = {
    info: 'info from father',
  }
  render() {
    return (
      <Provider value={this.state.info}>
        <div>
          <p>{this.state.info}</p>
          <Son />
        </div>
      </Provider>
    )
  }
}
export default Father

// Subcomponents
import React from 'react'
import GrandSon from './grandson'
import { Consumer } from './context'
class Son extends React.Component {
  constructor(props) {
    super(props)
  }
  render() {
    return (
      <Consumer>
        {(info) => (
          // Get the value of the parent component directly through the Consumer
          <div>
            <p>Value of parent component:{info}</p>
            <GrandSon />
          </div>
        )}
      </Consumer>
    )
  }
}
export default Son

// Grandson assembly
import React from 'react'
import { Consumer } from './context'
class GrandSon extends React.Component {
  constructor(props) {
    super(props)
  }
  render() {
    return (
      <Consumer>
        {(info) => (
          // The value of the group parent component can be obtained directly from the Consumer
          <div>
            <p>The value of the parent component of the group:{info}</p>
          </div>
        )}
      </Consumer>
    )
  }
}
export default GrandSon
Particular attention
If multiple contexts need to be consumed, React needs to make the context of each consumer component a separate node in the component tree.
// provider
...
  <Context1.Provider value={this.state.info}>
    <Context2.Provider value={this.state.theme}>
      <div>
        <p>{this.state.info}</p>
        <p>{this.state.theme}</p>
        <Son />
      </div>
    </Context2.Provider>
  </Context1.Provider>

 // consumer
 ...
 <Context1.Consumer>
    {(info: string) => (
      // Get the value of the parent component directly through the Consumer
      <Context2.Consumer>
        {(theme: string) => (
          <div>
            <p>Parent component info Value of:{info}</p>
            <p>Parent component theme Value of:{theme}</p>
          </div>
        )}
      </Context2.Consumer>
    )}
  </Context1.Consumer>
The core functions of many excellent React components are realized through Context, such as React Redux and React router, so it is necessary to master Context.
OnRef
The principle of OnRef is very simple. In essence, it uses props to take the component instance of the child component (also known as this) as a parameter and pass it to the parent component through a callback. Then, the parent component can get the instance of the child component and call its method (do whatever it wants) after getting its instance.
// Parent component
import React from 'react'
import Son from './son'
import { Button } from 'antd'

class Father extends React.Component {
  child: any
  constructor(props) {
    super(props)
  }
  sonRef = (ref) => {
    this.child = ref // Get the instance of the sub component here
  }
  clearSonInput = () => {
    this.child.clearInput()
  }
  render() {
    return (
      <div>
        <Son onRef={this.sonRef} />
        <Button type='primary' onClick={this.clearSonInput}>
          Cleaning sub assembly input
        </Button>
      </div>
    )
  }
}
export default Father

// Subcomponents
import React from 'react'
import { Button } from 'antd'

interface IProps {
  onRef: any
}

class Son extends React.Component<IProps> {
  constructor(props) {
    super(props)
  }
  componentDidMount() {
    this.props.onRef(this) // Here, the instance of the child component is passed to the parent component this.props.onRef() method
  }
  state = {
    info: 'son',
  }
  handleChange = (e) => {
    this.setState({
      info: e.target.value,
    })
  }
  clearInput = () => {
    this.setState({
      info: '',
    })
  }
  render() {
    return (
      <div>
        <div>{this.state.info}</div>
        <input type='text' onChange={this.handleChange} />
      </div>
    )
  }
}
export default Son
ref
ref is an attribute provided to us by react, through which we can access DOM nodes or components
// Parent component
import React from 'react'
import Son from './son'
import { Button } from 'antd'

class Father extends React.Component {
  son: any
  constructor(props) {
    super(props)
    this.son = React.createRef() // Create ref here
  }
  clearSonInput = () => {
    const { current } = this.son // Note that you must get the instance of the sub component through this.son.current
    current.clearInput()
  }
  render() {
    return (
      <div>
        <Son ref={this.son} />
        <Button type='primary' onClick={this.clearSonInput}>
          Cleaning sub assembly input
        </Button>
      </div>
    )
  }
}
export default Father

// Subcomponents
import React from 'react'
import { Button } from 'antd'

class Son extends React.Component {
  constructor(props) {
    super(props)
  }
  state = {
    info: 'son',
  }
  handleChange = (e) => {
    this.setState({
      info: e.target.value,
    })
  }
  clearInput = () => {
    this.setState({
      info: '',
    })
  }
  render() {
    return (
      <div>
        <div>{this.state.info}</div>
        <input type='text' onChange={this.handleChange} />
      </div>
    )
  }
}
export default Son
It is worth noting that we must pass this.childRef.current to get the instance of the sub component.
Common scenarios for using ref include managing focus, text selection or media playback, triggering forced animation, integrating third-party DOM libraries, etc.
Third party tools
Events (publish subscribe)
This approach applies to component communication without any nested relationships. The principle is to use event subscription. That is, a publisher, one or more subscribers. Installation before use:
yarn add events
// event.ts
import { EventEmitter } from 'events'
export default new EventEmitter()

// The publisher publishes the subscription message to the subscriber through the emit event trigger method
import React from 'react'
import Son1 from './son1'
import Son2 from './son2'
import { Button } from 'antd'
import emitter from './event'

class Father extends React.Component {
  son: any
  constructor(props) {
    super(props)
  }
  handleClick = () => {
    //The emit event triggering method finds the corresponding event handling function info through the event name, and passes the event handling function as a parameter
    emitter.emit('info', 'I'm from father of info')
  }
  render() {
    return (
      <div>
        <Button type='primary' onClick={this.handleClick}>
          Click the button to publish the event
        </Button>
        <Son1 />
        <Son2 />
      </div>
    )
  }
}
export default Father

// Subscriber 1
// Use the emitter.addlistener (event name, function name) method to listen (subscribe) to events.
// Destroy the event (unsubscribe) through the emitter.removelistener (event name, function name) method

import React from 'react'
import { Button } from 'antd'
import emitter from './event'

class Son1 extends React.Component {
  constructor(props) {
    super(props)
  }
  state = {
    info: '',
  }
  componentDidMount() {
    // Start listening after the component is mounted
    emitter.addListener('info', (info) => {
      this.setState({
        info: 'Son1 Received message--' + info,
      })
    })
  }

  componentWillUnmount() {
    // Remove event listener before component destruction
    emitter.removeListener('info', (info) => {
      this.setState({
        info: 'Son1 Removing event listener--' + info,
      })
    })
  }
  render() {
    return (
      <div>
        <div>{this.state.info}</div>
      </div>
    )
  }
}
export default Son1

// Subscriber 2
import React from 'react'
import { Button } from 'antd'
import emitter from './event'

class Son2 extends React.Component {
  constructor(props) {
    super(props)
  }
  state = {
    info: '',
  }
  componentDidMount() {
    // Start listening after the component is mounted
    emitter.addListener('info', (info) => {
      this.setState({
        info: 'Son2 Received message--' + info,
      })
    })
  }

  componentWillUnmount() {
    // Remove event listener before component destruction
    emitter.removeListener('info', (info) => {
      this.setState({
        info: 'Son2 Removing event listener--' + info,
      })
    })
  }
  render() {
    return (
      <div>
        <div>{this.state.info}</div>
      </div>
    )
  }
}
export default Son2
route
With the increasing complexity of front-end engineering, routing management is also a noteworthy point in current front-end engineering. vue provides vue router to manage routing. Similarly, react provides a react router to manage routes.
react-router
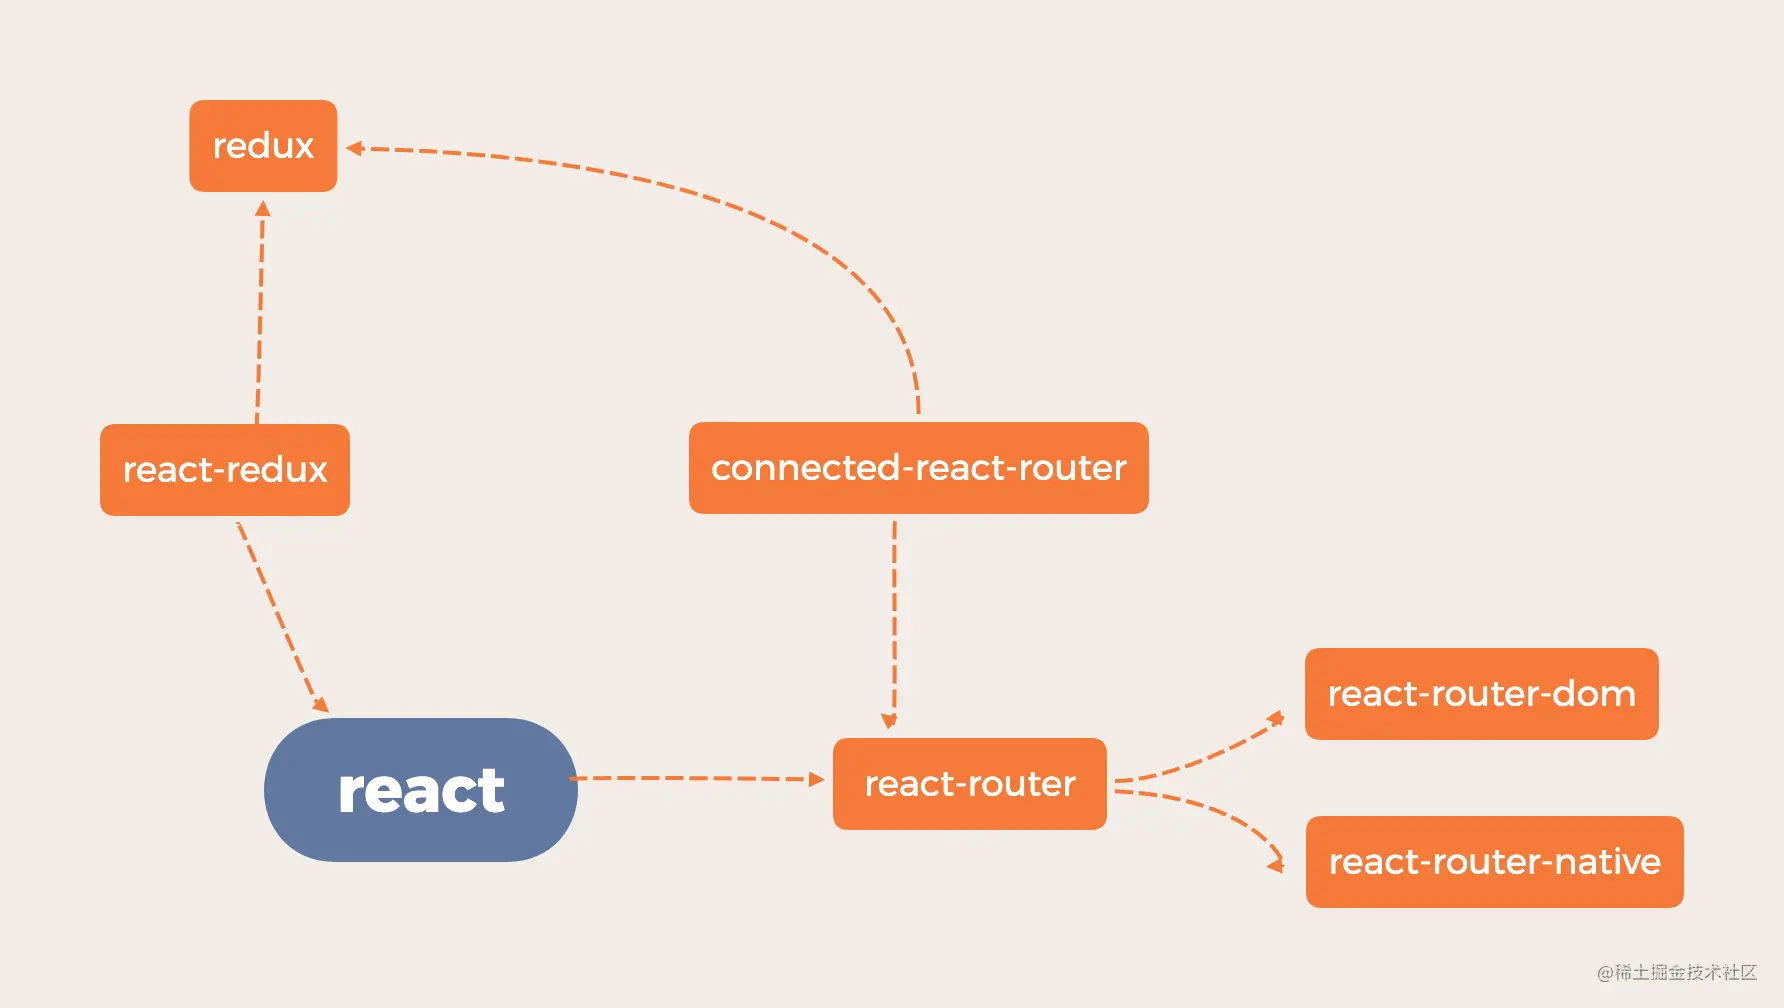
The react router consists of three: react router, react router Dom and react router native.
The react router provides the most basic routing functions, but we will not directly install the react router in actual use, but choose to install react router Dom and react router native according to the application running environment. Because both the react router Dom and the react router native depend on the react router, the react router will be automatically installed during installation.
Among them, react router DOM is used in the browser, while react router native is used in react native.
There are three basic components in the react router. They are
- Routing components such as < browserrouter > and < hashrouter >
- Route matchers components, such as < route > and < Switch >
- Navigation components such as < link >, < navlink >, and < redirect >
Routing component
For web projects, react router DOM provides two routing components < browserrouter > and < hashrouter >
- BrowserRouter: the browser's routing method, that is, it uses the history API (pushstate, replacestate and popstate events) provided by HTML5 to keep the UI and url synchronized. This method is often used in react development, but after packaging, you will find that you can't access the page, so you need to configure nginx or configure the agent in the background.
- HashRouter: add a # number before the path to become a Hash value. The advantage of Hash mode is that we will never find our corresponding path because we refresh, but there will be #/. This method is often used in vue development.
To use the routing component, we only need to ensure that it is used in the root component. We should wrap < app / > under the routing component:
import { BrowserRouter } from 'react-router-dom';
...
<BrowserRouter>
    <App />
</BrowserRouter>
...
Matching component
There are two route matching components: < route > and < Switch >
The two route matching components are usually used together. Multiple < routes > are wrapped in < Switch >, and then it will gradually compare whether the path attribute of each < route > is consistent with the pathname of the browser's current location. If it is consistent, the content will be returned, otherwise null will be returned.
<Switch>
  <Route exact path='/' component={Home} />
  {/* If the current URL is ` / About ', i.e. location = {pathname:' / About '}, the About component should be rendered and the rest of the routes will be ignored */
  <Route path='/about' component={About} />
  <Route path='/contact' component={Contact} />
</Switch>
Noteworthy ⚠️ The problem is: < route path = {XXX} > will only match the beginning of the URL, not the whole URL. Simply put, it is not an exact match. For example, < route path = '/' > and < route path = '/ about' > it can only match < route path = '/', and they all start with '/'.
Here we have two solutions:
- Put this < route path = '/' > in the last position of < Switch >
- Another solution is to add 'exact' to achieve exact matching: < route exact = '/' >
Therefore, the < Switch > component will only render the first matching route. As we said above, if the path is not set, it will match. We can use it to realize the function of 404:
<Switch>
  <Route exact path='/' component={Home} />
  <Route path='/about' component={About} />
  <Route path='/contact' component={Contact} />
  {/* When none of the above components match, the 404 page will be render ed */}
  <Route render={() => <div> 404 page </div>} />
</Switch>
Navigation components
The navigation components are < link >, < navlink >, and < redirect >.
When we use < link >, the html page will be rendered as an a tag:
<Link to='/'>Home</Link>
// <a href='/'>Home</a>
< navlink > is a special < link >. When the address in < navlink > matches the browser address successfully, a style style will be added, as follows:
<NavLink to='/about' activeClassName='active'>
  About
</NavLink>
In the html page, it will be rendered as:
<a href='/about' className='active'>
  About
</a>
However, sometimes you may want to forcibly jump to a page. For example, you can't enter the home page without logging in. At this time, you can use < redirect >
<Redirect to='/login' />
State management
The complexity of front-end engineering is getting higher and higher, and state management is also a very important point. In react ecology, the hottest state management scheme is redux.
redux
As we all know, react is a one-way data flow, and almost all data is transmitted from top to bottom through props
There are two ways to change the state of a component:
- If the props from the parent component changes, the component will also be re rendered
- It has its own state, which can be changed through this.setstate method
Now, if the level of our component tree is deep and there are many sub components that need to share the state, we can only change the state by promoting the state to the top-level parent component. When the state of the top-level parent component changes, all its child nodes will be re rendered
When this happens, you should use redux. This will happen after using redux
Store
In redux, there is only one Store, and the data to be managed by the whole application is in this Store. We can't change this Store directly. We can only change it by returning a new Store. redux provides a createStore to create a state
import { createStore } from 'redux'
const store = createStore(reducer)
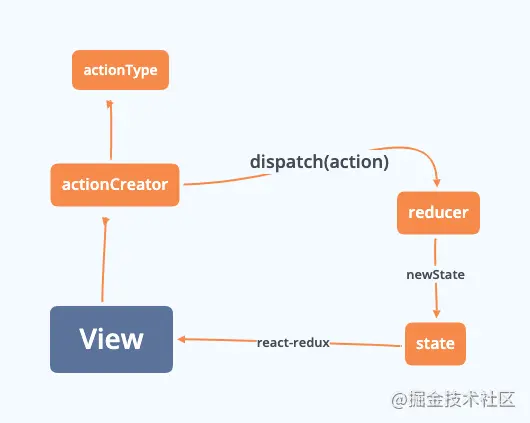
action
This action refers to an operation initiated by the view layer to tell the Store that we need to change. For example, if the user clicks the button, we will request the list, and the data in the list will change. Each action must have a type attribute, which indicates the name of the action, and then a payload attribute, which can take some parameters for Store changes:
const action = {
  type: 'ADD_ITEM',
  payload: 'new item', // optional attribute
}
The above example defines an ADD_ITEM Action, which also carries a payload parameter. Redux can use Action Creator to generate some actions in batches.
reducer
We have defined an Action above, but the Action will not automatically send the change operation to the Store, so we need something called dispatch, which is specially used to send the Action. Fortunately, this dispatch does not need to be defined and implemented by ourselves. redux has written it for us. In redux, store.dispatch() Is the only way for View to issue an Action.
store.dispatch({
  type: 'ADD_ITEM',
  payload: 'new item', // optional attribute
})
When a dispatch initiates an action, it will reach the reducer. What is the reducer used for? As the name suggests, this reducer is used to calculate a new store. The reducer receives two parameters: the current state and the received action. After calculation, it will return a new state. (as we said earlier, you can't change the state directly. You must change it by returning a new state.)
const reducer = function(prevState, action) {
  ...
  return newState;
};
This reducer is a pure function. Pure function means that for the same input, there will only be the same output, which will not affect the external value or be affected by the external value.
It can be seen that when we create a store, we pass in a reducer parameter in createStore. Here, we just want to, every time store.dispatch sends a new action,redux will automatically call reducer and return a new state.
When the project is very large and complex, state must be a very large object, so we need to write many reducers. Here, we need to split the reducers. Each reducer is only responsible for managing part of the state data. So how do we manage these reducers uniformly? redux provides us with the combineReducers method. As the name suggests, it is to synthesize all the child reducers into one reducer, which is convenient for us to manage.
import { combineReducers } from 'redux'
import listReducer from './listReducer/reducers'
import detailReducer from './detailReducer/reducers'
import aboutReducer from './aboutReducer/reducers'

const rootReducer = combineReducers({
  listReducer,
  detailReducer,
  aboutReducer,
})
export default rootReducer
middleware
Friends familiar with koa should know the concept of middleware. Middleware simply means that we need to perform some operations between two operations. So why should we introduce Middleware in redux? So far, let's review the steps we have just carried out:
- Create store
import { createStore } from 'redux'
const store = createStore(reducer)
- Issue action
store.dispatch({
 type: 'ADD_ITEM',
 payload: 'new item', // optional attribute
})
- The reducer calculates and returns a new state
const reducer = function(prevState, action) {
 ...
 return newState;
};
We found that the changes we initiated this time were synchronous operations, so the problem came. If there is a list in our state: list, the user initiates a request according to some filtering conditions clicked on the view, and then changes the value of the list in the state. Here, there are asynchronous requests, but the process of changing redux is synchronous. Obviously, asynchronous is not supported, so middleware is used here. So which of the above steps should we execute asynchronous requests? Obviously, steps 1 and 3 are impossible. Step 1 is just creating a store. Step 3 is a pure function, and it is impossible to add asynchronous operations at all. Therefore, it is natural for us to think of asynchronous operation after store.dispatch and before reaching reducer:
store.dispatch = function(prevAction) async{
  console.log("Send a request");
  // The action is not dispatched until the asynchronous operation is completed
  const list = await getList();
  // Put the list in the action
  const newAction = {
    type: prevAction.type,
    payload:list
  }
  store.dispatch(newAction);
};
This is to wrap store.dispatch with another layer, which is the principle of middleware.
The common middleware of redux includes redux thunx, redux promise and redux saga. The relevant detailed usage will not be repeated here (the usage of DVA core will be introduced below).
Method of redux application middleware:
import { applyMiddleware, createStore } from 'redux'
import myMiddleware from './myMiddleware'

const store = createStore(reducer, applyMiddleware(myMiddleware))
Notification of change
At this stage, we have changed the state. The next step is to notify the view of the change. In redux, the store.subscribe(listener) method is provided. This method passes in a listener. For example, in react, the listener can be this.setState(xxx). Whenever the state in redux changes, our page will be re rendered through store.subscribe(listener). It means that we have to manually go to store.subscribe(listener) on each page. It's too troublesome, isn't it.
React redux and redux
In order to solve the above pain points and better combine redux and react, the official provided us with the react redux package (maybe you're a little confused now, and I was the same at the beginning). So now, we need to clarify a concept: redux and react are two people who don't have eight poles. redux is just a state management framework and react is just a front-end application framework. redux can be used in any front-end framework, such as vue, or even pure javaScript. Later, react redux appeared. He brought redux and react together, so they joined forces, and they were invincible. Having said so much, I just want to explain the function of react redux package.
Before describing the role of react Redux in detail, let's introduce the following knowledge points: react Redux divides react components into container components and presentation components, where
- Presentation component: it is only responsible for displaying the UI without involving logical processing. The data comes from the props of the parent component
- Container component: it is responsible for logic and data interaction, and transfers the data in the state to the presentation component for UI rendering
Container components are provided by react Redux, that is, we only need to display components, and react Redux is responsible for state management.
As we know, redux provides a large state. Here we need to face two problems. The first problem is how to make all components in our react project get the state?; Second, how does the component receive the change information every time the state is changed?
Provider
To solve the first problem, react redux provides a Provider component. Wrap the root component with this Provider and pass the state exported by redux to the following as a parameter
import React from "react";

import { Provider } from "react-redux";
import App from "./App";
import { store } from "./store"; // This store is exported by redux
···
<Provider store={store}>
  <App />
</Provider>;
···
return
In this way, all components can get the state. The principle of this Provider component is realized through the Context of react. We can see the source code:
....
const Context = context || ReactReduxContext;
return <Context.Provider value={contextValue}>{children}</Context.Provider>;
....
The contextValue here wraps the store we passed in. Obviously, it creates the Context and provides the store we passed in to all components of react by < Context. Provider value = {contextValue} > {children} < / Context. Provider >.
connect
In the above, we know how to provide the state exposed by redux to the react component. Next, how do we receive the state change in a sub component? React redux provides us with the connect method. This method can pass in two optional parameters: mapStateToProps and mapDispatchToProps, and then a container component will be returned. This component can automatically listen to the change of state, map the value of state to the props parameter of the component, and then we can directly get the value in state through this.props.
const mapStateToProps = (state) => ({
  goodsList: state.goodsList,
  totalCount: state.totalCount,
});

export default connect(
  mapStateToProps, // Optional
// mapDispatchToProps, / / optional
(GoodsList);
mapStateToProps is to map the state value to the props of the component, and mapDispatchToProps is to map store.dispatch to props. If we don't transfer mapDispatchToProps, connect will automatically inject the dispatch into props. In the component, we can directly initiate an action to the reducer through this.props.dispatch.
Connected react router and redux
When we use both react router and Redux in the project, we can deeply integrate them. We want to get the router in the store. We can even operate the router and record the changes of the router. For example, we store the login status of the user in Redux, and the page will jump after login. The normal operation is to get a state after initiating a request. At this time, we need to dispatch an action to change the state of redux. At the same time, we need to jump the route, similar to store.dispatch(replace('/home'). To achieve this deep integration, we need to use two libraries: connected react router and history.
First, you need to generate a history object from history, generate a routerReducer in combination with the connectRouter of the connected reaction router, and use the routermidware of the connected reaction router to realize the dispatch action navigation, that is, the store.dispatch(replace('/home'):
// APP.tsx
const createHistory = require('history').createBrowserHistory
export const history = createHistory()

// reducer/index.ts
const routerReducer = connectRouter(history)
const routerMiddlewareForDispatch = routerMiddleware(history)
const middleware = [routerMiddlewareForDispatch]
Then, combine our own reducers and routerreducers with the combinerreducers of redux to form a rootReducer, and then create a store with createStore and expose it:
// reducer/index.ts
export default function geneGrateSotore(history: any) {
  const routerReducer = connectRouter(history)
  const routerMiddlewareForDispatch = routerMiddleware(history)
  const middleware = [routerMiddlewareForDispatch]
  //Merge routerReducer
  const rootRuder = combineReducers({
    info: infoRuder,
    router: routerReducer,
  })

  const store = createStore(rootRuder, applyMiddleware(...middleware))
  return store
}
Finally, we import the method we just created in App.tsx to generate a store, then transfer the history object we created into the ConnectedRouter component of the connected react Router as props, and wrap it around our Router component:
// App.tsx
import React from 'react'
import { Provider } from 'react-redux'
import { ConnectedRouter } from 'connected-react-router'
import geneGrateSotore from './store'
import Router from './router'
import './App.css'

const createHistory = require('history').createBrowserHistory
const history = createHistory()
const store = geneGrateSotore(history)

const f: React.FC = () => {
  return (
    <Provider store={store}>
      <ConnectedRouter history={history}>
        <Router></Router>
      </ConnectedRouter>
    </Provider>
  )
}

export default f
In this way, we will integrate connected react router and redux. Now, when we use Link to jump routes in View, we will jump routes through the react router DOM, and also initiate an action through the connected react router to update the router object in the redux state to record route changes. At the same time, we can also directly use the push, replace and other methods provided by the connected react router in state management. They start from Redux, that is, initiate an action first, and then perform route jump.
To summarize
After reading these things, do you feel confused? There are many concepts such as react, redux, react redux, react router, react router Dom and connected react router. When I first came into contact, I looked at them directly.. Therefore, the composability of react is much higher than vue, so vue is really automatic and react is manual. But we just need to remember that all the concepts in the front end are paper tigers. Calm down and stroke it, and you'll soon understand. OK, now let's look at this figure:
dva
Through the above tools, we can build a great project based on react and redux. If we only use Redux, when the project becomes larger and larger, our Redux operations will become complicated, and the organization of code and files will become bloated. We must put action, reducer, createActions, actionType and other files under different directories. When we need to use it, we need to open the file directory for half a day, We need to switch constantly in these files. It's crazy. So we can't help thinking: if only all the operations were put in one file! Yes, it's coming. It's the dva.
dva The first is based on redux and redux-saga To simplify the development experience, dva
 There is also an additional built-in react-router and fetch,Therefore, it can also be understood as a lightweight application framework.
Because we have already organized our own react router, we only use dva core. With this, we can organize reducers, effects, etc. in a model file. In the past, we used to organize code in createAction.ts, actionType.ts and reducer/xxx.ts, but through dva, we can write all these in one file. Next, let's see how to configure the dva core:
First, we need to expose a dva app through dva create:
// dva/index.tsx

import React from 'react'
import { create } from 'dva-core'
import { Provider } from 'react-redux'

export default function(options: any) {
  const app = create(options)
  options.models.forEach((model: any) => app.model(model))
  app.start()
  const store = app._store
  app.start = (container: any) => {
    return () => <Provider store={store}>{container}</Provider>
  }
  app.getStore = () => store

  return app
}
The options above is our model file. Then we need to use this app to reconfigure our store:
/// store/index.ts
import { connectRouter, routerMiddleware } from 'connected-react-router'
import dva from './dva'
import models from '../models'

export default function geneGrateSotore(history: any) {
  const routerReducer = connectRouter(history)
  const routerMiddlewareForDispatch = routerMiddleware(history)
  const app = dva({
    models,
    initState: {},
    extraReducers: { router: routerReducer },
    onAction: [routerMiddlewareForDispatch],
  })
  return app
}
Then, as usual, we can use it in App.tsx:
import React from 'react'
import { ConnectedRouter } from 'connected-react-router'
import geneGrateSotore from './store'
import Router from './router'
import './App.css'

const createHistory = require('history').createBrowserHistory
const history = createHistory()
const app = geneGrateSotore(history)
const f: React.FC = app.start(
  <ConnectedRouter history={history}>
    <Router />
  </ConnectedRouter>
)

export default f
Compared with the previous configuration of redux, we have saved a lot of files, and our store files are much cleaner. Let's write the model file. For example, there is a module called model1:
// model/model1.ts
export const namespace = 'model1'
interface IDvaState {
  info1: string
}
const state: IDvaState = {
  info1: 'init info1',
}
const model1 = {
  namespace,
  state,
  effects: {
    *changeInfo1({ payload }, { put }) {
      try {
        const { text } = payload
        yield put({
          type: 'setState',
          payload: { info1: text },
        })
        // eslint-disable-next-line no-empty
      } catch (error) {}
    },
  },
  reducers: {
    setState(state: IDvaState, { payload }) {
      return { ...state, ...payload }
    },
  },
}

export default [model1]
Some friends may not understand this document at once. Let's go over it together.
- Namespace: namespace (our components can get our model through this namespace to get values and operate)
- State: This is the state we need to manage (where the state is stored)
- Effects: for some operations, we can put both synchronous and asynchronous operations into effects, which is simply our business logic. It will be introduced in detail here. Let's first understand what it does
- Reducers: the concept of reducer is the same as that of reducer in redux (return a new state and update the state)
Well, with the above concepts, let's see how to connect components with model s.
// home.tsx

import React, { Component } from 'react'
import { connect } from 'react-redux'
import { Button } from 'antd'
import { namespace } from '../models/model1'

interface Iprops {
  info1: string
  dispatch: any
}

export class Home extends Component<Iprops> {
  changeFormHome = () => {
    const { dispatch } = this.props
    dispatch({
      type: `${namespace}/changeInfo1`,
      payload: {
        text: 'from Home Altered info1',
      },
    })
  }
  render() {
    console.log(this.props.info1)
    return (
      <div>
        <p>I am home page</p>
        <p>{this.props.info1}</p>
        <Button onClick={this.changeFormHome}> home Click change redux</Button>
      </div>
    )
  }
}

const mapStateToProps = (model: any) => ({
  info1: model[namespace].info1,
})

export default connect(mapStateToProps)(Home)
After reading the above code, do you understand immediately that we still obtain the model through the connect of react Redux, but we specify the specific model through the namespace. So far, we have known how components get values from the model. So how do we change the state in the model in the component?
Now there is a button on our home.tsx page. Clicking this button will dispatch an action:
...
 dispatch({
      type: `${namespace}/changeInfo1`,
      payload: {
        text: 'from Home Altered info1',
      },
    })
...
As you can see, the type of this action is our model/effects/changeInfo1. I'm sure you've understood it here. Yes, you can find the method corresponding to effects by dispatch ing a method with the same name as a method in effects.
Next, go to changeInfo1 corresponding to the effect to see how to change the state.
...
 *changeInfo1({ payload }, { put }) {
      try {
        const { text } = payload
        yield put({
          type: 'setState',
          payload: { info1: text },
        })
        // eslint-disable-next-line no-empty
      } catch (error) {}
    }
...
Through put, we initiate an action to the final reducer, where the payload comes from the text we passed in, then the state is modified and the page is refreshed
In addition to put, there are also call (used to initiate asynchronous requests) and select (used to retrieve the value in state), which are provided by Redux saga. There is no more description here. Please refer to the specific methods used redux-saga file.
Here I have sorted out two diagrams to compare the process operations of redux and dva:
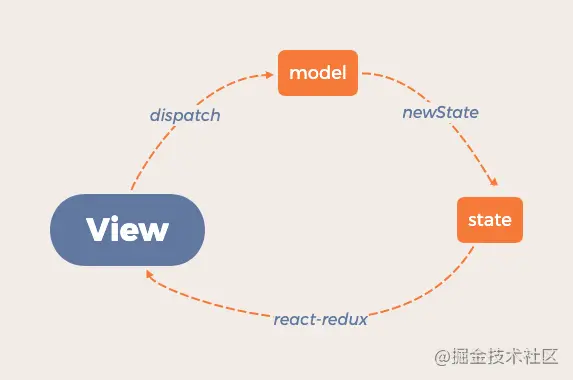
To sum up, dva divides action - > reducer into action - > model (reducer, effect). When we write business, we don't have to look for our reducer and action everywhere. dva really provides us with great convenience.