Introduction
Technology stack: react + redux + react-router + express + Nginx
Practice points:
- redux connection
- react-router routing jump
- scss style writing
- Design of Container Component and Display Component
- Structural Design of express Scaffolding Project
- User information persistence (cookie + redis)
- Common Security Problem Handling (xss sql injection cookie cross-domain)
- Promise encapsulates database operations
- PM2 process Guardian
Online Experience Address: Click on me to jump
github address Welcome to star_
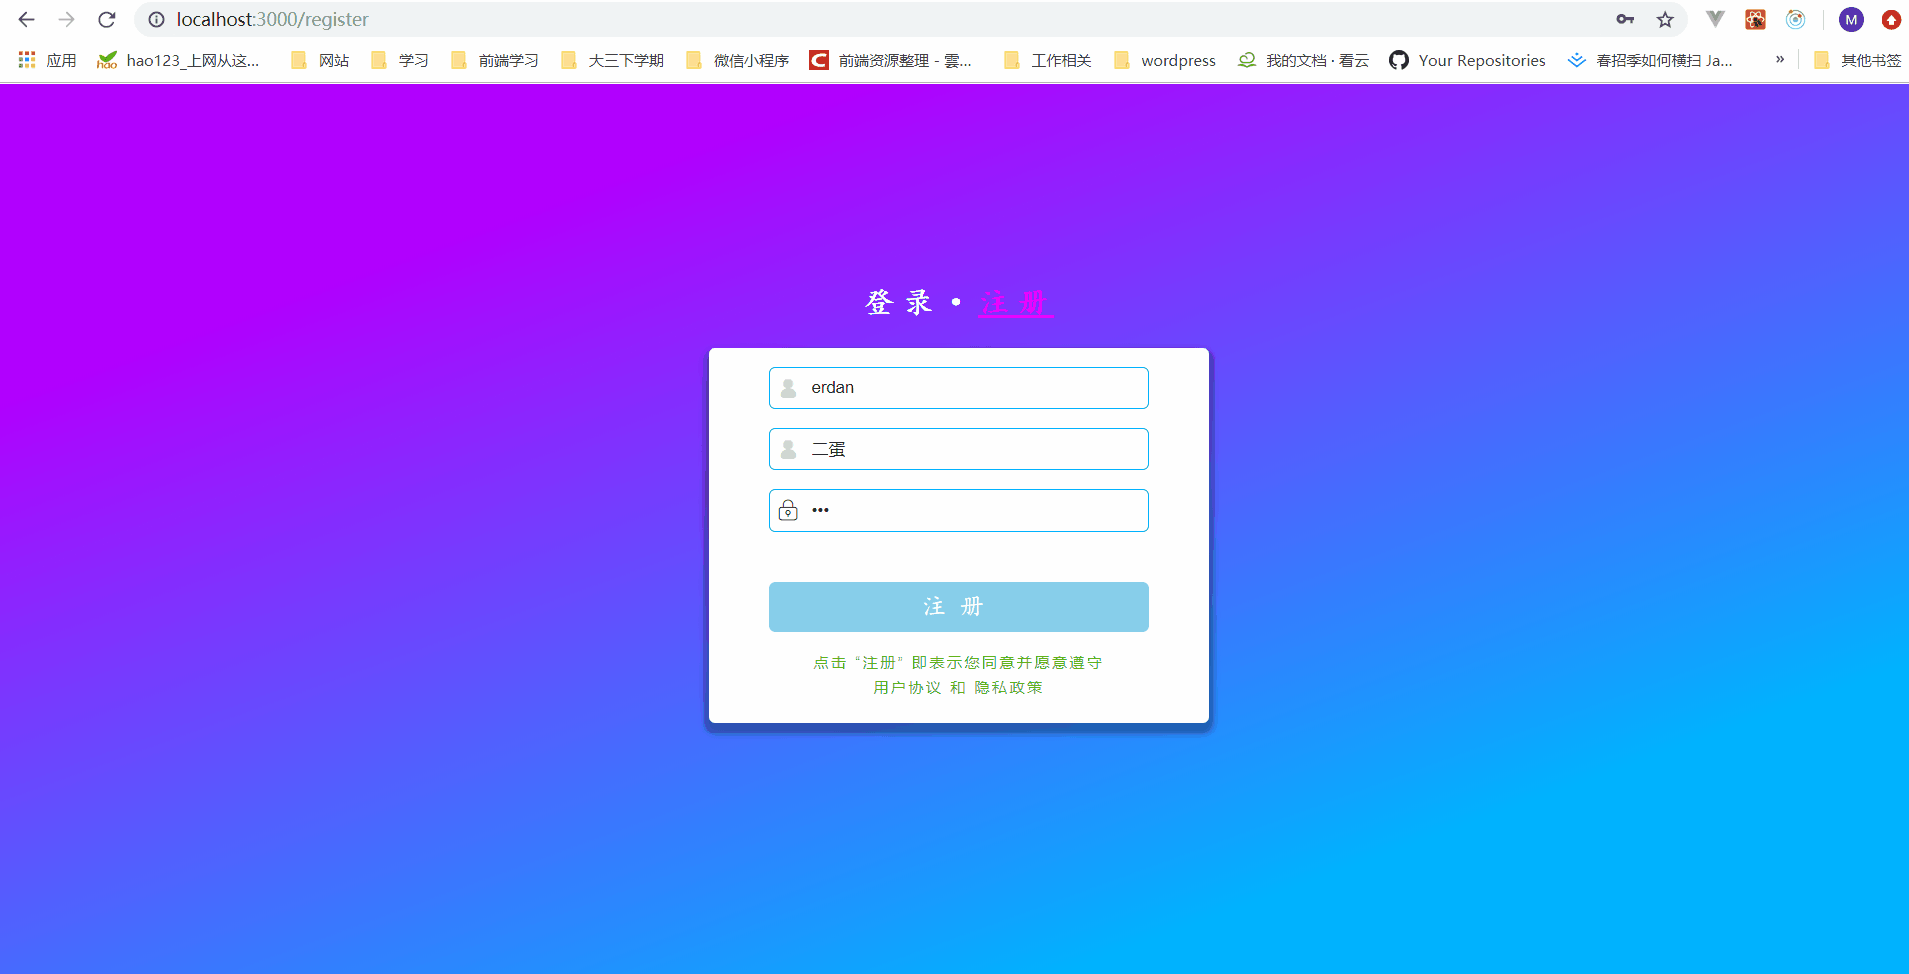
Show
Design

Front end
Project structure
|-- src
  |-- api                 // All API requests (axios)
  |-- assets              // Font icons, global/mixed styles
  |-- components          // Display Components / Components that are part of a page
    |-- common            // Reusable components
    |-- home              // The components used in the home page, that is, the home page, are composed of these components.
    |-- edit              // Components used in edit pages
  |-- pages               // Container component/component as a whole is displayed as a page, connected to redux and passed data from store to its subcomponents
    |-- login             // Login page
    |-- home              // home page
      |-- Home.jsx        // react component
      |-- Home.scss       // Style file for this component
      ......
  |-- store               // redux
    |-- home              // store corresponding to home page
      |-- action-type.js  // action type
      |-- actions.js      // action constructor
      |-- index.js        // For global derivation
      |-- reducer.js      // reducer of the module
    |-- module2           // This folder is just to show that if redux has a new module that needs to be introduced, it will be in the same format as under the home folder.
    |-- store.js          // Merge reducer, create store (globally unique) and export it. If middleware needs to be applied, add it here
|-- App.js                // Root Component/Custom Routing
|-- index.js              // Project Entry / webpack Packaging Entry File
Several Ways of Reaction-Router-dom Routing Jump
1. Introduce and use <Link> components, but they have default styles (such as underscores) and modify their default styles.
import <Link> from 'react-router-dom'
...
<Link to="/login" className="login-btn">
  <span className="login-text">Sign in</span>
</Link>
2. Import withRouter and jump in js mode
import { withRouter } from 'react-router-dom'

// This component needs to be processed as follows (this is the case when you connect to redux and use withRouter at the same time)
export default withRouter(connect(mapStateToProps, mapDispatchToProps)(Header))

// js method for routing jump
this.props.history.push('/')

// Simply put, history is passed to this component in some way.
Transition effect back to the top
1. Using window.scrollTo(xpos, ypos) method and transition: all linear.2s to achieve - this scheme is invalid
2. Using scrollTop attribute of the element, setting scrollTop: 0 of the element when clicking back to the top button and adding transition attribute to realize the transition - scrollTop attribute cannot be transitioned.
3. Adding scroll-behavior: smooth to the css of the element; setting scroll Top: 0-OK for the element when clicking back to the top button
Using < HR > to draw segmentation lines

hr {
  border-color: #eaeaea;
  border: 0; // Default crossbar
  border-top: 1px solid #eee; // Draw a gray line
  margin-left: 65px; // This is a block-level element, you can use margin to control the length of the crossbar
  margin-right: 15px;
}
Using transform:scaleX() to achieve the stretching effect of underscore

.menu-item {
  @include center;
  width: 100px;
  color: #969696;
  font-weight: 700;
  font-size: 16px;
  position: relative;
  .icon {
    margin-right: 5px;
  }
  // Use pseudo-elements to underline the item
  &:after {
    content: '';
    position: absolute;
    width: 100%;
    border-bottom: 2px solid #646464;
    top: 100%;
    transform: scaleX(0);
    transition: all linear .2s;
  }
  // Change scaleX when hover
  &:hover {
    color: #646464;
    cursor: pointer;
    &:after { // What is the choice?
      transform: scaleX(1);
    }
  }
}
Manual addition of event handlers using DOM operations requires manual removal
// Suppose you add event handlers like this when loading components
componentDidMount() {
  let app = document.getElementsByClassName('App')[0]
  app.addEventListener('scroll', this.handleScroll, false)
}

// This needs to be removed, otherwise memory leaks will be reported, and note that this.handleScroll here must have the same reference as addEventListener above.
componentWillUnmount() {
  let app = document.getElementsByClassName('App')[0]
  app.removeEventListener('scroll', this.handleScroll, false)
}
Prevent meaningless rendering
shouldComponentUpdate(nextProps, nextState) {
  // The ArticleList component is an articlelist obtained from the parent component and finds that scrolling down the page triggers the render function without changing the content.
  // Be opportunistic......
  return nextProps.articleList.length !== this.props.articleList.length
}
Realize a tooltip with borders

The triangle is drawn with the familiar css triangle, if we want to add a border to the outer layer of the tooltip? You can draw a triangle with a pseudo-element again, its color
It's the color of the border. It uses the height difference to achieve the border effect.
&:after {
  content: ''; // Just remember to add content.
  width: 0;
  height: 0;
  border-width: 10px;
  border-style: solid;
  border-color: #fff transparent transparent transparent;
  position: absolute;
  top: 100%;
  left: 50%;
  z-index: 101;
  margin-left: -10px;
}
// If I want to add a border to the triangle?
&:before {
  content: '';
  width: 0;
  height: 0;
  border-width: 11px;
  border-style: solid;
  border-color: #f0f0f0 transparent transparent transparent;
  position: absolute;
  top: calc(100% + 1px); // Cal is good
  left: 50%;
  z-index: 100;
  margin-left: -11px;
}
back-end
Project structure
|--bin
  |-- www                 // Entry file/startup file
|-- conf                  // Configuration Items
  |-- db.js               // Database Connection Configuration / redis Connection Configuration
|-- controller
  |-- blog.js             // Processing blog routing-related logic (encapsulating logical operations as functions and exporting them for routing processing)
  |-- user.js             // Processing user routing related logic
|-- db
  |-- mysql.js            // Create a mysql connection, encapsulate the execution of sql operations as Promise and export
  |-- redis.js            // Establish redis connection, encapsulate set and get operation and export
|-- middleware
  |-- loginCheck.js       // Customized Middleware
|-- model
  |-- resModel.js         // Format of encapsulated response
|-- routes                // Define related routing processing
  |-- blog.js             // Routing Processing Related to Blog Articles
  |-- user.js             // Routing Processing Related to User Registration/Logon
|-- utils                 // Tool class
  |-- cryp.js             // Encryption function
|-- app.js                // Specify the order of middleware introduction / request processing and integrate routing
|-- package.json
Using nodemon and cross-env
npm install nodemon cross-env --save-dev
nodemon is used for hot restart, which is similar to the hot update of webpack, and automatically restart the service after saving the file.
cross-env is used to configure environment variables.
packages.json does the following script configuration:
"scripts": {
    "start": "node ./bin/www",
    "dev": "cross-env NODE_ENV=dev nodemon ./bin/www",
    "prd": "cross-env NODE_ENV=production pm2 start ./bin/www" // pm2 will be introduced later
  },
Environmental parameters can be obtained by modifying some of our configurations (such as mysql redis) according to the environment.
// configuration file
const env = process.env.NODE_ENV

// mysql configuration, redis configuration
let MYSQL_CONF
let REDIS_CONF

// development environment
if (env === 'dev') {
  // mysql
  MYSQL_CONF = {
    ...
  }

  // redis
  REDIS_CONF = {
    port: 6379,
    host: '127.0.0.1'
  }
}

// Online environment
if (env === 'production') {
  ...
}
File structure splitting
- Why separate www from app.js?
WW is only related to server (service startup). app.js is responsible for some other business. if it needs to be modified later, then WW files are only responsible for WW files.
- Why are router s and controller s separated?
router is only responsible for routing response and reply, not for specific data processing (database operations);
controller is only responsible for data, and the input parameter operation database returns the result, which is equivalent to the encapsulated data operation, and is independent of routing (routing is responsible for calling).
mysql Placement Skills
let sql = `SELECT * FROM blogs WHERE 1 = 1` // What does 1 = 1 mean? Occupancy, if neither author nor keyword is worth it, it will not be wrong
if (author) {
  sql += `AND author='${author}' `
}
if (keyword) {
  sql += `AND title LIKE '%${keyword}%' `
}
sql += `ORDER BY createtime DESC;`
Encapsulating database execution statements as Promise objects
// Unified execution of sql functions and encapsulation as Promise objects
function exec (sql) {
  const promise = new Promise((resolve, reject) => {
    conn.query(sql, (err, result) => {
      if (err) {
        reject(err)
        return
      }
      resolve(result)
    })
  })
  return promise
}
We do another layer of encapsulation at the controller layer:
const getArticleList = () => {
  const sql = `SELECT * FROM articles`
  return exec(sql)
}
This is used in routing:
// Get a list of articles on the Home page
router.get('/getPartArticles', (req, res) => {
  const result = getArticleList()
  return result.then(data => {
    res.json(
      new SuccessModel(data)
    )
  })
})
The main purpose of doing this is to make the order of callbacks clearer. Originally Promise is to solve the problem of callback hell. Of course, it can also be written in async / await.
// This is the form of koa2, which naturally supports async / await
router.post('/login', async (req, res) => {
    // The original practice
    // query('select * from im_user', (err, rows) => {
    //     res.json({
    //         code: 0,
    //         msg:'Successful request',
    //         data: rows
    //     })
    // })

    // Now?
    const rows = await query('select * from im_user')
    res.json({
        code: 0,
        msg: 'Successful request',
        data: rows
    })
})
Logon Authentication (User Information Persistence)
Here's an analysis of the difference between using cookies only and cookies in combination with session s, or why there are such technical iterations.
Suppose we use the most primitive method: after the user enters the username and password validation successfully, the server sets the cookie to the client. We assume that the cookie stores a username field (which is obviously a foolish behavior), and then the cookie will have it the next time the user logs in after the first login. A cookie, the front-end can be set to send a request to the server as soon as the user opens the application (automatically carrying the cookie), and the back-end can make the user enter the login status directly by detecting the information in the cookie.
Tidy up:
- First login with cookie
- (2) Re-login determines the login status by checking whether cookie s exist or not.
It's foolish to expose user information directly in cookie s. Let's upgrade it.
We store a userid in the cookie, and the server gets the corresponding username according to the userid. Then we need to spend space to store the mapping relationship. Suppose we use global variables to store (i.e. in memory), this is called session, that is, the server side stores user information.
So now it becomes:
- The first login has cookie s, but this time the user rid is recorded.
- (2) Log in again and send cookies. The server analyses cookies and judges the login status according to the stored mapping relationship.
It looks good, but there are still some problems: Suppose we are a process of node.js, and the number of users is increasing, the memory will increase dramatically, while OS will limit the maximum memory that a process can use; in addition, suppose I set up a multi-process to make full use of the multi-core features of CPU. As a service, the memory between these processes can not be shared, that is, user information can not be shared, which is not very good.
So we can solve this problem by using redis. redis is different from mysql. Its data is stored in memory (expensive but fast to access). We change the global variables that were originally stored in each process to be stored in redis, so that we can share information among multiple processes (all through access). Store redis to implement)
So how should node.js be written?
Originally express-session middleware can help us to achieve this requirement very easily. It only needs the following configuration to achieve the requirement we mentioned above.
(Setting cookie s to clients and storing relevant information in redis) can be used for reference.
This article
const redisClient = require('./db/redis')
const sessionStore = new RedisStore({
  client: redisClient
})
app.use(session({
  secret: 'WJiol#23123_',
  cookie: {
    // path:'/', // default configuration
    // httpOnly: true, // default configuration
    maxAge: 24 * 60 * 60 * 1000
  },
  store: sessionStore
}))
However, there are always bug s when using it. Simply speaking, after setting the value of req.session.xxx for a routing, redis should be stored in theory and cookies should be set accordingly. Next time the request to carry the cookie is made.
When it arrives, it can be fetched directly by req.session.xxx, which the bug can't get. The Internet did not find a solution, so I roughly realized this function.
Simply put, this is the case:
- After the user successfully logs in, set up a cookie, which we call userid, and store the userid - username key pair in redis.
- The user opens the application again (such as the home page or other pages) and initiates an automatic login request, which carries cookie.userid. The back end checks whether redis has the same key as this userid. If so, it takes out username. If necessary, it uses username to query some user information and return it to the front end. If not, it means that the user has not logged in.
Only part of the code is posted:
// Routing is responsible for parsing the data in the request and returning the response. controller provides the logical operation function of the database.
router.post('/login', function(req, res, next) {
  const { username, password } = req.body // Middleware will help us store the data in POST body into req.body.
  const result = login(username, password) // Returns a Promise object
  return result.then(data => {
    if (data.username) { // If unsuccessful, data is an empty object
      // Setting session - After login, user information is stored in redis

      // Set a cookie for the user to store a userid after successful login
      // Then the key-value pair of cookie / username is stored in redis
      const userid = `${Date.now()}_${Math.random()}` // Random generation of a userId string
      set(userid, data.username) // redis operation
      res.cookie('userid', `${userid}`, {expires: new Date(Date.now() + 24 * 60 * 60 * 1000), httpOnly: true}) // The default of path / domain is app, so we should pay attention to some details when setting up domain.
      res.json( // res.json receives an object as a parameter and returns data in JSON format
        new SuccessModel()
      )
      return
    }
    res.json(
      new ErrorModel('loginfail')
    )
  })
})
router.get('/autoLogin', (req, res) => {
const userid = req.cookies.userid
if (userid) {
get(userid).then(data => {
const username = data // What we get is username, and then we use username to get user information.
const result = getUserInfoByUsername(username)
return result.then(userinfo => {
if (userinfo) {
res.json(
new SuccessModel(userinfo)
)
} else {
res.json(
new ErrorModel('Failed to obtain user information')
)
}
})
})
} else {
res.json(
new ErrorModel('No, cookie')
)
}
})Cross-domain issues related to cookie s
It is believed that most people will encounter this pit when they first contact cookie settings and sending problems. Here is a record.
- When using the axios library, AJAX requests are not allowed to carry cookie s by default, requiring the following settings:
// Used for automatic login
export function autoLogin () {
  return axios({
    method: 'get',
    url: `${BASE_URL}/user/autoLogin`,
    withCredentials: true // Note that axios does not carry cookie s by default!!!!
  })
}- Access-Control-Allow-Origin cannot be *, Access-Control-Allow-Credentials must be true
app.all('*', function(req, res, next) {
  // Note that the cross-domain restrictions of cookies are stringent. You can't use *here. You must use the same Origin as the Origin to send cookies. For local tests, such as http://localhost:3000, and you can't specify more than one cookie.
  // On-line should be the domain name and port number of the html page mounted
  res.header("Access-Control-Allow-Origin", "http://localhost:3000")
  res.header('Access-Control-Allow-Methods', 'PUT, GET, POST, DELETE, OPTIONS')
  res.header('Access-Control-Allow-Credentials', 'true')
  res.header("Access-Control-Allow-Headers", "X-Requested-With")
  res.header('Access-Control-Allow-Headers', 'Content-Type, Content-Length, Authorization, Accept')
  next();
})
xss and sql injection prevention measures
Let's look at the sql statement for login
const sql = `SELECT username, realname FROM users WHERE username='${username}' AND password='${password}'`Suppose we change the sql statement to this way, then we can login successfully without entering a password at all (that is, the user enters the user name zhangsan'--).
SELECT username, realname FROM users WHERE username='zhangsan'--' AND password='123'
If so, it would be even more dangerous.
SELECT username, realname FROM users WHERE username='zhangsan'; DELETE FROM users;--' AND password='123'
escape method of mysql module can help us solve this problem
username = escape(username)
password = escape(password)
const sql = `
    SELECT username, realname FROM users WHERE username=${username} AND password=${password} // Note that escape is used without quotation marks
  `
Let's look at the output of the escape function after processing the above inputs:
// before
SELECT username, realname FROM users WHERE username='zhangsan'--' AND password='123'
// after
SELECT username, realname FROM users WHERE username='zhangsan\'--' AND password='123'
Theoretically, all sql statements executed by splicing variables need to be considered for sql injection
Now let's talk about xss prevention
npm install xss --save
If the user enters an article title or content like this, it is an xss attack
<script>alert(document.cookie)</script>
We just need to deal with this:
let title = xss(ArticleTitle)
Then the content can be stored in the database. This tool will help us to escape, that is:
& -> & < -> < > -> > " -> " ' -> ' / -> / ...
Cryptographic Encryption
Consider that if the database is broken, if the database explicitly stores the user's username and password, the consequences are unpredictable, so we have to encrypt the user's password.
When registering, we do not directly store the password entered by the user. We can use some encryption methods (such as md5) to encrypt the password and then store it in the database. The next time the user logs in,
Still enter the same password, we first encrypt the password string with md5 and then query it. This makes cryptographic encryption possible.
const crypto = require('crypto') // Self-contained Library
// key
const SECRET_KEY = 'wqeW123s_#!@3'
// MD5 Encryption
function md5(content) {
let md5 = crypto.createHash('md5')
return md5.update(content).digest('hex') // Output changed to hexadecimal
}
// Encryption function
function genPassword(password) {
const str = `password=${password}&key=${SECRET_KEY}`
return md5(str)
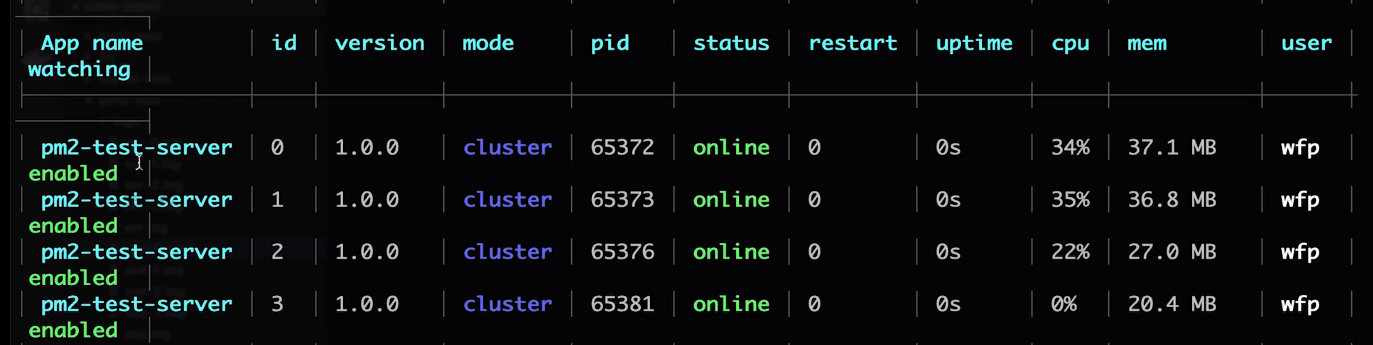
}Use of PM2
What problems does PM2 solve?
- Server stability: process daemon, automatic restart of system crash, this is very important!
- Make full use of server hardware resources to improve performance: multi-process can be started to provide services
- Online Logging: With Logging Function
npm install pm2 -g
Common commands:
- pm2 start...: start
- pm2 list: View the list of pm2 processes
- PM2 restart < App name > / ID >: restart
- PM2 stop < App name > / ID >: stop
- pm2 info <App name> / <id>
- pm2 log <App name> / <id>
- PM2 monitor <App name>/ <id>: Monitor CPU/memory information
You can customize PM2 configuration files (including setting the number of processes, log file directories, etc.)
{
  "apps": {
    "name": "pm2-test-server",
    "script": "app.js",
    "watch": true, // Auto restart for monitoring file changes (development environment/online environment)
    "ignore_watch": [ // Which file changes do not need to be monitored
      "node_modules",
      "logs"
    ],
    "instances": 4, // Multiprocess-related CPU kernels
    "error_file": "logs/err.log", // Error log path, undefined default path
    "out_file": "log/out.log", // Content printed by console.log
    "log_date_format": "YYYY-MM-DD HH:mm:ss", // Log time format, automatically add timestamp
  }
}
Log Analysis Skills
Use the crontab command (linux) to split logs:
- Log content accumulates slowly and is difficult to handle in a file.
- Partition of log files by time, such as 2019-02-10.access.log
Linux crontab command, that is, timing tasks
- Set timed tasks, format: * * * * * * command
- Minutes, Hours, Months, Sundays, Commands are shell scripts
What does command need to execute?
1. Copy access.log and rename it 2019-02-10.access.log
2. Clear the access.log file and continue to accumulate logs
We can write the following scripts:
// copy.sh
cd /Users/Proj/blog-proj
cp access.log $(date + %Y-%m-%d).access.log
echo "" > access.log
// Trigger the shell script every morning
crontab -e 1 * 0 * * * sh /Users/Proj/blog-Proj/copy.sh