Latest React Family Bucket Practice Configuration Guide
I'm listening to this document Mr. Lv Xiaoming For the course, Mrs. Lv combined her previous project experience with her own summary document on react webpack redux understanding, which took a total of one week to summarize. I hope to benefit the readers. I am here to do more basic processing, and hope to have a collection for you
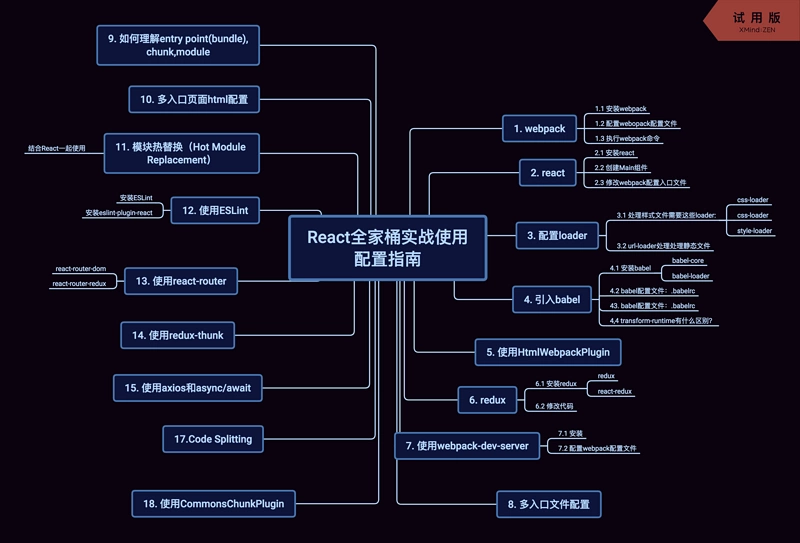
Catalog
6. Configure loader (sass, jsx)
11. Multiple Entry Page Configuration
12. How to understand entry point(bundle),chunk,module
13. Multiple Entry Page html Configuration
Last month, I spent 1,300 yuan to buy a li server to learn node s and their corresponding frameworks. Before 13, they had activities. Now the configuration of 1,300 is only 86 yuan a year. I really think it's a good deal. You can learn from this link:
Version description
Because the Build-related updates, such as webpack, babel, etc., are fast, this tutorial focuses on the version numbers of the following modules and should not be easily modified or updated.
"dependencies": {
    "babel-core": "^6.26.3",
    "babel-eslint": "^8.2.3",
    "babel-loader": "^7.1.4",
    "babel-plugin-transform-async-to-generator": "^6.24.1",
    "babel-plugin-transform-runtime": "^6.23.0",
    "babel-preset-es2015": "^6.24.1",
    "babel-preset-react": "^6.24.1",
    "babel-preset-stage-0": "^6.24.1",
    "babel-preset-stage-3": "^6.24.1",
    "css-loader": "^0.28.11",
    "eslint": "^4.19.1",
    "eslint-loader": "^2.0.0",
    "eslint-plugin-react": "^7.9.1",
    "file-loader": "^1.1.11",
    "history": "^4.7.2",
    "html-webpack-plugin": "^3.2.0",
    "react": "^16.4.0",
    "react-dom": "^16.4.0",
    "react-hot-loader": "^4.0.0",
    "react-redux": "^5.0.7",
    "react-router-dom": "^4.3.1",
    "react-router-redux": "^5.0.0-alpha.9",
    "redux": "^4.0.0",
    "sass-loader": "^7.0.3",
    "style-loader": "^0.21.0",
    "url-loader": "^1.0.1",
    "webpack": "^4.12.0",
    "webpack-cli": "^3.0.3",
    "webpack-dev-server": "^3.1.1"
}
directory structure
The development and release version configuration files are a separate, multi-entry page directory structure.
react-family/
    |
    |──dist/                                    * Release Build Output Path
    |
    |──dev/                                     * Debug Version Build Output Path
    |
    |──src/                                     * Tool Functions
    |     |
    |     |- component/                        * Page Common Components
    |     |
    |     |- page/                             * Page Code
    |     |      |- index/                     * Page Code
    |     |      |        |- Main/             * Component Code
    |     |      |        |       |- Main.jsx  * assembly jsx
    |     |      |        |       |- Main.scss * assembly css
    |     |      |
    |     |      |- detail/                    * Page Code
    |     |
    |     |- static/                           * Static File js,css
    |
    |
    |──webpack.config.build.js                  * Released version uses webpack configuration file
    |──webpack.config.dev.js                    * Debug version uses webpack configuration file
    |──.eslint                                  * eslint configuration file
    |__.babelrc                                 * babel configuration file
Initialize project
1. Create folders
mkdir react-family-bucket
2. Initialize npm
cd react-family-bucket
npm init
If you have special needs, you can fill in your own configuration and get back all the way to generate a package.json that contains the basic information for your project, where the subsequent npm-dependent installations will also be configured.
webpack
1. Install webpack
npm install webpack@4.12.0 --save
or
npm install webpack@4.12.0 --g
--save installs the current webpack into / node_modules under react-family-bucket.
--g is to install the current webpack globally, you can find the global/node_modules in the installation directory of the node.
2. Configure the webopack configuration file
touch webpack.config.dev.js
3. Create a new app.js
touch app.js
Write basic webpack configuration, you can Reference here:
const path = require('path');
const srcRoot = './src';
module.exports = {

    // Input Configuration
    entry: [
      './app.js'
    ],,

    // Output Configuration
    output: {
        path: path.resolve(__dirname, './dev'),

        filename: 'bundle.min.js'
    },
};
3. Execute the webpack command
If it is a global installation:
webpack --config webpack.config.dev.js
If installed in the current directory:
./node_modules/.bin/webpack --config webpack.config.dev.js
For our convenience, you can add execution commands to scripts in package.json:
"scripts": {
  "dev": "./node_modules/.bin/webpack --config webpack.config.dev.js",
},
After executing the npm run dev command, you will find that you need to install webpack-cli, (you need to install this after webpack4)
npm install webpack-cli --save
After installation, executing npm run dev will find that the console has a warning WARNING in configuration, remove the WARNING in configurationwarning, and add a configuration in webpack.config.dev.js:
...
mode: 'development'
...
After success, bundle.min.js will be generated under dev to represent normal.
If you want to dynamically monitor file changes, you need to add--watch after the command.
react
1. Install react
npm install react react-dom --save
2. Create the page directory and index page file:
mkdir src
mkdir page
cd page
3. Create an index
mkdir index
cd index & touch index.js & touch index.html
index.js
import ReactDom from 'react-dom';
import Main from './Main/Main.jsx';

ReactDom.render(<Main />, document.getElementById('root'));
index.html
<!DOCTYPE html>
<html>
<head>
    <title>index</title>
    <meta charset="utf-8">
    <meta name="viewport" content="width=device-width,initial-scale=1, maximum-scale=1, minimum-scale=1, user-scalable=no">

</head>
<body>
<div id="root"></div>
</body>
</html>
4. Create Main Components
import React from 'react';

class Main extends React.Component {

    constructor(props) {
        super(props);
    }

    render() {
        return (<div>Main</div>);
    }
}
export default Main;
5. Modify the webpack configuration entry file
entry: [
    path.resolve(srcRoot,'./page/index/index.js')
],
Configure loader
1. These loader s are required to process style files:
npm install css-loader sass-loader style-loader file-loader --save
To configure:
module: {
    // Loader Configuration
    rules: [
        { test: /\.css$/, use: ['style-loader', 'css-loader'], include: path.resolve(srcRoot)},
        { test: /\.scss$/, use: ['style-loader', 'css-loader', 'sass-loader'], include: path.resolve(srcRoot)}
    ]
},
2.url-loader Processing static files
npm install url-loader --save
To configure:
module: {
    // Loader Configuration
    rules: [
        { test: /\.(png|jpg|jpeg)$/, use: 'url-loader?limit=8192&name=images/[name].[hash].[ext]', include: path.resolve(srcRoot)}
    ]
},
limit: indicates that base64 is used instead of the number in byte
Name: You can set the path, name, and hash of the picture Reference here
Introducing babel
bebel Is used to parse es6 grammar or es7 grammar parser, enabling developers to use the new es grammar, while supporting jsx, vue and other frameworks.
1. Install babel
npm install babel-core babel-loader --save
To configure:
module: {
    // Loader Configuration
    rules: [
        { test: /\.(js|jsx)$/, use: [{loader:'babel-loader'}] ,include: path.resolve(srcRoot)},
    ]
},
2.babel configuration file:.babelrc
touch .babelrc
To configure:
{
    "presets": [
        "es2015",
        "react",
        "stage-0"
    ],
    "plugins": []
}
babel supports custom presets or plugins, which are only configured for babel to work. It is meaningless to install babel separately.
presets: stands for the grammar that babel supports (that is, the grammar you write in), the priority is from bottom to top, state-0|1|2|.. Reference here
Plugins: Which plugins are used to represent babel parsing, similar to presets, with priority from top to bottom.
Install in turn:
npm install babel-preset-es2015 babel-preset-react babel-preset-stage-0 --save
3.babel-polyfill What is it?
The Babel that we used before, babel-loader, by default, only converts the new JavaScript syntax, not the new API.For example, global objects such as Iterator, Generator, Set, Maps, Proxy, Reflect, Symbol, Promise, and methods defined on global objects, such as Object.assign, will not be translated.If you want to use these new objects and methods, you must use babel-polyfill to provide a pad for the current environment.
npm install --save babel-polyfill
4.transform-runtime What's the difference?
There are some problems when using babel-polyfill:
- The default introduces new syntax supported by all babel s, which can result in very large file codes.
- This is achieved by adding methods to the prototype of global and built-in objects, causing global variable contamination.
Then transform-runtime is needed to help us selectively import:
npm install --save babel-plugin-transform-runtime
Profile:
{
  "plugins": [
    ["transform-runtime", {
      "helpers": false,
      "polyfill": false,
      "regenerator": true,
      "moduleName": "babel-runtime"
    }]
  ]
}
Using HtmlWebpackPlugin
Remember the new index.html we created before? We did not package index.html into the dev directory after we executed the build command. HtmlWebpackPlugin To combine our output js with html:
npm install html-webpack-plugin --save
To configure:
const HtmlWebpackPlugin = require('html-webpack-plugin');
...
plugins: [
    new HtmlWebpackPlugin({
        filename: path.resolve(devPath, 'index.html'),
        template: path.resolve(srcRoot, './page/index/index.html'),
    })
]
filename: You can set the path and file name of the html output
Template: You can set which html file is already a template
More parameter configurations can Reference here
redux
about redux Use can refer to teacher Ruan Yifeng's introduction Course
1. Install redux
npm install redux react-redux --save
1. Create new reducers, actions directory and files
|- index/
|- Main/                   * Component Code
|       |- Main.jsx        * assembly jsx
|       |- Main.scss       * assembly css
|
|- actions/
|       |- actionTypes.js  * action constant
|       |- todoAction.js   * action
|
|- reducers/
|       |- todoReducer.js  * reducer
|
|- store.js
|
|- index.js
2. Modify the code to introduce redux, where a redux todo is an example of demo:
index.js
import ReactDom from 'react-dom';
import React from 'react';
import Main from './Main/Main.jsx';
import store from './store.js';
import { Provider } from 'react-redux';

ReactDom.render(
    <Provider store={store}>
        <Main />
    </Provider>
, document.getElementById('root'));
store.js
import { createStore } from 'redux';
import todoReducer from './reducers/todoReducer.js';

const store = createStore(todoReducer);

export default store;
tabReducer.js
    import { ADD_TODO } from '../actions/actionTypes.js';

    const initialState = {
          todoList: []
    };

    const addTodo = (state, action) => {

      return { ...state, todoList: state.todoList.concat(action.obj) }
    }

    const todoReducer = (state = initialState, action) => {
      switch(action.type) {
        case ADD_TODO: return addTodo(state, action);
        default: return state;
      }
    };
    export default todoReducer;
Main.jsx
import React from 'react';
import { connect } from 'react-redux';
import { addTodo } from '../actions/todoAction.js';

class Main extends React.Component {

    onClick(){
        let text = this.refs.input;

        this.props.dispatch(addTodo({
            text: text.value
        }))
    }
    render() {
        return (
            <div>
                <input ref="input" type="text"></input>
                <button onClick={()=>this.onClick()}>Submit</button>
                <ul>
                {this.props.todoList.map((item, index)=>{
                    return <li key={index}>{item.text}</li>
                })}
                </ul>
            </div>
        );
    }
}

export default connect(
    state => ({
        todoList: state.todoList
    })
)(Main);
todoAction.js
import { ADD_TODO } from './actionTypes.js';

export const addTodo = (obj) => {
  return {
    type: ADD_TODO,
    obj: obj
  };
};
Using webpack-dev-server
webpack-dev-server Is a small Nude.js Express server that uses webpack-dev-middleware to service packages in webpacks.
1. Installation
npm install webpack-dev-server --save
Modify the execution commands added in package.json:
"scripts": {
  "dev": "./node_modules/.bin/webpack-dev-server --config webpack.config.dev.js",
},
2. Configure the webpack configuration file:
devServer: {
    "contentBase": devPath,
    "compress": true,
},
contentBase: Represents the root directory of the server file
compress: Opens gzip
More Configuration Documents Reference here
- webpack-dev-server puts the output's contents in memory by default, so you can't see the physical file. If you want to see the file below the physical dev, you can install it write-file-webpack-plugin This plugin.
- webpack-dev-server turns on live reload by default
3.devtool functionality:
Specifically, after adding devtool:'inline-source-map', the source-map source code you see in the chrome console is all real source code, uncompressed, pre-compiled code, not added, the code you see is actually compressed, compiled code, more devtool configurations can Reference here.
Multiple Entry File Configuration
In previous configurations, they were all based on single-entry page configuration. Entry and output have only one file, but the actual project is multi-page in many cases. When configuring multi-page, there are two options:
1. When configuring entry entries, incoming objects are passed in instead of separate arrays, and output distinguishes output files by the [name] keyword, for example:
entry: {
    index: [path.resolve(srcRoot,'./page/index/index1.js'),path.resolve(srcRoot,'./page/index/index2.js')],
    detail: path.resolve(srcRoot,'./page/detail/detail.js'),
    home: path.resolve(srcRoot,'./page/home/home.js'),
},
output: {
    path: path.resolve(__dirname, './dev'),

    filename: '[name].min.js'
},
2. Generate entry dynamically by dynamically traversing the directory that requires entry point s through the node:
const pageDir = path.resolve(srcRoot, 'page');
function getEntry() {
    let entryMap = {};

    fs.readdirSync(pageDir).forEach((pathname)=>{
        let fullPathName = path.resolve(pageDir, pathname);
        let stat = fs.statSync(fullPathName);
        let fileName = path.resolve(fullPathName, 'index.js');

        if (stat.isDirectory() && fs.existsSync(fileName)) {
            entryMap[pathname] = fileName;
        }

    });

    return entryMap;
}
{
    ...
    entry: getEntry()
    ...
}
This demo is written in the second medium, which makes it more flexible.
How to understand entry point(bundle),chunk,module
How do I understand entry point(bundle),chunk,module in webpack?
Based on the illustration on the diagram, I would like to make a simple and understandable conclusion here:
- Each file in the configuration, such as index1.js,index2.js,detail.js,home.js, belongs to the entry point.
- entry In this configuration, each key value, index,detail,home is equivalent to a chunk.
- It's understandable that require s or import s in our code belong to module s.
- Chuk's classification is quite special, there are entry chunk,initial chunk,normal chunk, refer to this article
- Normally, a chunk corresponds to one output, and after using CommonsChunkPlugin or require.ensure, the chunk becomes an initial chunk, a normal chunk, in which case a chunk corresponds to multiple outputs.
Understanding these concepts can be very helpful for subsequent use of webpack plug-ins.
Multiple Entry Page html Configuration
Previously, when we configured HtmlWebpackPlugin, we used the same configuration as Page. Here we will make a multi-page transformation, entryMap is the entry from the previous step:
function htmlAarray(entryMap) {
    let htmlAarray = [];

    Object.keys(entryMap).forEach(function(key){
        let fullPathName = path.resolve(pageDir, key);
        let fileName = path.resolve(fullPathName, key + '.html')
        if (fs.existsSync(fileName)) {
            htmlAarray.push(new HtmlWebpackPlugin({
                chunks: key, // Notice that the key here is chunk
                filename: key + '.html',
                template: fileName,
                inlineSource:  '.(js|css)'
            }))
        }
    });

    return htmlAarray;

}
Modify plugin configuration: plugins: [
     ...
].concat(htmlMap)
Hot Module Replacement
Module Thermal Replacement (Hot Module Replacement or HMR) is one of the most useful features provided by webpack s.It allows various modules to be updated at runtime without having to refresh completely, very large and wooden!
Here's how to configure it, which needs to be used in conjunction with devServer:
devServer: {
    hot: true // Turn on HMR
},
Turn on plugin:
const webpack = require('webpack');
plugins: [
    new webpack.NamedModulesPlugin(),
    new webpack.HotModuleReplacementPlugin(),
].concat(htmlMap)
Use with React:
1. Installation react-hot-loader
npm install react-hot-loader --save
And create a new Container.jsx:
import React from 'react';
import Main from './Main.jsx';
import { hot } from 'react-hot-loader'

class Container extends React.Component {

    render() {
        return <Main />
    }

}
export default hot(module)(Container);
Combining redux: If your project does not use redux, you do not need to configure the next two steps
2. Modify store.js to add the following code so that reducer can also hot replace in real time
if (module.hot) {
    module.hot.accept('./reducers/todoReducer.js', () => {
      const nextRootReducer = require('./reducers/todoReducer.js').default;
      store.replaceReducer(nextRootReducer);
    });
}
3. Modify index.js
import ReactDom from 'react-dom';
import React from 'react';
import Container from './Main/Container.jsx';
import store from './store.js';

import { Provider } from 'react-redux';

ReactDom.render(
    <Provider store={store}>
        <Container />
    </Provider>
, document.getElementById('root'));
When the console sees [WDS] Hot Module Replacement enabled.
Using ESLint
ESLint One of many Javascript Linter s, others are more common JSLint with JSHint ESLint is used because he has the freedom to choose which rules to use, there are many ready-made plugin s to use, and he has the highest support for ES6 and JSX compared to other linter s.
1. Install ESLint
npm install eslint eslint-loader babel-eslint --save
Eslint-loader is a combination of Web pack and eslint, which adds an eslint-loader to the configuration file of the web pack, and is modified as follows:
{ test: /\.(js|jsx)$/, use: [{loader:'babel-loader'},{loader:'eslint-loader'}] ,include: path.resolve(srcRoot)},
2. Create a new.eslintrc configuration file to configure parser as babel-eslint
{
    "extends": ["eslint:recommended"],

    "parser": "babel-eslint",

    "globals": {
    },
    "rules": {
    }
}
3. Install eslint-plugin-react:
npm install eslint-plugin-react --save
- Note that every eslint rule normally needs to be configured under rule. If nothing is configured, eslint itself will not work.
- Eslint itself has many default rule templates that can be configured with extends and can be configured with eslint:recommended by default.
- When using react development, you can install es lint-plugin-react to tell you to use react-specific rules to link.
Modify the.eslintrc configuration file, add rules, more rules configurations can Reference here
{
    "extends": ["eslint:recommended","plugin:react/recommended"],

    "parser": "babel-eslint",

    "globals": {
        "window": true,
        "document": true,
        "module": true,
        "require": true
    },
    "rules": {
        "react/prop-types" : "off",
        "no-console" : "off"
    }
}
Use react-router
react-router is powerful in that it facilitates code management, makes redux more powerful, supports the web, and has more native s Reference here
1. Installation react-router-dom
npm install react-router-dom --save
2. If redux is used in the project, you can install it react-router-redux
npm install react-router-redux@next history --save
3. Modify the code:
index.js
import ReactDom from 'react-dom';
import React from 'react';
import Container from './Main/Container.jsx';
import { store, history } from './store.js';

import { Provider } from 'react-redux';

import createHistory from 'history/createHashHistory';
import { ConnectedRouter } from 'react-router-redux';

const history = createHistory();

ReactDom.render(
    <Provider store={store}>
        <ConnectedRouter history={history}>
            <Container />
        </ConnectedRouter>
    </Provider>
, document.getElementById('root'));
Combining history,react-router has three different routers:
- BrowserRouter Introduced through history/createBrowserHistory: url updates dynamically when switched, and html5's when used at the bottom pushState.
- HashRouter Introduced through history/createHashHistory: When switching, dynamically modify hash to take advantage of hashchange events.
- MemoryRouter Introduced through history/createMemoryHistory: Stores path, route-related data in memory, does not involve url-related updates, and has good compatibility.
More configurations can Reference here
4. If you want to get the current route path in your code logic, you need to introduce router-reducer:
New main.js:
import { combineReducers } from 'redux';
import { routerReducer } from "react-router-redux";
import todoReducer from './todoReducer.js';

const reducers = combineReducers({
  todoReducer,
  router: routerReducer
});
export default reducers;
Modify store.js:
import { createStore } from 'redux';
import mainReducer from './reducers/main.js';

const store = createStore(mainReducer);

export default store;
Then you can get the single-related path information in this.props.router
5. If you need to trigger a router jump through an action yourself, you need to introduce routerMiddleware:
import { createStore,applyMiddleware } from 'redux';
import { routerMiddleware } from "react-router-redux";
const middleware = routerMiddleware(history);
const store = createStore(mainReducer,applyMiddleware(middleware));
6. Use Route and Link and withRouter:
First of all, what are they all for?
<Route exact path="/" component={Div1}></Route>
<Route path="/2" component={Div2}></Route>
export default withRouter(connect(
   state => ({
      todoList: state.todoReducer.todoList
   })
)(Main));
If you encounter Warning: Hash history cannot PUSH the same path; a new entry will not be added to the history stack error when using hash, you can change the push to replace:
<NavLink
    replace={true}
    to="/2"
    activeClassName="selected"
    >Switch to 2</NavLink>
7. Set the initialization route:
BrowserRouter and HashRouter:
const history = createHistory();
history.push('2');
MemoryRouter:
const history = createMemoryHistory({
    initialEntries: ['/2']
});
Using redux-thunk
redux-thunk It's a popular Redux asynchronous action middleware, such as setTimeout in an action or through the fetch universal remote API, so it's time to use redux-thunk.Redux-thunk helps you unify the invocation of asynchronous and synchronous actions, and resolves asynchronous processes at the action level without affecting component.
1. Install redux-thunk:
npm install redux-thunk --save
2. Modify store.js:
import { createStore,applyMiddleware } from 'redux';
import thunk from 'redux-thunk';
import mainReducer from './reducers/main';
...
const store = createStore(mainReducer, applyMiddleware(thunk));
...
export default store;
3. Use redux-thunk in action.js:
export const getData = (obj) => (dispatch, getState) => {
  setTimeout(()=>{
    dispatch({
        type: GET_DATA,
        obj: obj
    });
  },1000);
};
Using axios and async/await
axios Is a Promise-based HTTP client for browsers and nodejs:
- Create XMLHttpRequest from Browser
- Make http requests from node.js
- Support for Promise API
- Automatically convert JSON data
1. Install axios:
npm install axios --save
2. Use axios in action s:
import axios from 'axios';
export const getData = (obj) => (dispatch, getState) => {
    axios.get('/json/comments.json').then((resp)=>{
        dispatch({
            type: GET_DATA,
            obj: resp
        });
    });
};
Javascript's callback hell is known to many people, especially on the node side. Promise's solution has become more popular in recent years, but with the release of Node 7, async/await, the final solution for programming, came out.
function resolveAfter2Seconds() {
  return new Promise(resolve => {
    setTimeout(() => {
      resolve('resolved');
    }, 2000);
  });
}

async function asyncCall() {
  var result = await resolveAfter2Seconds();
}

asyncCall();
The purpose of async/await is to simplify operations using promises asynchronous calls and perform certain operations on a set of Promises.Await assumes that the method returns a Promise object, just as Promises resembles structured callbacks and async/await resembles combiners and promises.
1.async/await needs to be installed babel-plugin-transform-async-to-generator.
npm install babel-plugin-transform-async-to-generator --save
2. Add configuration in.babelrc:
"plugins": [
    "transform-async-to-generator"
]
This is just to convert async to generator. If your current browser does not support generator, you will receive an Uncaught ReferenceError: regenerator Runtime is not defined. You need:
3. Installation babel-plugin-transform-runtime:
npm install babel-plugin-transform-async-to-generator --save
4. Modify the configuration in.babelrc (you can remove the transform-async-to-generator previously configured):
"plugins": [
    "transform-runtime"
]
5. If you don't want to bring in all the polyfills (see the explanation for babel above), you can add configurations:
"plugins": [
    "transform-runtime",
        {
            "polyfill": false,

            "regenerator": true,
        }
]
6. Use in conjunction with axios
import axios from 'axios';
export const getData = (obj) => async (dispatch, getState) => {
    let resp = axios.get('/json/comments.json');
    dispatch({
        type: GET_DATA,
        obj: resp
    });
};
Code Splitting
1. For webpack1, before 2, you could use require.ensure to control the lazy loading of a component:
require.ensure([], _require => {
    let Component = _require('./Component.jsx');
},'lazyname')
2. In webpack4, the official recommendation to use require.ensure instead of the Lazy-Load Dynamic Imports is ES6's import() method:
import(
  /* webpackChunkName: "my-chunk-name" */
  /* webpackMode: "lazy" */
  'module'
);
Not to mention the code in the comments, the webpack dynamically recognizes the code here when it is packaged for configuration purposes, such as chunk name.
3.Prefetching/Preloading modules:
webpack 4.6.0+ supports the writing of Prefetching/Preloading:
import(/* webpackPreload: true */ 'ChartingLibrary');
3. Use in conjunction with React-Router:
react-loadable encapsulates the above functions, enriches some functions, and makes them easier to use in combination with React-Router.
npm install react-loadable --save
Use in react-router:
function Loading() {
  return <div>Loading...</div>;
}

let Div2 = Loadable({
  loader: () => import('./Div2'),
  loading: Loading,
});

<Route path="/2" component={Div2}></Route>
Using CommonsChunkPlugin
The CommonsChunkPlugin plug-in is an optional function for creating a stand-alone file, also known as a chunk, that includes common modules for multiple entry chunks.By disassembling common modules, the final composite file can be loaded once at the beginning and stored in the cache for subsequent use.
1. Use before webpack4:
new webpack.optimize.CommonsChunkPlugin({
    name: 'common',
    chunks: ['page1','page2'],
    minChunks: 3
})
- name: string:name proposed
- chunks: string[]: webpack will extract public code from the incoming chunk, default extract from all entries
- MinChunks: number|infinity|function (module, count) ->boolean: If you pass in a number or infinity (default value is 3), you tell the webpack that the module will only be extracted if the number of times the module repeats is greater than or equal to that number.When passed in as a function, all modules in the eligible chunk are passed into the function for calculation, and the module returning true is extracted into the target chunk.
More parameter configurations, you can Reference here
2. Usage after webpack4:
module.exports = {
  //...
  optimization: {
    splitChunks: {
      chunks: 'async',
      minSize: 30000,
      minChunks: 1,
      maxAsyncRequests: 5,
      maxInitialRequests: 3,
      automaticNameDelimiter: '~',
      name: true,
      cacheGroups: {
        vendors: {
          test: /[\\/]node_modules[\\/]/,
          priority: -10
        },
        default: {
          minChunks: 2,
          priority: -20,
          reuseExistingChunk: true
        }
      }
    }
  }
};
- splitChunks: Configure a detached chunk (instead of the older version of Commons ChunkPlugin)
- cacheGroups: Custom configurations mainly use it to decide which files are generated:
- test:Limited Range
- Name:Generate file name
- Priority:priority
- minSize: number: minimum size must be greater than this value, default 30000B
- minChunks: Other entry references are greater than this value, default 1
- MaxInitialRequests: The chunks requested by the entry file should not exceed this value (too many requests, time consuming)
- maxAsyncRequests: chunks for asynchronous requests should not exceed this value
- automaticNameDelimiter: Auto Name Connector
- chunks: value is "initial", "async" (default) or "all":
- initial:Entry chunk, not processed for asynchronously imported files
- async: asynchronous chunk, only for asynchronously imported files
- all:All chunk s
Possible bugs in editing can not be known in real time. In order to solve these bugs afterwards, a lot of time has been spent debugging the log. By the way, a useful bug monitoring tool is recommended. Fundebug.
Communication
The dry goods series articles are summarized below, feel good to order Star, welcome to join the group to learn from each other.
I am Xiao Zhi, the author of the public number "Move the World", a fan of keeping learning about front-end technology.I often share what I've learned and what I've seen. On the way to the next level, I'll reluctantly!
Focus on the public number and reply to the benefits in the background. You can see the benefits, you know.