I. Cluster Structure
RabbitMQ always records the following four types of internal metadata:
Queue metadata: name and properties of the queue (persistent, can be deleted automatically);
Exchange metadata: Exchange name, type and properties (persistent, etc.);
Binding metadata: A table that records how messages are routed to a queue;
Vhost metadata: Provides namespace and security attributes for queues, switches, and bindings within vhost;
Within a single node, RabbitMQ stores this information in memory, as well as queues and exchanges (and bindings) marked as persistent on the hard disk.
1.1. Queues in a cluster
By default, when a queue is created in a cluster, the cluster only creates complete queue information (metadata, status, content) on a single node. As a result, only the owner node of the queue knows all about the queue, and all other non-owner nodes only know the metadata of the queue and the pointer to the node that the queue exists.So when a node in the cluster crashes, the queues and associated bindings on that node disappear.Consumers will not be able to consume messages on this queue until the crashed node recovers.
Why doesn't RabbitMQ copy queue content and state to all nodes by default?
storage space
Performance.For persisted messages, each message triggers disk I/O, and each time a node is added, the network and disk load increase.
1.2. Switches in clusters
The switch is actually just a name and a list of queue bindings.When a message is published to a switch, it is actually the connected channel that matches the routing key on the message to the switch's binding list and routes the message to the appropriate queue.
Since a switch is just a query table, it is easy to copy a switch across a cluster so that each node in the cluster has all the information for each switch.
1.3, Memory Node and Disk Node
RabbitMQ nodes in a cluster are divided into memory nodes (RAM node s) and disk nodes (disk nodes).A memory node stores all metadata, users, permissions, and so on in memory, and a disk node stores metadata on disk.For single-node systems, only disk nodes, otherwise restart RabbitMQ, all configuration information about the system will disappear.
The memory node guarantees the performance of the cluster, and the disk node guarantees that the cluster configuration information will not be lost due to a restart.RabbitMQ requires a minimum of one disk node in the entire cluster, and all other nodes can be memory nodes.
1.4, Mirror Queue
By default, a queue exists only on one node in the cluster.RabbitMQ uses the Mirror Queue option to copy queues to other nodes, and once the primary queue is unavailable, consumers can connect to queues on other nodes to continue working.
To use a mirrored queue, you need to declare a Policy that matches the appropriate queue as the mirrored queue.
2. Configuring clusters
2.1. Preparing the environment
host name |
IP Address |
operating system |
Node type |
master |
192.168.0.201 |
CentOS 7.7 |
Disk Node |
slave1 |
192.168.0.202 |
CentOS 7.7 |
Memory Node |
slave2 |
192.168.0.203 |
CentOS 7.8 |
Memory Node |
2.2, Configuration/etc/hosts file (operation on all three nodes)
[root@master ~]# cat /etc/hosts
......
192.168.0.201 master
192.168.0.202 slave1
192.168.0.203 slave2
2.3. Install RabbitMQ (to operate on all three nodes)
2.3.1, Configuring repo
[root@master ~]# cat /etc/yum.repos.d/erlang_solutions.repo
[erlang-solutions]
name=Centos $releasever - $basearch - Erlang Solutions
baseurl=http://packages.erlang-solutions.com/rpm/centos/$releasever/$basearch
gpgcheck=1
gpgkey=file:///etc/pki/rpm-gpg/erlang_solutions.asc
enabled=1
[root@master ~]# cat /etc/yum.repos.d/rabbitmq.repo
[rabbitmq_rabbitmq-server]
name=rabbitmq_rabbitmq-server
baseurl=https://packagecloud.io/rabbitmq/rabbitmq-server/el/7/$basearch
repo_gpgcheck=1
gpgcheck=0
enabled=1
gpgkey=https://packagecloud.io/rabbitmq/rabbitmq-server/gpgkey
sslverify=1
sslcacert=/etc/pki/tls/certs/ca-bundle.crt
metadata_expire=300
[root@master ~]# wget -O /etc/pki/rpm-gpg/erlang_solutions.asc https://packages.erlang-solutions.com/ubuntu/erlang_solutions.asc
[root@master ~]# yum clean all
[root@master ~]# yum makecache
[root@master ~]# yum -y install erlang
[root@master ~]# yum -y install rabbitmq-server
2.3.2, Getting Profiles
Get template files from GitHub: https://github.com/rabbitmq/rabbitmq-server/blob/master/docs/rabbitmq.conf.example
Name the configuration file: /etc/rabbitmq/rabbitmq.conf
2.4. Start RabbitMQ on master (operate on master)
Add a Web Management Plug-in first (Warning: It is not safe to use a Web Management Plug-in in a production environment):
[root@master ~]# rabbitmq-plugins list | grep management
[root@master ~]# rabbitmq-plugins enable rabbitmq_management
Start RabbitMQ:
[root@master ~]# rabbitmq-server -detached
View ports on master:
[root@master ~]# netstat -tlnp
tcp        0      0 0.0.0.0:4369            0.0.0.0:*               LISTEN      34678/epmd
tcp        0      0 0.0.0.0:15672           0.0.0.0:*               LISTEN      41444/beam.smp
tcp        0      0 0.0.0.0:25672           0.0.0.0:*               LISTEN      41444/beam.smp
tcp6       0      0 :::5672                 :::*                    LISTEN      41444/beam.smp
Four new ports (4369, 25672, 5672, 15672) will be found:
4369 is used by the empd process, all known as Erlang Port Mapper Daemon.When a distributed Erlang node is started, it is registered with the empd process, providing the address and port assigned by the OS kernel;
25672 is assigned by the OS to the Erlang VM running RabbitMQ;
5672 is the port on which the AMQP client connects to RabbitMQ;
15672 is a Web management plug-in enabled port.
2.5, Synchronization.erlang.cookie(operate on master)
The Erlang node is authenticated by matching the Erlang cookie.When creating a RabbitMQ cluster, the Erlang cookies of each node need to be consistent in order for the nodes to communicate with each other.Cookies are usually stored in'~/'.Erlang.cookieIn a file,'~'usually refers to the rabbitmq user's home directory.
[root@master ~]# scp /var/lib/rabbitmq/.erlang.cookie root@slave1:/var/lib/rabbitmq/
[root@master ~]# scp /var/lib/rabbitmq/.erlang.cookie root@slave2:/var/lib/rabbitmq/
2.6. Join slave1 and slave2 into the cluster and start as memory nodes (operate on slave1 and slave2)
[root@slave1 ~]# rabbitmq-plugins enable rabbitmq_management
[root@slave1 ~]# rabbitmq-server -detached
[root@slave1 ~]# rabbitmqctl stop_app
[root@slave1 ~]# rabbitmqctl reset
[root@slave1 ~]# rabbitmqctl join_cluster --ram rabbit@master
[root@slave1 ~]# rabbitmqctl start_app
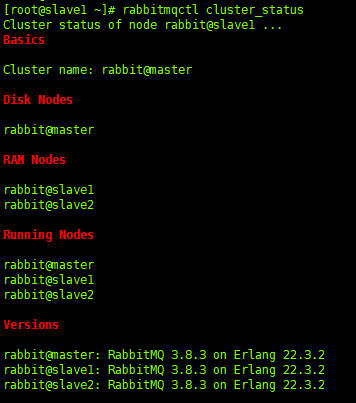
2.7. View cluster status (any node can execute)
Now let's take a look at the status of the cluster (the picture only shows part of it):

2.8, Changing Node Type
If you want to change slave2 to a disk node, you can do the following:
[root@slave2 ~]# rabbitmqctl stop_app
[root@slave2 ~]# rabbitmqctl change_cluster_node_type disc
Turning rabbit@slave2 into a disc node
[root@slave2 ~]# rabbitmqctl start_app
2.9. Removing nodes from a cluster
If you want to remove slave2 from the cluster, do the following:
[root@slave2 ~]# rabbitmqctl stop_app
[root@slave2 ~]# rabbitmqctl reset
[root@slave2 ~]# rabbitmqctl start_app
When you're done, remember to add slave2 back to the cluster to facilitate the following steps.
3. Mirror Queue
Creating a RabbitMQ cluster is easy.As mentioned earlier (described in section 1.4), by default, a queue exists only on one node in a cluster.So how can you ensure that when a node in a queue crashes, consumers can still consume the messages in that queue?This is what mirrored queues do.
For a mirror queue, move to the Web Management Console to see it.
3.1. Create a super-privileged user
When the Web Management Plug-in is enabled, there is a super-privileged user "guest" with a password of "guest".By default, however, only local logins are allowed for'guest'users.
To use the Web plug-in, temporarily create a user with super privileges that will synchronize to all nodes in the cluster:
[root@master ~]# rabbitmqctl add_user admin admin
[root@master ~]# rabbitmqctl set_user_tags admin administrator          #Add Administrator Rights to admin
Setting tags for user "admin" to [administrator] ...
[root@master ~]# rabbitmqctl set_permissions admin ".*" ".*" ".*"       #Grant admin configure, write, read permissions on the default vhost'/'
Setting permissions for user "admin" in vhost "/" ...
[root@master ~]# rabbitmqctl list_users
Listing users ...
user    tags
admin    [administrator]
guest    [administrator]
Access the management console through a browser: http://192.168.0.201:15672/
3.2. Create Policy:
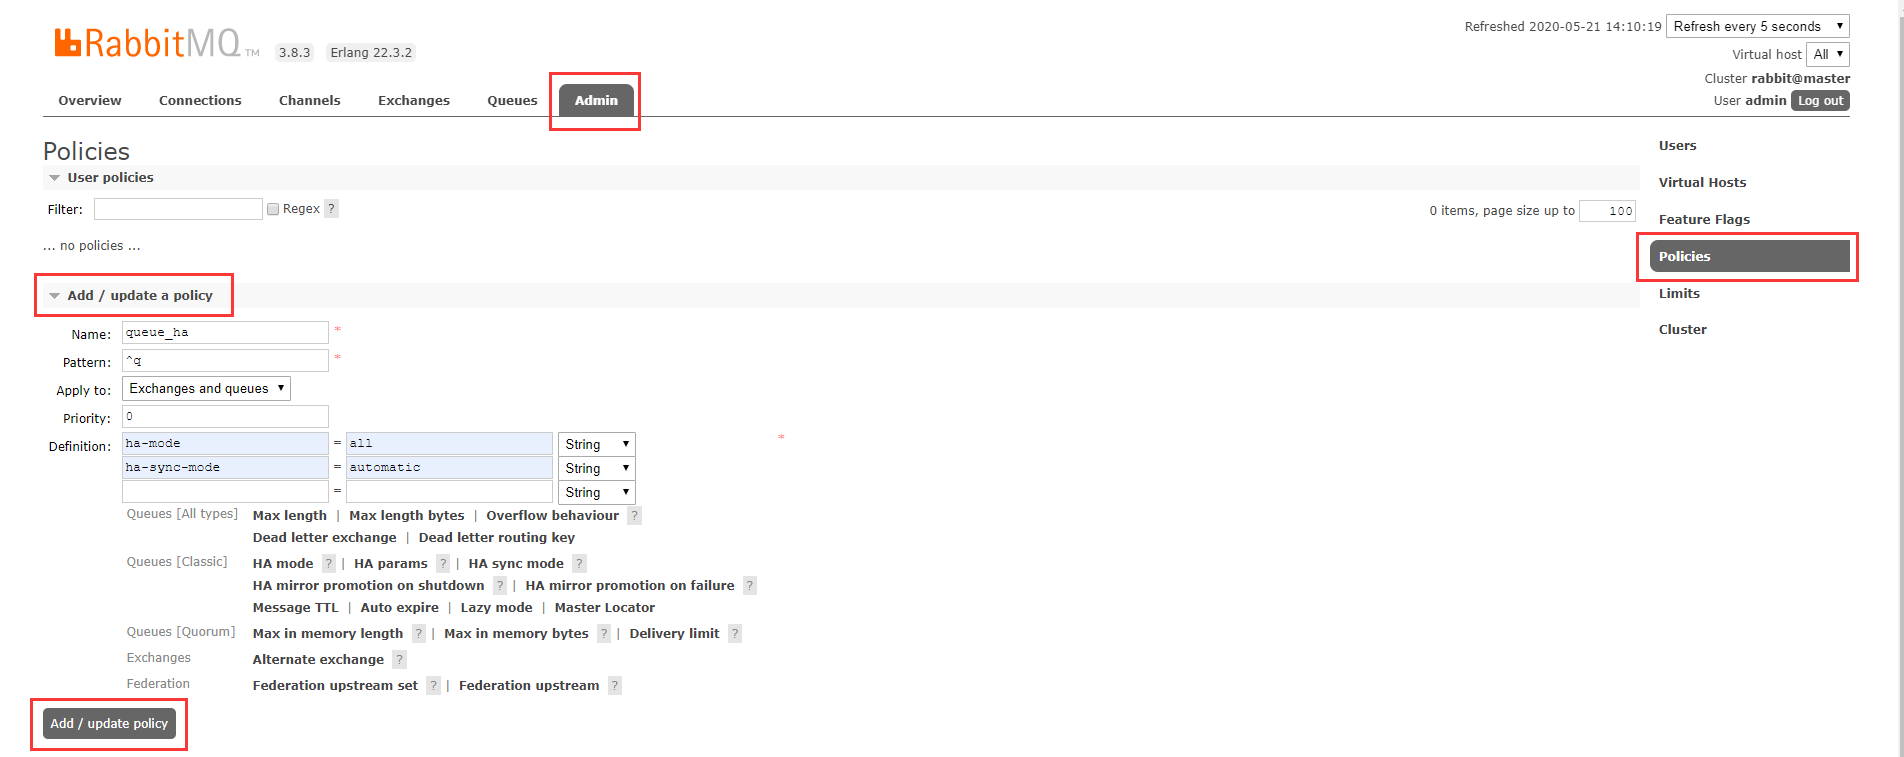
Click Admin at the top - > Policies at the right - > Add/update a policy in the middle.
Fill in the information:
Name:  queue_ha
Pattern:  ^q                      #Represents matching all queues and switches starting with "q".Use'^. 'to apply to all queues and switches;
Apply to: Exchanges and queues           #Use rules for all matching switches and queues;
Priority:  0                     #Priority;
Definition:  ha-mode = all             #Ha-model has three options, all means synchronize to all nodes, exactly and nodes need to cooperate with ha-params to select the number of nodes to synchronize;
             ha-sync-mode = automatic  #The synchronization policy of the mirror queue after the node restarts.For automatic to synchronize automatically, manual needs to manually execute rabbitmqctl sync_on the nodeQueue [Queue name] to complete;
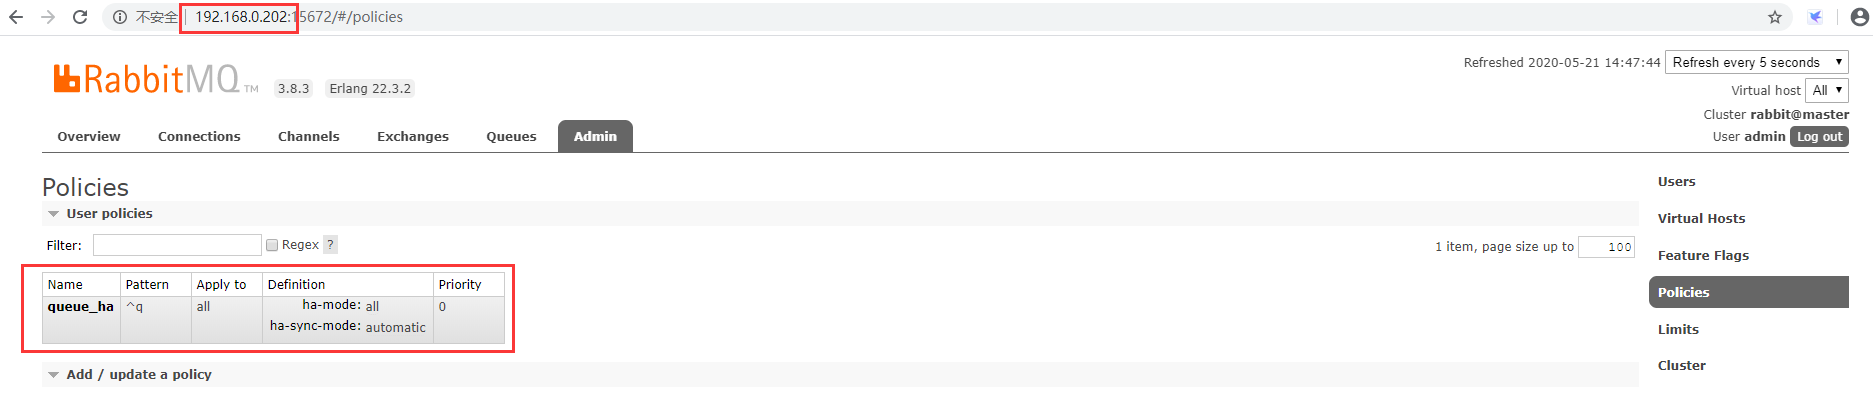
Once the Policy has been successfully created, you can see it when you log in to the Web Management Console of the other two nodes.As follows:
3.3, Create Queue
Create two queues, one "q1" queue starting with "q" (because of the olicy previously created: "queue_ha matches a queue that starts with'q', and a queue that starts with another letter, tq2.
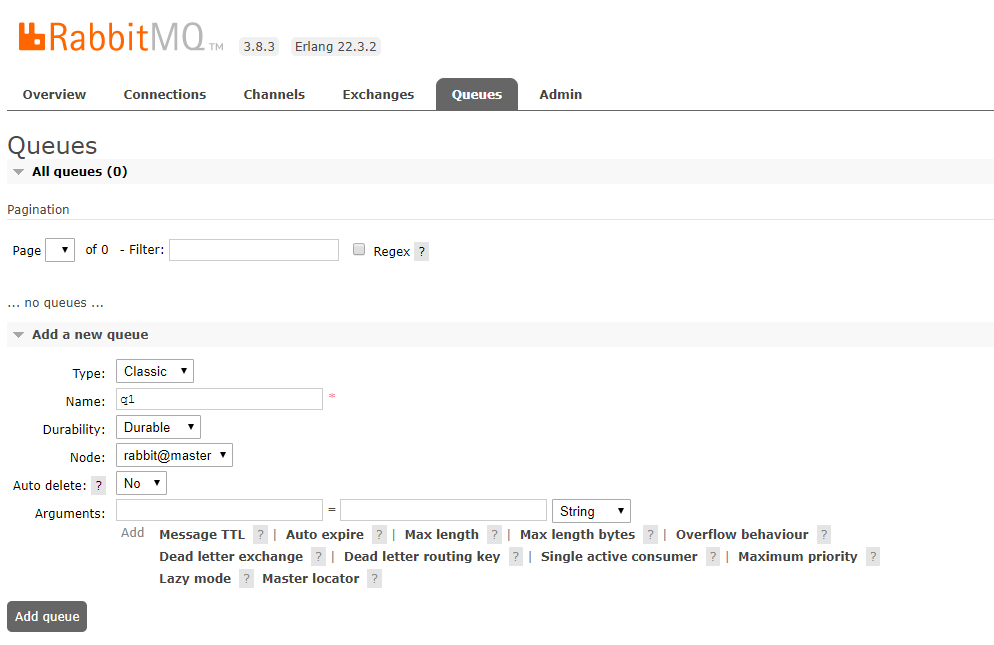
Click: Top "Queues" -> Middle "Add a new queue".
3.3.1, Create a "q1" queue
Fill in the information:
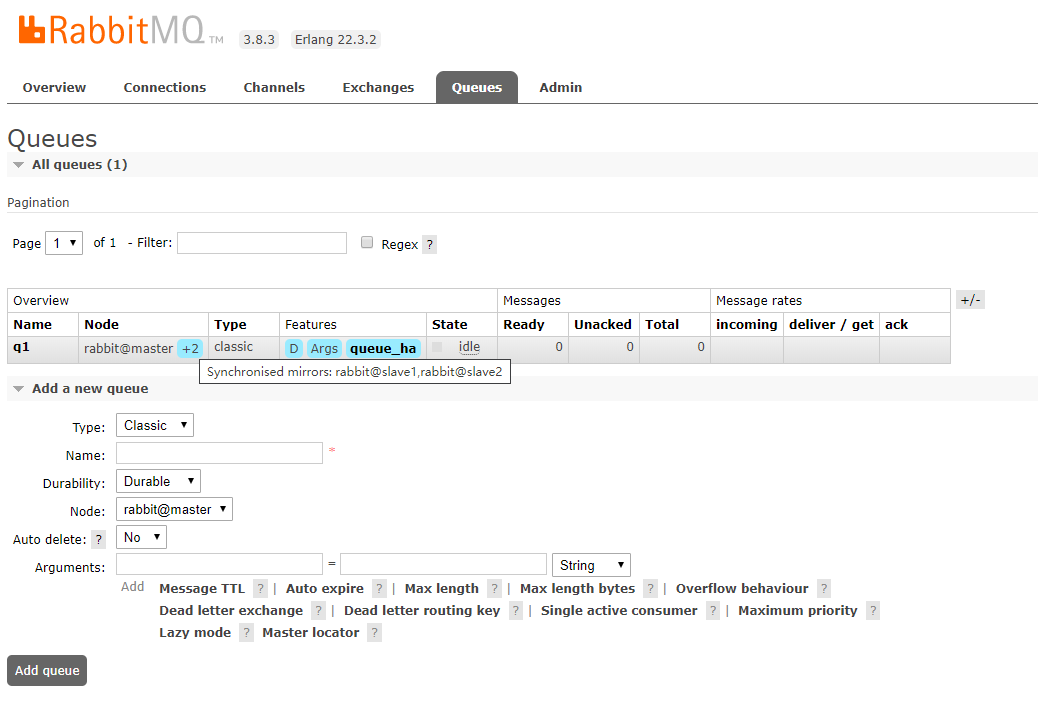
Type:  Classic
Name:  q1
Durability:  Durable         #Declaration queue is a persistent queue.Remember the message persistence rule: messages of Persistent type reach the persistence queue;
Node:  rabbit@master         #The primary node of the queue;
Auto delete:  No            #If set to Yes, when one consumer subscribes to this queue, no other consumer is allowed to subscribe;
Place the cursor at the blue'+2'to show that it has synchronized to two other nodes and that'queue_ha s been appliedHa"Policy, and the queue is"idle"available.As follows:
3.3.2, Create a "tq2" queue
The steps are the same as 3.3.1.
3.4. Publish messages to both queues
3.4.1, Publish message to "q1" queue
Click: Queues at the top - > All queues, Queue with Name as q1 - > Drop-down page to find Publish message on the left:
Fill in the information:
Delivery mode:  2-Persistent         #Declare the message as persistent
Headers:  q1_message = m1            #Can be set to any string
Propeties:  message_id = 1           #Set Properties
Payload:  "Hello RabbitMQ"           #The payload of the message, that is, the content of the message
Click "Publish message" and a "Message published" prompt appears in the center of the page, as shown below: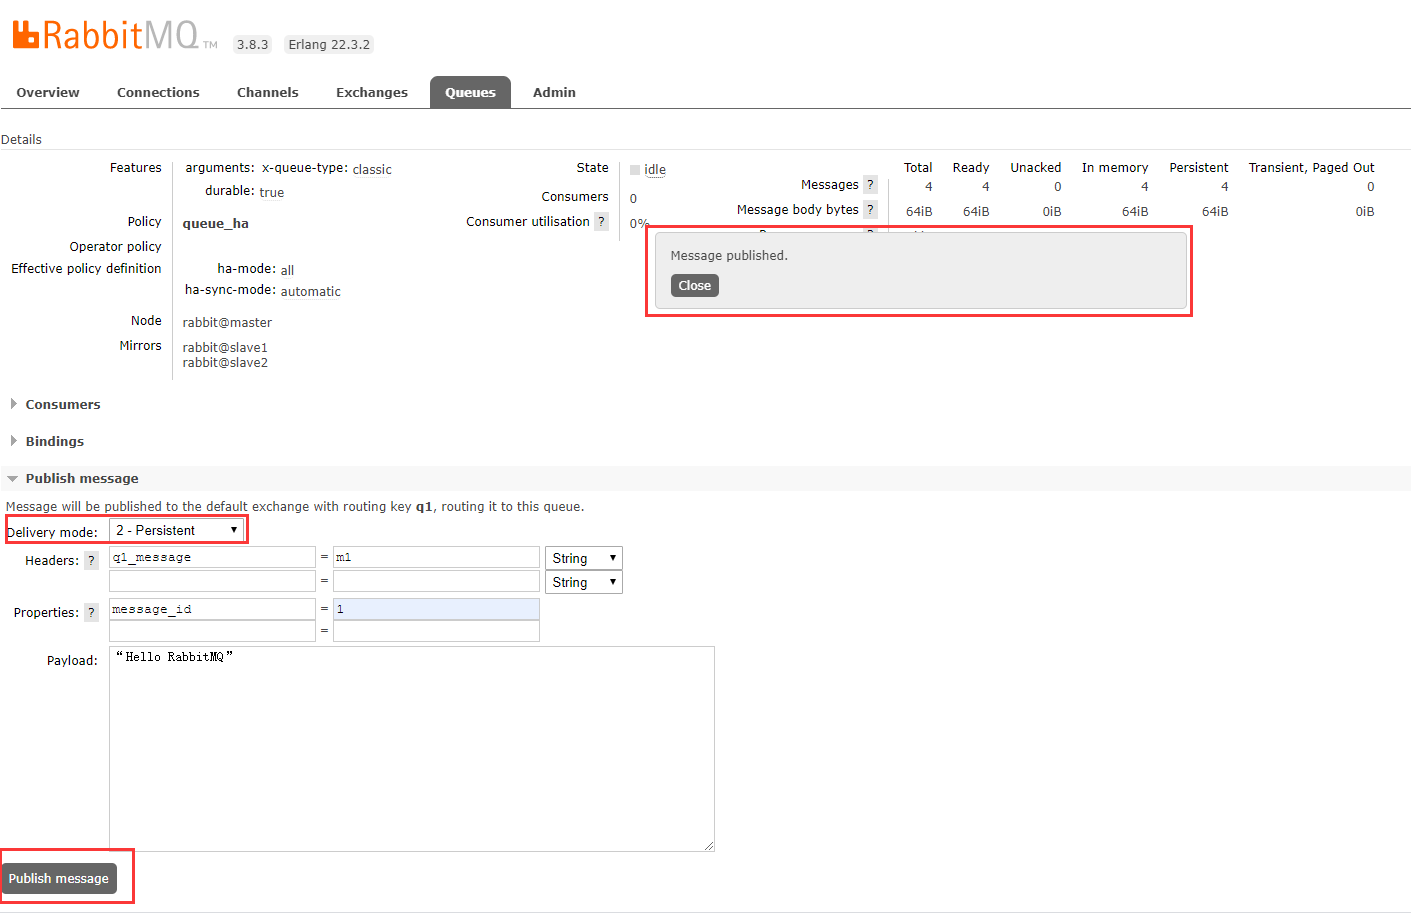
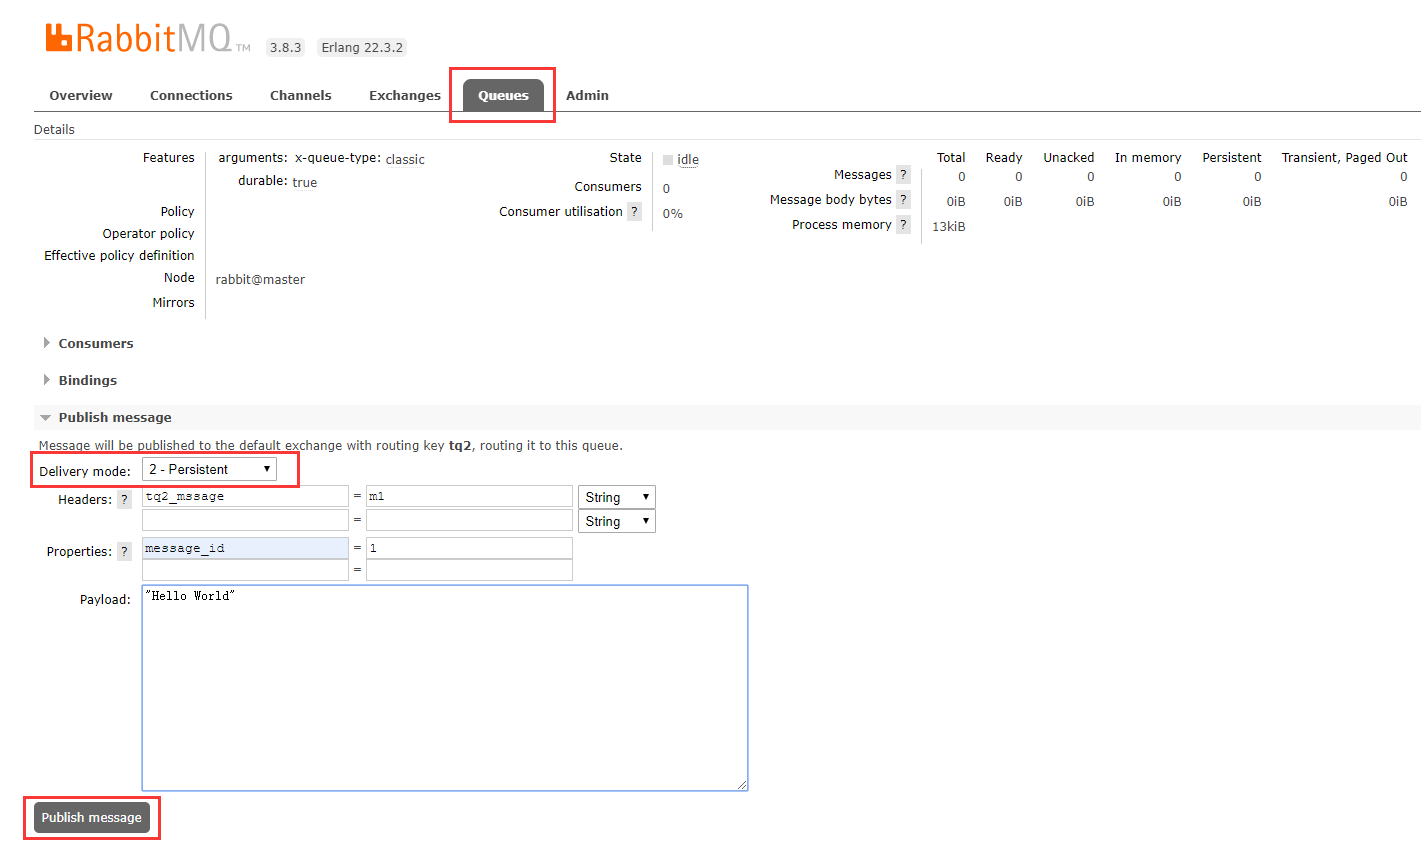
3.4.2, Publish messages to the "tq2" queue
Click: Queues at the top - > All queues, Queue with Name as tq2 - > Drop-down page to find Publish message on the left:
3.5. Simulated failure:
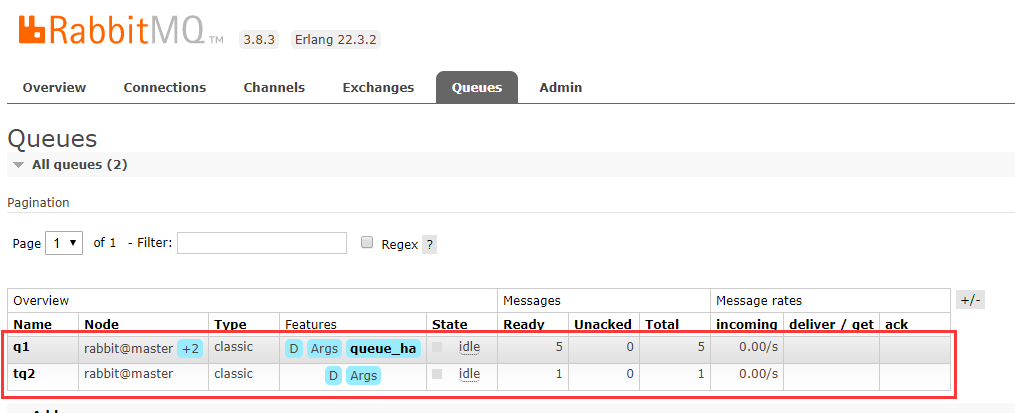
There are now two queues.One is the mirror queue "q1" and synchronizes to the other two nodes; one is the normal queue "tq2", which only exists on the master node.And messages are posted in both queues, as shown below:
3.5.1, Simulate master node failure (executed on master node):
[root@master ~]# rabbitmqctl shutdown
Shutting down RabbitMQ node rabbit@master running at PID 14879
Waiting for PID 14879 to terminate
RabbitMQ node rabbit@master running at PID 14879 successfully shut down
After turning off RabbitMQ on master, move to the Web administration console of slave1: http://192.168.0.202:15672/ .After logging in with admin user (password admin), view the status of the queue as follows:
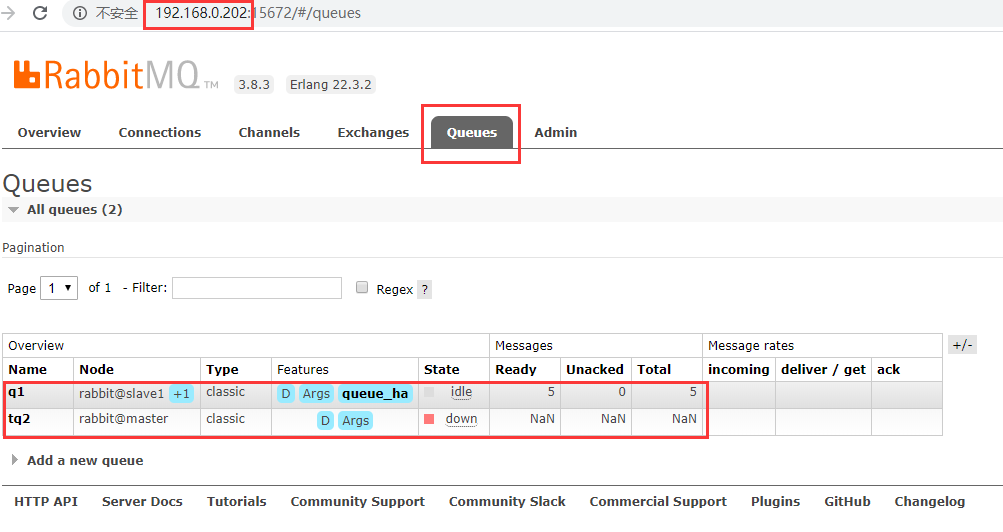
First, look at the q1 queue, where the blue marker at Node changes from'+2'to'+1', and the other states have not changed.
Take a look at the "tq2" queue, where "State" becomes "down" and "Messages" becomes "NaN" instead of the original number.
Click on "tq2" and the "Not found" page pops up, while the "q1" queue is normal.As follows:

As mentioned in section 1.1.1, the non-owner nodes of an ordinary queue in a cluster retain only the metadata of the queue, but cannot consume the messages in the queue.
3.5.2, Analog master node restart
Execute on master node:
[root@master ~]# rabbitmq-server -detached
Go to the Web Management Console and see "Mirror Queue is not synchronized on master" at "q1", as shown below:

Because in section 3.2, mirrored queues are specified to synchronize automatically after a restart of the node when the Policy is created; "tq2" is a persistent queue and there is a persistent message in the queue, after a while, both queues return to their state before the master node closes, as shown below:

4. Load Balancing for Rabbit
So far, there are three RabbitMQ nodes, and important queues have been set as mirrored queues.However, clients have to specify manually to access a single node, and when a single node fails, they have to manually try other nodes.It's time to set up load balancing for the Rabbit cluster.
Rabbit generally uses HAProxy for load balancing.
4.1. Install HAProxy
On the master node:
[root@master ~]# yum -y install haproxy
4.2. Configuring HAProxy
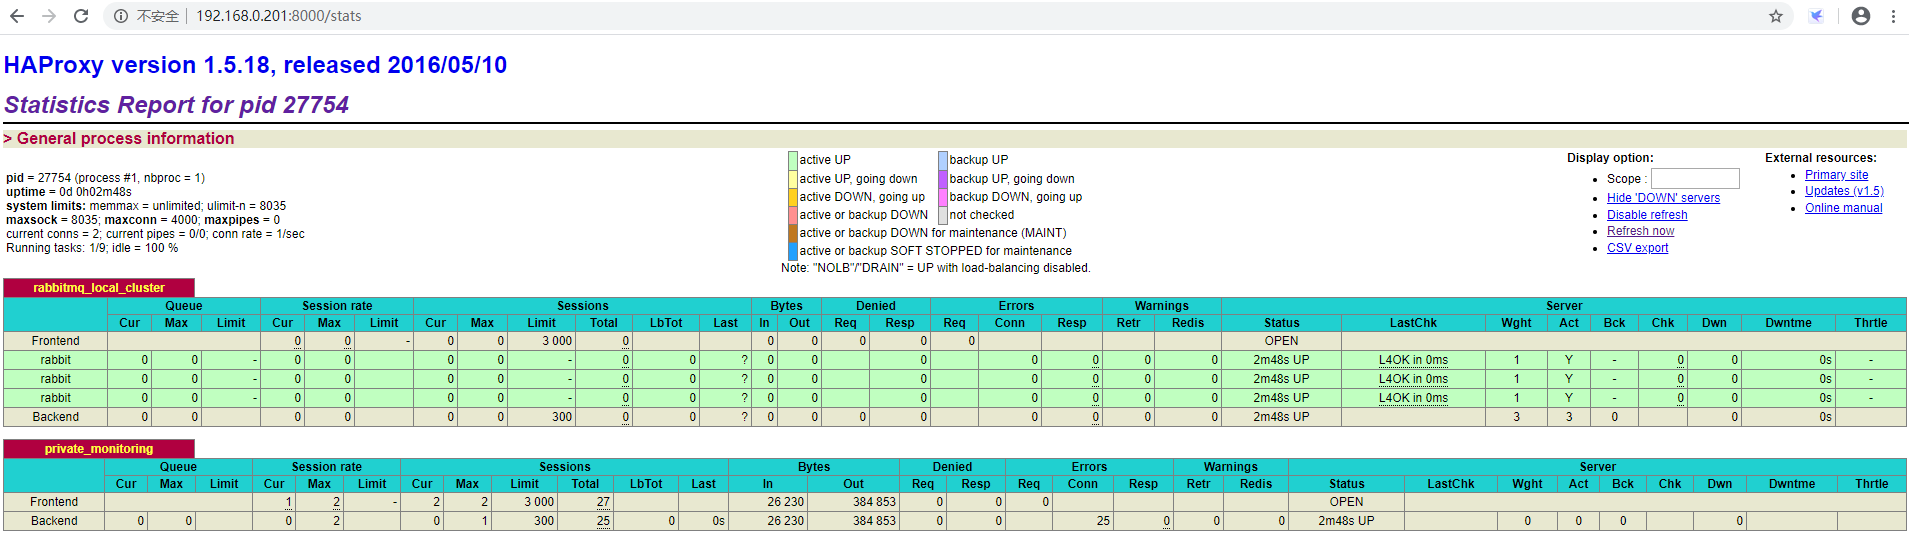
[root@master ~]# cat /etc/haproxy/haproxy.cfg
global
    log         127.0.0.1 local2
    chroot      /var/lib/haproxy
    pidfile     /var/run/haproxy.pid
    maxconn     4000
    user        haproxy
    group       haproxy
    daemon
    stats socket /var/lib/haproxy/stats
defaults
    mode                    tcp
    log                     global
    option                  tcplog
    option                  dontlognull
    retries                 3
    timeout connect         10s
    timeout client          1m
    timeout server          1m
    maxconn                 3000
listen rabbitmq_local_cluster 192.168.0.201:5670 #Front-end IP for producers and consumers
    mode tcp
    balance roundrobin                         #Load Balancing Options
    server rabbit 192.168.0.201:5672 check inter 5000 rise 2 fall 3   #Cluster Node Configuration in Load Balancing
    server rabbit 192.168.0.202:5672 check inter 5000 rise 2 fall 3
    server rabbit 192.168.0.203:5672 check inter 5000 rise 2 fall 3
listen private_monitoring :8000       #Data statistics page
    mode http
    option httplog
    stats enable
    stats uri /stats
    stats refresh 5s
4.4, Start HAProxy:
[root@master ~]# systemctl start haproxy
4.4. View status through HAProxy data statistics page
More:
One of RabbitMQ Learning: Understanding RabbitMQ
https://blog.51cto.com/13568014/2495857
RabbitMQ Learning II: Managing single-node RabbitMQ
https://blog.51cto.com/13568014/2496390