Blog Outline:
1, MQ introduction
2, What is RabbitMQ?
3, Installing RabbitMQ
4, Deploy Rabbitmq cluster
1) Deployment environment
2) Install rabbitmq service
3) Configure the host file and add the above two nodes to the cluster
4) rabbitmq01 configure the cluster and add rabbitmq02 and 03 to the 01 cluster
5) Accessing the web interface
6) Add vhost to web page
5, Single node joins or exits the cluster
1) Single node joining cluster
2) Single node exit cluster
1, MQ introduction
MQ is called Message Queue. Message Queue (MQ) is an application to application communication method. Applications communicate by reading and writing messages coming in and out of the queue (for the application's data), without requiring a dedicated connection to link them. Message passing refers to the communication between programs by sending data in messages, rather than directly calling each other. Direct calling is usually used for technologies such as remote procedure call. Queuing refers to the application communicating through queues. The use of queues removes the need for both receiving and sending applications to execute at the same time.
2, What is RabbitMQ?
RabbitMQ is an open source message broker software (also known as message oriented middleware) written in Erlang, which implements advanced message queuing protocol (AMQP). It supports Windows, Linux/Unix, MAC OS X operating system and multiple programming languages including JAVA.
AMQP, Advanced Message Queuing Protocol, is an application layer standard Advanced Message Queuing Protocol that provides unified message service. It is an open standard of application layer protocol and is designed for message oriented middleware. Based on this protocol, the client and message middleware can deliver messages, which is not limited by different products and different development languages.
RabbitMQ usage scenario:
1) Asynchronous processing;
2) Application decoupling;
3) Flow peak shaving;
4) Message communication;
3, Installing RabbitMQ
Required software download link: https://pan.baidu.com/s/1vopw5bvLX4gUkabSthI0hw Extraction code: ng8c
[root@localhost ~]# ls      #Confirm RPM package required
erlang-18.1-1.el6.x86_64.rpm
rabbitmq-server-3.6.6-1.el6.noarch.rpm
socat-1.7.3.2-2.el7.x86_64.rpm
[root@localhost ~]# yum -y localinstall erlang-18.1-1.el6.x86_64.rpm rabbitmq-server-3.6.6-1.el6.noarch.rpm socat-1.7.3.2-2.el7.x86_64.rpm
#Install RPM package
[root@localhost ~]# chkconfig rabbitmq-server on
#rabbitmq joins in power on self start
[root@localhost ~]# /etc/init.d/rabbitmq-server start
#Start rabbitmq service
[root@localhost ~]#  ps -ef | grep rabbitmq
#Make sure rabbitmq is running, more results are returned, omit
[root@localhost ~]# rabbitmq-plugins enable rabbitmq_management
#Open the web management plug-in of rabbitmq so that it can be accessed through the browser
[root@localhost ~]#  rabbitmqctl add_user admin 123.com
#Create login user
#The default login account and password of WEB management are: guest
[root@localhost ~]#  rabbitmqctl set_user_tags admin administrator
#Add the created admin user to the administrator group
The default RabbitMQ has the following port numbers: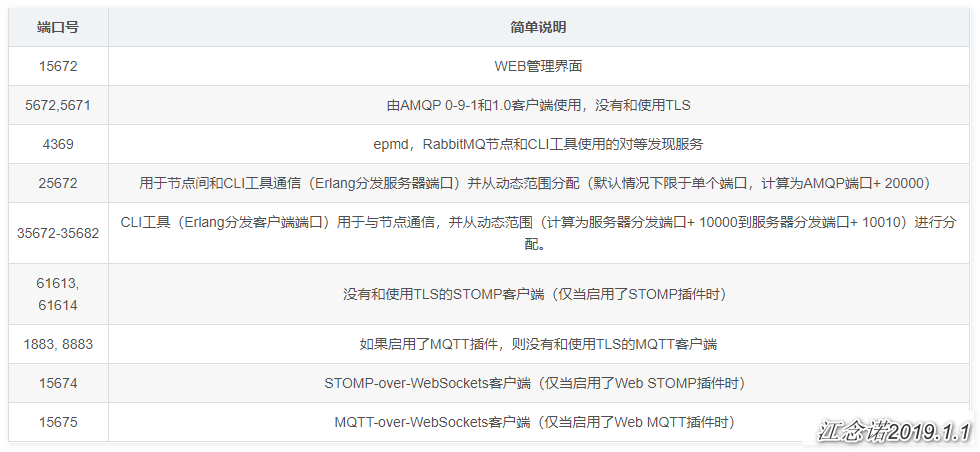
Commonly used on 15672 and 5672!
Client access:

4, Deploy Rabbitmq cluster
Rabbitmq cluster can be divided into two ways:
1. Normal mode: the default cluster mode. The message body only exists on one node;
2. Mirror mode: make the required queue into a mirror, which exists in multiple nodes.
ha-mode:
All: queue to all nodes;
exatly: randomly mirror to other nodes;
nodes: mirror to the specified node.
Cluster node mode:
1. Memory node: working in memory;
2. Disk node: working on disk;
Exception: memory nodes and disk nodes exist together to improve access speed and data persistence.
Compared with the memory node, although it does not write to the disk, its execution is better than the disk node. In the cluster, only one disk is needed to save the state. If there are only memory nodes in the cluster, once the node is down, all the States and messages will be lost and data persistence cannot be realized.
1) Deployment environment
| system | IP address | host name |
|---|---|---|
| Centos 7 | 192.168.1.4 | rabbitmq01 |
| Centos 7 | 192.168.1.5 | rabbitmq02 |
| Centos 7 | 192.168.1.6 | rabbitmq03 |
| Centos 7 | 192.168.1.7 | rabbitmq04 |
192.168.1.4 is based on the above single rabbitmq.
2) Install rabbitmq service
Deploy on two nodes 192.168.1.5 and 192.168.1.6, 192.168.1.7 will be used later!
[root@localhost ~]# ls      #Confirm RPM package required
erlang-18.1-1.el6.x86_64.rpm
rabbitmq-server-3.6.6-1.el6.noarch.rpm
socat-1.7.3.2-2.el7.x86_64.rpm
[root@localhost ~]# yum -y localinstall erlang-18.1-1.el6.x86_64.rpm rabbitmq-server-3.6.6-1.el6.noarch.rpm socat-1.7.3.2-2.el7.x86_64.rpm
#Install RPM package
[root@localhost ~]# chkconfig rabbitmq-server on
#rabbitmq joins in power on self start
[root@localhost ~]# /etc/init.d/rabbitmq-server start
#Start rabbitmq service
3) Configure the host file and add the above two nodes to the cluster
[root@localhost ~]# echo -e "192.168.1.4 rabbitmq01\n192.168.1.5 rabbitmq02\n192.168.1.6 rabbitmq03\n192.168.1.7 rabbitmq04" >> /etc/hosts
[root@localhost ~]# scp /etc/hosts root@192.168.1.5:/etc/
[root@localhost ~]# scp /etc/hosts root@192.168.1.6:/etc/
[root@localhost ~]# scp /etc/hosts root@192.168.1.7:/etc/
[root@localhost ~]# scp /var/lib/rabbitmq/.erlang.cookie root@192.168.1.5:/var/lib/rabbitmq/
[root@localhost ~]# scp /var/lib/rabbitmq/.erlang.cookie root@192.168.1.6:/var/lib/rabbitmq/
#Copy the cookie node information of rabbitmq01 to other nodes that need to join the cluster
#The cookie information of nodes should be consistent when deploying a cluster
All nodes in the cluster need to be restarted (including rabbitmq01). If you are stuck in an interface during restart, you need to manually force restart!
[root@rabbitmq01 ~]# ps -ef | grep rabbitmq
#After the restart, the host name is automatically updated, confirming that rabbitmq is running
4) rabbitmq01 configure the cluster and add rabbitmq02 and 03 to the 01 cluster
The following operations can be distinguished according to the host name!
[root@rabbitmq01 ~]# rabbitmqctl  stop_app   #Stop rabbitmq node service
[root@rabbitmq01 ~]#  rabbitmqctl reset     #Reset rabbitmq node
[root@rabbitmq01 ~]# rabbitmqctl start_app    #Start rabbit node service
Starting node rabbit@rabbitmq01 ... #Node name returned by replication
###########Following operations rabbitmq02,03 All need to be implemented.###########
[root@rabbitmq02 ~]# rabbitmqctl stop_app   #Stop node service
[root@rabbitmq02 ~]# rabbitmqctl reset     #Reset node
[root@rabbitmq02 ~]# rabbitmqctl join_cluster --ram rabbit@rabbitmq01
#Join the cluster in memory, followed by the node name of the copied rabbitmq01
[root@rabbitmq02 ~]# rabbitmqctl start_app
[root@rabbitmq02 ~]# rabbitmq-plugins enable rabbitmq_management
#Open the web management plug-in of rabbitmq so that it can be accessed through the browser
###########rabbitmq02,03 After execution#################
[root@rabbitmq01 ~]#  rabbitmqctl cluster_status
#View cluster status
Cluster status of node rabbit@rabbitmq01 ...
[{nodes,[{disc,[rabbit@rabbitmq01]},
         {ram,[rabbit@rabbitmq03,rabbit@rabbitmq02]}]},
 {running_nodes,[rabbit@rabbitmq02,rabbit@rabbitmq03,rabbit@rabbitmq01]},
 {cluster_name,<<"rabbit@rabbitmq01">>},
 {partitions,[]},
 {alarms,[{rabbit@rabbitmq02,[]},
          {rabbit@rabbitmq03,[]},
          {rabbit@rabbitmq01,[]}]}]
# rabbit01 working mode is disk node; rabbit02 and 03 are memory node mode
# Running nodes: running nodes
# Cluster name: node name
# alarms: rabbit01, 02 and 03 will give an alarm in case of any problem
#####Because just now rabbitmq01 Reset, so users need to be recreated########
[root@rabbitmq01 ~]# rabbitmqctl add_user admin 123.com
[root@rabbitmq01 ~]# rabbitmqctl set_user_tags admin administrator
5) Accessing the web interface
The IP+15672 port of any node in the cluster can be accessed by login!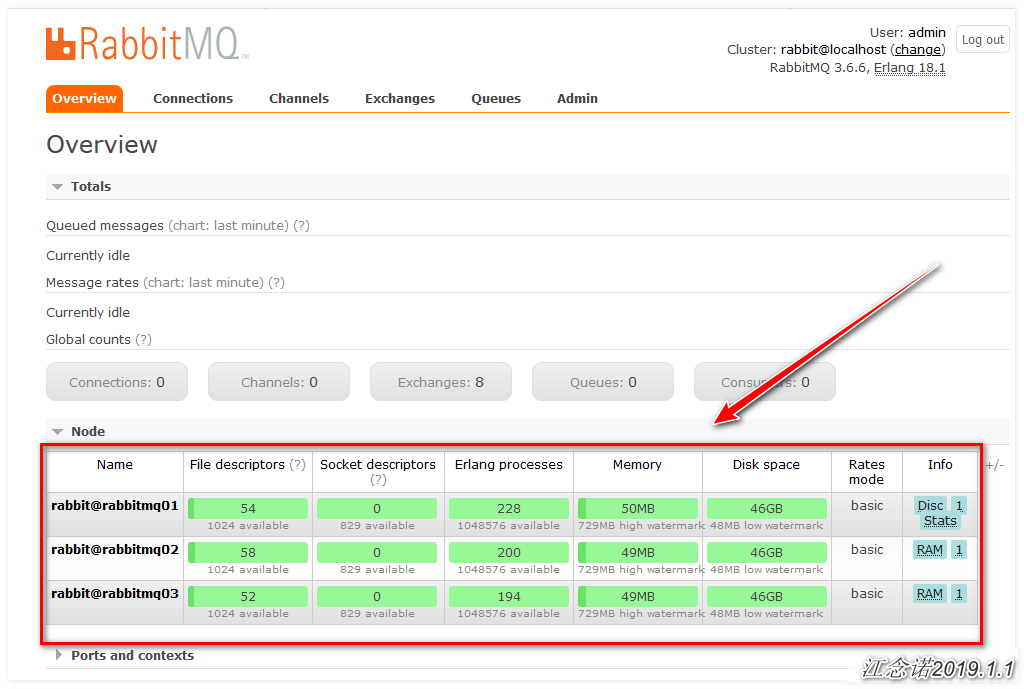
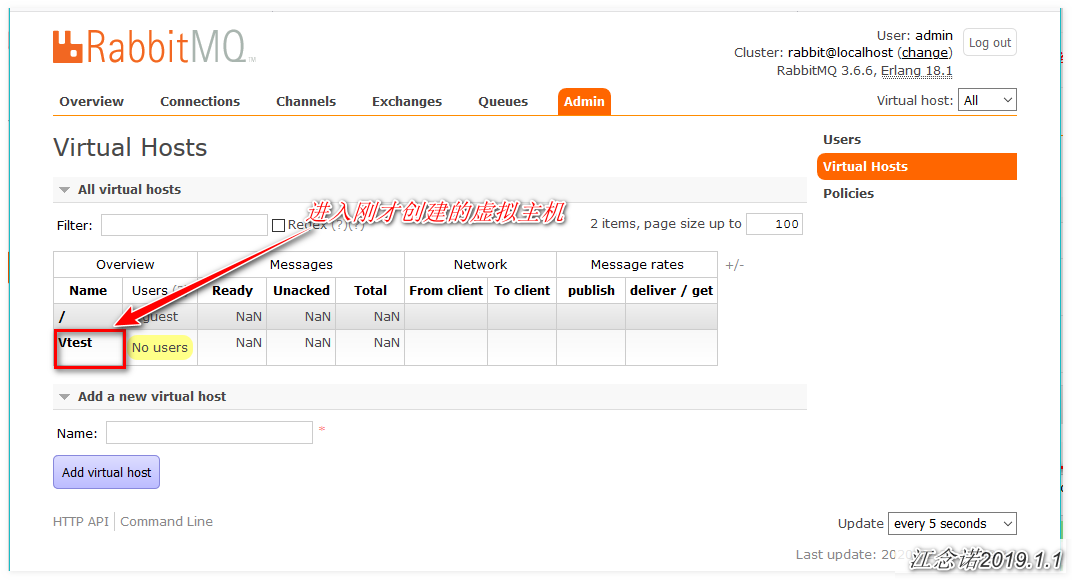
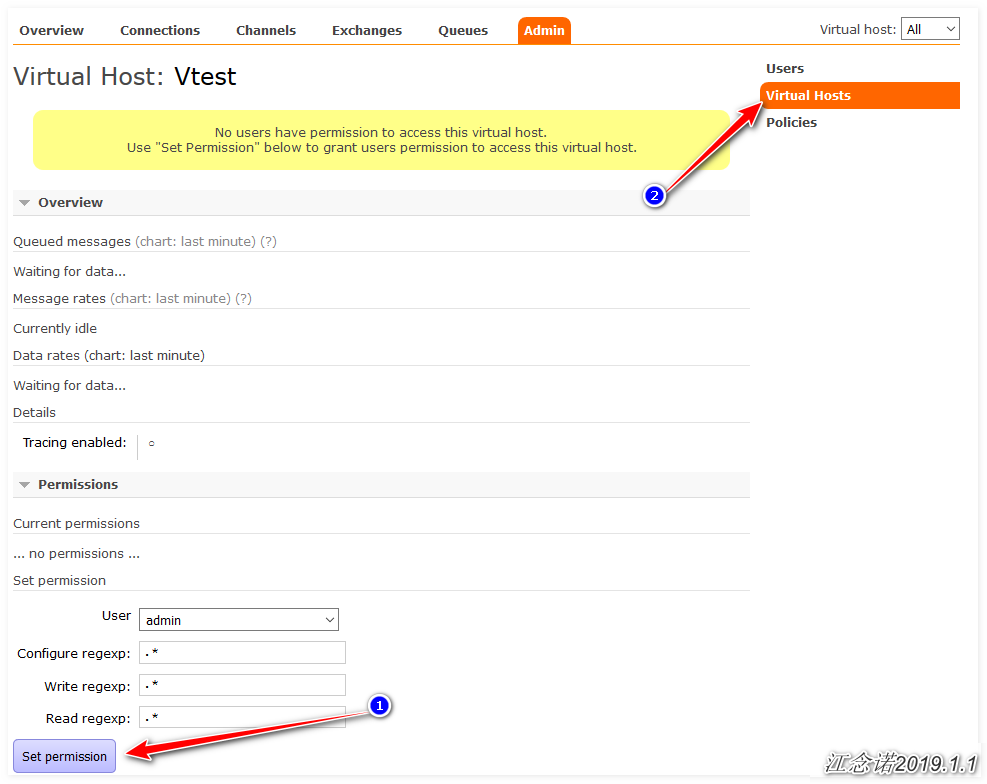
6) Add vhost to web page


Set matching policy: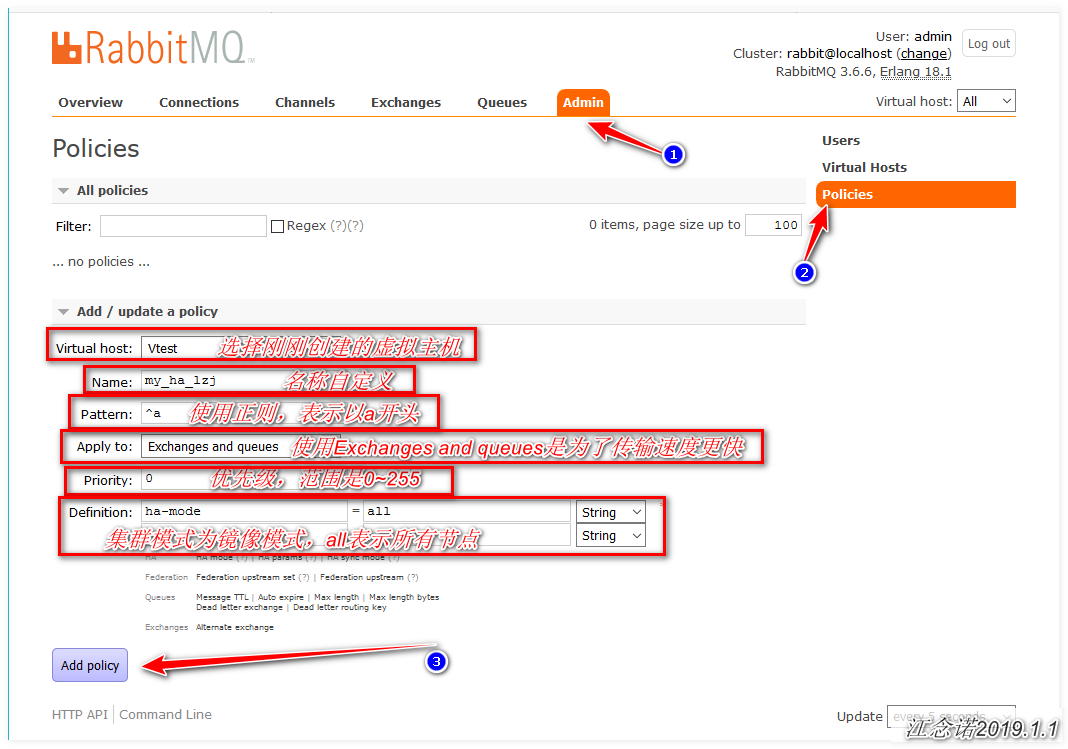
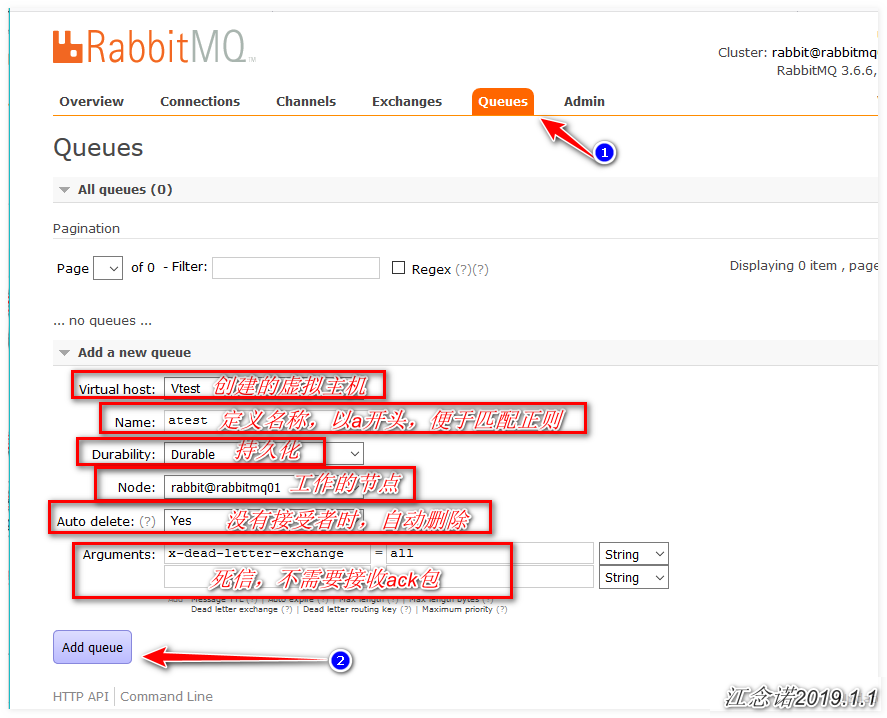
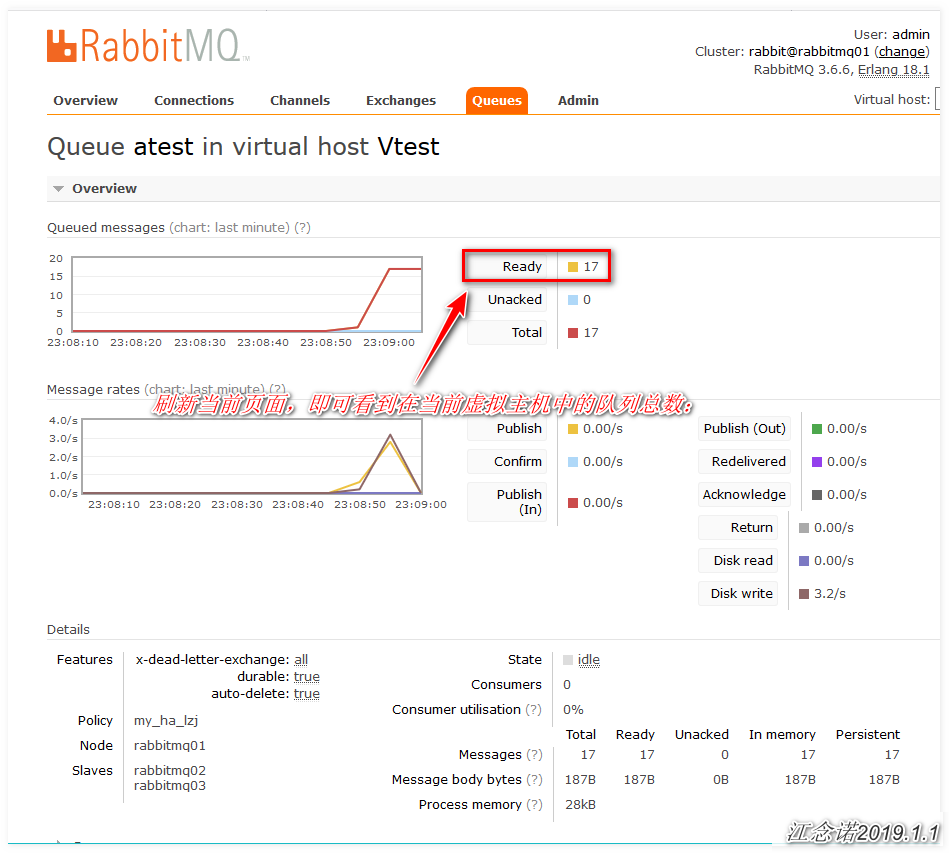
To set the content of a published message: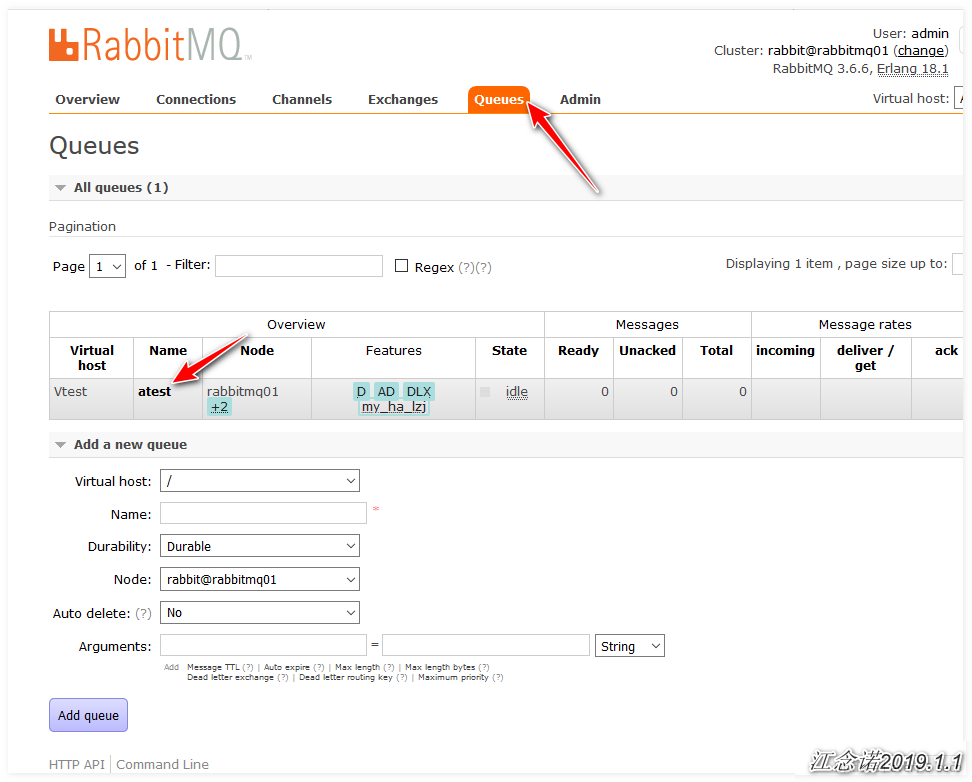

5, Single node joins or exits the cluster
1) Single node joining cluster
Since the hosts file can resolve the nodes in the cluster when I deploy the cluster, the resolution is omitted here!
#############At 192.168.1.7 Operation on server###################
[root@localhost ~]#  yum -y localinstall erlang-18.1-1.el6.x86_64.rpm rabbitmq-server-3.6.6-1.el6.noarch.rpm socat-1.7.3.2-2.el7.x86_64.rpm
[root@localhost ~]# chkconfig rabbitmq-server on
[root@localhost ~]#  /etc/init.d/rabbitmq-server start
[root@localhost ~]# scp root@rabbitmq01:/var/lib/rabbitmq/.erlang.cookie /var/lib/rabbitmq/
#Copy the cookie information in the cluster to local, and then restart
[root@rabbitmq04 ~]# rabbitmqctl stop_app
[root@rabbitmq04 ~]# rabbitmqctl reset
[root@rabbitmq04 ~]# rabbitmqctl join_cluster --ram rabbit@rabbitmq01
#Join the cluster in the way of memory operation. To join the cluster in the way of disk, omit the "- ram" option
[root@rabbitmq04 ~]# rabbitmqctl start_app
#Open web management page
[root@rabbitmq04 ~]# rabbitmq-plugins enable rabbitmq_management
To view the web interface: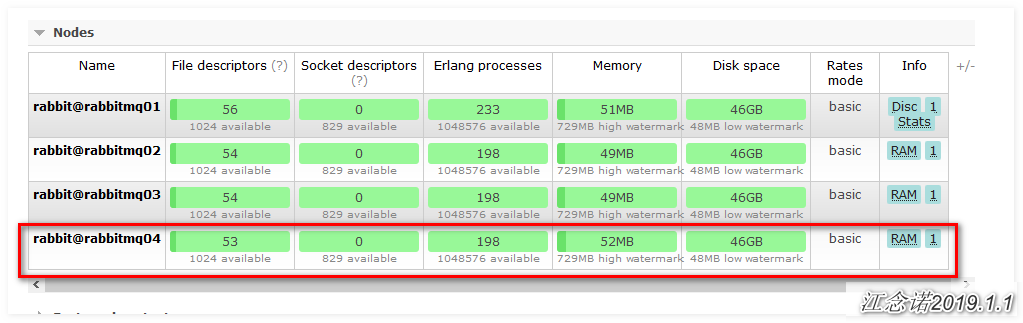
2) Single node exit cluster
[root@rabbitmq04 ~]# rabbitmqctl stop_app
#Stop the node on rabbitmq04 first
[root@rabbitmq01 ~]# rabbitmqctl -n rabbit@rabbitmq01 forget_cluster_node rabbit@rabbitmq04
#-n: Specify node name
#Forget? Cluster? Node: followed by the name of the node to be deleted
#Go back to the primary node (rabbitmq01) and delete the node
To view the web interface:
——————————At the end of this article, thank you for reading -————————————