Blog Outline:
I. Rabbitmq concept
II. Deploy a single Rabbitmq
III. deploy Rabbitmq cluster
IV. single node joins or exits cluster configuration
I. Rabbitmq concept
RabbitMQ is an open-source service implemented by AMQP protocol. The server side is written in Erlang language, and supports a variety of clients, such as Python, Ruby,. NET, Java, JMS, C, PHP, ActionScript, XMPP, STOMP, etc., and AJAX. It is used to store and forward messages in the distributed system, and it has good performance in ease of use, scalability, high availability, etc.
AMQP, Advanced Message Queuing Protocol, is an open standard of application layer protocol, which is designed for message oriented middleware. Message middleware is mainly used to decouple components. The sender of message does not need to know the existence of message consumer, and vice versa.
It enables the corresponding client to interact with the corresponding message middleware (broker). The publisher of the message middleware receives the message (the application that publishes the message, also known as the producer) and forwards them to the consumers (the application that processes the message). Because AMQP is a network protocol, publishers, consumers and message middleware can be deployed to different physical machines.
Rabbitmq usage scenario
Message queuing is often used in four scenarios: asynchronous processing, application decoupling, flow cutting and message communication.
II. Deploy a single Rabbitmq
Note: before starting, the hostname should be the default localhosts (if not, an error will be reported when rabbitmq is started. Solution: restart the host and then rabbitmq)
You can download the required software on the official website, or download The rpm package in my network disk is uploaded to the server by myself.
The IP of the following server is 192.168.20.2.
[root@localhost src]# ls      #Confirm RPM package required
erlang-18.1-1.el6.x86_64.rpm
rabbitmq-server-3.6.6-1.el6.noarch.rpm
socat-1.7.3.2-2.el7.x86_64.rpm
[root@localhost src]# yum -y localinstall erlang-18.1-1.el6.x86_64.rpm rabbitmq-server-3.6.6-1.el6.noarch.rpm socat-1.7.3.2-2.el7.x86_64.rpm
#Install RPM package
[root@localhost src]# chkconfig rabbitmq-server on   #rabbitmq joins in power on self start
[root@localhost src]# /etc/init.d/rabbitmq-server start    #Start rabbitmq service
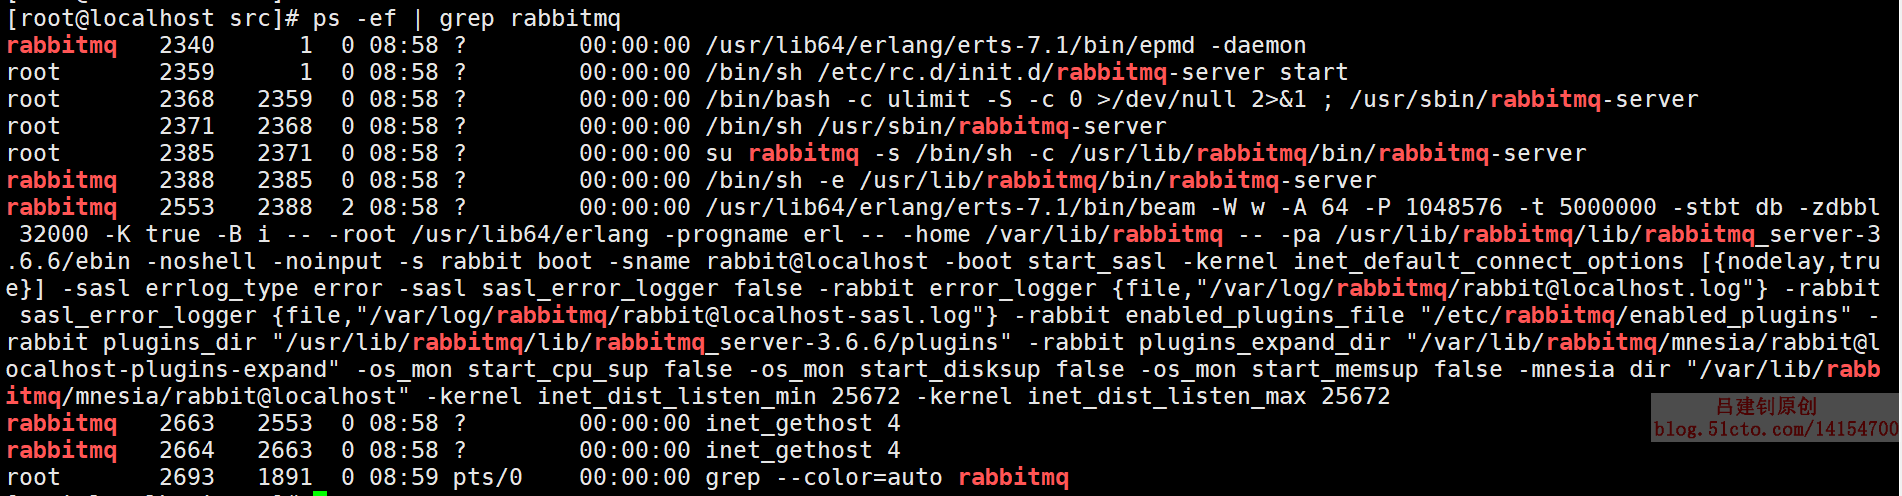
Make sure rabbitmq is running:
[root@localhost src]# ps -ef | grep rabbitmq
The results returned by the above command are as follows:
#Open the web management plug-in of rabbitmq so that it can be accessed through the browser
[root@localhost src]# rabbitmq-plugins enable rabbitmq_management
#Create login user
[root@localhost src]# rabbitmqctl add_user admin 123.com
#Add the created admin user to the administrator group
[root@localhost src]# rabbitmqctl set_user_tags admin administrator
The client accesses port 15672 of rabbitmq server and logs in with the newly created admin user. After the login is successful, the following display is displayed:
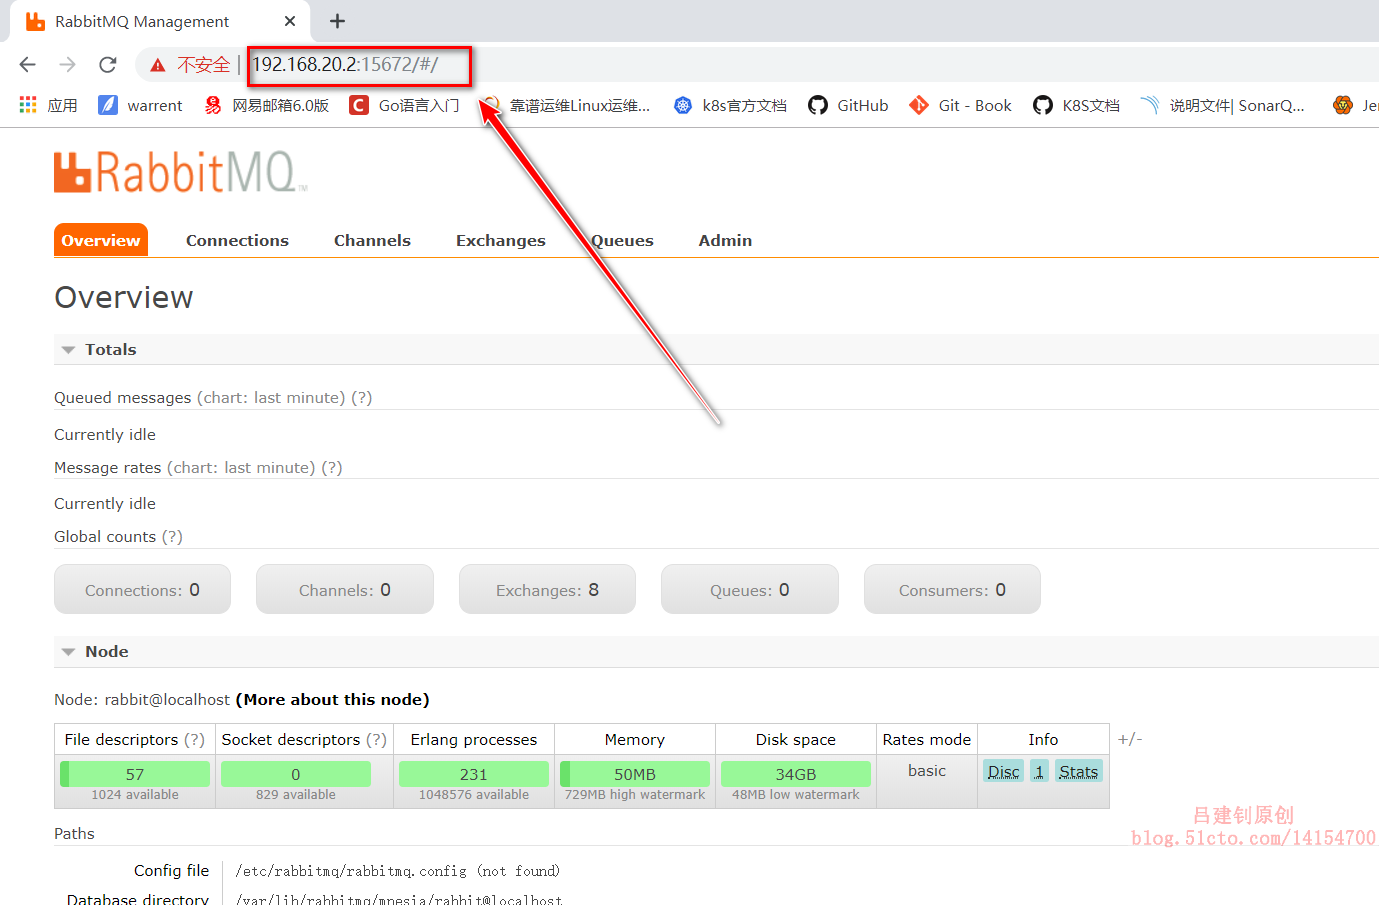
Being able to access successfully means that a single rabbitmq is set up.
III. deploy Rabbitmq cluster
Rabbitmq cluster can be divided into two ways:
1. Normal mode: the default cluster mode. The message body only exists on one node;
2. Mirror mode: make the required queue into a mirror, which exists in multiple nodes.
ha-mode:
- All: queue to all nodes;
- exatly: randomly mirror to other nodes;
- nodes: mirror to the specified node.
Cluster node mode:
1. Memory node: working in memory;
2. Disk node: working on disk;
Exception: memory nodes and disk nodes exist together to improve access speed and data persistence.
Compared with the memory node, although it does not write to the disk, its execution is better than the disk node. In the cluster, only one disk is needed to save the state. If there are only memory nodes in the cluster, once the node is down, all the States and messages will be lost and data persistence cannot be realized.
1. The deployment environment is as follows:
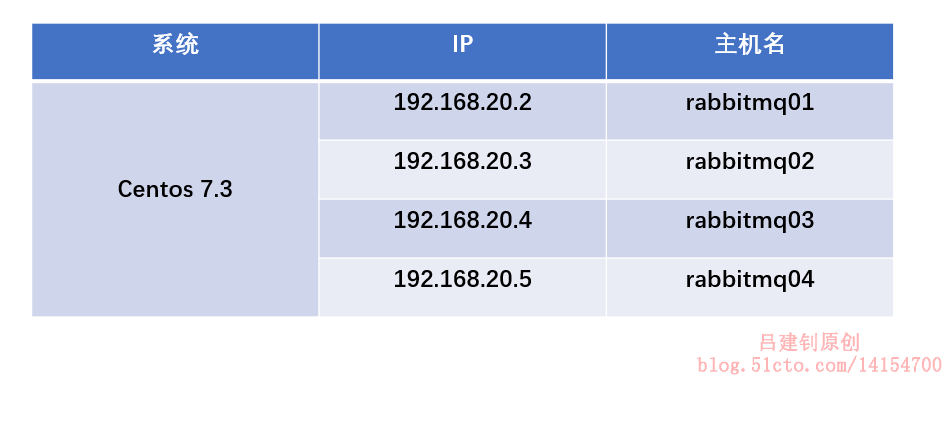
192.168.20.2 is based on the above single rabbitmq.
2. Install rabbitmq service
In 192.168.20.3 and 20.4 (to be reused after 20.5 node), the following operations are performed to deploy rabbitmq service:
#Upload the required rpm package
[root@localhost src]# ls
erlang-18.1-1.el6.x86_64.rpm
rabbitmq-server-3.6.6-1.el6.noarch.rpm
socat-1.7.3.2-2.el7.x86_64.rpm
#Install rabbitmq
[root@localhost src]# yum -y localinstall erlang-18.1-1.el6.x86_64.rpm rabbitmq-server-3.6.6-1.el6.noarch.rpm socat-1.7.3.2-2.el7.x86_64.rpm
#Start rabbitmq and add power on auto start
[root@localhost src]# /etc/init.d/rabbitmq-server start
[root@localhost src]# chkconfig rabbitmq-server on
3. Configure host 192.168.20.2
[root@localhost ~]# tail -4 /etc/hosts     #Configure local resolution (write directly the host name you want to customize)
192.168.20.2 rabbitmq01
192.168.20.3 rabbitmq02
192.168.20.4 rabbitmq03
192.168.20.5 rabbitmq04
#Copy the hosts file to another node
[root@localhost ~]# scp /etc/hosts root@192.168.20.3:/etc/
[root@localhost ~]# scp /etc/hosts root@192.168.20.4:/etc/
[root@localhost ~]# scp /etc/hosts root@192.168.20.5:/etc/
#Copy the cookie node information of rabbitmq01 to other nodes that need to join the cluster
#The cookie information of nodes should be consistent when deploying a cluster
[root@localhost ~]# scp /var/lib/rabbitmq/.erlang.cookie root@192.168.20.3:/var/lib/rabbitmq/
[root@localhost ~]# scp /var/lib/rabbitmq/.erlang.cookie root@192.168.20.4:/var/lib/rabbitmq/
4. Restart all node servers to join the cluster
Perform the following command on all servers to join the cluster to reboot (including rabbitmq01).
[root@localhost ~]# init 6 #After restarting, you will find that the host name has been changed to the one defined in the hosts file
If it is stuck in an interface after restart, it needs to be forced to restart.
[root@rabbitmq01 ~]# ps -ef | grep rabbit #Confirm that it has been started after restart
5. Configure the cluster on rabbitmq01
[root@rabbitmq01 ~]# rabbitmqctl  stop_app   #Stop rabbitmq node service
[root@rabbitmq01 ~]#  rabbitmqctl reset     #Reset rabbitmq node
[root@rabbitmq01 ~]# rabbitmqctl start_app    #Start rabbit node service
Starting node rabbit@rabbitmq01 ... #Node name returned by replication
6. Configure rabbitmq02 and 03 to join rabbitmq01 cluster
[root@rabbitmq02 ~]# rabbitmqctl stop_app   #Stop node service
[root@rabbitmq02 ~]# rabbitmqctl reset     #Reset node
[root@rabbitmq02 ~]# rabbitmqctl join_cluster --ram rabbit@rabbitmq01          #Join the cluster in memory, followed by the node name of the copied rabbitmq01
[root@rabbitmq02 ~]# rabbitmqctl start_app
[root@rabbitmq02 ~]# rabbitmq-plugins enable rabbitmq_management
7. View the node status on rabbitmq01
[root@rabbitmq01 ~]# rabbitmqctl cluster_status       #View node status
Cluster status of node rabbit@rabbitmq01 ...
[{nodes,[{disc,[rabbit@rabbitmq01]},
         {ram,[rabbit@rabbitmq03,rabbit@rabbitmq02]}]},
 {running_nodes,[rabbit@rabbitmq03,rabbit@rabbitmq02,rabbit@rabbitmq01]},
 {cluster_name,<<"rabbit@rabbitmq01">>},
 {partitions,[]},
 {alarms,[{rabbit@rabbitmq03,[]},
          {rabbit@rabbitmq02,[]},
          {rabbit@rabbitmq01,[]}]}]
# rabbit01 working mode is disk node; rabbit02 and 03 are memory node mode
# Running nodes: running nodes
# Cluster name: node name
# alarms: rabbit01, 02 and 03 will give an alarm in case of any problem
8. Create a management user in rabbitmq and join the management group
Since the node has been reset, the user needs to recreate it.
[root@rabbitmq01 ~]# rabbitmqctl add_user admin 123.com
[root@rabbitmq01 ~]# rabbitmqctl set_user_tags admin administrator
9. Log in to the web interface
The IP+15672 port of any node in the cluster can be logged in:
You can see the cluster node information on the following page: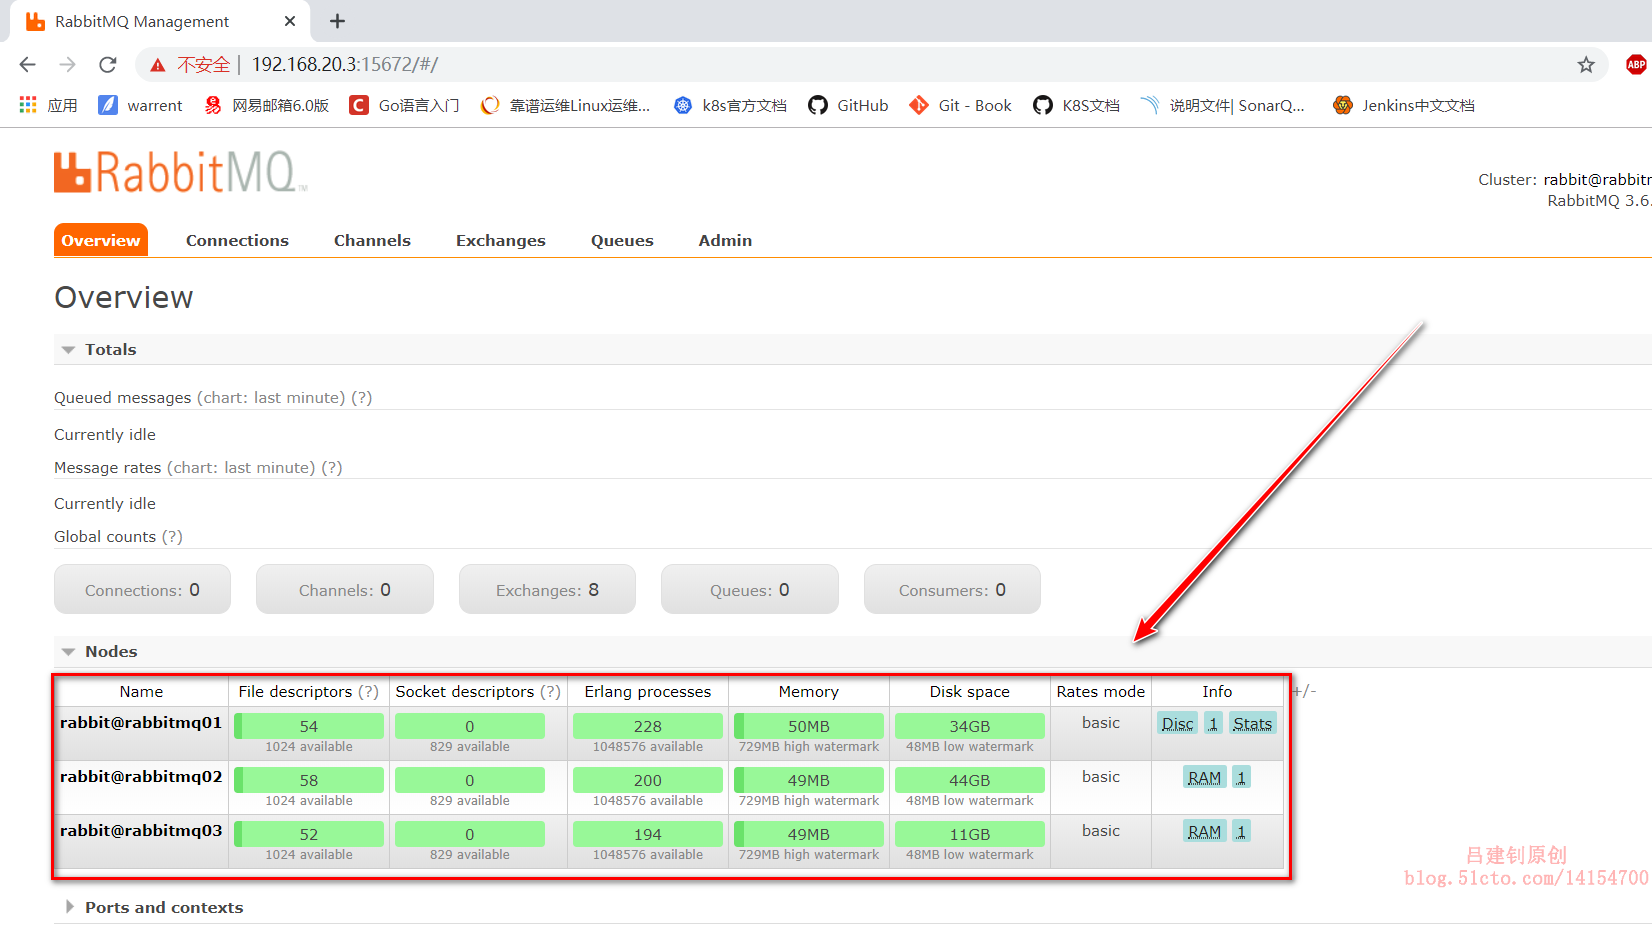
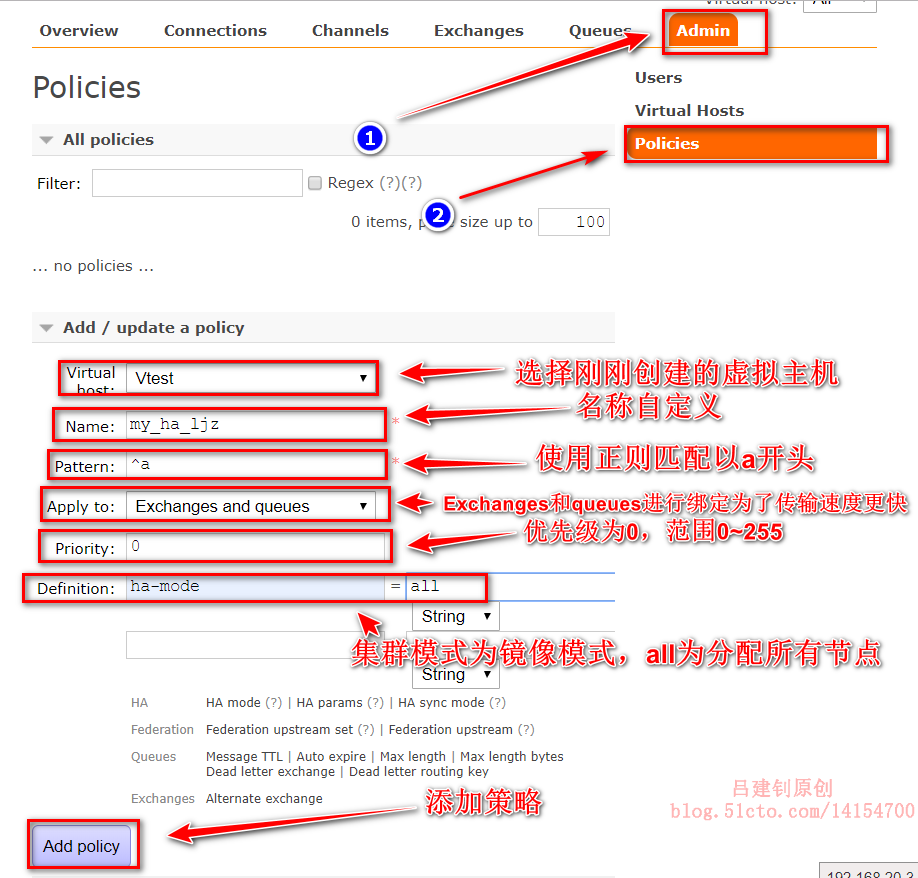
10. Configure the web interface to add Vhost
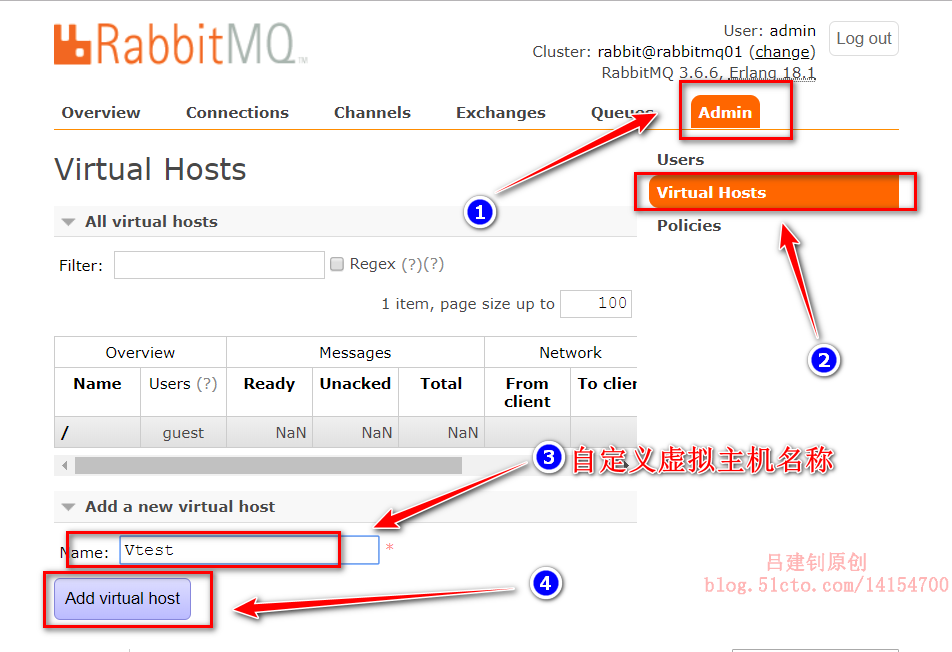
Enter the created virtual host:
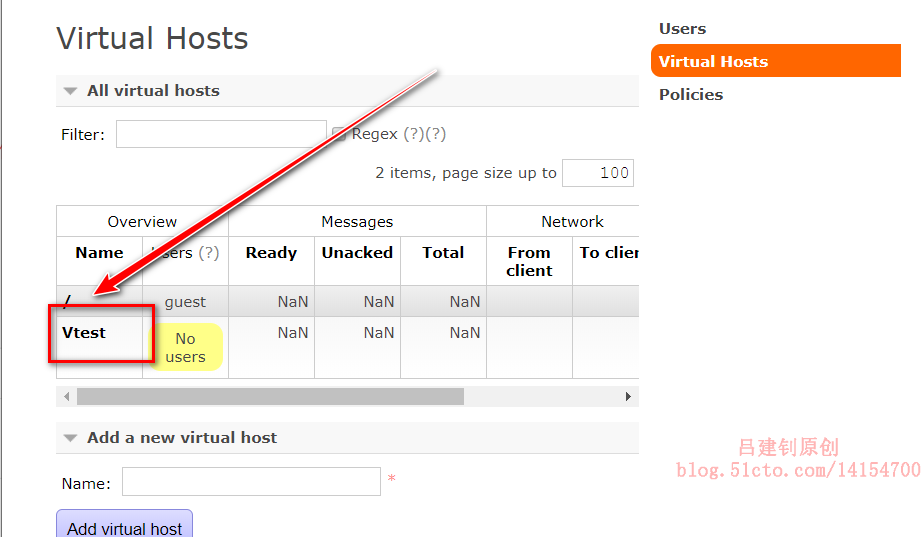
Then configure as follows:
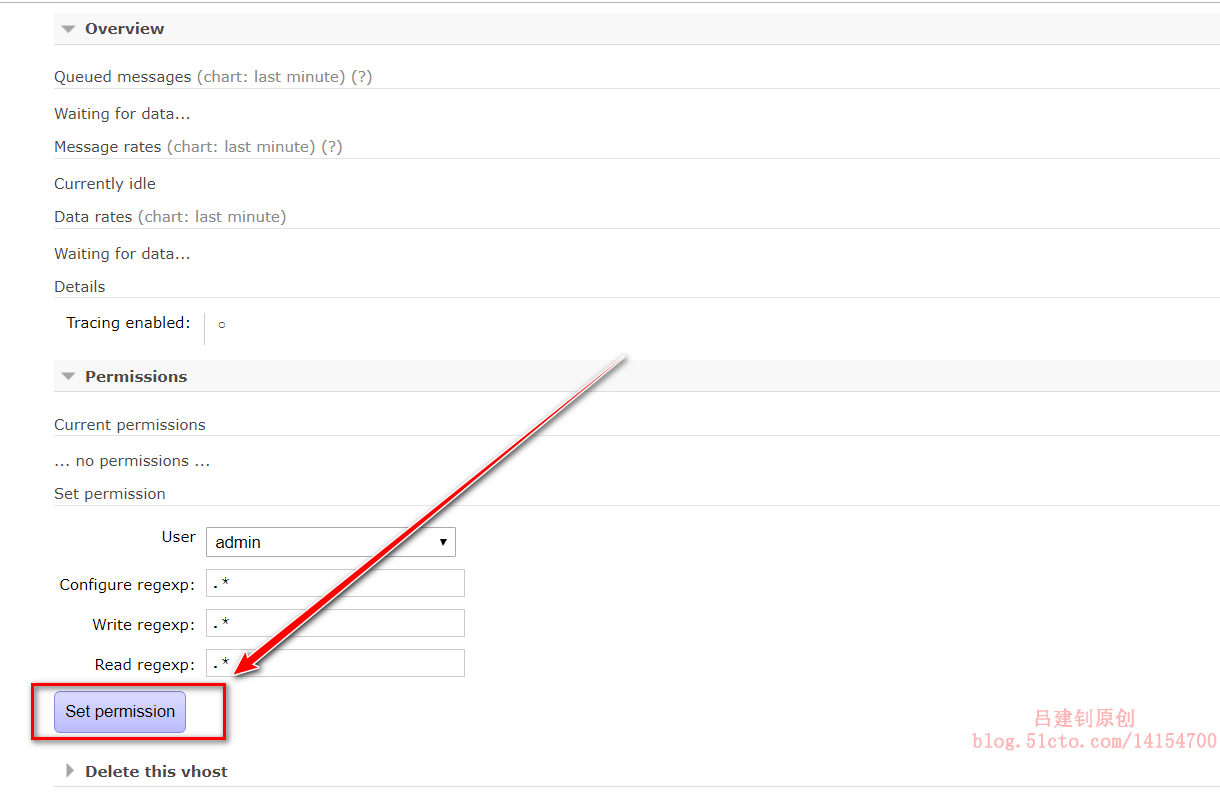
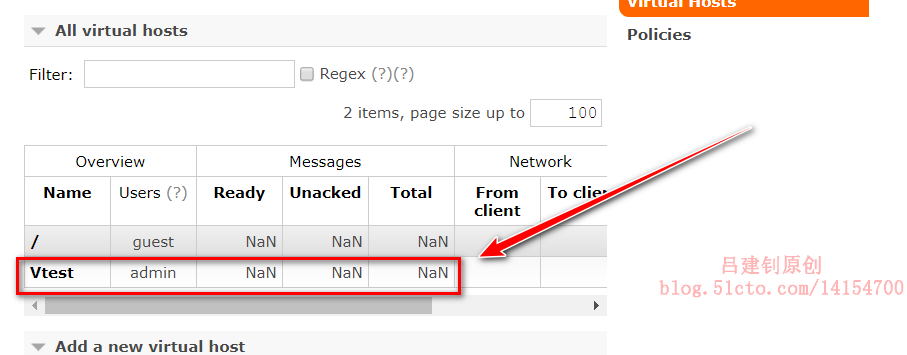
View the virtual host again after setup:
Set matching policy:
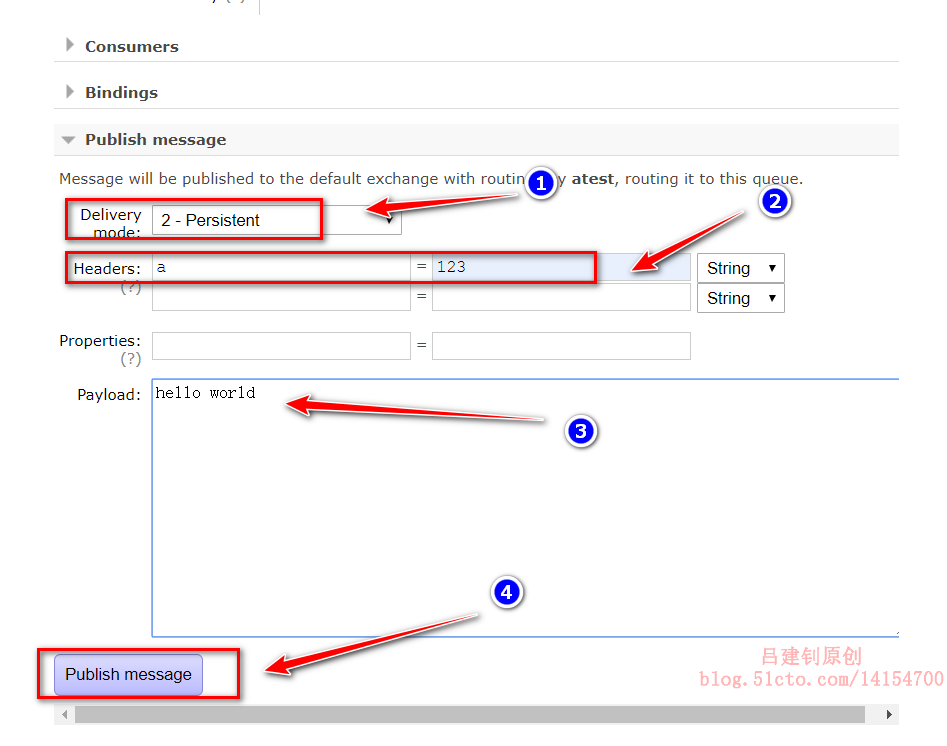
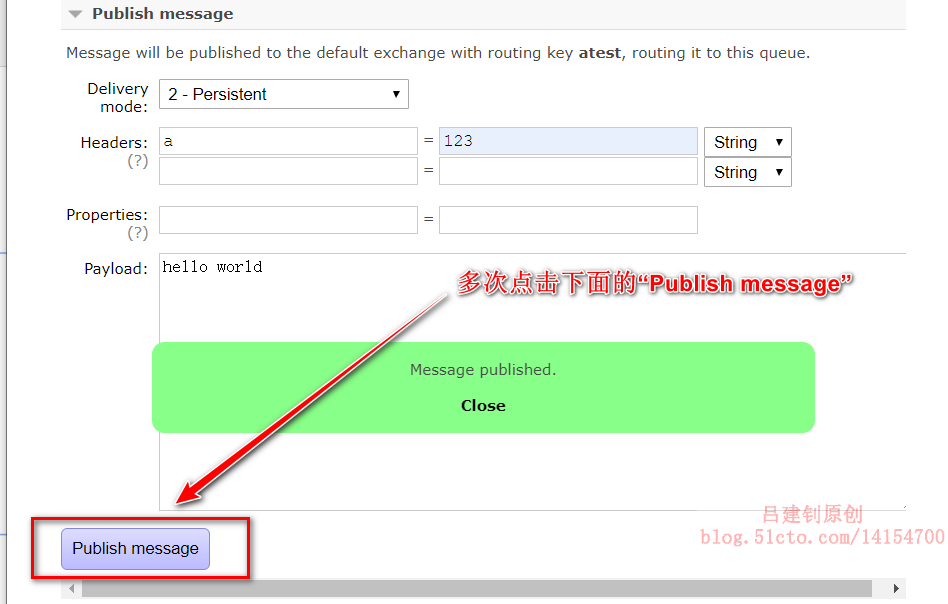
Publish message:
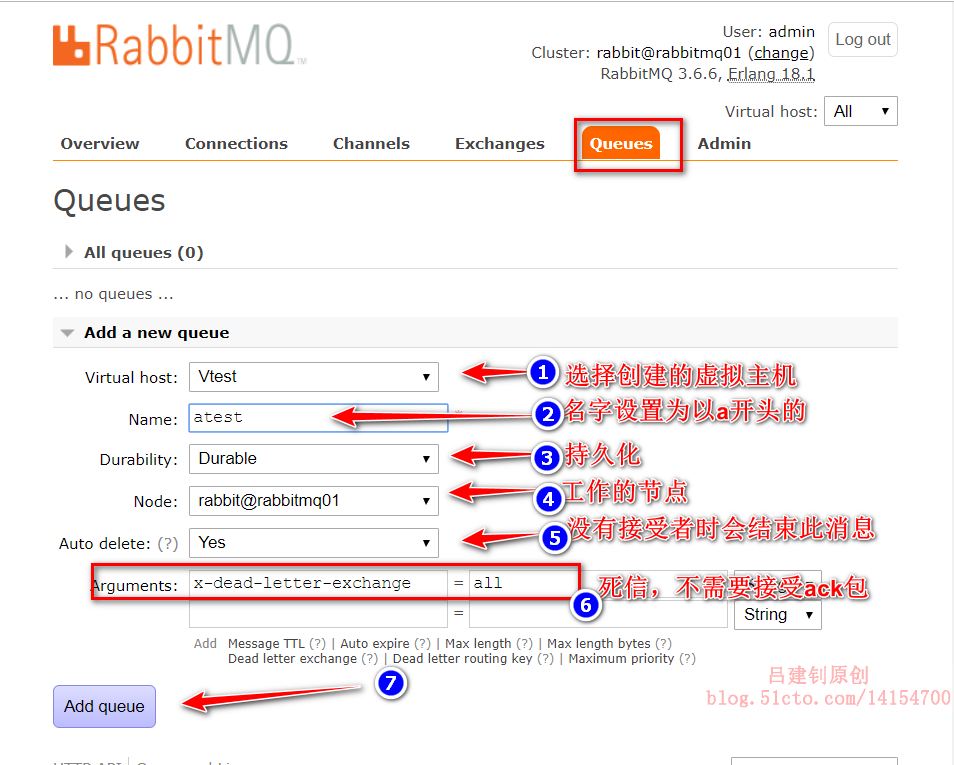
To set the content of a published message:
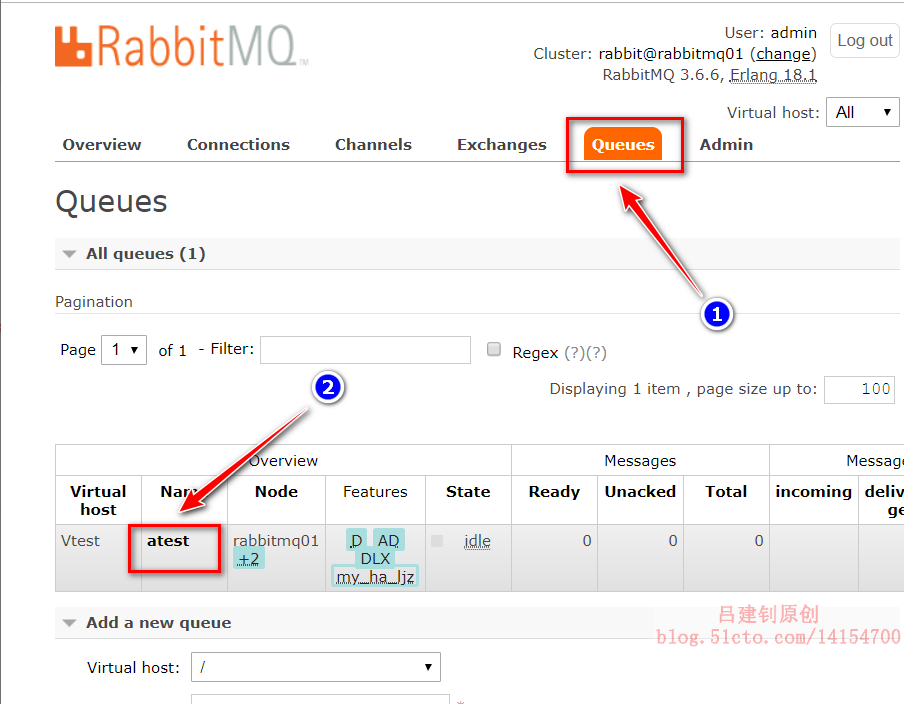
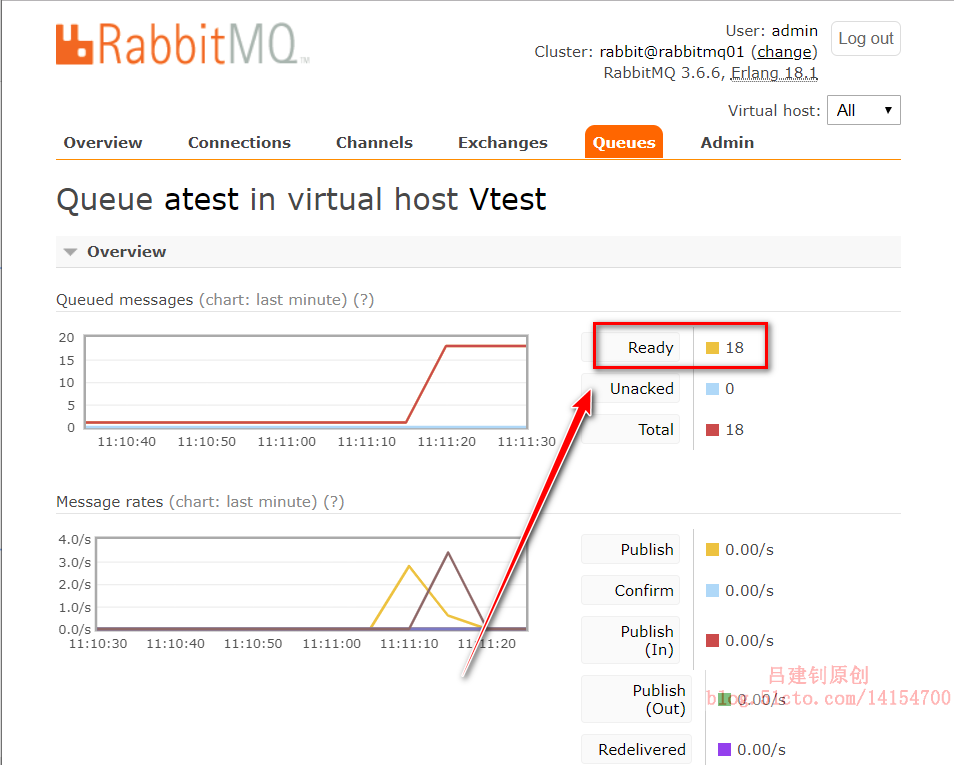
Then refresh the current page to see the total number of queues in the current virtual host:
IV. single node joins or exits cluster configuration
1. Nodes join the cluster
Since the hosts file can resolve the nodes in the cluster when I deploy the cluster above, the resolution is omitted here
#Install rabbitmq on node 192.168.20.5 server and configure
[root@localhost src]# yum -y localinstall erlang-18.1-1.el6.x86_64.rpm rabbitmq-server-3.6.6-1.el6.noarch.rpm socat-1.7.3.2-2.el7.x86_64.rpm
[root@localhost src]# chkconfig rabbitmq-server on
[root@localhost src]# /etc/init.d/rabbitmq-server start
#Copy cookie information from the cluster to the local
[root@localhost src]# scp root@rabbitmq01:/var/lib/rabbitmq/.erlang.cookie /var/lib/rabbitmq/
[root@localhost src]# init 6       #Restart the machine
#Join the cluster
[root@rabbitmq04 ~]# rabbitmqctl stop_app
[root@rabbitmq04 ~]# rabbitmqctl reset
[root@rabbitmq04 ~]# rabbitmqctl join_cluster --ram rabbit@rabbitmq01
#Join the cluster in the way of memory operation. To join the cluster in the way of disk, omit the "- ram" option
[root@rabbitmq04 ~]# rabbitmqctl start_app
#Open web management page
[root@rabbitmq04 ~]# rabbitmq-plugins enable rabbitmq_management
Check the web interface and confirm rabbitmq04 joins the cluster:

2. Single node exits the cluster
1) stop the node on rabbitmq04 first
[root@rabbitmq04 ~]# rabbitmqctl stop_app
2) return to the primary node rabbitmq01 to delete the node
[root@rabbitmq04 ~]# rabbitmqctl -n rabbit@rabbitmq01 forget_cluster_node rabbit@rabbitmq04
# -n: specify the node name
# Forget? Cluster? Node: followed by the name of the node to be deleted
————————Thank you for reading————————