1. Preparation:
Install idea, configure jdk,tomcat, maven, MySQL and other environments. In this case, JDK1.8, Tomcat 8.0, maven 3.6.0, idea2018, mysql5.6 and sqlyog are used
2. Introduction to the case:
The integration of parent-child modules of ssm is built from scratch. This case is based on the parent-child module created under Maven. Using the dependency transfer feature of maven, the child module has all the dependencies of the parent module, and the dependency can be carried out between the child module and the child module, so as to complete the separation of traditional vertical persistence layer, business layer, view layer, etc., complete the integration of ssm, sub module design, and integration of various modules at the same time It can complete simple query and save cases.
3. Experimental ideas:
-
Integration Description: there are many ways to integrate SSM. We will choose XML + annotation
-
The idea of integration
2.1 build an integrated environment first2.2 build the Spring configuration first
2.3 use Spring again to integrate Spring MVC framework
2.4 finally use Spring to integrate MyBatis framework
4. Experimental steps, codes and some graphical guidelines:
**4.1 * * build an integrated environment
1. Create database table
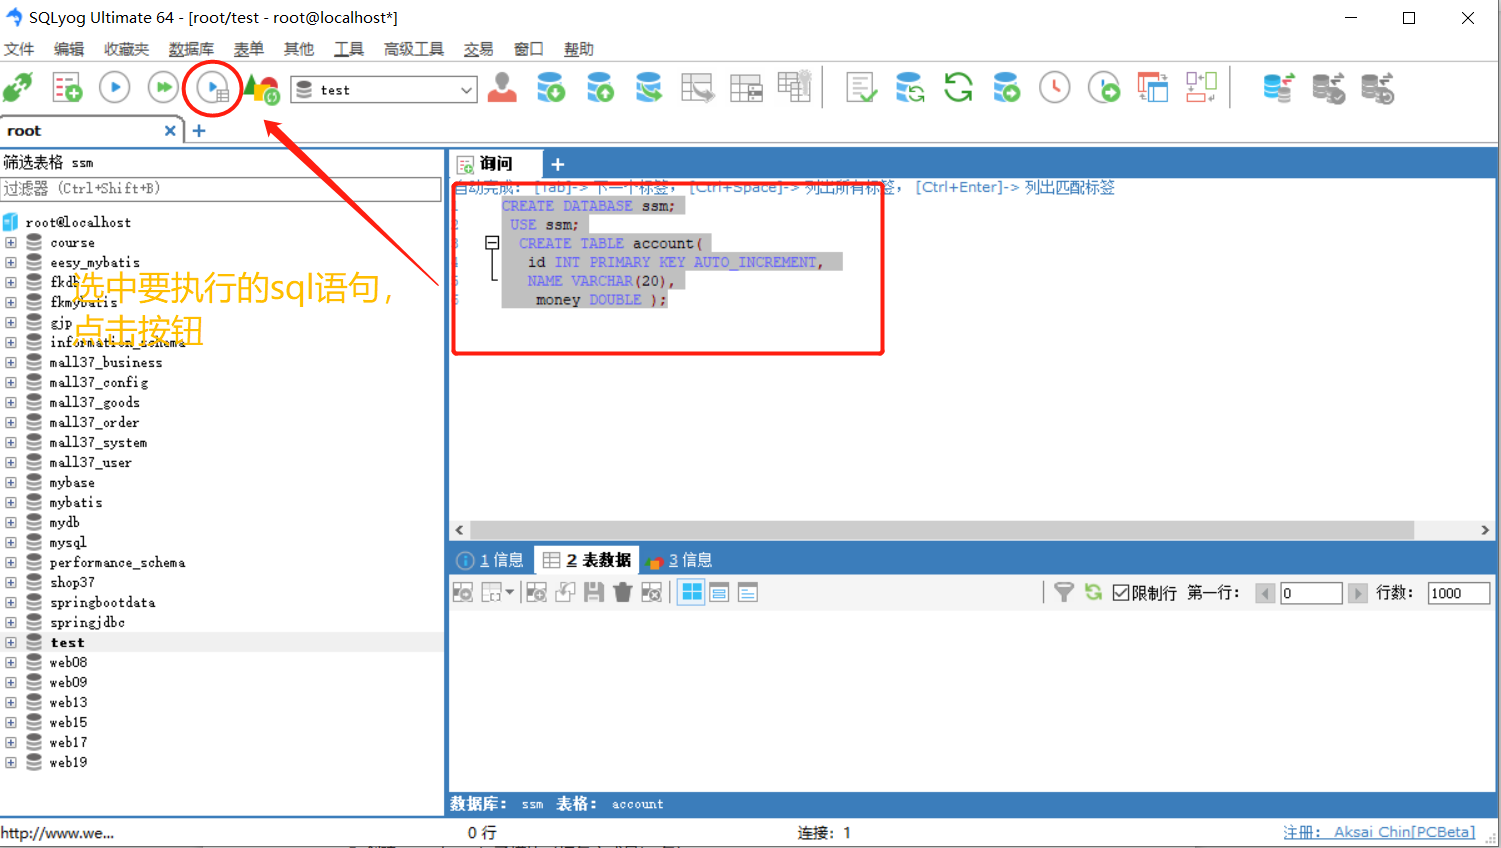
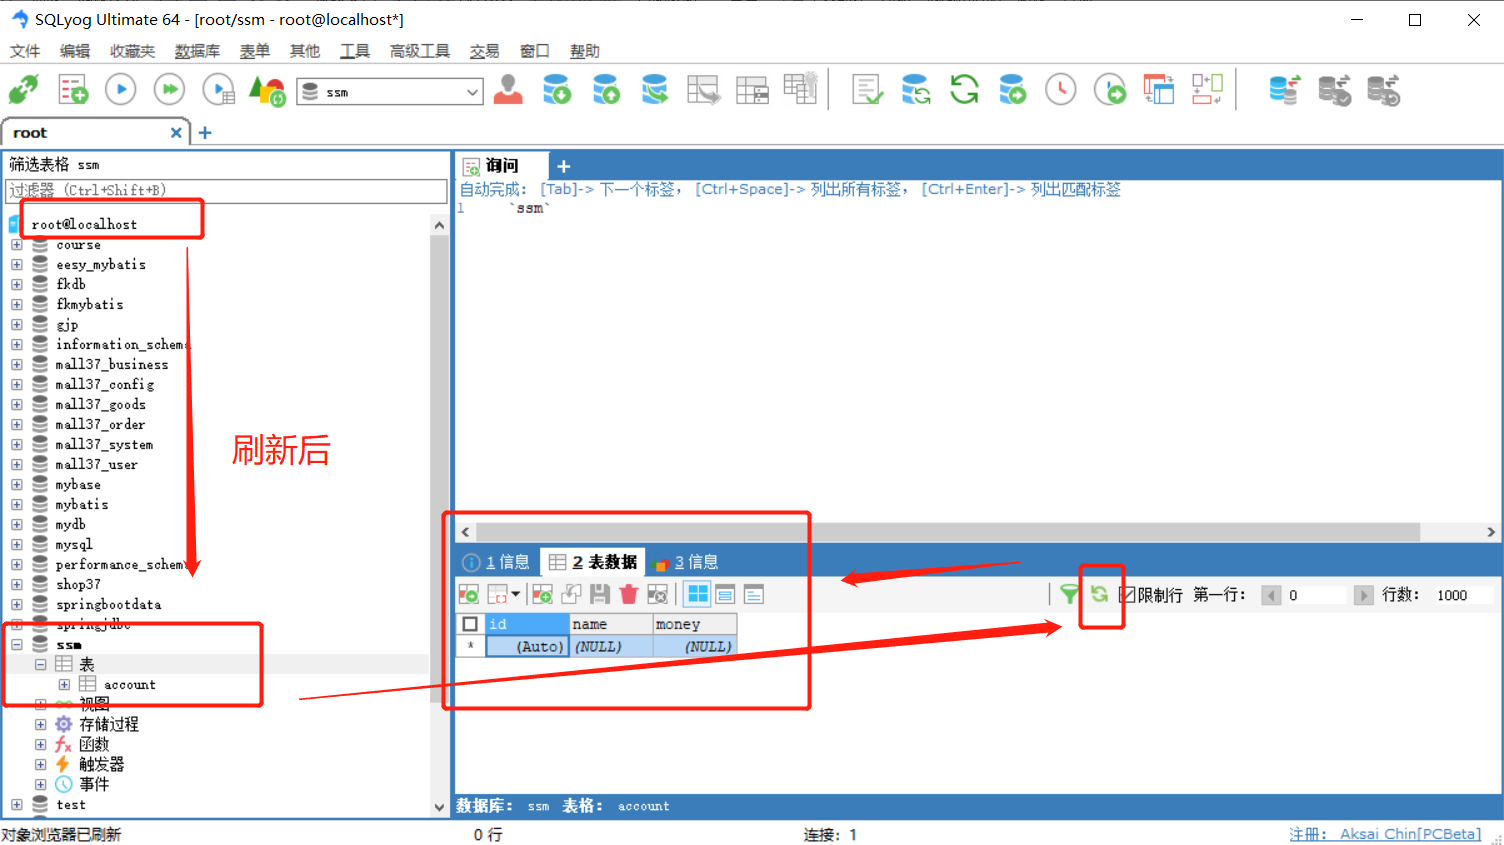
\1. Connect mysql with sqlyog to create data and tables. The sql statements are as follows:
create database ssm;
use ssm;
create table account(
id int primary key auto_increment,
name varchar(20),
money double );
2. Create maven project (use the concept of project aggregation and splitting, and the technical point belongs to maven advanced)
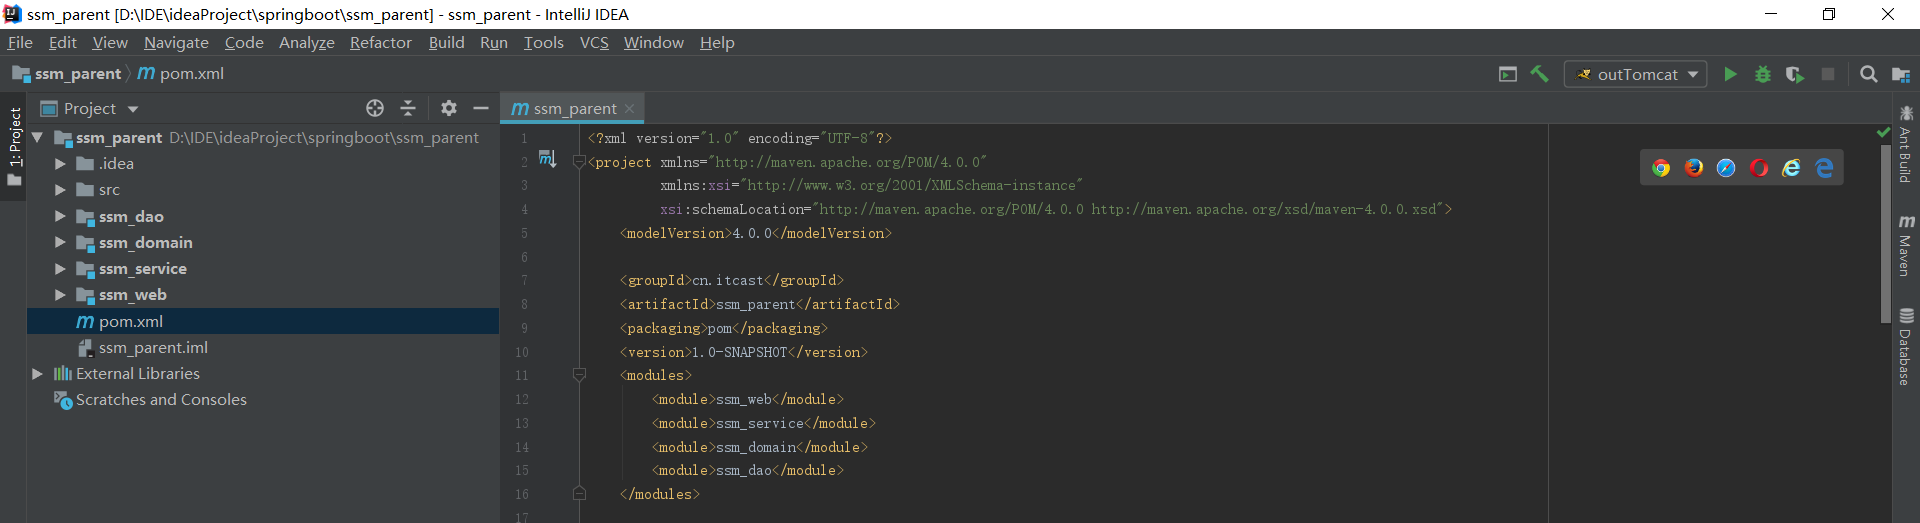
\1. Create ssm_parent parent project (pom is selected for packaging method, required)
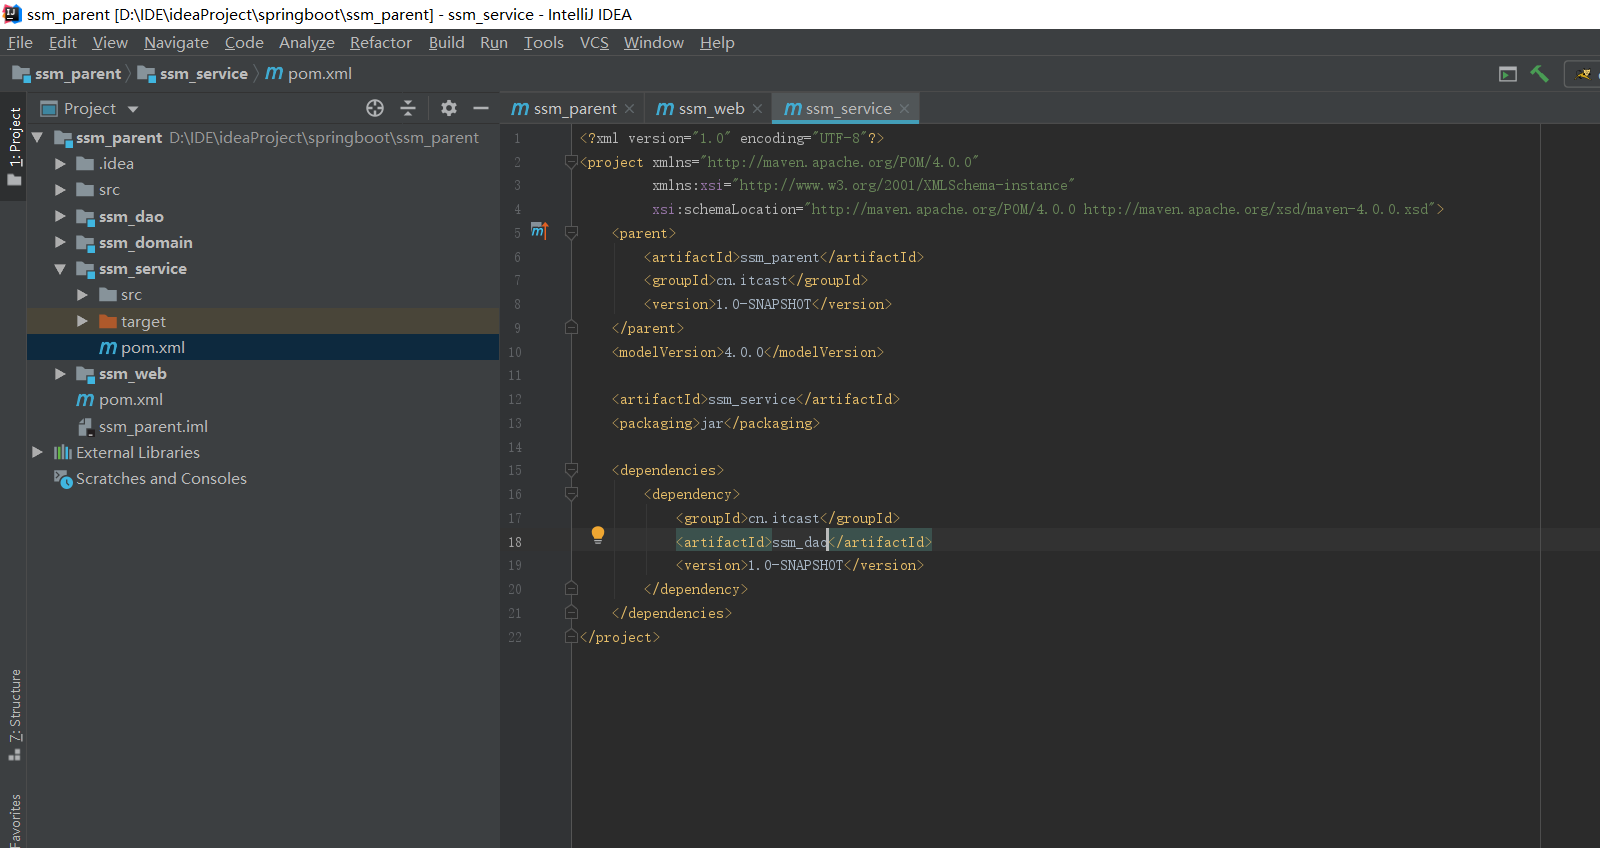
\2. Create ssm_service sub module (the packaging method is jar package)
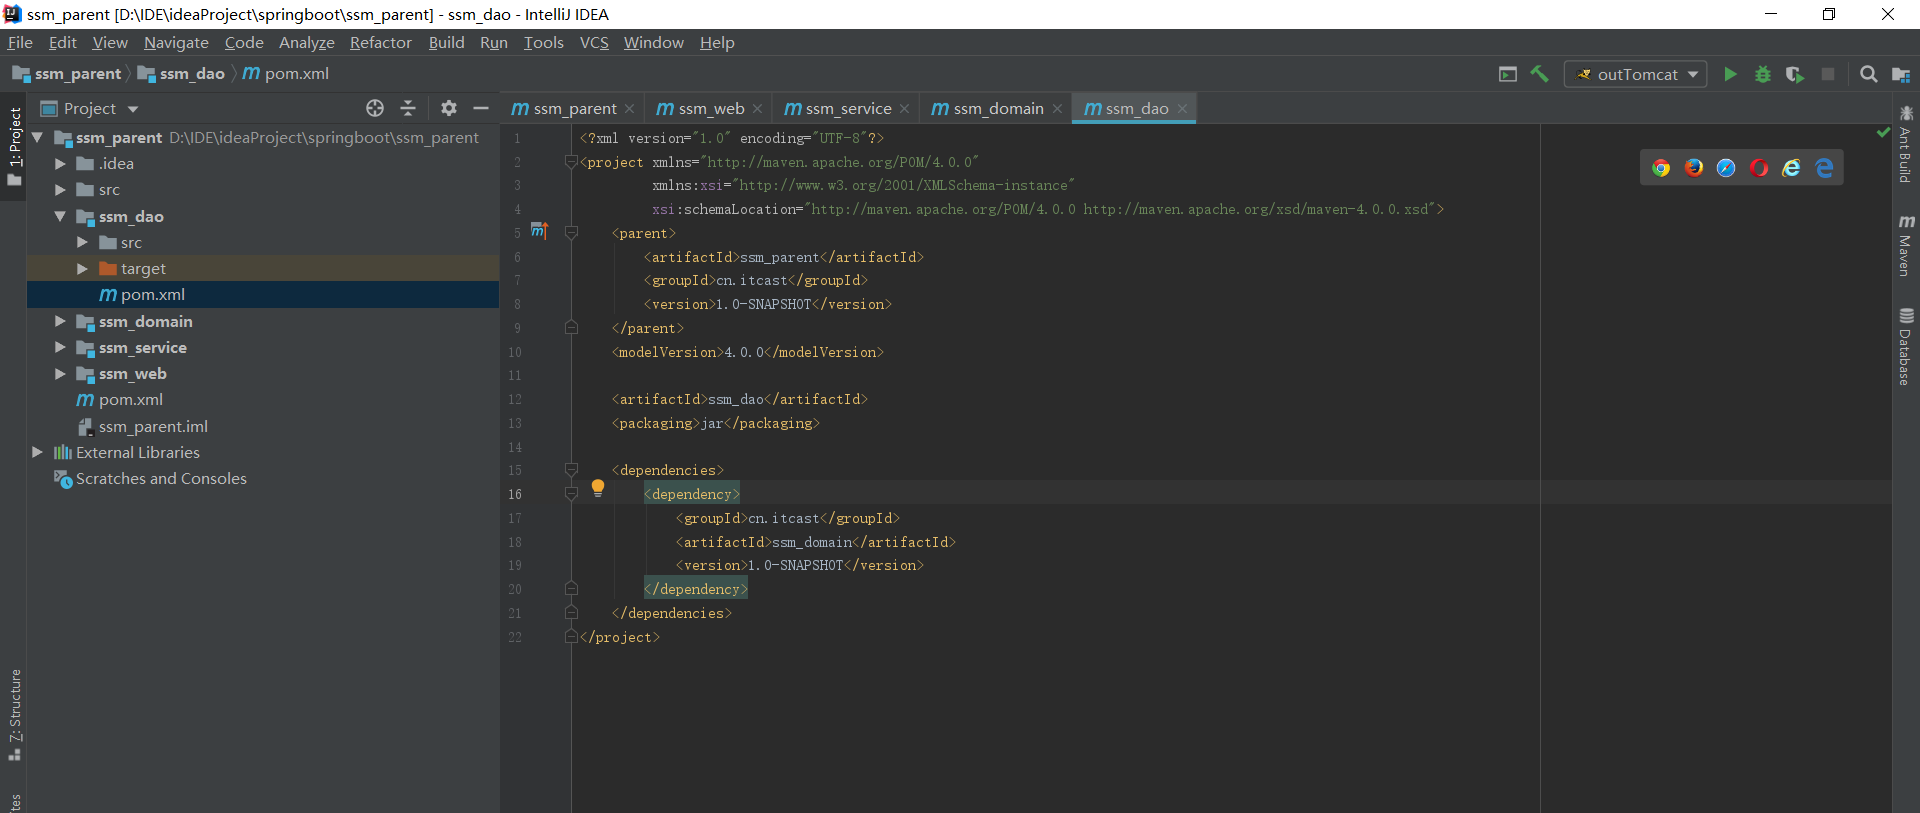
\3. Create ssm_dao sub module (packaged by jar package)
\4. Create ssm_domain submodule (packaged by jar package)
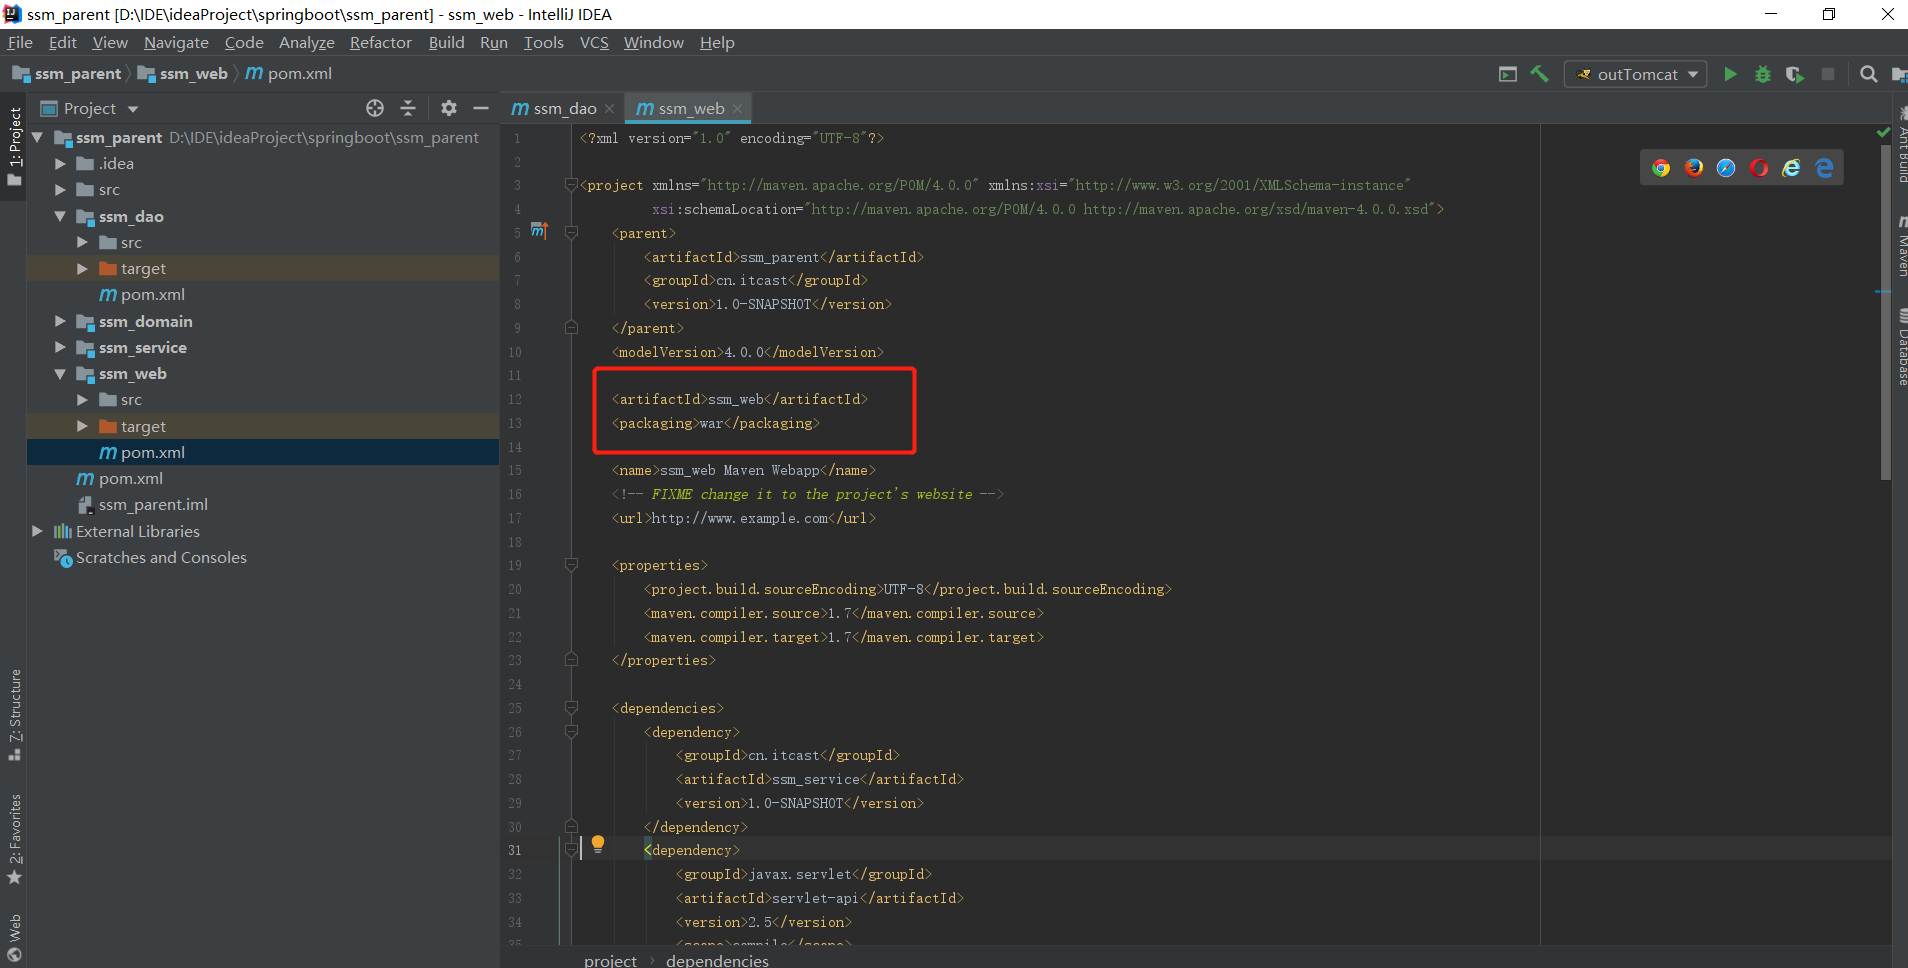
\5. Create ssm_web sub module (packaged by war package)
\6. web depends on service, service depends on dao, dao depends on domain
\7. In ssm_parent's pom.xml Introducing coordinate dependency into files
Steps and illustration:
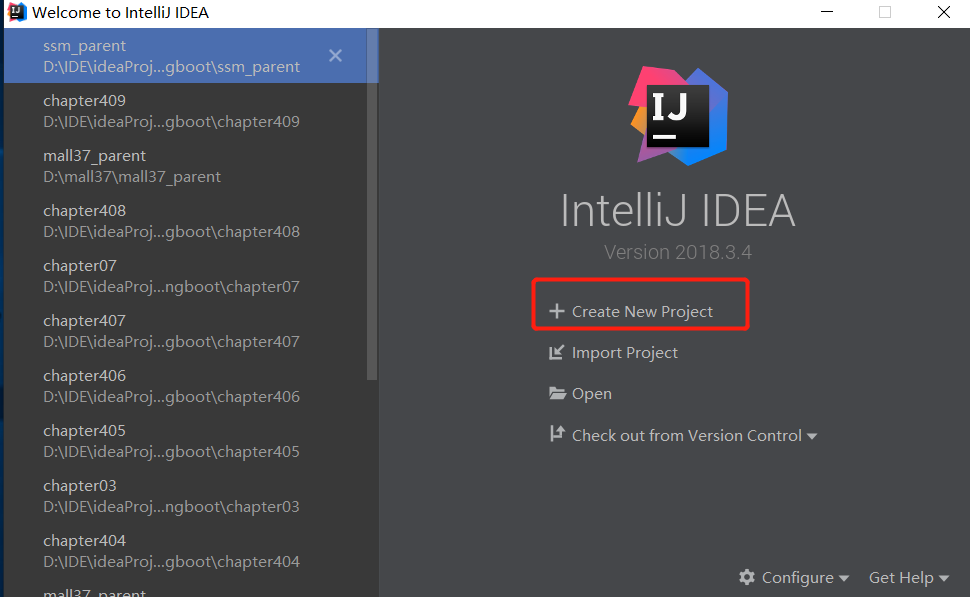
The parent project creates an empty project directly. next is as follows
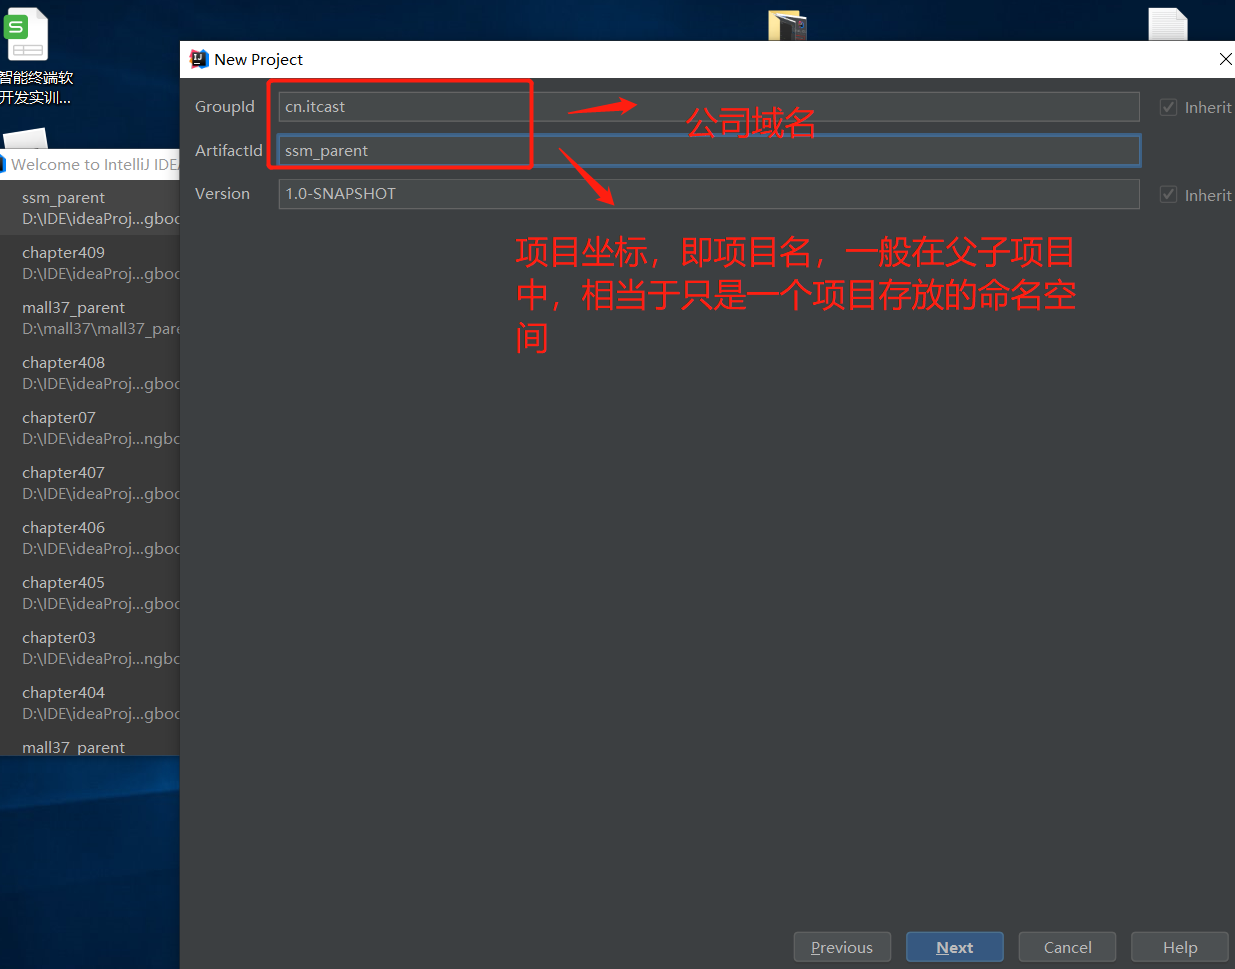
Build the parent project as follows, and click auto load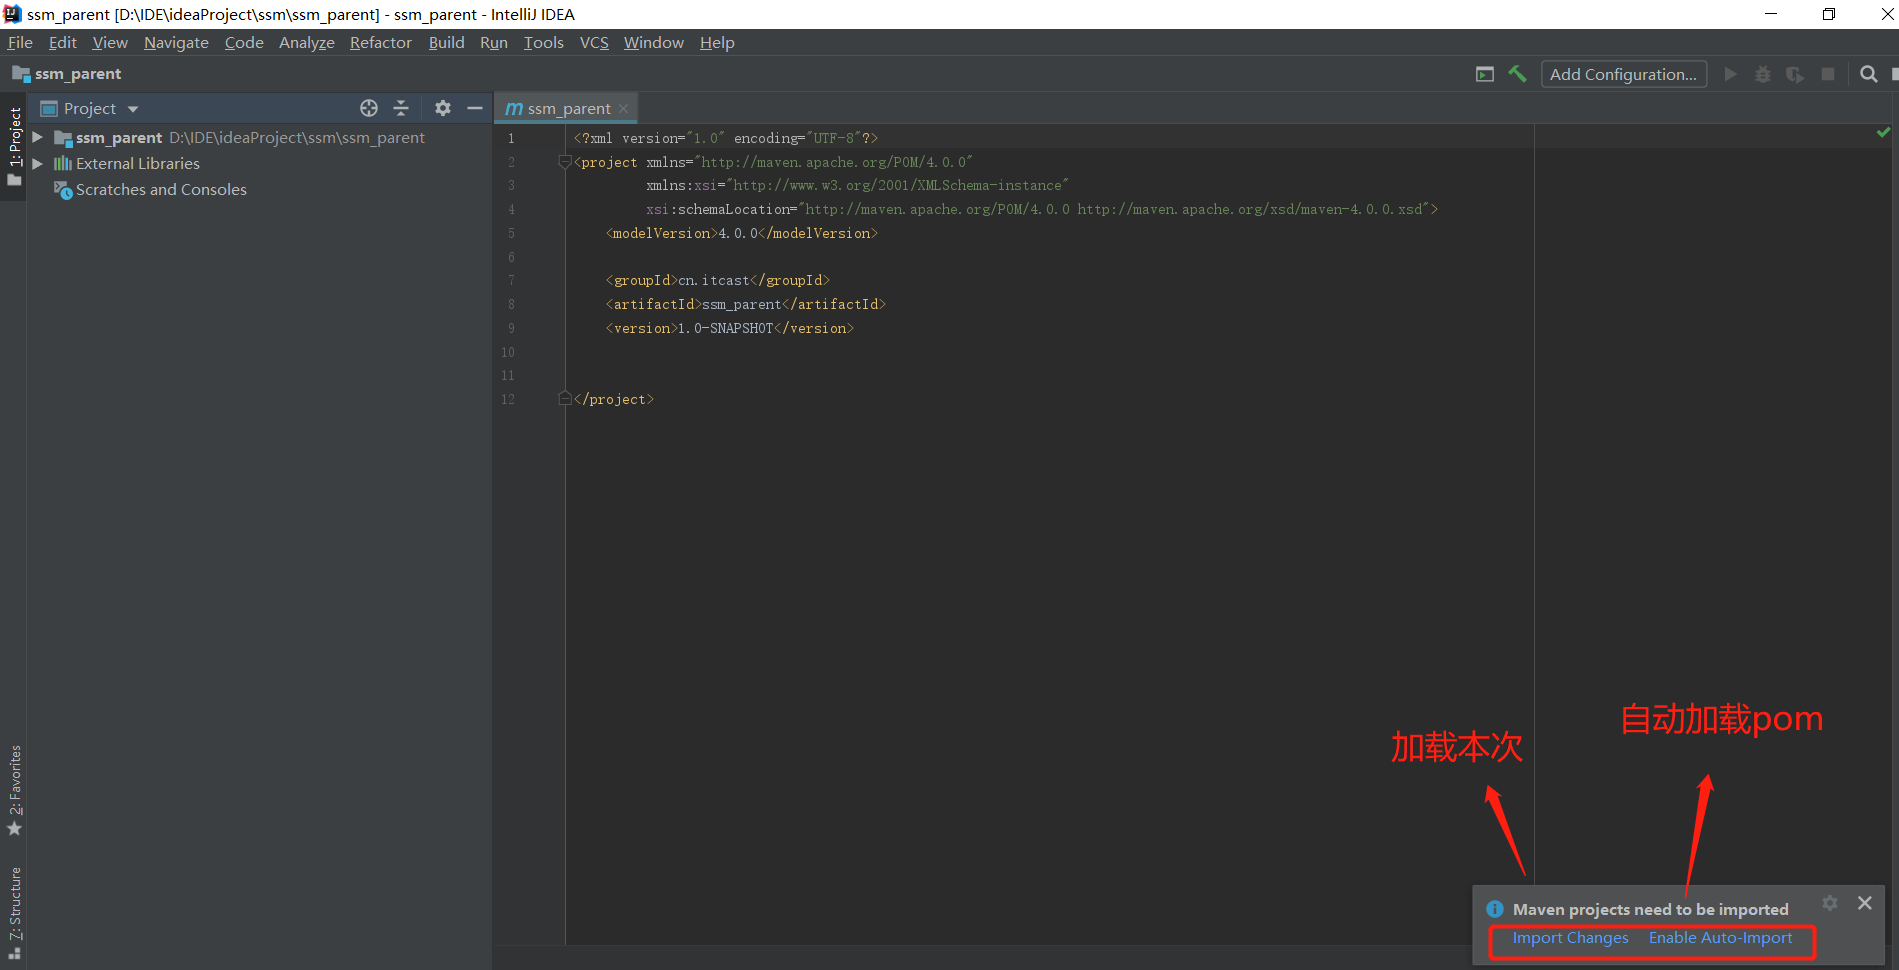
\2-4 creates jar packages in the same way. Right click the parent project, new module. Each creation process depends on the parent project coordinate, version number, and the created maven project is empty. Then create a packing label under the respective pom, with the value of jar, I still don't understand that you can refer to the creation process of the following web engineering module, which is basically the same. However, the template of maven template is the same as that of the parent project

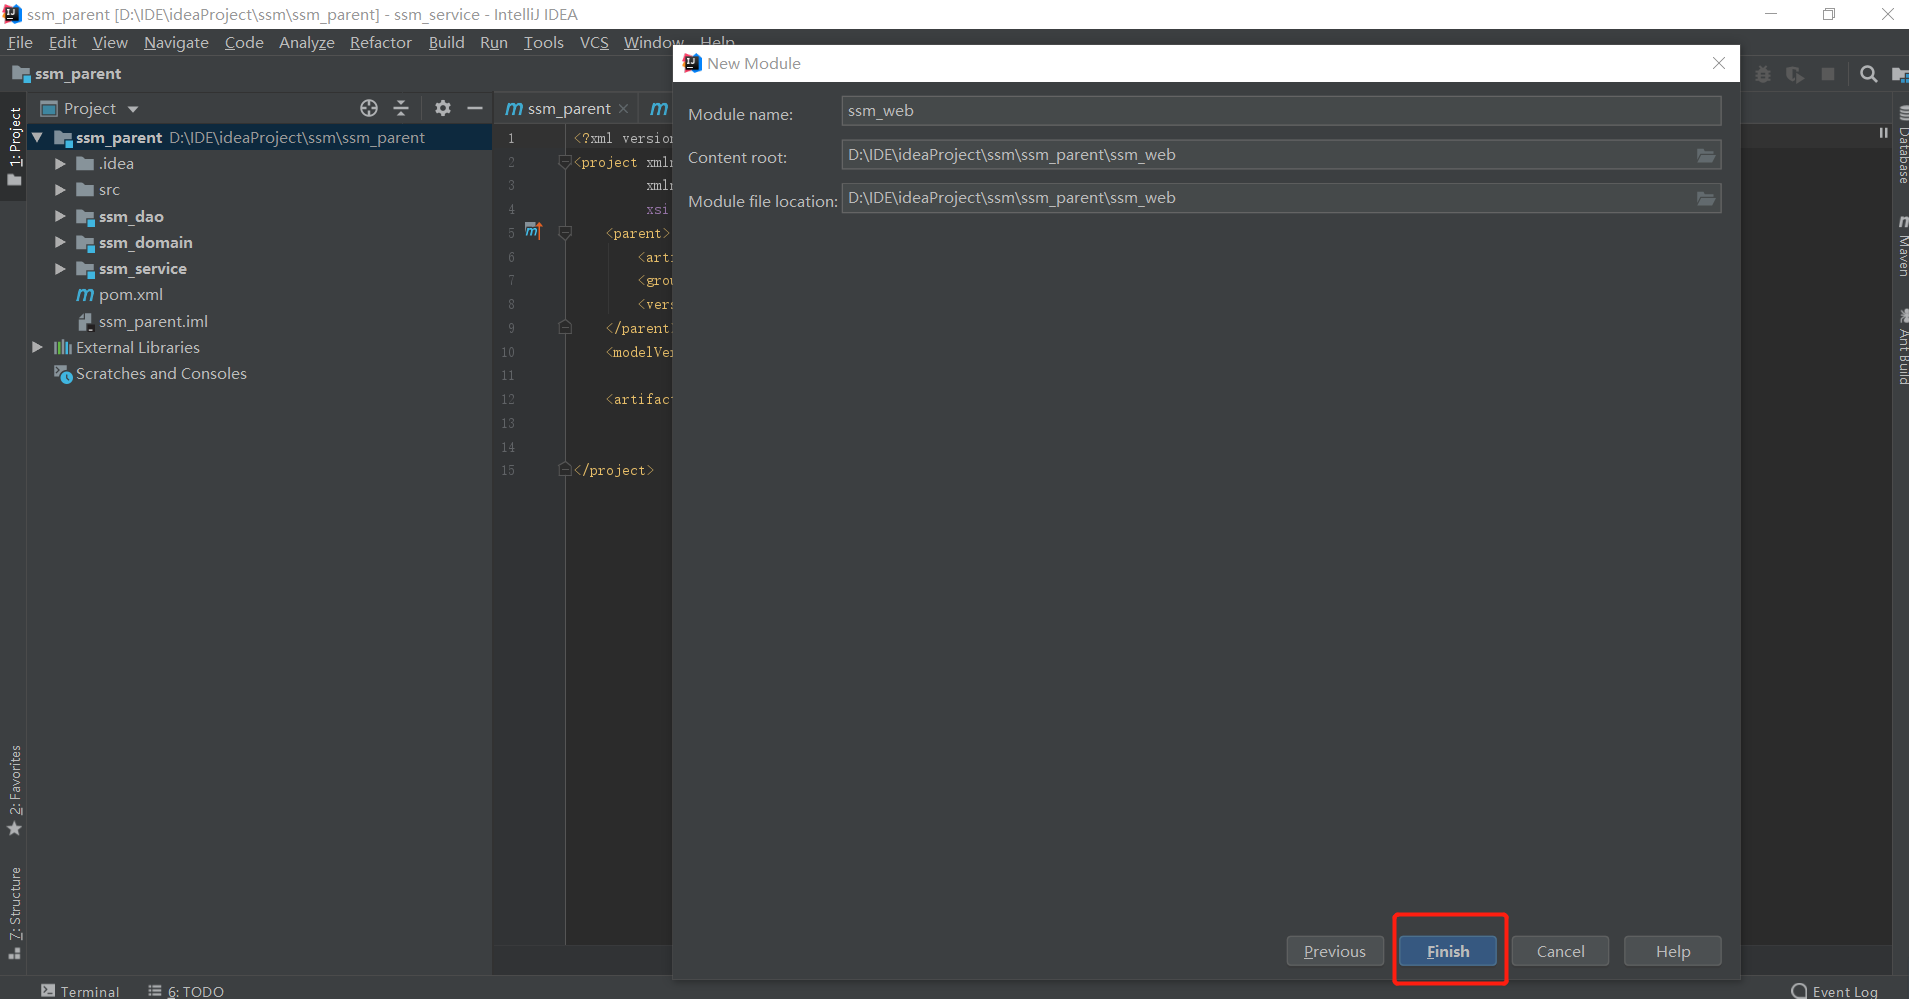
\5. Create ssm_web sub module (packaged by war package)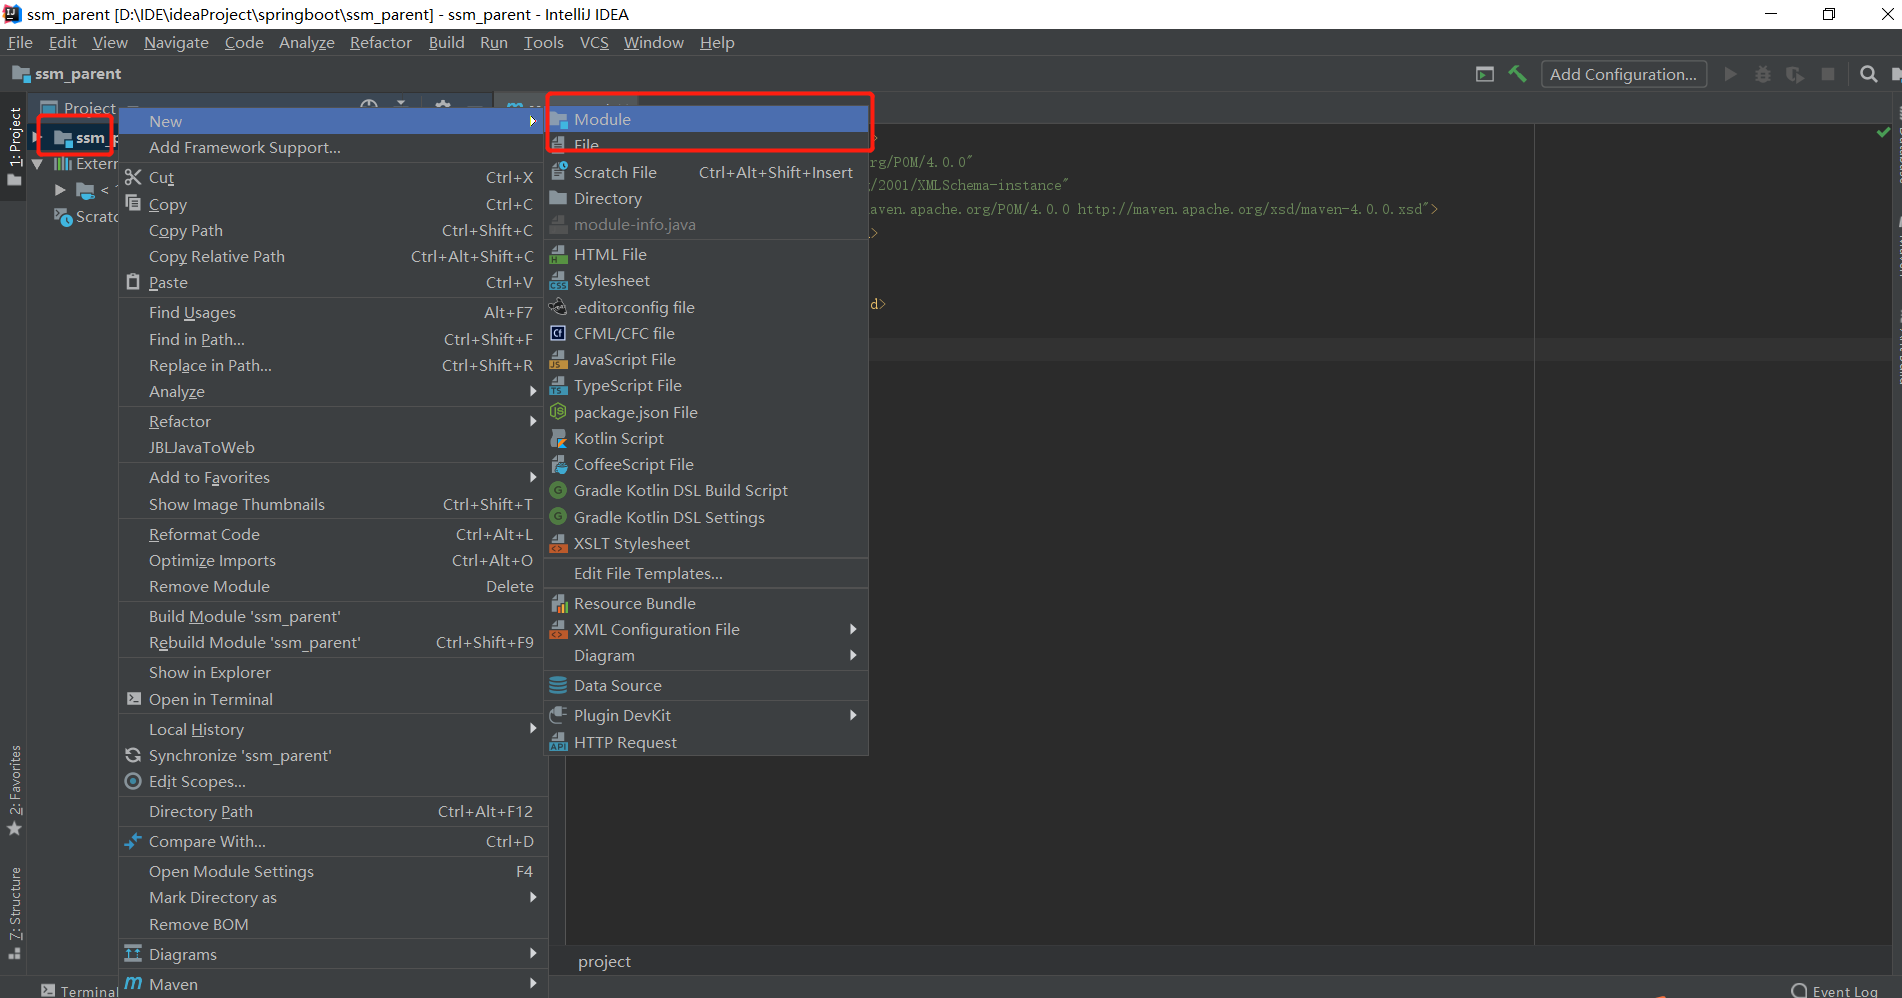
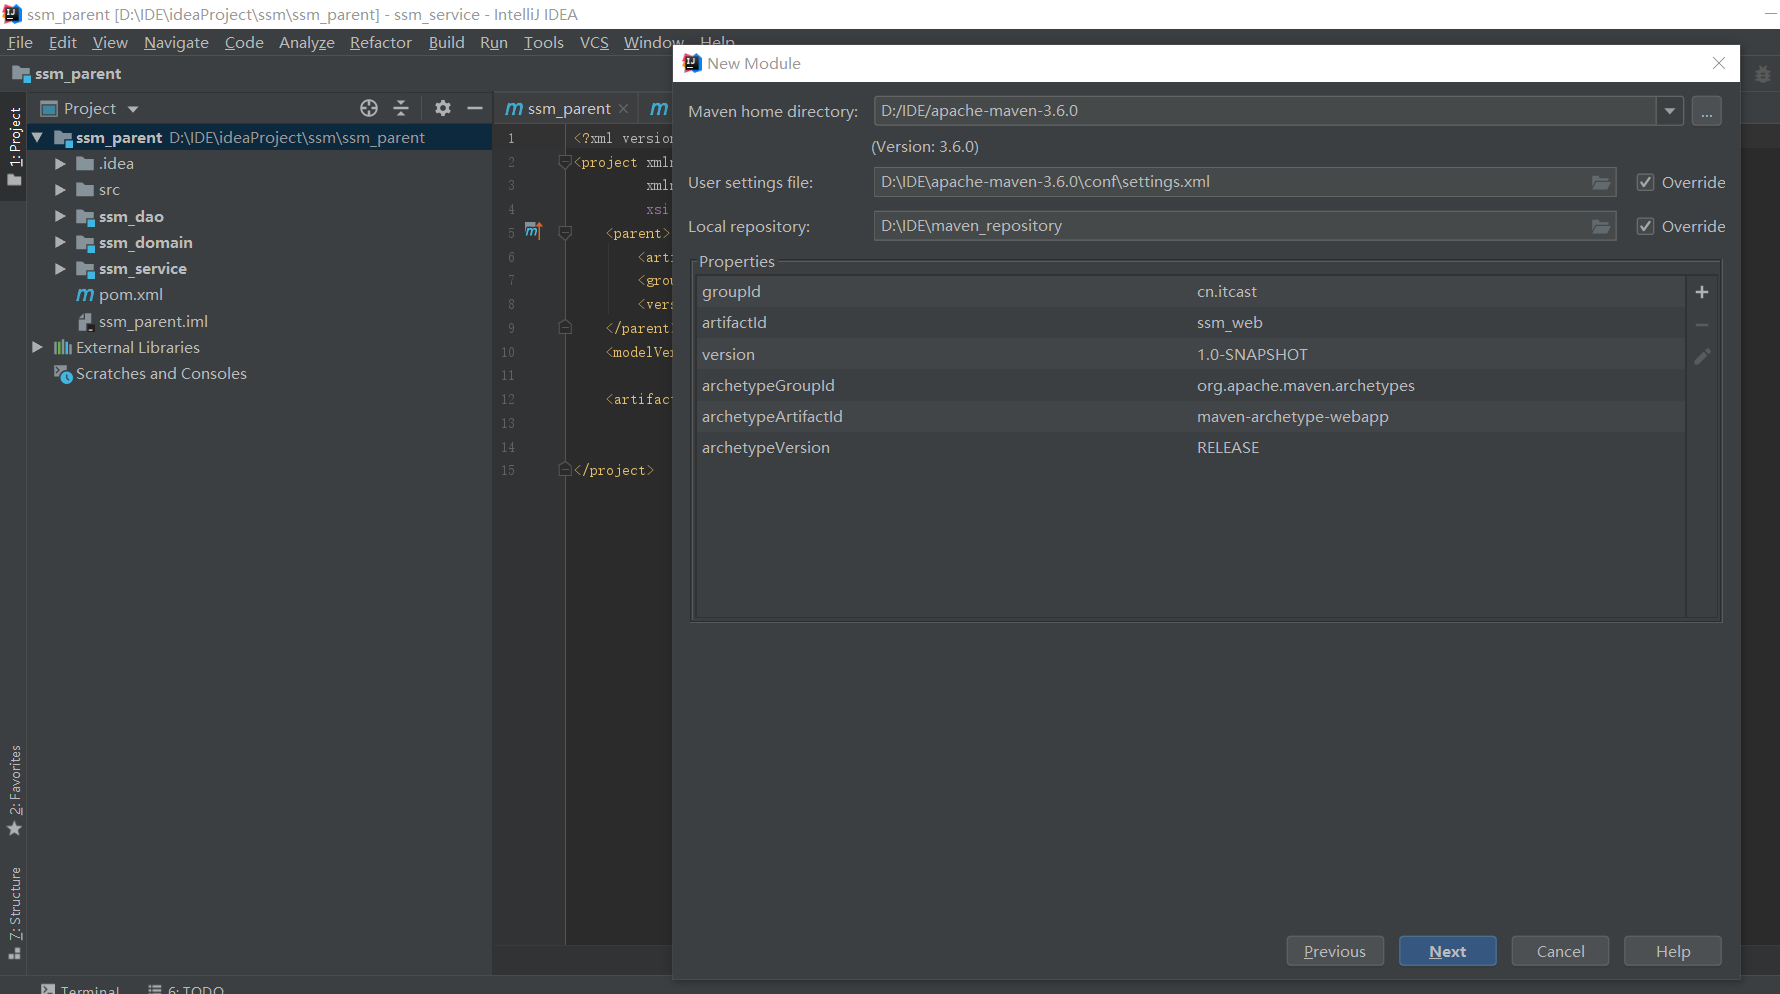
Check the maven template and select webapp. Please look carefully. There are two mistakes in wabapp
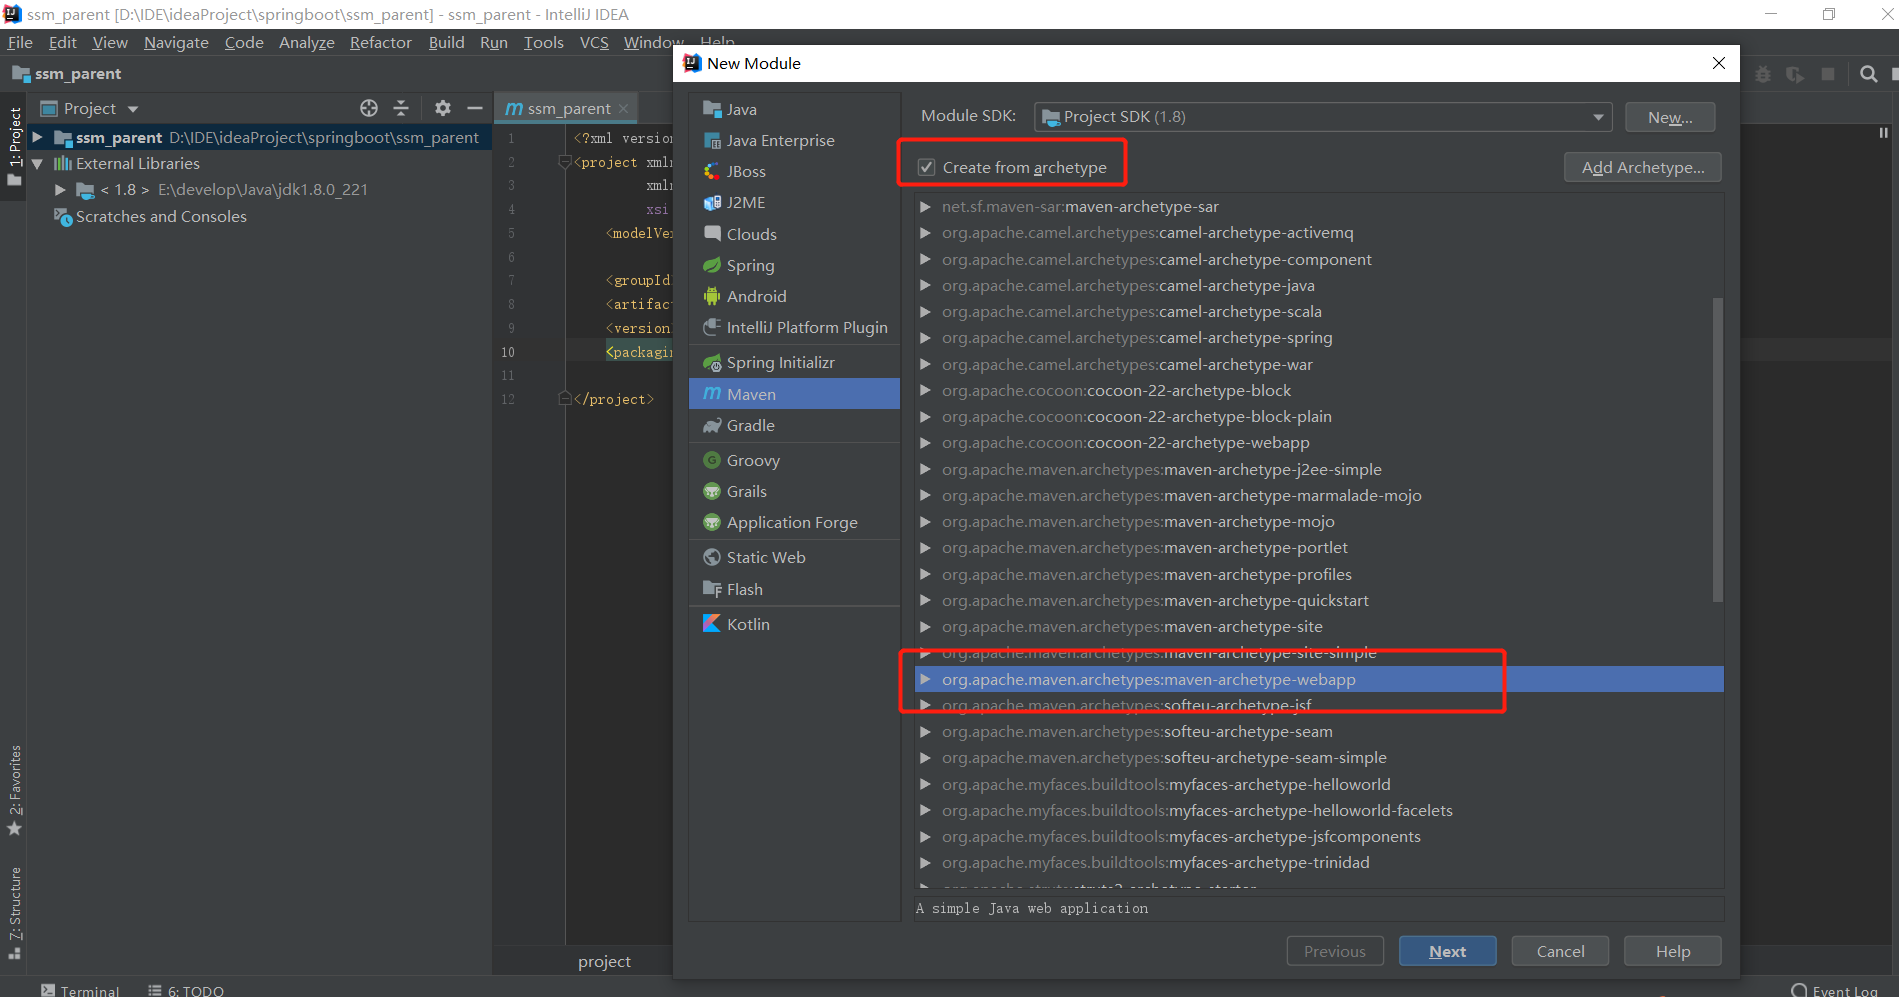
And then next, if you enter coordinates, you enter SSM_ Check web and dependency as shown in the figure above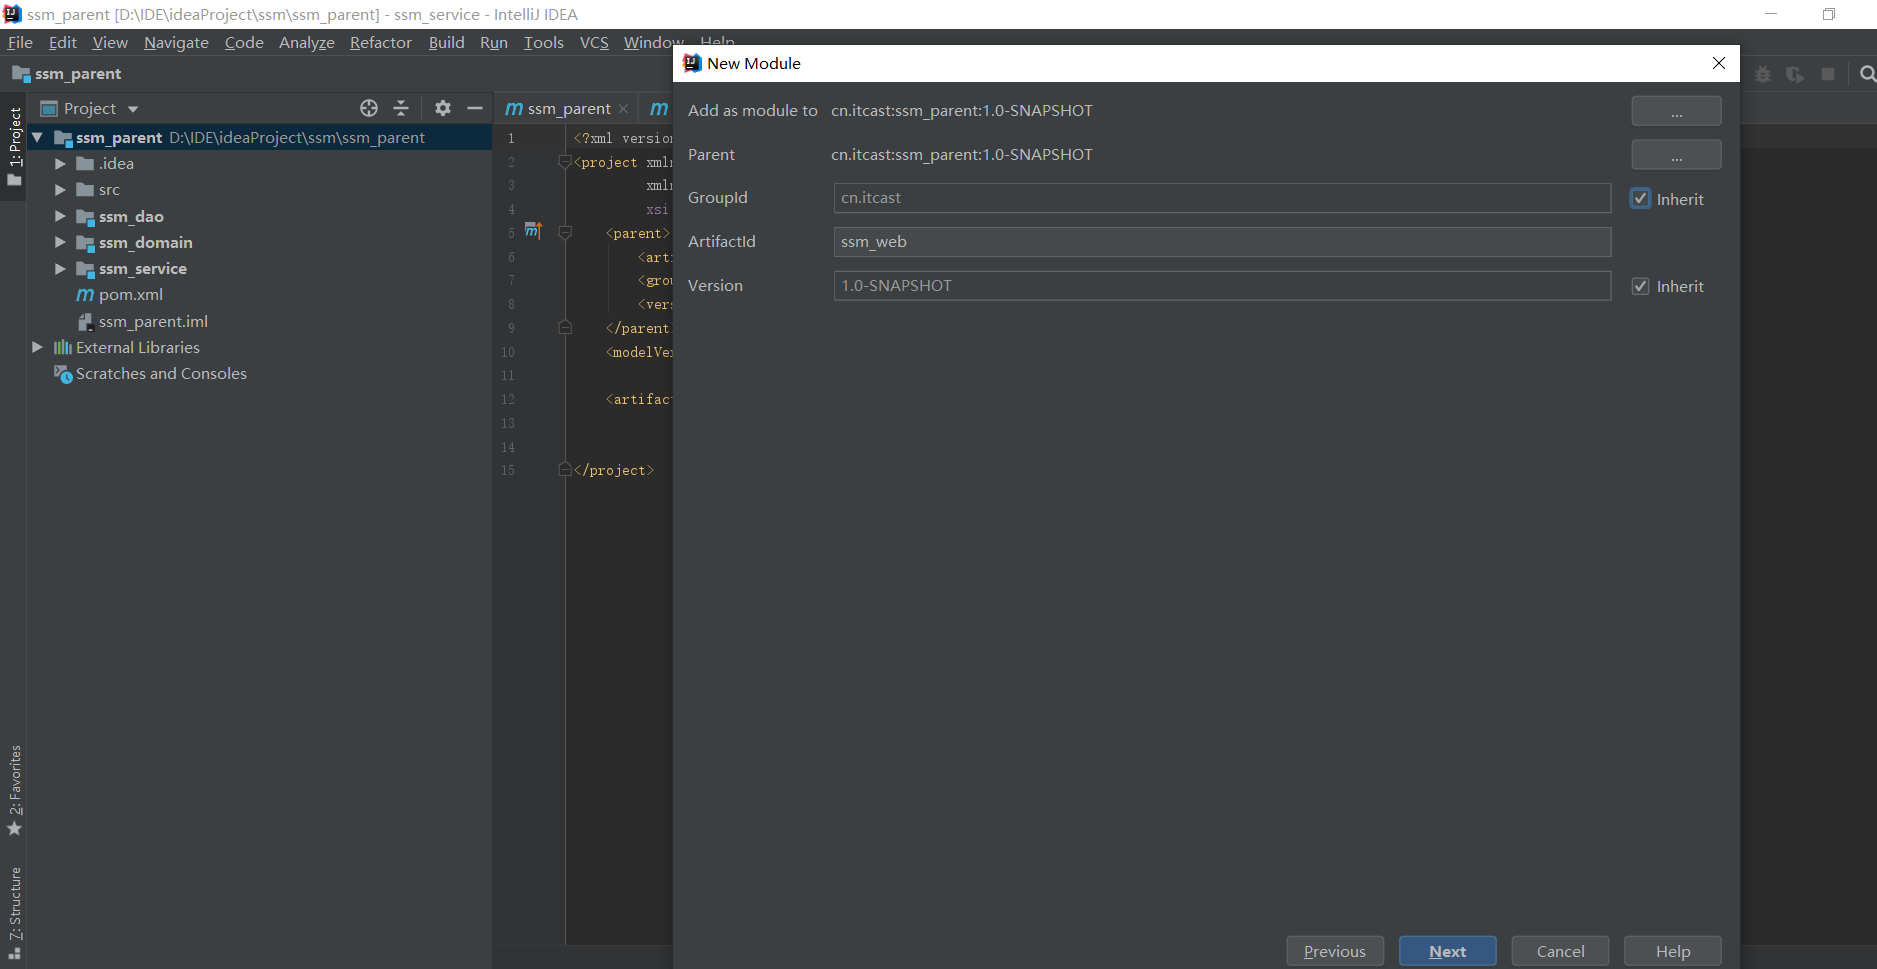
This creates the modules, and then adds the packaging method
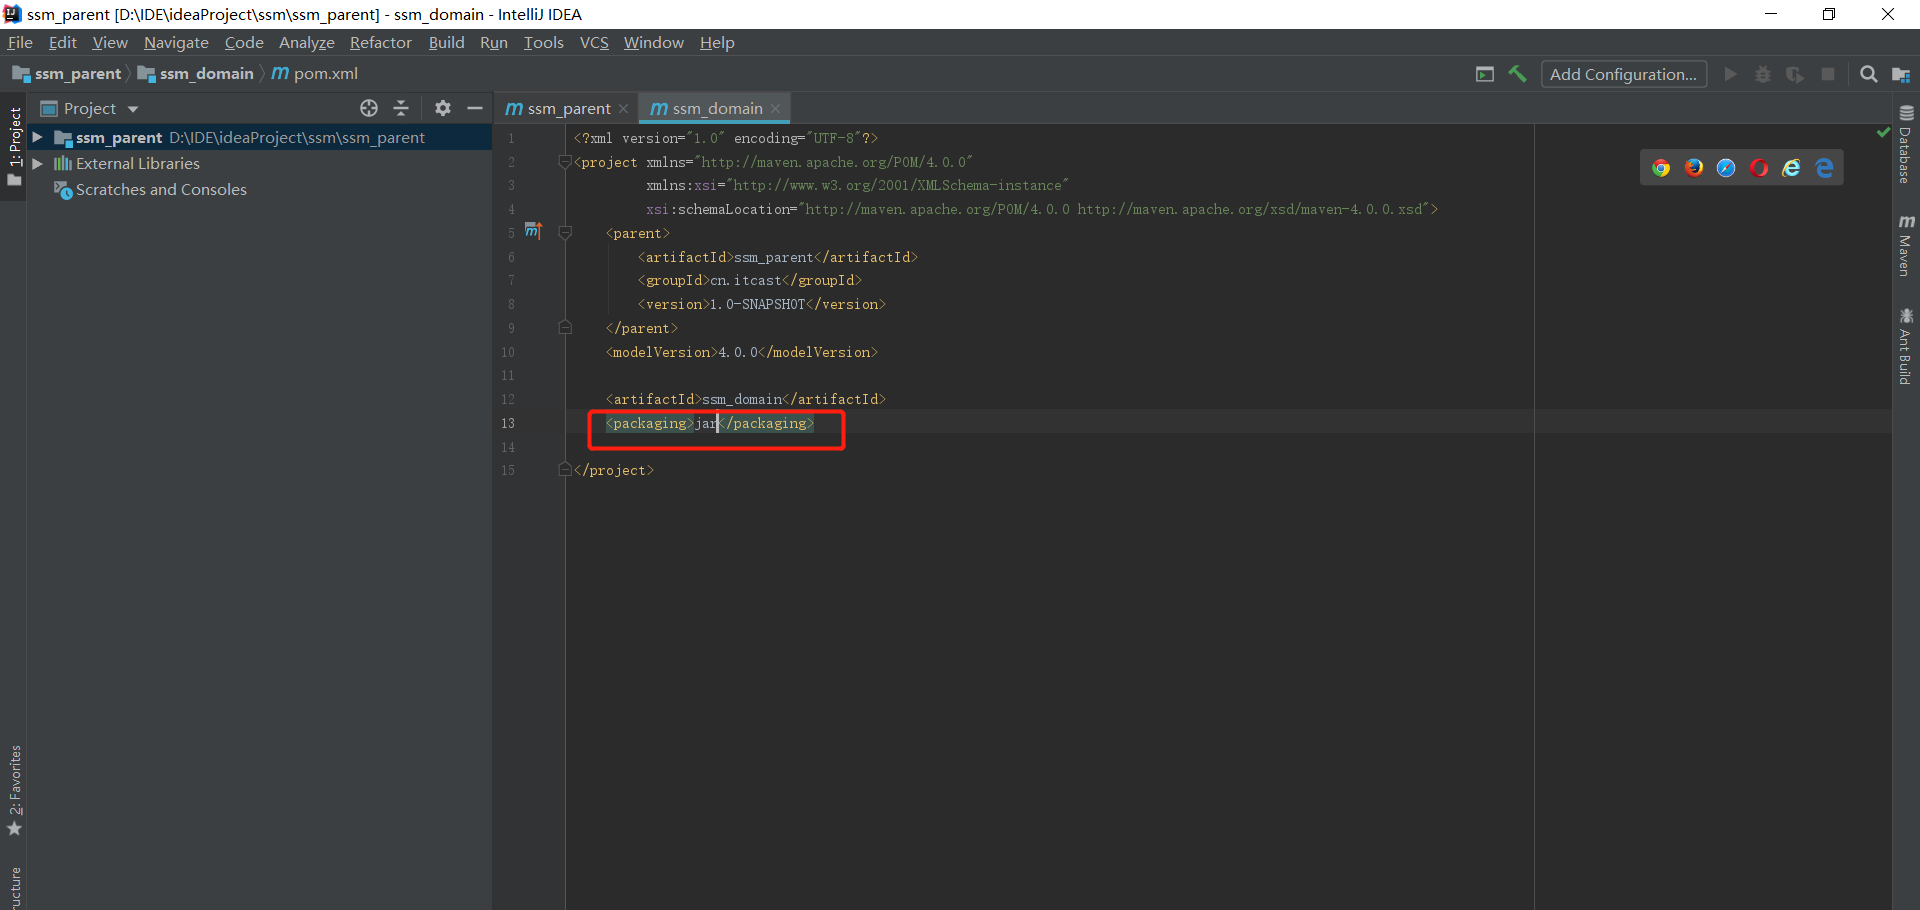
ssm_dao,ssm_service,ssm_domain is packed in the same way and written in the same way. Put a reference map:
For web, it is worth writing war:
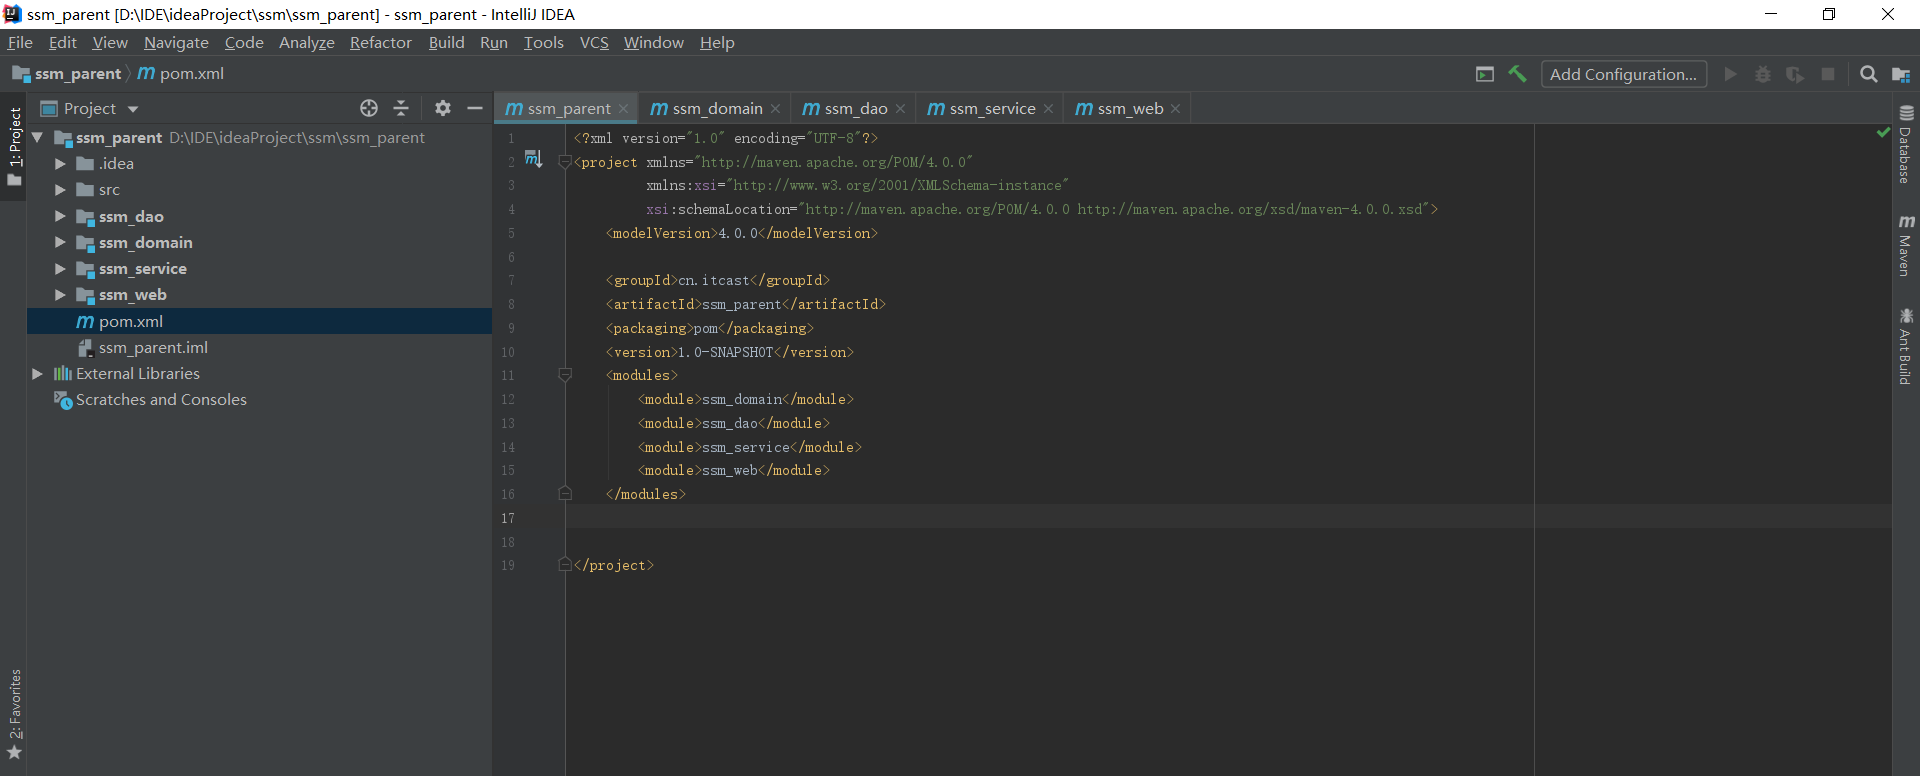
At the same time, if the parent project is dependent on the pom file, the idea will automatically generate the module tag, and each module can be seen, as shown in the figure:
\6. web depends on service, service depends on dao, dao depends on domain
Dependency between sub modules, as shown in the figure:
\7. In ssm_parent's pom.xml Introducing coordinate dependency into files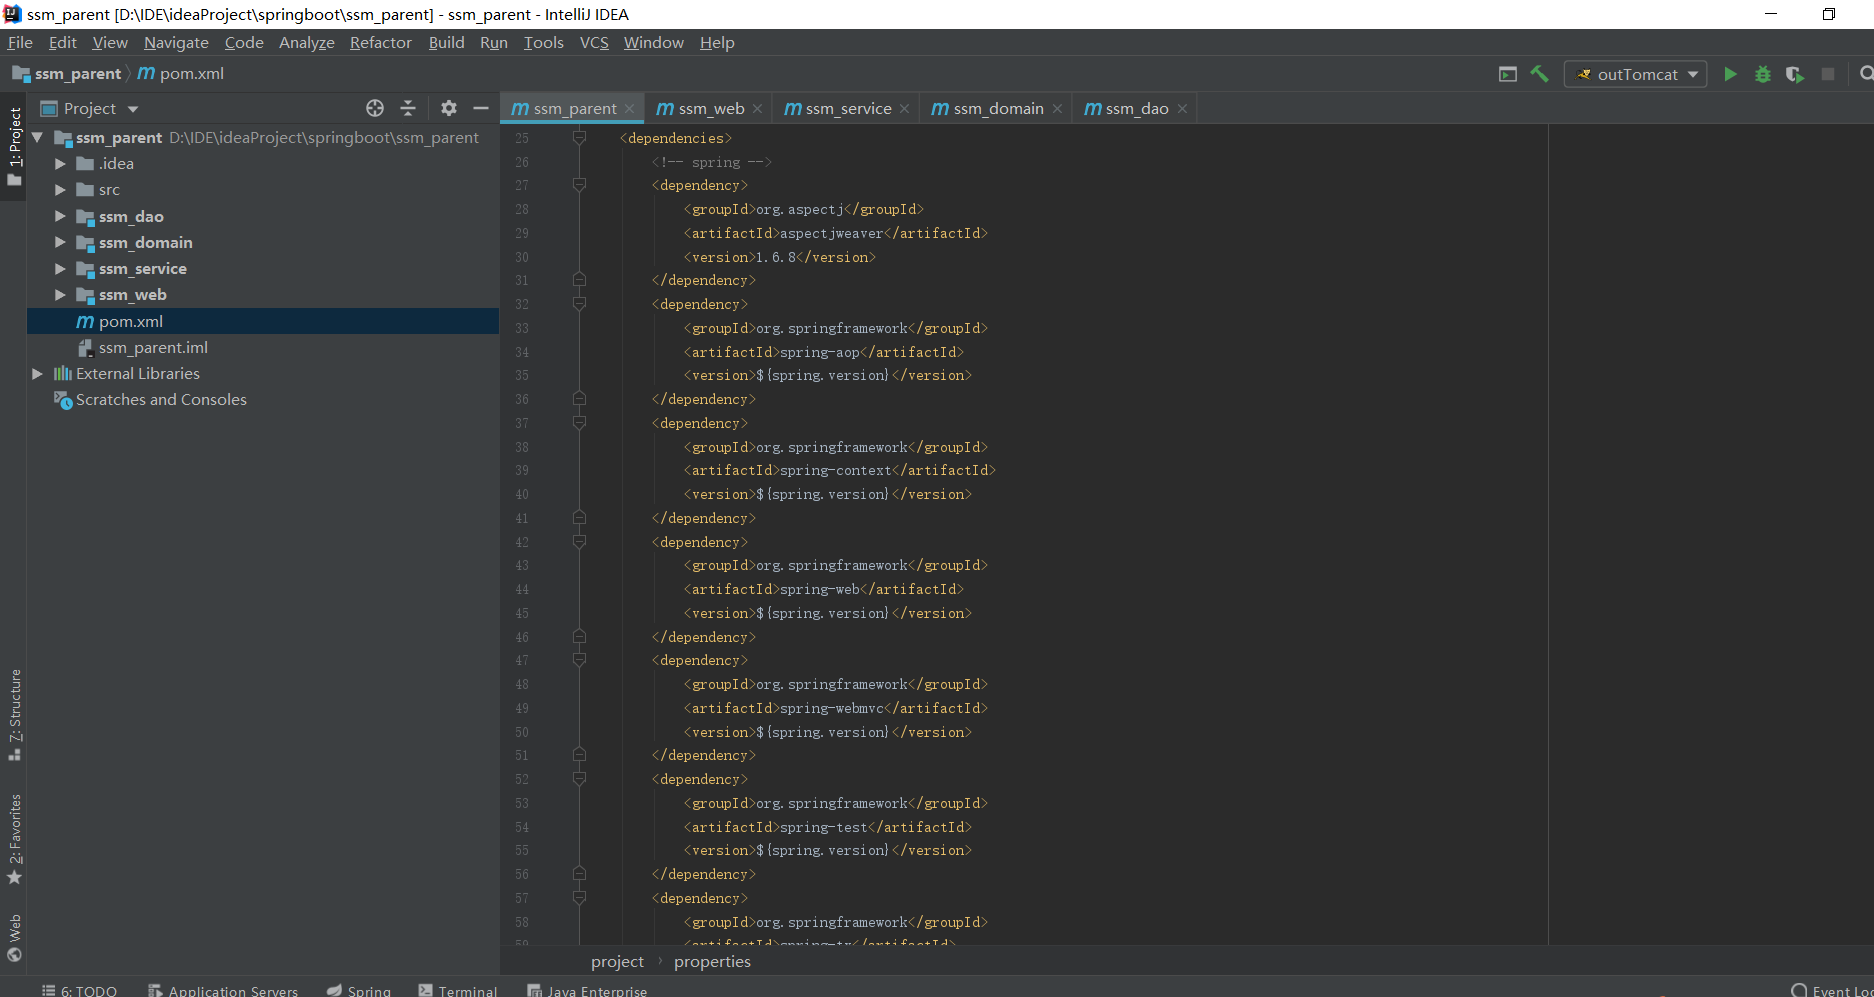
Paste it and copy by yourself, guide the coordinates, and introduce the jar package:
 <properties>
        <spring.version>5.0.2.RELEASE</spring.version>
        <slf4j.version>1.6.6</slf4j.version>
        <log4j.version>1.2.12</log4j.version>
        <mysql.version>5.1.6</mysql.version>
        <mybatis.version>3.4.5</mybatis.version>
    </properties>
    <dependencies>
        <!-- spring -->
        <dependency>
            <groupId>org.aspectj</groupId>
            <artifactId>aspectjweaver</artifactId>
            <version>1.6.8</version>
        </dependency>
        <dependency>
            <groupId>org.springframework</groupId>
            <artifactId>spring-aop</artifactId>
            <version>${spring.version}</version>
        </dependency>
        <dependency>
            <groupId>org.springframework</groupId>
            <artifactId>spring-context</artifactId>
            <version>${spring.version}</version>
        </dependency>
        <dependency>
            <groupId>org.springframework</groupId>
            <artifactId>spring-web</artifactId>
            <version>${spring.version}</version>
        </dependency>
        <dependency>
            <groupId>org.springframework</groupId>
            <artifactId>spring-webmvc</artifactId>
            <version>${spring.version}</version>
        </dependency>
        <dependency>
            <groupId>org.springframework</groupId>
            <artifactId>spring-test</artifactId>
            <version>${spring.version}</version>
        </dependency>
        <dependency>
            <groupId>org.springframework</groupId>
            <artifactId>spring-tx</artifactId>
            <version>${spring.version}</version>
        </dependency>
        <dependency>
            <groupId>org.springframework</groupId>
            <artifactId>spring-jdbc</artifactId>
            <version>${spring.version}</version>
        </dependency>
        <dependency>
            <groupId>junit</groupId>
            <artifactId>junit</artifactId>
            <version>4.12</version>
            <scope>compile</scope>
        </dependency>
        <dependency>
            <groupId>mysql</groupId>
            <artifactId>mysql-connector-java</artifactId>
            <version>${mysql.version}</version>
        </dependency>
        <dependency>
            <groupId>javax.servlet</groupId>
            <artifactId>servlet-api</artifactId>
            <version>2.5</version>
            <scope>provided</scope>
        </dependency>
        <dependency>
            <groupId>javax.servlet.jsp</groupId>
            <artifactId>jsp-api</artifactId>
            <version>2.0</version>
            <scope>provided</scope>
        </dependency>
        <dependency>
            <groupId>jstl</groupId>
            <artifactId>jstl</artifactId>
            <version>1.2</version>
        </dependency> <!-- log start -->
        <dependency>
            <groupId>log4j</groupId>
            <artifactId>log4j</artifactId>
            <version>${log4j.version}</version>
        </dependency>
        <dependency>
            <groupId>org.slf4j</groupId>
            <artifactId>slf4j-api</artifactId>
            <version>${slf4j.version}</version>
        </dependency>
        <dependency>
            <groupId>org.slf4j</groupId>
            <artifactId>slf4j-log4j12</artifactId>
            <version>${slf4j.version}</version>
        </dependency> <!-- log end -->
        <dependency>
            <groupId>org.mybatis</groupId>
            <artifactId>mybatis</artifactId>
            <version>${mybatis.version}</version>
        </dependency>
        <dependency>
            <groupId>org.mybatis</groupId>
            <artifactId>mybatis-spring</artifactId>
            <version>1.3.0</version>
        </dependency>
        <dependency>
            <groupId>c3p0</groupId>
            <artifactId>c3p0</artifactId>
            <version>0.9.1.2</version>
            <type>jar</type>
            <scope>compile</scope>
        </dependency>
    </dependencies>
    <build>
        <finalName>ssm</finalName>
        <pluginManagement>
            <plugins>
                <plugin>
                    <groupId>org.apache.maven.plugins</groupId>
                    <artifactId>maven-compiler-plugin</artifactId>
                    <version>3.2</version>
                    <configuration>
                        <source>1.8</source>
                        <target>1.8</target>
                        <encoding>UTF-8</encoding>
                        <showWarnings>true</showWarnings>
                    </configuration>
                </plugin>
            </plugins>
        </pluginManagement>
    </build>
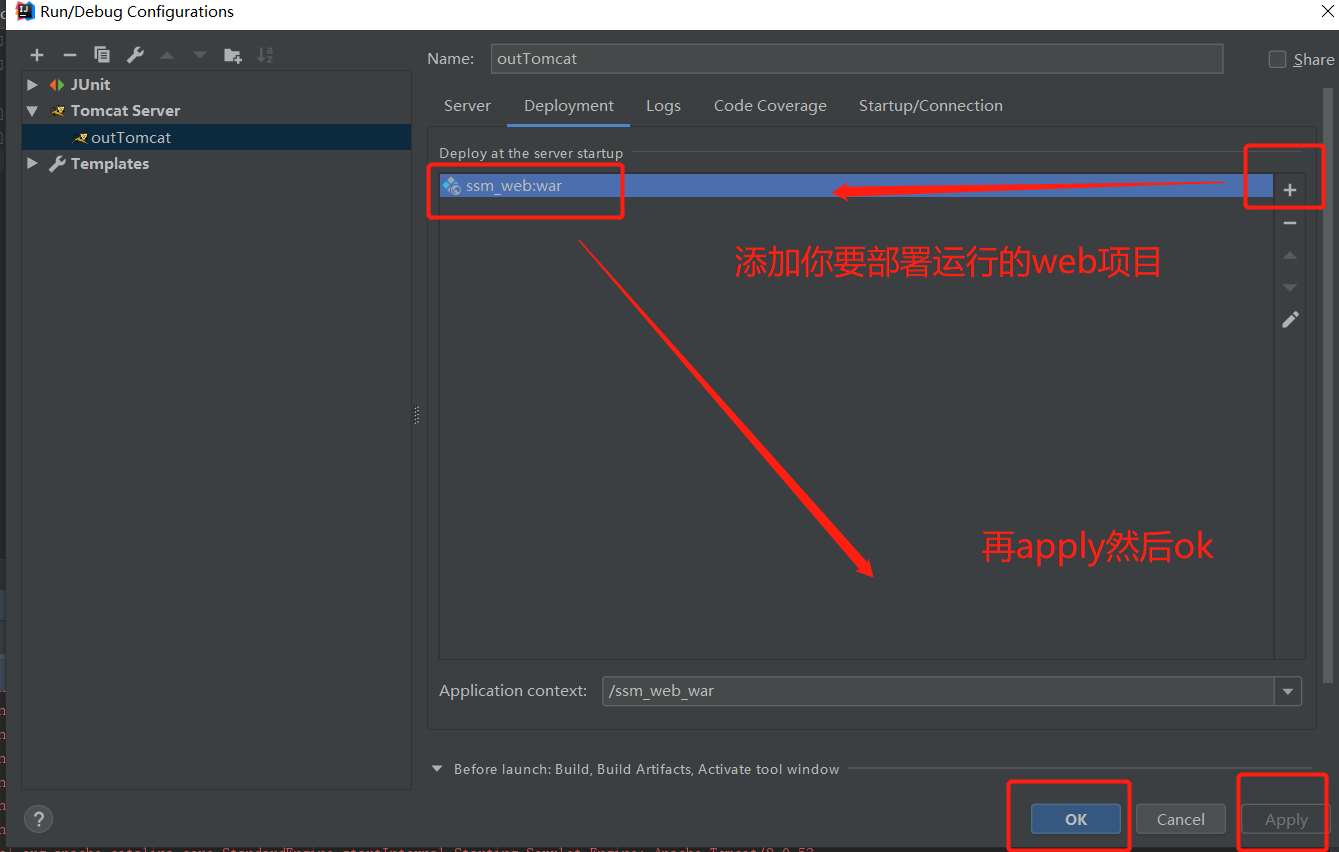
Then refresh in maven to check whether the jar package dependency is imported normally. By now, the skeleton has been basically completed, and the web module (SSM) is deployed_ Web project) is added to the tomcat server and can be done later when it needs to run.
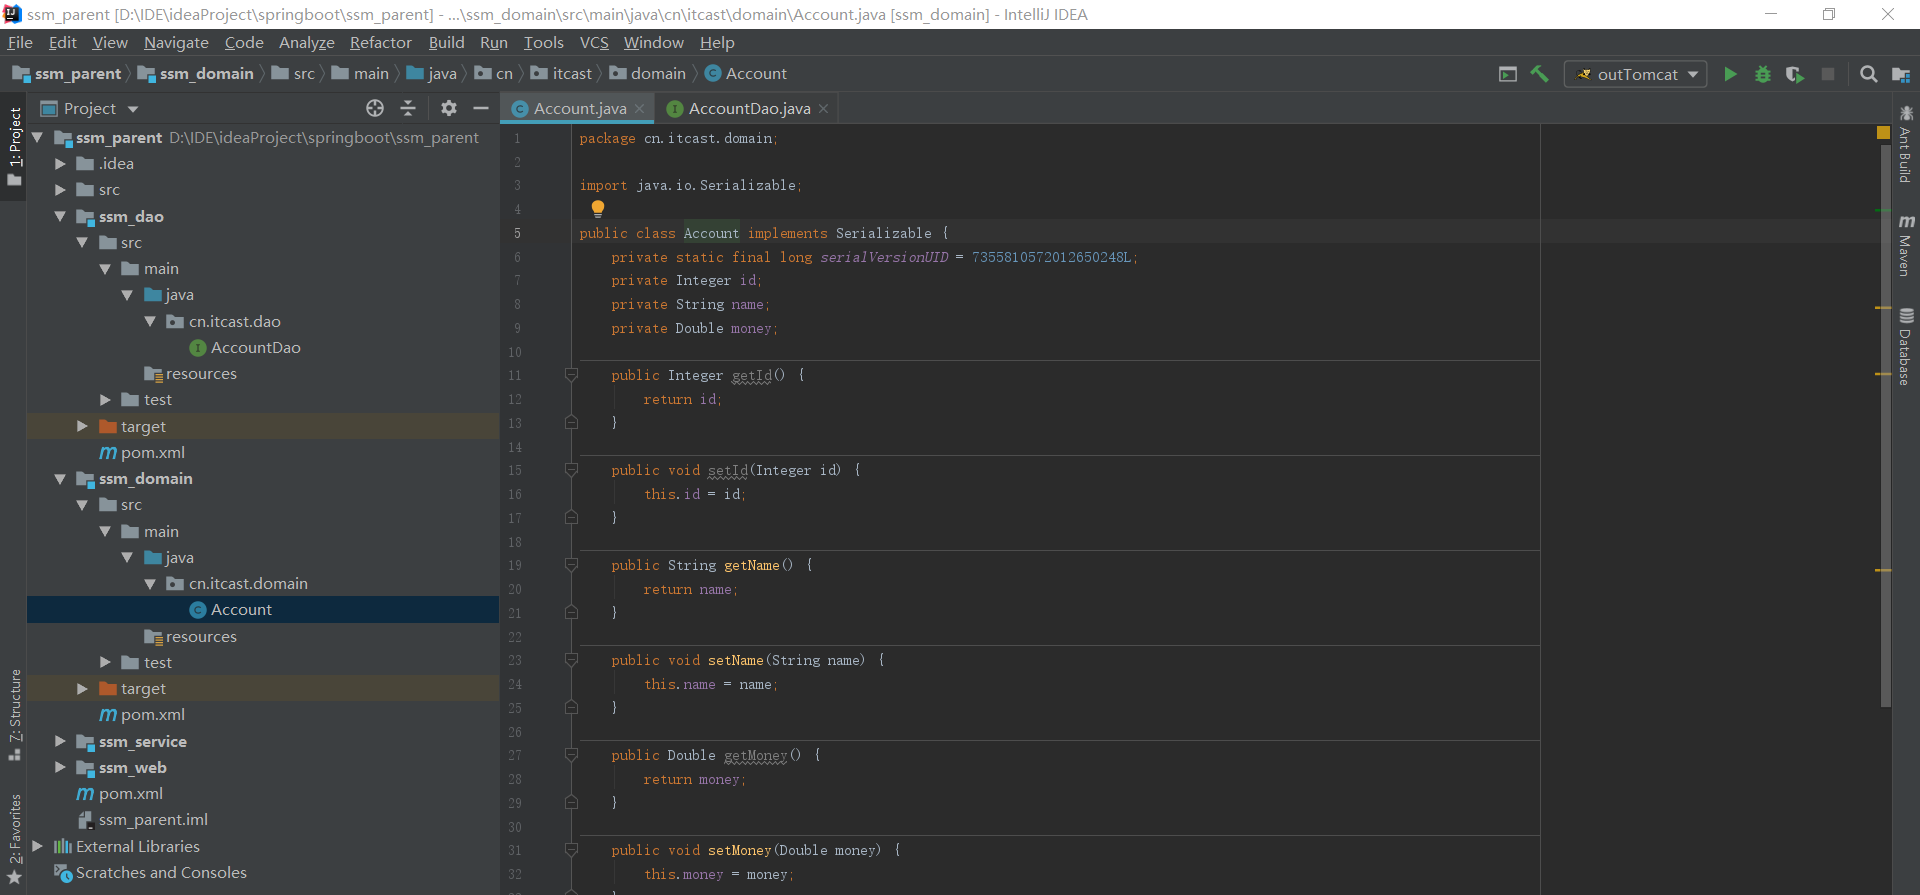
3. Write entity class in SSM_ Written in domain project
package cn.itcast.domain;

import java.io.Serializable;

public class Account implements Serializable {
    private static final long serialVersionUID = 7355810572012650248L;
    private Integer id;
    private String name;
    private Double money;

    public Integer getId() {
        return id;
    }

    public void setId(Integer id) {
        this.id = id;
    }

    public String getName() {
        return name;
    }

    public void setName(String name) {
        this.name = name;
    }

    public Double getMoney() {
        return money;
    }

    public void setMoney(Double money) {
        this.money = money;
    }

    @Override
    public String toString() {
        return "Account{" +
                "id=" + id +
                ", name='" + name + '\'' +
                ", money=" + money +
                '}';
    }
}
4. Write dao interface
package cn.itcast.dao;

import java.util.List;

import cn.itcast.domain.Account;
import org.apache.ibatis.annotations.Insert;
import org.apache.ibatis.annotations.Select;
import org.springframework.stereotype.Repository;

//@Repository
public interface AccountDao {

   // @Insert(value="insert into account (name,money) values (#{name},#{money})")
    public void saveAccount(Account account);

   // @Select("select * from account")
    public List<Account> findAll();
}
The structure is shown in the figure:
5. Write service interface and implementation class
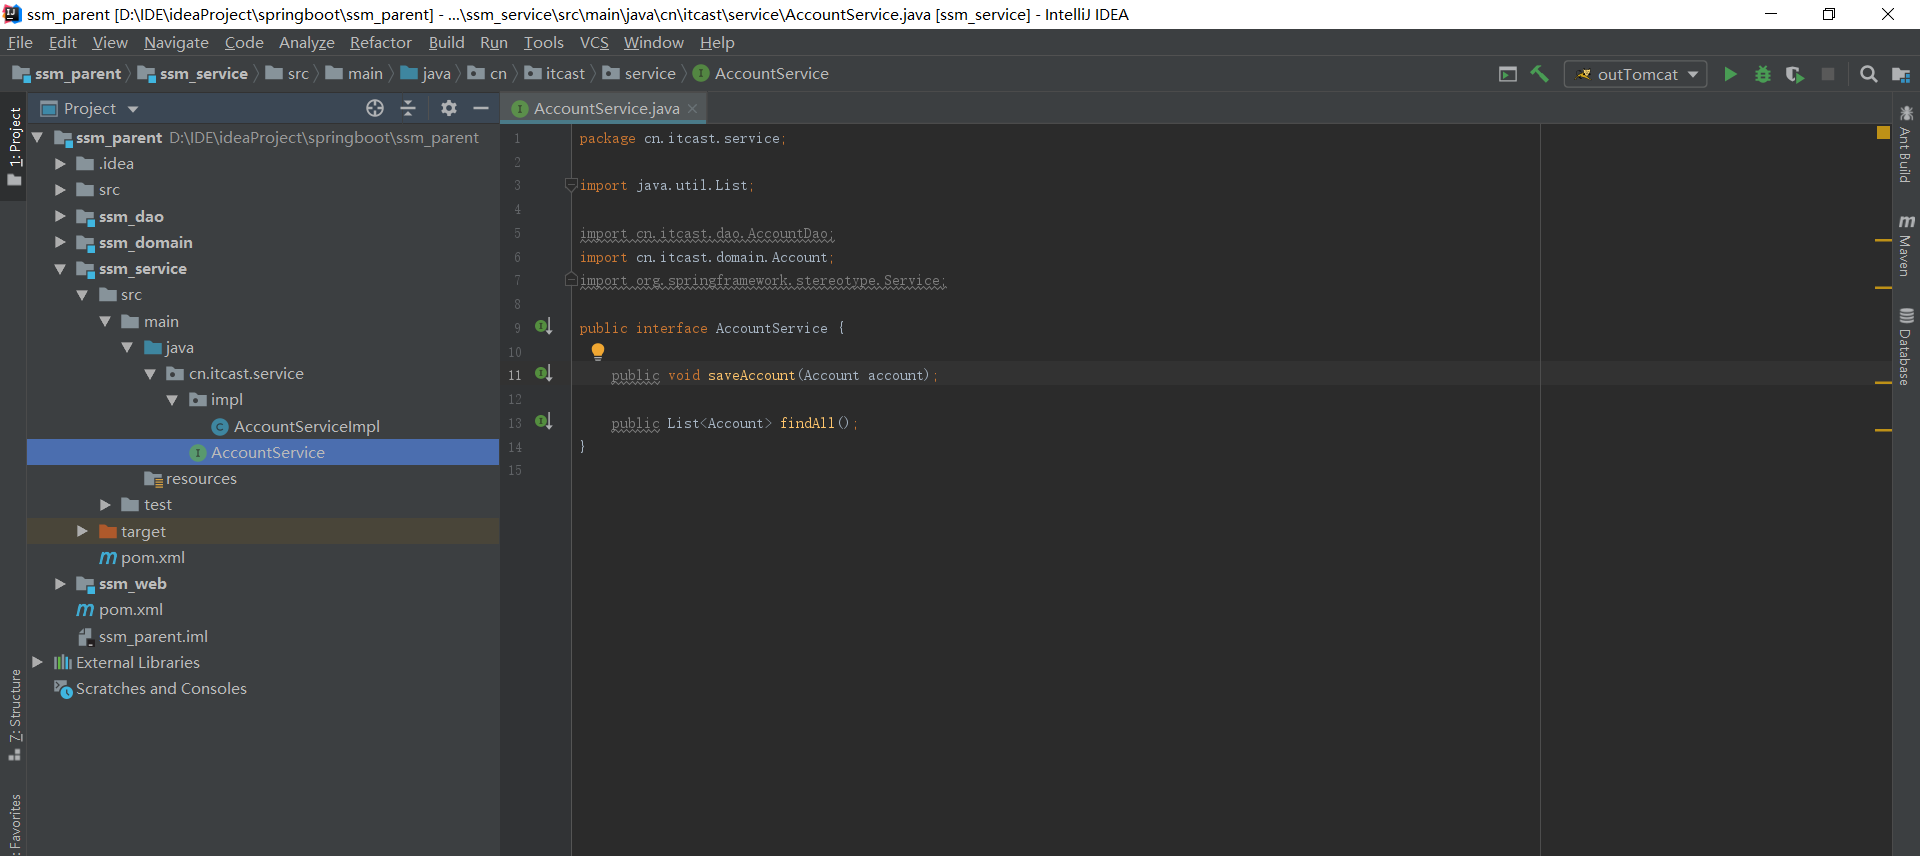
The service interface is as follows:
package cn.itcast.service;

import java.util.List;

import cn.itcast.dao.AccountDao;
import cn.itcast.domain.Account;
import org.springframework.stereotype.Service;

public interface AccountService {

    public void saveAccount(Account account);

    public List<Account> findAll();
}
serviceimpl implements the interface service:
package cn.itcast.service.impl;

import java.util.List;

import org.springframework.beans.factory.annotation.Autowired;
import org.springframework.stereotype.Service;
import cn.itcast.dao.AccountDao;
import cn.itcast.domain.Account;
import cn.itcast.service.AccountService;

@Service("accountService")
public class AccountServiceImpl implements AccountService {
    private AccountDao account;


    public void saveAccount(Account account) {
        System.out.println("Service Business tier: save account...");

    }

    public List<Account> findAll() {
        System.out.println("Business layer: query all accounts...");
        return null;
    }


}
4.2 coding of spring framework
1. Create applicationContext.xml
to write applicationContext.xml In SSM_ Under main\resources on the web, if not, create the resources directory by yourself, and then set it as the root resources directory. The code is as follows:
<?xml version="1.0" encoding="UTF-8"?>
<beans xmlns="http://www.springframework.org/schema/beans" xmlns:xsi="http://www.w3.org/2001/XMLSchema-instance"
       xmlns:context="http://www.springframework.org/schema/context"
       xmlns:aop="http://www.springframework.org/schema/aop" xmlns:tx="http://www.springframework.org/schema/tx"
       xsi:schemaLocation="http://www.springframework.org/schema/beans http://www.springframework.org/schema/beans/spring-beans.xsd http://www.springframework.org/schema/context http://www.springframework.org/schema/context/spring-context.xsd http://www.springframework.org/schema/aop http://www.springframework.org/schema/aop/spring-aop.xsd
      http://www.springframework.org/schema/tx  http://www.springframework.org/schema/tx/spring-tx.xsd "> to enable annotation scanning, you need to scan the annotations of the service and dao layers, and ignore the annotations of the web layer, because the web layer allows the spring MVC framework to manage -- >
    <context:component-scan base-package="cn.itcast"> <!-- Configure comments to ignore -->
        <context:exclude-filter type="annotation" expression="org.springframework.stereotype.Controller"/>
    </context:component-scan>
 </beans>
2. In SSM_ Write test method in Web project to test
package cn.itcast.test;

import org.junit.Test;
import org.springframework.context.ApplicationContext;
import org.springframework.context.support.ClassPathXmlApplicationContext;
import cn.itcast.service.AccountService;

public class ServiceTest {
    @Test
    public void run1() {
        ApplicationContext ac = new ClassPathXmlApplicationContext("classpath:applicationContext.xml");
        AccountService as = (AccountService) ac.getBean("accountService");
        as.findAll();
    }
}
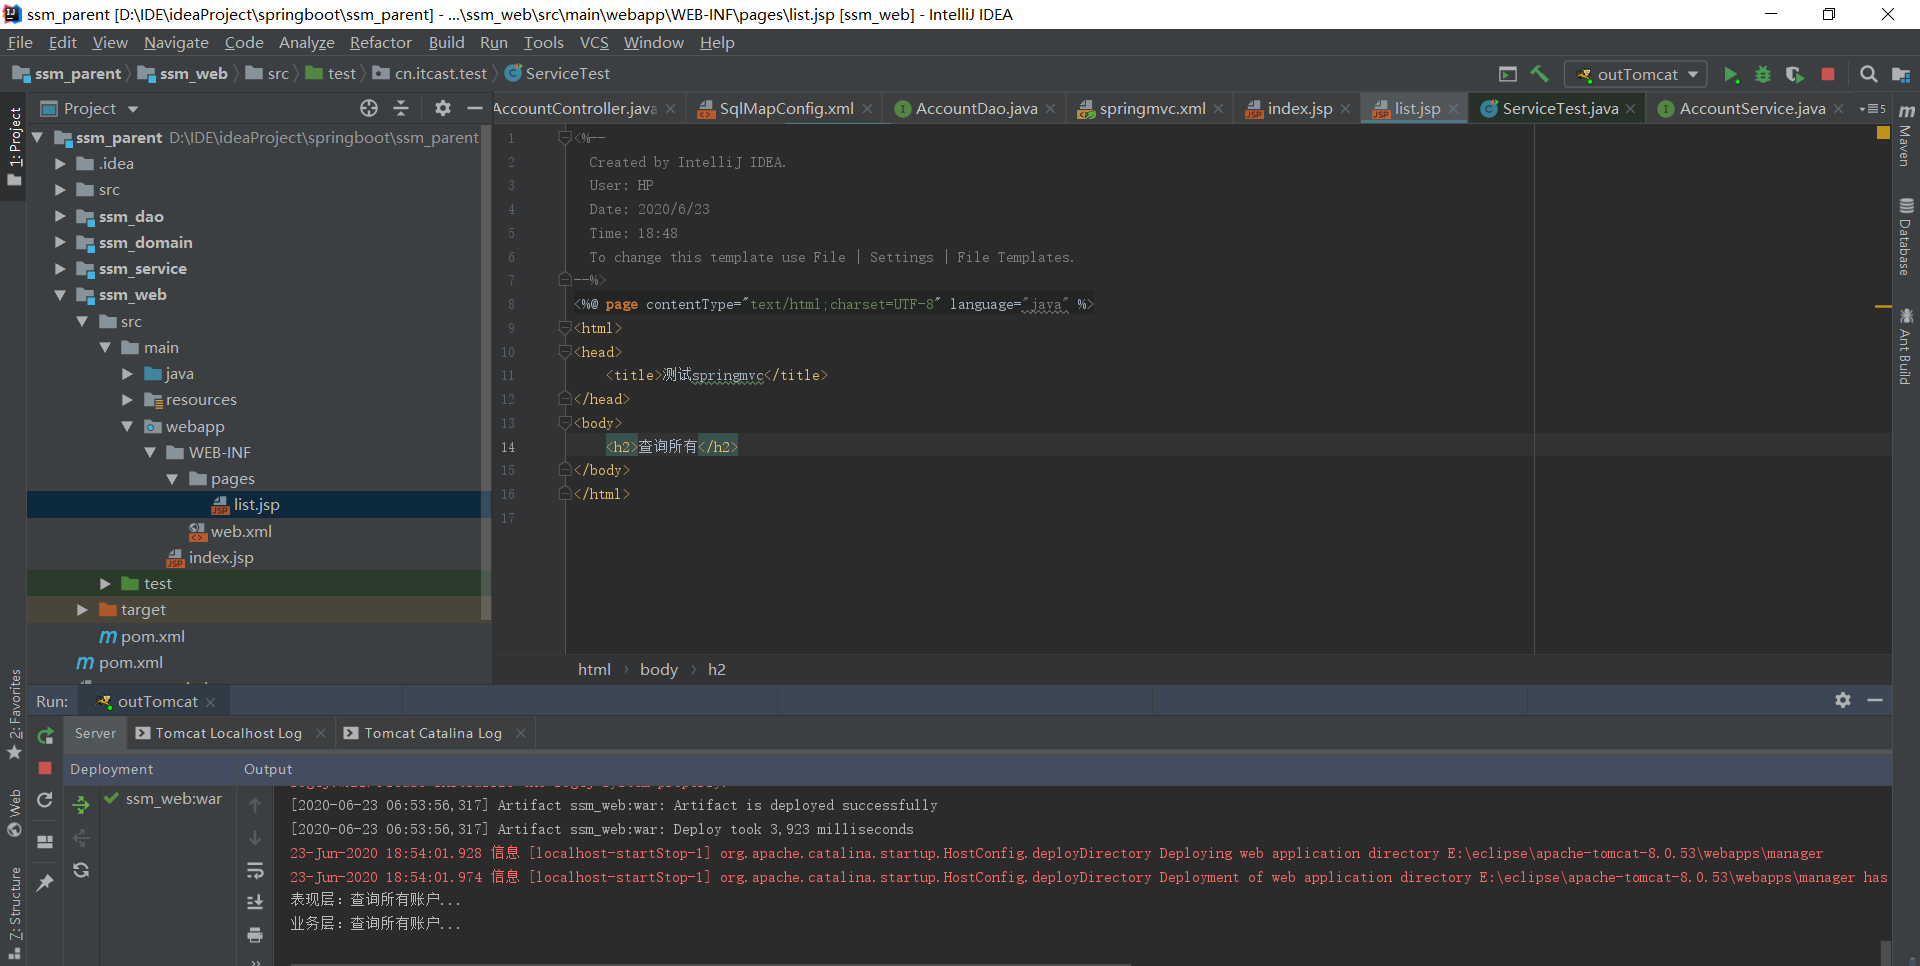
See the chart for the structure and results (if there is no test directory, you can create it yourself, and then set it as the default test directory). Test results:
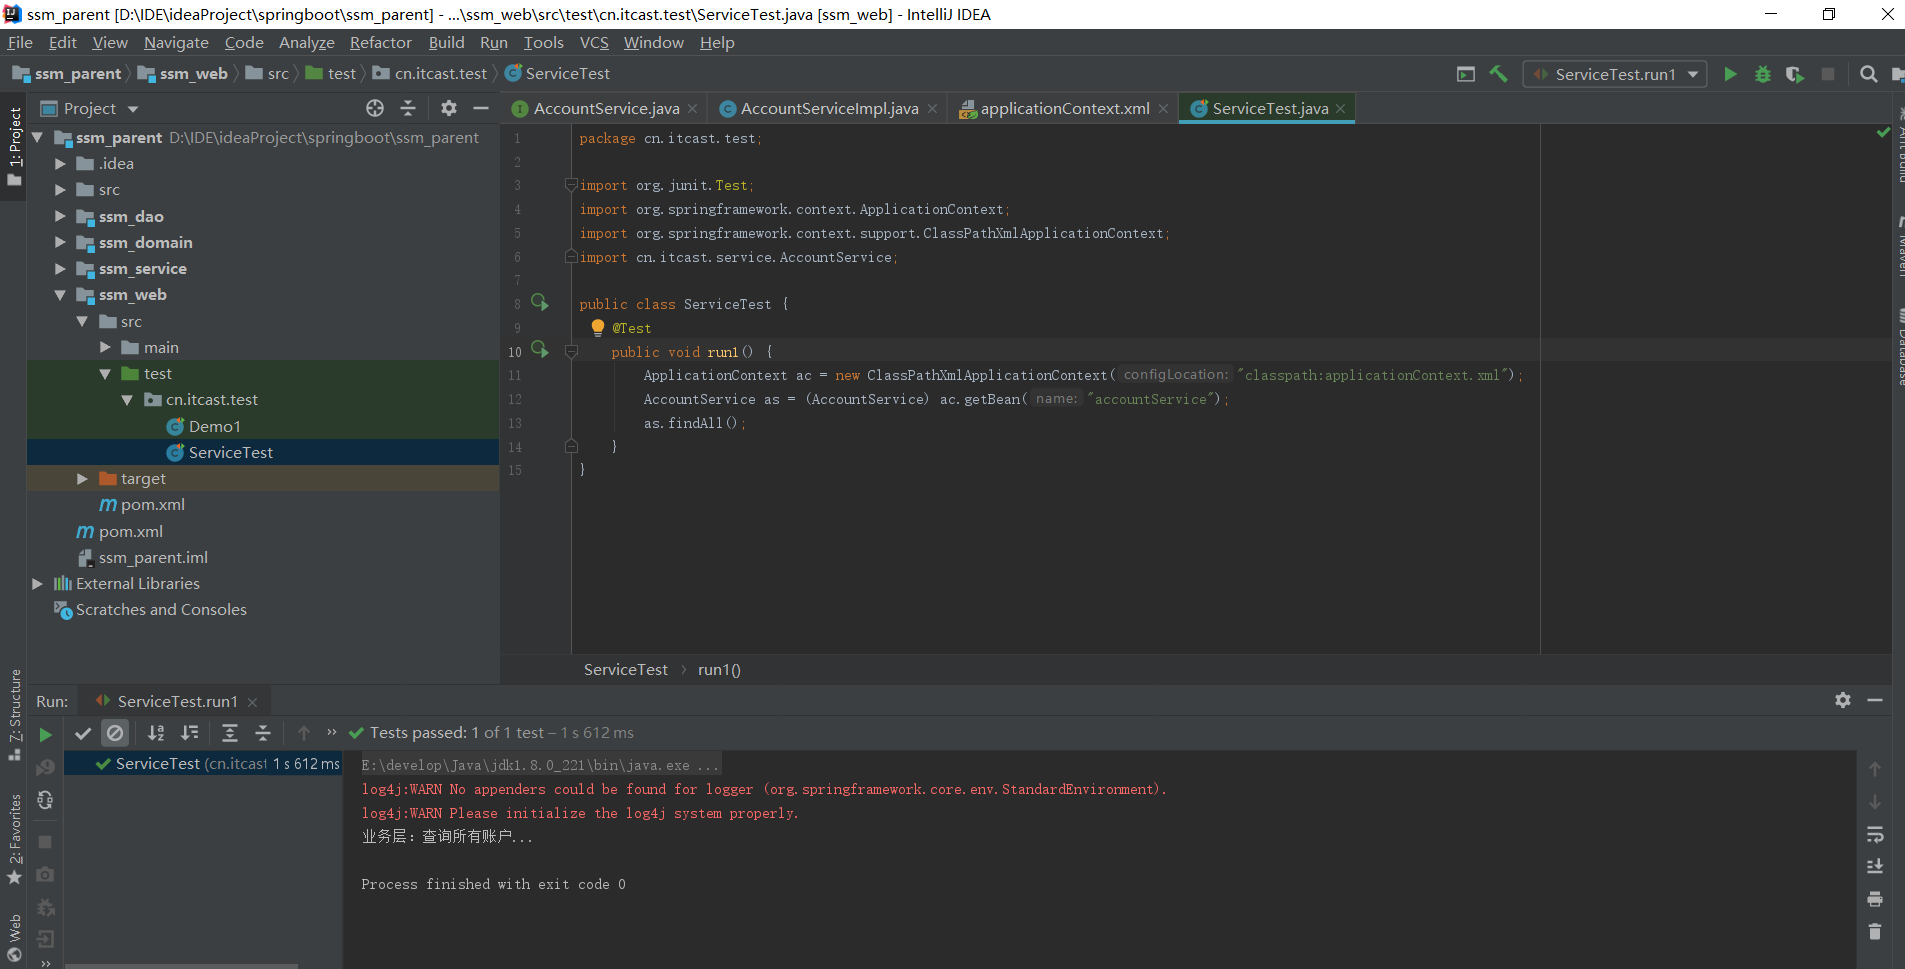
Run as shown in the figure above, indicating the success of setting up the Spring development environment!
4.3 Spring integrates spring MVC framework
1. Build and test the development environment of spring MVC
1. In web.xml Configuring the dispatcher servlet front-end controller in
<!--Configure front end controller-->
  <servlet>
  <servlet-name>dispatcherServlet</servlet-name>
   <servlet-class>org.springframework.web.servlet.DispatcherServlet</servlet-class>
   <!--load springmvc.xml configuration file-->
   <init-param>
       <param-name>contextConfigLocation</param-name>
       <param-value>classpath:springmvc.xml</param-value>
   </init-param>
   <!--Start the server and create the servlet-->
   <load-on-startup>1</load-on-startup>
  </servlet>
 <servlet-mapping>
     <servlet-name>dispatcherServlet</servlet-name>
     <url-pattern>/</url-pattern>
 </servlet-mapping>
2. In web.xml Configuring dispatcher servlet filter to solve Chinese code disorder
<!--The filter to solve the Chinese disorder-->
 <filter>
     <filter-name>characterEncodingFilter</filter-name>
     <filter-class>org.springframework.web.filter.CharacterEncodingFilter</filter-class>
     <init-param>
         <param-name>encoding</param-name>
         <param-value>UTF-8</param-value>
     </init-param>
 </filter>
 <filter-mapping>
     <filter-name>characterEncodingFilter</filter-name>
     <url-pattern>/*</url-pattern>
 </filter-mapping>
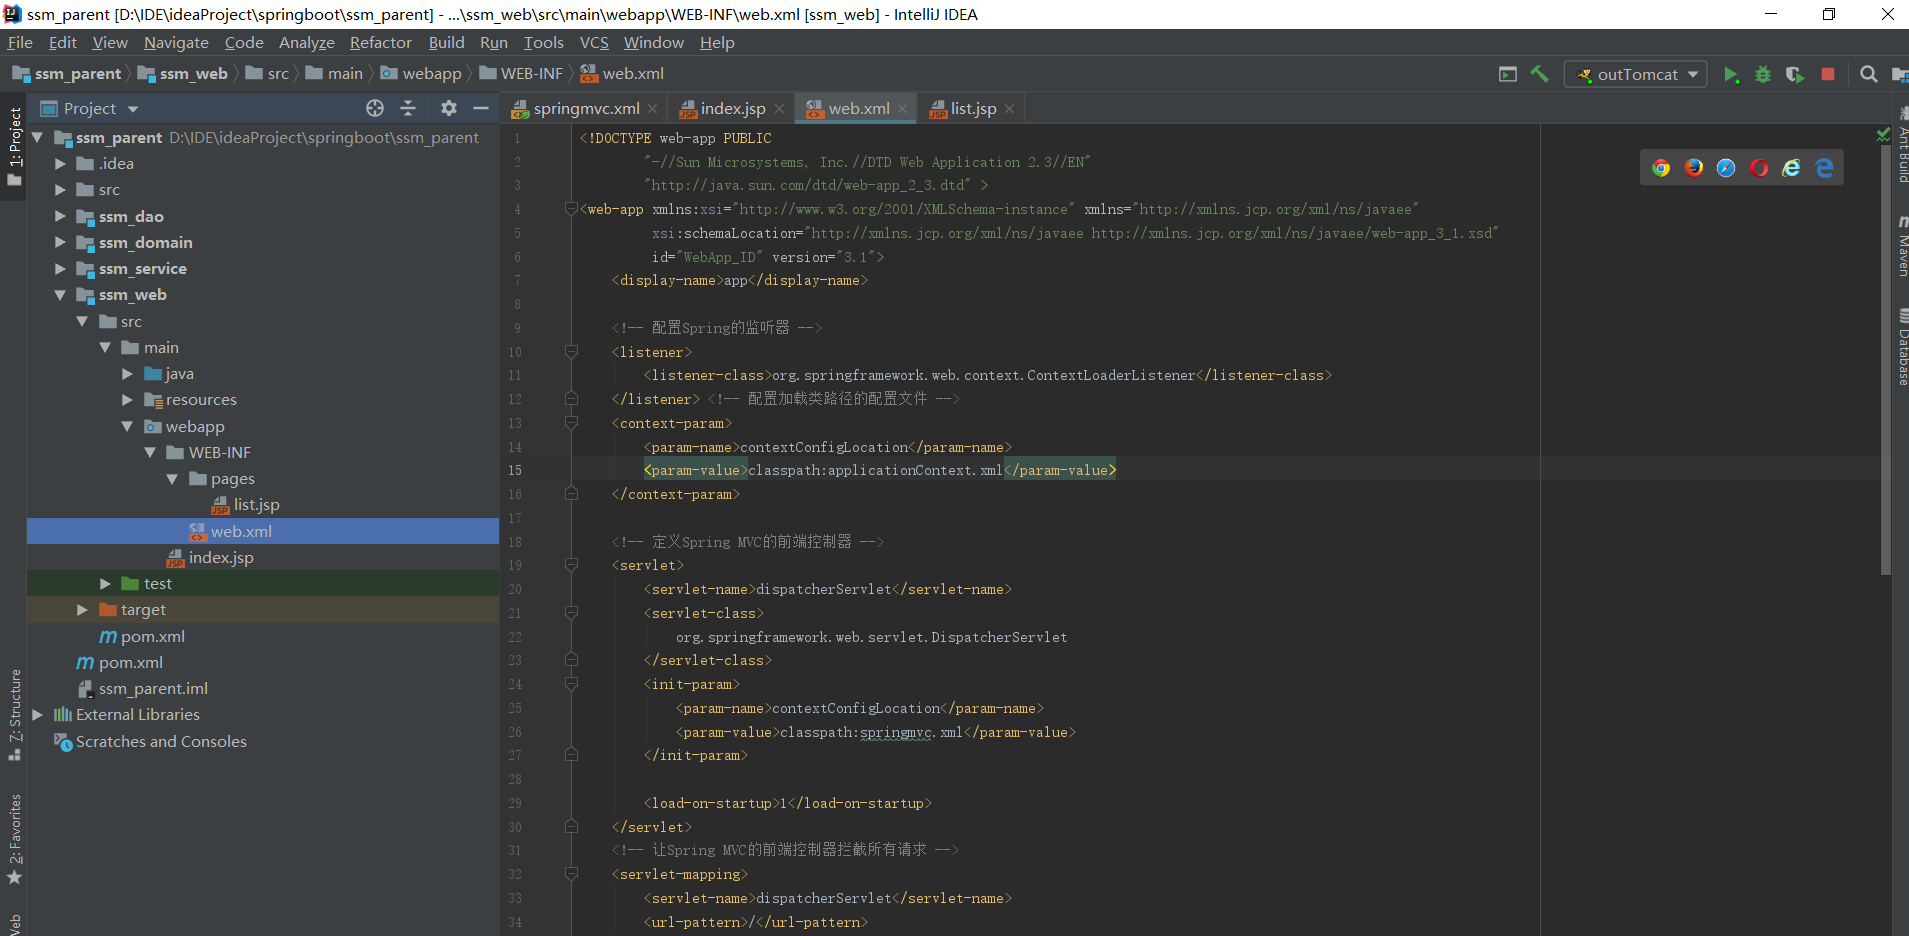
Three web.xml Overall effect of configuration in
<web-app xmlns:xsi="http://www.w3.org/2001/XMLSchema-instance"
        xmlns="http://java.sun.com/xml/ns/javaee"
        xsi:schemaLocation="http://java.sun.com/xml/ns/javaee http://java.sun.com/xml/ns/javaee/web-app_3_0.xsd"
        version="3.0">
  <display-name>Archetype Created Web Application</display-name>

    <!--Configure front end controller-->

  <servlet>
     <servlet-name>dispatcherServlet</servlet-name>
      <servlet-class>org.springframework.web.servlet.DispatcherServlet</servlet-class>
      <!--load springmvc.xml configuration file-->
      <init-param>
          <param-name>contextConfigLocation</param-name>
          <param-value>classpath:springmvc.xml</param-value>
      </init-param>
      <!--Start the server and create the servlet-->
      <load-on-startup>1</load-on-startup>
  </servlet>
    <servlet-mapping>
        <servlet-name>dispatcherServlet</servlet-name>
        <url-pattern>/</url-pattern>
    </servlet-mapping>

    <!--The filter to solve the Chinese disorder-->
    <filter>
        <filter-name>characterEncodingFilter</filter-name>
        <filter-class>org.springframework.web.filter.CharacterEncodingFilter</filter-class>
        <init-param>
            <param-name>encoding</param-name>
            <param-value>UTF-8</param-value>
        </init-param>
    </filter>
    <filter-mapping>
        <filter-name>characterEncodingFilter</filter-name>
        <url-pattern>/*</url-pattern>
    </filter-mapping>

</web-app>
As shown in the figure: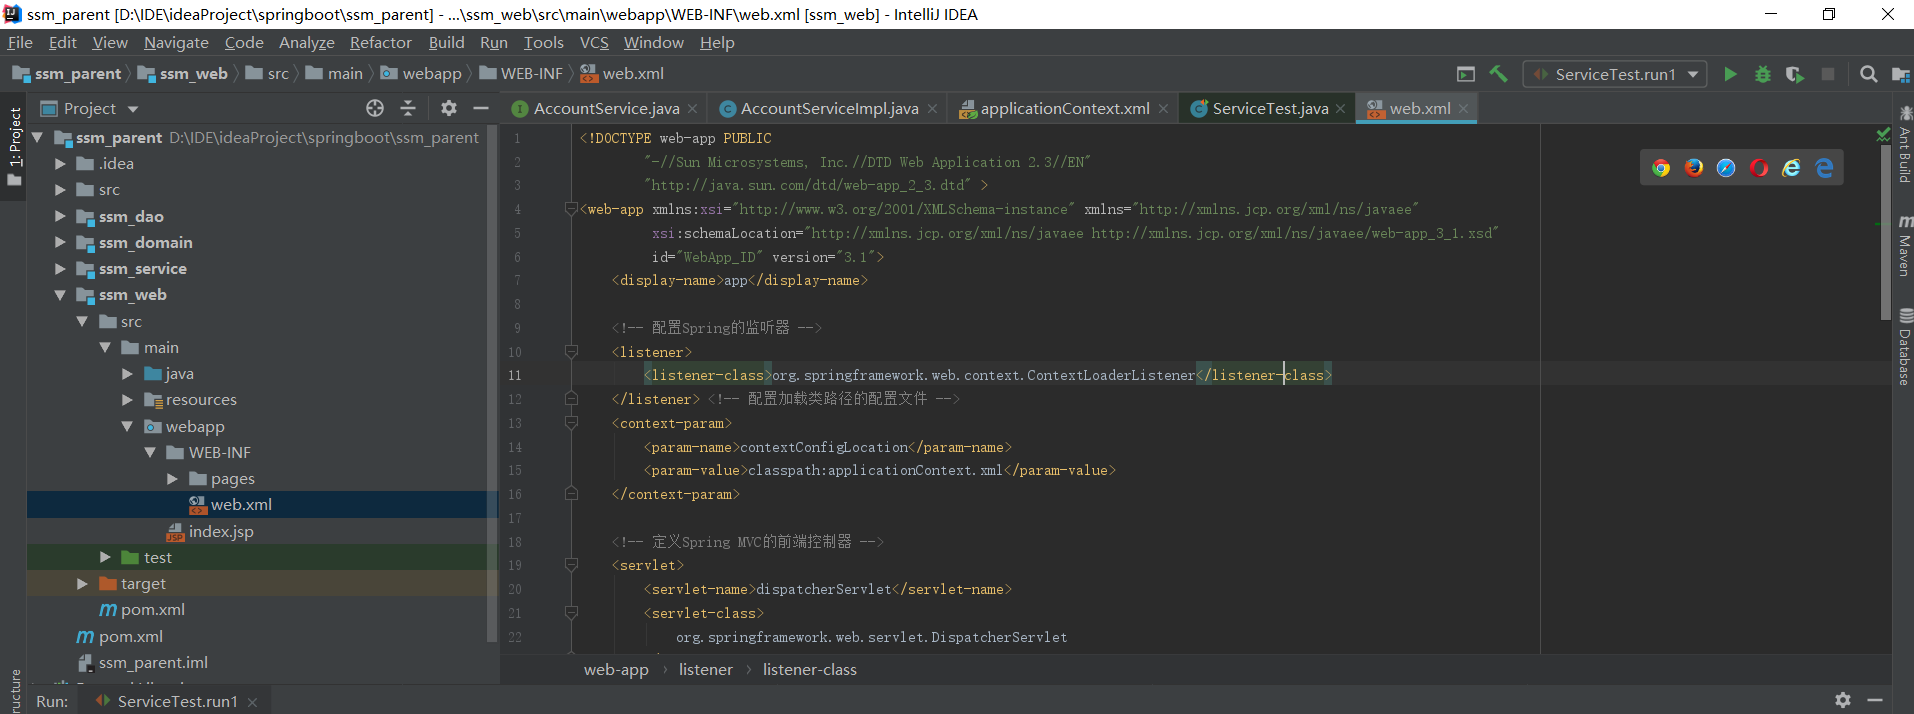
4. Create springmvc.xml Configuration files for, writing configuration files for
ssm_ Under the resources directory of the Web:
<?xml version="1.0" encoding="UTF-8"?>
<beans xmlns="http://www.springframework.org/schema/beans" xmlns:mvc="http://www.springframework.org/schema/mvc"
xmlns:context="http://www.springframework.org/schema/context"
xmlns:xsi="http://www.w3.org/2001/XMLSchema-instance"
xsi:schemaLocation=" http://www.springframework.org/schema/beans http://www.springframework.org/schema/beans/spring-beans.xsd http://www.springframework.org/schema/mvc http://www.springframework.org/schema/mvc/spring-mvc.xsd http://www.springframework.org/schema/context http://www.springframework.org/schema/context/spring-context.xsd "> <!-- Scan the comments of the controller, otherwise do not scan -- >
<context:component-scan base-package="cn.itcast">
<context:include-filter type="annotation" expression="org.springframework.stereotype.Controller"/>
</context:component-scan> <!-- Configure view resolver -->
<bean id="viewResolver"
class="org.springframework.web.servlet.view.InternalResourceViewResolver"> <!-- JSP Directory of files -->
<property name="prefix" value="/WEB-INF/pages/"/> <!-- Suffix of the file -->
<property name="suffix" value=".jsp"/>
</bean>
<!--
<!– Set static resources not to filter –>
<mvc:resources location="/css/" mapping="/css/**"/>
<mvc:resources location="/images/" mapping="/images/**"/>
<mvc:resources location="/js/" mapping="/js/**"/>
-->
<!-- Open right SpringMVC Annotation support -->
<mvc:annotation-driven/>
</beans>

-
Test whether the framework of spring MVC is built successfully
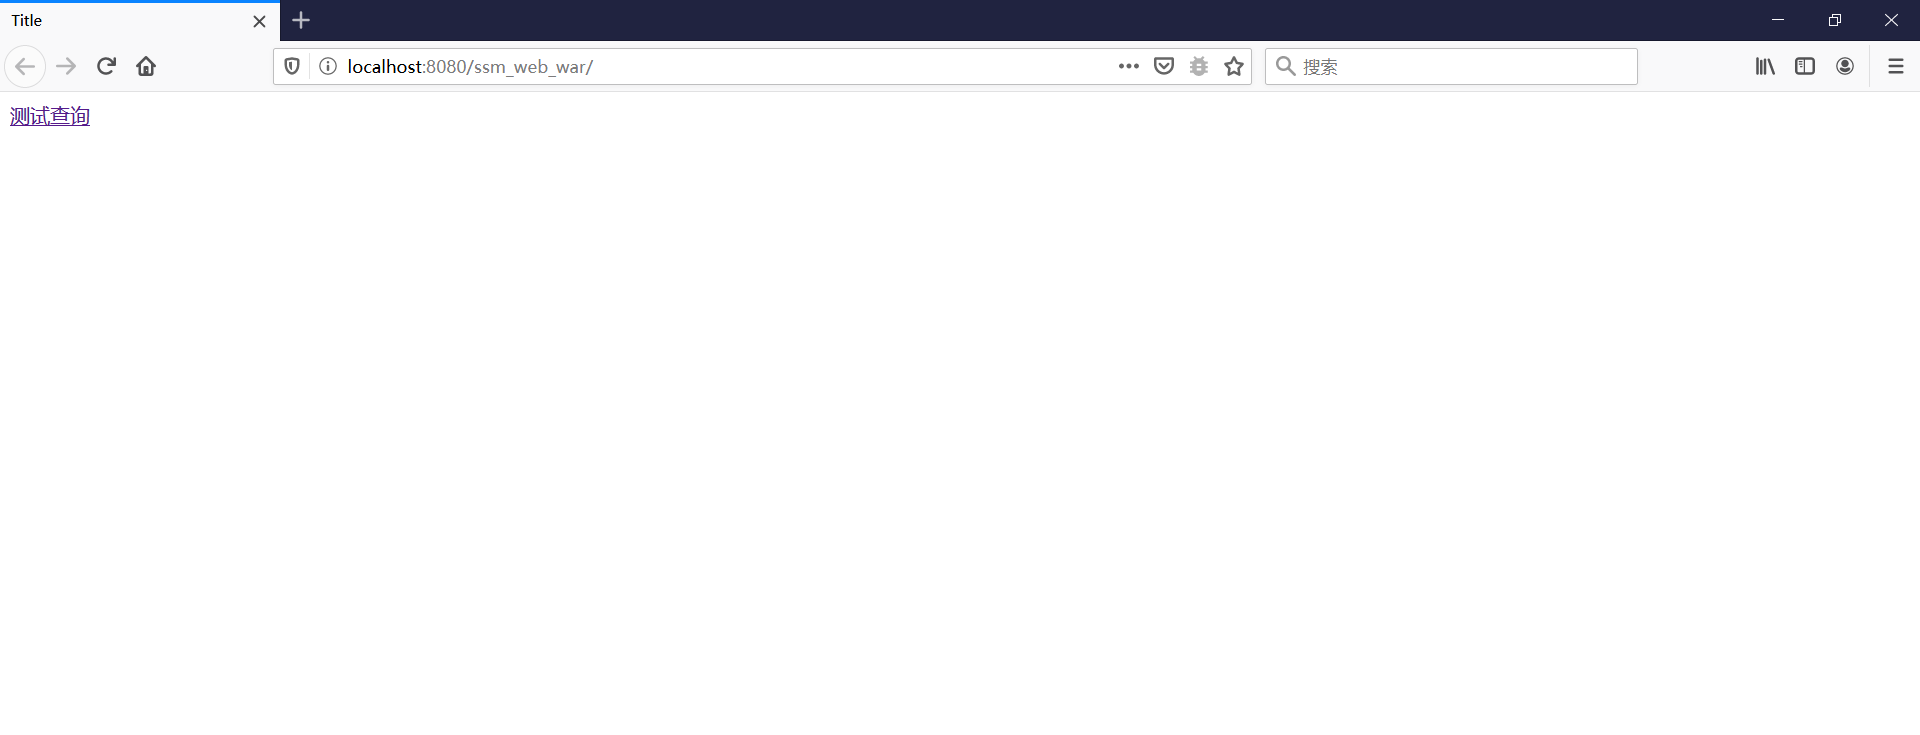
\1. Preparation index.jsp and list.jsp Authoring, hyperlinks
index.jsp:
<%@ page contentType="text/html;charset=UTF-8" language="java" %>
<html>
<head>
    <title>Title</title>
</head>
<body>

<a href="account/findAll">Test query</a>
</body>
</html>
Create the pages directory under SRC \ main \ webapp \ web inf \, and then create list.jsp The code is as follows:
<%@ page contentType="text/html;charset=UTF-8" language="java" isELIgnored="false" %>
<%@ taglib prefix="c" uri="http://java.sun.com/jsp/jstl/core" %>

<html>
<head>
    <title>Title</title>
</head>
<body>
<h2>Query all accounts</h2>
</body>
</html>
\2. Create the AccountController class, write methods, and test
package cn.itcast.controller;

import org.springframework.stereotype.Controller;

import org.springframework.web.bind.annotation.RequestMapping;

@Controller

@RequestMapping("/account")

public class AccountController {

/**

\* Query all data

\* @return

*/

@RequestMapping("/findAll")

public String findAll() {

System.out.println("Performance layer: query all accounts...");

return "list";

}

}
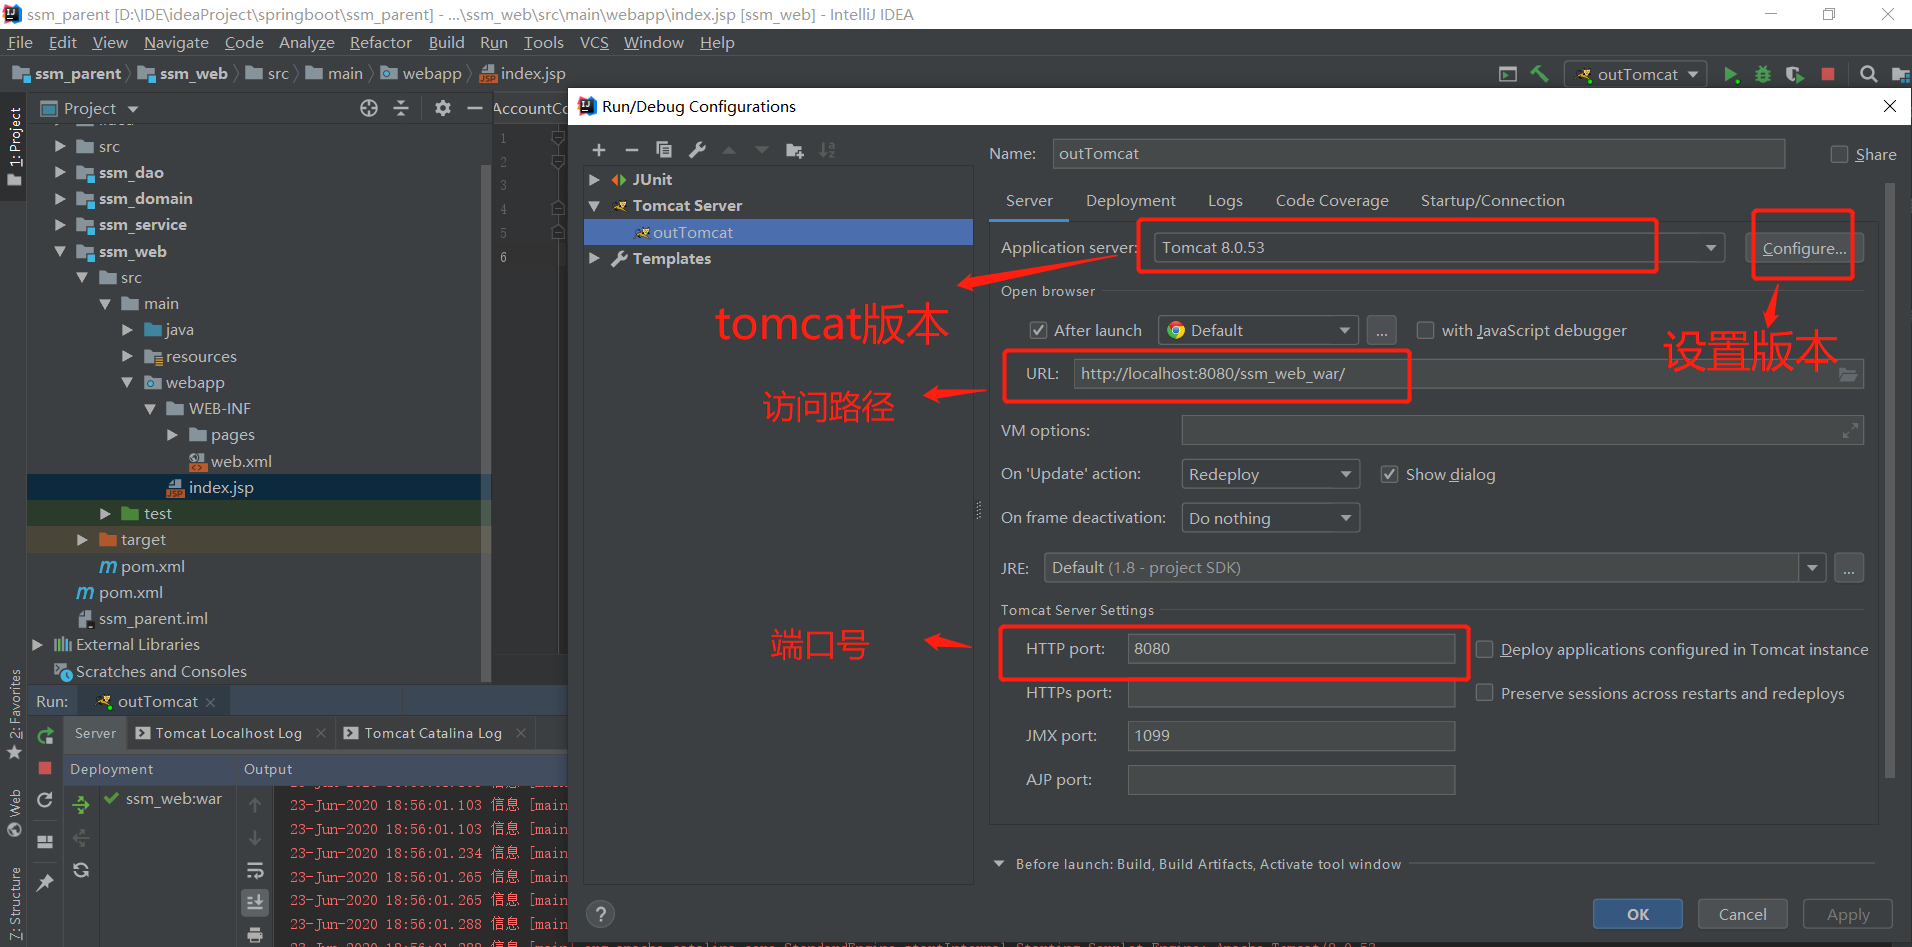
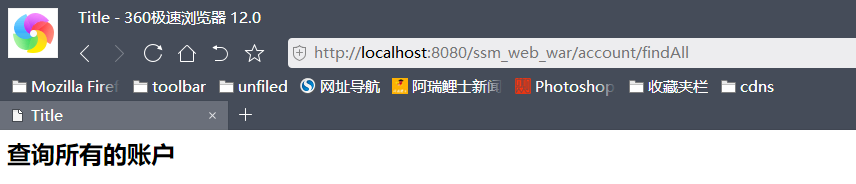
Run test =, visit: http://localhost:8080/ssm_web_war/account/findAll
Run tomcat:
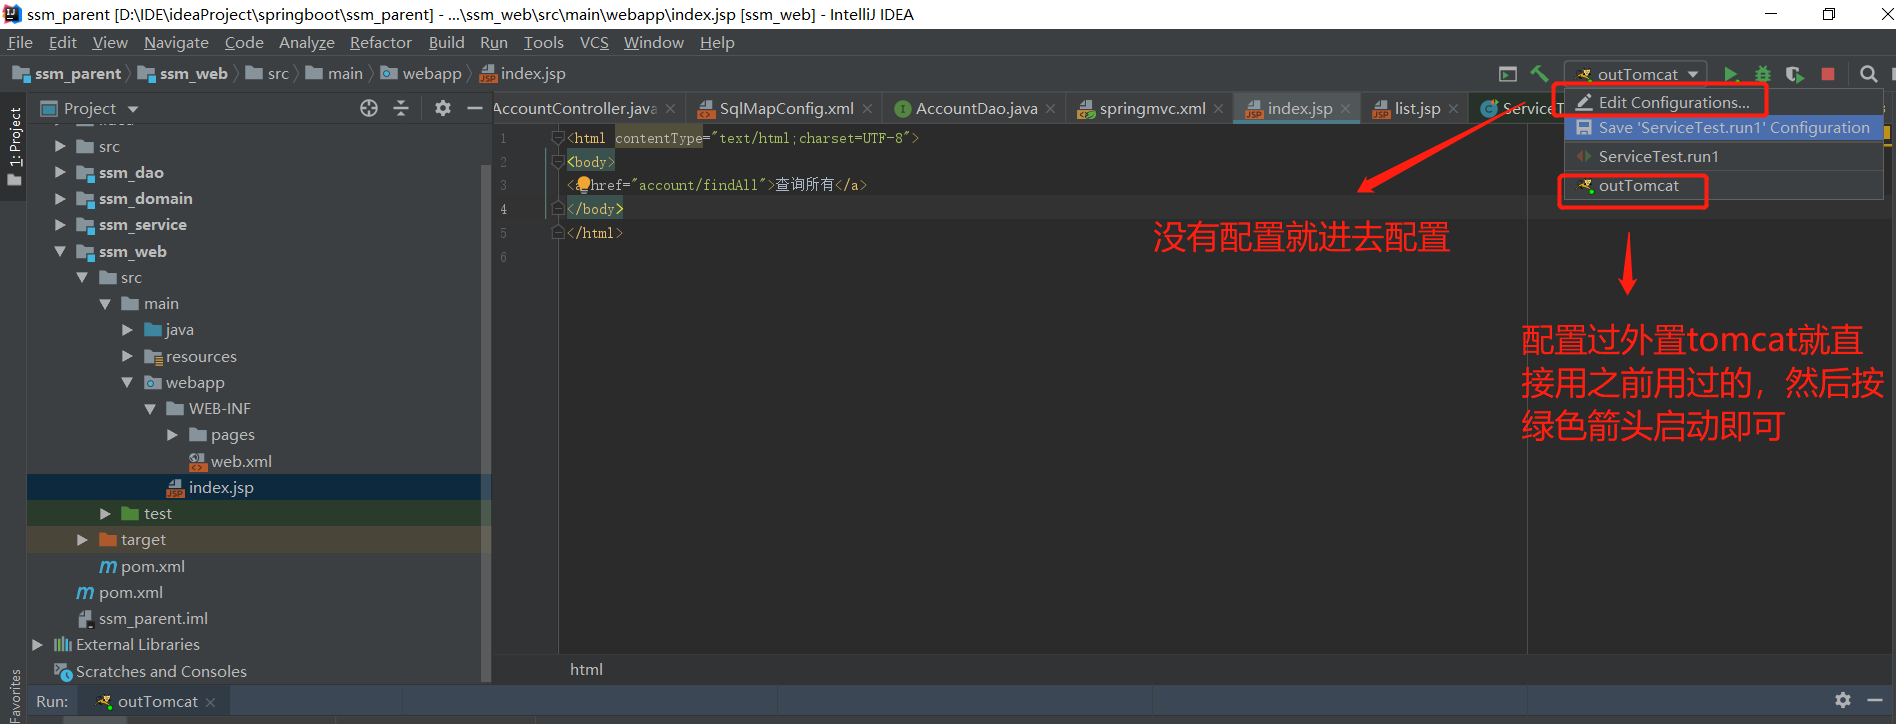
After startup (click the link or access address to test):
So far, the development environment of spring and spring MVC has been set up, and the next step is to integrate spring and spring MVC!
1. Purpose: the method in the service object can be successfully called in the controller.
Before integration, think about how to integrate the Spring and Spring MVC framework. How can the integration be successful
Successful performance of integration: in the controller (spring MVC), methods in the service (spring) object can be successfully called. If you want to call the service method in controller, you need to inject service into controller, and service objects can call the service method. There is nothing wrong with this method, but one problem is to think about it after starting Tomcat. web.xml The front-end controller is configured in, and the web container will help us load springmvc.xml Profile, in springmvc.xml In profile Our configuration is to scan only the controller and not the others spring.xml The files have not been executed from the beginning to the end, and the configuration scanning in spring will not be scanned naturally, which means that spring has not been delivered to the IOC container. Therefore, the current solution is to use the listener.
-
Load when the project starts applicationContext.xml The configuration file of web.xml Medium configuration
ContextLoaderListener listener (the listener can only load the applicationContext.xml Configuration file). So we have to create it under WEB-INF applicationContext.xml , or web.xml It is configured in the resources directory (this is generally used), between the tabs
<!-- to configure Spring Monitor for -->
<listener>
    <listener-class>org.springframework.web.context.ContextLoaderListener</listener-class>
</listener> <!-- Configure the profile to load the classpath -->
<context-param>
    <param-name>contextConfigLocation</param-name>
    <param-value>classpath:applicationContext.xml</param-value>
</context-param>
-
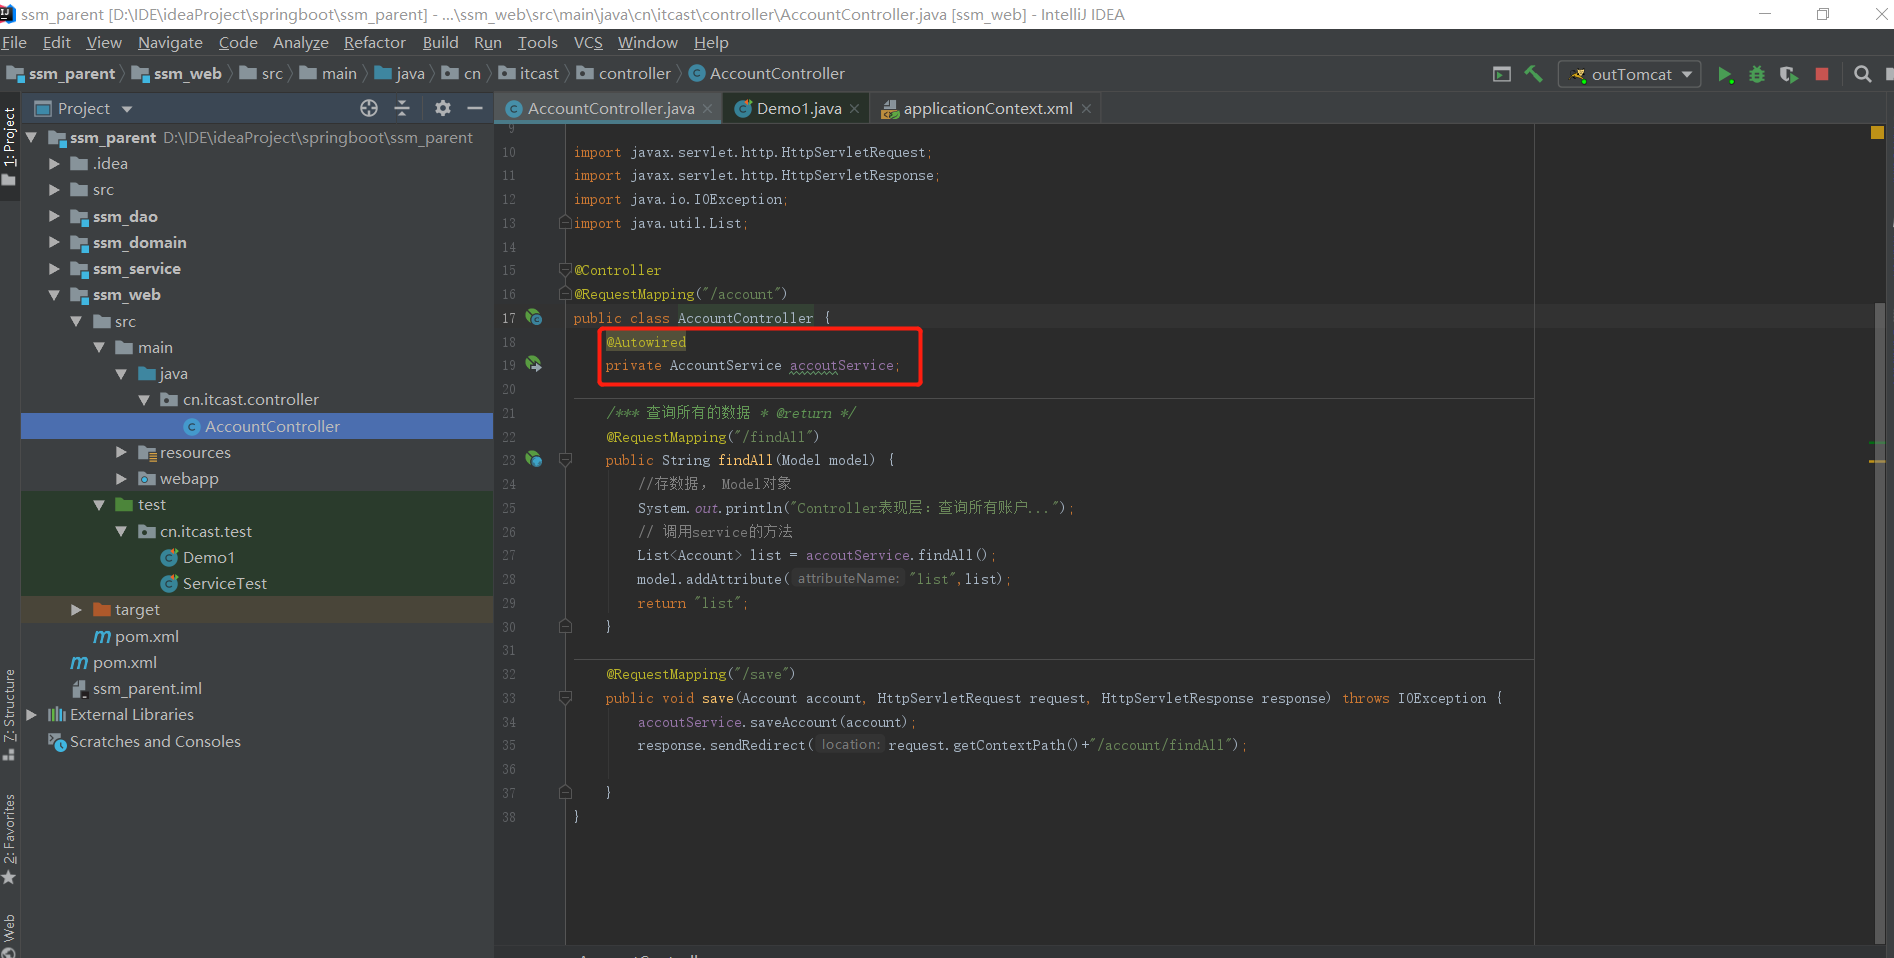
Inject the service object into the controller and call the method of the service object for testing
import cn.itcast.service.AccountService;

import javax.servlet.http.HttpServletRequest;
import javax.servlet.http.HttpServletResponse;
import java.io.IOException;
import java.util.List;

@Controller
@RequestMapping("/account")
public class AccountController {
    @Autowired
    private AccountService accoutService;

    /*** Query all data * @ return */
    @RequestMapping("/findAll")
    public String findAll(Model model) {
        //Save data, Model object
        System.out.println("Controller Performance layer: query all accounts...");
        // Method to call service
        List<Account> list = accoutService.findAll();
        model.addAttribute("list",list);
        return "list";
    }
    }
Test to start tomcat, as above: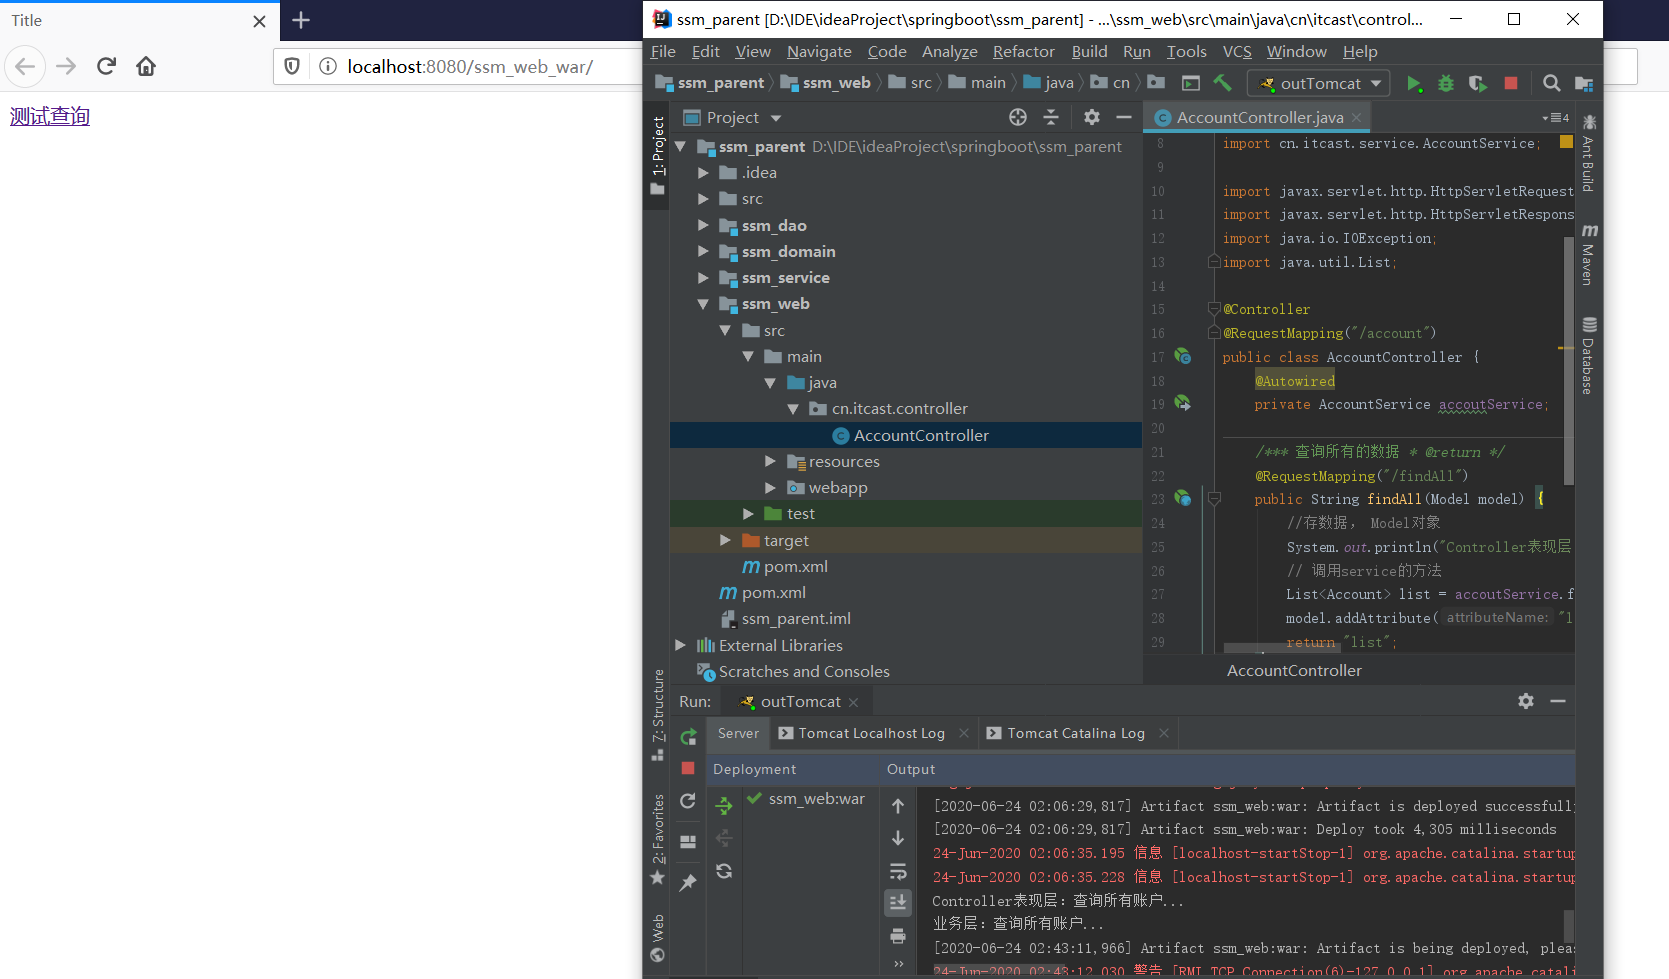
Now we have integrated spring and spring MVC, leaving mybatis
4.4 spring integrates MyBatis framework
1. Build and test MyBatis environment
-
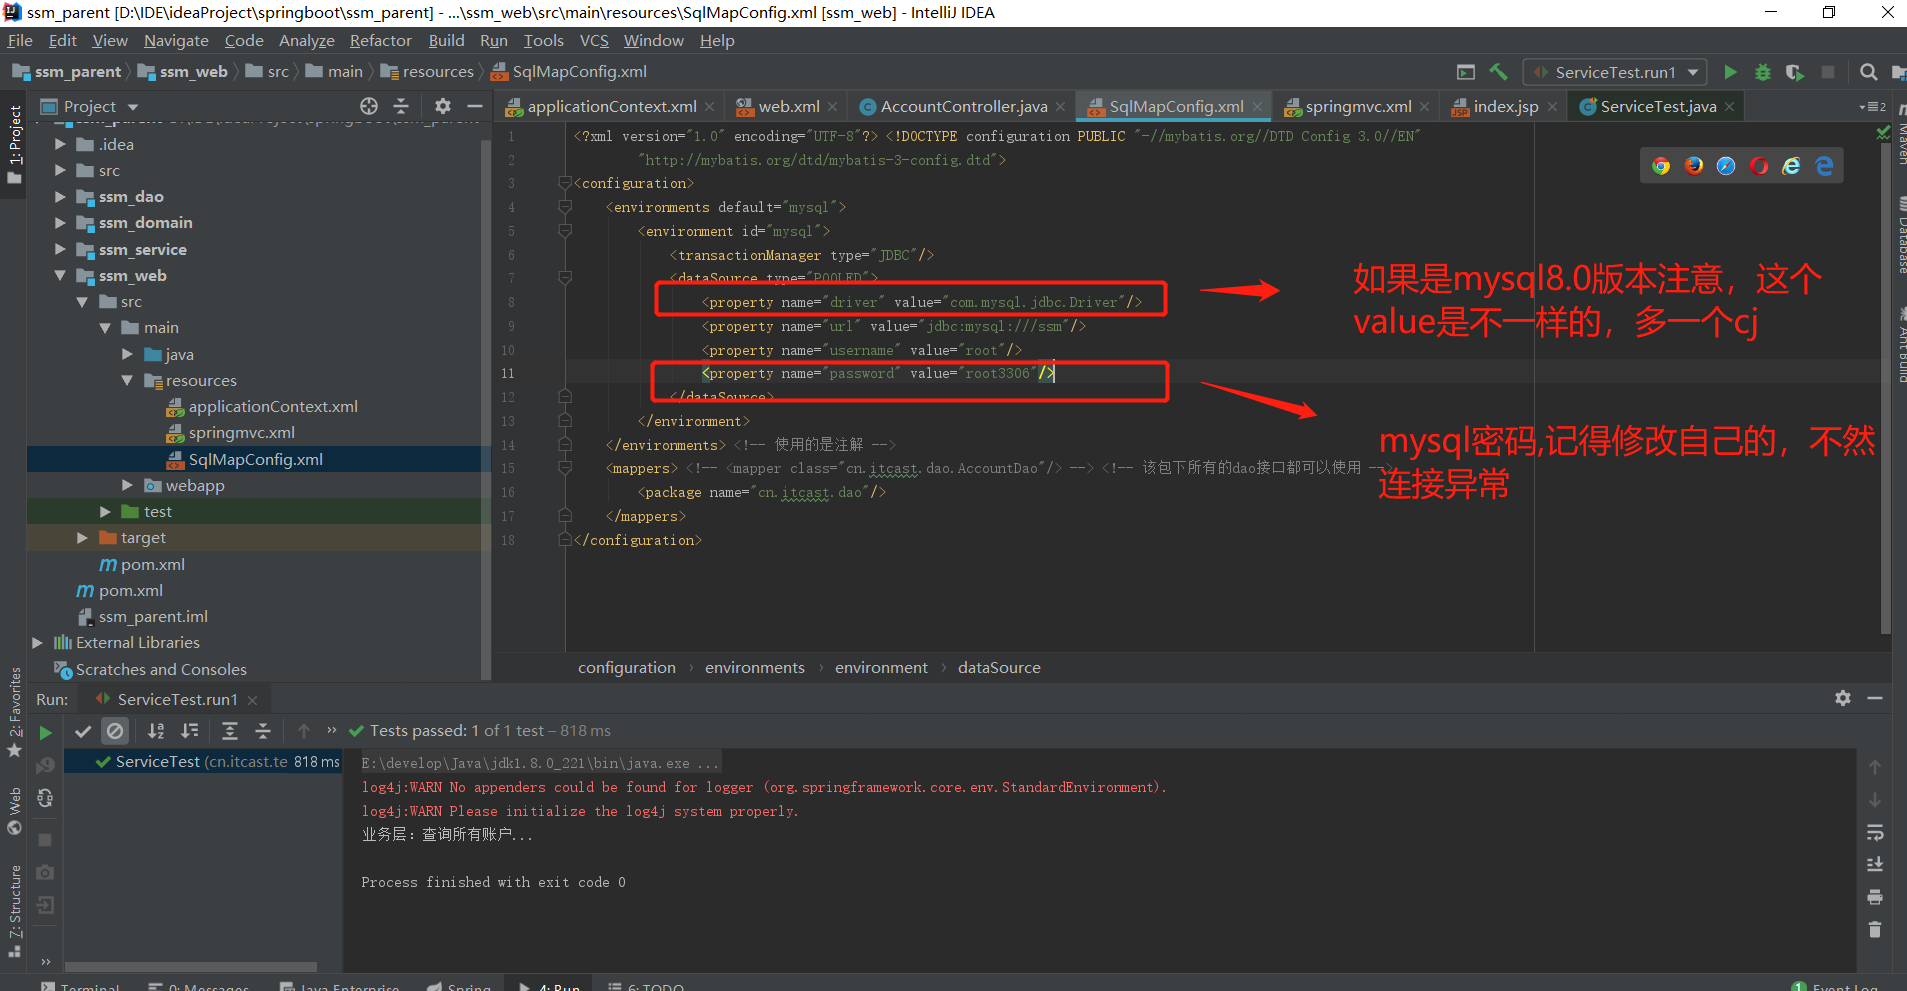
Writing in a web project SqlMapConfifig.xml Write the core configuration file
<?xml version="1.0" encoding="UTF-8"?> <!DOCTYPE configuration PUBLIC "-//mybatis.org//DTD Config 3.0//EN"
        "http://mybatis.org/dtd/mybatis-3-config.dtd">
<configuration>
    <environments default="mysql">
        <environment id="mysql">
            <transactionManager type="JDBC"/>
            <dataSource type="POOLED">
                <property name="driver" value="com.mysql.jdbc.Driver"/>
                <property name="url" value="jdbc:mysql:///ssm"/>
                <property name="username" value="root"/>
                <property name="password" value="root3306"/>
            </dataSource>
        </environment>
    </environments> <!-- Using annotations -->
    <mappers> <!-- <mapper class="cn.itcast.dao.AccountDao"/> --> <!-- All the dao Interface can be used -->
        <package name="cn.itcast.dao"/>
    </mappers>
</configuration>
2. add annotation on the method of AccountDao interface and write SQL statement
package cn.itcast.dao;

import java.util.List;

import cn.itcast.domain.Account;
import org.apache.ibatis.annotations.Insert;
import org.apache.ibatis.annotations.Select;
import org.springframework.stereotype.Repository;

public interface AccountDao {

    @Insert(value="insert into account (name,money) values (#{name},#{money})")
    public void saveAccount(Account account);

    @Select("select * from account")
    public List<Account> findAll();
}
3. Methods for writing tests
Test sheet mybatis is executed. Run method 2 and method 1 first, because there is no value at the beginning
package cn.itcast.test;

import java.io.InputStream;
import java.util.List;

import org.apache.ibatis.io.Resources;
import org.apache.ibatis.session.SqlSession;
import org.apache.ibatis.session.SqlSessionFactory;
import org.apache.ibatis.session.SqlSessionFactoryBuilder;
import org.junit.Test;
import cn.itcast.dao.AccountDao;
import cn.itcast.domain.Account;

public class Demo1 {
    @Test
    public void run1() throws Exception {
        // Load profile
         InputStream inputStream = Resources.getResourceAsStream("SqlMapConfig.xml");
        // Create factory
         SqlSessionFactory factory = new SqlSessionFactoryBuilder().build(inputStream);
        // Create sqlSession object
        SqlSession session = factory.openSession();
        // Get proxy object
        AccountDao dao = session.getMapper(AccountDao.class);
        // Method to call query
        List<Account> list = dao.findAll();
        for (Account account : list) {
            System.out.println(account);
        }
        // Release resources
        session.close();
        inputStream.close();
    }
    @Test
    public void run2() throws Exception {
        Account account = new Account(); account.setName("Bear big"); account.setMoney(400d);
        // Load profile
        InputStream inputStream = Resources.getResourceAsStream("SqlMapConfig.xml");
        // Create factory
        SqlSessionFactory factory = new SqlSessionFactoryBuilder().build(inputStream);
        // Create sqlSession object
        SqlSession session = factory.openSession();
        // Get proxy object
        AccountDao dao = session.getMapper(AccountDao.class);

        dao.saveAccount(account);
        // Commit transaction
        session.commit();
        // Release resources
        session.close();
        inputStream.close();
    }
}
Open sqlyog to check whether the account table has been inserted into xiongda, 400. If it is successfully inserted, there is no problem. mybatis succeeded!
2.spring integrates Mybatis
1. Purpose: to SqlMapConfig.xml Content in the configuration file is configured to applicationContext.xml In the configuration file, in the applicationContext.xml Add the following code
<!-- to configure C3P0 Connection pool object for -->
<bean id="dataSource" class="org.springframework.jdbc.datasource.DriverManagerDataSource">
    <property name="driverClassName" value="com.mysql.jdbc.Driver"/>
    <property name="url" value="jdbc:mysql:///ssm"/>
    <property name="username" value="root"/>
    <property name="password" value="root3306"/>
</bean> <!-- to configure SqlSession Factory of -->
<bean id="sqlSessionFactory" class="org.mybatis.spring.SqlSessionFactoryBean">
    <property name="dataSource" ref="dataSource"/>
</bean> <!-- Configure scan dao 's bag -->
<bean id="mapperScanner" class="org.mybatis.spring.mapper.MapperScannerConfigurer">
    <property name="basePackage" value="cn.itcast.dao"/>
</bean>
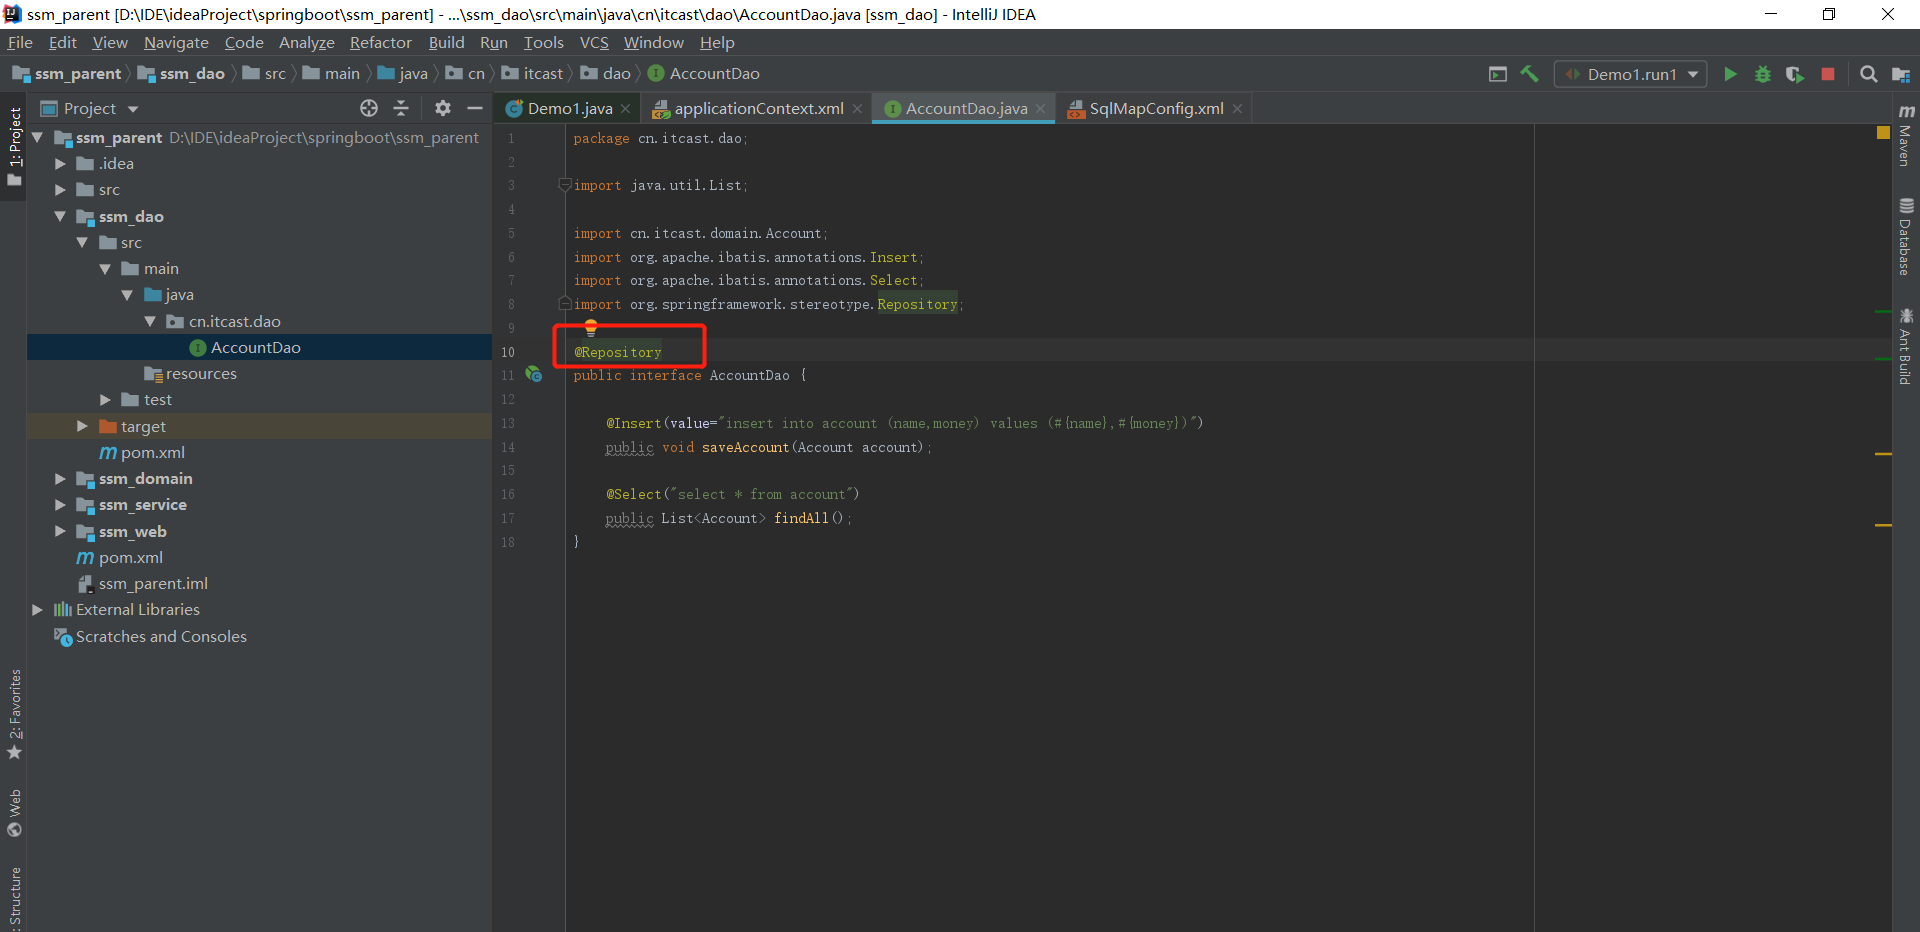
-
Add @ Repository annotation to the AccountDao interface
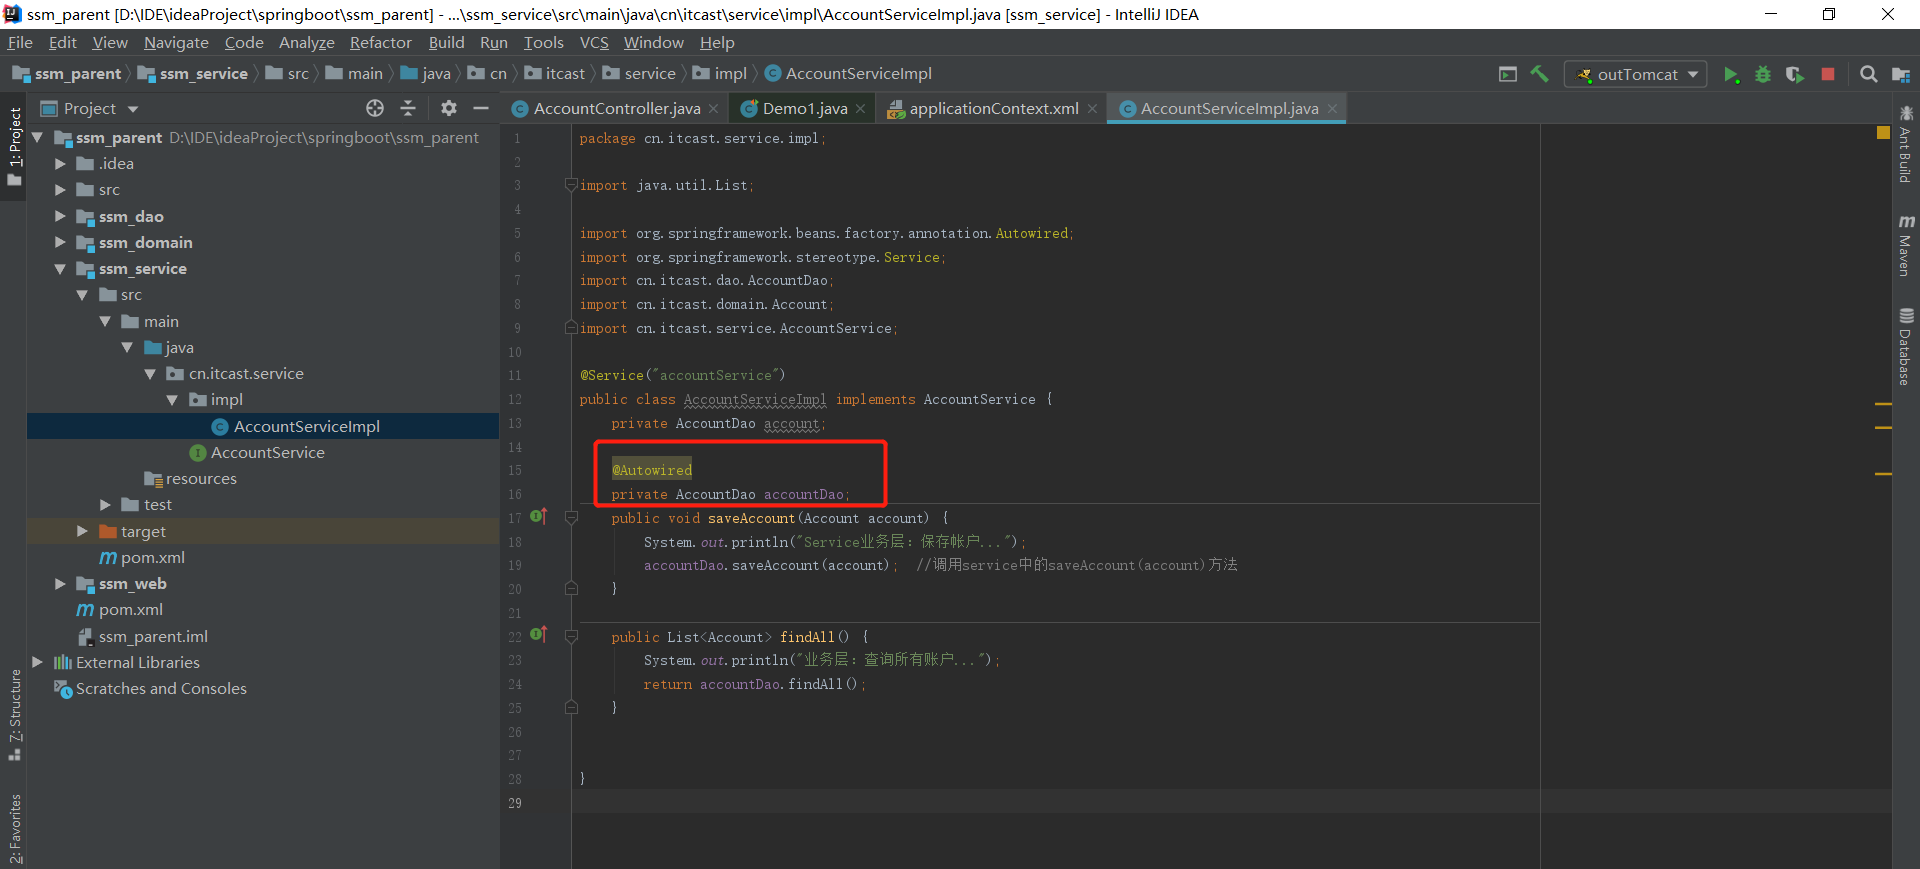
-
Inject dao object into service for testing
-
The code is as follows:
package cn.itcast.dao;

import java.util.List;

import cn.itcast.domain.Account;
import org.apache.ibatis.annotations.Insert;
import org.apache.ibatis.annotations.Select;
import org.springframework.stereotype.Repository;

@Repository
public interface AccountDao {

    @Insert(value="insert into account (name,money) values (#{name},#{money})")
    public void saveAccount(Account account);

    @Select("select * from account")
    public List<Account> findAll();
}
package cn.itcast.service.impl;

import java.util.List;

import org.springframework.beans.factory.annotation.Autowired;
import org.springframework.stereotype.Service;
import cn.itcast.dao.AccountDao;
import cn.itcast.domain.Account;
import cn.itcast.service.AccountService;

@Service("accountService")
public class AccountServiceImpl implements AccountService {
    private AccountDao account;

    @Autowired
    private AccountDao accountDao;
    public void saveAccount(Account account) {
        System.out.println("Service Business tier: save account...");
        accountDao.saveAccount(account);  //Call the saveAccount(account) method in the service
    }

    public List<Account> findAll() {
        System.out.println("Business layer: query all accounts...");
        return accountDao.findAll();
    }


}
5. Improve the cotoller layer and pass the service to the controller
package cn.itcast.controller;

import cn.itcast.domain.Account;
import org.springframework.beans.factory.annotation.Autowired;
import org.springframework.stereotype.Controller;
import org.springframework.ui.Model;
import org.springframework.web.bind.annotation.RequestMapping;
import cn.itcast.service.AccountService;

import javax.servlet.http.HttpServletRequest;
import javax.servlet.http.HttpServletResponse;
import java.io.IOException;
import java.util.List;

@Controller
@RequestMapping("/account")
public class AccountController {
    @Autowired
    private AccountService accoutService;

    /*** Query all data * @ return */
    @RequestMapping("/findAll")
    public String findAll(Model model) {
        //Save data, Model object
        System.out.println("Controller Performance layer: query all accounts...");
        // Method to call service
        List<Account> list = accoutService.findAll();
        model.addAttribute("list",list);
        return "list";
    }

    @RequestMapping("/save")
    public void save(Account account, HttpServletRequest request, HttpServletResponse response) throws IOException {
        accoutService.saveAccount(account);
        response.sendRedirect(request.getContextPath()+"/account/findAll");

    }
}
6. Improvement list.jsp page
<%@ page contentType="text/html;charset=UTF-8" language="java" isELIgnored="false" %>
<%@ taglib prefix="c" uri="http://java.sun.com/jsp/jstl/core" %>

<html>
<head>
    <title>Title</title>
</head>
<body>
<h2>Query all accounts</h2>
<c:forEach items="${list}" var="account">
    ${account.name}
</c:forEach>
</body>
</html>
Test:
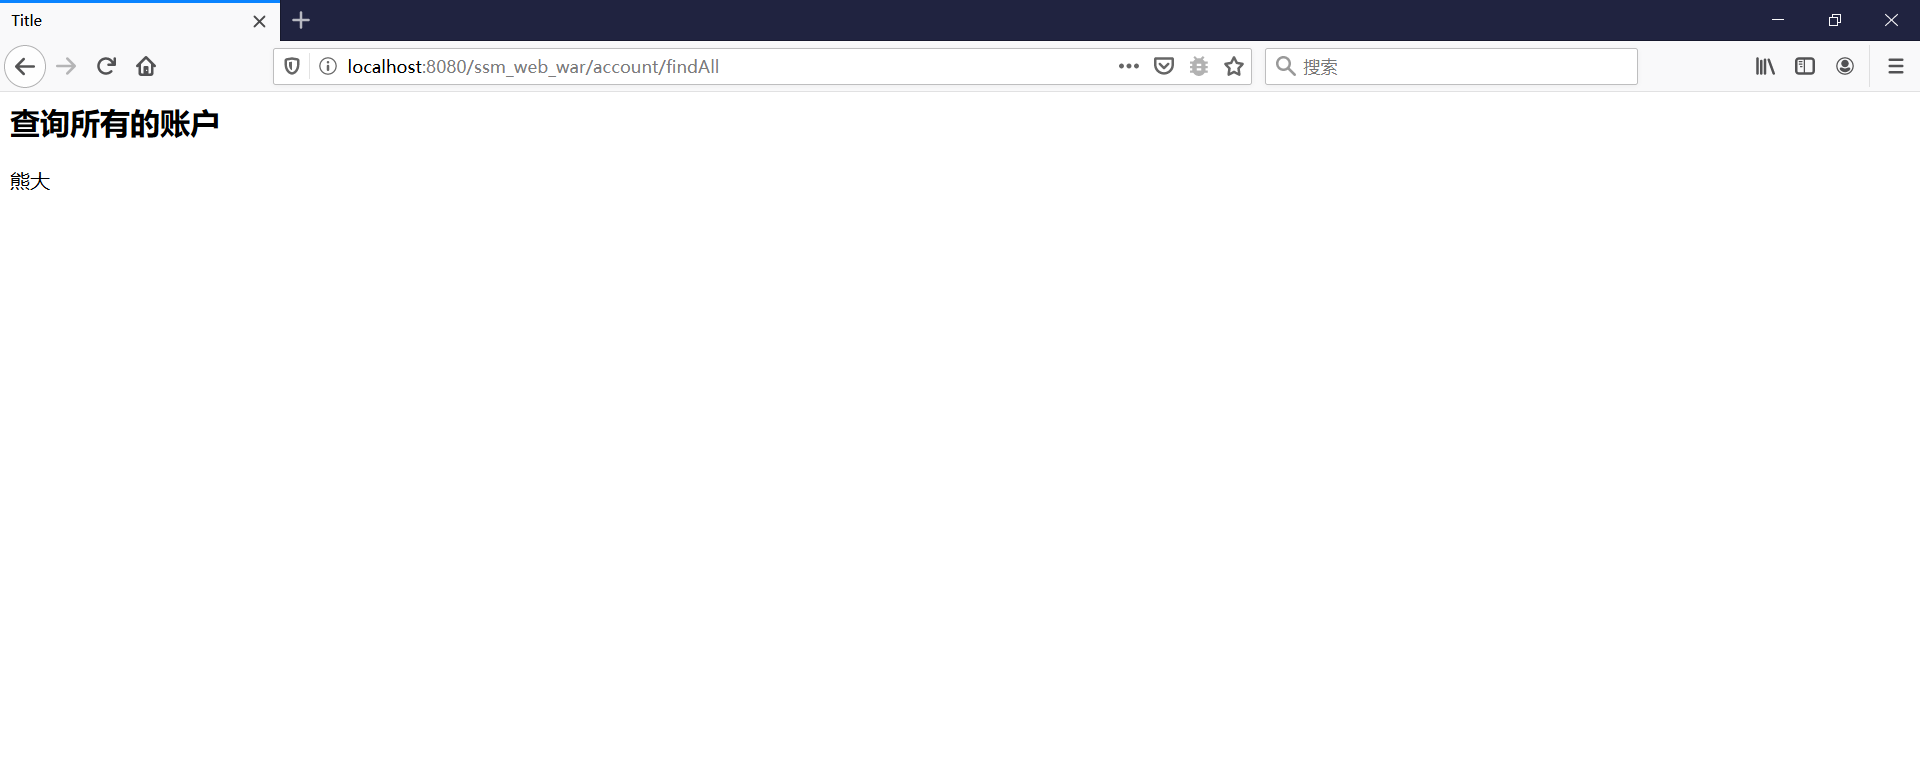
The result is that the data we saved in the database is Xiong Da, which proves that the integration is successful
7. Add declarative transaction management to complete the save operation
We know that mysql needs to commit transactions manually by default after opening transactions, especially when adding, deleting, and modifying operations. Otherwise, in fact, our operations have not changed to the data in the database, so we use the famous transaction management in spring to manage our transactions, so as to complete the saving operation and transfer the data from the page to the database.
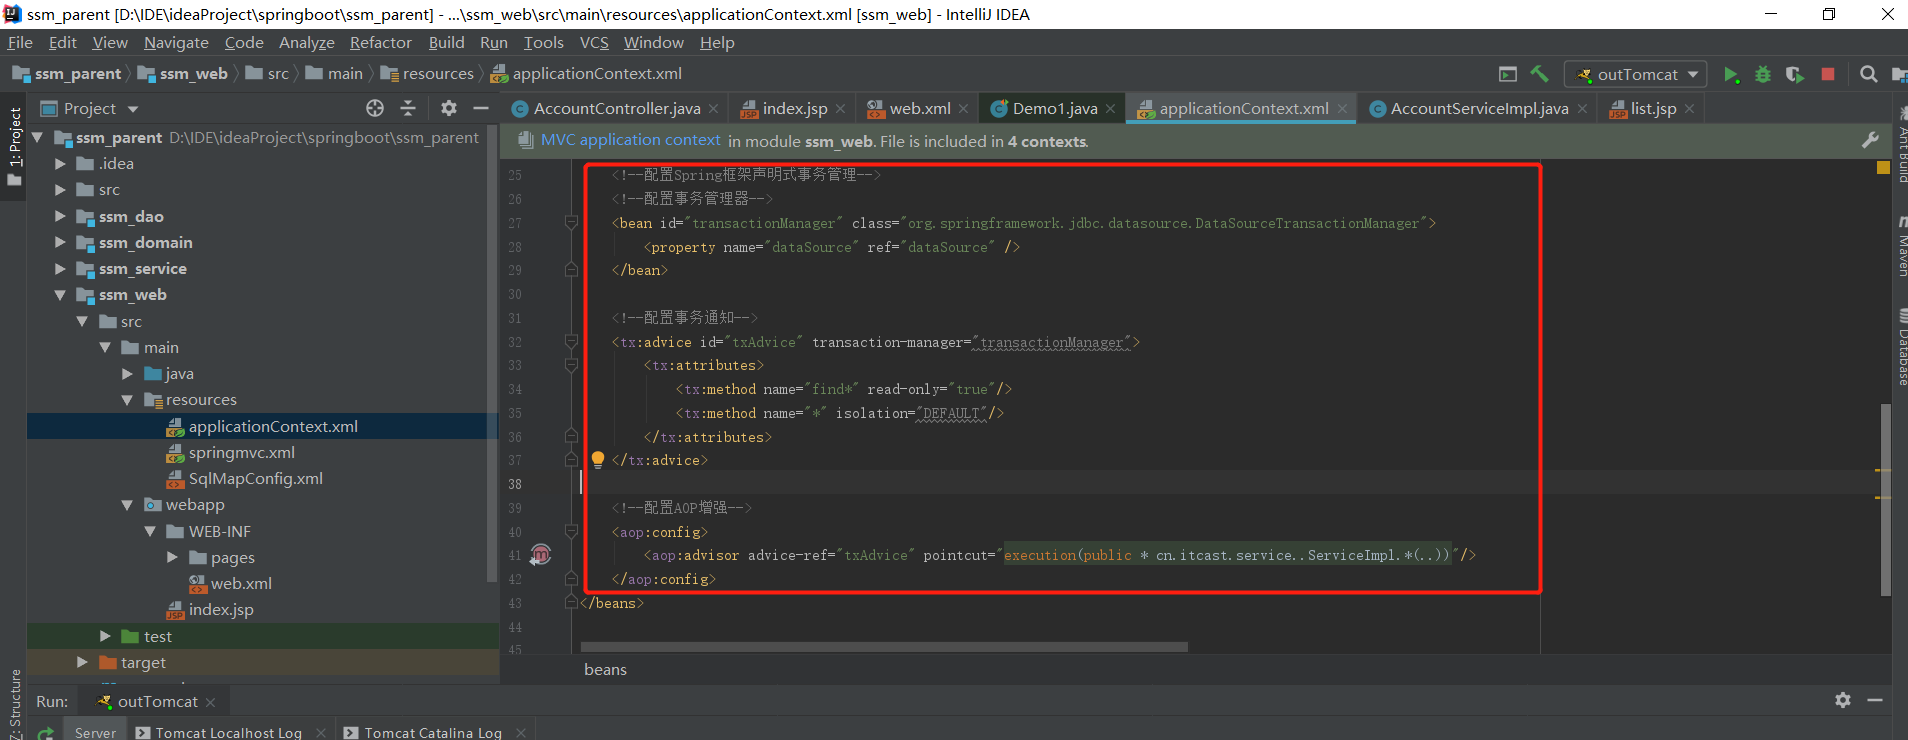
Add the following code to the applicationContext.xml In the beans tab of:
<!--to configure Spring Framework declarative transaction management-->
<!--Configure transaction manager-->
<bean id="transactionManager" class="org.springframework.jdbc.datasource.DataSourceTransactionManager">
    <property name="dataSource" ref="dataSource" />
</bean>

<!--Configure transaction notifications-->
<tx:advice id="txAdvice" transaction-manager="transactionManager">
    <tx:attributes>
        <tx:method name="find*" read-only="true"/>
        <tx:method name="*" isolation="DEFAULT"/>
    </tx:attributes>
</tx:advice>

<!--to configure AOP enhance-->
<aop:config>
    <aop:advisor advice-ref="txAdvice" pointcut="execution(public * cn.itcast.service..ServiceImpl.*(..))"/>
</aop:config>
Perfect home page Index.jsp Then test:
<html>
<head>
    <title>Title</title>
</head>
<body>

<a href="account/findAll">Test query</a>

<h3>Test package</h3>

<form action="account/save" method="post">
    full name:<input type="text" name="name" /><br/>
    amount of money:<input type="text" name="money" /><br/>
    <input type="submit" value="preservation"/><br/>
</form>

</body>
</html>
Run tomcat, input in the text box, save stone and 400, observe the results of page redirection query, refresh the database at the same time, and view the effect: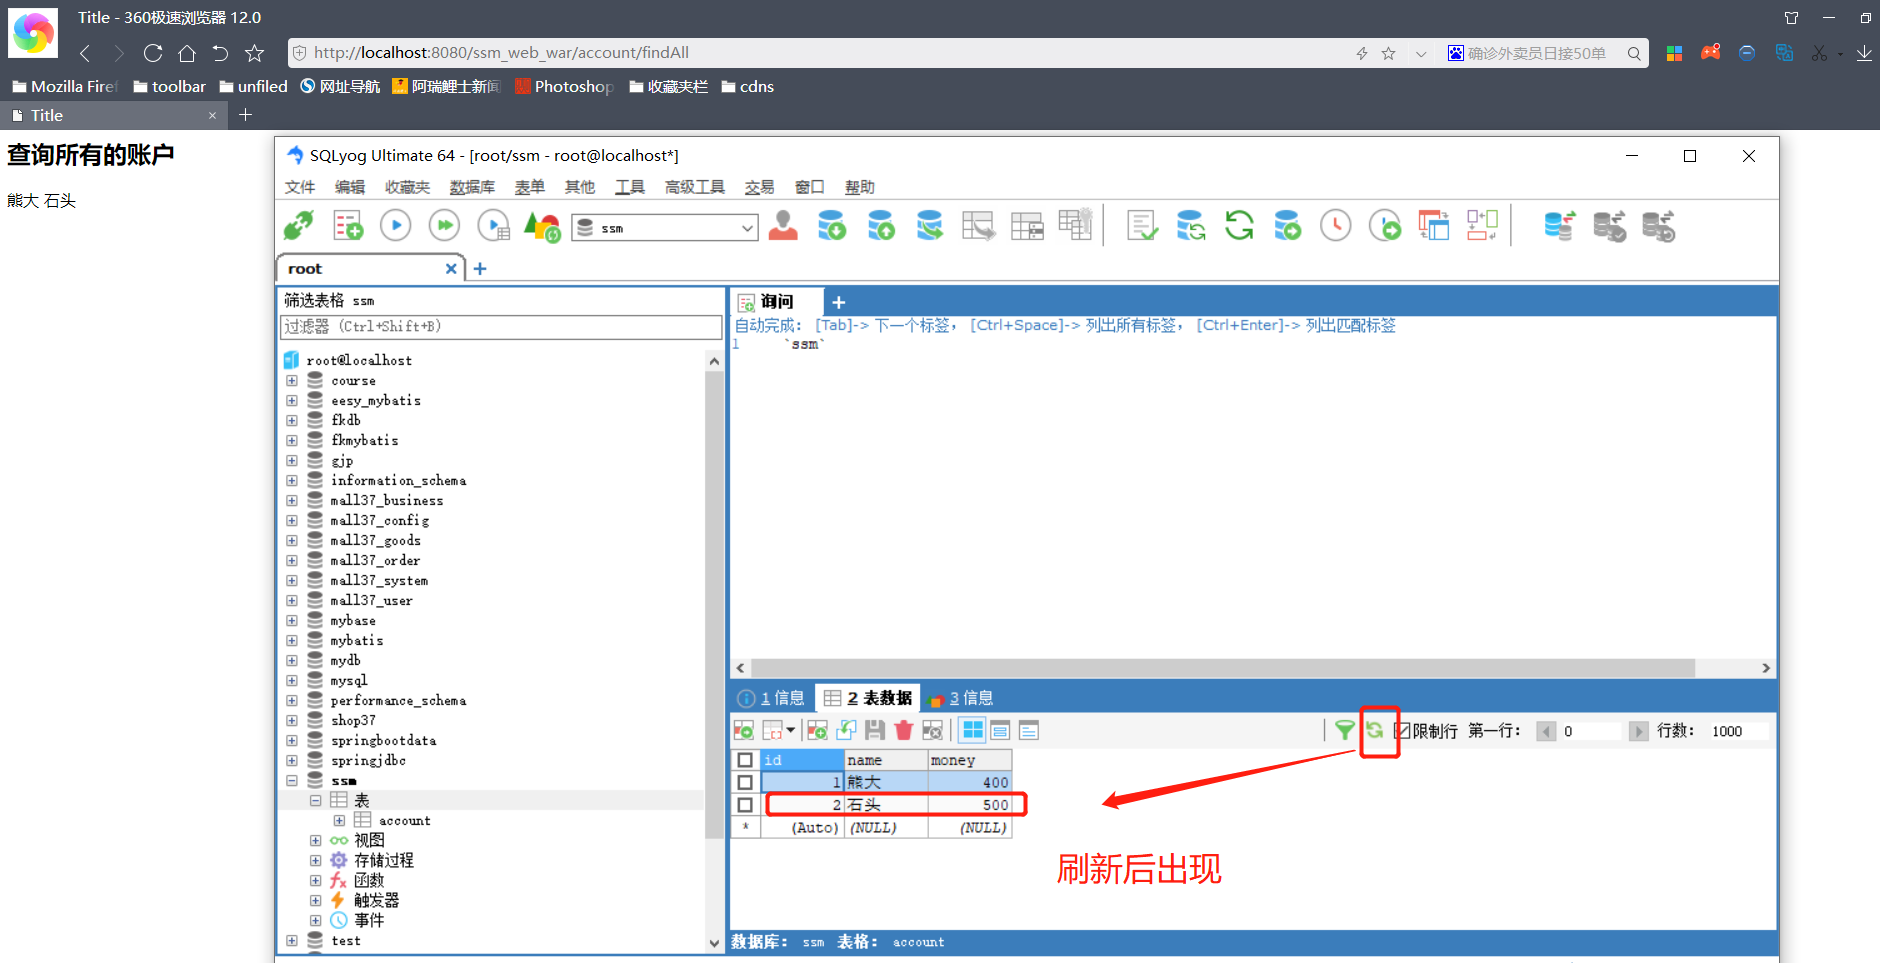
As shown in the figure above and successfully completed all integration!!