.
QT provides a class of QLayout for layout management, which can solve this problem well. Common layout management includes QVBoxLayout, QHBoxLayout, QFormLayout and QGridLayout. The layout nesting can basically achieve the ideal interface effect. The blogger's "image processing self-made software" is realized with QLayout layout management, which is simple and efficient. After adjusting the layout of the interface, adding the corresponding slot function of each control can realize various functions of the software.
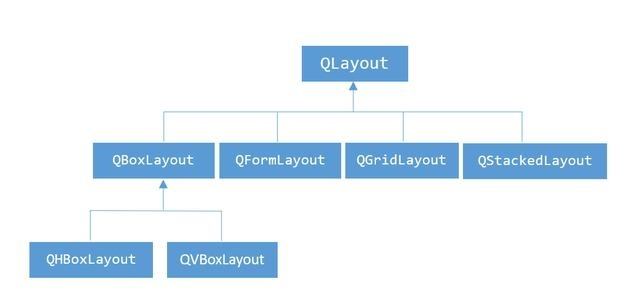
QHBoxLayout: horizontal layout. Arrange controls horizontally, i.e. left and right.
QVBoxLayout: vertical layout, arranging controls vertically, i.e. up and down.
QformLayout: table layout
QGridLayout: grid layout
Common interface
Set outside margin
setMargin(int); // At the same time, set the outer margin of left, top, right and bottom
setContentsMargins(int left, int top, int right, int bottom); // Assign values to the left, top, right, and bottom outer margins respectively
setContentsMargins(const QMargins &margins);
Setting distance
setSpacing(int);
Add spring
addStretch() // Add scaling control, understood as placeholder
add controls
addWidget(QWidget *, int stretch = 0, Qt::Alignment alignment = 0)
Set stretch scale
setStretchFactor(QLayout *l, int stretch);
Example
.
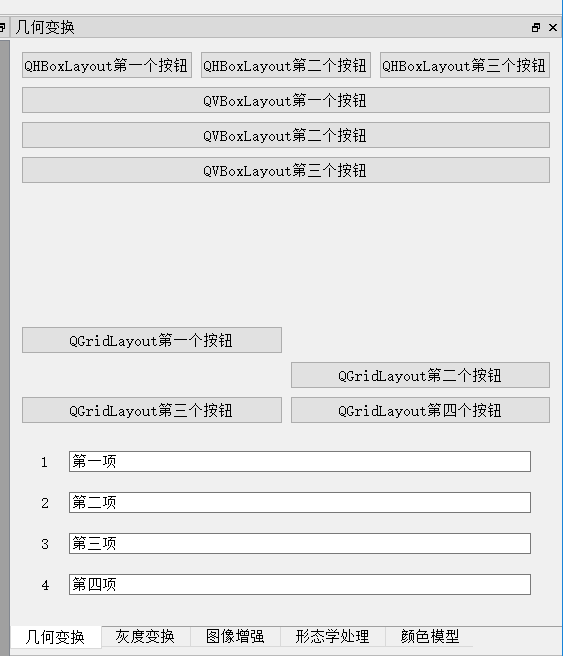
// Horizontal layout
QPushButton *button_H1 = new QPushButton(tr("QHBoxLayout First button"));
QPushButton *button_H2 = new QPushButton(tr("QHBoxLayout Second button"));
QPushButton *button_H3 = new QPushButton(tr("QHBoxLayout Third button"));

QHBoxLayout *hlayout = new QHBoxLayout();
hlayout->addWidget(button_H1);
hlayout->addWidget(button_H2);
hlayout->addWidget(button_H3);

// Vertical layout
QPushButton *button_V1 = new QPushButton(tr("QVBoxLayout First button"));
QPushButton *button_V2 = new QPushButton(tr("QVBoxLayout Second button"));
QPushButton *button_V3 = new QPushButton(tr("QVBoxLayout Third button"));

QVBoxLayout *vlayout = new QVBoxLayout();
vlayout->addWidget(button_V1);
vlayout->addWidget(button_V2);
vlayout->addWidget(button_V3);

// Grid layout (control size automatically stretches as the window changes)
QPushButton *button_G1 = new QPushButton(tr("QGridLayout First button"));
QPushButton *button_G2 = new QPushButton(tr("QGridLayout Second button"));
QPushButton *button_G3 = new QPushButton(tr("QGridLayout Third button"));
QPushButton *button_G4 = new QPushButton(tr("QGridLayout Fourth button"));

QGridLayout *glayout = new QGridLayout();
glayout->addWidget(button_G1, 0, 0);        // The first parameter is control, the second parameter is row number, and the third parameter is column number
glayout->addWidget(button_G2, 1, 1);        // First rows and 1 columns
glayout->addWidget(button_G3, 2, 0);        // Second rows and 0 columns
glayout->addWidget(button_G4, 2, 1);        // Second rows and 1 columns

// Table layout
QLineEdit *line_F1 = new QLineEdit(tr("First item"));
QLineEdit *line_F2 = new QLineEdit(tr("Second items"));
QLineEdit *line_F3 = new QLineEdit(tr("Third items"));
QLineEdit *line_F4 = new QLineEdit(tr("Fourth items"));

QFormLayout *flayout = new QFormLayout();
flayout->addRow(tr("1"), line_F1);          // Add row, the first column is the label, the second column is the added control QLineEdit
flayout->addRow(tr("2"), line_F2);
flayout->addRow(tr("3"), line_F3);
flayout->addRow(tr("4"), line_F4);
flayout->setSpacing(20);                    // Setting distance
flayout->setMargin(20);                     // Set outside margin

// Vertical arrangement of main layout
QVBoxLayout *pLayout = new QVBoxLayout();   // Use vertical layout as main layout
pLayout->addLayout(hlayout);
pLayout->addLayout(vlayout);
pLayout->addStretch();                      // Add spring
pLayout->addLayout(glayout);
pLayout->addLayout(flayout);

QWidget *pWidget = new QWidget(dock_Geom);  // This is the focus of QDockWidget layout!!!
pWidget->setLayout(pLayout);
dock_Geom->setWidget(pWidget);