To realize the classification of CIFAR-10, the steps are as follows:
- Loading and preprocessing CIFAR-10 datasets using torch vision
- Defining network
- Define loss function and optimizer
- Train network and update network parameters
- Test network
1. CIFAR-10 data loading and preprocessing
import torchvision as tv
import torch as t
import torchvision.transforms as transforms
from torchvision.transforms import ToPILImage
show = ToPILImage() #Turn Tensor into Image, aspect visualization
# The first time you run the program torch vision, CIFAR-10 datasets are automatically downloaded.
# If CIFAR-10 has been downloaded, you can specify it through the root parameter

# Define the preprocessing of data. The class Compose is used to manage each transform
transform = transforms.Compose([transforms.ToTensor(), # Turn to Tensor
                                transforms.Normalize((0.5,0.5,0.5),(0.5,0.5,0.5))]) # normalization

# Training set
trainset = tv.datasets.CIFAR10(root='D:\\Workspace\\Python\\CIFAR-10\\', train = True, download=True, transform=transform)
trainloader = t.utils.data.DataLoader(trainset, batch_size=4, shuffle=True,num_workers=2)

#Test set
testset = tv.datasets.CIFAR10(root='D:\\Workspace\\Python\\CIFAR-10\\', train = False, download=True, transform=transform)
testloader = t.utils.data.DataLoader(testset, batch_size=4, shuffle=False,num_workers=2)
classes = ('plane','car','bird','cat','deer','dog','frog','horse','ship','truck')
Files already downloaded and verified Files already downloaded and verified
1.1 the to tensor class implements the process of Convert a PIL Image or numpy.ndarray to sensor. In PyTorch, the PIL library is often used to read image data, so this method is equivalent to building a bridge between PIL Image and sensor. In addition, it should be emphasized that before data normalization, PIL Image must be converted to tensor, while other resize or cross operations are not required.
transform1 = transforms.Compose([
    transforms.ToTensor(),  # range [0, 255] -> [0.0,1.0]
])
# Converts a PIL Image or numpy.ndarray (H x W x C) in the range
# [0, 255] to a torch.FloatTensor of shape (C x H x W) in the range [0.0, 1.0].
1.2 transforms.Compose normalized to [- 1.0, 1.0]
Change transform1 above to the following:
transform2 = transforms.Compose([
    transforms.ToTensor(),
    transforms.Normalize(mean = (0.5, 0.5, 0.5), std = (0.5, 0.5, 0.5))
    ])
transforms.Normalize use the following formula to normalize:
Channel = (channel mean) / std (because transforms.ToTensor() has processed data into [0,1], then (x-0.5)/0.5 is [- 1.0, 1.0])
In this way, each value in our data becomes a number of [- 1,1].
1.3 torch.utils.data.DataLoader()
If there are special requirements for data input, you can set parameters:
- Dataset, this is the output of PyTorch's existing data reading interface (such as torch vision. Datasets. Imagefolder) or custom data interface. The output is either the object of torch.utils.data.Dataset class, or the object of self defined class inherited from torch.utils.data.Dataset class.
- batch_size, the number of images loaded in each batch. Default =1
- shuffle,set to True to have the data reshuffled at every epoch(default:False).
- Collate FN is a package used to process input dataset s in different situations. Generally, it can be used by default, unless your customized data reading and output are very rare.
- From the comments, it can be seen that the batch ABCD sampler is mutually exclusive with the batch ABCD size, shuffle and other parameters, and the default is generally used.
- sampler, defines the strategy to draw samples from the dataset. It is mutually exclusive with shuffle, which is usually the default.
- From the comments, it can be seen that this parameter must be greater than or equal to 0. If 0, it means that the data is imported in the main process. If other numbers are greater than 0, it means that the data is imported through multiple processes, which can speed up the data import.
- Pin'u memory (bool, optional): if true, the data loader will copy tensors into CUDA pinned memory before returning them.
- T imeout is used to set the time-out time for data reading, but an error will be reported if the data has not been read before this time.
1.4 Dataset object is a Dataset, which can be accessed by subscript and return data with the shape of (data,label).
(data, label) = trainset[100]
print(classes[label])
#(data+1)/2 is to restore the normalized data. The output picture of the program is as shown in the figure
show((data+1)/2).resize((100,100))
Out: ship
1.5 Dataloder is an iterative object, which splices every data sample returned by dataset into a batch, and provides multithreading to accelerate optimization and data scrambling. After the program traverses all data of dataset, it also iterates over Dataloader.
dataiter = iter(trainloader)
images,labels = dataiter.next() #Return 4 pictures and labels, as shown below
print(''.join('%11s'%classes[labels[j]] for j in range(4)))
show(tv.utils.make_grid((images+1)/2)).resize((400,100))
Out: horse plane frog deer
2. Define network
import torch.nn as nn
import torch.nn.functional as F
class Net(nn.Module):
    def __init__(self):
        #nn.Module subclass must execute the constructor of the parent class in the constructor
        #The following formula is equivalent to nn.module
        super(Net,self).__init__()
        #Convolution layer '3' indicates that the input picture is 3 channels, '6' indicates the number of output channels, '5' indicates that the convolution kernel is 5 * 5
        self.conv1 = nn.Conv2d(3,6,5)
        #Convolution layer
        self.conv2 = nn.Conv2d(6,16,5)
        #Affine layer / full connection layer, y=Wx+b
        self.fc1 = nn.Linear(16*5*5,120)
        self.fc2 = nn.Linear(120,84)
        self.fc3 = nn.Linear(84,10)

    def forward(self,x):
        #Convolution - > activation - > pooling
        x = F.max_pool2d(F.relu(self.conv1(x)),(2,2))
        x = F.max_pool2d(F.relu(self.conv2(x)),2)
        # reshape, '-1' means adaptive
        x = x.view(x.size()[0], -1)
        x = F.relu(self.fc1(x))
        x = F.relu(self.fc2(x))
        x = self.fc3(x)
        return x
net = Net()
print(net)
# Out: Net(
#         (conv1): Conv2d(3, 6, kernel_size=(5, 5), stride=(1, 1))
#         (conv2): Conv2d(6, 16, kernel_size=(5, 5), stride=(1, 1))
#         (fc1): Linear(in_features=400, out_features=120, bias=True)
#         (fc2): Linear(in_features=120, out_features=84, bias=True)
#         (fc3): Linear(in_features=84, out_features=10, bias=True)
#         )
3. Define loss function and optimizer (loss and optimizer)
from torch import optim
criterion = nn.CrossEntropyLoss() #Cross entropy loss function
optimizer = optim.SGD(net.parameters(),lr=0.001, momentum = 0.9)
4. Training network
The training process of all networks is similar, and the following process is continuously implemented.
- Input data
- Forward propagation + backward propagation
- Update parameters
for epoch in range(2):  # loop over the dataset multiple times

    running_loss = 0.0
    for i, data in enumerate(trainloader, 0):
        # get the inputs
        inputs, labels = data

        # zero the parameter gradients
        optimizer.zero_grad()

        # forward + backward + optimize
        outputs = net(inputs)
        loss = criterion(outputs, labels)
        loss.backward()
        # Update parameters
        optimizer.step()

        # print statistics
        running_loss += loss.item()
        if i % 2000 == 1999:    # print every 2000 mini-batches
            print('[%d, %5d] loss: %.3f' %
                  (epoch + 1, i + 1, running_loss / 2000))
            running_loss = 0.0

print('Finished Training')
Only two epochs are trained here (one epoch is called after traversing the dataset). Let's see if the Internet works. Input the test image into the network, calculate its label, and then compare it with the actual label.
dataiter = iter(testloader)
images,labels = dataiter.next() #A batch returns 4 pictures
# print images
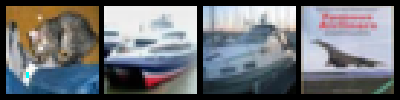
print('GroundTruth: ', ' '.join('%08s' % classes[labels[j]] for j in range(4)))
show(tv.utils.make_grid(images/2-0.5)).resize((400,100))Out: GroundTruth: cat ship ship plane
Then calculate the label of network prediction:
#Calculate the classification of pictures in each category
outputs = net(images)
#The one with the highest score
_, predicted = t.max(outputs.data, 1)

print('Predicted: ', ' '.join('%5s' % classes[predicted[j]]  for j in range(4)))
Out: Predicted: dog ship car plane
Let's take a look at the effect on the whole test set.
correct = 0 #Predict the correct number of pictures
total = 0 #Total picture number
with t.no_grad():
    for data in testloader:
        images, labels = data
        outputs = net(images)
        _, predicted = t.max(outputs.data, 1)
        total += labels.size(0)
        correct += (predicted == labels).sum().item()

print('Accuracy of the network on the 10000 test images: %d %%' % ( 100 * correct / total))
Out: Accuracy of the network on the 10000 test images: 61 %
5. Training on GPU
if t.cuda.is_available():
    net.cuda()
    images = images.cuda()
    labels = labels.cuda()
    output = net(images)
    loss = criterion(output, labels)

