catalogue
1, Horizontal layout class (QHBoxLayout)
2. Vertical layout class (QVBoxLayout)
3. Grid layout class (QGridLayout)
3.2 network layout across rows and columns
4. Form layout class (QFormLayout)
5.1. Add other layouts to the layout
stay Python Qt GUI Design: window layout management method [basic chapter] (basic chapter-5) In this article, we talked about how to use Qt Designer for window layout management. In fact, it is very convenient to design window layout management in Qt Designer. This blog will continue to talk about API functions on the basis of four window layout methods~
There are four layout methods in PyQt 5: horizontal layout, vertical layout, grid layout, form layout, and two layout methods, namely addLayout() and addWidget(), where addLayout() is used to insert sub layouts in the layout and addWidget() is used to insert controls in the layout.
The four layout methods correspond to four layout classes:
- The horizontal layout class (QHBoxLayout) can arrange the added controls in order in the horizontal direction;
- The vertical layout class (QVBoxLayout) can arrange the added controls in the vertical direction in turn;
- Grid layout class (QGridLayout), which can arrange the added controls in the form of grid;
- The form layout class (QFormLayout) can arrange the added controls in the form of two columns.
The inheritance relationship between the layout class and its subclasses is shown in the following figure:

1, Horizontal layout class (QHBoxLayout)
Use the QHBoxLayout class to add controls from left to right. The common methods in QHBoxLayout class are shown in the following table:
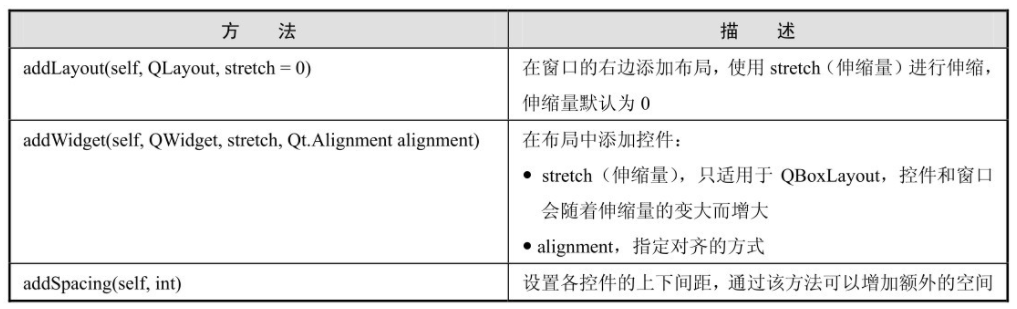
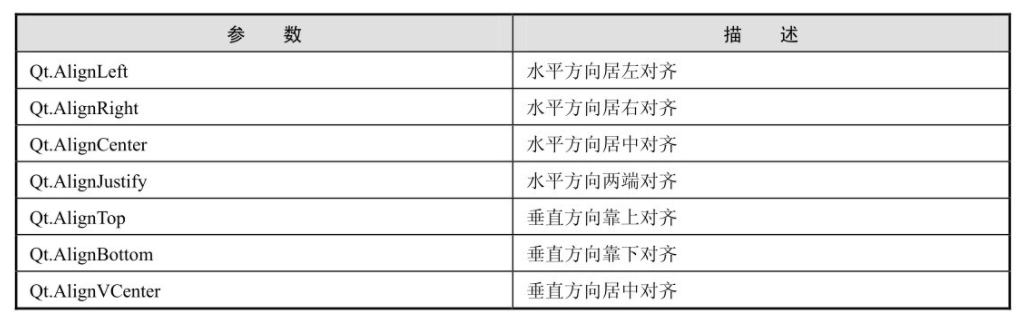
The alignment parameters used in creating QHBoxLayout layout are shown in the following table:
Understand the use of horizontal layout through an example. The example code is as follows:
import sys
from PyQt5.QtWidgets import QApplication  ,QWidget ,QHBoxLayout , QPushButton
from PyQt5.QtCore import Qt

class Winform(QWidget):
	def __init__(self,parent=None):
		super(Winform,self).__init__(parent)
		self.setWindowTitle("Horizontal layout management example")

		# The horizontal layout is arranged from left to right. Add button parts.
		hlayout = QHBoxLayout()

		hlayout.addWidget(QPushButton(str(1)))
		hlayout.addWidget(QPushButton(str(2)))
		hlayout.addWidget(QPushButton(str(3)))
		hlayout.addWidget(QPushButton(str(4)))
		hlayout.addWidget(QPushButton(str(5)))

		#Sets the spacing between controls
		hlayout.setSpacing( 0 )
		self.setLayout(hlayout)

if __name__ == "__main__":
	app = QApplication(sys.argv)
	form = Winform()
	form.show()
	sys.exit(app.exec_())
The operation effect is as follows:

2. Vertical layout class (QVBoxLayout)
The QVBoxLayout class is used to add controls from top to bottom. QHBoxLayout and QVBoxLayout classes inherit from QBoxLayout class, so the common methods are the same.
Learn about the use of vertical layout through an example. The example code is as follows:
import sys
from PyQt5.QtWidgets import QApplication ,QWidget ,QVBoxLayout , QPushButton
class Winform(QWidget):
def __init__(self,parent=None):
super(Winform,self).__init__(parent)
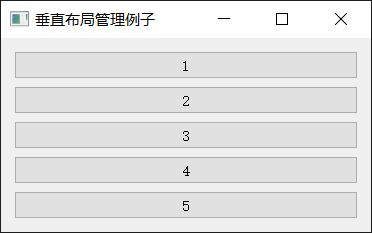
self.setWindowTitle("Vertical layout management example")
self.resize(330, 150)
# The vertical layout is in order from top to bottom. Add button parts.
vlayout = QVBoxLayout()
vlayout.addWidget( QPushButton(str(1)))
vlayout.addWidget( QPushButton(str(2)))
vlayout.addWidget( QPushButton(str(3)))
vlayout.addWidget( QPushButton(str(4)))
vlayout.addWidget( QPushButton(str(5)))
self.setLayout(vlayout)
if __name__ == "__main__":
app = QApplication(sys.argv)
form = Winform()
form.show()
sys.exit(app.exec_())The operation effect is as follows:
3. Grid layout class (QGridLayout)
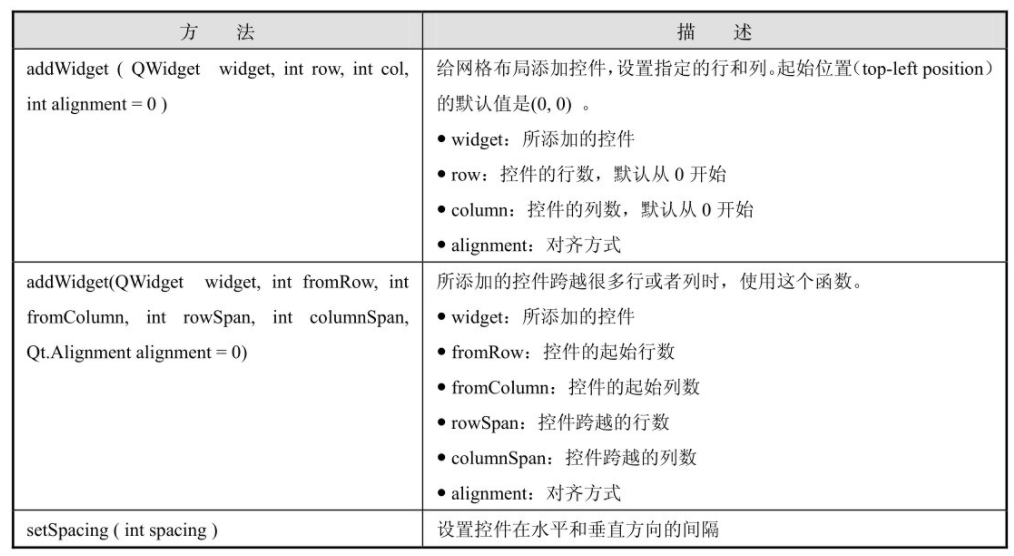
QGridLayout is a grid that separates windows into rows and columns. You can usually use the function addwidget () to add the managed control (Widget) to the window, or use the addLayout() function to add the layout to the window. You can also set the span of the number of rows and columns for the added control through the addWidget() function, and finally realize that the grid occupies multiple panes.
The common methods in the QGridLayout class are shown in the following table:
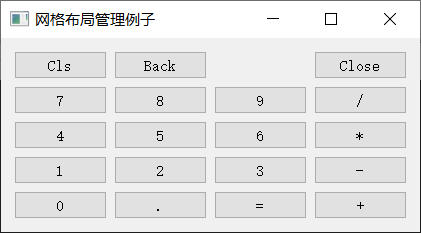
3.1. Single network layout
To make a small case of a single grid layout, create an instance of QGridLayout, set it as the layout of the window, create a label list of buttons, create a location list in the grid, create buttons, and add them to the layout through the addWidget() method. The example is as follows:
import sys
from PyQt5.QtWidgets import QApplication  ,QWidget  , QGridLayout, QPushButton

class Winform(QWidget):
	def __init__(self,parent=None):
		super(Winform,self).__init__(parent)
		self.initUI()

	def initUI(self):
        #Create an instance of QGridLayout and set it as the layout of the window
		grid = QGridLayout()
		self.setLayout(grid)

        #Create a label list for the button
		names = ['Cls', 'Back', '', 'Close',
                 '7', '8', '9', '/',
                '4', '5', '6', '*',
                 '1', '2', '3', '-',
                '0', '.', '=', '+']

        #Create a list of locations in the grid
		positions = [(i,j) for i in range(5) for j in range(4)]

        #Create a button and add it to the layout through the addWidget() method
		for position, name in zip(positions, names):
			if name == '':
				continue

			button = QPushButton(name)
			grid.addWidget(button, *position)

		self.move(300, 150)
		self.setWindowTitle('Grid layout management example')

if __name__ == "__main__":
		app = QApplication(sys.argv)
		form = Winform()
		form.show()
		sys.exit(app.exec_())
The operation effect is as follows:
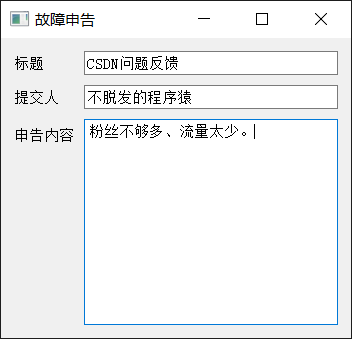
3.2 network layout across rows and columns
This example will realize the network cell design across rows and columns, as shown below:
import sys
from PyQt5.QtWidgets import (QWidget, QLabel, QLineEdit,   QTextEdit, QGridLayout, QApplication)

class Winform(QWidget):
	def __init__(self,parent=None):
		super(Winform,self).__init__(parent)
		self.initUI()

	def initUI(self):
		titleLabel = QLabel('title')
		authorLabel = QLabel('submitter')
		contentLabel = QLabel('Content of declaration')

		titleEdit = QLineEdit()
		authorEdit = QLineEdit()
		contentEdit = QTextEdit()

		grid = QGridLayout()
		grid.setSpacing(10)

        #Place the titleLabel in row 1 and column 0 of the QGridLayout layout.
		grid.addWidget(titleLabel, 1, 0)
        #Put titleEdit in row 1 and column 1 of the QGridLayout layout.
		grid.addWidget(titleEdit, 1, 1)

        #Put the authorLabel in Row 2 and column 0 of the QGridLayout layout.
		grid.addWidget(authorLabel, 2, 0)
        #Place authorEdit in Row 2 and column 1 of the QGridLayout layout.
		grid.addWidget(authorEdit, 2, 1)

        #Put the contentLabel in row 3 and column 0 of the QGridLayout layout.
		grid.addWidget(contentLabel, 3, 0)
        #Put contentEdit in the third row and the first column of the QGridLayout layout, spanning five rows and one column.
		grid.addWidget(contentEdit, 3, 1, 5, 1)

		self.setLayout(grid)

		self.setGeometry(300, 300, 350, 300)
		self.setWindowTitle('Fault declaration')

if __name__ == "__main__":
		app = QApplication(sys.argv)
		form = Winform()
		form.show()
		sys.exit(app.exec_())
The operation effect is as follows:
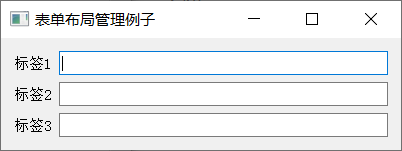
4. Form layout class (QFormLayout)
QFormLayout is a label field form layout. As the name suggests, it is the layout that implements the form method.
Form is a mode that prompts users to interact. It is mainly composed of two columns: the first column is used to display information and prompt users, which is generally called label field; The second column requires user selection or input, which is generally called field field. The relationship between label and field is that label is associated with field. Examples are as follows:
import sys
from PyQt5.QtWidgets import QApplication  ,QWidget ,QFormLayout , QLineEdit, QLabel

class Winform(QWidget):
	def __init__(self,parent=None):
		super(Winform,self).__init__(parent)
		self.setWindowTitle("Form layout management example")
		self.resize(400, 100)

		fromlayout = QFormLayout()
		labl1 = QLabel("Label 1")
		lineEdit1 = QLineEdit()
		labl2 = QLabel("Label 2")
		lineEdit2 = QLineEdit()
		labl3 = QLabel("Label 3")
		lineEdit3 = QLineEdit()

		fromlayout.addRow(labl1, lineEdit1)
		fromlayout.addRow(labl2, lineEdit2)
		fromlayout.addRow(labl3, lineEdit3)

		self.setLayout(fromlayout)

if __name__ == "__main__":
		app = QApplication(sys.argv)
		form = Winform()
		form.show()
		sys.exit(app.exec_())
The operation effect is as follows:
5. Nested layout
It is not difficult to make a single layout in the window, but if it is a complex layout, it involves layout nesting. It is recommended to use the visual management tool of Qt Designer for interface layout. See First blog post.
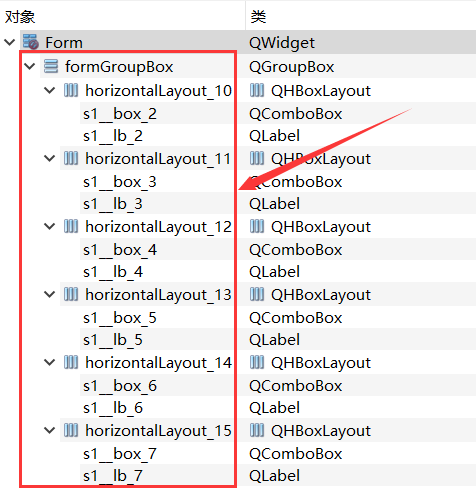 Nested layout level effect in Qt Designer
This article only introduces the example method of implementing nested layout by API functions.
5.1. Add other layouts to the layout
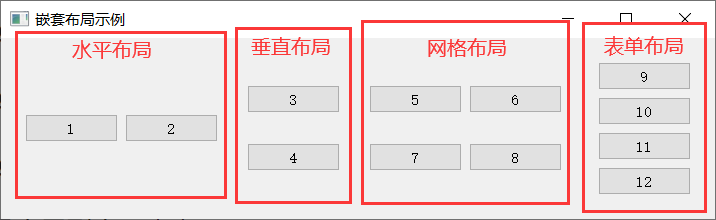
For the whole example, firstly, the global layout adopts the horizontal layout, and the local layout adopts the horizontal layout, vertical layout, grid layout and form layout respectively. Prepare four QWidget controls: hwg, vwg, gwg and formlayout, and use four QWidget controls to set the local layout respectively. Next, add four QWidget controls to the global variable. Finally, Apply the global layout to the window itself.
The example effect is as follows:
The implementation code is as follows:
import sys
from PyQt5.QtWidgets import QApplication  ,QWidget , QHBoxLayout,  QVBoxLayout,  QGridLayout ,  QFormLayout, QPushButton

class MyWindow( QWidget):

    def __init__(self):
        super().__init__()
        self.setWindowTitle('Nested layout example')

        # Global layout (1): Horizontal
        wlayout =  QHBoxLayout()
         # Local layout (4): horizontal, vertical, grid, form
        hlayout =  QHBoxLayout()
        vlayout =  QVBoxLayout()
        glayout = QGridLayout()
        formlayout =  QFormLayout()

        # Add part to partial layout (for example: button)
        hlayout.addWidget( QPushButton(str(1)) )
        hlayout.addWidget( QPushButton(str(2)) )
        vlayout.addWidget( QPushButton(str(3)) )
        vlayout.addWidget( QPushButton(str(4)) )
        glayout.addWidget( QPushButton(str(5)) , 0, 0 )
        glayout.addWidget( QPushButton(str(6)) , 0, 1 )
        glayout.addWidget( QPushButton(str(7)) , 1, 0)
        glayout.addWidget( QPushButton(str(8)) , 1, 1)
        formlayout.addWidget( QPushButton(str(9))  )
        formlayout.addWidget( QPushButton(str(10)) )
        formlayout.addWidget( QPushButton(str(11)) )
        formlayout.addWidget( QPushButton(str(12)) )

        # Prepare four components
        hwg =  QWidget()
        vwg =  QWidget()
        gwg =  QWidget()
        fwg =  QWidget()

        # Local layout of four components
        hwg.setLayout(hlayout)
        vwg.setLayout(vlayout)
        gwg.setLayout(glayout)
        fwg.setLayout(formlayout)

         # Four subassemblies are added to the global layout
        wlayout.addWidget(hwg)
        wlayout.addWidget(vwg)
        wlayout.addWidget(gwg)
        wlayout.addWidget(fwg)

        # Form ontology setting global layout
        self.setLayout(wlayout)

if __name__=="__main__":
    app =  QApplication(sys.argv)
    win = MyWindow()
    win.show()
    sys.exit(app.exec_())
Such a layout has a disadvantage: four local layouts need four blank controls. If there are 10 local layouts, 10 blank controls are needed. How to solve this problem? At this time, you need to add a layout to the control.
5.2. Add layout in control
Adding a layout to a control, no matter how many local layouts there are, only one blank control is needed, and then multiple layouts in this blank control can achieve the effect of nested layout.
To optimize the example in 5.1, first prepare a global control to add the global layout, define the global layout and four local layouts, place some button controls in the local layout, and finally add the four local layouts to the global layout. The implementation code is as follows:
from PyQt5.QtWidgets import *
import sys

class MyWindow(QWidget):

	def __init__(self):
		super().__init__()
		self.setWindowTitle('Nested layout example')
		self.resize(700, 200)

        # Global assembly (note the parameter self), which is used to "host" the global layout
		wwg = QWidget(self)

         # Global layout (note parameter wwg)
		wl = QHBoxLayout(wwg)
		hlayout =  QHBoxLayout()
		vlayout =  QVBoxLayout()
		glayout = QGridLayout()
		formlayout =  QFormLayout()

         # Add part to partial layout (for example: button)
		hlayout.addWidget( QPushButton(str(1)) )
		hlayout.addWidget( QPushButton(str(2)) )
		vlayout.addWidget( QPushButton(str(3)) )
		vlayout.addWidget( QPushButton(str(4)) )
		glayout.addWidget( QPushButton(str(5)) , 0, 0 )
		glayout.addWidget( QPushButton(str(6)) , 0, 1 )
		glayout.addWidget( QPushButton(str(7)) , 1, 0)
		glayout.addWidget( QPushButton(str(8)) , 1, 1)
		formlayout.addWidget( QPushButton(str(9))  )
		formlayout.addWidget( QPushButton(str(10)) )
		formlayout.addWidget( QPushButton(str(11)) )
		formlayout.addWidget( QPushButton(str(12)) )

        # Here, add components to the local layout and add them to the global layout
		wl.addLayout(hlayout)
		wl.addLayout(vlayout)
		wl.addLayout(glayout)
		wl.addLayout(formlayout)

if __name__=="__main__":

	app = QApplication(sys.argv)
	win = MyWindow()
	win.show()
	sys.exit(app.exec_())
5.3. QSplitter layout manager
In addition to the Layout management described above, PyQt also provides a special Layout manager: QSplitter, which can dynamically drag the boundary between child controls. It is a dynamic Layout manager.
QSplitter allows users to control the size of child controls by dragging the boundaries of child controls, and provides a controller to handle dragging child controls.
In the QSplitter object, the child controls are arranged horizontally by default, and Qt.Vertical can be used for vertical layout. The common methods in QSplitter class are shown in the following table:
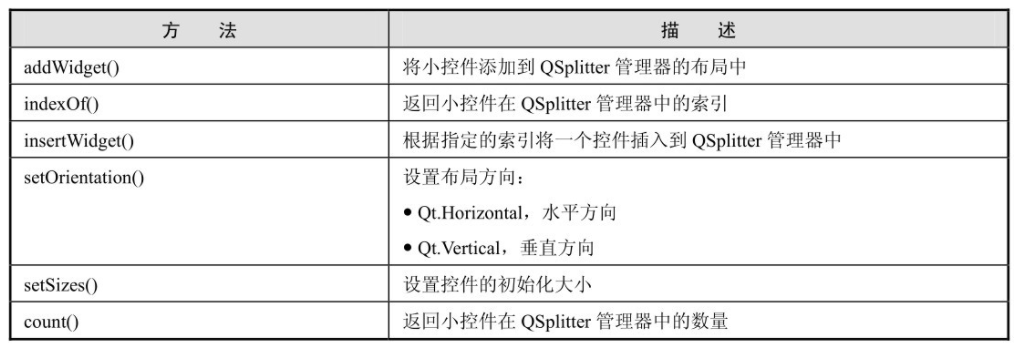
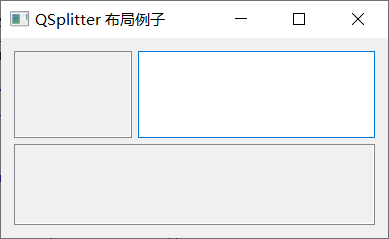
Understand the use of QSplitter layout through an example. In this example, two QFrame controls organized by two qsplitters are shown. The first QSplitter object contains a QFrame object and a QTextEdit object, and is laid out horizontally. The second QSplitter object adds the first QSplitter object and another QFrame object and is laid out vertically.
The example effect is as follows:
The example code is as follows:
from PyQt5.QtCore import *
from PyQt5.QtGui import *
from PyQt5.QtWidgets import *

class SplitterExample(QWidget):
	def __init__(self):
		super(SplitterExample, self).__init__()
		self.initUI()

	def initUI(self):
		hbox = QHBoxLayout(self)
		self.setWindowTitle('QSplitter Layout example')
		self.setGeometry(300, 300, 300, 200)
		topleft = QFrame()
		topleft.setFrameShape(QFrame.StyledPanel)

		bottom = QFrame()
		bottom.setFrameShape(QFrame.StyledPanel)

		splitter1 = QSplitter(Qt.Horizontal)
		textedit = QTextEdit()
		splitter1.addWidget(topleft)
		splitter1.addWidget(textedit)
		splitter1.setSizes([100,200])
		splitter2 = QSplitter(Qt.Vertical)
		splitter2.addWidget(splitter1)
		splitter2.addWidget(bottom)
		hbox.addWidget(splitter2)
		self.setLayout(hbox)

if __name__ == '__main__':
	app = QApplication(sys.argv)
	demo = SplitterExample()
	demo.show()
	sys.exit(app.exec_())