Python makes mosaic images
200 lines of Python code complete the script for generating mosaic pictures
Knowledge points
- What is RGB
- HSV color space
- Python Basics
- Including the use of the pilot library
- Use of multiprocessing Library
- Principle of making mosaic image
effect:
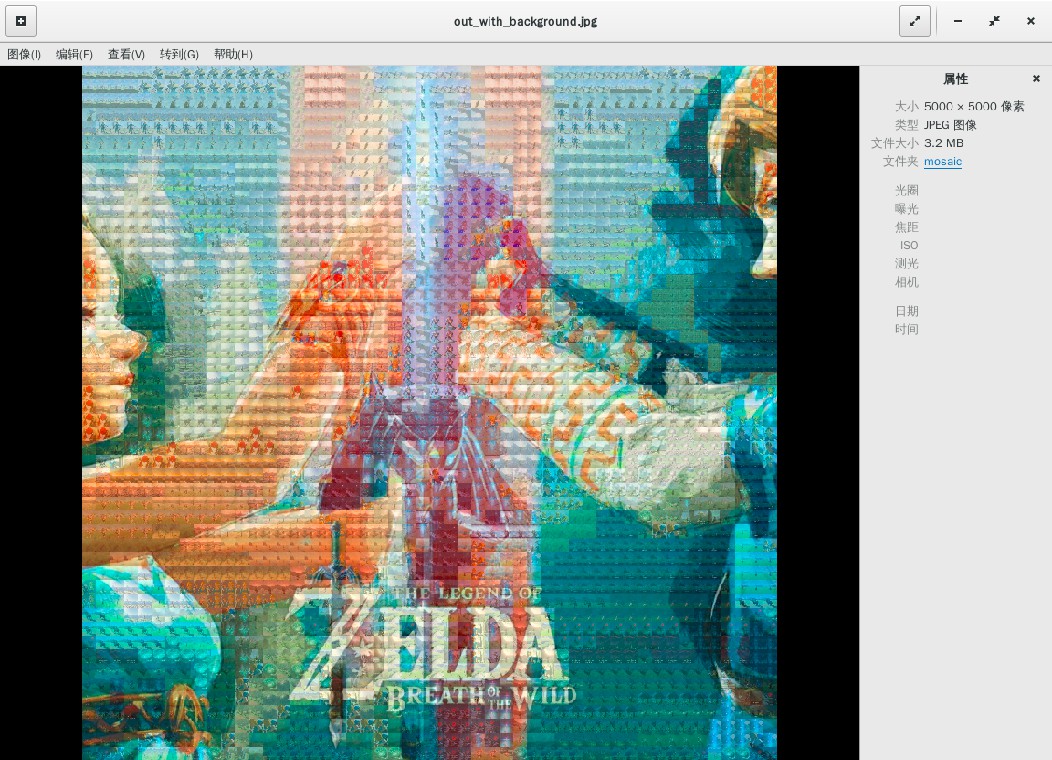
You can generate pictures similar to the following:
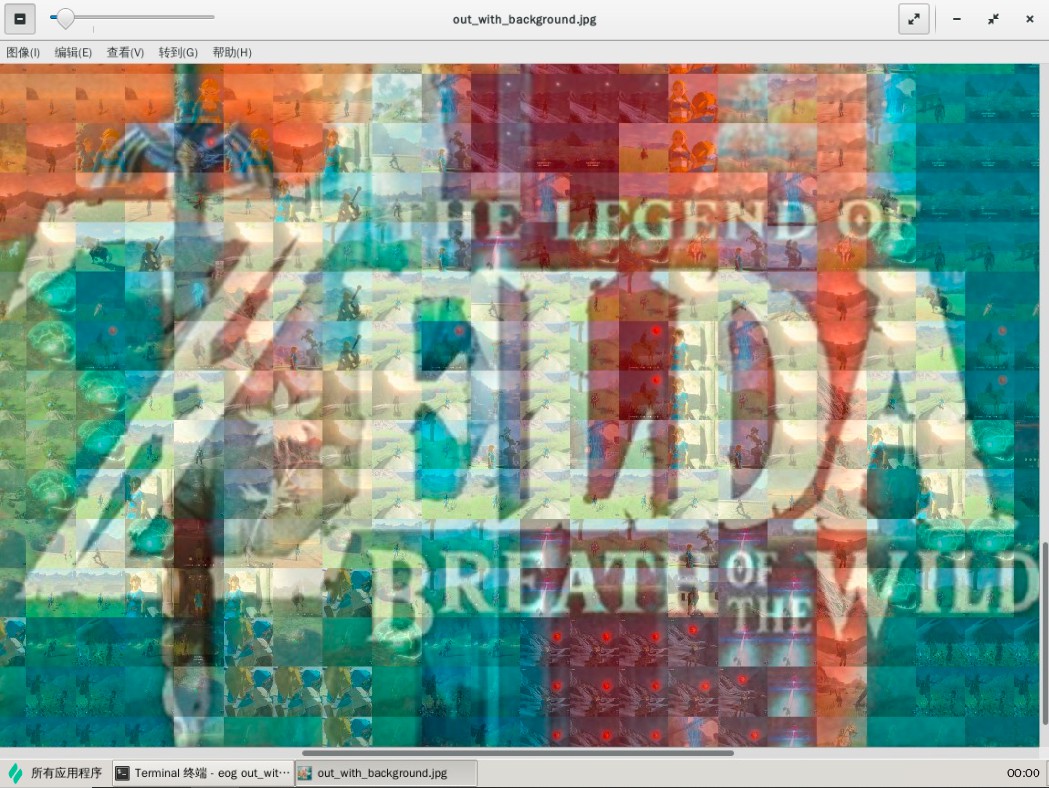
After zooming in, you can see that the figure above is composed of many small images:
environment
- Python 3.5.2
- numpy==1.18.1
- Pillow==8.0.0
We will use the pilot (PIL) library in Python to process images and numpy to perform some numerical calculations. We first install the two libraries using the following command:
pip install numpy
pip install pillow
principle
An image is composed of many pixels. In order to generate a mosaic image, our idea is to replace each small part of the original image with an image with a color similar to this small part, so as to generate a mosaic style image.
The following is the whole structure (the picture may be a little small, you can click to view the large picture), and we will introduce it in turn:
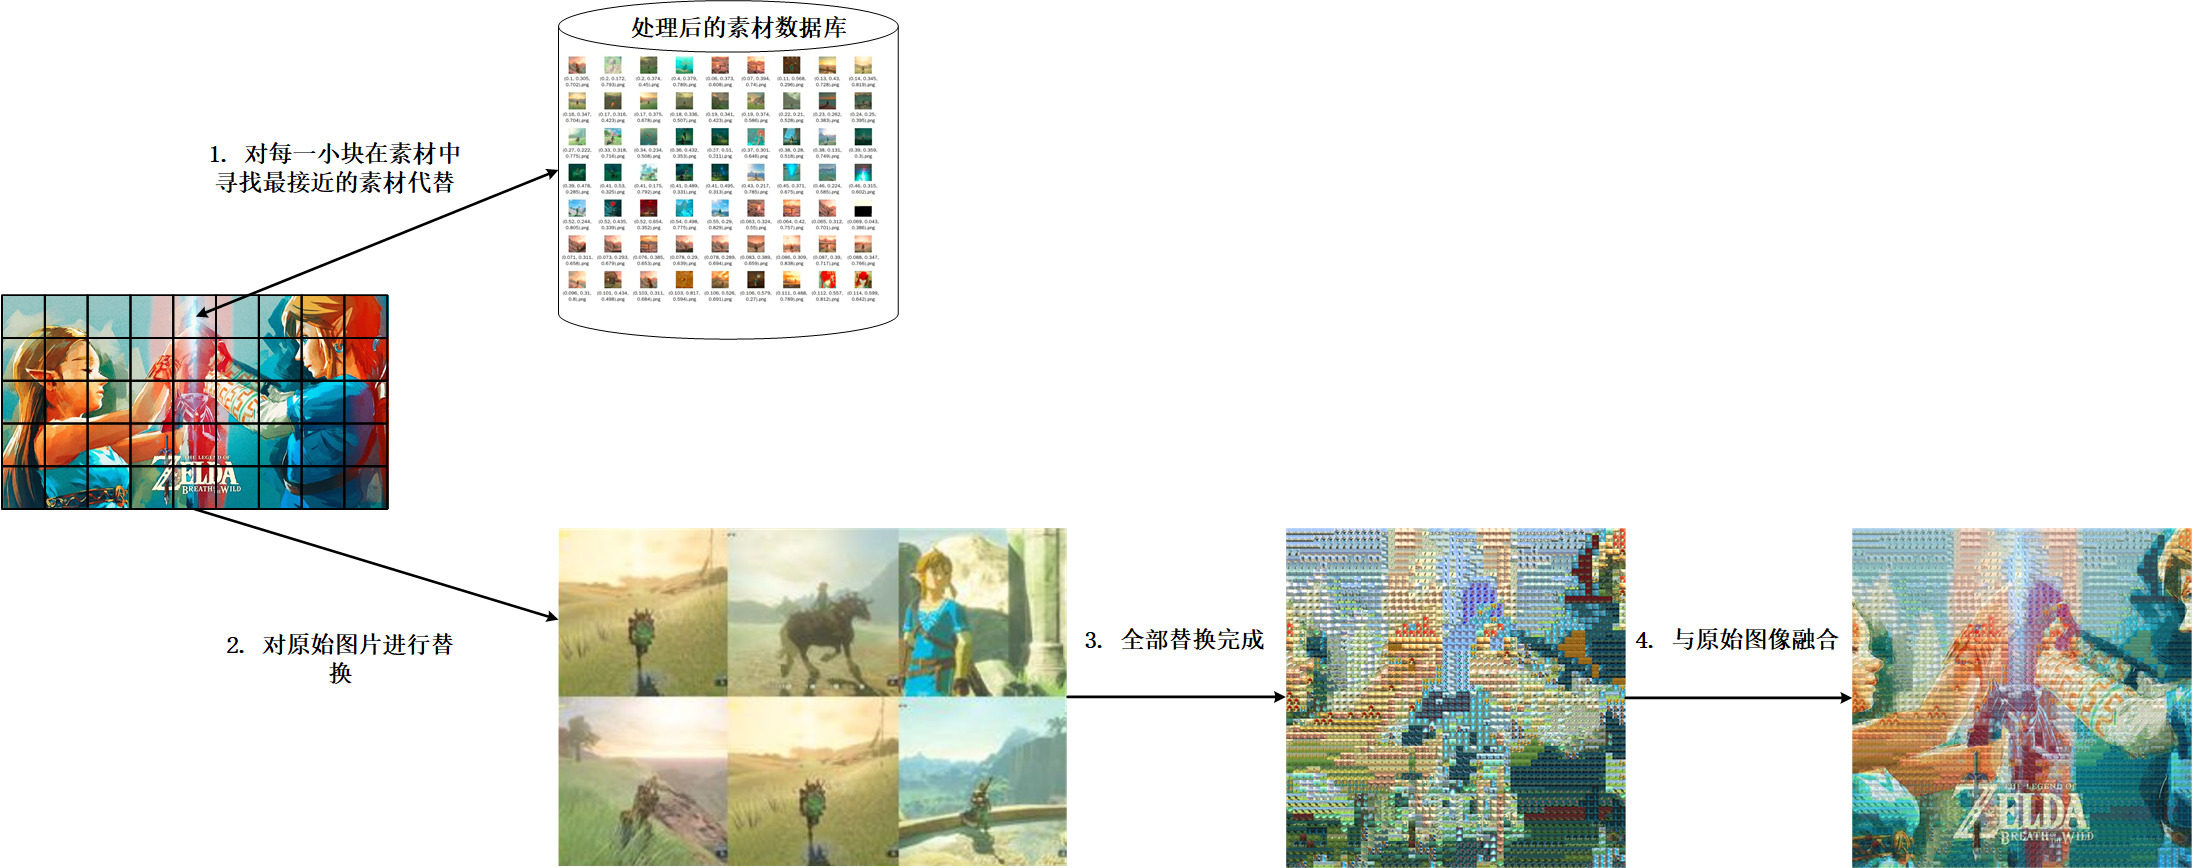
In the next, we will:
- Firstly, RGB and HSV color space are introduced, and how to convert from RGB color space to HSV color space is introduced.
- Then we will introduce the experimental steps of mosaic image mosaic, mainly including the processing of material images and the generation of image database;
- Finally, we use the processed material image to generate mosaic image.
RGB color space
RGB color space is an image represented by three channels. The three channels are red ®, Green (G) and blue (B). RGB color space is defined by the chromaticity of the three primary colors of red, green and blue, so that the corresponding color triangle can be defined to generate other colors. Through different combinations of these three colors, almost all other colors can be formed. The most common RGB space is sRGB.
[external chain picture transfer failed. The source station may have anti-theft chain mechanism. It is recommended to save the picture and upload it directly (img-wsxwto1u-1636963261977)( https://doc.shiyanlou.com/courses/3007/246442/43c98ec982b69be0a54c798540467cde-1 )]
However, in the natural environment, the image is easily affected by natural illumination, occlusion and so on. That is, the human eye will be more sensitive to the brightness of the picture. The three components of RGB color space are closely related to brightness. As long as the brightness changes, the three components of RGB color will change
At the same time, the sensitivity of human eyes to these three RGB colors is different. In monochrome, the human eye is the least sensitive to red and the most sensitive to blue, so RGB color space is a color space with poor uniformity.
If we directly use Euclidean distance to measure the color similarity in RGB color space, there will be a large deviation between his result and human vision.
HSV color space
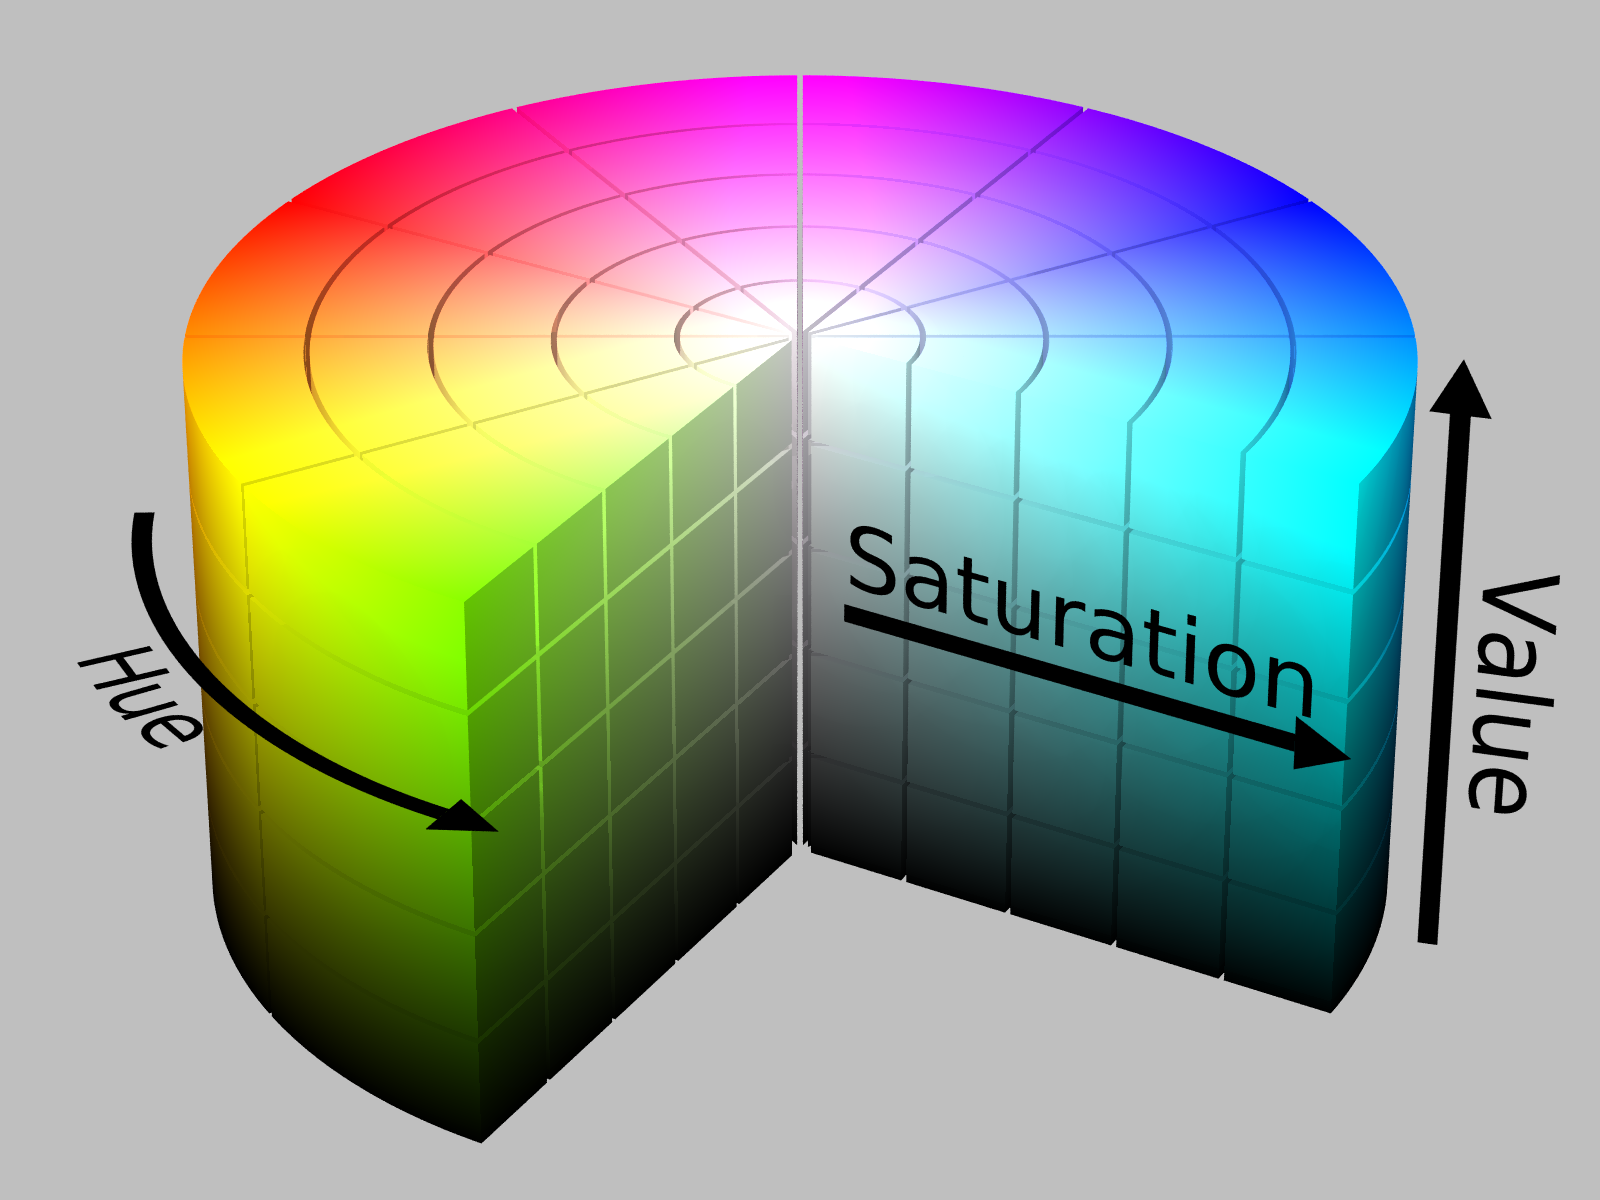
Because the RGB color space mentioned above can not easily compare the similarity between colors, we use HSV color space more when dealing with this kind of problems. HSV color space is also composed of three components, namely:
- Hue (hue)
- Saturation
- Value (lightness)
We will use the cylinder in the figure below to represent HSV color space, where:
- H is represented by the polar angle of polar coordinates;
- S is expressed by the length of the axis of polar coordinates;
- V is expressed by the height of the cylinder;
In RGB color space, color is determined by three common values. For example, the RGB value corresponding to yellow is (255, 255, 0). However, in HSV color space, yellow is only determined by H (Hue), that is, Hue=60. The following figure shows the yellow color in HSV space:
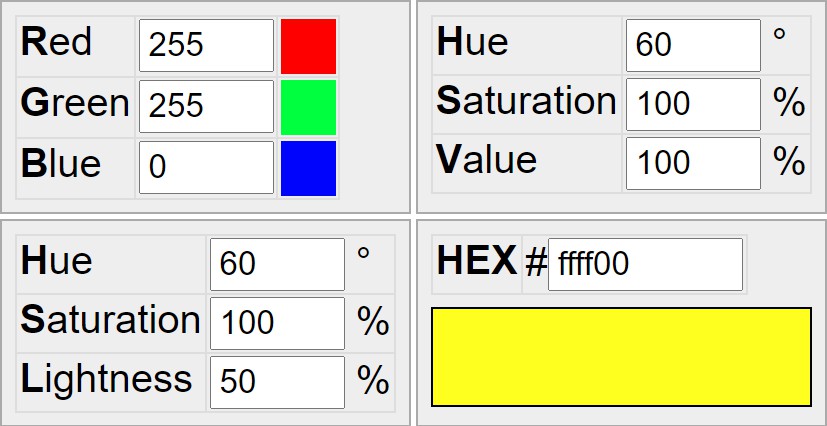
After determining H (Hue), we can change Saturation and Value.
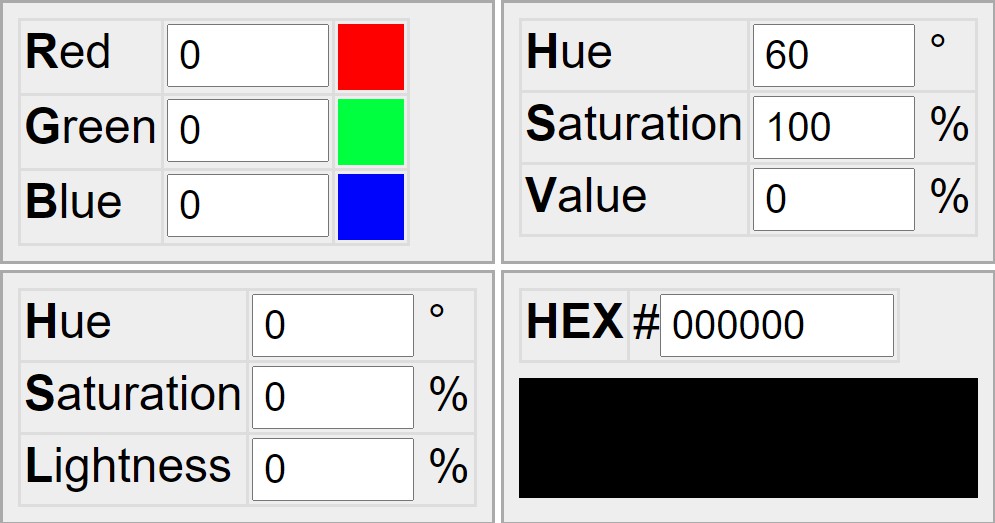
- Saturation: saturation indicates how close the color is to the spectral color. The higher the saturation, the darker the color and the closer it is to the spectral color; The lower the saturation, the lighter the color and the closer it is to white.
- Value: the lightness determines the lightness of the color in the color space. The higher the brightness, the brighter the color. When the lightness is 0, it is all black. The following figure shows that when the lightness is 0, the last color is black.
Conversion of RGB and HSV color space
Next, let'S introduce how to convert colors from RGB color space to HSV color space. First, we define max = \max(R, G, B)max=max(R,G,B), min = \min(R, G, B)min=min(R,G,B). Next, calculate the values of H, S and V respectively. The calculation formula of V is as follows:
V = maxV=max
The calculation formula of S is as follows:
S = \begin{cases} & \frac{max-min}{max} ,& if \ V \neq 0 \ & 0 ,& if \ V = 0 \end{cases}S={maxma**x−min,0,i**f V\=0i**f V=0
The calculation formula of H is as follows:
h = \begin{cases} & 60° \times (0 + \frac{G-B}{max-min}) , & if \ max = R \ & 60° \times (2 + \frac{B-R}{max-min}) , & if \ max = G \ & 60° \times (4 + \frac{R-G}{max-min}) , & if \ max = B \end{cases}h=⎩⎪⎪⎨⎪⎪⎧60°×(0+max−min**G−B),60°×(2+max−min**B−R),60°×(4+max−min**R−G),i**f max=Rif max=Gif max=B
We don't need to write the conversion function ourselves. We can directly use the colorsys library. It contains two functions, rgb_to_hsv and hsv_to_rgb. They are converting colors from RGB space to HSV color space, and converting colors from HSV color space to RGB color space. Let's do a small conversion test with yellow.
We first convert yellow from RGB color space to HSV color space. What we need to note is that here rgb_to_hsv needs to convert RGB values between 0 and 1, so we divide by 255.

0.1666 in the above result is \ frac{60}{360}36060. Then we convert it from HSV color space to RGB color space.

Mosaic picture mosaic
namely:
- Generating an image material database;
- Analyze each small piece of the original image and compare it with the image database to find the closest picture for replacement;
So we write the above functions into two classes: mosaic.create_image_db, used to generate material database; mosaic.create_mosaic is used to generate mosaic images. Both classes inherit from the base class, mosaic.mosaic. There are two methods in this base class: resize_pic and get_avg_color. We will introduce these three classes in turn.

Data preparation:
https://labfile.oss.aliyuncs.com/courses/3007/mosaic_images.zip
Import required libraries
We first import the necessary libraries. In the file, we will use the pilot (PIL) library in Python to process images and numpy to perform some numerical calculations. We first introduce the required libraries in the mosaic.py file.
import os
import sys
import time
import math
import numpy as np
from PIL import Image, ImageOps
from multiprocessing import Pool
from colorsys import rgb_to_hsv, hsv_to_rgb
from typing import List, Tuple, Union
Calculate the average HSV value of the image
As mentioned above, it is better to compare the similarity of picture colors through HSV color space. So here we want to achieve such a function: enter a picture and return the average HSV value of the picture.
Our idea is to traverse each pixel of the image to obtain the RGB value of each pixel. Then, through the function RGB introduced above_ to_ HSV to convert RGB values to HSV values. Finally, the average values of H (Hue), S (Saturation) and V (Saturation) are calculated respectively.
After that, we need to calculate the average HSV value for both the material image and the image to be converted, so we create a parent class mosaic, which contains a method to calculate the average HSV value of the image, and then we can inherit this class. At the same time, because the image size conversion will be used later, we also define an image resize method in this class.
class mosaic(object):
    """Defines the average of calculated pictures hsv value
    """
    def __init__(self, IN_DIR: str, OUT_DIR: str, SLICE_SIZE: int, REPATE: int,
                 OUT_SIZE: int) -> None:
        self.IN_DIR = IN_DIR  # Folder of original image material
        self.OUT_DIR = OUT_DIR  # The folder of output materials. These are the images after hsv calculation and resize
        self.SLICE_SIZE = SLICE_SIZE  # The size of the image after zooming
        self.REPATE = REPATE  # The number of times the same picture can be reused
        self.OUT_SIZE = OUT_SIZE  # Size of final picture output

    def resize_pic(self, in_name: str, size: int) -> Image:
        """Convert image size
        """
        img = Image.open(in_name)
        img = ImageOps.fit(img, (size, size), Image.ANTIALIAS)
        return img

    def get_avg_color(self, img: Image) -> Tuple[float, float, float]:
        """Calculate the average of the image hsv
        """
        width, height = img.size
        pixels = img.load()
        if type(pixels) is not int:
            data = []  # Stores the values of image pixels
            for x in range(width):
                for y in range(height):
                    cpixel = pixels[x, y]  # Get the value of each pixel
                    data.append(cpixel)
            h = 0
            s = 0
            v = 0
            count = 0
            for x in range(len(data)):
                r = data[x][0]
                g = data[x][1]
                b = data[x][2]  # Get the GRB tricolor of a point
                count += 1
                hsv = rgb_to_hsv(r / 255.0, g / 255.0, b / 255.0)
                h += hsv[0]
                s += hsv[1]
                v += hsv[2]

            hAvg = round(h / count, 3)
            sAvg = round(s / count, 3)
            vAvg = round(v / count, 3)

            if count > 0:  # The number of pixels is greater than 0
                return (hAvg, sAvg, vAvg)
            else:
                raise IOError("Failed to read picture data")
        else:
            raise IOError("PIL Failed to read picture data")
Generate material database
Before, we downloaded and unzipped our material pictures into the images folder. But because the pictures we prepare may be different in size. Therefore, in order to facilitate the subsequent image generation, we first process the original material image, which mainly includes two parts:
- Convert the original material picture to a unified format. Here, use the resize defined in the above class_ PIC method is completed;
- Calculate the average HSV value of the picture and save it as a new file name;
Therefore, we traverse the entire material folder, convert the size of each picture and calculate the average HSV value. And save the new picture in the folder out_ In dir. Here we will use multiprocessing and multiprocessing to complete the use of multiprocessing. The complete classes of this part are as follows:
class create_image_db(mosaic):
    """Create the required data
    """
    def __init__(self, IN_DIR: str, OUT_DIR: str, SLICE_SIZE: int, REPATE: int,
                 OUT_SIZE: int) -> None:
        super(create_image_db, self).__init__(IN_DIR, OUT_DIR, SLICE_SIZE,
                                              REPATE, OUT_SIZE)

    def make_dir(self) -> None:
        os.makedirs(os.path.dirname(self.OUT_DIR), exist_ok=True) # Create folder without

    def get_image_paths(self) -> List[str]:
        """Get the address of the image in the folder
        """
        paths = []
        suffixs = ['png', 'jpg']
        for file_ in os.listdir(self.IN_DIR):
            suffix = file_.split('.', 1)[1]  # Get file suffix
            if suffix in suffixs:  # Judge whether it is a picture by suffix
                paths.append(self.IN_DIR + file_)  # Add image path
            else:
                print("Non picture:%s" % file_)
        if len(paths) > 0:
            print("Totally%s" % len(paths) + "Picture")
        else:
            raise IOError("No pictures found")

        return paths

    def convert_image(self, path):
        """Convert image size, Calculate the average of an image at the same time hsv value.
        """
        img = self.resize_pic(path, self.SLICE_SIZE)
        color = self.get_avg_color(img)
        img.save(str(self.OUT_DIR) + str(color) + ".png")

    def convert_all_images(self) -> None:
        """Convert all images
        """
        self.make_dir()
        paths = self.get_image_paths()
        print("Generating mosaic blocks...")
        pool = Pool()  # Multi process processing
        pool.map(self.convert_image, paths)  # The existing image is processed and converted into the corresponding color block
        pool.close()
        pool.join()
After running this part of the code, a folder of outputImages will be generated under the current folder. Here is our processed image. The size of all images is the same, and the name of the image is changed to the average HSV value of the image. The following is the folder generated by running mosaic.py and the pictures in it.
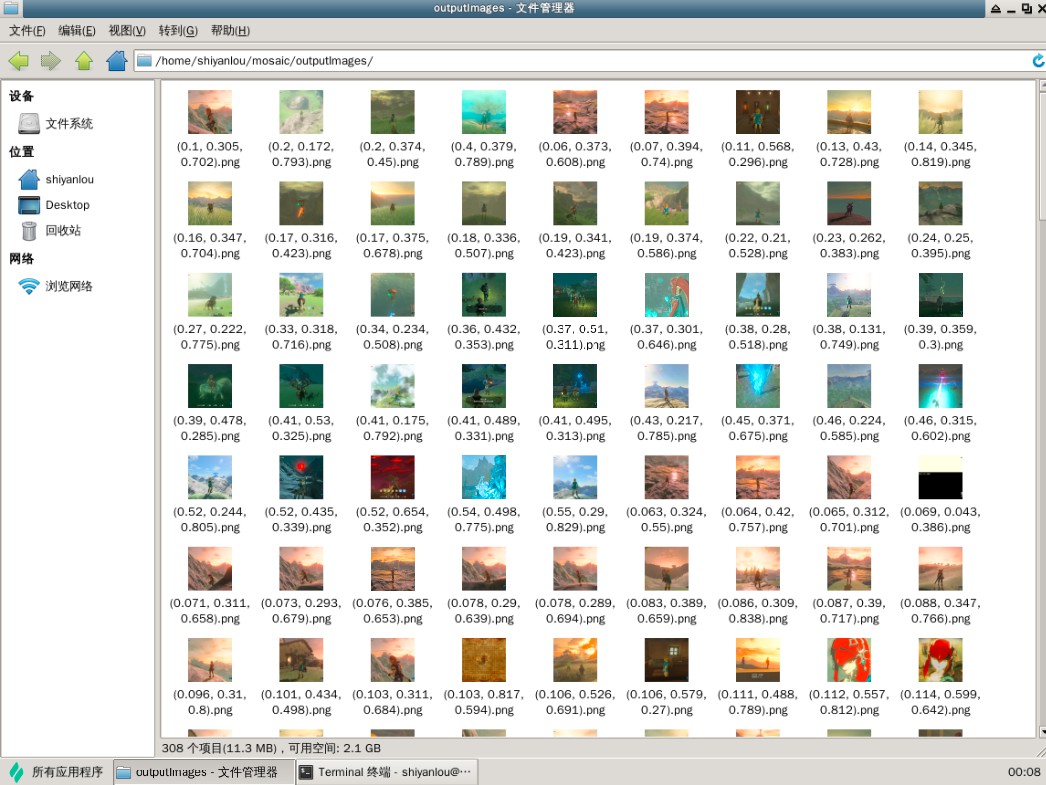
For the time being, we will not run here, but continue to write later to complete the class of generating mosaic pictures. After that, the mosaic.py file will be run, and we can check it again.
Generate mosaic pictures
With the processed material photos, we can start to generate mosaic pictures. The whole process here is:
- First, traverse the material folder we generated, obtain the average HSV value of all pictures in it, and save it in a list;
- Then we divide the original image into small pieces, and calculate the average HSV value of each piece;
- Then, in the list of the average HSV value of the material generated above, we find the picture closest to the average HSV value of the small block, and replace the small block with that picture;
- Such operations are performed on the whole graphics in turn, so that an image can be generated using the material image;
- Finally, you can choose to overlap the generated image with the original image and complete it with Image.blend. This step is optional;
We write the above steps in a class, and the following is the complete code.
class create_mosaic(mosaic):
    """Create mosaic picture
    """
    def __init__(self, IN_DIR: str, OUT_DIR: str, SLICE_SIZE: int, REPATE: int,
                 OUT_SIZE: int) -> None:
        super(create_mosaic, self).__init__(IN_DIR, OUT_DIR, SLICE_SIZE, REPATE,
                                           OUT_SIZE)

    def read_img_db(self) -> List[List[Union[float, int]]]:
        """Read all pictures
        """
        img_db = []  # Store color_list
        for file_ in os.listdir(self.OUT_DIR):
            if file_ == 'None.png':
                pass
            else:
                file_ = file_.split('.png')[0]  # Get file name
                file_ = file_[1:-1].split(',')  # Three values of hsv are obtained
                file_ = [float(i) for i in file_]
                file_.append(0)  # The last bit calculates the number of times the image is used
                img_db.append(file_)
        return img_db

    def find_closiest(self, color: Tuple[float, float, float],
                      list_colors: List[List[Union[float, int]]]) -> str:
        """Find the image closest to the pixel block color
        """
        FAR = 10000000
        for cur_color in list_colors:  # list_color is the average hsv color of all images in the image library
            n_diff = np.sum((color - np.absolute(cur_color[:3]))**2)
            if cur_color[3] <= self.REPATE:  # The same picture cannot be used too many times
                if n_diff < FAR:  # Change the closest color
                    FAR = n_diff
                    cur_closer = cur_color
        cur_closer[3] += 1
        return "({}, {}, {})".format(cur_closer[0], cur_closer[1],
                                     cur_closer[2])  # Returns the hsv color

    def make_puzzle(self, img: str) -> bool:
        """Make puzzles
        """
        img = self.resize_pic(img, self.OUT_SIZE)  # Read the picture and change the size
        color_list = self.read_img_db()  # Get a list of all colors

        width, height = img.size  # Get the width and height of the picture
        print("Width = {}, Height = {}".format(width, height))
        background = Image.new('RGB', img.size,
                               (255, 255, 255))  # Create a blank background and fill it with pictures
        total_images = math.floor(
            (width * height) / (self.SLICE_SIZE * self.SLICE_SIZE))  # How many small pictures do you need
        now_images = 0  # Used to calculate completion
        for y1 in range(0, height, self.SLICE_SIZE):
            for x1 in range(0, width, self.SLICE_SIZE):
                try:
                    # Calculate current position
                    y2 = y1 + self.SLICE_SIZE
                    x2 = x1 + self.SLICE_SIZE
                    # Capture a small piece of the image and calculate the average hsv
                    new_img = img.crop((x1, y1, x2, y2))
                    color = self.get_avg_color(new_img)
                    # Find the photo with the most similar color
                    close_img_name = self.find_closiest(color, color_list)
                    close_img_name = self.OUT_DIR + str(
                        close_img_name) + '.png'  # Address of the picture
                    paste_img = Image.open(close_img_name)
                    # Calculation completion
                    now_images += 1
                    now_done = math.floor((now_images / total_images) * 100)
                    r = '\r[{}{}]{}%'.format("#" * now_done,
                                             " " * (100 - now_done), now_done)
                    sys.stdout.write(r)
                    sys.stdout.flush()
                    background.paste(paste_img, (x1, y1))
                except IOError:
                    print('Failed to create mosaic block')
        # Keep the final result
        background.save('out_without_background.jpg')
        img = Image.blend(background, img, 0.5)
        img.save('out_with_background.jpg')
        return True
The parameter REPATE here indicates the maximum number of times each picture can be repeated. If we have enough pictures, we can set it to REPATE=1. At this time, each picture can only be used once.
Effect display
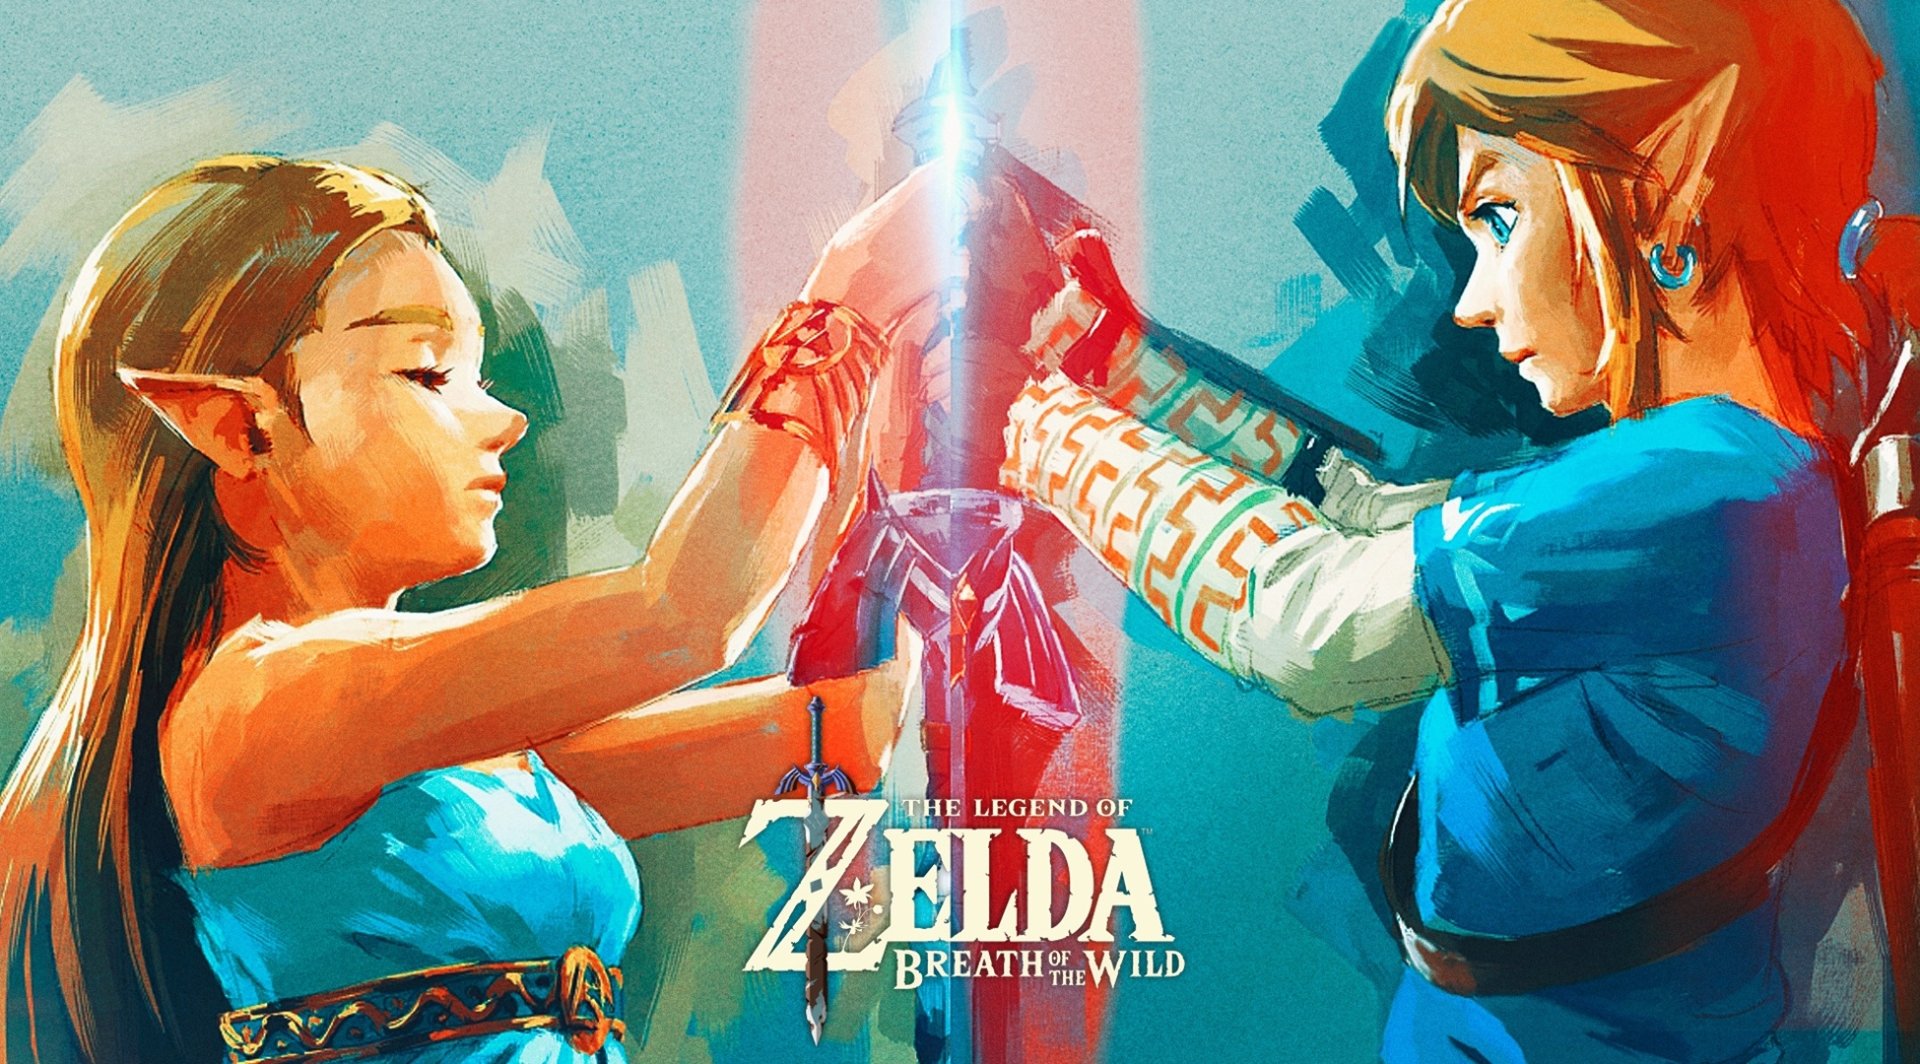
Above, we have completed the main framework of the code, and now let's run it to see the results. First, we download the test images used:
https://labfile.oss.aliyuncs.com/courses/3007/Zelda.jpg
It is also a picture in Zelda, as shown in the figure below:
Then we write the main function:
if __name__ == "__main__":
    filePath = os.path.dirname(os.path.abspath(__file__))  # Get current path
    start_time = time.time()  # When the program starts running, record how long it has been running
    # Create mosaic blocks and create material library
    createdb = create_image_db(IN_DIR=os.path.join(filePath, 'images/'),
                               OUT_DIR=os.path.join(filePath, 'outputImages/'),
                               SLICE_SIZE=100,
                               REPATE=20,
                               OUT_SIZE=5000)
    createdb.convert_all_images()
    # Create a puzzle (absolute path is used here)
    createM = create_mosaic(IN_DIR=os.path.join(filePath, 'images/'),
                           OUT_DIR=os.path.join(filePath, 'outputImages/'),
                           SLICE_SIZE=100,
                           REPATE=20,
                           OUT_SIZE=5000)
    out = createM.make_puzzle(img=os.path.join(filePath, 'Zelda.jpg'))
    # Print time
    print("time consuming: %s" % (time.time() - start_time))
    print("Completed")
Then we save and close the file we just wrote, mosaic.py. In order to better observe the effect of pictures, we need to install a software for viewing pictures, Eye of GNOME (ego).
Run the mosaic.py file
It will wait about 2-3 minutes here. The operation process is roughly as shown in the figure below:

After running, two pictures will be generated in our current directory. One is not fused with the original picture, and the file name is' out '_ without_ background.jpg'. We use eog to view images:
If it is not fused with the original picture, the effect is as shown in the following figure:

Similarly, we can also view the effect of the image fused with the original image.
The final effect is shown in the figure below:
We can enlarge the picture to view, and we can see that it is composed of many small pictures. Some pictures here are repeated. We can set the parameter REPATE=1 to control the number of pictures repeated. Because there are few material pictures here, we set REPATE to be larger. In this way, we have completed the mosaic puzzle using Python.
Full code:
import os
import sys
import time
import math
import numpy as np
from PIL import Image, ImageOps
from multiprocessing import Pool
from colorsys import rgb_to_hsv, hsv_to_rgb
from typing import List, Tuple, Union


class mosaic(object):
    """Defines the average of calculated pictures hsv value
    """
    def __init__(self, IN_DIR: str, OUT_DIR: str, SLICE_SIZE: int, REPATE: int,
                 OUT_SIZE: int) -> None:
        self.IN_DIR = IN_DIR  # Folder of original image material
        self.OUT_DIR = OUT_DIR  # The folder of output materials. These are the images after hsv calculation and resize
        self.SLICE_SIZE = SLICE_SIZE  # The size of the image after zooming
        self.REPATE = REPATE  # The number of times the same picture can be reused
        self.OUT_SIZE = OUT_SIZE  # Size of final picture output

    def resize_pic(self, in_name: str, size: int) -> Image:
        """Convert image size
        """
        img = Image.open(in_name)
        img = ImageOps.fit(img, (size, size), Image.ANTIALIAS)
        return img

    def get_avg_color(self, img: Image) -> Tuple[float, float, float]:
        """Calculate the average of the image hsv
        """
        width, height = img.size
        pixels = img.load()
        if type(pixels) is not int:
            data = []  # Stores the values of image pixels
            for x in range(width):
                for y in range(height):
                    cpixel = pixels[x, y]  # Get the value of each pixel
                    data.append(cpixel)
            h = 0
            s = 0
            v = 0
            count = 0
            for x in range(len(data)):
                r = data[x][0]
                g = data[x][1]
                b = data[x][2]  # Get the GRB tricolor of a point
                count += 1
                hsv = rgb_to_hsv(r / 255.0, g / 255.0, b / 255.0)
                h += hsv[0]
                s += hsv[1]
                v += hsv[2]

            hAvg = round(h / count, 3)
            sAvg = round(s / count, 3)
            vAvg = round(v / count, 3)

            if count > 0:  # The number of pixels is greater than 0
                return (hAvg, sAvg, vAvg)
            else:
                raise IOError("Failed to read picture data")
        else:
            raise IOError("PIL Failed to read picture data")


class create_image_db(mosaic):
    """Create the required data
    """
    def __init__(self, IN_DIR: str, OUT_DIR: str, SLICE_SIZE: int, REPATE: int,
                 OUT_SIZE: int) -> None:
        super(create_image_db, self).__init__(IN_DIR, OUT_DIR, SLICE_SIZE,
                                              REPATE, OUT_SIZE)

    def make_dir(self) -> None:
        os.makedirs(os.path.dirname(self.OUT_DIR), exist_ok=True) # Create folder without

    def get_image_paths(self) -> List[str]:
        """Get the address of the image in the folder
        """
        paths = []
        suffixs = ['png', 'jpg']
        for file_ in os.listdir(self.IN_DIR):
            suffix = file_.split('.', 1)[1]  # Get file suffix
            if suffix in suffixs:  # Judge whether it is a picture by suffix
                paths.append(self.IN_DIR + file_)  # Add image path
            else:
                print("Non picture:%s" % file_)
        if len(paths) > 0:
            print("Totally%s" % len(paths) + "Picture")
        else:
            raise IOError("No pictures found")

        return paths

    def convert_image(self, path):
        """Convert image size, Calculate the average of an image at the same time hsv value.
        """
        img = self.resize_pic(path, self.SLICE_SIZE)
        color = self.get_avg_color(img)
        img.save(str(self.OUT_DIR) + str(color) + ".png")

    def convert_all_images(self) -> None:
        """Convert all images
        """
        self.make_dir()
        paths = self.get_image_paths()
        print("Generating mosaic blocks...")
        pool = Pool()  # Multi process processing
        pool.map(self.convert_image, paths)  # The existing image is processed and converted into the corresponding color block
        pool.close()
        pool.join()


class create_mosaic(mosaic):
    """Create mosaic picture
    """
    def __init__(self, IN_DIR: str, OUT_DIR: str, SLICE_SIZE: int, REPATE: int,
                 OUT_SIZE: int) -> None:
        super(create_mosaic, self).__init__(IN_DIR, OUT_DIR, SLICE_SIZE, REPATE,
                                           OUT_SIZE)

    def read_img_db(self) -> List[List[Union[float, int]]]:
        """Read all pictures
        """
        img_db = []  # Store color_list
        for file_ in os.listdir(self.OUT_DIR):
            if file_ == 'None.png':
                pass
            else:
                file_ = file_.split('.png')[0]  # Get file name
                file_ = file_[1:-1].split(',')  # Three values of hsv are obtained
                file_ = [float(i) for i in file_]
                file_.append(0)  # The last bit calculates the number of times the image is used
                img_db.append(file_)
        return img_db

    def find_closiest(self, color: Tuple[float, float, float],
                      list_colors: List[List[Union[float, int]]]) -> str:
        """Find the image closest to the pixel block color
        """
        FAR = 10000000
        for cur_color in list_colors:  # list_color is the average hsv color of all images in the image library
            n_diff = np.sum((color - np.absolute(cur_color[:3]))**2)
            if cur_color[3] <= self.REPATE:  # The same picture cannot be used too many times
                if n_diff < FAR:  # Change the closest color
                    FAR = n_diff
                    cur_closer = cur_color
        cur_closer[3] += 1
        return "({}, {}, {})".format(cur_closer[0], cur_closer[1],
                                     cur_closer[2])  # Returns the hsv color

    def make_puzzle(self, img: str) -> bool:
        """Make puzzles
        """
        img = self.resize_pic(img, self.OUT_SIZE)  # Read the picture and change the size
        color_list = self.read_img_db()  # Get a list of all colors

        width, height = img.size  # Get the width and height of the picture
        print("Width = {}, Height = {}".format(width, height))
        background = Image.new('RGB', img.size,
                               (255, 255, 255))  # Create a blank background and fill it with pictures
        total_images = math.floor(
            (width * height) / (self.SLICE_SIZE * self.SLICE_SIZE))  # How many small pictures do you need
        now_images = 0  # Used to calculate completion
        for y1 in range(0, height, self.SLICE_SIZE):
            for x1 in range(0, width, self.SLICE_SIZE):
                try:
                    # Calculate current position
                    y2 = y1 + self.SLICE_SIZE
                    x2 = x1 + self.SLICE_SIZE
                    # Capture a small piece of the image and calculate the average hsv
                    new_img = img.crop((x1, y1, x2, y2))
                    color = self.get_avg_color(new_img)
                    # Find the photo with the most similar color
                    close_img_name = self.find_closiest(color, color_list)
                    close_img_name = self.OUT_DIR + str(
                        close_img_name) + '.png'  # Address of the picture
                    paste_img = Image.open(close_img_name)
                    # Calculation completion
                    now_images += 1
                    now_done = math.floor((now_images / total_images) * 100)
                    r = '\r[{}{}]{}%'.format("#" * now_done,
                                             " " * (100 - now_done), now_done)
                    sys.stdout.write(r)
                    sys.stdout.flush()
                    background.paste(paste_img, (x1, y1))
                except IOError:
                    print('Failed to create mosaic block')
        # Keep the final result
        background.save('out_without_background.jpg')
        img = Image.blend(background, img, 0.5)
        img.save('out_with_background.jpg')
        return True


if __name__ == "__main__":
    filePath = os.path.dirname(os.path.abspath(__file__))  # Get current path
    start_time = time.time()  # When the program starts running, record how long it has been running
    # Create mosaic blocks and create material library
    createdb = create_image_db(IN_DIR=os.path.join(filePath, 'images/'),
                               OUT_DIR=os.path.join(filePath, 'outputImages/'),
                               SLICE_SIZE=100,
                               REPATE=20,
                               OUT_SIZE=5000)
    createdb.convert_all_images()
    # Create a puzzle (absolute path is used here)
    createM = create_mosaic(IN_DIR=os.path.join(filePath, 'images/'),
                           OUT_DIR=os.path.join(filePath, 'outputImages/'),
                           SLICE_SIZE=100,
                           REPATE=20,
                           OUT_SIZE=5000)
    out = createM.make_puzzle(img=os.path.join(filePath, 'Zelda.jpg'))
    # Print time
    print("time consuming: %s" % (time.time() - start_time))
    print("Completed")