Python: generating avatars with user nicknames
demand
After a new user is created, a picture is generated according to the nickname entered by the user. (example: after registering the "nailing" user, the avatar is generated according to the entered name)
development environment
- Windows 10
- Python 3.8
- Pillow 8.1.2
realization
Snakeskin egg: Python creates text picture (Center) / multi picture merge (PIL) , refer to this article to create a new picture and render the text to the picture. The code is as follows:
import cv2
import numpy as np
from PIL import ImageFont, ImageDraw, Image
def new_image(size, color, name):
img = Image.new('RGB', size, color) # Generate picture
img.show() # Show pictures
img.save(name) # Save picture
def create_font_img(value, file_name, path):
img = cv2.imread(path) # Open negative
font_path = "simsun/simsun.ttc" # Set the font to be displayed
font = ImageFont.truetype(font_path, size=100) # Font size is 100
img_pil = Image.fromarray(img)
draw = ImageDraw.Draw(img_pil)
text_width, text_height = draw.textsize(value, font) # Get font width and height
# When drawing text information, img.shape calculates the width and height of the picture. The starting position of font drawing (x, y), (255255255) is white font
draw.text(((img.shape[1] - text_width) / 2, (img.shape[0] - text_height) / 2), value, fill=(255, 255, 255), font=font)
bk_img = np.array(img_pil)
# cv2.imshow("add_text", bk_img)
# cv2.waitKey()
cv2.imwrite(file_name + "_font.png", bk_img)
new_image((128, 128), (192, 202, 208), "new.jpg")
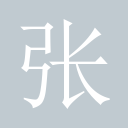
create_font_img("Zhang", "name", "new.jpg")
After the code is executed, two pictures are obtained, as follows:

According to the article mentioned above, the above code is obtained after simplification. The first function is new_image() creates a new picture. No objection.
The second function is create_font_img() renders text onto the picture. First, cv2.imread() reads the picture, then sets the font and size of the text, and draw.text() draws the text on the picture. Note that in the last three lines of code of this function, the meaning of cv2.imshow() should be very obvious, that is, directly display the picture and cv2.imwrite() save the picture. What does cv2.waitKey() mean?
This is not the focus of this article. You can take a look at the following article: Strong on the mountain: entry level understanding of cv2.waitKey
Note that cv2 requires opencv Python to be installed. The command is PIP install opencv python.
It's not over here. I'm not satisfied with the above code. The main problems are as follows:
- You need to create a new picture as a negative, read the picture and render the text. If you don't save it, it's better to use this picture directly.
- You need to read the font file. A font file is very large. At least the simsun.ttc font file used here is 10 MB large. It would be better if it could be read from the system or not to use font files.
Based on these three problems, the code must be simplified- Too many third-party libraries are used, up to three. The three libraries seem to be few, but do not add entities (including the font files above) unless necessary. In particular, some libraries have different versions. The less they are used in the project, the better, so as to avoid any problems.
Advanced
After searching, I found the following article: Amigo 1226: automatically generate avatars with nicknames (modeled after nail avatars) . This article realizes the direct generation of pictures without negatives. However, this article is written in Java. In order to verify whether it is successful, I specially run the code with IDEA. It can indeed succeed. The figure obtained is the same as Figure 1 above. So Python is theoretically OK.
After carefully reading the code in this article, I find a code: BufferedImage bi = new BufferedImage(width, height, BufferedImage.TYPE_INT_RGB);, BufferedImage seems to mean that the picture exists in the cache? Let's see if the PIL library has a similar method. Sure enough, there is a method in the Image class, frombuffer(), but after many attempts, this method doesn't seem to work. Consider our code carefully. img.save() is used in the first function to save the Image.
Then we can't save the picture immediately. Secondly, create_font_img() uses cv2.imread() to read pictures. Since you don't need to read pictures, this code can be deleted. At this time, only cv2.imwrite() is left for cv2 to save pictures. Since we plan not to use so many libraries, PIL also has a saving method (img.save()), so that the usage of cv2 library can be deleted from the code.
def create_font_img(value, file_name, path):
    # img = cv2.imread(path)  # Open negative
    img = Image.new('RGB', (128, 128), (192, 202, 208))  # Generate picture
    font_path = "simsun/simsun.ttc"  # Set the font to be displayed
    font = ImageFont.truetype(font_path, size=100)  # Font size is 100
    img_pil = Image.fromarray(img)
    draw = ImageDraw.Draw(img_pil)
    text_width, text_height = draw.textsize(value, font)  # Get font width and height
    # When drawing text information, img.shape calculates the width and height of the picture. The starting position of font drawing (x, y), (255255255) is white font
    draw.text(((img.shape[1] - text_width) / 2, (img.shape[0] - text_height) / 2), value, fill=(255, 255, 255), font=font)
    bk_img = np.array(img_pil)
    # cv2.imwrite(file_name + "_font.png", bk_img)
    img.save(file_name + "_font.png")  # Save picture
The preliminary simplified code is as above. Such code can not be executed correctly. There are many problems. First, cv2.imread() reads the picture file and gets the < class' numpy. Ndarray '> type. Under this type, Image.fromarray() creates an image, and img.shape reads the pixel size of the image. The image created by Image.new() is not of this type, but < class' PIL. Image. Image > >. I was going to see if I could convert < class' PIL. Image. Image '> to < class' numpy. Ndarray' > (in fact, np.array() method), but on second thought, I didn't intend to use numpy library, so there was no need to convert types. I directly saw whether I could use PIL library only for drawing.
After finishing, the whole drawing process is as follows: create a new drawing, calculate the pixel size of the drawing (in fact, the size has been given when creating the drawing), set the font and size of the text to be drawn, calculate the pixel size of the text (given when setting the font), and draw the text on the picture; Save the picture.
The resulting code is as follows:
def create_font_img(name):
    img = Image.new('RGB', (128, 128), (192, 202, 208))  # Generate a 128 * 128 pixel picture
    font_path = "simsun/simsun.ttc"  # Set the font to be displayed
    font = ImageFont.truetype(font_path, size=100)  # Font size is 100
    draw = ImageDraw.Draw(img)  # mapping
    # When drawing text information, the starting position of font drawing (x, y), (255255255) is white font
    draw.text(((128 - 100) / 2, (128 - 100) / 2), name, fill=(255, 255, 255), font=font)
    # img.show()  # Show pictures
    img.save("name.png")  # Save picture
Execute the above code and the result is the same as Figure 1.
Is there a corresponding method to obtain the pixel size of the picture and the pixel size of the text? Since cv2.imread() (img.shape()) and ImageDraw.Draw() (draw.textsize()) can read picture and text pixel sizes, theoretically, Image.new() and ImageFont.truetype() should have corresponding methods. By looking up the functions owned by the object, two methods size are found. img.size and font.size can be used to obtain picture pixels and text pixels respectively.
The modified code is as follows:
def create_font_img(name):
    img = Image.new('RGB', (128, 128), (192, 202, 208))  # Generate picture
    img_width, img_height  = img.size
    font_path = "simsun/simsun.ttc"  # Set the font to be displayed
    font = ImageFont.truetype(font_path, size=100)  # Font size is 100
    width_height = font.size # Get font width and height
    draw = ImageDraw.Draw(img)
    # When drawing text information, img.shape calculates the width and height of the picture. The starting position of font drawing (x, y), (255255255) is white font
    draw.text(((img_width - width_height) / 2, (img_height - width_height) / 2), name, fill=(255, 255, 255), font=font)
    # img.show()
    img.save("name.png")  # Save picture
The user's nickname may be Chinese or English, so it's not good for the font size to be a constant value. At the same time, extract the values that need to be changed. After optimizing the code, it is as follows:
from PIL import Image, ImageFont, ImageDraw

def create_font_img(username, img_size, img_bg_color, file_name):
    img = Image.new('RGB', img_size, img_bg_color)  # Generate picture
    img_width, img_height  = img.size
    font_path = "simsun/simsun.ttc"  # Set the font to be displayed
    if '\u4e00' <= username <= '\u9fff':
        font = ImageFont.truetype(font_path, size=100)  # The font size of Chinese characters is 100
    elif 'a' <= username <= 'z' or 'A' <= username <= 'Z':
        username = username.upper()  # Convert English letters to uppercase
        font = ImageFont.truetype(font_path, size=60)  # The font size of English characters is 60
    else:
        font = ImageFont.truetype(font_path, size=32)  # The font size of other characters is 32
    char_width_height = font.size # Get font width and height
    draw = ImageDraw.Draw(img)
    # When drawing text information, the starting position of font drawing (x, y), (255255255) is white font
    draw.text(((img_width - char_width_height) / 2, (img_height - char_width_height) / 2), username, fill=(255, 255, 255), font=font)
    img.save(file_name + ".png")  # Save picture

create_font_img('Zhang', (128, 128), (192, 202, 208), 'zhang')
At this point, the problem that there are many intermediate pictures and third-party libraries is solved, leaving only one font file? Can I not use font files? Or use files in the system?
After trying, if the default font file is used, the pixel size of the font cannot be obtained because the method of setting the default font is ImageFont.load_default().font, no pixel size specified, char in draw.text()_ width_ Height is set as a fixed value, but the font in draw.text() has the problem of encoding and decoding Chinese characters, and the English can be executed correctly. However, the font size is not set, so that the size of characters in a 128 * 128 pixel picture is very small and almost invisible, as shown in the figure:

After searching, in this question and answer How to change font size using Python ImageDraw Library A sentence was found, as follows:
For each PIL's docs, the default font of ImageDraw is bitmap font, so it cannot be scaled. To zoom, you need to select the real font type. I hope it's not difficult to find a good truetype font that "looks a bit like" the default font in the font size you want!
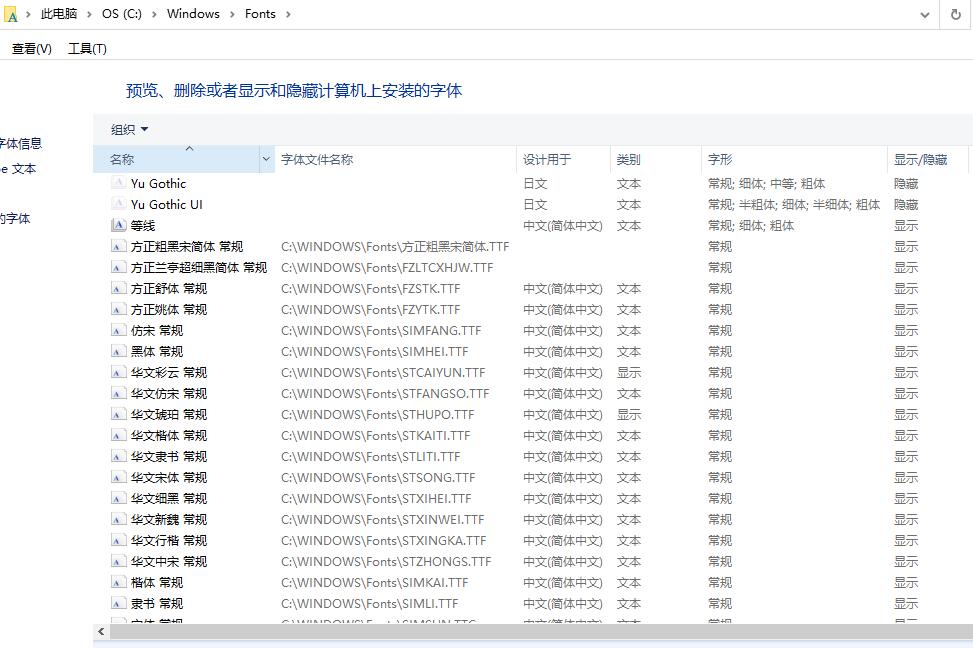
The meaning should be very obvious. If you want to scale the font size, you must specify the font file. I learned from the search that you can also load font files from the system. There are many font files in the windows system. The directory is C:\Windows\Fonts. You can get font files from here. If there is no simsun.ttc in the project, you need to download one first, or use the file under fonts first. The file in Fonts is as follows:
Add the above code to font_path = "simsun/simsun.ttc" is modified to font_path = "C:\Windows\Fonts\STXINGKA.TTF", the font is "regular Chinese block letters", and the obtained pictures are as follows:

summary
This paper introduces how to generate a picture and add text (user nickname), and explores some usage of PIL.
The generated image may not be perfect, such as color matching, image fillet setting, and how to give up too many text characters, which are left to the readers to explore by themselves.