Daily sentence: Shine silently, and then amaze everyone!!!
preface:
This project was written by the author before the end of the summer vacation. Because of the opening of school and other problems, this project has been put aside. With the author's need to transform Java, there may not be many projects to write python in the future. This weekend, I pulled this project out of the warehouse and improved it. Maybe the functions are not very complete, Hope to bring you help!!!
catalogue
Project introduction
Let's first look at the results:
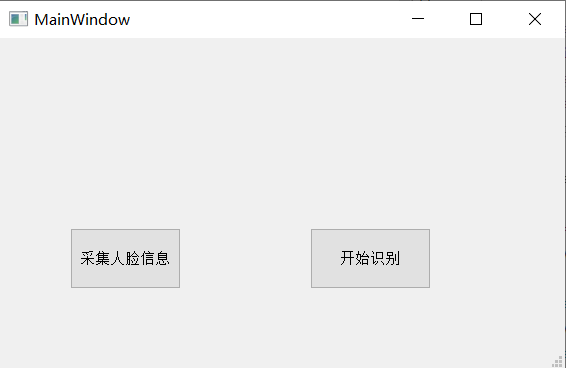
First, write a GUI interface that can operate.
Two buttons correspond to corresponding functions:
Collect face:
Identification function:
I sacrificed my hue... (computer pixels are not very good. Let's make do with it. Hey, hey, hey)
Project ideas
This project uses a cv2 image recognition library of python to recognize faces and save face images by calling the computer camera, and then trains the saved face images through the two training tools in cv2 (these are already written face recognition algorithms). We can call them directly.

Project module
The project can be roughly divided into four modules.
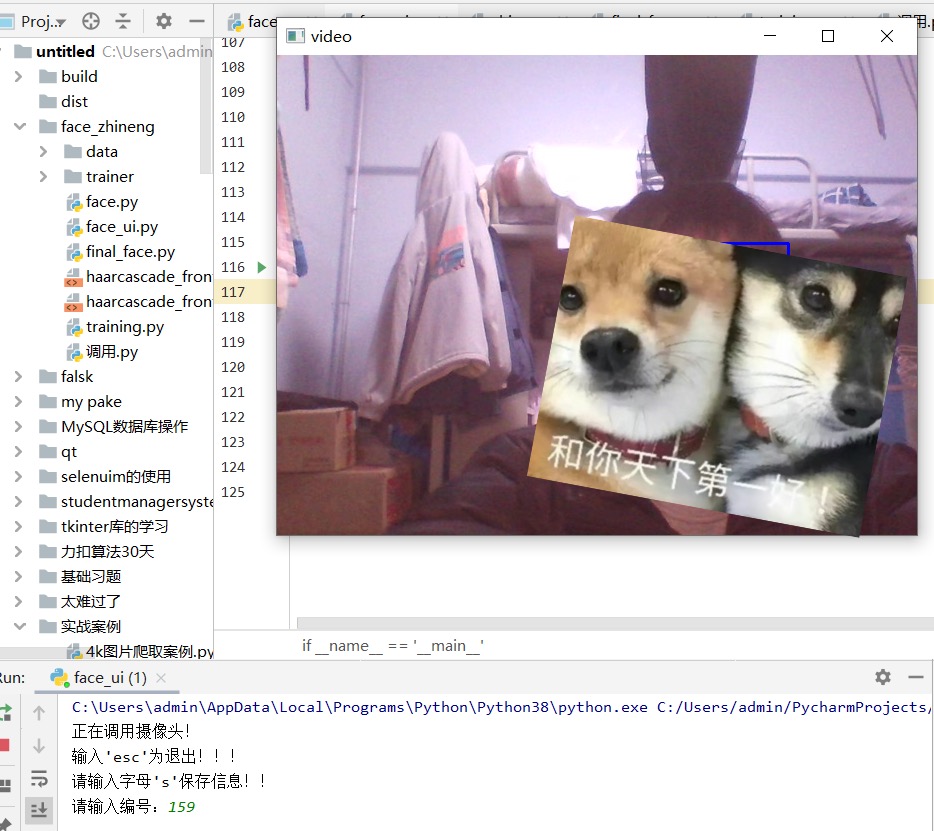
1. Face acquisition
adopt
cv2.CascadeClassifier('haarcascade_frontalface_default.xml')
Compare the face information of the camera images, find the core area of the face, circle it with a rectangular box, wait for instructions, and save the face image in the next step:

I saved these (I sacrificed hue woo woo) for data training.
2. Data training
Convert the pictures in a directory into an array, obtain the data of the face part in each picture and save it in the pre created list. At the same time, obtain the ID of each picture and save it in the pre created list. Finally, save the trained data.
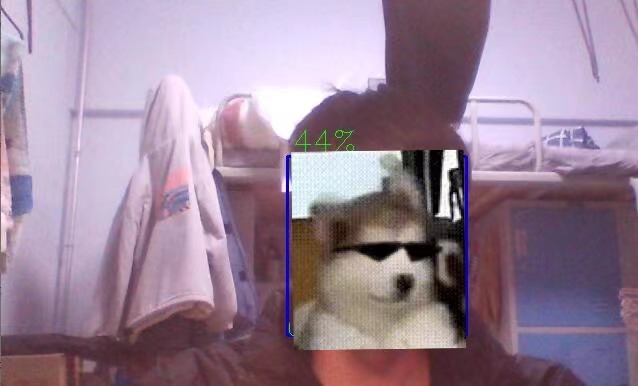
3. Face recognition
cv2 will put the trained data in a file. When recognizing, we directly call this data to compare with the face on the camera.

The above figure shows a file after training.
The recognition effect is also seen above!!!
4.GUI interface
I designed a simple GUI interface and configured the pyqt environment through pyqt, which I introduced in my previous blog—— Introduction to pyqt
Two simple button s are used for a visualization.
Project code
Face acquisition
import numpy as np
import cv2
def b():
    print('Calling camera!')

    faceCascade = cv2.CascadeClassifier('haarcascade_frontalface_default.xml')

    cap = cv2.VideoCapture(0)
    cap.set(3,640) # set Width
    cap.set(4,480) # set Height

    while True:
        ret, img = cap.read()
        #Convert color map to grayscale map
        gray = cv2.cvtColor(img, cv2.COLOR_BGR2GRAY)
        faces = faceCascade.detectMultiScale(
            gray,
             scaleFactor=1.2,
            minNeighbors=5
            ,
            minSize=(20, 20)

        )

        for (x,y,w,h) in faces:
            cv2.rectangle(img,(x,y),(x+w,y+h),(255,0,0),2)
            roi_gray = gray[y:y+h, x:x+w]
            roi_color = img[y:y+h, x:x+w]


        cv2.imshow('video',img)

        k = cv2.waitKey(30) & 0xff
        if k == ord('s'):
            n = input('Please enter the number:')
            cv2.imwrite('./data/jm/'+n+'.jpg',roi_gray)
        if k == 27: # press 'ESC' to quit
            break

    cap.release()
    cv2.destroyAllWindows()

b()
Data training
import os
import cv2
import sys
from PIL import Image
import numpy as np


def getImageAndLabels(path):
    facesSamples=[]
    ids=[]
    imagePaths=[os.path.join(path,f) for f in os.listdir(path)]
    #Face detection
    face_detector = cv2.CascadeClassifier('haarcascade_frontalface_alt2.xml')
    #Print array imagePaths
    print('Data arrangement:',imagePaths)
    #Traverse the pictures in the list
    for imagePath in imagePaths:
        #Open picture, black and white
        PIL_img=Image.open(imagePath).convert('L')
        #Convert the image to an array in black and white
       # PIL_img = cv2.resize(PIL_img, dsize=(400, 400))
        img_numpy=np.array(PIL_img,'uint8')
        #Get picture face features
        faces = face_detector.detectMultiScale(img_numpy)
        #Get the id and name of each picture
        id = int(os.path.split(imagePath)[1].split('.')[0])
        #Prevent faceless photos
        for x,y,w,h in faces:
            ids.append(id)
            facesSamples.append(img_numpy[y:y+h,x:x+w])
        #Print facial features and IDS
        #print('fs:', facesSamples)
        print('id:', id)
        #print('fs:', facesSamples[id])
    print('fs:', facesSamples)
    #print('face example: ', facesSamples[0])
    #print('identity information: ', ids[0])
    return facesSamples,ids

if __name__ == '__main__':
    #Picture path
    path='./data/jm/'
    #Get image array and id tag array and name
    faces,ids=getImageAndLabels(path)
    #Get training object

    recognizer=cv2.face.LBPHFaceRecognizer_create()

    #recognizer.train(faces,names)#np.array(ids)
    recognizer.train(faces,np.array(ids))
    #Save file
    recognizer.write('trainer/trainer3.yml')
Face recognition
import cv2
import os
def a():
#Load recognizer
recognizer = cv2.face.LBPHFaceRecognizer_create()
recognizer.read('trainer/trainer3.yml')
#Load classifier
cascade_path = "haarcascade_frontalface_alt2.xml"
face_cascade = cv2.CascadeClassifier(cascade_path)
cam = cv2.VideoCapture(0)
minW = 0.1*cam.get(3)
minH = 0.1*cam.get(4)
font = cv2.FONT_HERSHEY_SIMPLEX
names = []
agelist=[21,21,21,21,21,21,22]
path='./data/jm/'
imagePaths=[os.path.join(path,f) for f in os.listdir(path)]
for imagePath in imagePaths:
id = int(os.path.split(imagePath)[1].split('.')[0])
names.append(id)
while True:
ret, img = cam.read()
gray = cv2.cvtColor(img, cv2.COLOR_BGR2GRAY)
faces = face_cascade.detectMultiScale(
gray,
scaleFactor=1.3,
minNeighbors=5,
minSize=(int(minW), int(minH))
)
for (x, y, w, h) in faces:
cv2.rectangle(img, (x , y ), (x + w , y + h ), (225, 0, 0), 2)
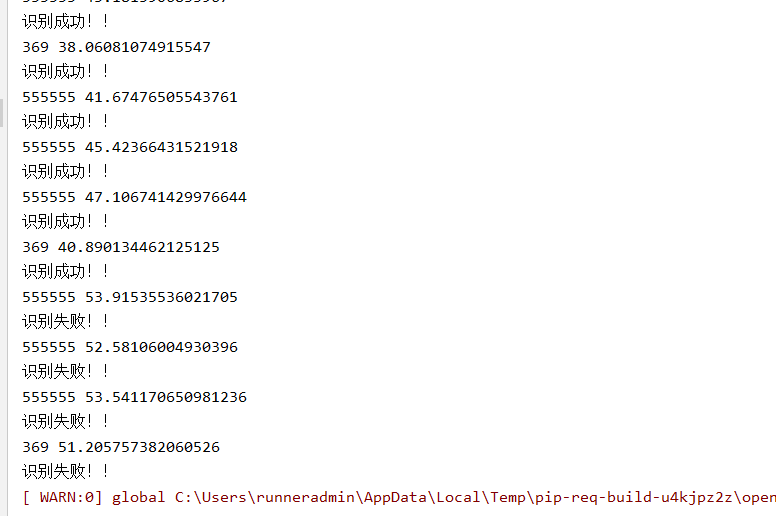
img_id, confidence = recognizer.predict(gray[y:y + h, x:x + w])
print(img_id,confidence)
if confidence < 50:
confidence = "{0}%".format(round(100 - confidence))
else:
img_id = "Unknown"
confidence = "{0}%".format(round(100 - confidence))
if img_id != "Unknown":
print('Recognition succeeded!!')
else:
print('Recognition failed!!')
cv2.putText(img, str(img_id), (x, y + h), font, 0.55, (0, 255, 0), 1)
cv2.putText(img, "18", (x , y + 500), font, 1, (0, 255, 0), 1)
cv2.putText(img, "18", (x , y +h + 150), font, 1, (0, 255, 0), 1)
cv2.putText(img, str(confidence), (x + 5, y - 5), font, 1, (0, 255, 0), 1)
cv2.imshow('face', img)
if cv2.waitKey(5) & 0xFF == 27:
break
cam.release()
cv2.destroyAllWindows()
Merge GUI
from PyQt5 import QtCore, QtGui, QtWidgets
import cv2

class Ui_MainWindow(QtWidgets.QMainWindow):
    def __init__(self):
        super(Ui_MainWindow,self).__init__()
    def setupUi(self, MainWindow):
        MainWindow.setObjectName("MainWindow")
        MainWindow.resize(565, 331)
        self.centralwidget = QtWidgets.QWidget(MainWindow)
        self.centralwidget.setObjectName("centralwidget")
        self.pushButton = QtWidgets.QPushButton(self.centralwidget)
        self.pushButton.setGeometry(QtCore.QRect(70, 190, 111, 61))
        self.pushButton.setObjectName("pushButton")
        self.pushButton_2 = QtWidgets.QPushButton(self.centralwidget)
        self.pushButton_2.setGeometry(QtCore.QRect(310, 190, 121, 61))
        self.pushButton_2.setObjectName("pushButton_2")
        self.label = QtWidgets.QLabel(self.centralwidget)
        self.label.setGeometry(QtCore.QRect(180, 60, 161, 81))
        self.label.setObjectName("label")
        MainWindow.setCentralWidget(self.centralwidget)
        self.menubar = QtWidgets.QMenuBar(MainWindow)
        self.menubar.setGeometry(QtCore.QRect(0, 0, 565, 26))
        self.menubar.setObjectName("menubar")
        MainWindow.setMenuBar(self.menubar)
        self.statusbar = QtWidgets.QStatusBar(MainWindow)
        self.statusbar.setObjectName("statusbar")
        MainWindow.setStatusBar(self.statusbar)

        self.retranslateUi(MainWindow)
        QtCore.QMetaObject.connectSlotsByName(MainWindow)

    def retranslateUi(self, MainWindow):
        _translate = QtCore.QCoreApplication.translate
        MainWindow.setWindowTitle(_translate("MainWindow", "MainWindow"))
        self.pushButton.setText(_translate("MainWindow", "Collect face information"))
        self.pushButton_2.setText(_translate("MainWindow", "Start identification"))
        # self.label.setText(_translate("MainWindow", "result:")
        self.pushButton.clicked.connect(self.b)
        self.pushButton_2.clicked.connect(self.final)

    def b(self):
        print('Calling camera!')
        print("input'esc'Exit for!!!")

        faceCascade = cv2.CascadeClassifier('haarcascade_frontalface_default.xml')

        cap = cv2.VideoCapture(0)
        cap.set(3, 640)  # set Width
        cap.set(4, 480)  # set Height
        print("Please enter a letter's'Save information!!")
        while True:
            ret, img = cap.read()
            # Convert color map to grayscale map
            gray = cv2.cvtColor(img, cv2.COLOR_BGR2GRAY)
            faces = faceCascade.detectMultiScale(
                gray,
                scaleFactor=1.2,
                minNeighbors=5
                ,
                minSize=(20, 20)

            )

            for (x, y, w, h) in faces:
                cv2.rectangle(img, (x, y), (x + w, y + h), (255, 0, 0), 2)
                roi_gray = gray[y:y + h, x:x + w]
                roi_color = img[y:y + h, x:x + w]

            cv2.imshow('video', img)

            k = cv2.waitKey(30) & 0xff

            if k == ord('s'):
                n = input('Please enter the number:')
                cv2.imwrite('./data/jm/' + n + '.jpg', roi_gray)
            if k == 27:
                break

        cap.release()
        cv2.destroyAllWindows()
        print("Training!!!")
        self.train()

    def final(self):
        import face_zhineng.final_face
        face_zhineng.final_face.a()


    def train(self):
        import cv2
        import numpy as np
        import face_zhineng.training
        # Picture path
        path = './data/jm/'
        faces, ids = face_zhineng.training.getImageAndLabels(path)
        # Get training object
        recognizer = cv2.face.LBPHFaceRecognizer_create()
        recognizer.train(faces, np.array(ids))
        # Save file
        recognizer.write('trainer/trainer3.yml')
        print("Training finished!!!")


if __name__ == '__main__':
    import sys

    app = QtWidgets.QApplication(sys.argv)
    MainWindow = QtWidgets.QMainWindow()
    ui = Ui_MainWindow()
    ui.setupUi(MainWindow)
    MainWindow.show()
    sys.exit(app.exec_())
Project summary
The project was finally completed. I sighed a long sigh. Ha ha ha ha ha ha ha ha ha ha ha ha ha ha ha ha ha ha ha ha ha ha ha ha ha ha ha ha ha ha ha ha ha ha ha ha ha ha ha ha ha ha ha ha ha ha ha ha ha ha ha ha ha ha ha ha ha ha ha ha ha ha ha ha ha ha ha ha ha ha ha ha ha ha ha ha ha ha ha ha ha ha ha ha ha ha ha ha ha ha ha ha ha ha ha ha ha ha ha ha ha.
In fact, this project can also be extended to some face opening software. It was originally intended to be written like this, but because I didn't have enough time and energy, I simply did it. If interested partners can try it by themselves!
Next is the final review. I wish you all a good result!!!
Come on, come on, come on!!!!