This article is shared from Huawei cloud community< Python and API: successful combination of reading public data >, author: Yuchuan.
Understanding API
API stands for application programming interface. In essence, the API acts as a communication layer, or as the name suggests, an interface that allows different systems to communicate with each other without accurately understanding each other's roles.
APIs can take many forms or shapes. They can be operating system APIs for operations such as turning on a camera and audio to join a Zoom call. Or they can be web APIs for web centric operations, such as liking images on Instagram or getting the latest tweets.
Regardless of the type, the functions of all APIs are roughly the same. You usually request information or data, and the API returns a response based on your request. For example, every time you open Twitter or scroll down an Instagram feed, you basically make a request to the API behind the application and get a response in return. This is also called calling the API.
In this tutorial, you will focus more on the advanced API for cross network communication, also known as the Web API.
SOAP and REST and GraphQL
Although some of the examples mentioned above are for newer platforms or applications, web APIs have existed for a long time. In the late 1990s and early 2000s, two different design models became the norm for public data:
- SOAP (Simple Object Access Protocol) is usually associated with the enterprise world, has a more strict contract based usage, and is mainly designed around operations.
- REST (representational state transfer) is usually used in public API s and is an ideal choice for obtaining data from the Web. It is much lighter than SOAP and closer to the HTTP specification.
Now, there is a new child in the town: GraphQL. Created by Facebook, GraphQL is a very flexible API query language. Clients can accurately determine what they want from the server, rather than what the server decides to send.
If you want to learn more about the differences between the three design models, here are some good resources:
- What is soap?
- What is rest?
- API 101: SOAP and REST
- Introduction to GraphQL
- Compare API architecture styles: SOAP vs REST vs GraphQL vs RPC
Although GraphQL is emerging and adopted by more and more companies, including GitHub and Shopify, the fact is that most public APIs are still rest APIs. Therefore, for the purposes of this tutorial, you will only learn about rest APIs and how to use them using Python.
requests and API s: a match made in heaven
When using the Python API, you only need one library: requests. With it, you should be able to perform most, if not all, of the operations required to use any public API.
You can install requests by running the following command in the console:
$ python -m pip install requests
To follow the code examples in this tutorial, make sure you are using Python 3.8.1 and requests2.24.0 or later.
Call your first API using Python
Don't say much - it's time to make your first API call! For the first example, you will call a popular API to generate random user data.
Throughout the tutorial, you will see the new API introduced in the alert block, as shown below. This is a convenient way to scroll through and quickly find all the new APIs you know.
Random User Generator API: This is a good tool for generating random user data. You can use it to generate any number of random users and related data, and you can specify gender, nationality, and many other filters that are useful when testing applications or APIs in this case.
When you start using the Random User Generator API, the only thing you need to know is which URL to call it with. For this example, the URL to use is https://randomuser.me/api/ , this is the smallest API call you can make:
>>>
>>> import requests
>>> requests.get("https://randomuser.me/api/")
<Response [200]>
In this small example, you import the requests library and then obtain (or obtain) the data from the random user generator API in the URL. But you don't actually see any returned data. You get a Response [200], which means that everything is normal in API terminology.
If you want to view the actual data, you can use. text from the returned Response object:
>>>
>>> import requests
>>> response = requests.get("https://randomuser.me/api/")
>>> response.text
'{"results":[{"gender":"female",
"name":{"title":"Ms","first":"Isobel","last":"Wang"}...'
this is it! This is the basic knowledge of API consumption. You managed to get your first random user from the random user generator API using Python and the requests library.
Endpoints and resources
As you can see above, the first thing you need to know about using an api is the API URL, commonly referred to as the basic URL. The basic URL structure is no different from the URL you use to browse Google, YouTube, or Facebook, although it usually contains a word api. This is not mandatory, just more rules of thumb.
For example, the following are the basic URL s of some well-known API players:
- https://api.twitter.com
- https://api.github.com
- https://api.stripe.com
As you can see, all the above contents are in English https://api And include the remaining official domains, such as. twitter.com or. github.com. There is no specific standard for the appearance of the API base URL, but it is common for it to mimic this structure.
If you try to open any of these links, you will notice that most of them return errors or require credentials. This is because API s sometimes require authentication steps to use them. You will learn more about this in future tutorials.
The dog API: this API is interesting, but it is also a good example. It is a good API and good documentation. With it, you can get different dog breeds and some images, but if you register, you can also vote for your favorite dog.
Next, using the dogapi just introduced, you will try to issue a basic request to see how it is different from the Random User Generator API you tried above:
>>>
>>> import requests
>>> response = requests.get("https://api.thedogapi.com/")
>>> response.text
'{"message":"The Dog API"}'
In this case, when you call the basic URL, you will receive a general message with The Dog API. This is because you are calling the base URL, which is usually used for very basic information about the API, not real data.
It's not fun to call the base URL alone, but that's where the endpoint comes in handy. An endpoint is a resource that specifies which URLs you want to get. Documented APIs often contain API references, which are useful for understanding the exact endpoints and resources of the API and how to use them.
You can check the official documentation for more information on how to use the dog API and the available endpoints. There, you'll find a / feeds endpoint that you can use to get all available resources or objects.
If you scroll down, you will find the send test request section, where you will see the form as follows:

This is what you will see in many API documents: a way to quickly test the API directly from the document page. In this case, you can click send to quickly get the result of calling the endpoint. Wait, you just call the API without writing any code for it.
Now try the code locally using the variety endpoint and some API knowledge you already have:
>>>
>>> response = requests.get("https://api.thedogapi.com/v1/breeds")
>>> response.text
'[{"weight":{"imperial":"6 - 13","metric":"3 - 6"},"height": ...}]'
Well, you listed your first breed using the dog API!
If you are a cat lover, please don't worry. There is also an API for you to use, which has the same endpoint but different base URL s:
>>>
>>> response = requests.get("https://api.thecatapi.com/v1/breeds")
>>> response.text
'[{..."id":"abys","name":"Abyssinian"}]'
I bet you're already considering different ways to use these APIs to make some lovely side projects, and that's the greatness of the API. Once you start using them, nothing can stop you from turning your hobbies or passions into interesting small projects.
As you move forward, one thing you need to understand is the difference between endpoints http: / / and HTTPS: / /. In short, HTTPS is an encrypted version of HTTP, making all traffic between the client and the server more secure. When using public APIs, you should absolutely avoid sending any private or sensitive information to http: / / endpoints and use only those APIs that provide secure HTTPS: / / basic URL s.
For more information on the importance of sticking to HTTPS when browsing online, see exploring HTTPS with Python.
In the next section, you will learn more about the main components of API calls.
Request and response
As you briefly read above, all interactions between the client (in this case, your Python console) and the API are divided into request and response:
- The request contains relevant data about your API request call, such as the basic URL, endpoint, method used, header, and so on.
- The response contains relevant data returned by the server, including data or content, status code and header.
Using the dogapi again, you can gain insight into the exact contents of the Request and Response objects:
>>>
>>> response = requests.get("https://api.thedogapi.com/v1/breeds")
>>> response
<Response [200]>
>>> response.request
<PreparedRequest [GET]>

>>> request = response.request
>>> request.url
'https://api.thedogapi.com/v1/breeds'
>>> request.path_url
'/v1/breeds'
>>> request.method
'GET'
>>> request.headers
{'User-Agent': 'python-requests/2.24.0', 'Accept-Encoding': 'gzip, deflate',
'Accept': '*/*', 'Connection': 'keep-alive'}

>>> response
<Response [200]>
>>> response.text
'[{"weight":{"imperial":"6 - 13","metric":"3 - 6"},
"height":{"imperial":"9 - 11.5","metric":"23 - 29"},"id":1,
"name":"Affenpinscher", ...}]'
>>> response.status_code
200
>>> response.headers
{'Cache-Control': 'post-check=0, pre-check=0', 'Content-Encoding': 'gzip',
'Content-Type': 'application/json; charset=utf-8',
'Date': 'Sat, 25 Jul 2020 17:23:53 GMT'...}
The above example shows you some of the most important properties available for Request and Response objects.
You'll learn more about some of these attributes in this tutorial, but if you want to dig deeper, you can check Mozilla's HTTP message documentation for a deeper explanation of each attribute.
Status code
Status code is one of the most important information to look for in any API response. They tell you whether your request was successful, whether data is missing, whether credentials are missing, and so on.
Over time, you will recognize different status codes without help. But for now, here are some of the most common status codes you'll find:
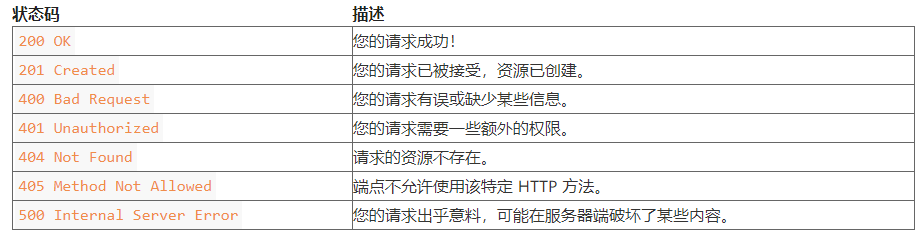
You have seen in the example executed before 200 OK. You can even 404 Not Found by browsing the web page.
Interesting fact: companies tend to use 404 error pages for private jokes or pure fun, such as the following example:
- Mantra Labs
- Gymbox
- Pixar
- Slack
However, in the API world, developers have limited space to respond to this fun. But they make up for this in other places, such as HTTP headers. You'll see some examples soon!
You can use. status_code and to check the status of the Response. reason. The requests library also prints the status code in the representation of the Response object:
>>>
>>> response = requests.get("https://api.thedogapi.com/v1/breeds")
>>> response
<Response [200]>
>>> response.status_code
200
>>> response.reason
'OK'
The above request returns 200, so you can consider it a successful request. But now look at the failed request triggered when you include a spelling error in the endpoint / breedz:
>>>
>>> response = requests.get("https://api.thedogapi.com/v1/breedz")
>>> response
<Response [404]>
>>> response.status_code
404
>>> response.reason
'Not Found'
As you can see, / breedz endpoint does not exist, so the API returns a 404 Not Found status code.
You can use these status codes to quickly see if your request needs to be changed, or if you should check the document again for any spelling errors or missing parts.
HTTP header
The HTTP header is used to define some parameters for managing requests and responses:

You can also find many other headers when examining a request or response. If you're curious about the specific purpose of each, check out Mozilla's list of extensions.
To check the header of the response, you can use response.headers:
>>>
>>> response = requests.get("https://api.thedogapi.com/v1/breeds/1")
>>> response.headers
{'Content-Encoding': 'gzip',
'Content-Type': 'application/json; charset=utf-8',
'Date': 'Sat, 25 Jul 2020 19:52:07 GMT'...}
To perform the same operation on the request header, you can use response.request.headers because request is a property of the Response object:
>>>
>>> response = requests.get("https://api.thedogapi.com/v1/breeds/1")
>>> response.request.headers
{'User-Agent': 'python-requests/2.24.0',
'Accept-Encoding': 'gzip, deflate', 'Accept': '*/*',
'Connection': 'keep-alive'}
In this case, you did not define any specific header when you made the request, so the default header is returned.
Custom title
Another standard you may encounter when using the API is to use custom headers. These usually start with X -, but are not required. API developers usually use custom headers to send or request other custom information to clients.
Interesting fact: some companies spare no effort to become interesting and innovative, using HTTP headers in a way they shouldn't use, such as soliciting job applications.
You can use a dictionary to define headers, and you can use the headers parameter to send them with your request. get().
For example, suppose you want to send some request IDs to the API server, and you know that you can use X-Request-Id:
>>>
>>> headers = {"X-Request-Id": "<my-request-id>"}
>>> response = requests.get("https://example.org", headers=headers)
>>> response.request.headers
{'User-Agent': 'python-requests/2.24.0', 'Accept-Encoding': 'gzip, deflate',
'Accept': '*/*', 'Connection': 'keep-alive',
'X-Request-Id': '<my-request-id>'}
If you look through the request.headers dictionary, you will find some other headers at the end of the X-Request-Id. these headers are the default headers for any API request.
The response may have many useful headers, but one of the most important headers is the content type, which defines the content type returned in the response.
Content-Type
Now, most APIs use JSON as the default content type, but you may need to use an API that returns XML or other media types, such as images or videos. In this case, the content type will be different.
If you review one of the previous examples using the dogapi and try to check the content type header, you will notice how it is defined as application/json:
>>>
>>> response = requests.get("https://api.thedogapi.com/v1/breeds/1")
>>> response.headers.get("Content-Type")
'application/json; charset=utf-8'
In addition to a specific type of content (in this case, application/json), the header may also return the specified encoding of the response content.
PlaceGOAT API: This is a very stupid API that returns goat images of different sizes that you can use as placeholder images in your website.
For example, if you try to get an image of a goat from the PlaceGOAT API, you will notice that the content type is no longer application/json, but is defined as image/jpeg:
>>>
>>> response = requests.get("http://placegoat.com/200/200")
>>> response
<Response [200]>
>>> response.headers.get("Content-Type")
'image/jpeg'
In this case, the content type header declares that the returned content is a JPEG image. You will learn how to view this in the next section.
The content type header is very important. You need to know how to deal with the response and how to deal with its content. There are hundreds of other acceptable content types, including audio, video, fonts, etc.
Reply content
As you just learned, the content type you find in the API Response will vary depending on the content type header. In order to correctly read the Response content according to different content type headers, the requests package comes with several different Response attributes, which you can use to manipulate the Response data:
- . text returns the response content in Unicode format.
- . content returns the response content in bytes.
You have used the properties above. Text. However, for some specific types of data, such as images and other non text data, using. content is usually a better method, even if it returns results very similar to. Text:
>>>
>>> response = requests.get("https://api.thedogapi.com/v1/breeds/1")
>>> response.headers.get("Content-Type")
'application/json; charset=utf-8'
>>> response.content
b'{"weight":{"imperial":"6 - 13","metric":"3 - 6"}...'
As you can see,. content is the same as the previously used. text
However, by looking at the content type header of the response, you can see that the content is application/json;JSON object. For such content, the requests library contains a specific. json() method that you can use to immediately convert API byte responses to Python data structures:
>>>
>>> response = requests.get("https://api.thedogapi.com/v1/breeds/1")
>>> response.headers.get("Content-Type")
'application/json; charset=utf-8'
>>> response.json()
{'weight': {'imperial': '6 - 13', 'metric': '3 - 6'},
'height': {'imperial': '9 - 11.5', 'metric': '23 - 29'}
...}
>>> response.json()["name"]
'Affenpinscher'
As you can see, after executing response.json(), you will get a dictionary that you can use like any other dictionary in Python.
Now, review the recent examples run using the PlaceGOAT API, try to get the same goat image and view its contents:
>>>
>>> response = requests.get("http://placegoat.com/200/200")
>>> response
<Response [200]>
>>> response.headers.get("Content-Type")
'image/jpeg'
>>> response.content
b'\xff\xd8\xff\xe0\x00\x10JFIF\x00\x01\x01\x01\x00H\...'
In this case, because you are requesting an image,. content is not very helpful. In fact, it is almost impossible to understand. However, you know this is a JPEG image, so you can try to store it in a file and see what happens:
>>>
>>> response = requests.get("http://placegoat.com/200/200")
>>> response
<Response [200]>
>>> response.headers.get("Content-Type")
'image/jpeg'
>>> file = open("goat.jpeg", "wb")
>>> file.write(response.content)
>>> file.close()
Now, if you open the working folder, you will find a goat.jpeg file, which is a random image of the goat you just got using the API. Isn't it amazing?
HTTP method
When calling an API, there are several different methods, also known as verbs, that can be used to specify the action to be performed. For example, if you want to GET some data, you will use the method GET. If you want to create some data, you will use the method POST.
When consuming data purely using API s, you usually insist on using GET requests, but here are the most common methods and their typical use cases:

These four methods are often called CRUD operations because they let you reate,[R EAD,ü PDATE and d elete resource.
Note: there is an additional PATCH method also associated with CRUD operation, but it is slightly less than the above four methods. It is used for partial modification instead of using the full replacement resource PUT.
You can read more about the differences between the two and understand their different needs.
If you're curious about the rest of the HTTP methods, or if you just want to learn more about the methods already mentioned, check Mozilla's documentation.
So far, you have only used. get() to get data, but you can also use the requests package for all other HTTP methods:
>>>
>>> requests.post("https://api.thedogapi.com/v1/breeds/1")
>>> requests.get("https://api.thedogapi.com/v1/breeds/1")
>>> requests.put("https://api.thedogapi.com/v1/breeds/1")
>>> requests.delete("https://api.thedogapi.com/v1/breeds/1")
If you try these on the console, you will notice that most of them will return 405 Method Not Allowed status code. This is because not all terminals will allow POST, PUT or DELETE methods. Especially when you use public APIs to read data, you will find that most APIs only allow GET requests because you are not allowed to create or change existing data.
Query parameters
Sometimes, when you call the API, you will get a lot of data that you don't need or don't need. For example, when you call the / feeds endpoint of the dogapi, you will get a lot of information about a given variety. But in some cases, you may only want to extract some information about a given variety. This is where query parameters come in!
When browsing online, you may have seen or used query parameters.
For example, when watching a YouTube video, you have a similar problem https://www.youtube.com/watch?v=aL5GK2LVMWI. V = in URL is what you call query parameter. It is usually after the basic URL and endpoint.
To add a query parameter to a given URL, you must add a question mark before the first query parameter( ). If you want to have multiple query parameters in your request, you can use the & sign( &) Separate them.
There are multiple query parameters on the same YouTube website, which are as follows: https://www.youtube.com/watch?v=aL5GK2LVMWI&t=75 .
In the API world, query parameters are used as filters, and you can send them along with API requests to further narrow the response range. For example, back to the Random User Generator API, you know how to generate random users:
>>>
>>> requests.get("https://randomuser.me/api/").json()
{'results': [{'gender': 'male', 'name':
{'title': 'Mr', 'first': 'Silvijn', 'last': 'Van Bekkum'},
'location': {'street': {'number': 2480, 'name': 'Hooijengastrjitte'},
'city': 'Terherne', 'state': 'Drenthe',
'country': 'Netherlands', 'postcode': 59904...}
However, suppose you especially want to generate only random female users. According to the document, you can use the query parameter gender =:
>>>
>>> requests.get("https://randomuser.me/api/?gender=female").json()
{'results': [{'gender': 'female', 'name':
{'title': 'Mrs', 'first': 'Marjoleine', 'last': 'Van Huffelen'},
'location': {'street': {'number': 8993, 'name': 'De Teebus'},
'city': 'West-Terschelling', 'state': 'Limburg',
'country': 'Netherlands', 'postcode': 24241...}
That's great! Now suppose you only want to generate female users from Germany. Check the document again and you will find the section about nationality. You can use the query parameter nat =:
>>>
>>> requests.get("https://randomuser.me/api/?gender=female&nat=de").json()
{'results': [{'gender': 'female', 'name':
{'title': 'Ms', 'first': 'Marita', 'last': 'Hertwig'},
'location': {'street': {'number': 1430, 'name': 'Waldstraße'},
'city': 'Velden', 'state': 'Rheinland-Pfalz',
'country': 'Germany', 'postcode': 30737...}
Using query parameters, you can start to get more specific data from the API, so that the whole experience can better meet your needs.
To avoid rebuilding the URL over and over again, you can use this params property to send a dictionary of all query parameters to attach to the URL:
>>>
>>> query_params = {"gender": "female", "nat": "de"}
>>> requests.get("https://randomuser.me/api/", params=query_params).json()
{'results': [{'gender': 'female', 'name':
{'title': 'Ms', 'first': 'Janet', 'last': 'Weyer'},
'location': {'street': {'number': 2582, 'name': 'Meisenweg'},
'city': 'Garding', 'state': 'Mecklenburg-Vorpommern',
'country': 'Germany', 'postcode': 56953...}
You can apply the above to any other API you like. If you return to the dogapi, there is a method in the document that allows you to filter the breed endpoint to return only breeds that match a specific name. For example, if you want to find a Labrador breed, you can use the query parameter to implement q:
>>>
>>> query_params = {"q": "labradoodle"}
>>> endpoint = "https://api.thedogapi.com/v1/breeds/search"
>>> requests.get(endpoint, params=query_params).json()
[{'weight': {'imperial': '45 - 100', 'metric': '20 - 45'},
'height': {'imperial': '14 - 24', 'metric': '36 - 61'},
'id': 148, 'name': 'Labradoodle', 'breed_group': 'Mixed'...}]
You have it! By sending q the query parameter labradoodle with value, you can filter all varieties matching the specific value.
Tip: when you reuse the same endpoint, the best practice is to define it as a variable at the top of the code. This will make your life easier when you interact with the API repeatedly.
With the help of query parameters, you can further narrow the scope of the request and specify exactly what you want to find. Most APIs you can find on the Internet have some query parameters that you can use to filter data. Remember to check the documentation and API references to find them.
Learn advanced API concepts
Now that you have a good understanding of the basics of using the API with Python, there are some more advanced topics worth exploring, even brief ones, such as authentication, paging, and rate limiting.
verification
API authentication is probably the most complex topic covered in this tutorial. Although many public APIs are free and fully public, more APIs are available behind some form of authentication. There are many APIs that require authentication, but here are some good examples:
Authentication methods range from simple and straightforward (such as using API keys or basic authentication) to more complex and secure technologies (such as OAuth).
Typically, calling the API without credentials or with incorrect credentials will return a 401 Unauthorized or 403 Forbidden status code.
API key
The most common authentication level is the API key. These keys are used to identify you as an API user or customer and to track your use of the API. API keys are usually sent as request headers or query parameters.
NASA API: one of the coolest public API collections is the API provided by NASA. You can find the API to get astronomical pictures of the day or pictures taken by the earth multicolor imaging camera (EPIC).
For this example, you will use NASA's Mars Rover Photo API and obtain photos taken on July 1, 2020. For testing purposes, you can use DEMO_KEYNASA provides the API key by default. Otherwise, you can quickly generate your own API by going to NASA's main API page and clicking start.
You can use additional APIs_ Key = add API key to your request with query parameters:
>>>
>>> endpoint = "https://api.nasa.gov/mars-photos/api/v1/rovers/curiosity/photos"
>>> # Replace DEMO_KEY below with your own key if you generated one.
>>> api_key = "DEMO_KEY"
>>> query_params = {"api_key": api_key, "earth_date": "2020-07-01"}
>>> response = requests.get(endpoint, params=query_params)
>>> response
<Response [200]>
So far, it's good. You try to issue an authenticated request to NASA's API and get a 200 OK response.
Now look at the Response object and try to extract some pictures from it:
>>>
>>> response.json()
{'photos': [{'id': 754118,
   'sol': 2809,
   'camera': {'id': 20,
    'name': 'FHAZ',
    'rover_id': 5,
    'full_name': 'Front Hazard Avoidance Camera'},
   'img_src': 'https://mars.nasa.gov/msl-raw-images/...JPG',
   'earth_date': '2020-07-01',
   'rover': {'id': 5,
    'name': 'Curiosity',
    'landing_date': '2012-08-06',
    'launch_date': '2011-11-26',
    'status': 'active'}},
  ...
}
>>> photos = response.json()["photos"]
>>> print(f"Found {len(photos)} photos")
Found 12 photos
>>> photos[4]["img_src"]
'https://mars.nasa.gov/msl-raw-images/proj/msl/redops/ods/surface/sol/02809/opgs/edr/rcam/RRB_646869036EDR_F0810628RHAZ00337M_.JPG'
Using. json() to convert the response into a Python dictionary, and then photos gets the fields from the response, you can traverse all Photo objects and even get the image URL of a specific Photo. If you open the website in your browser, then you will see Mars taken by a Mars probe with the following pictures:

For this example, you selected a specific earth from the response Dictionary ()_ Date (2020-07-01), and then select a specific photo 4. Before continuing, try changing the date or taking photos from different cameras to see how it changes the final result.
OAuth: getting started
Another very common standard in API authentication is OAuth. In this tutorial, you will only learn the basics of OAuth, because it is a very broad topic.
Even if you don't know it's part of OAuth, you may have seen and used OAuth processes many times. This is the starting point of OAuth process whenever the application or platform has login mode or continue mode options:
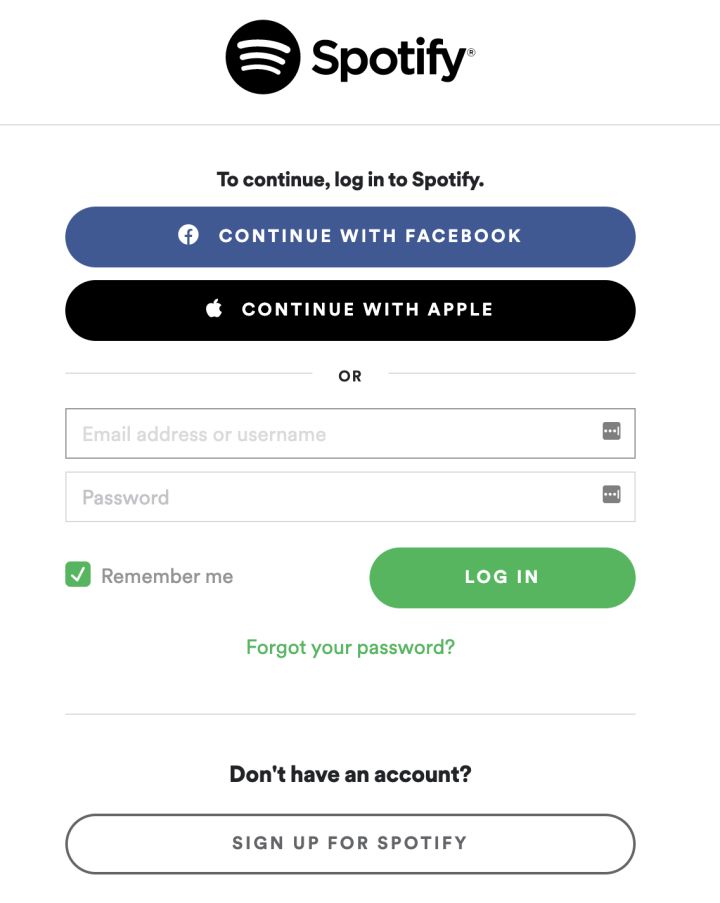
Here is a step-by-step breakdown of what happens when you click to continue using Facebook:
- The Spotify application will ask the Facebook API to start the authentication process. To do this, the Spotify application sends its application ID (client_id) and URL (redirect_uri) to redirect the user after success or error.
- You will be redirected to the Facebook site and asked to sign in with your credentials. The Spotify application will not see or cannot access these credentials. This is the most important benefit of OAuth.
- Facebook will show you all the data requested by the Spotify app from your profile and ask you to accept or refuse to share the data.
- If you accept letting Spotify access your data, you will be redirected back to the Spotify application that you have logged in to.
In step 4, Facebook will provide Spotify with a special access_token that can be reused to get your information. This particular Facebook login token is valid for 60 days, but other applications may have different validity periods. If you're curious, Facebook has a settings page where you can see which applications have obtained your Facebook access token.
Now, from a more technical point of view, here are the things you need to know when using OAuth API s:
- You need to create an application with an ID (app_id or client_id) and a secret (app_secret or client_secret).
- You need to have a redirect_uri that the API will use to send you information.
- You will get a code as the result of authentication that you need to exchange for an access token.
There are some variations above, but in general, most OAuth processes have steps similar to these.
Tip: when you are just testing and need some kind of redirect URL to get. code, you can use a service called httpbin.
More specifically, you can https://httpbin.org/anything Used as a redirect URL because it only outputs anything it gets as input. You can test from the row by navigating to the URL.
Next, you'll delve into an example of using the GitHub API!
OAuth: a practical example
As you can see above, the first thing you need to do is create an application. You can refer to the GitHub documentation for detailed step-by-step instructions on how to do this. The only thing to remember is to https://httpbin.org/anything The URL mentioned above is used to authorize the callback URL field.
GitHub API: you can use the GitHub API for many different use cases, such as getting a list of repositories you belong to, getting a list of followers you own, and so on.
After the application is created, the client and_ ID and Client_Secret copy and paste the redirect URL you selected into the Python file named github.py:
import requests

# REPLACE the following variables with your Client ID and Client Secret
CLIENT_ID = "<REPLACE_WITH_CLIENT_ID>"
CLIENT_SECRET = "<REPLACE_WITH_CLIENT_SECRET>"

# REPLACE the following variable with what you added in the
# "Authorization callback URL" field
REDIRECT_URI = "<REPLACE_WITH_REDIRECT_URI>"
Now that you have all the important variables ready, you need to be able to create a link to redirect users to their GitHub account, as described in the GitHub document:
def create_oauth_link():
    params = {
        "client_id": CLIENT_ID,
        "redirect_uri": REDIRECT_URI,
        "scope": "user",
        "response_type": "code",
    }

    endpoint = "https://github.com/login/oauth/authorize"
    response = requests.get(endpoint, params=params)
    url = response.url
    return url
In this code, you first define the required parameters expected by the API, and then use the requests package and. get()
When you make a request to the / login/oauth/authorize endpoint, the API will automatically redirect you to the GitHub website. In this case, you want the URL to get the parameters from the response. This parameter contains the exact URL that GitHub redirects you to.
The next step in the authorization process is to exchange the code you get for an access token. Similarly, follow the steps in the GitHub document to create a method for it:
def exchange_code_for_access_token(code=None):
    params = {
        "client_id": CLIENT_ID,
        "client_secret": CLIENT_SECRET,
        "redirect_uri": REDIRECT_URI,
        "code": code,
    }

    headers = {"Accept": "application/json"}
    endpoint = "https://github.com/login/oauth/access_token"
    response = requests.post(endpoint, params=params, headers=headers).json()
    return response["access_token"]
Here, you POST the code to exchange the access token. In this request, you must send your CLIENT_SECRETandcode so that GitHub can verify that this particular code was originally generated by your application. Only in this way will the GitHub API generate a valid access token and return it to you.
Now you can add the following to your file and try to run it:
link = create_oauth_link()
print(f"Follow the link to start the authentication with GitHub: {link}")
code = input("GitHub code: ")
access_token = exchange_code_for_access_token(code)
print(f"Exchanged code {code} with access token: {access_token}")
If everything goes according to plan, you should be rewarded with a valid access token, which you can use to call the GitHub API to simulate an authenticated user.
Now try adding the following code to get your user profile using the User API and print your name, user name, and number of private repositories:
def print_user_info(access_token=None):
    headers = {"Authorization": f"token {access_token}"}
    endpoint = "https://api.github.com/user"
    response = requests.get(endpoint, headers=headers).json()
    name = response["name"]
    username = response["login"]
    private_repos_count = response["total_private_repos"]
    print(
        f"{name} ({username}) | private repositories: {private_repos_count}"
    )
Now that you have a valid access token, you need to send it in all API requests using the Authorization header. The response to your request will be a Python dictionary containing all user information. From the dictionary, the fields you want to get are name, login and total_private_repos. You can also print the response variable to see other available fields.
Well, it should be! The only thing left is to put them together and try:
 1import requests
 2
 3# REPLACE the following variables with your Client ID and Client Secret
 4CLIENT_ID = "<REPLACE_WITH_CLIENT_ID>"
 5CLIENT_SECRET = "<REPLACE_WITH_CLIENT_SECRET>"
 6
 7# REPLACE the following variable with what you added in
 8# the "Authorization callback URL" field
 9REDIRECT_URI = "<REPLACE_WITH_REDIRECT_URI>"
10
11def create_oauth_link():
12    params = {
13        "client_id": CLIENT_ID,
14        "redirect_uri": REDIRECT_URI,
15        "scope": "user",
16        "response_type": "code",
17    }
18    endpoint = "https://github.com/login/oauth/authorize"
19    response = requests.get(endpoint, params=params)
20    url = response.url
21    return url
22
23def exchange_code_for_access_token(code=None):
24    params = {
25        "client_id": CLIENT_ID,
26        "client_secret": CLIENT_SECRET,
27        "redirect_uri": REDIRECT_URI,
28        "code": code,
29    }
30    headers = {"Accept": "application/json"}
31    endpoint = "https://github.com/login/oauth/access_token"
32    response = requests.post(endpoint, params=params, headers=headers).json()
33    return response["access_token"]
34
35def print_user_info(access_token=None):
36    headers = {"Authorization": f"token {access_token}"}
37    endpoint = "https://api.github.com/user"
38    response = requests.get(endpoint, headers=headers).json()
39    name = response["name"]
40    username = response["login"]
41    private_repos_count = response["total_private_repos"]
42    print(
43        f"{name} ({username}) | private repositories: {private_repos_count}"
44    )
45
46link = create_oauth_link()
47print(f"Follow the link to start the authentication with GitHub: {link}")
48code = input("GitHub code: ")
49access_token = exchange_code_for_access_token(code)
50print(f"Exchanged code {code} with access token: {access_token}")
51print_user_info(access_token=access_token)
When you run the above code, the following occurs:
- A link is generated asking you to go to the GitHub page for authentication.
- After you follow this link and log in with your GitHub credentials, you will be redirected to the callback URL you defined, which contains a field in the code query parameter:
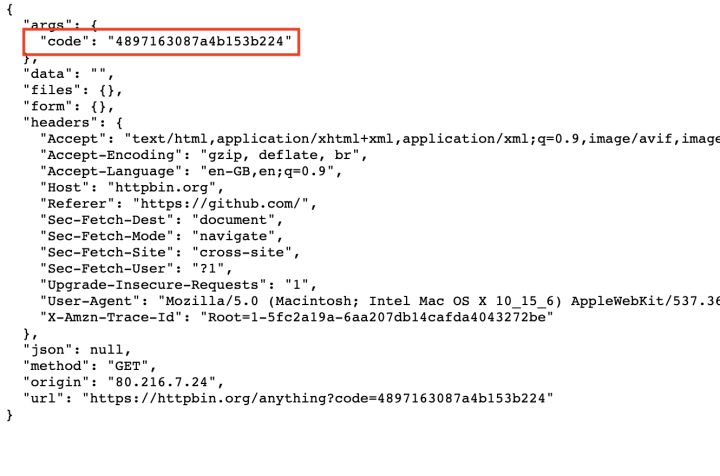
- After pasting the code in your console, you can exchange the code for a reusable access token.
- Your user information was obtained using this access token. Print your name, user name, and private repository count.
If you follow the above steps, you should get a similar final result:
$ John Doe (johndoe) | number of private repositories: 42
There are many steps to perform, but it is important that you take time to really understand each step. Most APIs that use OAuth will share many of the same behaviors, so when you read data from the API, fully understanding this process will release a lot of potential.
Feel free to improve this example and add more features, such as getting your public and starred repositories or traversing your followers to identify the most popular repositories.
There are many excellent resources about OAuth on the Internet. If you really need to use the API behind OAuth, I suggest you do more research on this topic. Here are some good starting points:
- What is OAuth?
- OAuth 2 simplified
- OAuth 2.0 authorization framework
From the perspective of API consumption, when you interact with public APIs, it is certainly useful to understand OAuth. Most APIs use OAuth as their authentication standard for good reason.
paging
Sending large amounts of data back and forth between the client and the server comes at a cost: bandwidth. To ensure that the server can handle a large number of requests, Apis usually use paging.
In very simple terms, paging is the act of dividing a large amount of data into smaller parts. For example, whenever you go to the Questions page in Stack Overflow, you will see the following at the bottom:

You may recognize this from many other websites, and the concepts of different websites are roughly the same. For API s, this is usually handled with query parameters, mainly including the following two:
- One page, which page properties are you currently requesting to be defined
- A size defines the size attribute of each page
Specific query parameter names may vary greatly depending on API developers, but the concept is the same. Some API players may also use HTTP headers or JSON responses to return the current paging filter.
Using the GitHub API again, you can find the event endpoint in the document that contains the paging query parameters. This parameter is per_page = defines the number of items to return and allows you to page multiple results. Here is how to use these parameters:
>>>
>>> response = requests.get("https://api.github.com/events?per_page=1&page=0")
>>> response.json()[0]["id"]
'14345572615'
>>> response = requests.get("https://api.github.com/events?per_page=1&page=1")
>>> response.json()[0]["id"]
'14345572808'
>>> response = requests.get("https://api.github.com/events?per_page=1&page=2")
>>> response.json()[0]["id"]
'14345572100'
Using the first URL, you can only get one event. However, using the page = query parameter, you can continue to page the results to ensure that you can get all events without overloading the API.
Speed limit
Since API s are open to the public and can be used by anyone, malicious people often try to abuse them. To prevent such attacks, you can use a technique called rate limiting, which limits the number of requests a user can make within a given time frame.
If you often exceed the defined rate limit, some APIs may actually block your IP or API key. Be careful not to exceed the limits set by API developers. Otherwise, you may have to wait a while before calling the API again.
For the following example, you will use the GitHub API and / events endpoint again. According to its file , GitHub allows about 60 unauthenticated requests per hour. If you exceed this value, you will get a 403 status code and will not be able to make any API calls for a long time.
Warning: running the next piece of code will indeed prevent you from calling GitHub for a period of time, so please make sure you don't need to access GitHub's API for the time being before running it.
For demonstration purposes, you'll purposefully try to exceed GitHub's rate limit to see what happens. In the following code, you will request data until you get a status code other than 200 OK:
>>>
>>> endpoint = "https://api.github.com/events"
>>> for i in range(100):
>>>   response = requests.get(endpoint)
>>>   print(f"{i} - {response.status_code}")
>>>   if response.status_code != 200:
>>>     break
0 - 200
1 - 200
2 - 200
3 - 200
4 - 200
5 - 200
...
55 - 200
56 - 200
57 - 403
>>> response
<Response [403]>
>>> response.json()
{'message': "API rate limit exceeded for <ip-address>.",
 'documentation_url': 'https://developer.github.com/v3/#rate-limiting'}
You have it: after about 60 requests, the API stops returning 200 OK responses and returns a 403 Forbidden response to notify you that the API rate limit has been exceeded.
Some API s, such as GitHub's, may even contain additional information about the current rate limit and the number of requests remaining in the header. These are very helpful for you to avoid exceeding the defined limits. Check out the latest response.headers to see if you can find those specific rate limiting headers.
Using the Python API: a practical example
Now that you know all the theories and have tried some API s, you can consolidate this knowledge with more practical examples. You can modify the following examples to customize them for your own purposes.
You can learn these examples by downloading the source code provided in the following link:
Search and get popular gifs
How to make a small script to get the top three popular GIF dynamic maps from the GIPHY website? To do this, you need to create an application and get the API key from GIPHY. You can find instructions by expanding the box below, or you can view the quick start documentation for GIPHY.
Creating a gifhy application show hide
Once you have the API key, you can start writing some code to use the API. However, sometimes you want to run some tests before implementing a large amount of code. I know, I know. The problem is that some APIs actually provide you with tools to get API data directly from documents or their dashboards.
In this special case, GIPHY provides you with an API Explorer that allows you to start using the API without writing a single line of code after you create the application.
Other APIs will provide you with a resource manager in the document itself, which is what the dog API does at the bottom of each API reference page.
In any case, you can always use code to use the API, which is what you want to do here. Get the API key from the dashboard and replace the API_KEY the values of the following variables, you can start using the GIPHY API:
 1import requests
 2
 3# Replace the following with the API key generated.
 4API_KEY = "API_KEY"
 5endpoint = "https://api.giphy.com/v1/gifs/trending"
 6
 7params = {"api_key": API_KEY, "limit": 3, "rating": "g"}
 8response = requests.get(ENDPOINT, params=params).json()
 9for gif in response["data"]:
10    title = gif["title"]
11    trending_date = gif["trending_datetime"]
12    url = gif["url"]
13    print(f"{title} | {trending_date} | {url}")
At the top of the file, on lines 4 and 5, you define your API_KEY API and GIPHY API, endpoint, because they don't change as often as other parts.
In line 7, using what you learned in the query parameters section, define params and add your own API key. You also include some other filters: limit gets 3 results and rating gets only the appropriate content.
Finally, after getting the response, you iterate over the result on line 9. For each GIF, you print its title, date, and URL on line 13.
Running this code in the console will output a somewhat structured GIF list:
Excited Schitts Creek GIF by CBC | 2020-11-28 20:45:14 | https://giphy.com/gifs/cbc-schittscreek-schitts-creek-SiGg4zSmwmbafTYwpj
Saved By The Bell Shrug GIF by PeacockTV | 2020-11-28 20:30:15 | https://giphy.com/gifs/peacocktv-saved-by-the-bell-bayside-high-school-dZRjehRpivtJsNUxW9
Schitts Creek Thank You GIF by CBC | 2020-11-28 20:15:07 | https://giphy.com/gifs/cbc-funny-comedy-26n79l9afmfm1POjC
Now, suppose you want to make a script that allows you to search for a specific word and get the first gifhy match for that word. Different endpoints and minor changes in the above code can do this quickly:
import requests

# Replace the following with the API key generated.
API_KEY = "API_KEY"
endpoint = "https://api.giphy.com/v1/gifs/search"

search_term = "shrug"
params = {"api_key": API_KEY, "limit": 1, "q": search_term, "rating": "g"}
response = requests.get(endpoint, params=params).json()
for gif in response["data"]:
    title = gif["title"]
    url = gif["url"]
    print(f"{title} | {url}")
You have it! You can now modify this script to your liking and generate gifs as needed. Try to get gifs from your favorite programs or movies, add shortcuts to your terminal to get the most popular gifs on demand, or integrate with another API in your favorite messaging system (WhatsApp, Slack, etc.). Then start sending gifs to your friends and colleagues!
COVID-19 confirmed cases were obtained for each country
Although you may be tired of this now, there is a free API that contains the latest global COVID-19 data. This API does not require authentication, so it's easy to get some data immediately. The free version you'll use below has rate limits and some data limits, but it's enough for small use cases.
For this example, you will get the total number of confirmed cases as of the previous day. Again, I randomly selected Germany as the country, but you can choose any country / region you like:
 1import requests
 2from datetime import date, timedelta
 3
 4today = date.today()
 5yesterday = today - timedelta(days=1)
 6country = "germany"
 7endpoint = f"https://api.covid19api.com/country/{country}/status/confirmed"
 8params = {"from": str(yesterday), "to": str(today)}
 9
10response = requests.get(endpoint, params=params).json()
11total_confirmed = 0
12for day in response:
13    cases = day.get("Cases", 0)
14    total_confirmed += cases
15
16print(f"Total Confirmed Covid-19 cases in {country}: {total_confirmed}")
In lines 1 and 2, you import the necessary modules. In this case, you must import date and timedelta objects to get today's and yesterday's dates.
In lines 6 through 8, you define the country slug, endpoint, and query parameters for the API request to use.
The response is a list of days. For each day, you have a Cases field containing the total number of confirmed Cases on that date. On line 11, you create a variable to hold the total number of confirmed Cases, and then on line 14, you iterate over all the days and add them.
The final print result will show the total number of confirmed cases in the selected country:
Total Confirmed Covid-19 cases in germany: 1038649
In this example, you are looking at the total number of confirmed cases in the whole country. However, you can also try to view the document and get data for a specific city. Why not make it more thorough and get some other data, such as the number of recovered cases?
Search Google Books
If you are passionate about books, you may need a way to quickly search for specific books. You may even want to connect it to the search of your local library to see if the ISBN using the book can find a given book.
For this example, you will use the Google Books API and the public volume endpoint to perform a simple book search.
This is a simple code for moby dick to find words in the whole directory:
 1import requests
 2
 3endpoint = "https://www.googleapis.com/books/v1/volumes"
 4query = "moby dick"
 5
 6params = {"q": query, "maxResults": 3}
 7response = requests.get(endpoint, params=params).json()
 8for book in response["items"]:
 9    volume = book["volumeInfo"]
10    title = volume["title"]
11    published = volume["publishedDate"]
12    description = volume["description"]
13    print(f"{title} ({published}) | {description}")
This code example is very similar to the code example you saw earlier. Starting from lines 3 and 4, define important variables, such as endpoints, in this case queries.
After the API request is issued, start the iteration result on line 8. Then, on line 13, print the most interesting information for each book that matches the initial query:
Moby-Dick (2016-04-12) | "Call me Ishmael." So begins the famous opening...
Moby Dick (1892) | A literary classic that wasn't recognized for its...
Moby Dick; Or, The Whale (1983-08-16) | The story of Captain Ahab's...
You can print variables within the book loop to see what other fields you have available. Here are some things that may help to further improve this Code:
- industryIdentifiers
- averageRating and ratingsCount
- imageLinks
An interesting challenge to using this API is to use your OAuth knowledge and create your own bookshelf application to record all the books you read or want to read. Then you can even connect it to your favorite bookstore or library to quickly find books on sale near you from your wish list. It's just an idea - I'm sure you can think of more.
conclusion
There are a million other things you can learn about APIs: different headers, different content types, different authentication techniques, and so on. However, the concepts and techniques you learn in this tutorial will allow you to practice with any API you like and use Python to meet any API you may have.
Click focus to learn about Huawei cloud's new technologies for the first time~