This article belongs to a confused pig original, please indicate the source author.
The two Demo addresses in this article are located at: https://github.com/ftc300/PythonAmazing.git
Welcome to follow and start.
I'm an android developer, but I have to say that python also brings me fun and convenience.

In this article you will see:
- python version management (virtualenv)
- An interesting little program to inspire your python enthusiasm
- Packaging code submission process
For beginners, the installation of Python may not be easy, especially facing the dilemma of choosing the python version, which wastes a lot of valuable time and even makes people feel abandoned. When you get an interesting project and report a mistake as soon as it runs and complain about what the developer is doing, it's likely that the environment is not working properly, so when you learn python, I first learn about the python environment. I've been struggling to learn Python 2 or pyhton 3, but when you use virtualenv, don't think about it. Learn both.
Officials also gave explanations:
Python2orPython3
Personally, I think the recognition of the importance of language environment may save you a lot of trouble, so this article starts with virtual alenv, which can isolate multiple operating environments.

I. virtualenv
The following is a tutorial on the use of virtual alenv for windows and mac, and also a memo for myself.
The usage process may include
- 1. Install virtualenv
- 2. Create an isolated environment
- 3. Activate and switch to virtualenv environment
- 4. Exit virtualenv environment
Windows:
1. Installation (omitted)
2,virtualenv venv
When installing multiple versions requires specifying the Python version path:
virtualenv venv --python=C:\Python2.7\python.exe
3,venv \Scripts\activate
4,venv\Scripts\deactivate
Reference link: python's virtualenv environment and its use
Mac:
Reference link: Python--A concise tutorial on Virtualenv
II. Small Procedures Enhance Interest
The running environment is python 2.7
Two modules:
PIL: Image Processing Standard Library. Install it through pip install Pillow
argparse: python's command line parsing tool, or you can call some of the shell's commands in python code to simplify the interaction with system commands
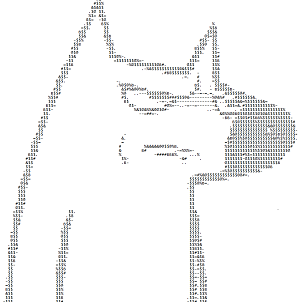
Here's the code for converting pictures into characters
#! /usr/bin/env python
# coding: utf-8

from PIL import Image
import argparse
# Command Line Parameter Tool
# This is not the point here, so no explanation is given, see https://docs.python.org/2/library/argparse.html for details.

parser = argparse.ArgumentParser()
parser.add_argument('file')

args = parser.parse_args()
imgpath = args.file
# Variable ascii_char: Stores the type of characters used to display pictures. We want to note that the last element of this list is a space, which means that we
# Spaces will be used to replace the pixels with the highest gray value in the original image (in the gray image, the highest gray value is 255, representing white, the lowest is 0, representing black).
# The first element in the list is $, which means that we will replace the lowest grayscale pixel in the original image with $. The rest of the characters and so on.
ascii_char = list(r"$@&%B#=-. ")


# Convert RGB to gray value, and return the corresponding character marker of the gray value.
def select_ascii_char(r, g, b):
    gray = int((19595 * r + 38469 * g + 7472 * b) >> 16)  # The Conversion Formula of'RGB-Gray Value'
    unit = 256.0/len(ascii_char)  # The Gray Value Interval of a Character in ascii_char
    return ascii_char[int(gray/unit)]


# Returns the character representation of a given path picture, where the user can also specify the width and height of the output character drawing.
def output(imgpath, width=100, height=100):
    im = Image.open(imgpath)
    im = im.resize((width, height), Image.NEAREST)
    txt = ""

    for h in xrange(height):
        for w in xrange(width):
            txt += select_ascii_char(*im.getpixel((w, h))[:3])  # See here for details (1)
        txt += '\n'
    return txt


def save_as_txtfile(txt):
    with open('imgtochar.txt', 'wb') as f:
        f.write(txt)


if __name__ == '__main__':
    print output(imgpath, 120, 90)
    save_as_txtfile(output(imgpath, 120, 90))
Effect:

3. Encapsulating git code submission process
In our daily development process, we will certainly often use some code version control tools, which are more commonly used, such as GitHub, of course, GitHub's commands have been more streamlined, but according to each of us different habits or can carry out some simple encapsulation. In daily development, it is not unexpected to write the code every day and submit the code after testing the function, so I usually use the following submission method.

import subprocess
import argparse

parser = argparse.ArgumentParser()
parser.add_argument('cmtmsg')
args = parser.parse_args()
msg = args.cmtmsg
print subprocess.Popen("cd .", shell=True, stdout=subprocess.PIPE).stdout.read()
print subprocess.Popen("git pull", shell=True, stdout=subprocess.PIPE).stdout.read()
print subprocess.Popen("git add .", shell=True, stdout=subprocess.PIPE).stdout.read()
print subprocess.Popen("git commit -m \""+msg +"\"", shell=True, stdout=subprocess.PIPE).stdout.read()
print subprocess.Popen("git push", shell=True, stdout=subprocess.PIPE).stdout.read()
It's not helpful to manipulate individual files, and it's not applicable if your day's work or full functionality is not over. Specific git commands I learned Mr. Liao Xuefeng Because I think I wrote it very well, I donated 20 yuan in a moment of excitement, and I admire myself very much. Return to the original subprocess module has brought me unlimited convenience. The above example just provides a way of thinking. You can also encapsulate some system commands to simplify your work, such as adb commands:
import subprocess

print subprocess.Popen("echo uninstall start***", shell=True, stdout=subprocess.PIPE).stdout.read()
print subprocess.Popen("adb uninstall com.xiaomi.smarthome", shell=True, stdout=subprocess.PIPE).stdout.read()
print subprocess.Popen("echo uninstall end***", shell=True, stdout=subprocess.PIPE).stdout.read()
print subprocess.Popen("echo install start***", shell=True, stdout=subprocess.PIPE).stdout.read()
p = subprocess.Popen("adb install %cd%/SmartHome.apk", shell=True, stdout=subprocess.PIPE, stderr=subprocess.STDOUT)
for line in p.stdout.readlines():
    print line,
retval = p.wait()
If the implementation is to uninstall Mijia app and reinstall a series of processes, but if GIT and ADB commands are not added to the system environment variables, the above code is invalid, then what are you waiting for is that you can also encapsulate a script that incorporates jdk, git, adb, gradle, gitk, python commands into the environment variables, and it is also convenient for you to delete the database from your current company. Go to the new company to report (joke), one click to complete the cool behavior of setting environmental variables ah, of course, you'd better follow your current installation path to install the relevant software.
The article is coming to an abrupt end. On the way to Python, I am more grateful to a former colleague. Wen Jie You can also visit his github address.