catalogue
1) GUI controls (signals) and slots
2. Actual combat 1: timer (no custom signal slot and no multithreading)
1) Interface design - use QT designer to design, and then compile pyuic into py file
2) Rewrite UI classes and write logical files
3) Add large cycle in built-in signal slot function - normal operation
4) Add a big loop in the slot function bound to the button control - GUI fake dead Caton
3. Actual combat 2: timer -- using multithreading to solve the problem of GUI jam
2) Solution to Caton - multithreading
(1) Create a thread class and override the run function
(2) Initializing functions in GUI classes__ init__ Instantiate thread class in
(3) Start the thread in the corresponding slot function
4. Actual combat 3: Timer - parameter transmission using user-defined signal slot
1) Custom signal (signal with parameter) in line class
2) Transmitting signals in line classes
1. What are signals and slots
Press the switch and the light comes on
In the above description, the action of "pressing the switch" is a signal, and the slot refers to what will happen when the action is completed. It can be understood that only when the signal is triggered can the corresponding slot function (event) occur
The common signal and slot in GUI is the callback function bound to button controls and buttons. When you click the \ release \ double click button, different callback functions, namely slot functions, will be run according to the signal. Common signal and slot forms are as follows:
1) GUI controls (signals) and slots
This kind of signal and slot. The signal is mainly aimed at the controls on the GUI. The slot function can be self-contained in the GUI or user-defined
To create such signals and slots:
- Creating a control is a button
self.pushButton = QtWidgets.QPushButton(self.centralwidget)
- Write slot function
#Custom slot function def slotEvent(self): for i in range(1000000): print(i) #GUI built-in slot function - Interface exit event def slotEvent(self): exit() - Bind the control related actions (signals) with the corresponding slot function according to the requirements
Control name. Action. Connect (slot function)
    self.pushButton.clicked.connect(self.slotEvent)
    Signal: click button slot function: slotEvent() function
2) Custom signals and slots
- Import corresponding modules
from PyQt5.Qt import pyqtSignal
- Custom signal (with or without parameters)
Signal name = pyqtsignal (type)
intSignal = pyqtSignal(int)
- Define slot function - same as 1)
#Custom slot function
def slotEvent(self):
for i in range(1000000):
print(i)
#GUI built-in slot function - Interface exit event
def slotEvent(self):
exit()
- Transmit signal
Signal name.emit (parameter content)
self.intSignal.emit(val)
Note: the number of parameter types during signal transmission must be consistent with the number of parameter types during definition.
- Receive signal (slot function corresponding to signal binding)
Signal name. Connect (slot function)
self.intSignal.connect(self.slotEvent)
2. Actual combat 1: timer (no custom signal slot and no multithreading)
Development environment: pycharm + windows10 + pyqt5
Function:
1. After pressing the start timing button, the counting board starts counting, and the button text is modified to stop detection
2. After pressing the stop timing button, the counting board stops counting and the timing returns to zero. At the same time, the button text is modified to start timing
1) Interface design - use QT designer to design, and then compile pyuic into py file
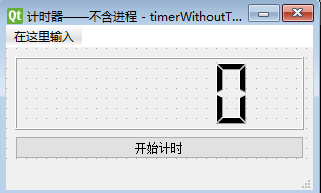
# -*- coding: utf-8 -*-

# Form implementation generated from reading ui file 'timerWithoutThread.ui'
#
# Created by: PyQt5 UI code generator 5.15.2
#
# WARNING: Any manual changes made to this file will be lost when pyuic5 is
# run again.  Do not edit this file unless you know what you are doing.


from PyQt5 import QtCore, QtGui, QtWidgets


class Ui_MainWindow(object):
    def setupUi(self, MainWindow):
        MainWindow.setObjectName("MainWindow")
        MainWindow.resize(307, 165)
        self.centralwidget = QtWidgets.QWidget(MainWindow)
        self.centralwidget.setObjectName("centralwidget")
        self.verticalLayout = QtWidgets.QVBoxLayout(self.centralwidget)
        self.verticalLayout.setObjectName("verticalLayout")
        self.lcdNumber = QtWidgets.QLCDNumber(self.centralwidget)
        self.lcdNumber.setObjectName("lcdNumber")
        self.verticalLayout.addWidget(self.lcdNumber)
        self.pushButton = QtWidgets.QPushButton(self.centralwidget)
        self.pushButton.setObjectName("pushButton")
        self.verticalLayout.addWidget(self.pushButton)
        MainWindow.setCentralWidget(self.centralwidget)
        self.menubar = QtWidgets.QMenuBar(MainWindow)
        self.menubar.setGeometry(QtCore.QRect(0, 0, 307, 23))
        self.menubar.setObjectName("menubar")
        MainWindow.setMenuBar(self.menubar)
        self.statusbar = QtWidgets.QStatusBar(MainWindow)
        self.statusbar.setObjectName("statusbar")
        MainWindow.setStatusBar(self.statusbar)

        self.retranslateUi(MainWindow)
        QtCore.QMetaObject.connectSlotsByName(MainWindow)

    def retranslateUi(self, MainWindow):
        _translate = QtCore.QCoreApplication.translate
        MainWindow.setWindowTitle(_translate("MainWindow", "Timer - without process"))
        self.pushButton.setText(_translate("MainWindow", "Start timing"))


if __name__ == "__main__":
    import sys
    app = QtWidgets.QApplication(sys.argv)
    MainWindow = QtWidgets.QMainWindow()
    ui = Ui_MainWindow()
    ui.setupUi(MainWindow)
    MainWindow.show()
    sys.exit(app.exec_())
2) Rewrite UI classes and write logical files
Composition:
Class custom class name (QtWidgets.QMainWindow,Ui_MainWindow):
def __init__(self):
Super (MainUI, self). _init_ () # override class
self.setupUi(self)
self.run() # is used to bind signals and slots
def event 1 (self):
...
def event 2 (self):
...
def run(self):
Control name. Action. Connect (Event 1)
Control name. Action. Connect (Event 2)
#!/usr/bin/env python
# -*- coding: utf-8 -*-
# @Time    : 2021/10/31 19:31
# @Author  : @linlianqin
# @Site    :
# @File    : timerWithoutThreadLogic.py
# @Software: PyCharm
# @description: do not use threads and signal slots to implement counters

from PyQt5 import QtWidgets
from pyqt_learn.signal_slot.Counters are implemented without threads and signal slots.timerWithoutThread import Ui_MainWindow
from PyQt5.QtCore import QTimer

'''
The relationship between the signal and the slot here is not user-defined, but simply through pyqt There are mainly two corresponding relationships between signals and slots:
1,Signal: end of counter count per second    Slot function: update the information on the counter board
2,Signal: click the button on the counting board    Slot function: counter starts working
3,Signal: click the button on the counting board    Slot function: the counter stops counting and the count returns to zero
 Note: clicking the button here actually starts a cycle, in which the counter per second is continuously called, and then the counter board information is updated

Steps:
1,Counter class instantiation per second, i.e QTimer
2,Write the execution event at the end of the counter per second, that is, update the number on the counter board
3,Write button events and start counting

result:
1,After pressing the start timing button, the counting board starts counting, and the button text is modified to stop detection
2,After pressing the stop timing button, the counting board stops counting and the timing returns to zero. At the same time, the button text is modified to start timing
'''

global sec

class mainUi(QtWidgets.QMainWindow,Ui_MainWindow):
	def __init__(self):
		super(mainUi, self).__init__()
		self.setupUi(self)
		self.timer = QTimer() # Instantiate counter per second
		global sec
		sec = 0
		self.run()

	# Update the number of counters
	def setTime(self):
		global sec
		sec += 1
		self.lcdNumber.display(sec)

	# Start counting
	def startCount(self):
		# Set the counting interval and start it. Send a timeout signal every 1000 milliseconds (1 second) to cycle. If you need to stop, you can call timer.stop() to stop
		self.timer.start(1000)
		# When you click the button to start timing, the button text is changed to stop timing, and the bound slot function is changed
		self.pushButton.setText("Stop timing")
		self.pushButton.clicked.connect(self.stopTime)

	# Stop timing and set the timing to 0
	def stopTime(self):
		global sec
		sec = 0
		self.timer.stop()
		self.lcdNumber.display(sec)
		# When you click the button to stop timing, the button text is changed to start timing, and the button binding slot function is changed
		self.pushButton.setText("Start timing")
		self.pushButton.clicked.connect(self.startCount)

	# Binding signal and slot
	def run(self):
		# Update the count plate number after the counter count per second is completed
		self.timer.timeout.connect(self.setTime)
		# Click the button to start counting
		self.pushButton.clicked.connect(self.startCount)

if __name__ == '__main__':
	import sys
	app = QtWidgets.QApplication(sys.argv)
	main = mainUi()
	main.show()
	sys.exit(app.exec_())
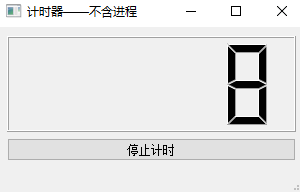
There are actually two signals, one is to click the button, the other is to start timer timing, and timer is a built-in signal,
3) Add large cycle in built-in signal slot function - normal operation
	# Update the number of counters
	def setTime(self):
		global sec
		sec += 1
		# Adding a large loop in the event of built-in signal binding will not cause the GUI to get stuck
		for i in range(1000000000):
			pass
		self.lcdNumber.display(sec)
Practice has proved that the timer can operate normally. Adding a large loop in the slot function of the built-in signal will not cause the phenomenon of jamming of the GUI interface. This is because another thread is used inside the timer counter to count, which will not affect the operation of the main thread of the GUI, so it will not jam
4) Add a big loop in the slot function bound to the button control - GUI fake dead Caton
	# Start counting
	def startCount(self):
		# Set the counting interval and start it. Send a timeout signal every 1000 milliseconds (1 second) to cycle. If you need to stop, you can call timer.stop() to stop
		self.timer.start(1000)
		# Add a large time-consuming loop in the slot function corresponding to the GUI control
		for i in range(1000000):
			print(i)
			pass
		# When you click the button to start timing, the button text is changed to stop timing, and the bound slot function is changed
		self.pushButton.setText("Stop timing")
		self.pushButton.clicked.connect(self.stopTime)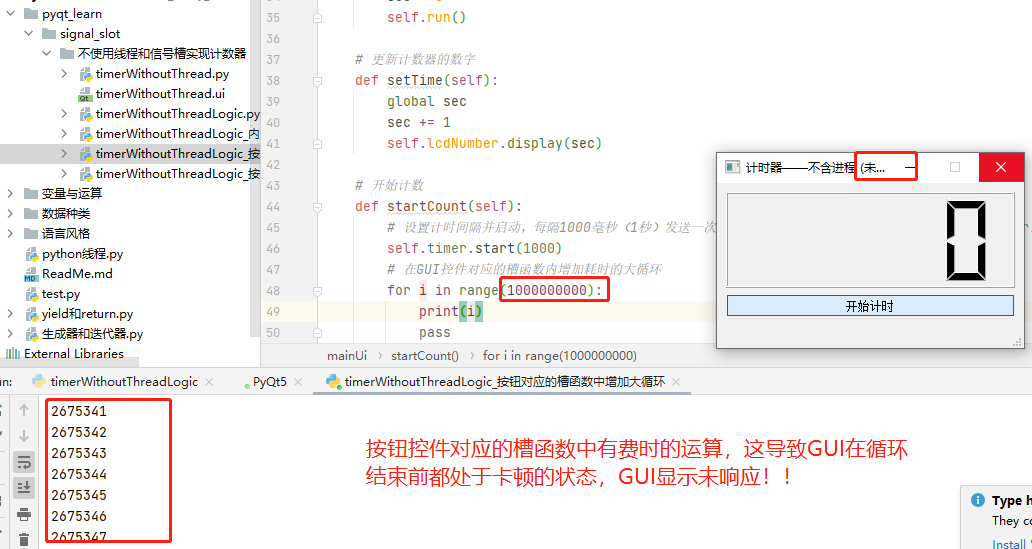
A large cycle is added to the slot function corresponding to the button. Before the large cycle runs, the GUI will get stuck. This is because the button belongs to the GUI control, and the slot function corresponding to the control is carried out in the main thread of the GUI. Therefore, the main thread will be temporarily suspended, that is, it will cause the GUI to get stuck. After the cycle ends, the GUI will return to normal
3. Actual combat 2: timer -- using multithreading to solve the problem of GUI jam
1) Common causes of GUI Caton
① Contains complex operations
② Contains time-consuming cycles
③time.sleep()
2) Solution to Caton - multithreading
From the cause of Caton, we can know that Caton mainly encounters time-consuming operations during the running of the GUI main thread, which leads to the pseudo dead Caton state of the GUI during cyclic calculation.
Therefore, we only need to select the time-consuming operations, and then open a new thread to perform these time-consuming operations, and the main thread is used to trigger the start of the new thread, so as to solve the GUI jam.
(1) Create a thread class and override the run function
The run function runs automatically when the thread calls the start() function
from PyQt5.QtCore import QTimer,QThread

# Open a new thread to operate the loop
class newThread(QThread):
	def __init__(self):
		super(newThread, self).__init__()

	# Large cycle
	def run(self):
		for i in range(1000000):
			print(i)
			pass
(2) Initializing functions in GUI classes__ init__ Instantiate thread class in
self.loopThread = newThread()
(3) Start the thread in the corresponding slot function
		# Start a new thread to execute a large loop
		self.loopThread.start()
(4) Complete code
After another thread is opened, there will be no jamming. During the large cycle, the numbers on the counting board can still be updated in real time. The GUI code here has not changed
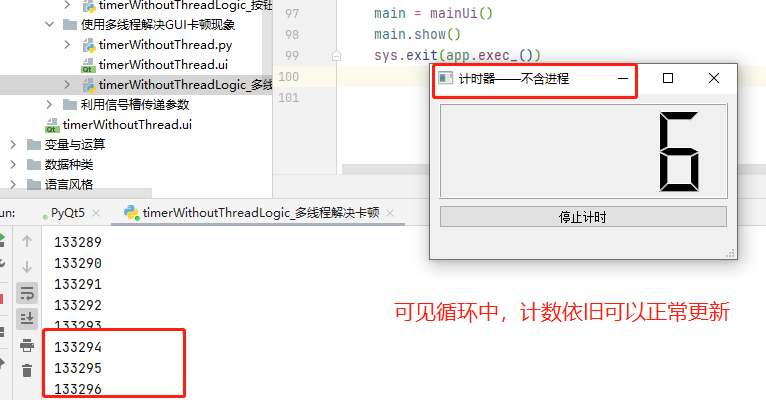
#!/usr/bin/env python
# -*- coding: utf-8 -*-
# @Time    : 2021/10/31 19:31
# @Author  : @linlianqin
# @Site    :
# @File    : timerWithoutThreadLogic.py
# @Software: PyCharm
# @description:

from PyQt5 import QtWidgets
from pyqt_learn.signal_slot.Counters are implemented without threads and signal slots.timerWithoutThread import Ui_MainWindow
from PyQt5.QtCore import QTimer,QThread
from PyQt5.Qt import pyqtSignal


'''
The relationship between the signal and the slot here is not user-defined, but simply through pyqt There are mainly two corresponding relationships between signals and slots:
1,Signal: end of counter count per second    Slot function: update the information on the counter board
2,Signal: click the button on the counting board    Slot function: Send a signal to inform the counter to start counting
3,Signal: click the button on the counting board    Slot function: the counter stops counting and the count returns to zero
4,Signals: Custom signals           Slot function: counter starts counting
 Note: clicking the button here actually starts a cycle, in which the counter per second is continuously called, and then the counter board information is updated

Steps:
1,Counter class instantiation per second, i.e QTimer
2,Write the execution event at the end of the counter per second, that is, update the number on the counter board
3,Write button events and start counting

Result: a large cycle is added in the slot function corresponding to the button before the large cycle runs GUI There will be a jam because the button belongs to GUI Control. The slot function corresponding to the control is in GUI In the main thread, so
 Make the main thread temporarily suspended, that is, it will cause GUI Caton, when the cycle is over, GUI Return to normal

Method: select the loop part, and then open another thread to run. When you click the button, start the thread and run the loop in the background without affecting the GUI The running of the main thread can be realized GUI No, Caton
'''

global sec

# Open a new thread to operate the loop
class newThread(QThread):
	def __init__(self):
		super(newThread, self).__init__()

	# Large cycle
	def run(self):
		for i in range(1000000):
			print(i)
			pass

class mainUi(QtWidgets.QMainWindow,Ui_MainWindow):

	def __init__(self):
		super(mainUi, self).__init__()
		self.setupUi(self)
		self.timer = QTimer() # Instantiate counter per second
		self.loopThread = newThread()
		global sec
		sec = 0
		self.run()

	# Update the number of counters
	def setTime(self):
		global sec
		sec += 1
		self.lcdNumber.display(sec)

	# Start counting
	def startCount(self):
		# Set the counting interval and start it. Send a timeout signal every 1000 milliseconds (1 second) to cycle. If you need to stop, you can call timer.stop() to stop
		self.timer.start(1000)
		# When you click the button to start timing, the button text is changed to stop timing, and the bound slot function is changed
		self.pushButton.setText("Stop timing")
		self.pushButton.clicked.connect(self.stopTime)
		# Start a new thread to execute a large loop
		self.loopThread.start()

	# Stop timing and set the timing to 0
	def stopTime(self):
		global sec
		sec = 0
		self.timer.stop()
		self.lcdNumber.display(sec)
		# When you click the button to stop timing, the button text is changed to start timing, and the button binding slot function is changed
		self.pushButton.setText("Start timing")
		self.pushButton.clicked.connect(self.startCount)

	# Binding signal and slot
	def run(self):
		# Update the count plate number after the counter count per second is completed
		self.timer.timeout.connect(self.setTime)
		# Click the button to emit a custom signal
		# self.pushButton.clicked.connect(self.startCount)
		# self.pushButton.clicked.connect(lambda:self.signal.emit()) # Here, the statement is functionalized by lambda
		self.pushButton.clicked.connect(self.startCount)

if __name__ == '__main__':
	import sys
	app = QtWidgets.QApplication(sys.argv)
	main = mainUi()
	main.show()
	sys.exit(app.exec_())
4. Actual combat 3: Timer - parameter transmission using user-defined signal slot
A label control is added to the GUI to update and display the number of cycles of a large cycle in real time
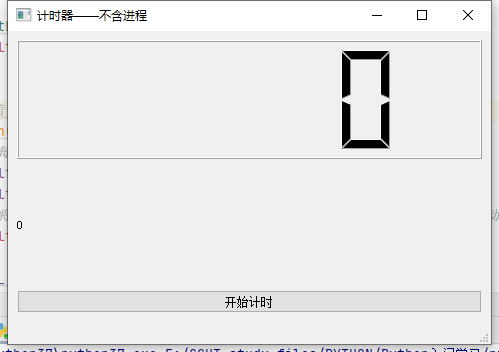
1) Custom signal (signal with parameter) in line class
The type of parameter is determined according to the type of parameter to be passed
	# Customize a signal with integer parameters for use when clicking a button
	intSignal = pyqtSignal(int)
2) Transmitting signals in line classes
This line of code generally appears at the position where the parameter content to be transmitted is obtained. Each time a new parameter content is obtained, the signal is transmitted. Therefore, the signal is transmitted once every cycle. The signal has parameters, and the parameters are accepted by the slot function bound by the signal
self.intSignal.emit(val)
3) Bind the signal and slot function in the GUI class to receive the parameters of signal transmission
Note: here, the number and type of parameters received by the slot function are consistent with the number and type of parameters transmitted by the signal.
		# Connect the custom signal to the slot function for modifying tag events, where the signal transmission will return parameters, and then the slot function will automatically receive the returned parameters
		self.loopThread.intSignal.connect(self.setLabel)
	def setLabel(self,val):
		self.label.setText(str(val))
4) Complete code
#!/usr/bin/env python
# -*- coding: utf-8 -*-
# @Time    : 2021/10/31 19:31
# @Author  : @linlianqin
# @Site    :
# @File    : timerWithoutThreadLogic.py
# @Software: PyCharm
# @description:

from PyQt5 import QtWidgets
from pyqt_learn.signal_slot.Transmitting parameters by signal slot.timerWithoutThread import Ui_MainWindow
from PyQt5.QtCore import QTimer,QThread
from PyQt5.Qt import pyqtSignal

'''
The relationship between the signal and the slot here is not user-defined, but simply through pyqt There are mainly two corresponding relationships between signals and slots:
1,Signal: counter end signal slot function: update the number on the counter board
2,Signals: click the button       Slot function: start counting and trigger a new thread to start running
3,Signal: new thread running
 Note: clicking the button here actually starts a cycle, in which the counter per second is continuously called, and then the counter board information is updated

Expectation: click the button to start counting, and GUI Change the label to the value of the loop

Steps:
1,Create inheritance QThread Class of
2,Rewrite class def __init__()
3,In the class name and__init__Custom signal between
4,In class run Transmitting signal in method emit()

5,stay GUI Class__init__Instantiate thread in
6,stay GUI Bind custom signals in threads to slot functions

be careful:
1,The parameters when transmitting signals need to match the parameter types when customizing signals;
2,stay GUI The number and type of parameters of the slot function bound by the user-defined signal in the class should match the number and type of parameters defined by the user-defined signal
'''

global sec

# Open a new thread to operate the loop
class newThread(QThread):
	# Customize a signal with integer parameters for use when clicking a button
	intSignal = pyqtSignal(int)

	def __init__(self):
		super(newThread, self).__init__()

	# Large loop, which is automatically started when the run function calls the thread start function
	def run(self):
		i = 0
		while True:
			print(i)
			i += 1
			self.emit_(i)

	# Transmit signal
	def emit_(self,val):
		self.intSignal.emit(val)

class mainUi(QtWidgets.QMainWindow,Ui_MainWindow):

	def __init__(self):
		super(mainUi, self).__init__()
		self.setupUi(self)
		self.timer = QTimer() # Instantiate counter per second
		self.loopThread = newThread() # Instantiate thread
		global sec
		sec = 0
		self.run()

	# Update the number of counters
	def setTime(self):
		global sec
		sec += 1
		self.lcdNumber.display(sec)

	# Start counting
	def startCount(self):
		# Set the counting interval and start it. Send a timeout signal every 1000 milliseconds (1 second) to cycle. If you need to stop, you can call timer.stop() to stop
		self.timer.start(1000)
		# When you click the button to start timing, the button text is changed to stop timing, and the bound slot function is changed
		self.pushButton.setText("Stop timing")
		self.pushButton.clicked.connect(self.stopTime)
		# Start a new thread to execute a large loop
		self.loopThread.start()


	# Stop timing and set the timing to 0
	def stopTime(self):
		global sec
		sec = 0
		self.timer.stop()
		self.lcdNumber.display(sec)
		# When you click the button to stop timing, the button text is changed to start timing, and the button binding slot function is changed
		self.pushButton.setText("Start timing")
		self.pushButton.clicked.connect(self.startCount)

	def setLabel(self,val):
		self.label.setText(str(val))


	# Binding signal and slot
	def run(self):
		# Update the count plate number after the counter count per second is completed
		self.timer.timeout.connect(self.setTime)
		self.pushButton.clicked.connect(self.startCount)
		# Connect the custom signal to the slot function for modifying tag events, where the signal transmission will return parameters, and then the slot function will automatically receive the returned parameters
		self.loopThread.intSignal.connect(self.setLabel)

if __name__ == '__main__':
	import sys
	app = QtWidgets.QApplication(sys.argv)
	main = mainUi()
	main.show()
	sys.exit(app.exec_())
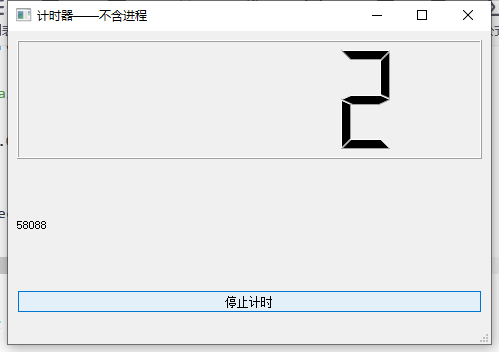
Results: the counting plate counted in real time; Number of label real-time scrolling cycles
5. Summary
- It involves time-consuming computing and separate thread computing to avoid GUI jamming
- If parameter transmission is required, note that the user-defined signal parameter type is consistent with the transmitted signal parameter type
- The parameter types of transmitted signal and slot function should be consistent