This article mainly introduces the development of pygame. Through this article, you can use pygame to develop a Marseille logic game ~ friends in need can use it for reference. I hope it can be helpful
1, Game introduction
Marseille logic is a logic game similar to Sudoku and minesweeping. It lights up the square according to the data prompts around the chessboard. It is named because it looks like mosaic. There are several apps in mobile games that can experience the game, such as Peak, Nonogram, Crossme, etc. However, on the PC side, the author has not found the reprint for the time being, so he plans to implement it himself.
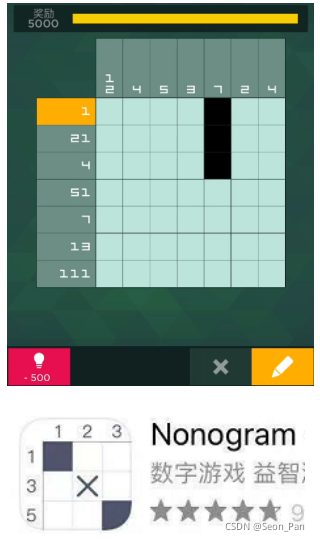
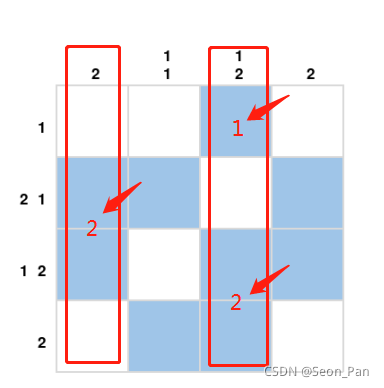
The basic playing method of Marseille logic is shown in the figure below. The horizontal groups of numbers on the upper side are: the annotation of the target grid in each column. For example, 2 means that the column has 2 consecutive targets, and 1 2 means that the column has 1 independent target + 2 consecutive targets. Each group of data in the left vertical direction is the annotation of each row. Through the prompts on the upper and left sides, lighting all target squares is customs clearance. Finally, if your time is not very tight and you want to improve python quickly, the most important thing is not afraid of hardship. It is recommended that you can price @ 762459510. That's really good. Many people make rapid progress and need you to be not afraid of hardship! You can add it and have a look~
2, Core code parsing
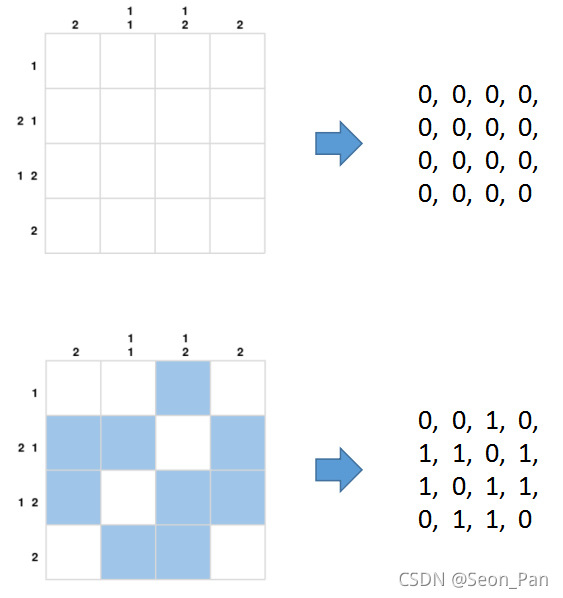
Before officially starting game development, we can think about the key points to realize this project. First, the grid has two states: selected and unselected. You can use 1 to indicate selected and 0 to indicate unselected. To judge whether the square lit by the player is correct, just map the square matrix into 01 matrix and compare it with the answer matrix. In this way, it is also easy to solve the problem, and a series of 01 combinations can be randomly generated.
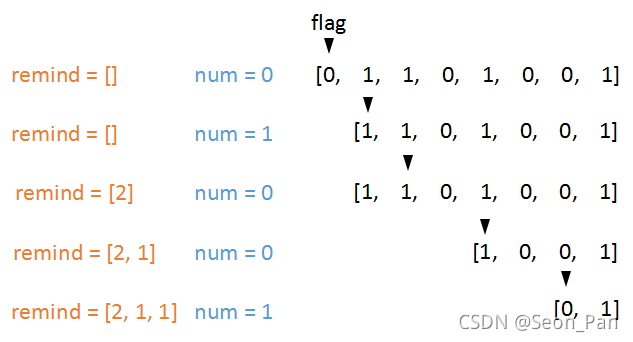
The most important thing is how to generate prompt values? We need to traverse each row and column separately to find the individual 1 and the continuous 1. The following is an example of the behavior of a chessboard.
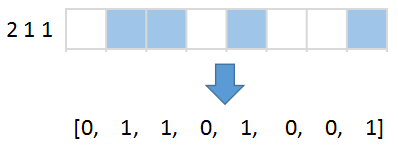
First, prepare a list type variable remind to store multiple prompt values, and prepare a displacement flag to record which bit of the answer array is currently used for judgment, as well as a value record num, and then pass the answer array [0, 1, 1, 0, 0, 1] into the counter. Finally, if your time is not very tight and you want to improve python quickly, the most important thing is not afraid of hardship. It is recommended that you can price @ 762459510. That's really good. Many people make rapid progress and need you to be not afraid of hardship! You can add it and have a look~
When the length of the incoming array is greater than 1, there are four situations: ① current bit 0, secondary bit 1; ② Current bit 1, secondary bit 0; ③ Continuous multiple bits 1; ④ Consecutive multiple bits 0. Shift according to different conditions, transfer the new array into the counter, and record the value when 1 changes to 0.
When the incoming array is equal to 1, there are two cases: ① upper 0; ② Upper 1. Record the values according to different situations. Finally, if your time is not very tight and you want to improve python quickly, the most important thing is not afraid of hardship. It is recommended that you can price @ 762459510. That's really good. Many people make rapid progress and need you to be not afraid of hardship! You can add it and have a look~
According to this idea, we can implement the prompt algorithm with a simple recursive algorithm. The code is as follows:
|
`def` `get_line_remind(_line):` `# Output a prompt for a row or column`

`remind` `=` `[]` `# Prompt records in one row or column`

`num` `=` `0`  `# Prompt value`

`def` `fun(line):`

`nonlocal remind, num`

`flag` `=` `0`  `# Displacement`

`if` `len``(line) >` `1``:`

`if` `line[``0``]` `=``=` `0` `and` `line[``1``]` `=``=` `1``:`

`flag` `+``=` `1`

`elif` `line[``0``]` `=``=` `line[``1``]` `=``=` `0``:`

`flag` `+``=` `2`

`elif` `line[``0``]` `=``=` `1` `and` `line[``1``]` `=``=` `0``:`

`num` `+``=` `1`

`remind.append(num)`

`num` `=` `0`

`flag` `+``=` `2`

`elif` `line[``0``]` `=``=` `line[``1``]` `=``=` `1``:`

`num` `+``=` `1`

`flag` `+``=` `1`

`fun(line[flag:])`

`elif` `len``(line)` `and` `line[``0``]:`

`if` `num:`

`remind.append(num` `+` `1``)`

`else``:`

`remind.append(``1``)`

`fun(_line)`

`return` `remind`

 |
3, pygame development process
1. From creation window to checkerboard drawing
The design and playing method of chessboard have begun to take shape. You can officially start making games~ The author uses the game making library pygame, which has a history of more than 20 years. The game library contains the basic suite for making simple 2D games. python and game lovers have made thousands of small games with it, which can be installed with pip.
The first step is to set the color, position, size and other necessary parameters of various game elements. Then, initialize pygame, draw a window of the specified size, and use pygame.font.Font() to load the specified font file to prevent errors in the operation of the game after packaging.
It should be noted that all visual elements of pygame are based on continuous redrawing, and pygame.display.flip() is used for overall update. Because dynamic elements need to be added to the white background in the later stage, the background drawing is put in the first place of the main loop.
In the main loop, the player's operation is obtained by traversing events. Currently, only one exit event is tracked. Finally, if your time is not very tight and you want to improve python quickly, the most important thing is not afraid of hardship. It is recommended that you can price @ 762459510. That's really good. Many people make rapid progress and need you to be not afraid of hardship! You can add it and have a look~
|


`import` `pygame`

`import` `sys`

`# Parameter setting----------------------------------`

`blue` `=` `(``159``,` `197``,` `232``)` `# The color of the selected grid`

`gray` `=` `(``217``,` `217``,` `217``)` `# Checkerboard grid line color`

`gold` `=` `(``255``,` `215``,` `0``)` `# Game record text color`

`black` `=` `(``0``,` `0``,` `0``)`

`white` `=` `(``255``,` `255``,` `255``)`

`start_x` `=` `240`  `# Upper left corner of chessboard`

`start_y` `=` `150`

`size` `=` `2`  `# Number of squares in a row / column`

`square` `=` `320`  `# Chessboard side length`

`length` `=` `int``(square` `/` `size)` `# Side length of each square`

`# Game initialization----------------------------------`

`pygame.init()`

`screen` `=` `pygame.display.set_mode((``780``,` `520``))` `# Create window`

`font` `=` `pygame.font.Font(r``'./data/msyh.ttf'``,` `20``)` `# Prompt font`

`# Main cycle----------------------------------`

`while` `True``:`

`screen.fill(white)` `# Background fill`

`for` `event` `in` `pygame.event.get():`

`if` `event.``type` `=``=` `pygame.QUIT:`

`pygame.quit()` `# Exit pygame`

`sys.exit()` `# Safe exit system`

`pygame.display.flip()` `# Update show all`
|
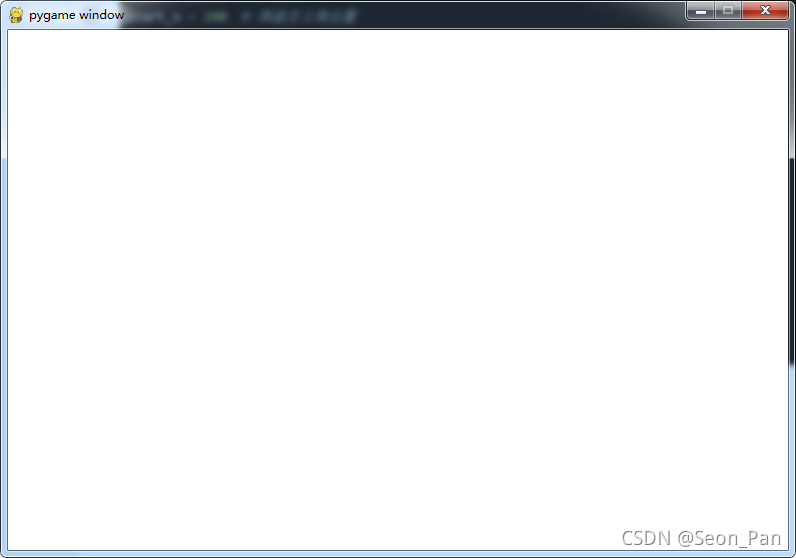
Run the above code to get a blank (FOG).
Next, let's think about how to draw a chessboard. First, the size of the chessboard itself is fixed. We only need to modify the number and size of squares in the chessboard to change the chess game. Therefore, in the parameter setting of the first step, start is used_ x,start_y to determine the position of the chessboard, and set the side length of the chessboard square = 320, as well as the number of squares in a row size and square side length. Finally, if your time is not very tight and you want to improve python quickly, the most important thing is not afraid of hardship. It is recommended that you can price @ 762459510. That's really good. Many people make rapid progress and need you to be not afraid of hardship! You can add it and have a look~
Because the box can be clicked to change the color, we need to customize a box class first. The mechanism is relatively simple. Initialization is to pass in coordinates and side length, and call pygame.draw.rect() to draw a rectangle.
`class` `Item:` `# Custom block class`

`def` `__init__(``self``, pos_x, pos_y, leng):`

`self``.rect` `=` `pygame.draw.rect(screen, gray, [pos_x, pos_y, leng, leng],` `0``)`

`self``.state` `=` `False`
|
Then define a method to draw a chessboard. Start from the upper left corner of the chessboard, draw size squares horizontally and vertically, and return to the list of box objects.
|
`def` `create_chessboard():` `# Create chessboard`

`item_lst` `=` `[]`

`for` `v` `in` `range``(size):`

`for` `h` `in` `range``(size):`

`rect` `=` `Item(start_x` `+` `h``*``length, start_y` `+` `v``*``length, length)`

`item_lst.append(rect)`

`return` `item_lst`
|
Since the initial color of the square is white as the background color, you also need to add grid lines, draw size+1 lines horizontally and vertically, and call pygame.draw.line() to draw lines. Finally, if your time is not very tight and you want to improve python quickly, the most important thing is not afraid of hardship. It is recommended that you can price @ 762459510. That's really good. Many people make rapid progress and need you to be not afraid of hardship! You can add it and have a look~
|
`def` `draw_line():` `# Draw gridlines`

`for` `n` `in` `range``(size``+``1``):`

`start` `=` `(start_x, start_y` `+` `n` `*` `length)`

`end` `=` `(start_x` `+` `square, start_y` `+` `n` `*` `length)`

`pygame.draw.line(screen, gray, start, end,` `2``)`

`for` `n` `in` `range``(size``+``1``):`

`start` `=` `(start_x` `+` `n` `*` `length, start_y)`

`end` `=` `(start_x` `+` `n` `*` `length, start_y` `+` `square)`

`pygame.draw.line(screen, gray, start, end,` `2``)`
|
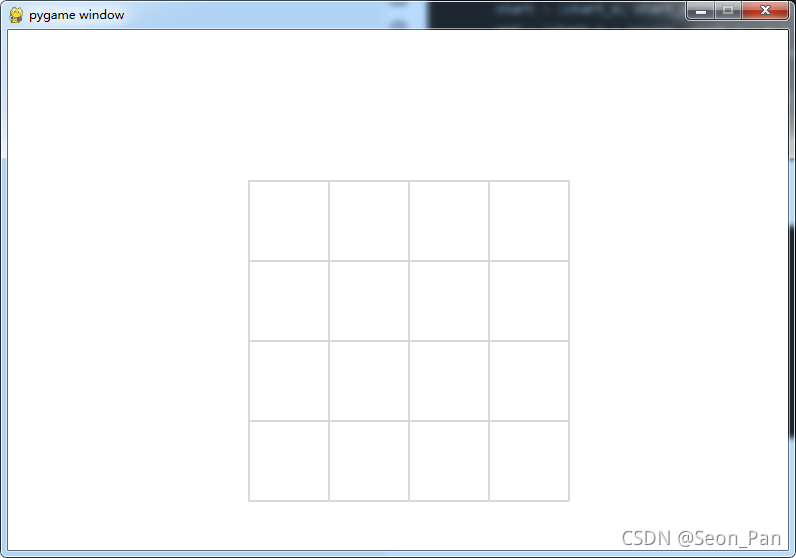
Modify the main loop code as follows. Note: the grid line is drawn on the top layer of the whole layer group so that it will not be covered by the grid and background. The initial chessboard can be drawn by running, as shown in the figure is the specification of 4X4.
|
`## The previous parameters and initialization are omitted`

`......`

`items` `=` `create_chessboard()` `# Create chessboard`

`while` `True``:`

`screen.fill(white)` `# Background fill`

`for` `event` `in` `pygame.event.get():`

`if` `event.``type` `=``=` `pygame.QUIT:`

`pygame.quit()` `# Exit pygame`

`sys.exit()` `# Safe exit system`

`draw_line()` `# Draw checkerboard gridlines`

`pygame.display.flip()` `# Update show all`

 |
2. Click the square to change the color
2.1 click event
In the event traversal, add the tracking of the mouse click event and obtain the click coordinates. Then, by judging whether the click position is in a grid, you can know which grid has been clicked and modify the color. Finally, if your time is not very tight and you want to improve python quickly, the most important thing is not afraid of hardship. It is recommended that you can price @ 762459510. That's really good. Many people make rapid progress and need you to be not afraid of hardship! You can add it and have a look~
|
`if` `event.``type` `=``=` `pygame.MOUSEBUTTONDOWN:` `# Mouse click event`

`x, y` `=` `event.pos`
|
2.2 collision detection
Then write a judgment method, pass in the list of box objects and mouse coordinates obtained when creating the chessboard, traverse the box, and conduct collision detection through the rectangular colladeboint() method. If the mouse collides with the rectangular area, the state of the box will be reversed.
|
`def` `check_click(item_lst, pos_x, pos_y):` `# Update the click status of each box`

`for` `i` `in` `item_lst:`

`if` `i.rect.collidepoint(pos_x, pos_y):`

`i.state` `=` `bool``(``1` `-` `i.state)`

 |

#### 2.3 grid discoloration

|


`def` `change_color(item_lst):` `# Change the color of the square according to the status`

`for` `i` `in` `item_lst:`

`if` `i.state:`

`pygame.draw.rect(screen, blue, i.rect,` `0``)`

`else``:`

`pygame.draw.rect(screen, white, i.rect,` `0``)`

 |
2.4 array conversion
Then write a method to obtain the player's operation array, and use the list generation formula to convert the box state to the 01 list.
|
`def` `create_answer_array():` `# Create answer matrix`

`lst` `=` `[``1` `if` `random() >` `0.5` `else` `0` `for` `_` `in` `range``(size``*``size)]`

`if` `list``(``set``(lst))[``0``]` `=``=` `0``:`

`lst[``0``]` `=` `1`

`return` `lst`
|
The answer is created by random generation, and then the game can be judged by comparing the two lists. Don't forget, the answer array can't be all 0. Finally, if your time is not very tight and you want to improve python quickly, the most important thing is not afraid of hardship. It is recommended that you can price @ 762459510. That's really good. Many people make rapid progress and need you to be not afraid of hardship! You can add it and have a look~
|
`def` `create_answer_array():` `# Create answer matrix`

`lst` `=` `[``1` `if` `random() >` `0.5` `else` `0` `for` `_` `in` `range``(size``*``size)]`

`if` `list``(``set``(lst))[``0``]` `=``=` `0``:`

`lst[``0``]` `=` `1`

`return` `lst`

 |
2.5 initial effect
Modify the main loop code as follows, and try to click the visible effect after running.
|
|
`## The previous parameters and initialization are omitted`

`......`

`answer` `=` `create_answer_array()` `# Create answer matrix`

`# Main cycle----------------------------------`

`while` `True``:`

`screen.fill(white)` `# Background fill`

`for` `event` `in` `pygame.event.get():`

`if` `event.``type` `=``=` `pygame.QUIT:`

`pygame.quit()` `# Exit pygame`

`sys.exit()` `# Safe exit system`

`if` `event.``type` `=``=` `pygame.MOUSEBUTTONDOWN:` `# Mouse click event`

`x, y` `=` `event.pos`

`check_click(items, x, y)` `# Check the selected grid and modify the status`

`result` `=` `get_player_array(items)` `# Get grid operation matrix`

`print``(result)`

`if` `result` `=``=` `answer:`

`print``(``"YOU WIN!"``)`

`change_color(items)` `# Modify the color according to the grid status`

`draw_line()` `# Draw checkerboard gridlines`

`pygame.display.flip()` `# Update show all`
|
3. Display prompt information
How can I play without a hint! Get the prompt out quickly( ε (#) ☆ system ╮ o (dish / / /)
Previously, we have learned about the prompt algorithm. Next, we will sort out the prompt information on both sides according to the answer matrix.
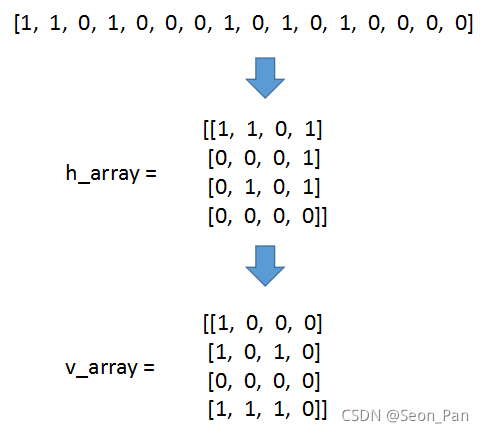
|


`def` `get_w_remind(answer_lst):` `# Output the prompt list according to the answer matrix`

`h_remind` `=` `[]`

`v_remind` `=` `[]`

`h_array` `=` `[answer_lst[i: i``+``size]` `for` `i` `in` `range``(``0``,` `len``(answer_lst), size)]` `# Transverse matrix`

`for` `h` `in` `h_array:`

`h_remind.append(get_line_remind(h))`

`v_array` `=` `list``(``map``(``list``,` `zip``(``*``h_array)))` `# Longitudinal matrix`

`for` `v` `in` `v_array:`

`v_remind.append(get_line_remind(v))`

`return` `h_remind, v_remind`
|
Because the author directly uses a one-dimensional list to replace the matrix, if you want to get the prompt of each row, you need to divide the answer array into multiple copies according to the size. When you want to get the prompt of each column, you need to transpose the rows and columns of the divided horizontal matrix. Finally, if you are not very tight in time and want to improve python quickly, the most important thing is I'm not afraid of hardship. I suggest you pay @ 762459510. That's really good. Many people are making rapid progress. You need to be not afraid of hardship! You can add it and have a look~
Then, the display coordinates of the information on both sides are obtained through the mathematical calculation of 100 million points, and the rendered text object is pasted by the blit() method of the window object. The purpose of reversing the horizontal / vertical array is to display multiple prompt values from outside to inside to meet the reading habit.
 |

`def` `show_remind(answer_lst):` `# Display the prompt of each row / column at the corresponding position on both sides of the chessboard`

`h_remind, v_remind` `=` `get_w_remind(answer_lst)`

`for` `i, h` `in` `enumerate``(h_remind):`

`for` `j, num` `in` `enumerate``(h[::``-``1``]):`

`text` `=` `font.render(f``"{num}"``,` `True``, black)`

`screen.blit(text, (start_x` `-` `20` `*` `(j` `+` `1``), start_y` `+` `i` `*` `length` `+` `length` `/` `2` `-` `10``))`

`for` `i, v` `in` `enumerate``(v_remind):`

`for` `j, num` `in` `enumerate``(v[::``-``1``]):`

`text` `=` `font.render(f``"{num}"``,` `True``, black)`

`screen.blit(text, (start_x` `+` `i` `*` `length` `+` `length` `/` `2` `-` `5``, start_y` `-` `30` `*` `(j` `+` `1``)))`

 |
Finally, you can play. Let's have a look.
So far, the core playing method of Marseille logic has been realized. After that, improve the game mechanism and experience effects, such as modifying the difficulty and adding sound effects, you can create a relatively complete small game! (for laziness) limited to space, I won't repeat it here. You can obtain the annotated final source code reference at the end of the article.