In large Linux applications, such as Web Clustering, Distributed Computing, and so on, servers often do not have CD-ROM drives. In this case, how can you quickly install the system for hundreds of server bare machines?The traditional installation methods such as USB CD-ROM, mobile hard disk, etc. are obviously out of order, so it needs to be - PXE network installation and unattended installation.
PXE network installation and unattended installation can achieve the following functions:
1. Scaling: assembling multiple servers at the same time;
2. Automation: Install systems and configure services;
3. Remote implementation: no installation media such as CD-ROM, U-disk, etc.
Figure: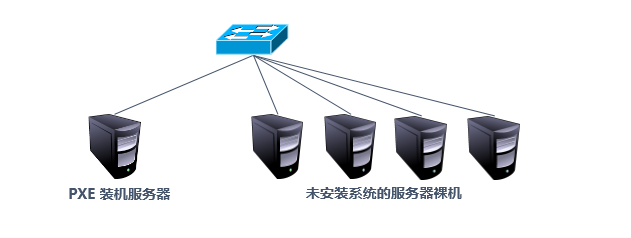
Refer to the blog post about Windows PXE network installation: Windows server 2016 Deploy WDS Service
To build a PXE network system, the following conditions must be met:
1. Client's network card supports PXE protocol (integrated BOOTROM chip), and the motherboard supports network boot;
2. There must be a DHCP server in the network to assign IP addresses to clients and to specify the location of boot files.
3. The server provides bootstrapping mirror file downloads via TFTP (Simple File Transfer Protocol).
The first condition is hardware requirements, which are currently supported by most servers and PC s, simply by allowing boot from Network or LAN in the BIOS settings.
Once the conditions are met, we do this!
Basic deployment process for PXE remote installation service:
This trial PXE remote installation server integrates CentOS 7 installation source, FTP service, TFTP service, DHCP service, and can send PXE bootstrapper, Linux kernel, boot menu and other data like client (bare machine), as well as provide installation files.
The deployment of the PXE remote installation service can be roughly divided into these steps:
1. Install FTP service and prepare CentOS 7 installation source;
2. Install the TFTP service and start it;
3. Prepare the Linux kernel and initialize the mirror file;
4. Prepare PXE bootstrapper and Startup menu files;
5. Install and start the DHCP service;
6. Verify the PXE network installation.
Next, we start to complete the experiment step by step and achieve the desired results!
1. Install FTP service and prepare CentOS 7 installation source
Install a series of services by setting up a local YUM.If you have friends who do not understand the building of YUM, you can refer to the blog: YUM repository configuration and command details
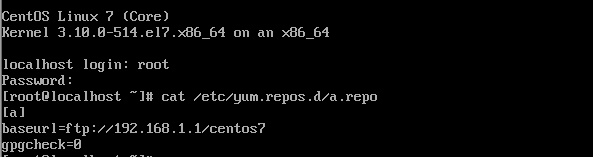
[root@localhost ~]# mount /dev/cdrom /mnt
[root@localhost ~]# cd /etc/yum.repos.d/
[root@localhost yum.repos.d]# rm -rf *
[root@localhost yum.repos.d]# vim a.repo
[a]
baseurl=file:///mnt
gpgcheck=0
[root@localhost ~]# yum -y install vsftpd
//Install FTP Service
[root@localhost ~]# mkdir /var/ftp/centos7
[root@localhost ~]# cp -rf /mnt/* /var/ftp/centos7/
//Copy everything from the disc to a directory anonymously accessed by the FTP Services Section
[root@localhost ~]# systemctl start vsftpd
//Start FTP Service
2. Install the TFTP service and start it
Port 69 of UDP is used by the TFTP (Simple File Transfer Protocol) service.
[root@localhost ~]# yum -y install tftp-server
//Install TFTP Service
[root@localhost ~]# vim /etc/xinetd.d/tftp
//Modify the configuration file for the TFTP service as follows:
service tftp
{
        socket_type             = dgram
        protocol                = udp                          //TFTP service uses udp transport protocol
        wait                    = yes
        user                    = root
        server                  = /usr/sbin/in.tftpd
        server_args             = -s /var/lib/tftpboot             //Specify the root directory of the TFTP service
        disable                 = no                           //This must be changed to "no"
        per_source              = 11
        cps                     = 100 2
        flags                   = IPv4
}
[root@localhost ~]# systemctl start tftp
//Start TFTP Service
3. Prepare the Linux kernel, initialize the mirror file
The Linux kernel and initialization files installed with the PXE network can be obtained from the CentOS 7 system disc under images/pxeboot/directory, initrd.img and vmlinuz, respectively.Copy these two files to the root directory of the TFTP service.
[root@localhost ~]# cd /mnt/images/pxeboot/
[root@localhost pxeboot]# cp vmlinuz initrd.img /var/lib/tftpboot/
4. Prepare PXE bootstrapper, launch menu file
The bootstrapper for PXE network installation is pxelinux.0, provided by the package syslinux.Therefore, syslinux needs to be installed first.
[root@localhost ~]# yum -y install syslinux
[root@localhost ~]# cp /usr/share/syslinux/pxelinux.0  /var/lib/tftpboot/
Launch menu to guide the client's boot process, including how to call the kernel and how to load the initialization image.The default boot menu file is default, which should be placed in the pxelinux.cfg subdirectory of the TFTP root directory. A typical boot menu boot file needs to be created manually. You can refer to the following:
[root@localhost ~]# mkdir /var/lib/tftpboot/pxelinux.cfg
//Create the pxelinux.cfg directory under the TFTP service root directory
[root@localhost ~]# cd /var/lib/tftpboot/pxelinux.cfg/
[root@localhost pxelinux.cfg]# vim default
//Create default menu file.The contents of the file are as follows:
default auto
prompt 1
label auto
        kernel vmlinuz
        append initrd=initrd.img method=ftp://192.168.1.1/centos7
label linux text
        kernel vmlinuz
        append text initrd=initrd.img method=ftp://192.168.1.1/centos7

label linux rescue
        kernel vmlinuz
        append rescue initrd=initrd.img method=ftp://192.168.1.1/centos7
The meaning of one of these configuration items: Default: used to specify the default entry name; prompt: used to decide whether to wait for user control (1 for need, 0 for no); label: used to define and split startup items, there are three boot modes in the file: Graphic Installation (default), Text Installation, Rescue Mode, respectively; Kernel: Used to specify the required kernel; Append: append configuration items; initrd: Used to specify the system initialization file; Method: used to specify the installation method; The number and content of boot entries are customized to the actual situation.
5. Install and start the DHCP service
Since PXE clients are usually bare machines with no system installed, the DHCP server needs to be preconfigured to automatically assign addresses and inform the boot file location in order to contact the server and download the relevant boot files correctly.
[root@localhost ~]# yum -y install dhcp
[root@localhost ~]# cp /usr/share/doc/dhcp-4.2.5/dhcpd.conf.example /etc/dhcp/dhcpd.conf
//Copy templates for DHCP services
[root@localhost ~]# vim /etc/dhcp/dhcpd.conf
//Modify the configuration file of the DHCP service as follows:
                   ..................           //Omit some content
subnet 192.168.1.0 netmask 255.255.255.0 {
  range 192.168.1.100 192.168.1.200;
  option domain-name-servers 192.168.1.1;
  option domain-name "internal.example.org";
  option routers 192.168.1.1;
  option broadcast-address 192.168.1.255;
  default-lease-time 600;
  max-lease-time 7200;
  next-server 192.168.1.1;                         //Specify the address of the TFTP server
  filename "pxelinux.0";                              //Specify the file name of the PXE bootstrapper
}
                   ..................           //Omit some content
[root@localhost ~]# systemctl start dhcpd
6. Verify PXE network installation
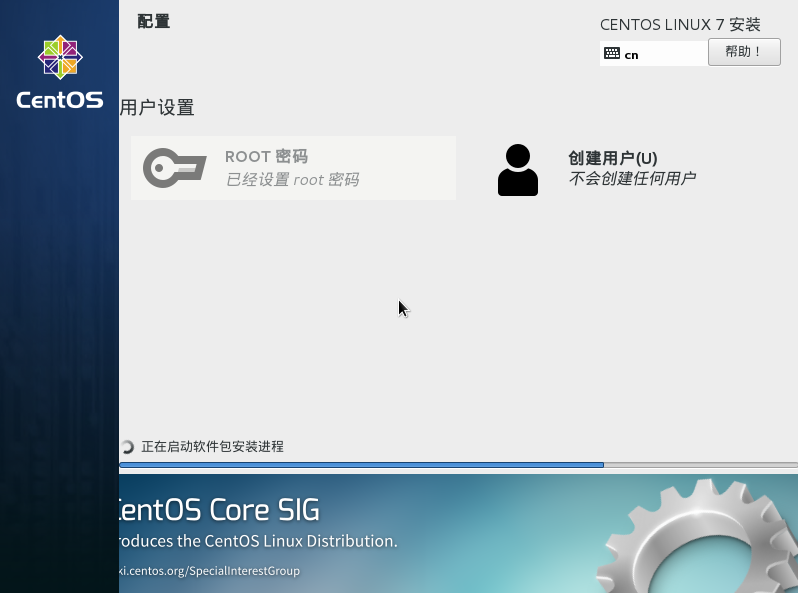
For newly purchased bare machines, settings are generally not required (if the system is reinstalled, BIOS should be adjusted for network boot).If you use a vmware virtual machine for testing, the virtual machine memory needs at least 2GB, otherwise an error will occur at startup.
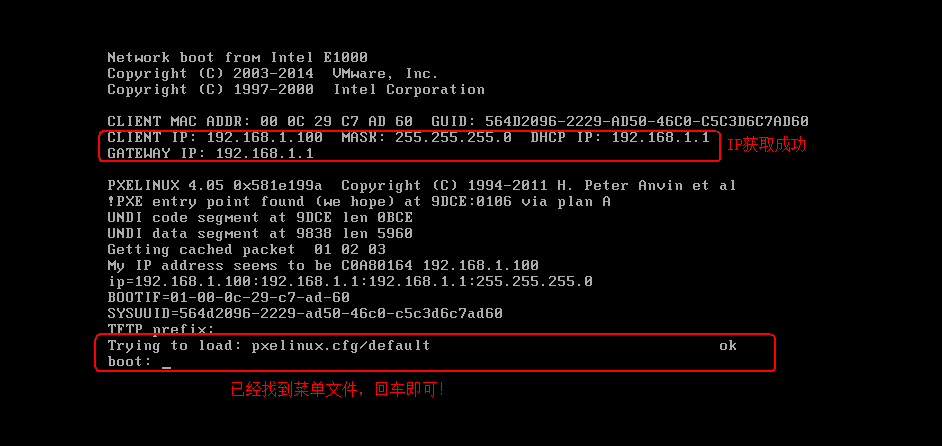
Wait patiently. In a few minutes:
When this happens, the deployment is successful!
Through the PXE remote installation service, although the installation media is no longer limited to discs, mobile hard disks, U-disks and other devices, greatly improving the flexibility of system installation, but during the installation process still requires interactive operation, when the need for bulk installation is very inconvenient.Then you need to use -- "Kickstart unattended installation"
Implement unattended installation of Kickstart
Implement the Kickstart unattended installation deployment process:
1. Configure the answer file and save it;
2. Start the auto-answer file;
3. Verify unattended installation.
Next we start to work step by step and achieve the desired results!
1. Configure the answer file and save it
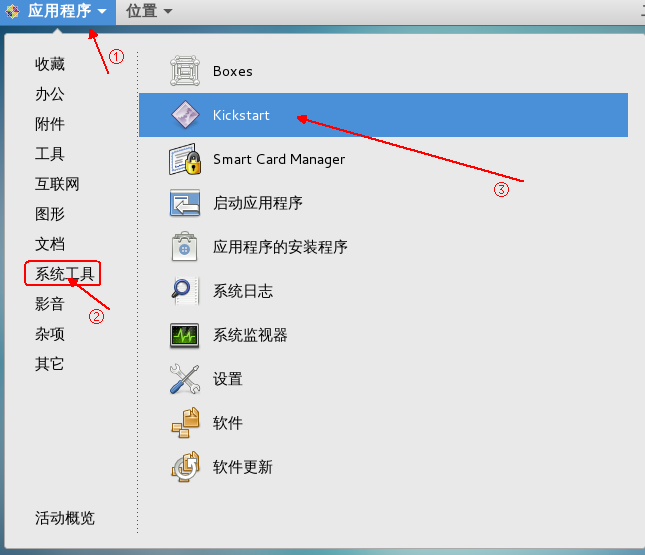
To graphically create an answer file, you need to install the system-config-kickstart tool, or you can directly modify the unattended installation profile/root/anaconda-ks.cfg that is automatically created by the system if you are familiar with the configuration file.This case installs the system-config-kickstart tool, which graphically edits the configuration file.
[root@localhost ~]# yum -y install system-config-kickstart
//Install the system-config-kickstart tool, after installation:
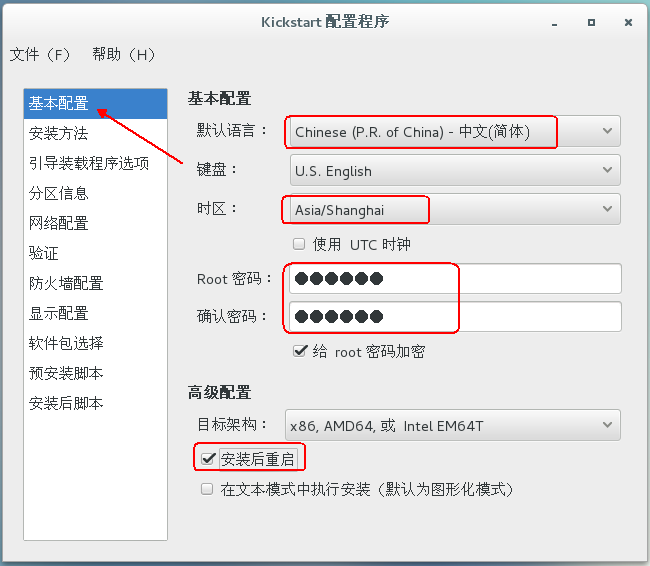
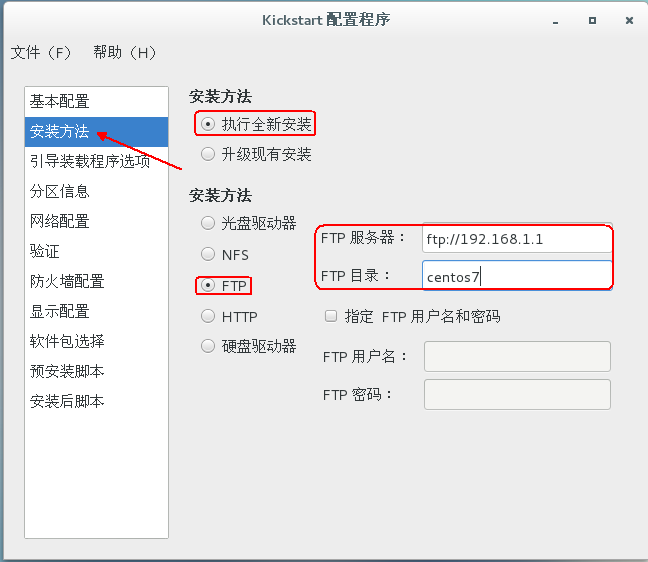

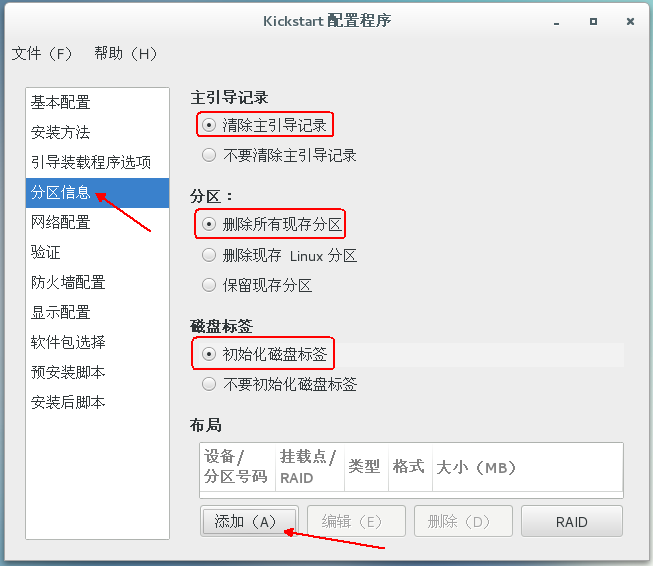
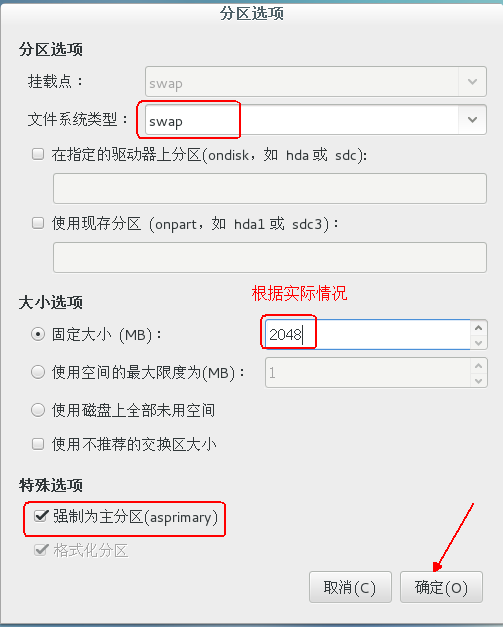
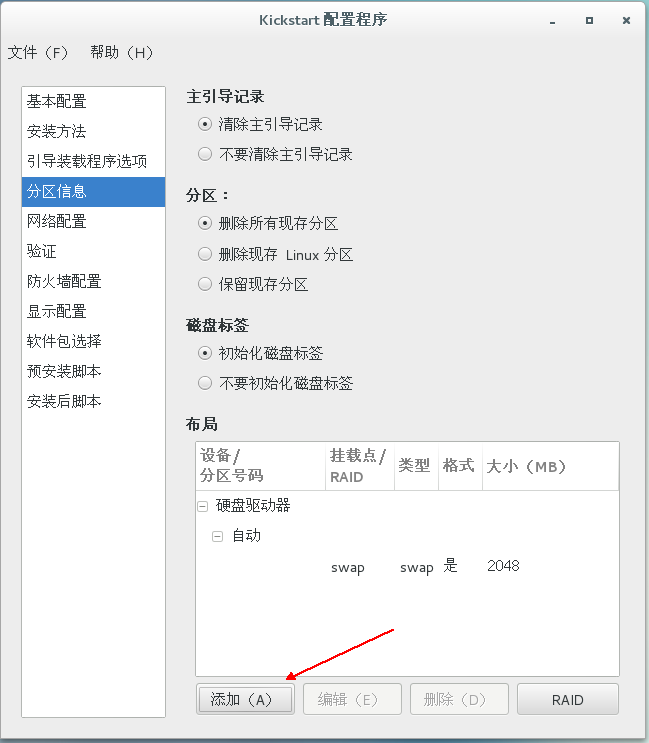
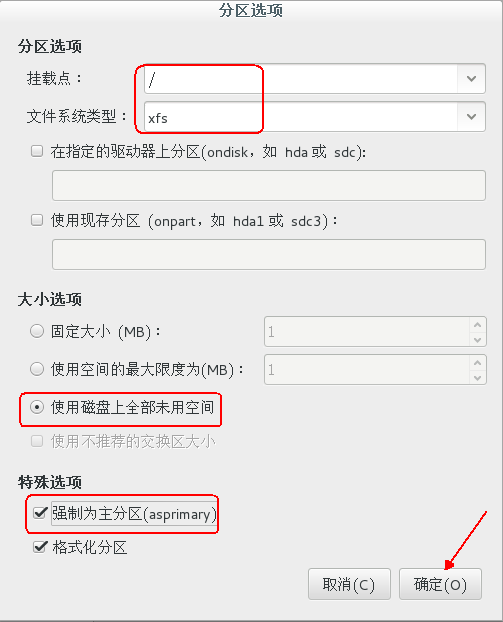

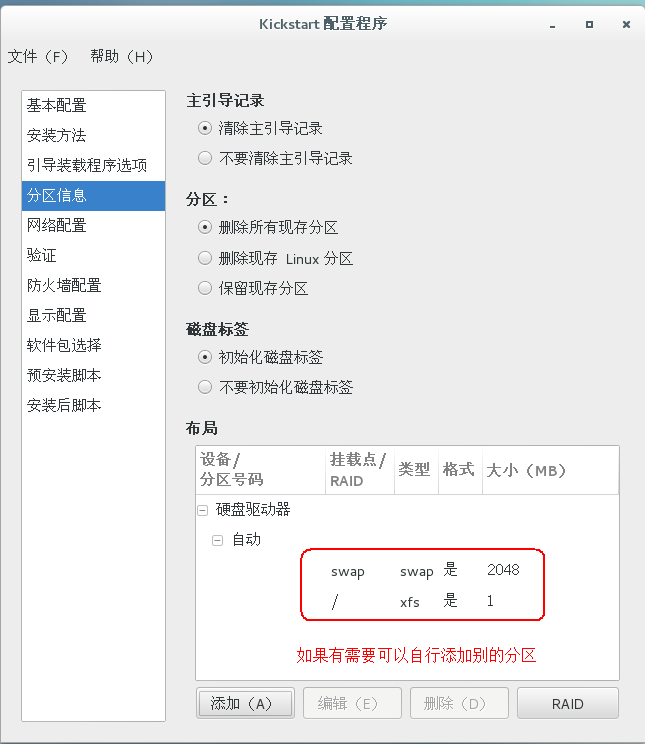
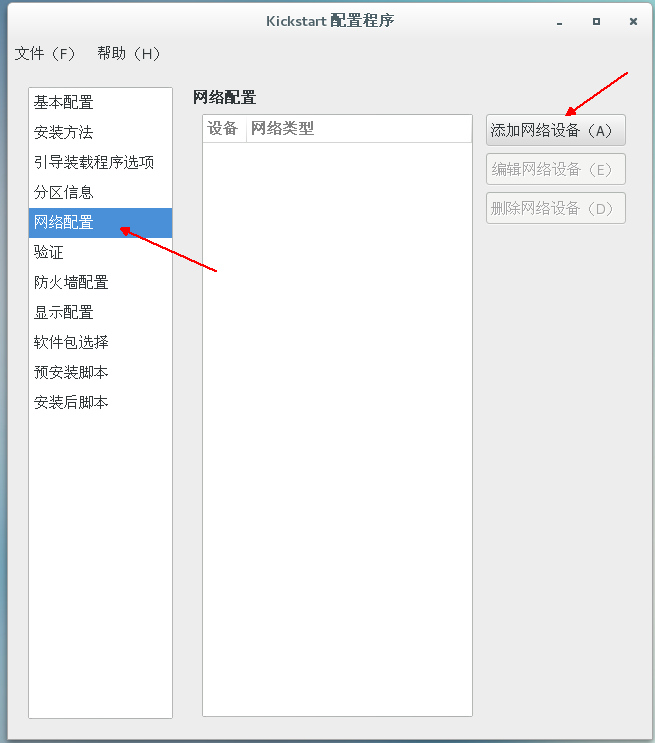
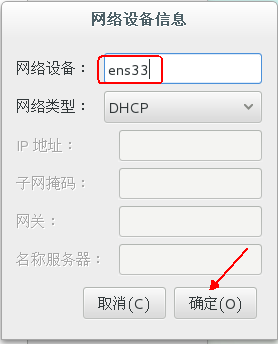
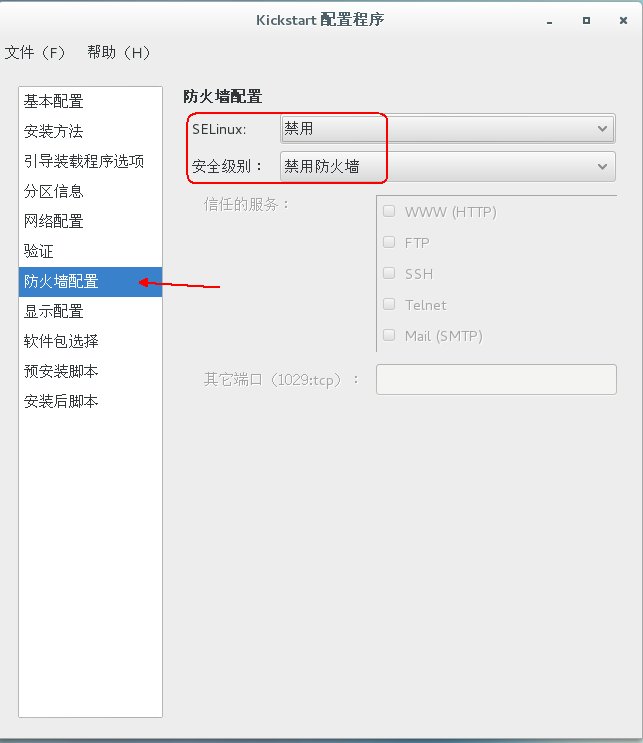
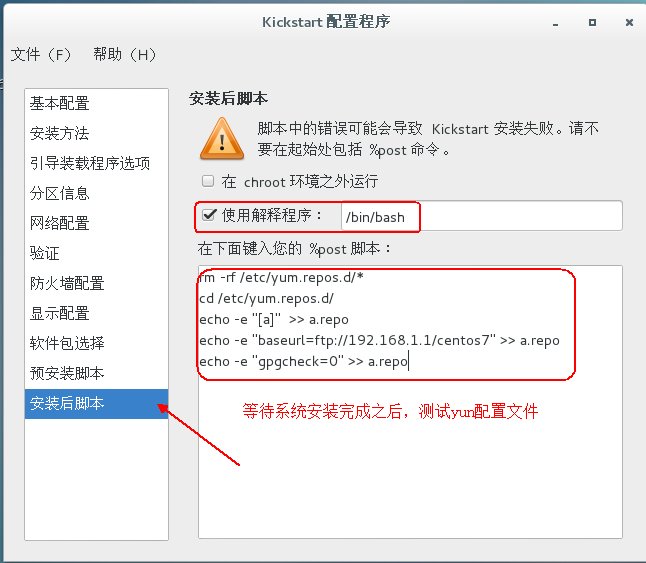

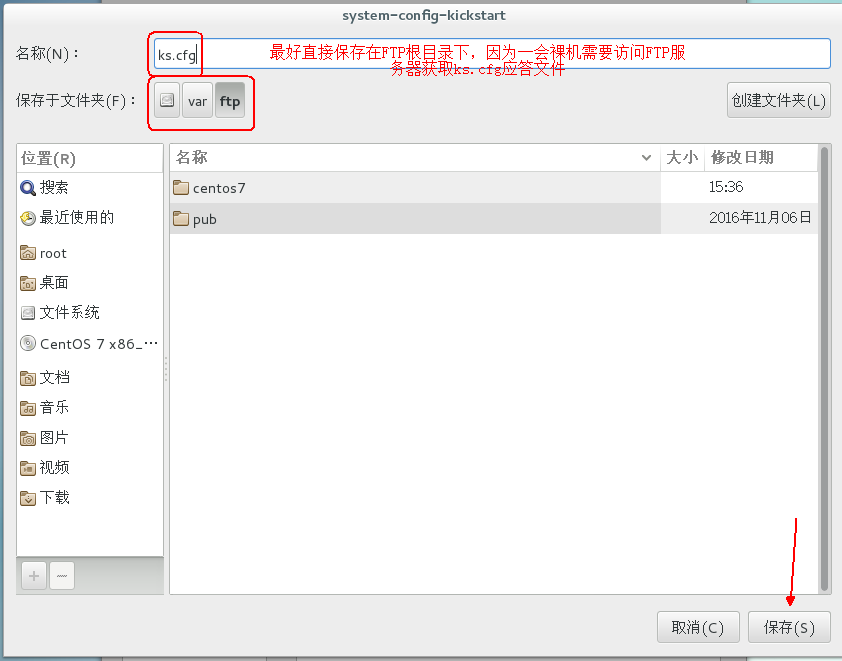
[root@localhost ~]# vim /var/ftp/ks.cfg
//View the answer file you just edited graphically
#platform=x86, AMD64, or Intel EM64T
#version=DEVEL
# Install OS instead of upgrade
install
# Keyboard layouts
keyboard 'us'
# Root password
rootpw --iscrypted $1$3uZeSVnX$FYsU4y8y/qqEWA66Wuysg1
# Use network installation
url --url="ftp://192.168.1.1/centos7"
# System language
lang zh_CN
# Firewall configuration
firewall --disabled
# System authorization information
auth  --useshadow  --passalgo=sha512
# Use graphical install
graphical
firstboot --disable
# SELinux configuration
selinux --disabled

# Network information
network  --bootproto=dhcp --device=ens33
# Reboot after installation
reboot
# System timezone
timezone Asia/Shanghai
# System bootloader configuration
bootloader --location=mbr
# Clear the Master Boot Record
zerombr
# Partition clearing information
clearpart --all --initlabel
# Disk partitioning information
part swap --asprimary --fstype="swap" --size=2048
part / --asprimary --fstype="xfs" --grow --size=1

%post --interpreter=/bin/bash
rm -rf /etc/yum.repos.d/*
cd /etc/yum.repos.d/
echo -e "[a]"  >> a.repo
echo -e "baseurl=ftp://192.168.1.1/centos7" >> a.repo
echo -e "gpgcheck=0" >> a.repo

%end
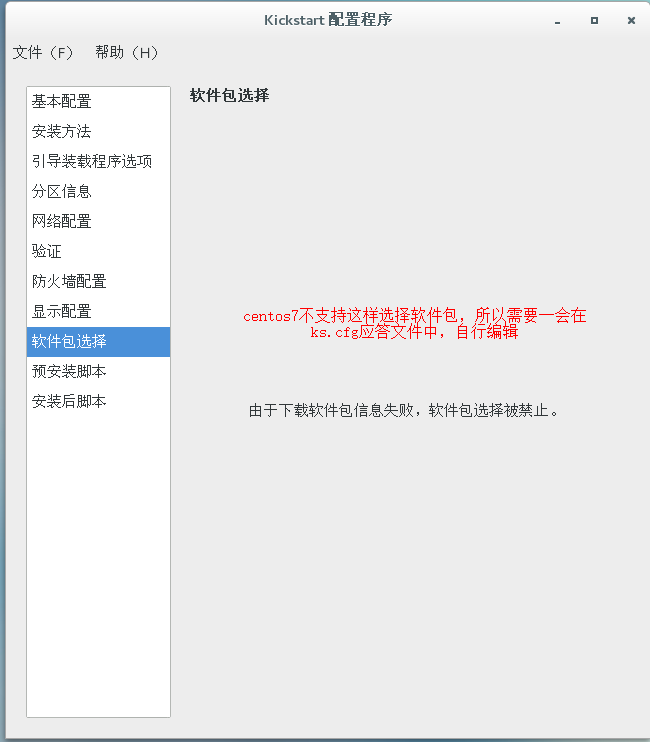
Just now, however, it has been explained that there is one missing option - "Package Selection". You need to add several lines of configuration items manually by yourself. Add them at the end as follows:
%packages
@^minimal
%end
//These three items mean minimum installation
Of course, you can also refer to the / root/anaconda-ks.cfg file, where the configuration options are from%packages to%end, one configuration option per line, any choice!
You can copy the configuration file directly without graphical editing!The effect is also possible!
2. Start the auto-answer file
[root@localhost ~]# vim /var/lib/tftpboot/pxelinux.cfg/default
default auto
prompt 0
label auto
        kernel vmlinuz
        append initrd=initrd.img method=ftp://192.168.1.1/centos7 ks=ftp://192.168.1.1/ks.cfg
Changing prompt to 0 means no user selection is pending.Add ks boot parameters and make URL access paths.
3. Verify unattended installation
The experiment is finished!