Experimental purpose: Using software to achieve network batch automatic installation
Experimental environment: one linux desktop, more than one new virtual machine, in the same local area network
Experimental steps:
1. Install software dependency packages on desktop systems
[root@localhost ~]# yum -y install dhcp tftp tftp-server vsftpd syslinux system-config-kickstart
2. Modify the tftp configuration file and change the tftp root directory to / tftpboot
[root@localhost ~]# vim /etc/xinetd.d/tftp
 1 service tftp
 2 {
 3         socket_type             = dgram
 4         protocol                = udp
 5         wait                    = yes
 6         user                    = root
 7         server                  = /usr/sbin/in.tftpd
 8         server_args             = -s /tftpboot   #Change to/tftpboot
 9         disable                 = no      #yes to no
10         per_source              = 11
11         cps                     = 100 2
12         flags                   = IPv4
13 }
3. Create tftp root and subdirectories
[root@localhost ~]# mkdir -p /tftpboot/pxelinux.cfg
4. Mount the installation disc to the anonymous login directory of vsftp
[root@localhost ~]# mkdir /var/ftp/pub/cd
[root@localhost ~]# mount /dev/sr0/ /var/ftp/pub/cd     #Note the installation location of the discCopy the kernel and boot file totftp Catalog
5. Copy the kernel and boot files to the tftp directory
[root@localhost ~]# cp /var/ftp/pub/cd/isolinux/isolinux.cfg  /tftpboot/pxelinux.cfg/default
[root@localhost ~]# chmod 644 /tftpboot/pxelinux.cfg/default    #Give file write permission
Copy the installation boot file to the root directory of tftp:
[root@localhost ~]# cp -a /var/ftp/pub/cd/isolinux/vmlinuz /tftpboot/
[root@localhost ~]# cp -a /var/ftp/pub/cd/isolinux/initrd.img /tftpboot/
[root@localhost ~]# cp -a /usr/share/syslinux/pxelinux.0 /tftpboot/
6. Generate DHCP profile and edit
[root@localhost ~]# cp /usr/share/doc/dhcp-4.*/dhcpd.conf.sample /etc/dhcp/dhcpd.conf
[root@localhost ~]# vim /etc/dhcp/dhcpd.conf
subnet 192.168.135.0 netmask 255.255.255.0 {  #Network Address and Subnet Mask
  range 192.168.135.100 192.168.135.200;      #Declare dhcp allocation IP range
  option domain-name-servers ns1.internal.example.org;  #dhcp Assigned Domain Namedefault-lease-time 600;
  max-lease-time 7200;
  filename "pxelinux.0";  #Declare dhcp to assign this file
  next-server 192.168.135.50; Tell me the location of the file dhcp,I.e. local machine ip
}
Start related services
[root@localhost ~]# service dhcpd start
[root@localhost ~]# service vsftpd start
[root@localhost ~]# service xinetd start
7. Edit default file and modify boot parameters
vim /tftpboot/pxelinux.cfg/default

1 #default vesamenu.c32  #Comment first line
2 #prompt 1
3 timeout 600
4 display boot.msg
5 default linux    #Add this line
8. Start network batch installation configuration software
[root@localhost ~]# system-config-kickstart #Configuration as GUI requires mouse clicks
Basic Configuration: Set the current time zone and password for the root user
Installation method: Select FTP, server address is ftp://native IP, directory is the previously created mount point

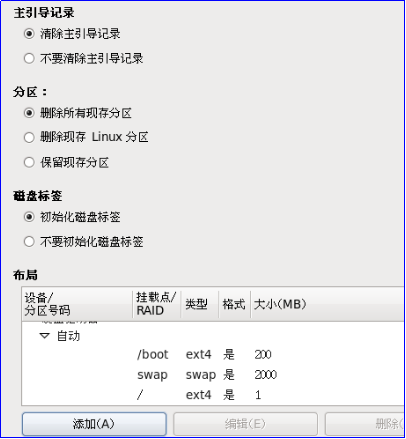
Partition information: Select Clear master boot record, Delete all partitions, Initialize disk labels and manually create new partitions. Click Add in the red box to create partitions

Network Configuration: Add the device name eth0 to the network device information and the network type is DHCP
Firewall Configuration: Firewall can be disabled
Package Selection: Select as needed
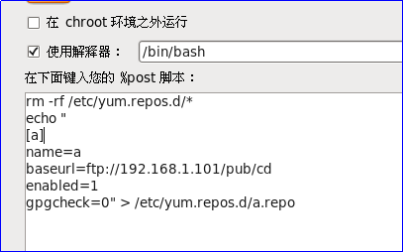
Post-installation script: Write script to modify local yum source
rm -rf /etc/yum.repos.d/*
echo "
[a]
name=a
baseurl=ftp://192.168.1.101/pub/cd
enabled=1
gpgcheck=0" > /etc/yum.repos.d/a.repo

Save the configuration file to the / var/ftp/pub directory (pop-up save with mouse click in the upper left corner)

9. Modify ks.cfg to add a line reboot at the end of the file
[root@localhost ~]# vim /var/ftp/pub/ks.cfg #Add a line reboot at the end
10. Edit the boot file to inform clients where to automatically install the configuration
[root@localhost ~]# vim /tftpboot/pxelinux.cfg/default
label linux #Find this label
  menu label ^Install or upgrade an existing system
  menu default
  kernel vmlinuz
  append initrd=initrd.img ks=ftp://192.168.135.50/pub/ks.cfg #Add ftpks.cfg file path to this line
11. Open the new virtual machine test