Catalog
Evolution of Single Page Applications (SPA)
Decorators and class-based components
Main Vue.js page of original Vanilla JavaScript
Manage storage size and code base
Vue.js Router Navigation Protection
Implementing HTTP singleton service
TypeScript compatibility and type definition files
Vue DevTools Browser Extension
Prerequisites and running the sample application
Download Web API Download the JavaScript versionDownload the TypeScript version
introduce
The age of the Big Three. If you're a professional basketball fan, you can think of the term "Big Three" as three basketball players -- LeBron James, Dwyane Wade and Chris Bosh -- who played for the Miami Heat's National Basketball Association (NBA) from 2010 to 2014 and were a sensation for the 2010 NBA Free Players. In nba free agency, the hot fire triggered a major power transfer, opened the era of "three giants" and began a great chaotic period in history. We can now say with certainty that this team is the most interesting team in the history of the NBA. In other areas of life, the Big Three usually refers to the three most prominent entities in any given group or topic. Take the current situation of men's professional tennis as an example. Tennis is still under the thumbs of the "Big Three" - Roger Federer, Rafael Nadal and Novak Djokovic. Since Stanwallinka won the 2016 U.S. Open, the "Big Three" of tennis has now won all eight Grand Slams.
In the field of Web development, when it comes to single page applications (SPAs), we now have the "Big Three". One-page applications are becoming more and more popular. Facebook, YouTube, Twitter, GitHub, Google and many other services are built using SPA technology. Over the past decade, we have seen an increase in interest in three major SPA frameworks: Angular, React and Vue.js, with little interest in other frameworks such as Ember.JS, Aurelia, Meteor.Js.
Evolution of Single Page Applications (SPA)
In the early stages of Web-based application development, JavaScript and jQuery have brought significant advances to front-end Web development. It provides simple and effective out-of-the-box functions such as client verification, modal windows, alert messages, animation, and even partial page updates based on Ajax. Enter the world of single-page application frameworks and libraries. A single page application is a Web-based application that loads a single HTML page and dynamically updates the page when the user interacts with the application. SPA uses AJAX and HTML5 to create a smooth and responsive front-end for Web applications without having to reload pages constantly. However, this means that most of the work happens on the client side, in JavaScript. The origin of the term "one-page application" is unclear. Although the concept was discussed at least as early as 2003, it is often described as using JavaScript to display user interfaces (UI s), run application logic, and communicate with Web servers in Web applications.
Overview of Three Frameworks
Welcome to the JavaScript world today. Frameworks like Angular, React.js or Vue.js have become popular because they solve the basic problem that jQuery has not solved: tracking the status of our pages, interacting with DOM, without having to control all content or perform full page refreshes. The following is a summary of the "Big Three" SPA framework and library:
- Angular, developed by Google, was first released in 2010, making it the oldest. Although Angular JS (Version 1) is still updated, the release of Angular 2 (and the deletion of "JS" from the original name - Angular JS) has changed dramatically, as the Angular framework is completely rewritten in TypeScript. Angular 2 + is abbreviated as Angular.
- React, developed by Facebook, was first released in 2013. Facebook uses React extensively in its products (Facebook, Instagram and WhatsApp).
- Vue, also known as Vue.js, is the youngest member of the group. It was developed by Evan You, a former Google employee, in 2014. In the past few years, although Vue.js has not been supported by large companies, its popularity has declined dramatically. For version 3 of Vue. Js, Vue contributors and supporters are using TypeScript to rewrite the framework.
Vue.js, Angular Developer
If you're like me and have been developing one-page applications since its early adoption, you might have written one or two or more SPAs using Angular 1 and moved to Angular 2 using TypeScript when it was released in 2016. As software developers and architects, we need to be proficient in several technologies, but due to time constraints, we have to carefully select how we spend our time. Of course, you don't want to spend five years learning and using Microsoft's Silverlight technology, just to see the Web application development community abandon it completely or never accept it. For this reason, I decided to shift gears and go deep into Vue.js. This article comes from my time spent working in the Angular Spa world. It will introduce my experience in learning Vue. js. I started with a plain old version of Vanilla JavaScript, but eventually turned to using typescript to develop Vue. js.
Learning Vue.js
If you're a developer with an Angular background that just started using Vue.js, jumping in can be both exciting and confusing. Although each person's learning process is very different, I find the following ways to help me most:
- Visit Vue.js website To get an overview of Vue
- Download and install Vue.js and its accompanying CLI tools
- Create a default Vue.js Hello World application on Scafold using Vue.js CLI
- Before venturing into the world of TypeScript, learn Vue.js using vanilla JavaScript
- Paying for online courses through plurasight.com or Udemy.com -- Maximillian Schwarzmuller's complete Vue.js course on Udemy is excellent and well worth its low-cost label
- Understand the main components and aspects of Vue.js, including Vue Router and Vuex
- Learn about Vue.js UI frameworks, such as Vuetify for Material Design
- Familiar with some Vue.js development tools
- Developing a small application using Vue.js
Analysis of Vue.js Page
The core of each Vue.js single-page application is the Vue file. The Vue file ends with the ".vue" extension, in which three tags are written: an HTML template for template tags, a JavaScript for controlling script tags'internal pages, and finally a style tag for CSS application to pages. You can also use the Scoped attribute on the Style tag to limit the scope of CSS styles to only apply to the current page. Vue pages also include data attributes, methods, computational attributes, observers, life cycle events, and other attributes. Computed properties and watchers are the two most basic concepts in Vue. js. For Angular developers, Vue's computational properties and observers are very similar to Angular's observable objects, and provide a way to observe and respond to data changes on Vue instances. By default, Vue pages contain all HTML, JavaScript and CSS for pages contained in a single file. Like Angular, Vue.js uses HTML-based template syntax, allowing you to declaratively bind the rendered DOM to the data of the underlying Vue instance.
//
// orders.vue
//
<template>
  <v-layout>
    <!---xs12 sm6 offset-sm3-->
    <v-flex>
      <v-card>
        <v-card-title primary-title>
          <div>
            <h3 class="headline mb-0">Orders</h3>
          </div>
        </v-card-title>

           <v-data-table

              class="elevation-1" :headers="headers" :hide-actions="true" :loading="loading"

              :items="orderInquiryViewModel.orders">

          <v-progress-linear v-slot:progress color="blue" indeterminate></v-progress-linear>

          <template v-slot:items="props">
            <td style="min-width: 50px; max-width: 50px; width:50px;">
                 {{ props.item.orderNumber }}
            </td>
            <td style="min-width:50px; max-width: 50px; width:50px;">
                {{ props.item.orderDate | moment("MM/DD/YYYY") }}
            </td>
          </template>

          <template v-slot:no-data>
            <v-alert :value="displayNoDataMessage" color="error" icon="warning">
                     There are no orders
            </v-alert>
          </template>

        </v-data-table>
      </v-card>
    </v-flex>
  </v-layout>
</template>

<style scoped>
a {
  color: white;
}
</style>

<script>
import { OrderInquiryViewModel } from "../viewmodels/order-inquiry.viewmodel";
import { HttpService } from "../services/http-service";

export default {
  components: {
    HttpService
  },
  data() {
    return {
      httpService: null,
      alertMessage: null,
      orderInquiryViewModel: null,
      headers: [
        {
          text: "Order Number",
          align: "left",
          sortable: false,
          value: "OrderNumber"
        },
        { text: "Order Date", value: "OrderDate", sortable: false },
        { text: "Customer Name", value: "CustomerName", sortable: false },
        { text: "Product #", value: "ProductNumber", sortable: false },
        { text: "Description", value: "Description", sortable: false },
        {
          text: "Order Quantity",
          align: "right",
          value: "OrderQuantity",
          sortable: false
        },
        {
          text: "Unit Price",
          align: "right",
          value: "UnitPrice",
          sortable: false
        }
      ],
      loading: true,
      displayNoDataMessage: false
    };
  },
  methods: {
    initializeSearch() {
      this.orderInquiryViewModel.orders = [];
    },
    displayOrders(response) {
      this.orderInquiryViewModel.orders = response.entity;
      this.loading = false;
      if (this.orderInquiryViewModel.orders.length == 0) {
        this.displayNoDataMessage = true;
      }
    },
    displayServerError: function(response) {
      this.loading = false;
      store.dispatch("alert/error", response.returnMessage[0]);
    },
    executeSearch() {
      this.httpService.getOrders().then(function(response) {
        if (response.returnStatus == true) {
          this.displayOrders(response);
        } else {
          this.displayServerError(response);
        }
      });
    }
  },
  created() {
    this.orderInquiryViewModel = new OrderInquiryViewModel();
    this.httpService = new HttpService(this.$http);
    this.displayNoDataMessage = false;
  },
  mounted() {
    this.initializeSearch();
    this.executeSearch();
  }
};
</script>
Building a sample application
The sample application in this article is a small shopping cart application that contains the latest versions of Angular 2 and TypeScript for the front end. For this article, I'll cover the development of front-end applications, but this time using the latest version of Vue.js, and merging TypeScript together. The backend of this sample application will use the MongoDB database and the. NET Core 2 backend project.
The Case of TypeScript
I started using vanilla JavaScript to learn Vue.js, initially using Vue.js with vanilla JavaScript to develop the entire front end of the sample application for this article. I think this is the best way to learn about the Vue.js framework, because most of the online courses and articles on Vue.js are based on vanilla JavaScript. But as an Angular 2 developer, I began to miss TypeScript. TypeScript is an open source programming language developed and maintained by Microsoft. It is a rigorous set of grammatical superclasses JavaScript and adds static types to the language. I like TypeScript, but for most developers, it's an acquired taste. Like all technologies, JavaScript development is deeply rooted in the standards and traditions that most JavaScript developers like. After all, TypeScript code is simply compiled into the latest version of JavaScript.
Some of the things I like to develop with TypeScript include:
- Variable declaration - In TypeScript, variables must be declared before they can be used. This is my favorite TypeScript feature. Vanilla JavaScript development can lead to errors because variables are misspelled and never captured during testing. If we try to assign values to variables that do not exist or are not found due to undeclared or spelling errors, the TypeScript compiler generates errors.
- Syntax Sugar - TypeScript comes with a syntax that improves the look and feel of JavaScript, including classes, interfaces, and arrow functions. This seems to be a very natural extension of the JavaScript language and one of the reasons for the adoption of many TypeScript functions in the ECMA specification.
- Strong Type / Static Type - Static Type Language can minimize the number of errors you make and improve code analysis, so that all your tools (such as IDE) can give you hints, help and appropriate refactoring. If we try to assign values to different types of variables, the TypeScript compiler also generates errors.
- The future is now -- as mentioned earlier, many TypeScript functions have become part of the ECMA specification. And because of compilation (conversion), you don't have to wait for browsers to adopt. In addition, Angular and the next version of Vue.js (Version 3) are fully developed internally using TypeScript, which can be said to exist in the foreseeable future and may even become a standard for JavaScript development.
At the end of the day, it's hard to develop bug-free software. I'm excited about all the new tools we have now, including CLI tools, connectors, and, of course, TypeScript, which can help us produce fewer bug-free software.
Introduction - Vue.js CLI 3.0
Like Angular, Vue.js provides a complete system for rapid Vue.js development. Vue CLI version 3.0 installs the latest version of the Vue.js framework and provides complete project creation and scaffolding. Vue CLI aims to become a standard tool benchmark for the entire Vue.js ecosystem, including installing plug-ins and integrating with webpack to replace hot modules during development and production deployment functions.
After installing the Vue CLI, you can create a new Vue project as follows:
vue create hello-world
The system will prompt you to choose the default. You can choose the default preset, or you can choose the "Manual Selection Function" to select the required functionality. For the sample application, I chose the following functions: Babel, TypeScript, Router, Vuex, Linting and Formatting. In addition, you can use the graphical interface to create and manage projects, and the vue ui command will open the CLI UI to make project creation and setup more intuitive.
After creation, you can compile, build and start the webpack development server and access the application on localhost:8080 using the following CLI commands:
npm run serve
Vuetify and Material Design
Before developing an application, it is important to determine how to implement the user interface. Just like any other library or framework, you should study it carefully when choosing a UI framework or library. These UI frameworks and libraries usually have proprietary syntax and/or symbols. Once your application gets bigger, you will integrate with the framework -- more than the underlined JavaScript framework of your choice. Material Design is one of the latest trends. Material is an adaptive guide, component and tool system that supports best practices in user interface design. With open source support, Material simplifies collaboration between designers and developers and helps teams build exquisite products quickly. For the sample application, I chose Vuetify for the Material Design UI framework of the application. Vuetify conforms to Material Design Specification. This means that the core functions of Vue. JS and Material will be available by default and can be improved by two communities. Vuetify also supports the future of Vue.js tools through its vue-cli-3 plug-in.
Vuetify can also be installed using Vue CLI UI or from the command line, as follows:
Vue add vuetify
Start and run
One thing you'll notice as an Angular developer is that it's much easier to start and run with Vue.js. For the sample application, it begins with the main.ts TypeScript file below. You just use Vue.js to register Vuetify and create a Vue instance and attach / mount it to HTML elements. You don't have to configure any modules or any other complex configuration, such as Angular requirements.
// main.ts

import Vue from "vue";
import AppComponent from "./app.component.vue";
import router from "./router";
import "./plugins/vuetify";
import "./registerServiceWorker";
import Vuetify from "vuetify";
import colors from "vuetify/es5/util/colors";

Vue.use(Vuetify, {
  theme: {
    primary: colors.blue.darken1, // #E53935
    secondary: colors.red.lighten4, // #FFCDD2
    accent: colors.indigo.base // #3F51B5
  }
});

Vue.config.productionTip = false;

new Vue({
  router,
  store,
  render: h => h(AppComponent)
}).$mount("#app");
Main Vue.js TypeScript page
The main Vue page of the following sample application is written in TypeScript. This page is the main page. As the main body of the sample application, there is a menu bar at the top and a content section, where all other Vue pages will be rendered. The main Vue page will also contain functions for displaying user status information and alerts.
// app.component.ts

template src="./app.component.html"></template>

<style>
#app {
  font-family: "Avenir", Helvetica, Arial, sans-serif;
  -webkit-font-smoothing: antialiased;
  -moz-osx-font-smoothing: grayscale;
  /*text-align: center;*/
  color: #2c3e50;
  /*margin-top: 60px;*/
}
</style>

<script lang="ts">

import { Component, Vue } from "vue-property-decorator";
import { UserInformationViewModel } from "./viewmodels/user-information.viewmodel";
import AlertComponent from "./alert.component.vue";
import store from "./store";

@Component({
  components: { AlertComponent }
})

export default class AppComponent extends Vue {

  private title: string;

  constructor() {
    super();
    this.title = "VueJs With Typescript";
  }

  public logout() {
    store.dispatch("logoutUser");
  }

  get userInformation() {
    return store.state.userInformation;
  }

  get alert() {
    return store.state.alert;
  }

  get displayProcessing() {
    return store.state.processing;
  }

}

</script>
The main application HTML page has a router-view tag, where all content pages are injected into the page when routing changes. The main application HTML page also contains a progress bar that is displayed at the top of the content page when an HTTP request is made.
<!-- app.component.html -->
<v-app style="height: 100vh;">
<v-toolbar app style="background-color: green; color: white">
<v-toolbar-title class="headline text-uppercase">
<span>Code Project</span>
<span class="font-weight-light"> {{title}}</span>
</v-toolbar-title>
<v-spacer></v-spacer>
<div v-if="userInformation.isAuthenicated==true">
{{userInformation.firstName}} {{userInformation.lastName}}
</div>
<v-spacer></v-spacer>
<div id="nav">
<router-link to="/">Home</router-link> |
<router-link to="/about">About</router-link> |
</div>
<div id="nav" v-if="userInformation.isAuthenicated==true">
<router-link to="/productsearch">Product Search</router-link> |
<router-link to="/orders">Orders</router-link> |
<router-link to="/shoppingcart">Shopping Cart</router-link>
</div>
<div id="nav" style="margin-left:15px;" v-if="userInformation.isAuthenicated==false">
<router-link to="/register">Register</router-link> |
<router-link to="/login">Login</router-link>
</div>
<div id="nav" style="margin-left:15px;" v-if="userInformation.isAuthenicated==true">
<router-link v-on:click.native="logout" to="/login">Logout</router-link>
</div>
</v-toolbar>
<v-content>
<v-dialog content-class="progressbar" v-model="displayProcessing" persistent transition="false">
<v-container fluid fill-height fullscreen transition="false">
<v-layout justify-center align-center>
<v-progress-linear height="10" indeterminate color="primary"></v-progress-linear>
</v-layout>
</v-container>
</v-dialog>
<router-view />
<v-layout style="position:absolute; top:0; width:100%">
<AlertComponent
:messageId="alert.messageId" :messageType="alert.type" :displayMessage="alert.message">
</AlertComponent>
</v-layout>
</v-content>
</v-app>Decorators and class-based components
If you have an Angular (2+) background, you may be familiar with the pattern of writing components as classes, using attributes and modifiers to describe the complex parts of components. The biggest advantage of class-based components over standard Vue.js components is that they allow for more concise and standard code. In the TypeScript code of the sample application, I install and import the vue-class-component and vue-property-decorator npm packages.
The class component is just a TypeScript class that extends the Vue object. In the following Alert Component, the Vue object is extended with the @Component decorator, just as we now have a class-based component in Vue.js. Alert Component also uses the @Prop decorator to decorate the input properties of the component.
import { Component, Watch, Prop, Vue } from "vue-property-decorator";

@Component
export default class AlertComponent extends Vue {

  public timeoutId: number;
  public originalMessageId: Date;
  public alertModel: any;
  public dismissed: Boolean;

  @Prop() displayMessage: any;
  @Prop() messageType: any;
  @Prop() messageId: any;

  constructor() {}

}

</script>
The vue-property-decorator NPM package includes the following seven decorations: @Prop,@PropSync,@Provide,@Model,@Watch,@Inject,@Provide and@Emit. @ The Component Decorator is provided by the vue-class-component NPM package. You can also extend Vuex storage using the decorator in the vuex-class npm package. The vuex-class package comes with the following Vuex storage decorators: @State, @Getter, @Action, and @Mutation.
Main Vue.js page of original Vanilla JavaScript
The following is the original vanilla JavaScript for the main Vue page. This page has three computational attributes implemented using the computational object block structure: one for status information, one for displaying alert messages, and the other for displaying progress bars. Rewriting the sample application in TypeScript means using get statements to change the computational property block. After looking at the final product of the sample application, the vanilla JavaScript version of the Vue page seems to have a proprietary look and feel. Using TypeScript seems to provide a cleaner, more standard and more natural look and feel for Vue pages; it includes building classes and components using class constructors. With TypeScript, everything looks like a normal class. Suddenly, Vue.js began to look like Angular (2+).
<template>
<v-app style="height: 100vh;">
<v-toolbar app style="background-color: green; color: white">
<v-toolbar-title class="headline text-uppercase">
<span>Code Project</span>
<span class="font-weight-light"> MATERIAL DESIGN</span>
</v-toolbar-title>
<v-spacer></v-spacer>
<div v-if="userInformation.isAuthenicated==true">
{{userInformation.firstName}}
{{userInformation.lastName}}
</div>
<v-spacer></v-spacer>
<div id="nav">
<router-link to="/">Home</router-link> |
<router-link to="/about">About</router-link> |
</div>
<div id="nav" v-if="userInformation.isAuthenicated==true">
<router-link to="/productsearch">Product Search</router-link> |
<router-link to="/orders">Orders</router-link> |
<router-link to="/shoppingcart">Shopping Cart</router-link>
</div>
<div id="nav" style="margin-left:15px;" v-if="userInformation.isAuthenicated==false">
<router-link to="/register">Register</router-link> |
<router-link to="/login">Login</router-link>
</div>
<div id="nav" style="margin-left:15px;" v-if="userInformation.isAuthenicated==true">
<router-link v-on:click.native="logout" to="/login">Logout</router-link>
</div>
</v-toolbar>
<v-content>
<v-dialog content-class="progressbar"
v-model="displayProcessing" persistent transition="false">
<v-container fluid fill-height fullscreen transition="false">
<v-layout justify-center align-center>
<v-progress-linear height="10" indeterminate color="primary"></v-progress-linear>
</v-layout>
</v-container>
</v-dialog>
<router-view/>
<v-layout style="position:absolute; top:0; width:100%">
<AlertComponent :messageId="alert.messageId" :messageType="alert.type"
:displayMessage="alert.message">
</AlertComponent>
</v-layout>
</v-content>
</v-app>
</template>
<style>
.progressbar {
opacity: 0.7;
position: absolute;
top: 25px;
height: 25px;
overflow: hidden;
}
</style>
<script>
import { UserInformationViewModel } from "./viewmodels/user-information.viewmodel";
import AlertComponent from "./components/Alert.component";
import store from "./store";
export default {
name: "App",
components: {
AlertComponent
},
data() {
return {};
},
methods: {
logout() {
store.dispatch("logoutUser");
}
},
created() {},
computed: {
userInformation() {
return store.state.userInformation;
},
alert() {
return store.state.alert;
},
displayProcessing() {
return store.state.processing;
}
}
};
</script>Separate HTML template files
Some of the advocacy of Vue.js is that all HTML templates are combined into the same file using JavaScript code. This follows the React framework. When developing the vanilla JavaScript version of the sample application, I noticed that I scrolled up and down in the ".vue" between the HTML template and JavaScript code and lost my location in the file. Of course, I can install tools in Visual Studio Code that provide jump and anchor functions to move easily back and forth in source files. Perhaps I just got used to developing Angular applications using separate HTML files and using contact switching tools and commands in Visual Studio Code to quickly switch between template files and code files. When developing the TypeScript version of the sample application, I decided to move the HTML template to a separate HTML file for each Vue page. Use the src attribute that provides template tags for this function. As an Angular developer, my experience in developing Vue pages is similar to Angular's familiarity.
<template src="./app.component.html"></template>
Vuex
Because multiple components are scattered among and interact with many components, the complexity of large applications often increases. To solve this problem, Vue provides Vuex. Vuex is inspired by Redux's React implementation, which helps React developers concentrate on the state and logic of applications to achieve powerful state persistence capabilities. Vuex is the state management mode + library of Vue.js application program. It acts as a centralized storage for all components in an application, and its rules ensure that the state can only be changed in a predictable manner. In Angular applications, state management is usually managed in a global singleton class object, which can be shared among all components through dependency injection. By defining and separating the concepts involved in state management and implementing rules to maintain the independence between views and states, Vuex provides more structure and maintainability for Vue code. The Vuex npm package can be installed through the Vue CLI UI or command line, as follows:
vue install vuex --save
In the main.ts file below, I added an import statement to refer to the Vuex package. I just registered it with Vue.
// main.ts

import Vue from 'vue';
import VueX from 'vuex';
Vue.use(Vuex);
Vuex storage
To manage the state in the sample application, I created a store.ts file and added code to create a storage instance to track the state of the application using the Vuex.Store function. Vuex storage is managed by mutations and actions. The only way to actually change the state in Vuex storage is to commit mutations. Vuex mutations are very similar to events: each mutation has a string type and a handler. Processing functions are where we perform actual state modifications.
//
//  store.ts
//

import Vue from "vue";
import Vuex from "vuex";
import alert from "./alert.module";
import { UserInformationViewModel } from "./viewmodels/user-information.viewmodel";

let userInformationModel: UserInformationViewModel = new UserInformationViewModel();

Vue.use(Vuex);

export default new Vuex.Store({
  modules: {
    alert
  },
  state: {
    userInformation: userInformationModel,
    processing: false
  },
  mutations: {
    updateUser(state: any, user: UserInformationViewModel): void {
      state.userInformation = user;
    },
    startProcessing(state: any): void {
      state.processing = true;
    },
    stopProcessing(state: any): void {
      setTimeout(function(): void {
        state.processing = false;
      }, 100);
    },
    logoutUser(state: any): void {
      state.userInformation = new UserInformationViewModel();
      localStorage.removeItem("VueToken");
    }
  },
  actions: {
    updateUser(context: any, user: UserInformationViewModel): void {
      context.commit("updateUser", user);
    },
    logoutUser(context: any): void {
      context.commit("logoutUser");
    },
    startProcessing(context: any): void {
      context.commit("startProcessing");
    },
    stopProcessing(context: any): void {
      context.commit("stopProcessing");
    }
  }
});
To call the mutation handler, you need to call the stored commit statement. For example, the following line updates user information in storage.
context.commit("updateUser", user);Actions are similar to mutations. The difference is that they are not mutations, but submit mutations. The Vue page that you want to update the storage can trigger the storage operation by executing the store.dispatch method. To update the user's status information from the Vue page, the following statements will be executed in each Vue page of the sample application.
store.dispatch("updateUser", userInformation);User Information View Model
To enhance the development process of single page applications, I like to use ES6 classes with strongly typed TypeScript attributes and initialize the values of each attribute of the class using constructors. The combination of ES6 classes and TypeScript makes the code base of a single page application more compact and less susceptible to coding errors that may not be realized during testing.
The User Information View Model below will be used to store the user's login information in Vuex.
export class UserInformationViewModel {

    constructor() {
        this.id = "";
        this.firstName = "";
        this.lastName = "";
        this.addressLine1 = "";
        this.addressLine2 = "";
        this.city = "";
        this.state = "";
        this.zipCode = "";
        this.emailAddress = "";
        this.phoneNumber = "";
        this.lastLogin = new Date();
        this.isAuthenicated = false;
    }

    public id: string;
    public firstName: string;
    public lastName: string;
    public addressLine1: string;
    public addressLine2: string;
    public city: string;
    public state: string;
    public zipCode: string;
    public emailAddress: string;
    public phoneNumber: string;
    public lastLogin : Date;
    public isAuthenicated: boolean;

}
Manage storage size and code base
As your application grows larger and larger, the information in Vuex storage is likely to grow larger, and the code that manages the storage becomes larger and more difficult to manage. To alleviate this problem, you can create a separate namespace module that can be added to the repository. An additional feature of the sample application is the ability to generate various toaster and alert messages from a centralized location. Vuex storage seems to be a reasonable location for this function. Sample applications can use the standard colors (red, blue, yellow and orange) we see in most applications today to trigger several different types of messages, informative messages, error messages, warning messages and success messages.
To add to storage and help keep the code base manageable, I created an alert module as follows:
//
// alert.module.ts
//

import store from "./store";

export const alert: any = {

  namespaced: true,
  state: {
    type: null,
    message: null,
    messageId: null
  },
  mutations: {
    error(state: any, message: any): void {
      state.type = "error";
      state.message = message;
      state.messageId = new Date();
    },
    success(state: any, message: any): void {
      state.type = "success";
      state.message = message;
      state.messageId = new Date();
    },
    warning(state: any, message: any): void {
      state.type = "warning";
      state.message = message;
      state.messageId = new Date();
    },
    info(state: any, message: any): void {
      state.type = "info";
      state.message = message;
      state.messageId = new Date();
    }
  },
  actions: {
    success(state: any, message: any): void {
      store.commit("alert/success", message);
    },
    error(state: any, message: any): void {
      store.commit("alert/error", message);
    },
    warning(state: any, message: any): void {
      store.commit("alert/warning", message);
    },
    info(state: any, message: any): void {
      store.commit("alert/info", message);
    }
  }
};

export default alert;
To add an alarm module to Vuex storage, simply import the alarm module into the store.ts file and reference it as a module.
//
// store.ts
//

import Vue from "vue";
import Vuex from "vuex";
import alert from "./alert.module";

Vue.use(Vuex);

export default new Vuex.Store({
  modules: {
    alert
  }
});
Since the alert module is namespaced, alert messages are sent from any Vue page by scheduling operations with an alert namespace prefix and the type of message to be displayed.
store.dispatch("alert/error", response.returnMessage[0]);Shared Vue.js components
Like Angular applications, Vue.js also supports reusable shared components that can be used throughout the application. In the sample application, the alert message will be displayed at the top of the page with toaster functionality. The following code snippet refers to an Alert Component and adds it to the HTML template of the main Vue page.
<v-layout style="position:absolute; top:0; width:100%">
  <AlertComponent

      :displayMessage="alert.message" :messageId="alert.messageId" :messageType="alert.type">

  </AlertComponent>
</v-layout>
The Alert Component HTML template consists of the following HTML. Vuetify has the function of displaying toaster messages and message boxes.
<div class="alert-style">
    <v-alert v-if="messageType !== null"

        dismissible  :type="messageType" :value="displayAlertMessage"

        transition="scale-transition"

        @click="close" :value="displayAlertMessage" >

        {{displayMessage}}

    </v-alert>
</div>
Sometimes one thing you have to overcome when using various UI libraries is that they don't always provide the exact functionality you want. The Vuetify alert has no functionality and can automatically close the message box or toaster message after a few seconds without the user pressing the Undo button. To provide this functionality, I have to expand the message box to turn it off automatically by implementing a timeout function that sets the computational property called displayAlertMessage to false in five seconds.
<template src="./alert.component.html"></template>

<style scoped>

.alert-style {
  width: 100%;
  position: absolute;
  right: 0;
  z-index: 1000;
}

</style>

<script lang="ts">

import { Component, Watch, Prop, Vue } from "vue-property-decorator";

@Component
export default class AlertComponent extends Vue {
  public timeoutId: number;
  public originalMessageId: Date;
  public alertModel: any;
  public dismissed: Boolean;

  @Prop() displayMessage: any;
  @Prop() messageType: any;
  @Prop() messageId: any;

  constructor() {
    super();
    this.timeoutId = -1;
    this.originalMessageId = new Date();
    this.alertModel = null;
    this.dismissed = false;
  }

  public close() {
    clearTimeout(this.timeoutId);
    this.dismissed = true;
    this.originalMessageId = new Date();
  }

  public created() {
    this.dismissed = false;
  }

  get displayAlertMessage() {
    if (this.messageId != this.originalMessageId && this.dismissed == false) {
      clearTimeout(this.timeoutId);
      this.timeoutId = setTimeout(() => {
        this.originalMessageId = this.messageId;
      }, 5000);

      this.dismissed = false;
      return true;
    } else {
      this.dismissed = false;
      return false;
    }
  }
}
</script>
Alert Component has three input properties, including the type of message to be displayed and the actual message to be displayed. When using TypeScript, you need to annotate these attributes with the @Prop() annotation. The original vanilla JavaScript version of this Alert Component contains props blocks for input properties. Again, you can see that the TypeScript version of this component is less proprietary in appearance and feel.
<script>
 export default {
    name: "AlertComponent",
    data() {
      return {
          timeoutId: -1,
          originalMessageId: null,
          alertModel: null,
          dismissed: false
        }
    },
    props: {
       displayMessage: String,
       messageType: String,
       messageId: Date
    },
    methods: {
      close() {
        clearTimeout(this.timeoutId);
        this.dismissed = true;
        this.originalMessageId = null;
      }
    },
    created() {
      this.dismissed = false;
    },
    computed: {
       displayAlertMessage: function() {
        if (this.messageId != this.originalMessageId && this.dismissed == false) {
          clearTimeout(this.timeoutId);
          this.timeoutId = setTimeout(()=>{
              this.originalMessageId = this.messageId;
          }, 5000);
          this.dismissed = false;
          return true;
        }
        else {
          this.dismissed = false;
          return false;
        }
      }
    }
 }

</script
Vue.js Router
Vue Router is the official router of Vue.js. It is deeply integrated with the core functions of Vue.js, making it easy to build single-page applications using Vue.js. It's actually very similar to routing in Angular. You just need to associate the path to the Vue component. In the router.ts file below, vue-router imports and registers with the Vue instance. Some additional key points include the following:
- Meta-fields - In a Vue router, you can include meta-fields when defining a path. When routing in a Vue application, the path information contains meta-fields. In the following code snippet, I create a requires Authorization metafield. This field will be used later to protect routes from unauthorized access, such as the router protection implementation in Angular.
- Webpack Block Name - JavaScript bundles can become very large when building applications with bundlers, which can affect page loading time. It would be more efficient if we could split the components of each route into separate blocks and load them only when accessing the path. Using the webpack block name, you can group components into blocks. In the following code snippet, two block (chuck) files will be created, one for the product and one for the order.
- History mode - The default mode of the Vue router is hash mode and uses URL hash to simulate the full URL so that the page will not reload when the URL changes. To get rid of the hash in the URL, we can use the historical model of the router, which uses the history.pushstate API.
//
// router.ts
//

import Vue from "vue";
import Router from "vue-router";
import HomeComponent from "./views/home.component.vue";
import AboutComponent from "./views/about.component.vue";
import RegisterComponent from "./views/register.component.vue";
import LoginComponent from "./views/login.component.vue";

Vue.use(Router);

export default new Router({
  mode: "history",
  base: process.env.BASE_URL,
  routes: [
    {
      path: "/",
      name: "home",
      component: HomeComponent
    },
    {
      path: "/login",
      name: "login",
      component: LoginComponent
    },
    {
      path: "/register",
      name: "register",
      component: RegisterComponent
    },
    {
      path: "/checkout",
      name: "checkout",
      component: () =>
        import(
          /* webpackChunkName: "orders" */ "./views/checkout.component.vue"
        ),
      meta: {
        requiresAuthorization: true
      }
    },
    {
      path: "/orders",
      name: "orders",
      component: () =>
        import(/* webpackChunkName: "orders" */ "./views/orders.component.vue"),
      meta: {
        requiresAuthorization: true
      }
    },
    {
      path: "/productdetail/:id",
      name: "productdetail",
      component: () =>
        import(
          /* webpackChunkName: "products" */ "./views/productdetail.component.vue"
        ),
      meta: {
        requiresAuthorization: true
      }
    },
    {
      path: "/productsearch",
      name: "productsearch",
      component: () =>
        import(
          /* webpackChunkName: "products" */ "./views/productsearch.component.vue"
        ),
      meta: {
        requiresAuthorization: true
      }
    },
    {
      path: "/shoppingcart",
      name: "shoppingcart",
      component: () =>
        import(
          /* webpackChunkName: "orders" */ "./views/shoppingcart.component.vue"
        ),
      meta: {
        requiresAuthorization: true
      }
    },
    {
      path: "/about",
      name: "about",
      component: AboutComponent
    }
  ]

})
Vue.js Router Navigation Protection
As the name implies, navigation protection provided by Vue routers is mainly used to protect navigation by redirecting or canceling routing requests. There are several ways to link the path navigation process: globally, by path or within components. Another way to protect the Vue.js application part is to use global navigation protection with metafields. In this way, we can register protection in the Vue router as mentioned earlier. In the main.ts file below, a router beforeEach hook is added, which will be executed at each routing transition. The hook checks the Boolean meta field requires Authorized defined in the router definition. When the required Authorization field is set to true, the router hook checks the application storage to see if the user has passed authentication. If the authentication check fails, the router redirects the application to the login page, otherwise the router will continue to execute the requested route.
//
//  router guard implementation - main.ts
//
router.beforeEach(
  (to: any, from: any, next: any): void => {
    let requiresAuthorization: Boolean = to.matched.some(
      (x: { meta: { requiresAuthorization: Boolean } }) =>
        x.meta.requiresAuthorization
    );

    if (requiresAuthorization) {
      if (store.state.userInformation.isAuthenicated === true) {
        next();
      } else {
        next("/login");
      }
    } else {
      next();
    }
  }
);
HTTP RESTful Web API support
When building modern Web applications, you may need to use data from certain remote resources, whether you build it or someone else builds it. Sending HTTP requests is one of the more common ways to send data from client-oriented applications to the back end of the RESTful Web API. Vue.js does not provide an out-of-the-box HTTP approach, but you can use libraries and plug-ins, such as the popular Axios HTTP client and the vue-resource plug-in or browser's built-in fetch API. I initially implemented the vue-resource plug-in for the vanilla JavaScript version of the sample application, but the vue-resource plug-in was considered to have been discarded and many plug-ins in the Vue world have exited from the official recommended state. For the TypeScript version of the sample application, I implemented the Axios HTTP client. Axios is currently one of the most popular HTTP client libraries, covering almost everything vue-resource provides with very similar APIs. In addition, it is generic, supports cancellation, and has a TypeScript definition. Axios is simple and lightweight, making it an ideal solution for any Vue. JS project.
To include axios in your project, do the following:
npm install axios --save
Implementing HTTP singleton service
The sample application in this article makes RESTful Web API calls to the back end of the. NET Core Web API. To help encapsulate and centralize the HTTP capabilities of the Axios library so that it can be reused throughout the application without polluting the application with a lot of repetitive HTTP code, I created an HTTP Service class that implements a singleton pattern. Singleton services are service instances shared across components. Implementing the singleton pattern means that you create only a single instance of this class in your application. The last line of the http.service.ts file creates an instance of the HttpService class and exports it so that any component that needs to use it can simply import it.
//
// http.service.ts
//

import { ResponseModel } from "./viewmodels/response.model";
import axios from "axios";
import store from "./store";

export class HttpService {

  private urlRoot: string;

  constructor() {
    this.urlRoot = "https://localhost:44340/api/secureonlinestore";
  }

  login(requestData: any): any {
    return this.httpPost("/login", requestData);
  }

  register(requestData: any): any {
    return this.httpPost("/register", requestData);
  }

  getProducts(requestData: any): any {
    return this.httpPost("/productinquiry", requestData);
  }

  createOrder(requestData: any): any {
    return this.httpPost("/createOrder", requestData);
  }

  getOrders(): any {
    return this.httpGet("/GetOrders");
  }

  getProductDetail(productId: string): any {
    return this.httpGet("/getproductdetail/" + productId);
  }

  validateEmailAddress(emailAddress: string): any {
    return this.httpGet("/ValidateEmailAddress/" + emailAddress);
  }

  httpGet(urlPath: string): any {
    store.dispatch("startProcessing");
    let url: string = this.urlRoot + urlPath;

    return axios
      .get(url)
      .then(response => {
        store.dispatch("stopProcessing");
        return response.data;
      })
      .catch((error: any) => {
        let response: ResponseModel = new ResponseModel();
        response.returnStatus = false;
        if (error.response) {
          if (error.response.status === "401") {
            response.returnMessage.push("Unauthorized");
          } else {
            response.returnMessage.push(error.response.data.returnMessage[0]);
          }
        } else {
          response.returnMessage.push(error);
        }
        store.dispatch("stopProcessing");
        return response;

      });
  }

  httpPost(urlPath: string, requestData: any): any {
    store.dispatch("startProcessing");
    let url: string = this.urlRoot + urlPath;

    return axios
      .post(url, requestData)
      .then(response => {
        store.dispatch("stopProcessing");
        return response.data;
      })
      .catch((error: any) => {
        let response: ResponseModel = new ResponseModel();
        response.returnStatus = false;
        if (error.response) {
          if (error.response.status === "401") {
            response.returnMessage.push("Unauthorized");
          } else {
            response.returnMessage.push(error.response.data.returnMessage[0]);
          }
        } else {
          response.returnMessage.push(error);
        }
        store.dispatch("stopProcessing");
        return response;
      });
  }
}

export default new HttpService();
Axios HTTP Interceptor
Axios provides some features inspired by Angular's $http library. Axios allows us to add interceptors to the function we call. These interceptor functions can be attached to requests or responses when requests are made or when responses are received. For the sample application, the Axios interceptor for Web API requests will be used as a centralized way to send custom headers to the server. Since the server Web API requires authorization tokens from most terminals, the Axios request interceptor will retrieve the request from the client local storage and add the stored JSON Web Token (JWT) to the head of the request as a "Bearer" token before sending the request to the server. For response interceptors, any response from the server whose status code is 401 will be intercepted and redirected to the login page.
import axios from "axios";

//
//  http interceptors - main.ts
//

axios.interceptors.request.use(
  config => {
    const token: any = localStorage.getItem("VueToken");
    if (token != null && token !== undefined) {
      config.headers.Authorization = "Bearer " + token;
    }
    config.headers.Accept = "application/json";
    return config;
  },
  error => {
    return Promise.reject(error);
  }
);

const UNAUTHORIZED: number = 401;

axios.interceptors.response.use(response => response,
  error => {
    const status: any = error.response;
    if (status === UNAUTHORIZED) {
      router.push({ name: "login" });
    }
    return Promise.reject(error);
  }
);
Login component
To view all operations, the following login components perform the following functions:
- Import Http Service singleton service
- Import Vuex storage
- Import and initialize user and user information view model
- Set the necessary validation rules for the Vuetify form
- When the user presses the login button, the form is validated
- Execute the Http service to publish the user's credentials to the server
- After successful login, the authorization token (JWT) generated by the server will be stored in the user's local storage.
- Scheduling Vuex storage to update user status information in Vuex storage
- After successful login, the Vue router redirects the user to the product search page
- If the user's credentials cannot be authenticated, a toaster error message is displayed
//
// login.component.ts
//

<template src="./login.component.html"></template


<script lang="ts">
import { Component, Vue } from "vue-property-decorator";
import { UserViewModel } from "../viewmodels/user.viewmodel";
import { UserInformationViewModel } from "../viewmodels/user-information.viewmodel";
import httpService from "../http.service";
import store from "../store";

@Component
export default class LoginComponent extends Vue {

  public emailAddressErrors: Array<string>;
  public validForm: Boolean;
  public userViewModel: UserViewModel;
  public requiredRules: Array<any>;

  constructor() {
    super();
    this.emailAddressErrors = new Array<string>();
    this.validForm = false;
    this.userViewModel = new UserViewModel();
    this.userViewModel.emailAddress = "";
    this.userViewModel.password = "";
    this.requiredRules = [(v: any) => !!v || "Field is required"];
  }

  public login() {
    let thisComponent: any = this;

    let form: any = this.$refs.form;
    if (form.validate == false) {
      return false;
    }

    httpService.login(this.userViewModel).then(function(response: any) {

      if (response.returnStatus === true) {

        let token = response.entity.token;
        localStorage.setItem("VueToken", token);

        let userInformation = new UserInformationViewModel();

        userInformation.firstName = response.entity.firstName;
        userInformation.lastName = response.entity.lastName;
        userInformation.emailAddress = response.entity.emailAddress;
        userInformation.id = response.entity.id;
        userInformation.phoneNumber = response.entity.phoneNumber;
        userInformation.addressLine1 = response.entity.addressLine1;
        userInformation.addressLine2 = response.entity.addressLine2;
        userInformation.city = response.entity.city;
        userInformation.state = response.entity.state;
        userInformation.zipCode = response.entity.zipCode;
        userInformation.isAuthenicated = true;

        store.dispatch("updateUser", userInformation);

        thisComponent.loginSuccessful();

      } else {
        store.dispatch("alert/error", response.returnMessage[0]);
      }
    });
  }

  public loginSuccessful() {
    this.$router.push({ name: "productsearch" });
  }

}
</script>
Vuetify form validation
In form validation, Vuetify has many integration and functions. You can also choose to use third-party authentication plug-ins, such as Vee-validate or Vuelidate. For the sample application, I used the baked validation function.
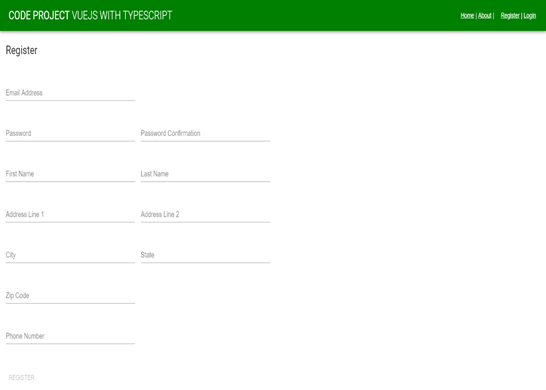
Below is the HTML template for the registration page, which contains the validation of the Vuetify form and the required fields, the e-mail address pattern, password matching validation, and the validation of duplicate e-mail addresses in the back-end database.
<v-layout>
<v-flex>
    <v-card>
    <v-card-title primary-title>
    <div>
        <h3 class="headline mb-0">Register</h3>
    </div>
    </v-card-title>

    <v-form ref="form" v-model="validForm">
    <v-container fluid>
       <v-layout v-bind="binding">
          <v-flex xs12 lg3 sm6 md6>
          <v-text-field @blur="validateEmailAddress"

                  v-model="userViewModel.emailAddress"

                  required :rules="emailRules" :error-messages="emailAddressErrors"

                  label="Email Address">
          </v-text-field>
          </v-flex>
       </v-layout>

       <v-layout v-bind="binding">
             <v-flex xs12 lg3 sm6 md6>
             <v-text-field v-model="userViewModel.password" required :rules="requiredRules"

                 label="Password"></v-text-field>
             </v-flex>

              <v-flex xs12 lg3 sm6 md6>
              <v-text-field v-model="userViewModel.passwordConfirmation"

                      required :error-messages="passwordConfirmationErrors"

                      label="Password Confirmation" :rules="passwordConfirmationRules">
              </v-text-field>
              </v-flex>
       </v-layout>

       <v-layout v-bind="binding">
              <v-flex xs12 lg3 sm6 md6>
              <v-text-field v-model="userViewModel.firstName"

                      required :rules="requiredRules"

                      label="First Name">
              </v-text-field>
              </v-flex>

              <v-flex xs12 lg3 sm6 md6>
               <v-text-field v-model="userViewModel.lastName"

                             required :rules="requiredRules"

                             label="Last Name">
               </v-text-field>
              </v-flex>
        </v-layout>

        <v-layout v-bind="binding">
              <v-flex xs12 lg3 sm6 md6>
              <v-text-field v-model="userViewModel.addressLine1"

                            required :rules="requiredRules"

                            label="Address Line 1"></v-text-field>
              </v-flex>
              <v-flex xs12 lg3 sm6 md6>
              <v-text-field

                      v-model="userViewModel.addressLine2"

                      label="Address Line 2">
              </v-text-field>
               </v-flex>
        </v-layout>

        <v-layout v-bind="binding">
               <v-flex xs12 lg3 sm6 md6>
               <v-text-field v-model="userViewModel.city"

                             required :rules="requiredRules"

                             label="City">
               </v-text-field>
               </v-flex>

               <v-flex xs12 lg3 sm6 md6>
               <v-text-field v-model="userViewModel.state"

                             required :rules="requiredRules"

                             label="State">
               </v-text-field>
               </v-flex>
        </v-layout>

        <v-layout v-bind="binding">
                <v-flex xs12 lg3 sm6 md6>
                <v-text-field v-model="userViewModel.zipCode"

                              required :rules="requiredRules"

                              label="Zip Code">
                </v-text-field>
                </v-flex>
        </v-layout>

        <v-layout v-bind="binding">
                <v-flex xs12 lg3 sm6 md6>
                <v-text-field v-model="userViewModel.phoneNumber"

                              required :rules="requiredRules"

                              label="Phone Number">
                </v-text-field>
                </v-flex>
        </v-layout>
    </v-container>

    <v-card-actions>
         <v-btn flat color="primary" :disabled="!validForm" @click="register">Register</v-btn>
    </v-card-actions>

    </v-form>

</v-card>
</v-flex>
</v-layout>
In the e-mail address form field, an @blur event handler is added to the field to verify that the e-mail address is unique and is not currently used in the user database. E-mail validation rules will be assigned to: rules properties, and any errors will be displayed by binding to: error-messages form field properties.
<v-text-field @blur="validateEmailAddress"

        v-model="userViewModel.emailAddress"

        required :rules="emailRules" :error-messages="emailAddressErrors"

        label="Email Address">
</v-text-field>
Setting validation rules for Vuetify is as simple as setting validation arrays. The e-mail validation rules for the following arrays include one for mandatory fields and another for ensuring that e-mail addresses follow a valid pattern of e-mail addresses.
this.emailRules = [
(v: any) => !!v || "E-mail address is required",
(v: any) => /^\w+([.-]?\w+)*@\w+([.-]?\w+)*(\.\w{2,3})+$/.test(v) || "E-mail address is invalid"
];
The on blur event triggers the validateEmailAddress method, which resets the e-mail address validation array and sends a Web API request to the server to verify that the e-mail address is unique and does not yet exist.
public validateEmailAddress(event: any) {

    let vm = this;
    let emailAddress = event.target.value;
    if (emailAddress == null || emailAddress == undefined || emailAddress.length == 0) {
        return false;
    }

    vm.emailAddressErrors = [];

    httpService.validateEmailAddress(emailAddress).then(function(response: any) {
        if (response.returnStatus == false) {
            vm.emailAddressErrors.push(response.returnMessage[0]);
        }
   });

}
Another type of verification is password confirmation matching. Because password verification matching requires matching on two fields in the form, password matching verification needs to be set to computed property so that it can respond to changes in values in the form. Use TypeScript get property to set the passwordConfirmationRules property to computered property. The original vanilla JavaScript version of this page implements computational blocks for this purpose.
get passwordConfirmationRules() {

    let rules = [];

    let rule1 = (v: any) => !!v || "Password is required";
    rules.push(rule1);

    let rule2 = (v: any) =>
            (!!v && v) === this.userViewModel.password ||  `Password confirmation must match`;
    rules.push(rule2);

    return rules;
}
When the user presses the registration button, the registration method is executed. Before submitting form information to the server, the first thing you always do is to re-verify that everything on the form is still valid by executing the form.validate method. The user may re-edit the fields on the form that may not trigger all the necessary validation on the form. In the register method, a reference to a form instance needs to be reassigned to another object of type any. This is necessary because Vue.js does not have a TypeScript definition for the validate method and generates a TypeScript compilation error when referenced in the code.
public register() {

   let vm: any = this;
   let form: any = this.$refs.form;

   if (form.validate() === false) {
       return false;
   }

   httpService.register(this.userViewModel).then(function(response: any) {
       if (response.returnStatus == true) {
           vm.$router.push({ name: "login" });
       } else {
           store.dispatch("alert/error", response.returnMessage[0]);
       }

   });
}
Vue.js filter
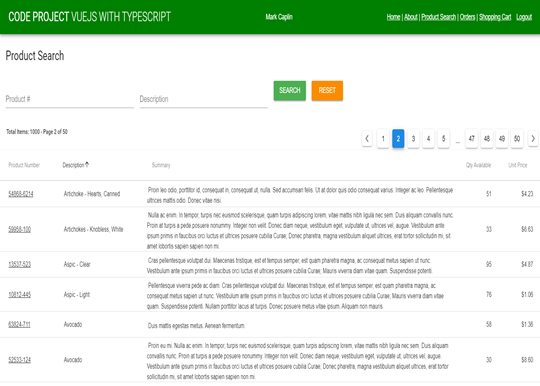
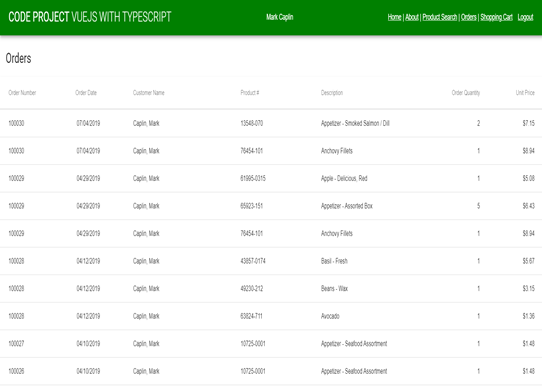
The following is the Vuetify Material Design template for the order page. The two items you will see in the template are formatting order dates and unit prices using filters. The filters in Vue.Js are similar to those in Angular. Filters are functions provided by Vue components that allow you to apply formats and transformations to any part of template data. The filter does not change component data or anything, but only affects the rendered output. Filters can be used in two ways: globally for all components to be used, or locally, so that they can be used only in components defined by them.
It turns out that Vue. Js doesn't provide any filters out of the box, but there are some useful community packages that might help your project. For the original vanilla JavaScript version of the Vue.js project of the sample application, I downloaded and installed the following two popular npm packages:
- vue2-filters - This npm package comes with more than ten types of common filters, such as acronym capitals, all capitals, all lowercase, currency, etc.
- vue-moment -- Format time values based on popular Ment.js filter packages.
<v-layout>
<!---xs12 sm6 offset-sm3-->
<v-flex>
<v-card>
<v-card-title primary-title>
<div>
<h3 class="headline mb-0">Orders</h3>
</div>
</v-card-title>
<v-data-table :headers="headers" :hide-actions="true" :items="orderInquiryViewModel.orders"

class="elevation-1">
<v-progress-linear v-slot:progress color="blue" indeterminate></v-progress-linear>

<template v-slot:items="props">
<td style="min-width: 50px; max-width: 50px; width:50px;">
    {{ props.item.orderNumber }}
</td>
<td style="min-width:50px; max-width: 50px; width:50px;">
    {{ props.item.orderDate | moment("MM/DD/YYYY") }}
</td>
<td style="min-width:200px; max-width: 200px; width:200px;">
    {{ props.item.customerName }}
</td>
<td style="min-width:150px; max-width: 150px; width:150px;">
    {{ props.item.productNumber }}
</td>
<td style="min-width:200px; max-width: 200px; width:200px;">
    {{ props.item.description }}
</td>
<td style="min-width: 50px; max-width: 50px; width:50px;" class="text-xs-right">
    {{ props.item.orderQuantity }}
</td>
<td style="min-width: 50px; max-width: 50px; width:50px;" class="text-xs-right">
    {{ props.item.unitPrice | currency }}
</td>
</template>

<template v-slot:no-data>
<v-alert :value="displayNoDataMessage" color="error" icon="warning">
    There are no orders
</v-alert>

</template>
</v-data-table>
</v-card>
</v-flex>
</v-layout>
After installing npm packages for vue2-filters and vue-moment, you just need to import the packages and register them with the Vue instance in the main.js startup code.
//
// maint.ts
//

import Vue from 'vue';
import Vue2Filters from "vue2-filters";
import VueMoment from "vue-moment";

Vue.use(Vue2Filters);
Vue.use(VueMoment);
TypeScript compatibility and type definition files
Therefore, in the vanilla JavaScript Vue.js version of the sample application, everything went smoothly with the Vue filter and moment.js package and functionality. Then I started looking at the TypeScript version of the project and found that not everything in Vue. Js had good support for TypeScript. TypeScript is still a novice to the Vue.js ecosystem. To make TypeScript perform type checking, you need to define a type somewhere. This is where type definition files come into play. They allow you to provide type information for JavaScript code that is not static in nature. The file extension for such a file is ".d.ts", where d stands for definition. Type definition files allow you to enjoy the benefits of type checking, automatic completion and member documentation. Although very useful, type definition files take a lot of time to create. Fortunately, most npm packages and libraries have TypeScript type definitions. Unfortunately, neither vue2-filters nor vue-moment npm packages come with type definition files. Fortunately, you have the option of resolving packages that are not included in the TypeScript definition file. One way is to create your own definition file or find someone else who might have created it. For the sample application, I decided to solve the TypeScript type definition problem in different ways. To use the vue-moment package, I only need to register the package with the require statement, instead of importing it as follows:
Vue.use(require("vue-moment"));The require statement dynamically loads the vue-moment module through the TypeScript type checker.
Customize global filters
Vue.js allows you to define filters that can be used to apply common text formats. As a solution to the vue2-filters package, I decided to create a custom global filter for the currency formatting function required by the sample application. Looking at the npm package of vue2-filters, I can extract JavaScript functions that provide currency format and add them to the sample application as custom global filters. The following filters.ts file implements a global custom currency filter.
import Vue from "vue";

//
//  currency filter - filters.ts
//

Vue.filter("currency", (value: any, symbol: string, decimals: number, options: any) => {

    var thousandsSeparator: any,
    var symbolOnLeft: any,
    var spaceBetweenAmountAndSymbol: any;
    var digitsRE: any = /(\d{3})(?=\d)/g;

    options = options || {};

    value = parseFloat(value);

    if (!isFinite(value) || (!value && value !== 0)) {
      return "";
    }

    symbol = symbol != null ? symbol : "$";

    decimals = decimals != null ? decimals : 2;

    thousandsSeparator =
      options.thousandsSeparator != null ? options.thousandsSeparator : ",";

    symbolOnLeft = options.symbolOnLeft != null ? options.symbolOnLeft : true;

    spaceBetweenAmountAndSymbol =
      options.spaceBetweenAmountAndSymbol != null
        ? options.spaceBetweenAmountAndSymbol
        : false;

    var stringified: any = Math.abs(value).toFixed(decimals);

    stringified = options.decimalSeparator
      ? stringified.replace(".", options.decimalSeparator)
      : stringified;

    var _int: any = decimals
      ? stringified.slice(0, -1 - decimals)
      : stringified;

    var i: any = _int.length % 3;

    var head: any =
      i > 0
        ? _int.slice(0, i) + (_int.length > 3 ? thousandsSeparator : "")
        : "";

    var _float: any = decimals ? stringified.slice(-1 - decimals) : "";

    symbol = spaceBetweenAmountAndSymbol
      ? symbolOnLeft
        ? symbol + " "
        : " " + symbol
      : symbol;

    symbol = symbolOnLeft
      ? symbol +
        head +
        _int.slice(i).replace(digitsRE, "$1" + thousandsSeparator) +
        _float
      : head +
        _int.slice(i).replace(digitsRE, "$1" + thousandsSeparator) +
        _float +
        symbol;

    var sign: any = value < 0 ? "-" : "";
    return sign + symbol;

  }

);
Vue.js Mixins
One of the things I want to do in the sample application is always update the user's current state whenever the user starts the application, refreshes the browser window (F5) or switches to a different path. To do this, I need an executable global code to update the Vuex storage of the application. Enter Vue.js Mixins. Mixins is a flexible way to distribute reusable functionality for Vue components. The mixin object can contain any component options. When a component uses mixins, all options in a mixin "mix" into the component's own options. When mixins and components themselves contain overlapping options, they will "merge" using the appropriate strategy. In the following code, whenever a global mixin is created, the created life cycle event is triggered. When the created event is triggered, the mixin checks the user's JSON Web token (JWT) from the local storage and determines whether the user's token has expired. If the token expires, Vuex storage will be set to an unauthenticated state by updating the dispatch statement and the user's state; essentially, it will record the user from the application. Since all content is considered to be a component in Vue.js, including shared components and all other visual components, events created are triggered multiple times per page. I just want to check the user's token when the Vue component page is routed to and created; so I check in the mixin to see if events are triggered in the Vue page. This is a good example of how to create global mixing. Of course, the functions I want can also be done in the foreach event hook for path changes.
//
//  mixin for user authenication on page routing
//

Vue.mixin({
  created(): void {

    let vm: any = this;

    if (vm._self.$vnode.data.routerView !== undefined) {
      let user: UserInformationViewModel = new UserInformationViewModel();
          let token: any = localStorage.getItem("VueToken");
          if (token === null || token === undefined) {
            user.emailAddress = "";
            user.firstName = "";
            user.lastName = "";
            user.id = "";
            user.isAuthenicated = false;
            store.dispatch("updateUser", user);

          } else {

            let jwt: any = JSON.parse(atob(token.split(".")[1]));
            let currentTime: number = Date.now() / 1000;
            if (jwt.exp < currentTime) {
              user.emailAddress = "";
              user.firstName = "";
              user.lastName = "";
              user.id = "";
              user.isAuthenicated = false;
              store.dispatch("updateUser", user);
            }
          }
        }
  }
});
When the user refreshes the browser (F5) or reopens the application in the browser, the user's token can be parsed and the application storage can be updated in the main.ts file, as follows:
//
//  user authenication on application start-up/refresh - main.ts
//

let user: UserInformationViewModel = new UserInformationViewModel();
user.emailAddress = "";
user.firstName = "";
user.lastName = "";
user.id = "";
user.isAuthenicated = false;

let token: any = localStorage.getItem("VueToken");
if (token == null || token === undefined) {
  user.isAuthenicated = false;
} else {
  let jwt: any = JSON.parse(atob(token.split(".")[1]));

  user.emailAddress = jwt.emailAddress;
  user.firstName = jwt.given_name;
  user.lastName = jwt.nameid;
  user.id = jwt.primarysid;
  user.isAuthenicated = true;

  let currentTime: number = Date.now() / 1000;
  if (jwt.exp < currentTime) {
    user.isAuthenicated = false;
  }
}

store.dispatch("updateUser", user);
Even though JSON Web tokens are base64 encoded, they can still be decoded by anyone. It is important not to store any key or private information in these tokens that can be used to compromise application security.
Production deployment
Single-page applications usually consist of dozens or even hundreds of components that can be divided into several JavaScript package files. When building applications with bundler s, JavaScript packages can become very large, affecting page load times. If we could split several related components into a single block and load them only when accessing component-related routes, they would be more effective. Combined with Vue's async component loading and web pack's code splitting feature, it is easy to delay loading components according to the path.
In the sample application, the routing configuration webpackChunckName for the webpack bundler will be used to create separate bundles.
// router.ts

{
    path: "/shoppingcart",
    name: "shoppingcart",
    component: () =>
    import(
        /* webpackChunkName: "orders" */ "./views/shoppingcart.component.vue"
    ),
    meta: { requiresAuthorization: true }
}
To create a bundled JavaScript file for production deployment by shrinking JS/CSS/HTML, you only need to execute the Vue.js CLI build command to compile the application and call webpack bundler.
npm run build
By default, the output of the webpack build will go to the dist folder in the project. The following list is the result of building the sample application and creating predefined bundles for products and orders defined in the Vue.js router configuration.
File                                      Size             Gzipped

  dist\js\chunk-vendors.132c74f3.js         829.55 KiB       207.68 KiB
  dist\js\orders~products.7efe385e.js       68.99 KiB        17.35 KiB
  dist\js\app.0eed3d02.js                   29.69 KiB        8.35 KiB
  dist\js\products.cf0343bb.js              16.21 KiB        4.37 KiB
  dist\js\orders.77b1fed7.js                14.09 KiB        3.46 KiB
  dist\precache-manifest.8c24b13f01c7e.js    1.16 KiB        0.40 KiB
  dist\service-worker.js                    0.95 KiB         0.54 KiB
  dist\css\chunk-vendors.587a5dd2.css       137.14 KiB       18.01 KiB
  dist\css\orders~products.c472f02d.css     29.67 KiB        4.74 KiB
  dist\css\products.0aa943ff.css            2.75 KiB         0.64 KiB
  dist\css\app.2db963e6.css                 0.45 KiB         0.28 KiB
  dist\css\orders.dd9178be.css              0.36 KiB         0.21 KiB
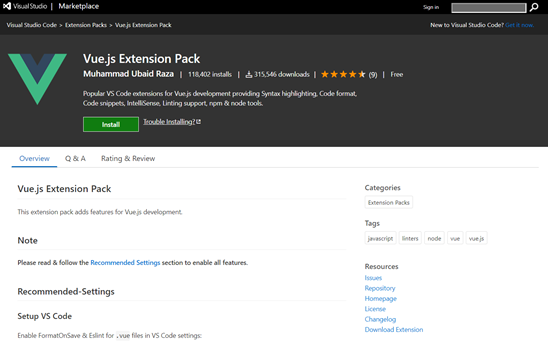
Vue.js Extension Pack
With its built-in support for development tools such as TypeScript and Chrome Debugger, Visual Studio Code has become a de facto code editor for Microsoft community developers on projects based on JavaScript and TypeScript. To make things better, Visual Studio Code has many extensions that help make Vue. JS development a great experience. If you are using Visual Studio Code to develop Vue.js applications, you need to Visual Studio Marketplace Download Vue VS Code Extension Pack. This extension package comes with a set of extensions for using vue applications in Visual Studio Code. The extension package comes with Vetur and fully supports. vue files. Vetur includes syntax highlighting, code snippets, linting, error checking, formatting, automatic completion and debugging. In the extension package, you can also get a code formatter Prettier, which automatically formats your code. There are about 20 extensions in the extensions package to enhance your Vue.js development experience.
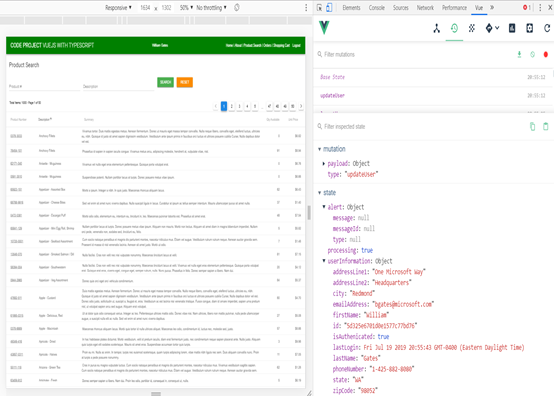
Vue DevTools Browser Extension
Using console.log statements in complex JavaScript code is still a popular and useful way to debug JavaScript code in browsers. To enhance debugging applications in browsers, Vue has a dedicated plug-in that can help you debug and develop applications more effectively. Vue DevTools is an extension of Chrome and Firefox for debugging Vue.js applications. After installation, you can access Vue DevTools through the Developer Tools (F12) panel in the browser, and then enter the Vue tab.
Some of the features extended by Chrome and Firefox's Vue DevTools include:
- Real-time editing component data - A very convenient function of Vue DevTools is real-time editing component data. This allows you to quickly test different variants of components.
- Using Time Travel to debug Vuex - Vue DevTools seamlessly integrates with Vuex state management library, enabling you to easily browse previous versions of Vuex state objects. This allows you to do so-called time-travel debugging. Time travel debugging is a process of tracing application data to understand what happens during execution.
- Track custom events for your application -- If you use events in your application, you can track them in the Event tab of Vue DevTools.
summary
Developers often describe Vue.js as the beginners of Angular and React, and bake their similarities into frameworks. Vue. JS and React use similar state management libraries, such as Vuex and Redux, respectively. React and Vue.js are one-way. This means that data flows only in one direction from parent to child components. Compared with Angular, Vue. JS is a more flexible and flexible solution. This allows you to build applications in the way you want them to, rather than being forced to do everything Angular. Starting and running with Vue.js is a much simpler way to travel than Angular's module configuration and declaration requirements. Of course, if you're working with large development teams to develop large mission-critical applications, a solid and complete framework, such as Angular, where large companies support large ecosystems, may still be a viable approach. After rewriting the sample Vue.js application in TypeScript, the Vue.js code base begins to look like an Angular 2 application. Once you have an application up and running, the lines between Vue. JS and Angular start to blur, especially when you use TypeScript. Like religion, technology choices are usually based on what you propose. Ultimately, it depends on your own preferences. Good news; I haven't seen Vue. JS or Angular become the next Silverlight; an obsolete technology that has never really been embraced.
Prerequisites and running the sample application
The back end of the sample application is a. NET Core Web API application using MongoDB. Between Vue.js,. NET Core and MongoDB, there are many mobile components that need to be installed and configured to start and run the sample application. The sample application consists of two Visual Studio Professional (2017 or 2019) projects and two Visual Studio code projects -- a Visual Studio Code project for the version of vanilla JavaScript Vue.js and a TypeScript version of the sample application. To start and run the sample application as easily as possible in a local development environment, I outline the prerequisites and installation steps needed to start and run.
Prerequisites for software installation:
- MongoDB 4.0 or later
- Visual Studio 2017 or 2019 Professional or Community Edition
- Visual Studio Code
- NET Core 2.2 - SDK version 2.2.106
- NodeJS 10.13.0 or later
- Vue.js CLI 3
To run the sample application, the following steps need to be performed:
- Install the MongoDB server as a service - Download MongoDB Community Server Version 4.0 from the Download page. Starting with Version 4.0, you can install and configure MongoDB as a Windows service during installation, and start the MongoDB service after successful installation. Configure MongoDB using the configuration file in the installation bin directory.
- (Optional) Convert MongoDB stand-alone servers to replica sets - MongoDB transaction support is required for orders placed in shopping cart applications. If you want to see the practical application of this function, you need to support MongoDB transactions. To support transactions, convert the MongoDB installation to a replica set.
- Download the source code for the sample application -- You can download the source code for the sample application from the Download Source Link at the top of this article. There are three download links, one for the Vue.js front end using TypeScript and the other for the vanilla JavaScript version of the sample application. The third link will download the MongoDB and. NET Core back-end Web API applications.
- NET Core 2.2 - When downloading and installing Visual Studio 2017 or 2019 (Professional or Community Edition), it should automatically install. NET Core 2.2. If you have already installed Visual Studio, you can verify the installation by going to the Tools menu and selecting Get Tools and Features, which will start the Visual Studio installer. From the Installer option, you can verify that. NET Core 2.2 has been installed. If you need to download. NET Core SDK for Visual Studio; from NET Core SDK Download Page Select SDK version 2.2.106 for Windows 64-bit operating system.
- Vue.js CLI 3 - The Vue.js front-end application is built and provided through Vue.js CLI version 3. You can verify the Vue.js CLI installation by running the Vue.js CLI command: vue --version. To install the latest version of Vue CLI, execute NPM install-g@vue/cli. Vue CLI requires version 8.9 or higher of Node.js (recommended 8.11.0+). Installing Vue CLI will also install the latest version of Vue.js.
- Build and run the sample application. NET Core Web API project -- To verify that everything is installed correctly, compile the Web API project of the CodeProject. Mongo. Web API sample application. When you open and build these projects using Visual Studio Professional or Community Edition, be sure to wait a minute or two, because when you open the project, Visual Studio will need to restore the packages needed to compile these projects.
- SSL - The Web API project is configured to use SSL. To avoid the problem of SSL, you need to try to run the project by selecting the IISExpress configuration file and selecting the run button. ASP.NET Core will create an SSL certificate. Depending on your development computer, Visual Studio may ask if you want to trust self-signed certificates generated by ASP.NET Core. Select Yes to trust the certificate. Because Visual Studio is Visual Studio, you may have to run the project for a second or third time, or exit and reload Visual Studio to make sure that everything in the project works properly. When running a project from Visual Studio, the browser should start from the value controller and display the output in the browser.
- Build and run the seed program -- Fill the Product collection with test data built by the sample application and run the. NET Core console application CodeProject.Mongo.Import. This program will also create the required indexes to support the functionality of the sample application.
- Build and provide a Vue.js front-end application -- both versions of the Vue.js front-end application depend on the node module to be installed in the project node_modules folder. Creating all node modules can be accomplished by executing npm install from the root folder of the application in the DOS command window. After installing the package, you can use the Vue.js CLI to build the Vue.js application project in the DOS command window and execute: NPM run service. Once the Vue.js front-end application is built, the webpack will start the Node.js Express Web server in the background.
- Troubleshooting and fixing Node.js and NPM problems -- it seems that Node.js and Node Packet Manager (npm) sometimes encounter strange problems. These problems can sometimes be solved by running npm cache clean or running npm install with the - verbose option to see more details. As a last resort, you can uninstall Node.js, delete the% APPDATA% folders NPM and npm-cache, and reinstall the latest version of Long Term Support (LTS) for Node.js.
- Start the sample application -- To run the sample application, enter http://localhost:8080 in the browser.