Original text: NVMe over RoCE - Zhihu
Common SSD s are mainly divided into SATA and PCIe interfaces, and their interface protocols correspond to AHCI and NVMe protocols. Compared with the original ATA protocol, AHCI There are two features. The first supports hot plug and the second supports NCQ (native command queuing) technology. The maximum depth of NCQ is 32. When fio is used for performance test, its iodepth shall not exceed 32;
In the early days of HDD and SSD, AHCI controller interface protocol and SATA hard disk transmission interface were enough to meet the performance requirements of the system. The performance bottleneck was on the hard disk side. With the rapid development of flash memory technology, the performance bottleneck of the system was transferred from the lower layer (hard disk) to the upper layer (interface and protocol). SSD urgently needed more efficient interfaces and protocols. In this context, NVMe was born.
NVMe The full name is non volatile memory express. It is a non-volatile memory standard and a protocol standard running on the PCIe interface.
The hierarchical relationship of the protocol is: NVMe < --- transaction layer < --- data link layer < --- physical layer. NVMe is located at the top layer as the command layer and application layer protocol, and the lower three layers are PCIe.
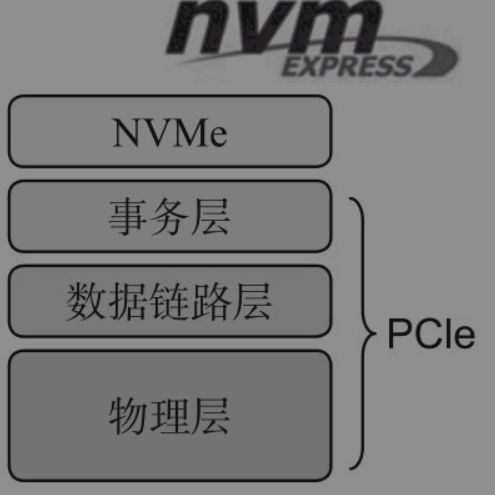
NVMe protocol is actually an application layer protocol. PCIe specification defines transport layer (transaction layer), data link layer and physical layer.
NVMe protocol usually runs on the PCIe protocol stack.
pcie is the interface and nvme is the protocol.
PCI interfaces on notebooks are in the physical form of M.2, but M.2 solid-state drives do not necessarily use nvme protocol, which may be the ahci protocol used by traditional sata hard drives.
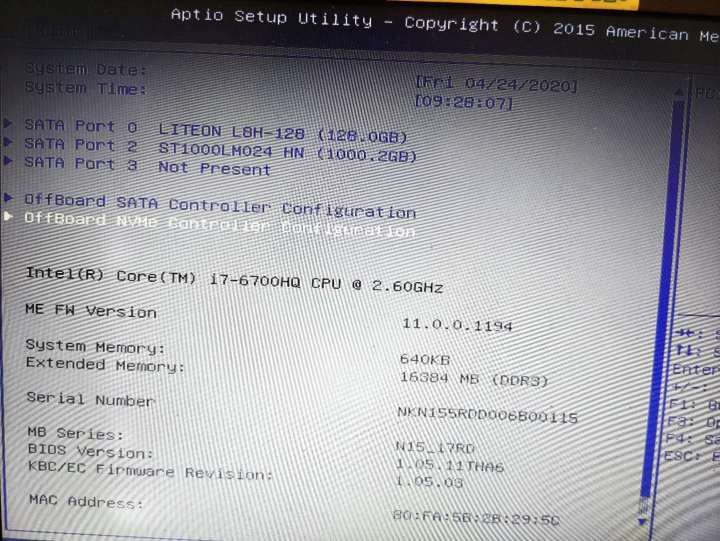
Now that there is an M.2 interface through the PCIe channel, you need to confirm whether there are NVMe protocol related drivers. You can enter the BIOS to see if there are NVMe Related words, such as my computer. After entering the BIOS, you will see the following:
Link: https://www.zhihu.com/question/263723989/answer/1203340571
The following will compare the differences between NVMe and AHCI from three aspects: SATA and PCIe interface comparison, AHCI and NVMe speed comparison, and SSD overall dimensions.
- Comparison of AHCI and PCIe interfaces
| term | AHCI(SATA/SAS) | NVMe(PCIe) |
|---|---|---|
| background | Designed for HDD | Designed for SSD |
| Maximum number of queues | 1 | 64k |
| Maximum queue depth | 32 | 64k |
| delay | 6ms | 2.8ms |
| signal communication | Communicating with SATA controller | Direct communication with CPU |
- SATA and PCIe speed comparison
At present, we use Intel Purley platform server, that is, the speed of I/O interface is SATA 3.0 and PCIe 3.0 respectively. It is expected that Intel will mass produce Ice lake Xeon processor in mid-2021. One of the changes is that I/O will be switched from PCIe 3.0 to PCIe 4.0, and the server platform will also be switched from Purley to Whitley.
| term | SATA 1.0 | SATA 2.0 | SATA 3.0 |
|---|---|---|---|
| rate | 150 MB/s | 300 MB/s | 600 MB/s |
| type | Theoretical unidirectional rate (GT/s) | transmission mode | Actual unidirectional rate (Gbps) | Unidirectional bandwidth receive or transmit |
|---|---|---|---|---|
| PCIe 1.0 | 2.5 | 8 bit/10 bit | 2 | 250 MB/s |
| PCIe 2.0 | 5 | 8 bit/10 bit | 4 | 500 MB/s |
| PCIe 3.0 | 8 | 128 bit/ 130 bit | 7.87 | 985 MB / S (approximately equal to 1GB/s) |
| PCIe 4.0 | 16 | 128 bit/ 130 bit | 15.75 | 2016 MB / S (approximately equal to 2GB/s) |
- Overall dimensions of SSD
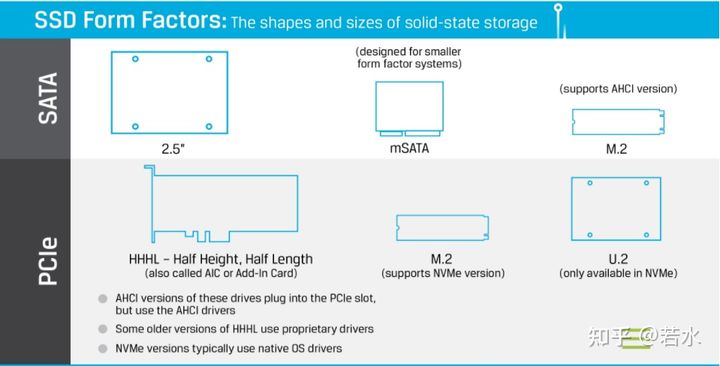
NVMe SSD appearance interface forms include: PCIe card slot, M.2, and U.2. U.2 is specially designed for NVMe and has 2.5 inch / 3.5 inch standard size solid state hard disk drive.
- For example, the parameters of S4510 1.92TB and P4610 1.6TB are compared
| term | S4510 1.92TB | P4610 1.6TB |
|---|---|---|
| Lithography type | 64-Layer TLC 3D NAND | <-- |
| Interface type | SATA 3.0 6Gb/s | PCIe 3.1 x4, NVMe |
| Sequential read (MB/s) | 560 | 3200 |
| Sequential write (MB/s) | 510 | 2080 |
| Random read (IOPS) | 97k | 643k |
| Random write (IOPS) | 35.5k | 199k |
| Idle power consumption (W) | 1.1 | 5 |
| Typical power consumption (W) | 3.2 | 14 |
| Hardware encryption | AES 256 bit | <-- |
It can be seen from the above figure that the sequential and random read / write performance of P4610 NVMe SSD is significantly better than that of S4510 SATA SSD. The specific data are: sequential read about 5.7 times, sequential write about 3.7 times, random read about 6.6 times and random write about 5.6 times.
RDMA
RDMA (full name: Remote Direct Memory Access) is a Remote Direct Memory Access technology. It implements the transport layer protocol in the hardware, exposes the memory / message primitive interface to the user space, and realizes the high throughput and low latency of the network by bypassing the CPU and kernel network protocol stack. Nowadays, the main ways to deploy RDMA on a large scale are Infiniband and RoCE. The former is mainly used in high-performance fields, and the latter is more used in data centers of Internet companies. The experimental environment of this paper uses RoCE. No matter which RDMA implementation mode, it provides a unified operation interface upward, namely RDMA verbs.
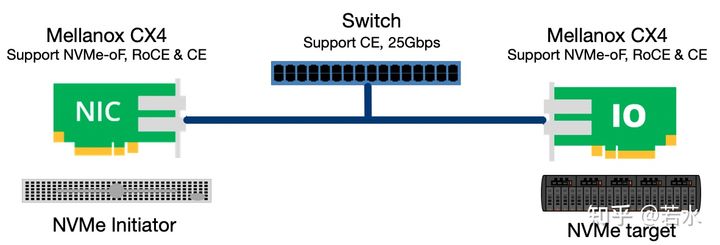
Topology of experimental equipment:
RDMA network configuration
Hardware / software information
- Hardware
 Server model: Lenovo SR650
CPU: Xeon Silver 4214R*2 @ 2.40GHz
 Memory: DDR4 2933MHz 32G*12
 Hard disk: Intel P4610 U.2/2.5 inch NVMe SSD 1.6T*4(Data disk), 2.5 inch SATA SSD 240G*2(System disk)
network card: Mellanox CX4-2port 25Gb/s*2

- Software
OS: Debian 10.3
Kernel: 4.19.0-8-amd64 x86_64
nvme-cli Version: 1.13.23.g274a
MCX4121A Firmware version: 14.28.1002 (LNV2420110034)
mlx5_core Version: 5.2-1.0.4
RDMA drive installation
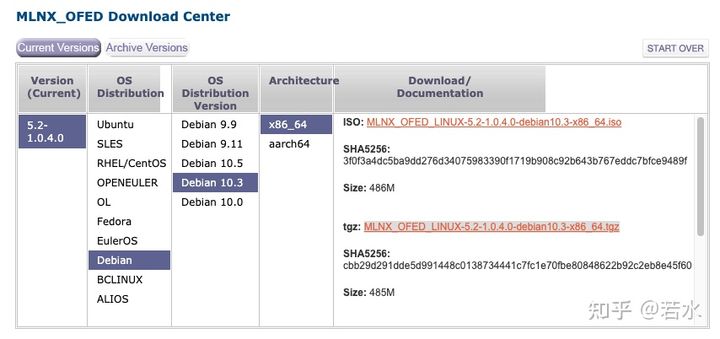
Drive selection: MLNX_OFED_LINUX-5.2-1.0.4.0-debian10.3-x86_64.tgz
MLNX_OFED driver
The configuration process is as follows:
# Download link
https://www.mellanox.com/products/infiniband-drivers/linux/mlnx_ofed

# decompression
tar xvf MLNX_OFED_LINUX-5.2-1.0.4.0-debian10.3-x86_64.tgz

# Install, add parameters kernel and nvmf support
cd MLNX_OFED_LINUX-5.2-1.0.4.0-debian10.3-x86_64
./mlnxofedinstall  --add-kernel-support --with-nvmf

# The installation log is as follows:
Note: This program will create MLNX_OFED_LINUX TGZ for debian10.3 under /tmp/MLNX_OFED_LINUX-5.2-1.0.4.0-4.19.0-8-amd64 directory.
See log file /tmp/MLNX_OFED_LINUX-5.2-1.0.4.0-4.19.0-8-amd64/mlnx_iso.25161_logs/mlnx_ofed_iso.25161.log
....
Installation passed successfully
To load the new driver, run:
/etc/init.d/openibd restart
Note: In order to load the new nvme-rdma and nvmet-rdma modules, the nvme module must be reloaded.
Verify RDMA connectivity
Background: the ip addresses of the two nodes are 192.168.13.146 and 192.168.13.147 respectively, using ib_send_bw command test (ib device name needs to be specified, and mlx5#u 3 device communication is configured in this example).
# Open the server
ib_send_bw --ib-dev=mlx5_3

************************************
* Waiting for client to connect... *
************************************
 ---------------------------------------------------------------------------------------
 #bytes     #iterations    BW peak[MB/sec]    BW average[MB/sec]   MsgRate[Mpps]
 65536      1000             0.00               2761.97        0.044192
---------------------------------------------------------------------------------------


# Open client
ib_send_bw --ib-dev=mlx5_3 192.168.13.147
---------------------------------------------------------------------------------------
 #bytes     #iterations    BW peak[MB/sec]    BW average[MB/sec]   MsgRate[Mpps]
     65536      1000             2757.59            2757.57        0.044121
---------------------------------------------------------------------------------------
NVMe Initiator and target configuration
The initiator and target are connected as shown in the following figure. The initiator is on the left and the target is on the right. In the NVMe protocol, the NVMe controller acts as an entity that communicates with the initiator. By determining the PCIe port, NVMe controller and NVMe namespace, the initiator can discover the NVMe namespace on the target side and connect it to the local server through the discover and connect interconnection commands.
Reference to "explain in simple terms"
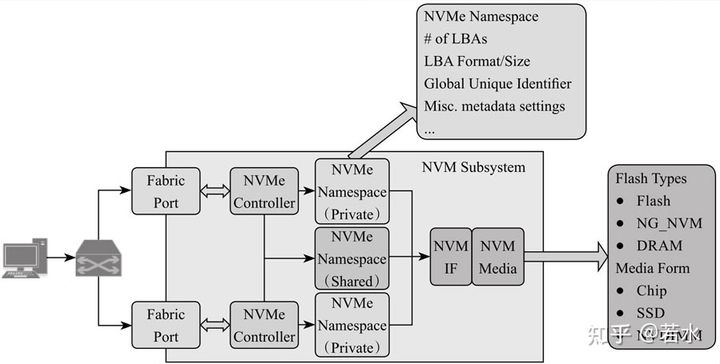
NVM over Fabrics protocol defines the use of various transaction layer protocols to implement NVMe functions, including RDMA, FibreChannel, etc. Compared with ordinary NVMe commands, NVMe over Fabrics extends NVMe standard commands and data transmission methods, such as adding interconnection commands, discover, connect, Property Get/Set, Authentication Send/Receive, etc. The connect command carries the Host NQN, NVM Subsystem NQN, PCIe port and Host identifier information, and can be connected to the target NVMe controller.
The NVMe over RoCE calling relationship in this article is shown in the figure below, and the kernel NVMe_ The RDMA module is equivalent to the glue layer, connecting the rdma stack and the nvme core interface, that is, the NVMe queue interface can connect to the RDMA queue interface, and then call the verbs transmission interface in the lower rdma stack.
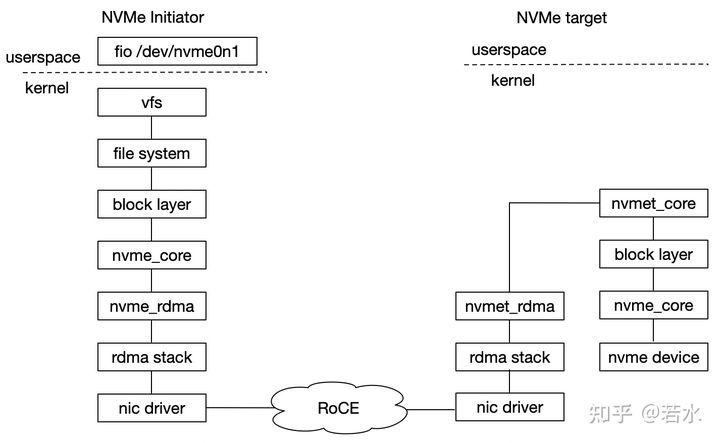
NVMe over RoCE calling relationship
target side configuration
# NVMe target configuration
# Assuming the following:
# IP is 192.168.13.147/24
# link is up
# using ib device eth2
# modprobe nvme and rdma module

modprobe nvmet
modprobe nvmet-rdma
modprobe nvme-rdma

# 1,config nvme subsystem
mkdir /sys/kernel/config/nvmet/subsystems/nvme-subsystem-name
cd /sys/kernel/config/nvmet/subsystems/nvme-subsystem-name

# 2,allow any host to be connected to this target
echo 1 > attr_allow_any_host

# 3,create a namesapce,example: nsid=10
mkdir namespaces/10
cd namespaces/10

# 4,set the path to the NVMe device
echo -n /dev/nvme0n1> device_path
echo 1 > enable

# 5,create the following dir with an NVMe port
mkdir /sys/kernel/config/nvmet/ports/1
cd /sys/kernel/config/nvmet/ports/1

# 6,set ip address to traddr
echo "192.168.13.147" > addr_traddr

# 7,set rdma as a transport type,addr_trsvcid is unique.
echo rdma > addr_trtype
echo 4420 > addr_trsvcid

# 8,set ipv4 as the Address family
echo ipv4 > addr_adrfam

# 9,create a soft link
ln -s /sys/kernel/config/nvmet/subsystems/nvme-subsystem-name /sys/kernel/config/nvmet/ports/1/subsystems/nvme-subsystem-name

# 10,Check dmesg to make sure that the NVMe target is listening on the port
dmesg -T| grep "enabling port"
[369910.403503] nvmet_rdma: enabling port 1 (192.168.13.147:4420)
initiator side configuration
Initiator side, also known as host/client side, initiator configuration premise: RDMA basic environment has been built. The NVMe SSD at the target end can be detected and connected through the NVMe interconnection command.
# Probe nvme ssd of port 4420 on 192.168.13.147 machine
nvme discover -t rdma -q nvme-subsystem-name -a 192.168.13.147 -s 4420

# Connect 192.168.13.147 4420 port nvme ssd
nvme connect -t rdma -q nvme-subsystem-name -n nvme-subsystem-name  -a 192.168.13.147 -s 4420

# Disconnect from target nvme ssd
nvme disconnect -n nvme-subsystem-name
Configuration success status
Before configuration, the initiator and target each have four nvme SSDs. Use the above initiator and target configuration methods to mount the four nvme SSDs on the target to the initiator. After configuration, the initiator will display eight nvme SSDs, and the target is still four. It is verified that the target cannot operate the NVMe SSD mounted to the initiator. The configuration status is shown in the following figure:
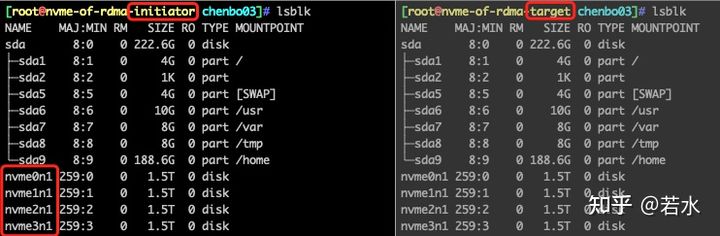
Before configuration
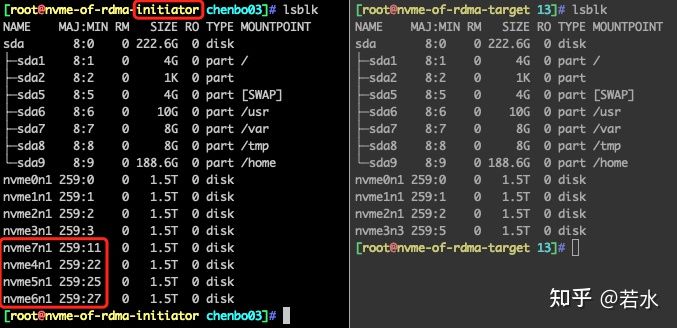
After configuration
performance testing
The following compares and tests the sequential / random performance between the local NVMe SSD and NVMe over RoCE SSD, single disk + ext4 file system. The conclusion is that the performance data shows that the sequential read performance of NVMe over RoCE method decreases by about 14%, the random write and random read performance decreases by about 6% and 2% respectively, and the sequential write performance has no impact.
| I/O type | Local NVMe SSD | NVMe over RoCE SSD |
|---|---|---|
| Sequential write (MB/s) | 2035 | 2031 |
| Sequential read (MB/s) | 3374 | 2889 |
| Random write (IOPS) | 51.6k | 48.4k |
| Random read (IOPS) | 571k | 557k |
Note: the NVMe bare disk test performance is normal, and the performance drops sharply after mounting the file system. Later, we will study how to tune it at the file system level.
Test method: write NVMe SSD in full order twice, and then use fio test tool
# Sequential write:
fio --iodepth=128 --numjobs=4 --size=1TB --norandommap --readwrite=write --bs=128k  --filename=/partition1/write.txt --runtime=1200 --time_based --ioengine=libaio --direct=1 --group_reporting --name=write

# Sequential read:
fio --iodepth=128 --numjobs=4 --size=1TB --norandommap --readwrite=read --bs=128k  --filename=/partition1/write.txt --runtime=120 --time_based --ioengine=libaio --direct=1 --group_reporting --name=read

# Random write:
fio --iodepth=128 --numjobs=4 --size=1TB --norandommap --readwrite=randwrite --bs=4k --runtime=1200 --time_based --filename=/partition1/randwrite.txt --ioengine=libaio --direct=1 --group_reporting --name=rand_write

# Random read:
fio --iodepth=128 --numjobs=4 --size=1TB --norandommap --readwrite=randread --bs=4k --runtime=300 --time_based --filename=/partition1/randwrite.txt --ioengine=libaio --direct=1 --group_reporting --name=rand_read
The same subsystem in target (for example: nvme subsystem name) can be connected by multiple initiators. The hard disk associated with the target subsystem is / dev/nvme0n1. At this time, initiator1 and initiator2 are connected to target nvme subsystem name at the same time. The effect of mounting the partition is that initiator1 and initiator2 can read and write to / dev/nvme0n1 partition normally, but will not synchronize. Only wait for disconnect and connect again before data synchronization.
Problems encountered
Problem 1: nvmet module failed to load
# Import nvmet kernel module
modprobe nvmet
dmesg | tail
[87679.872351] device-mapper: ioctl: 4.39.0-ioctl (2018-04-03) initialised: dm-devel@redhat.com
[87776.766628] nvmet: Unknown symbol nvme_find_pdev_from_bdev (err -2)
[87850.518208] nvmet: Unknown symbol nvme_find_pdev_from_bdev (err -2)
[88090.703738] nvmet: Unknown symbol nvme_find_pdev_from_bdev (err -2)
[88093.708573] nvmet: Unknown symbol nvme_find_pdev_from_bdev (err -2)

# Solution: after deleting the nvme module, reload the nvme
rmmod nvme
modprobe nvme nvmet
Problem 2: when executing the nvme discover command on the initiation side, an error was encountered Failed to write to / dev / nvme fabrics: invalid argument
# The following logs are found through dmesg, indicating that the hostnqn parameter is not specified.
[Sat Jan  9 23:00:19 2021] nvme_fabrics: unknown parameter or missing value 'hostnqn=' in ctrl creation request

# resolvent
nvme discover add to -q nvme-subsystem-name parameter
Nvme cli user documentation
Nvme is a command line management tool for NVMe SSD and NVMe oF storage. The nvme installation package is nvme cli. It relies on the Linux kernel IOCTL system call, which connects the user layer and nvme driver layer. When the user executes nvme commands, IOCTL will pass the command parameters to the NVMe common layer. The layer code parses the commands, executes the commands, and encapsulates the commands into the capsule, Then it is transferred to the NVMe Submission queue. After processing, the Controller transfers the capsule to the NVMe Completion queue. The application takes out the capsule from the Completion queue to complete a communication.
nvme installation and common commands
# Install nvme cli
apt-get install pkg-config uuid-runtime -y
git clone https://github.com/linux-nvme/nvme-cli.git
cd nvme-cli && make && make install

# nvme command usage:
usage: nvme <command> [<device>] [<args>]
# Where device is either an NVMe character device, such as / dev/nvme0, or an NVMe block device, such as / dev/nvm0n1.

# View all nvme block devices
nvme list

# View namespace structure
nvme id-ns /dev/nvme1n1

# Creating a namespace is divided into three steps: create ns, attach ns and reset;
# The - s -c parameter in the create ns command corresponds to nsze and ncap respectively. You can refer to the output results of nvme ID NS / dev / nvme1n1
nvme create-ns -s 0xba4d4ab0 -c 0xba4d4ab0 -f 0 -d 0 -m 0 /dev/nvme0

# Associate command space 1 to controller 0
nvme attach-ns /dev/nvme0 -c 0 -n 1

# Reset / dev/nvme0 so that the created namespace appears in the OS as a block device
nvme reset /dev/nvme0

# View the namespace owned by / dev/nvme0
nvme list-ns /dev/nvme0

# Delete the first command space of / dev/nvme0
nvme delete-ns /dev/nvme0 -n 1

# View the controllers owned by / dev/nvme0
nvme list-ctrl /dev/nvme0
Viewing NVMe SSD smartctl information
# Use the smartctl command to view nvme disk information, for example, device_ The name is / dev/nvme0n1
apt-get install smartmontools -y
smartctl -a -d nvme $device_name
NVMe over RoCE application scenario
1. The blade has only 2 drawers and can be connected to the NVMe SSD storage pool through RoCE.
When the blade storage capacity is insufficient, it can be used RoCE connect NVMe SSD Storage pool.
2. In the read-write separation scenario, you can use NVMe over RDMA to build NFS.
target upper NVMe SSD You can partition, format the file system, and write data.
target NVMe SSD Mount as a block device to initiator After, just mount Operation is ready to use. The premise is that there are only read operations initator To the same block NVMe SSD When writing data, each initator Data is not synchronized.
3. NVMe SSD creates multiple namespaces for use by multiple tenants through RoCE.
Gong Youyun/In the private cloud scenario, as shown in the figure below, 1 large capacity NVMe SSD It is divided into multiple namespaces and provided to multiple tenants after virtualization, which can give full play to NVMe SSD Performance.
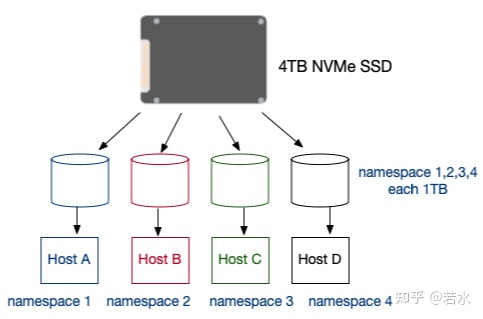
Create multiple namespaces
Reference documents
1,Kingston, Understanding SSD Technology: NVMe, SATA, M.2
4,NVMe over RoCE Storage Fabrics for noobs