React Native has been upgraded to 0.51.0, and the version has been upgraded very quickly, but there are also some problems with old projects, the common problem is that attributes can not be found. For example: 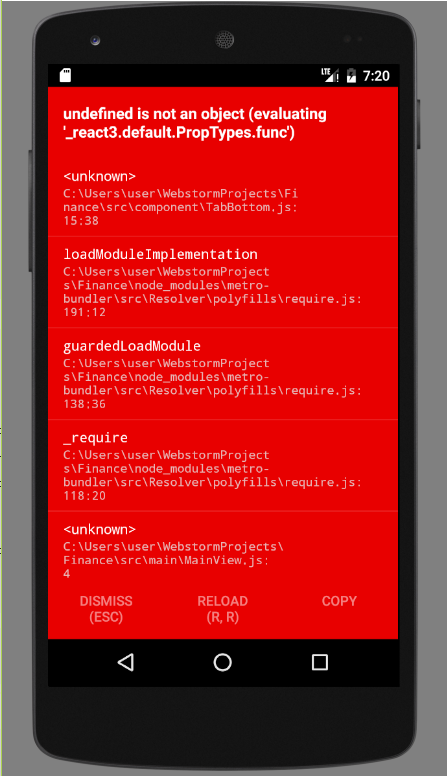
The main reason is that with the upgrade of React Native, the system has discarded a lot of things. In the past, we can use React.PropTypes directly for attribute validation, but this has been removed since React v15.5 and replaced by the prop-types library.
Attribute validation
Role of attribute validation
Components created using React Native are reusable, so the components we develop may be used by other colleagues on the project team. But others may not be familiar with this component, often forget to use some attributes, or some attributes transfer the wrong data type. So when we develop a React Native custom component, we can declare which attributes the component needs through attribute validation.
Note: In order to ensure the efficient operation of React Native code, attribute validation is only valid in the development environment, and the officially released App runtime will not be checked.
Use of prop-types Library
Similar to other third-party libraries, the installation of prop-types first enters the project root directory and executes the following code to install the prop-types libraries:
npm install --save prop-typesThen introduce where you need to use the PropTypes attribute:
import PropTypes from 'prop-types';Example
For example, let's write an example of a navigation bar. The effect is as follows: 
import React, {
  Component
} from 'react'
import {
  StyleSheet,
  View,
  Animated,
  Image,
  TouchableOpacity,
  TouchableNativeFeedback,
  Platform
} from 'react-native'
import px2dp from '../utils/Utils'
import Icon from 'react-native-vector-icons/Ionicons'
import PropTypes from 'prop-types';

export default class NavBar extends Component{

    static propTypes = {
        title: PropTypes.string,
        leftIcon: PropTypes.string,
        rightIcon: PropTypes.string,
        leftPress: PropTypes.func,
        rightPress: PropTypes.func,
        style: PropTypes.object
    }
    static topbarHeight = (Platform.OS === 'ios' ? 64 : 44)
    renderBtn(pos){
      let render = (obj) => {
        const { name, onPress } = obj
        if(Platform.OS === 'android'){
          return (
            <TouchableNativeFeedback onPress={onPress} style={styles.btn}>
              <Icon name={name} size={px2dp(26)} color="#fff" />
            </TouchableNativeFeedback>
          )
        }else{
          return (
            <TouchableOpacity onPress={onPress} style={styles.btn}>
              <Icon name={name} size={px2dp(26)} color="#fff" />
            </TouchableOpacity>
          )
        }
      }
      if(pos == "left"){
        if(this.props.leftIcon){
          return render({
            name: this.props.leftIcon,
            onPress: this.props.leftPress
          })
        }else{
          // return (<ImageButton style={styles.btn} source={require('../images/ic_back_white.png')}/>)
            return (<View style={styles.btn}/>)
        }
      }else if(pos == "right"){
        if(this.props.rightIcon){
          return render({
            name: this.props.rightIcon,
            onPress: this.props.rightPress
          })
        }else{
          return (<View style={styles.btn}/>)
        }
      }
    }
    render(){
        return(
            <View style={[styles.topbar, this.props.style]}>
                {this.renderBtn("left")}
                <Animated.Text numberOfLines={1} style={[styles.title, this.props.titleStyle]}>{this.props.title}</Animated.Text>
                {this.renderBtn("right")}
            </View>
        )
    }
}

const styles = StyleSheet.create({
    topbar: {
        height: NavBar.topbarHeight,
        backgroundColor: "#06C1AE",
        flexDirection: 'row',
        justifyContent: 'space-between',
        alignItems: 'center',
        paddingTop: (Platform.OS === 'ios') ? 20 : 0,
        paddingHorizontal: px2dp(10)
    },
    btn: {
      width: 22,
      height: 22,
      justifyContent: 'center',
      alignItems: 'center'
    },
    title:{
        color: "#fff",
        fontWeight: "bold",
        fontSize: px2dp(16),
        marginLeft: px2dp(5),
    }
});
grammar
1. Require attributes to be the specified JavaScript base type. For example:
Property: PropTypes.array,
Property: PropTypes.bool,
Attribute: PropTypes.func,
Attribute: PropTypes.number,
Property: PropTypes.object,
Property: PropTypes.string,
2. Require the attribute to be a renderable node. For example:
Property: PropTypes.node,
3. Require that the attribute be a React element. For example:
Attribute: PropTypes.element,
4. Require that an attribute be an instance of a specified class. For example:
Properties: PropTypes.instanceOf(NameOfAClass),
5. Require attribute values to be specific values. For example:
Property: PropTypes. oneOf (['value1','value2']),
6. Require that attributes can be any of the specified types. For example:
attribute: PropTypes.oneOfType([
  PropTypes.bool,
  PropTypes.number,
  PropTypes.instanceOf(NameOfAClass),
])
7. Require the property to be an array of the specified type. For example:
Property: PropTypes.arrayOf(PropTypes.number)
8. A property is required to be an object with a specific member variable. For example:
Property: PropTypes.objectOf(PropTypes.number)
9. Require an attribute to be an object that specifies its composition. For example:
attribute: PropTypes.shape({
  color: PropTypes.string,
  fontSize: PropTypes.number,
}),
10. Attributes can be of any type. For example:
Attribute: PropTypes.any
Declare attributes as necessary
Use the keyword isRequired to declare that it is necessary.
Property: PropTypes.array.isRequired,
Attribute: PropTypes.any.isRequired,
Property: PropTypes.instanceOf(NameOfAClass).isRequired,