Chapter 4 appointment management - scheduled tasks Quartz, appointment settings
1. Timed task component Quartz
[Objective]
Scheduled task component Quartz
- Clear the garbage pictures generated by file upload
[path]
1: Introduction to Quart
- Master the scene (scheduled task)
2: Introduction to Quartz
- Spring integration Quartz (configured in spring)
3: cron expression
4: cron expression online generator
[explanation]
1.1. Introduction to quartz
Quartz is an open source project in the field of Job scheduling. Quartz can be used alone or integrated with the spring framework. The latter is generally used in actual development. Using quartz, you can develop one or more scheduled tasks. Each scheduled task can be executed separately, such as every 1 hour, at 10 a.m. on the first day of each month, at 5 p.m. on the last day of each month, etc.
What: it is an open source framework for background task scheduling
Role: regular background task development
When to use: it can be used when you need to perform tasks regularly / repeatedly
How to use it?
-
Introducing maven dependency
-
Create a task class to implement the method of the task
-
Add spring configuration file
- The custom task class needs to be registered with the spring container
- Configure jobdetail and call the method in the bean object (task class) in the spring container (method in task class). Is it concurrent (multithreading)
- Configure trigger trigger and write trigger timing expression (7 subexpressions)
- Configure scheduler scheduling container
-
To start it, just start the spring container and load the spring configuration file
Official website: http://www.quartz-scheduler.org/
maven coordinates:
<!--quartz Basic package for-->
<dependency>
    <groupId>org.quartz-scheduler</groupId>
    <artifactId>quartz</artifactId>
    <version>2.2.1</version>
</dependency>
<dependency>
    <groupId>org.quartz-scheduler</groupId>
    <artifactId>quartz-jobs</artifactId>
    <version>2.2.1</version>
</dependency>
<!--spring integration Quartz-->
<dependency>
    <groupId>org.springframework</groupId>
    <artifactId>spring-context-support</artifactId>
    <version>5.0.2.RELEASE</version>
</dependency>
<dependency>
    <groupId>org.springframework</groupId>
    <artifactId>spring-tx</artifactId>
    <version>5.0.2.RELEASE</version>
</dependency>
1.2. Introduction to quartz
[path]
1: Create the maven project quartzdemo, package it in jar, and import the jar package
2: Customize a Job
3: Provide the Spring configuration file applicationContext-jobs.xml to configure custom jobs, task descriptions, triggers, scheduling factories, etc
4: Create a startup class and start the spring container using ClassPathXmlApplicationContext
[explanation]
This case is based on the integration of Quartz and spring. Specific steps:
(1) Create the maven project quartzdemo, import the coordinates related to Quartz and spring, and the pom.xml file is as follows
Import jar package
<?xml version="1.0" encoding="UTF-8"?>
<project xmlns="http://maven.apache.org/POM/4.0.0"
         xmlns:xsi="http://www.w3.org/2001/XMLSchema-instance"
         xsi:schemaLocation="http://maven.apache.org/POM/4.0.0 http://maven.apache.org/xsd/maven-4.0.0.xsd">
    <modelVersion>4.0.0</modelVersion>

    <groupId>com.itheima</groupId>
    <artifactId>quartzdemo</artifactId>
    <version>1.0-SNAPSHOT</version>

    <dependencies>
        <dependency>
            <groupId>org.springframework</groupId>
            <artifactId>spring-context-support</artifactId>
            <version>5.0.2.RELEASE</version>
        </dependency>
        <dependency>
            <groupId>org.springframework</groupId>
            <artifactId>spring-tx</artifactId>
            <version>5.0.2.RELEASE</version>
        </dependency>
        <dependency>
            <groupId>org.springframework</groupId>
            <artifactId>spring-web</artifactId>
            <version>5.0.2.RELEASE</version>
        </dependency>
        <dependency>
            <groupId>org.quartz-scheduler</groupId>
            <artifactId>quartz</artifactId>
            <version>2.2.1</version>
        </dependency>
        <dependency>
            <groupId>org.quartz-scheduler</groupId>
            <artifactId>quartz-jobs</artifactId>
            <version>2.2.1</version>
        </dependency>
    </dependencies>
</project>
(2) Customize a Job
package com.itheima.job;

import java.text.SimpleDateFormat;
import java.util.Date;

/**
 * Description: No Description
 * User: Eric
 */
public class JobDemo {
    SimpleDateFormat sdf = new SimpleDateFormat("yyyy-MM-dd HH:mm:ss");
    /**
     * The method name can be arbitrary
     */
    public void doJob(){
        System.out.println(sdf.format(new Date()));
    }
}
(3) Provide the Spring configuration file application-jobs.xml to configure custom jobs, task descriptions, triggers, scheduling factories, etc
[path]
1: Create a JobDetail object, which is responsible for calling the specified Job through reflection, injecting the target object and injecting the target method
2: Register a trigger and specify the time when the task is triggered
3: Register a unified scheduling factory to schedule tasks through this scheduling factory
<?xml version="1.0" encoding="UTF-8"?>
<beans xmlns="http://www.springframework.org/schema/beans"
       xmlns:xsi="http://www.w3.org/2001/XMLSchema-instance"
       xsi:schemaLocation="http://www.springframework.org/schema/beans http://www.springframework.org/schema/beans/spring-beans.xsd">

<!--  Register task class  -->
    <bean id="myJob" class="com.itheima.job.JobDemo"/>
<!--  Task policy class  -->
    <bean id="jobDetail" class="org.springframework.scheduling.quartz.MethodInvokingJobDetailFactoryBean">
<!--   targetObject Which one do you want to call bean object, Task class object     -->
        <property name="targetObject" ref="myJob"/>
<!--    Which method in the task class is called     -->
        <property name="targetMethod" value="doJob"/>
<!--   Concurrent concurrent=false Single thread
       true: When the task is not completed within the specified cycle, a new task is triggered, which belongs to the same task. Use multithreading to process tasks
     -->
        <property name="concurrent" value="true"/>
    </bean>
<!--  trigger  -->
    <bean id="trigger" class="org.springframework.scheduling.quartz.CronTriggerFactoryBean">
<!--  Starting from 0 seconds, it is triggered every 2 seconds
 Seven subexpressions are separated by spaces
 Second minute hour day month anniversary (omitted, annual)
-->
        <property name="cronExpression" value="0/2 * * * * ?"/>
<!--  Policy to use when triggering    -->
        <property name="jobDetail" ref="jobDetail"/>
    </bean>
<!--  The scheduling container registers a unified scheduling factory -->
    <bean class="org.springframework.scheduling.quartz.SchedulerFactoryBean">
        <property name="triggers">
            <list>
                <ref bean="trigger"/>
            </list>
        </property>
    </bean>
</beans>
(4) Create startup class
package com.itheima.job;

import org.springframework.context.support.ClassPathXmlApplicationContext;

import java.io.IOException;

/**
 * Description: No Description
 * User: Eric
 */
public class JobApplication {
    public static void main(String[] args) throws IOException {
        new ClassPathXmlApplicationContext("classpath:applicationContext-jobs.xml");
        // block
        System.in.read();
    }
}
Execute the above main method and observe the console. It can be found that the output occurs every 2 seconds, indicating that the custom Job is called every 2 seconds.
1.3. cron expression
In the above introductory case, we specified an expression: 0 / 2 * *?
This expression is called cron expression, which can flexibly define the execution time of the program that meets the requirements. In this section, let's learn how to use cron expressions. As shown below:
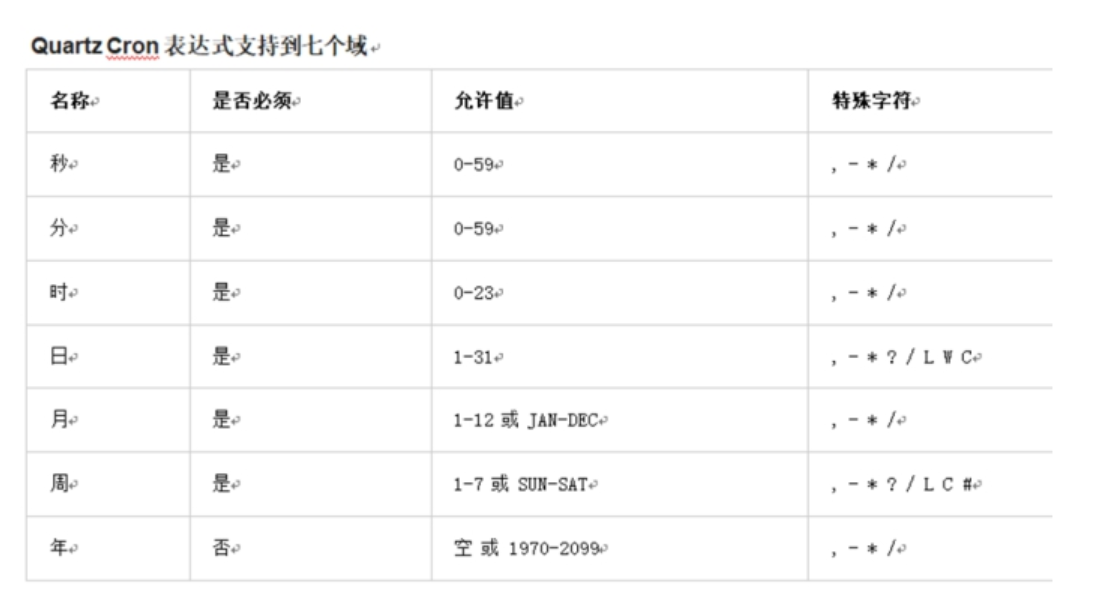
The cron expression is divided into seven fields separated by spaces. The last field (year) can be empty. Each field has its own allowed values and some special characters. Using these special characters can make the expressions we define more flexible.
The following is an introduction to these special characters:
Comma (,): specifies a list of values. For example, in the month field, 1,4,5,7 represents January, April, may and July
Horizontal bar (-): specify a range. For example, in the time domain, 3-6 represents 3 points to 6 points (i.e. 3 points, 4 points, 5 points and 6 points)
Asterisk (*): indicates that this field contains all legal values. For example, using an asterisk in the month field means that it is triggered every month
Slash (/): indicates increment. For example, in the second field, 0 / 15 indicates every 15 seconds. How long is the interval
Question mark (?): can only be used in the day and week fields, but cannot be used in both fields at the same time. Indicates that it is not specified. There must be one in the expression? Either on the day or on the week
Pound sign (#): it can only be used in the week field to specify the day of the week in the month. For example 6#3, it means that the third Friday of a month (6 = Friday, 3 means the third week in the month) Sunday is the first day of the week, 1 means Sunday, and 2: Monday
Mother's Day: 0 0 8? 5 1#2
50: The last value allowed on a field. Can only be used on day and week fields. When used in the day field, it represents the last day of the month specified in the month field. When used in the week field, it indicates that the last day of the week is Saturday
W: The w character represents the working day (Monday to Friday). It can only be used in the day field. It is used to specify the nearest working day from the specified day
1.4. cron expression online generator
We introduced cron expressions earlier, but there are still some difficulties in writing their own expressions. We can use some cron expression online generators to generate expressions according to our needs.
https://www.bejson.com/othertools/cron/
[summary]
1: Introduction to Quart
- Master the scene (background scheduled task)
2: Introduction to Quartz
- Introducing Quartz dependency, spring context support, spring TX
- Create task classes and methods
- spring configuration file:
- Task scheduling container SchedulerFactoryBean triggers
- Trigger CronTriggerFactoryBean, jobdetail
- Task policy JobDetail, MethodInvokingJobDetailFactoryBean targetObject.targetMethod
- For customized tasks, enter the spring container
3: cron expression seven sub expressions second minute hour day month anniversary
4: cron expression online generator
< https://qqe2.com/cron >There's a problem
https://www.bejson.com/othertools/cron/ Can use
2. Regularly clean up garbage pictures [ focus on use ]
[Objective]
Quartz integration project, complete regular cleaning of garbage pictures
[path]
Definition of junk image: the image on the database is needed, and what is not in the data is unnecessary. The picture is saved to 7 cattle.
Garbage picture: after subtracting the data from the 7 cattle, the rest is garbage
I hope the background will run automatically. When. The trigger time is 4:00 a.m. and can only be executed when no one comes to operate
-
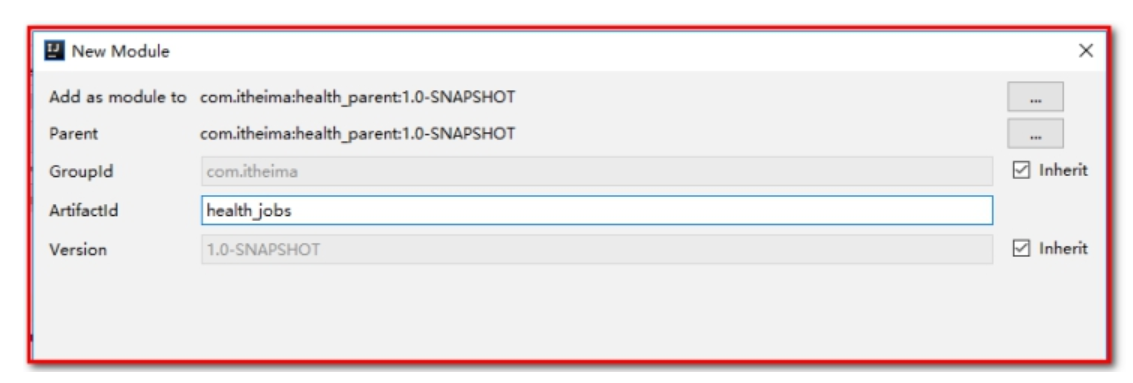
Create maven aggregation project health_jobs. The packaging method is war (not war). Import Quartz and other related coordinates
-
Create ClearImgJob scheduled task class
-
Configure redis spring-redis.xml
-
Clean up the garbage on 7 cattle
-
-
Configure spring-job.xml and use spring to integrate quartz
-
Scan package to register ClearImgJob task object
-
Task policy jobDetail
-
Trigger trigger
-
Scheduling container Scheduler
-
-
web.xml
Start the spring container
[explanation]
Previously, we have completed the management of the physical examination package. When adding the package, the basic information and pictures of the package are submitted to the background for operation in two times. That is, the user first uploads the picture to the qiniu cloud server, and then submits other information entered in the new window. If the user just uploads the picture without submitting other information entered, the picture will become a garbage picture because its existence is not recorded in the database. At this time, how do we deal with these garbage pictures?
The solution is to clean up these garbage pictures regularly through the scheduled task component. In order to distinguish which pictures are junk pictures, we save the pictures to a redis set after the file is uploaded successfully. When the package data is inserted into the database, we save the picture name to another redis set. We can obtain the names of all junk pictures by calculating the difference between the two sets.
In this chapter, we will find out all the junk images by calculating the difference between the two sets of redis based on the Quartz timing task, and then we can clean up the junk images.
2.1. Operation steps
(1) Create maven aggregation project health_jobs. The packaging method is war. Import Quartz and other related coordinates
<?xml version="1.0" encoding="UTF-8"?>
<project xmlns="http://maven.apache.org/POM/4.0.0"
         xmlns:xsi="http://www.w3.org/2001/XMLSchema-instance"
         xsi:schemaLocation="http://maven.apache.org/POM/4.0.0 http://maven.apache.org/xsd/maven-4.0.0.xsd">
    <parent>
        <artifactId>health_parent</artifactId>
        <groupId>com.itheima</groupId>
        <version>1.0-SNAPSHOT</version>
    </parent>
    <modelVersion>4.0.0</modelVersion>

    <artifactId>health_jobs</artifactId>

    <packaging>war</packaging>
    <name>health_jobs Maven Webapp</name>
    <url>http://www.example.com</url>
    <properties>
        <project.build.sourceEncoding>UTF-8</project.build.sourceEncoding>
        <maven.compiler.source>1.8</maven.compiler.source>
        <maven.compiler.target>1.8</maven.compiler.target>
    </properties>
    <dependencies>
        <dependency>
            <groupId>com.itheima</groupId>
            <artifactId>health_interface</artifactId>
            <version>1.0-SNAPSHOT</version>
        </dependency>
        <dependency>
            <groupId>org.quartz-scheduler</groupId>
            <artifactId>quartz</artifactId>
        </dependency>
        <dependency>
            <groupId>org.quartz-scheduler</groupId>
            <artifactId>quartz-jobs</artifactId>
        </dependency>
    </dependencies>
</project>
(2) Configure web.xml
<?xml version="1.0" encoding="UTF-8"?>
<web-app xmlns:xsi="http://www.w3.org/2001/XMLSchema-instance"
         xmlns="http://java.sun.com/xml/ns/javaee"
         xsi:schemaLocation="http://java.sun.com/xml/ns/javaee http://java.sun.com/xml/ns/javaee/web-app_3_0.xsd"
         id="WebApp_ID" version="3.0">
    <display-name>Archetype Created Web Application</display-name>
    <!-- load spring container -->
    <context-param>
        <param-name>contextConfigLocation</param-name>
        <param-value>classpath:applicationContext-*.xml</param-value>
    </context-param>
    <listener>
        <listener-class>org.springframework.web.context.ContextLoaderListener</listener-class>
    </listener>
</web-app>
(3) Configure log4j.properties
### direct log messages to stdout ###
log4j.appender.stdout=org.apache.log4j.ConsoleAppender
log4j.appender.stdout.Target=System.err
log4j.appender.stdout.layout=org.apache.log4j.PatternLayout
log4j.appender.stdout.layout.ConversionPattern=%d{ABSOLUTE} %5p %c{1}:%L - %m%n

### direct messages to file mylog.log ###
log4j.appender.file=org.apache.log4j.FileAppender
log4j.appender.file.File=c:\\mylog.log
log4j.appender.file.layout=org.apache.log4j.PatternLayout
log4j.appender.file.layout.ConversionPattern=%d{ABSOLUTE} %5p %c{1}:%L - %m%n

### set log levels - for more verbose logging change 'info' to 'debug' ###

log4j.rootLogger=debug, stdout
(4) Configure applicationContext-redis.xml
<?xml version="1.0" encoding="UTF-8"?>
<beans xmlns="http://www.springframework.org/schema/beans"
       xmlns:xsi="http://www.w3.org/2001/XMLSchema-instance"
       xsi:schemaLocation="http://www.springframework.org/schema/beans http://www.springframework.org/schema/beans/spring-beans.xsd ">

    <!--Jedis Configuration of connection pool-->
    <bean id="jedisPoolConfig" class="redis.clients.jedis.JedisPoolConfig">
        <property name="maxTotal">
            <value>200</value>
        </property>
        <property name="maxIdle">
            <value>50</value>
        </property>
<!--   testOnBorrow   When obtaining the connection object from the connection pool, test it to verify whether it can be used. If it cannot be used, re obtain and re create the connection   -->
        <property name="testOnBorrow" value="true"/>
<!--   testOnReturn   When returning to the connection pool, you should test it to verify whether it can be used-->
        <property name="testOnReturn" value="true"/>
    </bean>
    <bean id="jedisPool" class="redis.clients.jedis.JedisPool">
        <constructor-arg name="poolConfig" ref="jedisPoolConfig" />
        <constructor-arg name="host" value="127.0.0.1" />
        <constructor-arg name="port" value="6379" type="int" />
        <constructor-arg name="timeout" value="30000" type="int" />
    </bean>
</beans>
(5) Configure applicationContext-jobs.xml
<?xml version="1.0" encoding="UTF-8"?>
<beans xmlns="http://www.springframework.org/schema/beans"
       xmlns:xsi="http://www.w3.org/2001/XMLSchema-instance"
       xmlns:context="http://www.springframework.org/schema/context"
       xsi:schemaLocation="http://www.springframework.org/schema/beans http://www.springframework.org/schema/beans/spring-beans.xsd http://www.springframework.org/schema/context http://www.springframework.org/schema/context/spring-context.xsd">

    <!--  Custom classes registered to spring container  -->
    <context:component-scan base-package="com.itheima.health.job"/>

<!--  Task strategy  -->
    <bean id="jobDetail" class="org.springframework.scheduling.quartz.MethodInvokingJobDetailFactoryBean">
        <property name="targetObject" ref="clearImgJob"/>
        <property name="targetMethod" value="clearImg"/>
    </bean>
<!--  trigger  -->
    <bean id="trigger" class="org.springframework.scheduling.quartz.CronTriggerFactoryBean">
<!--  test      <property name="cronExpression" value="0/30 * * * * ?"/>-->
        <property name="cronExpression" value="0 0 4 * * ?"/>
        <property name="jobDetail" ref="jobDetail"/>
    </bean>
<!--  Scheduling container  -->
    <bean class="org.springframework.scheduling.quartz.SchedulerFactoryBean">
        <property name="triggers">
            <list>
                <ref bean="trigger"/>
            </list>
        </property>
    </bean>
</beans>
(6) Create ClearImgJob scheduled task class
package com.itheima.health.job;

import com.itheima.health.constant.RedisConstant;
import com.itheima.health.utils.QiNiuUtils;
import org.springframework.beans.factory.annotation.Autowired;
import org.springframework.stereotype.Component;
import redis.clients.jedis.Jedis;
import redis.clients.jedis.JedisPool;

import java.util.Set;

/**
 * Description: Clean up garbage picture task class
 * User: Eric
 *
 * Component   Register in the spring container through the annotation method. If the name attribute is not specified, the class name will be lowercase by default
 * Controller
 * Service
 * Repository
 */
@Component
public class ClearImgJob {

    @Autowired
    private JedisPool jedisPool;

    /**
     * Execution method of cleaning up garbage pictures
     */
    public void clearImg(){
        // Get redis connection
        Jedis jedis = jedisPool.getResource();
        // Calculate the difference set of two sets and save all seven cattle pictures to the database
        // Pictures to delete
        Set<String> need2Delete = jedis.sdiff(RedisConstant.SETMEAL_PIC_RESOURCES, RedisConstant.SETMEAL_PIC_DB_RESOURCES);
        // Call seven cattle to delete
        QiNiuUtils.removeFiles(need2Delete.toArray(new String[]{}));
        // Delete the pictures on redis. The pictures on both sides have been synchronized
        jedis.del(RedisConstant.SETMEAL_PIC_RESOURCES, RedisConstant.SETMEAL_PIC_DB_RESOURCES);
    }
}
Test:
The console output "delete success" indicates success
2.2 another implementation (seven cattle - database)
2.2.1 traverse the picture on 7 cattle
Modify QiNiuUitls and add a method to traverse the pictures on 7 cattle
    /**
     * Traverse all pictures on 7 cattle
     * @return
     */
    public static List<String> listFile(){
        BucketManager bucketManager = getBucketManager();
        //List spatial files. The first parameter is the image warehouse (spatial name), and the second parameter is file name prefix filtering. '' proxy all
        BucketManager.FileListIterator fileListIterator = bucketManager.createFileListIterator(BUCKET,"");
        List<String> imageFiles = new ArrayList<String>();
        while (fileListIterator.hasNext()) {
            //Processing the obtained file list results
            FileInfo[] items = fileListIterator.next();
            for (FileInfo item : items) {
                // item.key file name
                imageFiles.add(item.key);
                System.out.println(item.key);
            }
        }
        return imageFiles;
    }
2.2.2 modify dependency
Modify health_ pom.xml of jobs, add the_ Interface dependency
<dependencies>
    <dependency>
        <groupId>com.itheima</groupId>
        <artifactId>health_interface</artifactId>
        <version>1.0-SNAPSHOT</version>
    </dependency>
    <dependency>
        <groupId>org.quartz-scheduler</groupId>
        <artifactId>quartz</artifactId>
    </dependency>
    <dependency>
        <groupId>org.quartz-scheduler</groupId>
        <artifactId>quartz-jobs</artifactId>
    </dependency>
</dependencies>
2.2.3 spring-jobs.xml configuration
<?xml version="1.0" encoding="UTF-8"?>
<beans xmlns="http://www.springframework.org/schema/beans"
       xmlns:xsi="http://www.w3.org/2001/XMLSchema-instance" xmlns:dubbo="http://code.alibabatech.com/schema/dubbo"
       xsi:schemaLocation="http://www.springframework.org/schema/beans http://www.springframework.org/schema/beans/spring-beans.xsd http://code.alibabatech.com/schema/dubbo http://code.alibabatech.com/schema/dubbo/dubbo.xsd">

    <!-- Specify application name -->
    <dubbo:application name="health_job" />
    <!--Specify service registry address-->
    <dubbo:registry address="zookeeper://127.0.0.1:2181"/>
<!-- The task class needs to be registered dubbo Sweep package  -->
    <dubbo:annotation package="com.itheima.health.job"/>

<!--  strategy  -->
    <bean id="jobDetail" class="org.springframework.scheduling.quartz.MethodInvokingJobDetailFactoryBean">
        <property name="targetObject" ref="cleanImgJob"/>
        <property name="targetMethod" value="cleanImg"/>
<!--concurrent by true Multithreading runs tasks asynchronously
    false: It is a single thread to run task synchronization
-->
        <property name="concurrent" value="false"/>
    </bean>
<!--  trigger  -->
    <bean id="trigger" class="org.springframework.scheduling.quartz.CronTriggerFactoryBean">
        <property name="cronExpression" value="0/30 * * * * ?"/>
        <property name="jobDetail" ref="jobDetail"/>
    </bean>
<!--  Scheduling container  -->
    <!--  Scheduling container  -->
    <bean class="org.springframework.scheduling.quartz.SchedulerFactoryBean">
        <property name="triggers">
            <list>
                <ref bean="trigger"/>
            </list>
        </property>
    </bean>
</beans>
2.2.4 SetmealService and implementation class
SetmealService interface
/**
 * Find all the pictures in the database
 * @return
 */
List<String> findImgs();
SetmealServiceImpl implementation class
/**
 * Find all the pictures in the database
 * @return
 */
@Override
public List<String> findImgs() {
    return setmealDao.findImgs();
}
2.2.5 SetmealDao and mapping file
SetmealDao add a method to query all package pictures
/**
 * Check all pictures of the package in the data
 * @return
 */
List<String> findImgs();
SetmealDao.xml mapping file
<select id="findImgs" resultType="String">
    select img from t_setmeal
</select>
2.2.6 garbage image cleaning tasks
package com.itheima.health.job;

import com.alibaba.dubbo.config.annotation.Reference;
import com.itheima.health.service.SetmealService;
import com.itheima.health.utils.QiNiuUtils;
import org.springframework.stereotype.Component;

import java.util.List;

/**
 * Description: No Description
 * User: Eric
 */
@Component("cleanImgJob")
public class CleanImgJob {

    /**
     * Subscription Service
     */
    @Reference
    private SetmealService setmealService;

    public void cleanImg(){
        // Find out all the pictures on 7 cattle
        List<String> imgIn7Niu = QiNiuUtils.listFile();
        // Find all the pictures in the database
        List<String> imgInDb = setmealService.findImgs();
        // 7 Niu - the remaining imgIn7Niu in the database is to be deleted
        // imgIn7Niu.size(7) - 3 = imgIn7Niu.size(4)
        // Delete the objects in imgInDb if they can be found in imgIn7Niu
        imgIn7Niu.removeAll(imgInDb);
        // Delete junk pictures on 7 cattle
        String[] strings = imgIn7Niu.toArray(new String[]{});
        QiNiuUtils.removeFiles(strings);
    }
}
[summary]
-
Application scenario of Quartz: background task (executing task in the middle of the night)
-
Component and execution process: task scheduling container - > trigger - > task policy (concurrency = false) - > task class - > task method
-
Set collection operation in Redis:
sadd adds, smembers key views all elements in the set, srem deletes the elements in the set, and sdiff key1 key2 calculates the set of key1-key2
-
7. Save all pictures - pictures saved to the database = collection to be cleaned up
-
How to start: as long as you can start the spring container
3. Reservation setting demand analysis
[Objective]
- Master the requirements of reservation settings
[path]
- Reservation setting demand analysis
- Corresponding table structure and entity class
[explanation]
3.1. Reservation setting demand analysis
Previously, we have completed inspection item management, inspection group management, package management, etc. Next, we need to set the appointment. In fact, we need to set the maximum number of physical examination appointments per day. Customers can make an online appointment through wechat. When making an online appointment, they need to select the time of physical examination, so that the number of people who have made an appointment to select the time of physical examination plus 1. If the time selected by the customer is full, they cannot make an appointment.
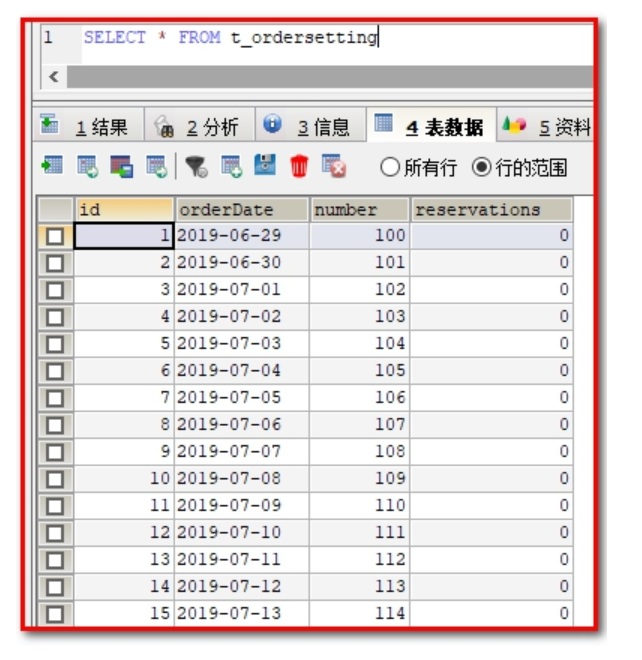
3.2. t_ordersetting table structure

orderDate: appointment date
Number: the maximum number of people that can be reserved
reservations: number of people reserved
[summary]
-
Appointment setting is to set the maximum number of medical appointments in a day (number field)
-
When a customer makes an appointment, judge whether it can make an appointment (reservations < number), and update the current number of appointments + 1 (reservations field)
Prevent oversold
-
The reserved number cannot be greater than the reserved number (reservations < = number)
-
Why make reservation settings: user experience (many people, long waiting time, poor experience), cost control (holidays, staff vacancies)
4. Apache POI
[Objective]
Learn what Apache POI is
Master the usage of Apache POI
[path]
-
POI introduction
-
POI introduction case
(1) Read data from Excel file
(2) Write data to Excel file
-
Introduction to POI tool class
[explanation]
4.1. POI introduction
Apache POI is a free, open source, cross platform Java API written in Java. Apache POI provides Java programs with the ability to read and write files in Microsoft Office format. The most used is to use POI to operate Excel files.
jxl: specialized in Excel
maven coordinates:
<dependency>
  <groupId>org.apache.poi</groupId>
  <artifactId>poi</artifactId>
  <version>3.14</version>
</dependency>
<dependency>
  <groupId>org.apache.poi</groupId>
  <artifactId>poi-ooxml</artifactId>
  <version>3.14</version>
</dependency>
Components of POI structure:
HSSF - Provide reading and writing Microsoft Excel XLS Function of format file 97-2003 of excel, Suffix.xls Worksheet line 65535
XSSF - Provide reading and writing Microsoft Excel OOXML XLSX Format file function (we use) after 2007.xlsx Worksheet large line number 1,048,576
HWPF - Provide reading and writing Microsoft Word DOC Function of format file
HSLF - Provide reading and writing Microsoft PowerPoint Function of format file
HDGF - Provide read Microsoft Visio Function of format file
HPBF - Provide read Microsoft Publisher Function of format file
HSMF - Provide read Microsoft Outlook Function of format file
We use: XSSF - provides the ability to read and write Microsoft Excel OOXML XLSX format files
4.2. Introduction case [key points]
4.2.1. Reading data from Excel file
[requirements]
Using POI, you can read data from an existing Excel file
[path]
1: Create workbook object
2: Get the location of the worksheet object file
3: Traverse the worksheet object to get the row object
4: Traverse the row object to get the cell (column) object
5: Obtain data
6: Shut down
[explanation]
- realization
Using POI, you can read data from an existing Excel file
Create poidemo project
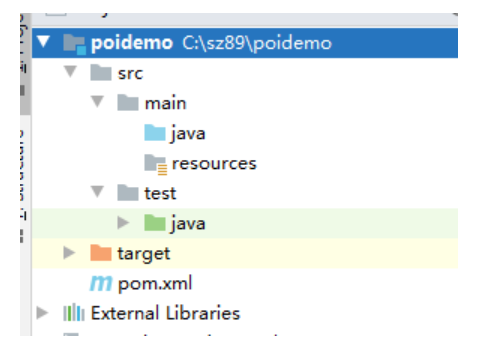
Add dependency in pom.xml
<dependencies>
    <dependency>
        <groupId>org.apache.poi</groupId>
        <artifactId>poi</artifactId>
        <version>3.14</version>
    </dependency>
    <dependency>
        <groupId>org.apache.poi</groupId>
        <artifactId>poi-ooxml</artifactId>
        <version>3.14</version>
    </dependency>
    <dependency>
        <groupId>junit</groupId>
        <artifactId>junit</artifactId>
        <version>4.12</version>
        <scope>test</scope>
    </dependency>
</dependencies>
Copy read.xlsx in the data to the root directory of disk D
Create and read excel test class
package com.itheima.test;

import org.apache.poi.hssf.usermodel.HSSFWorkbook;
import org.apache.poi.ss.usermodel.Cell;
import org.apache.poi.ss.usermodel.Row;
import org.apache.poi.ss.usermodel.Sheet;
import org.apache.poi.ss.usermodel.Workbook;
import org.apache.poi.xssf.usermodel.XSSFWorkbook;
import org.junit.Test;

import java.io.IOException;

/**
 * Description: No Description
 * User: Eric
 */
public class ReadFormExcel {
    @Test
    public void readFromExcel() throws Exception {
        // Create workbook, construction method, file path
        Workbook workbook = new XSSFWorkbook("d:\\read.xlsx");
        // Get worksheet
        Sheet sht = workbook.getSheetAt(0);
        // sht.getPhysicalNumberOfRows(); //  Number of physical rows
        // sht.getLastRowNum(); //  Subscript of the last line
        // getLastrowNum() is used in fori traversal
        // Traverse the worksheet to get the row object
        for (Row row : sht) {
            // Get cells through row objects
            for (Cell cell : row) {
                // Type of cell
                int cellType = cell.getCellType();
                if(Cell.CELL_TYPE_NUMERIC == cellType){
                    // Cells of numeric type
                    System.out.print(cell.getNumericCellValue() + ",");
                }else {
                    // Value from cell
                    System.out.print(cell.getStringCellValue() + ",");
                }
            }
            System.out.println();
        }
        // Close Workbook
        workbook.close();
    }
}
As can be seen from the above introductory case, POI operation Excel table encapsulates several core objects:
XSSFWorkbook: workbook
XSSFSheet: Worksheet
XSSFRow: that 's ok
XSSFCell: Cell
In the above case, the row is obtained by traversing the worksheet, the cell is obtained by traversing the row, and finally the value in the cell is obtained.
Another way is to obtain the last row number of the worksheet, so as to obtain the row object according to the row number, and obtain the last cell index through the row, so as to obtain a cell object of each row according to the cell index. The code is as follows:
// Export excel to get the last row
@Test
public void exportExcel_lastRow() throws IOException {
    //Create Workbook
    XSSFWorkbook workbook = new XSSFWorkbook("d:\\read.xlsx");
    //Obtain the worksheet, either according to the order of the worksheet or according to the name of the worksheet
    XSSFSheet sheet = workbook.getSheetAt(0);
    //Gets the row number of the last row of the current worksheet, starting from 0
    int lastRowNum = sheet.getLastRowNum();
    for(int i=0;i<=lastRowNum;i++){
        //Get line object by line number
        XSSFRow row = sheet.getRow(i);
        short lastCellNum = row.getLastCellNum();
        for(short j=0;j<lastCellNum;j++){
            String value = row.getCell(j).getStringCellValue();
            System.out.println(value);
        }
    }
    workbook.close();
}
4.2.2. Write data to Excel file
[requirements]
Using POI, you can create an Excel file in memory and write data to the file. Finally, you can save the Excel file in memory to disk through the output stream
[path]
1.Create workbook object
2.Create worksheet object
3.Create row object
4.Create column(Cell)object, Set content
5.Through the output stream workbook Object download to disk
[implementation]
Using POI, you can create an Excel file in memory and write data to the file. Finally, you can save the Excel file in memory to disk through the output stream
package com.itheima.test;
import org.apache.poi.ss.usermodel.Cell;
import org.apache.poi.ss.usermodel.Row;
import org.apache.poi.ss.usermodel.Sheet;
import org.apache.poi.ss.usermodel.Workbook;
import org.apache.poi.xssf.usermodel.XSSFWorkbook;
import org.junit.Test;
import java.io.File;
import java.io.FileNotFoundException;
import java.io.FileOutputStream;
/**
* Description: No Description
* User: Eric
*/
public class WriteExcel {
@Test
public void createExcel() throws Exception {
// Create workbook, in memory
Workbook workbook = new XSSFWorkbook();
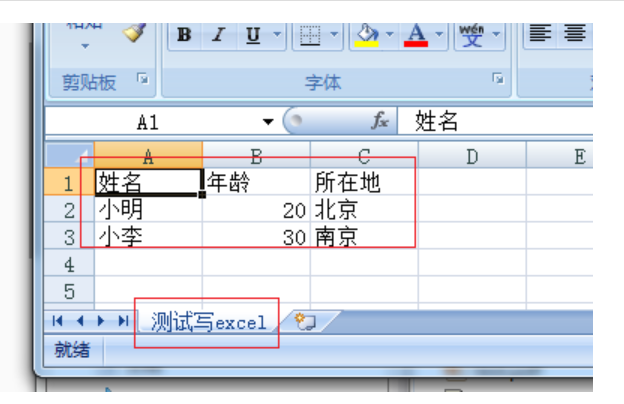
// Create worksheet
Sheet sht = workbook.createSheet("Test write excel");
// Create row under worksheet
Row row = sht.createRow(0);// The subscript of the line starts at 0
// Create cells using rows
Cell cell = row.createCell(0);// The subscript of the cell also starts from 0. Multiple cells are merged into 1 cell
// Assign values to cells
// Header
cell.setCellValue("full name");
row.createCell(1).setCellValue("Age");
row.createCell(2).setCellValue("Location");
row = sht.createRow(1);
row.createCell(0).setCellValue("Xiao Ming");
row.createCell(1).setCellValue(20);
row.createCell(2).setCellValue("Beijing");
row = sht.createRow(2);
row.createCell(0).setCellValue("petty thief");
row.createCell(1).setCellValue(30);
row.createCell(2).setCellValue("Nanjing");
// Save the workbook and persist it on your local hard disk
workbook.write(new FileOutputStream(new File("d:\\createExcel.xlsx")));
// Close Workbook
workbook.close();
}
}
Summary: POI Technology (writing data to Excel file)
- When creating a workbook, you do not need to pass in parameters (excel does not exist)
- Use the output stream to output excel
Application scenario: 1: read data from excel and write it to the database (import); 2: Query data from database and write it to excel file (report technology, export)
4.2.3. Introduction to POI tools
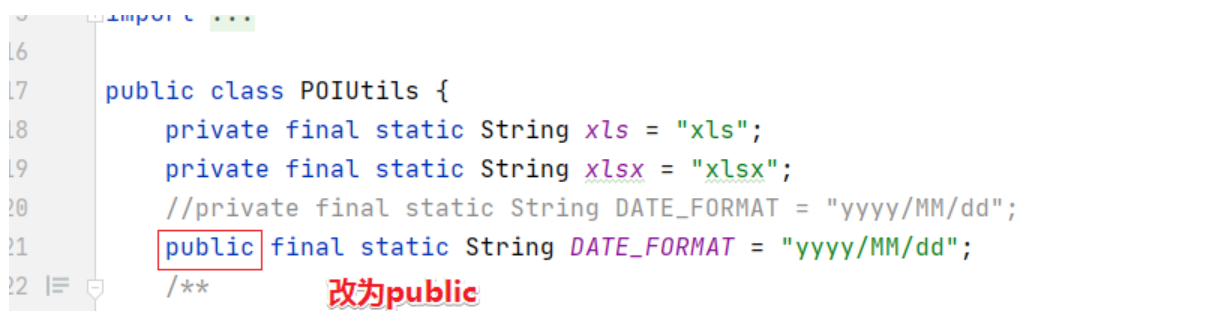
Copy the POIUtils tool class in the data to health_common project
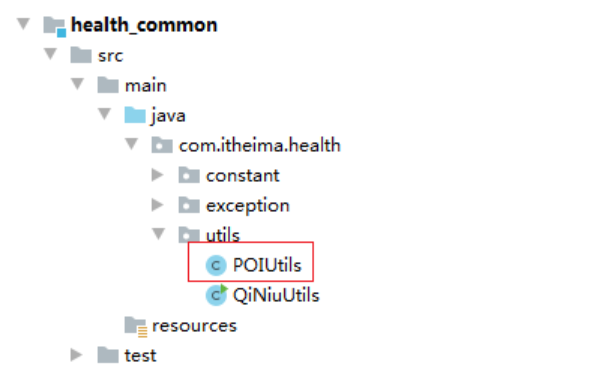
Modify the constant modifier of date format to public
[summary]
-
POI apache open source to operate office documents, excel (xls2003 HSSFWorkbook xlsx2007 XSSFWorkbook)
-
introduction
- Read excel
- Create a workbook and construct the full path of the file
- Get worksheet
- Get the row object, and get the row object through the worksheet
- Get cells through traversal of row objects
- Get the value of the cell through the cell, and follow the cell type. If it is a value, you have to use getNumbericCellValue
- Close Workbook
- Write excel
- Create workbook, parameterless construction
- Create a worksheet by subscript or name
- Create row subscripts starting at 0
- Create cells under row objects, starting at 0
- Assign values to cells
- Save workbook write to output stream
- Close Workbook
- POIUtils, read the uploaded excel file, and the read value is list < string [] > string [] represents a line of records
- Read excel
5. Batch import reservation setting information [ key ]
[Objective]
Batch import reservation setting information
[path]
- Provide template file download
- health_ Create a template directory under the webapp of the web and copy the "appointment setting template file \ ordersetting_template.xlsx" in the data to the template directory
-
Upload file import
-
OrderSettingController receives uploaded files
- Call POIUtils to parse excel file, list < string [] >
- Turn List < string [] > into List and call the server
- Return results to the page
-
OrderSettingService
-
Traversal loop List
-
Judge whether there is reservation setting information by date
-
existence
- Judge whether the reserved number is greater than the reserved number to be updated
- If it is greater than, an error is reported
- Less than, the number of appointments can be updated
-
If it does not exist, the reservation setting is inserted
-
-
-
OrderSettingDao
- Query reservation settings by date
- Update bookable number
- Insert appointment settings
-
[explanation]
[requirements]
Read the data of reservation settings from Excel and import it into the database in batch

[design]
The data table corresponding to the reservation setting information is t_ordersetting, and the page corresponding to the reservation setting operation is ordersetting.html
1: t_ordersetting table structure:

orderDate: appointment date
Number: the maximum number of people that can be reserved
reservations: number of people reserved
[path]
Operation process of batch importing reservation setting information:
Step 1: click the template download button to download the Excel template file [file download]
Step 2: enter the reservation setting information into the template file
Step 3: click the upload file button to upload the template file after entering the information to the server [file upload]
Step 4: read the data of the uploaded file through POI and save it to the database [POI import]
2: Place ordersetting.html in the health_web
5.1. Foreground code
5.1.1. Provide template documents
The Excel template file ordersetting_template.xlsx has been provided in the materials, and the file is placed in the template directory of health_web project

5.1.2. Implementation template file download - implemented
(1) Bind the event for the template download button to download the template file
<el-button style="margin-bottom: 20px;margin-right: 20px" type="primary" @click="downloadTemplate()">Template download</el-button>
(2)downloadTemplate()
//Download template file
downloadTemplate(){
    window.location.href="../../template/ordersetting_template.xlsx";
},
5.1.3. File upload - front end implemented
(1) Use the upload component of ElementUI to upload files and bind related events
<el-upload action="/ordersetting/upload.do"
           name="excelFile"
           :show-file-list="false"
           :on-success="handleSuccess"
           :before-upload="beforeUpload">
    <el-button type="primary">Upload file</el-button>
</el-upload>
(2) handleSuccess method: used to display the upload success or failure information.
//Prompt for successful upload
handleSuccess(response, file) {
    if(response.flag){
         this.$message({
              message: response.message,
              type: 'success'
         });
    }else{
         this.$message.error(response.message);
    }
},
(3) beforeUpload method in methods: used to verify whether the uploaded file is an excel file
//Check the file format before uploading
beforeUpload(file) {
    // file.type refers to the type of file,
    // Some students can't get application/vnd.ms-excel application/vnd.openxmlformats-officedocument.spreadsheetml.sheet
    // This is related to the system. You can replace the following file type verification by judging the suffix of the file

    // var fileExt = file.name.substring(file.name.lastIndexOf("."));
    // if (fileExt==".xls" || fileExt==".xlsx"){
             //return true;
    //}
    const isXLS = file.type === 'application/vnd.ms-excel';
    if(isXLS){
        return true;
    }
    const isXLSX = file.type === 'application/vnd.openxmlformats-officedocument.spreadsheetml.sheet';
    if (isXLSX) {
        return true;
    }
    this.$message.error('Upload file can only be xls perhaps xlsx format!');
    return false;
},
5.2. Background code
5.2.1. Controller
In health_ The web project creates the OrderSettingController and provides the upload method
package com.itheima.health.controller;

import com.alibaba.dubbo.config.annotation.Reference;
import com.itheima.health.constant.MessageConstant;
import com.itheima.health.entity.Result;
import com.itheima.health.pojo.OrderSetting;
import com.itheima.health.service.OrderSettingService;
import com.itheima.health.utils.POIUtils;
import org.springframework.web.bind.annotation.PostMapping;
import org.springframework.web.bind.annotation.RequestMapping;
import org.springframework.web.bind.annotation.RestController;
import org.springframework.web.multipart.MultipartFile;

import java.io.IOException;
import java.text.SimpleDateFormat;
import java.util.ArrayList;
import java.util.Date;
import java.util.List;

@RestController
@RequestMapping("/ordersetting")
public class OrderSettingController {

    @Reference
    private OrderSettingService orderSettingService;

    // Upload excel file
    @PostMapping("/upload")
    public Result upload(MultipartFile excelFile){
        try {
            // Read excel content
            List<String[]> strings = POIUtils.readExcel(excelFile);
            // Convert to list < ordersetting >
            List<OrderSetting> orderSettingList = new ArrayList<OrderSetting>();
            // Date format resolution
            SimpleDateFormat sdf = new SimpleDateFormat(POIUtils.DATE_FORMAT);
            Date orderDate = null;
            OrderSetting os = null;
            for (String[] dataArr : strings) {
                orderDate = sdf.parse(dataArr[0]);
                int number = Integer.valueOf(dataArr[1]);
                os = new OrderSetting(orderDate,number);
                orderSettingList.add(os);
            }
            // Call business service
            orderSettingService.add(orderSettingList);
            return new Result(true, MessageConstant.IMPORT_ORDERSETTING_SUCCESS);
        } catch (Exception e) {
            e.printStackTrace();
            return new Result(false, MessageConstant.IMPORT_ORDERSETTING_FAIL);
        }
    }
}
5.2.2. Service interface
Create an OrderSettingService service interface and provide new methods
package com.itheima.health.service;

import com.itheima.health.exception.HealthException;
import com.itheima.health.pojo.OrderSetting;

import java.util.List;

/**
 * Description: No Description
 * User: Eric
 */
public interface OrderSettingService {
    /**
     * Batch import
     * @param orderSettingList
     */
    void add(List<OrderSetting> orderSettingList) throws HealthException;
}
5.2.3. Service implementation class
Create the service implementation class ordersettingsserviceimpl and implement the new method
package com.itheima.health.service.impl;

import com.alibaba.dubbo.config.annotation.Service;
import com.itheima.health.dao.OrderSettingDao;
import com.itheima.health.exception.HealthException;
import com.itheima.health.pojo.OrderSetting;
import com.itheima.health.service.OrderSettingService;
import org.springframework.beans.factory.annotation.Autowired;
import org.springframework.transaction.annotation.Transactional;

import java.util.List;

/**
 * Description: No Description
 * User: Eric
 */
@Service(interfaceClass = OrderSettingService.class)
public class OrderSettingServiceImpl implements OrderSettingService {

    @Autowired
    private OrderSettingDao orderSettingDao;

    @Override
    @Transactional
    public void add(List<OrderSetting> orderSettingList) {
        // ergodic
        for (OrderSetting orderSetting : orderSettingList) {
            // Judge whether it exists and query by date. Note: whether there are times, minutes and seconds in the date, and there are no hours, minutes and seconds in the database
            OrderSetting osInDB = orderSettingDao.findByOrderDate(orderSetting.getOrderDate());
            if(null != osInDB){
                // This reservation setting exists in the database. The reserved quantity cannot be greater than the reserved quantity
                if(osInDB.getReservations() > orderSetting.getNumber()){
                    throw new HealthException(orderSetting.getOrderDate() + " The reserved quantity in cannot be greater than the reserved quantity");
                }
                orderSettingDao.updateNumber(orderSetting);
            }else{
                // non-existent
                orderSettingDao.add(orderSetting);
            }
        }
    }
}
5.2.4. Dao interface
Create Dao interface OrderSettingDao and provide update and new methods
package com.itheima.health.dao;

import com.itheima.health.pojo.OrderSetting;

import java.util.Date;

/**
 * Description: No Description
 * User: Eric
 */
public interface OrderSettingDao {
    /**
     * Query reservation settings by date
     * @param orderDate
     * @return
     */
    OrderSetting findByOrderDate(Date orderDate);

    /**
     * Update the number of available appointments
     * @param orderSetting
     */
    void updateNumber(OrderSetting orderSetting);

    /**
     * Add appointment settings
     * @param orderSetting
     */
    void add(OrderSetting orderSetting);
}
5.2.5. Mapper mapping file
Create Mapper mapping file OrderSettingDao.xml and provide related SQL
<?xml version="1.0" encoding="UTF-8" ?>
<!DOCTYPE mapper
        PUBLIC "-//mybatis.org//DTD Mapper 3.0//EN"
        "http://mybatis.org/dtd/mybatis-3-mapper.dtd">

<mapper namespace="com.itheima.health.dao.OrderSettingDao">

    <select id="findByOrderDate" parameterType="date" resultType="OrderSetting">
        select * From t_orderSetting where orderDate = #{orderDate}
    </select>

    <update id="updateNumber" parameterType="OrderSetting">
        update t_ordersetting set number=#{number} where orderDate = #{orderDate}
    </update>

    <insert id="add" parameterType="ordersetting">
        insert into t_ordersetting (orderDate,number,reservations)
        values(#{orderDate},#{number}, #{reservations})
    </insert>
</mapper>
View t_ordersetting table
[summary]
1: Foreground code
(1) Providing template files strictly requires the user's behavior, so the imported data will enter the database. If there is a problem with the data, the function will be affected
Date yyyy/MM/dd
(2) Download the template file, put the file to be downloaded into the corresponding webapp/template directory, and add the download link
(3) File upload
2: Background code
Business:
(1)OrderSettingController.java(Controller)
Read the reservation setting information from excel, convert it into a List, and import it into the database in batch
(2) OrderSettingService.java (service interface)
(3) OrderSettingServiceImpl.java (service implementation class)
- If the reservation information of this date is not saved, you can insert it directly
- If there is reservation setting information, query reservation settings by date
- Whether the number of people who have made an appointment is greater than the maximum number of appointments to be changed
- If it is greater than, an exception is thrown
- Less than or equal to, the maximum number of appointments will be updated
(4) OrderSettingDao.java (Dao interface)
Add a method to update the maximum reservation quantity through date query
(5) OrderSettingDao.xml (Mapper mapping file)
Add a method to update the maximum reservation quantity through date query
Where OrderDate = #{OrderDate, JDBC type = date}
6. Calendar display reservation setting information [ key ]
[Objective]
Calendar display reservation setting information
[path]
1: Foreground code
(1) Use static data debugging to remove the leftobj annotation in the initData method in the ordersetting.html page and refresh the page
Send a request to obtain the data of the current month (yyyy mm) and obtain the data binding this.leftobj
Data source t required by the front end_ Ordersetting table, but the data format is [] - > list, {date, number, reservations}- > java has no entity, but can be replaced by map. The controller needs to return list < map < string, integer > >
(2) When the page is loaded, get the current month, send ajax to get dynamic data, and bind the returned data to leftObj
2: Background code
Business:
- On the page, use the calendar to display the appointment setting information
(1)OrderSettingController.java(Controller)
Receive the month and date, call the service, and return the result (yyyy mm)
(2) OrderSettingService.java (service interface)
(3) OrderSettingServiceImpl.java (service implementation class)
Splice start date - 1, end date - 32, call dao query and return to controller
(4) OrderSettingDao.java (Dao interface)
Query reservation setting information through date range
(5) OrderSettingDao.xml (Mapper mapping file)
select cast(DATE_FORMAT(ORDERDATE,'%d') as SIGNED) date,
	number,reservations
from t_ordersetting
where orderDate between #{startDate} and #{endDate}
3: Initialize data of next month and last month
[explanation]
[requirements]
The appointment setting function has been completed. Now you need to display the number of appointments set every day through the calendar.
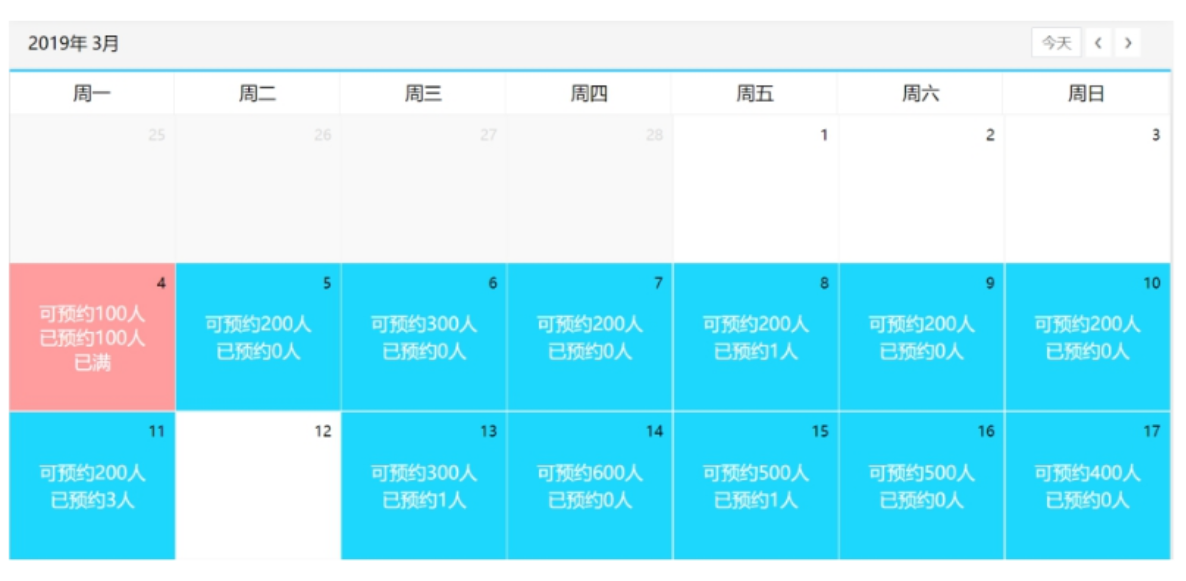
The dynamic display of the calendar has been completed on the page. We only need to query the appointment setting information of the current month and display it in the calendar. At the same time, we also need to display the number of people who have made an appointment in the calendar. The effect is as follows:
6.1. Foreground code
6.1.1. Debugging with static data
In order to see the effect quickly, we can use static data simulation first, and then send ajax requests to query the database instead.
Implementation steps:
(1) The model data corresponding to the reservation setting data is leftobj, and the leftobj model data is assigned at the end of the initData method:
this.leftobj = [
    { date: 1, number: 120, reservations: 1 },
    { date: 3, number: 120, reservations: 1 },
    { date: 4, number: 120, reservations: 120 },
    { date: 6, number: 120, reservations: 1 },
    { date: 8, number: 120, reservations: 1 }
];
Where date represents the date, number represents the number of people who can be reserved, and reservations represents the number of people who have been reserved
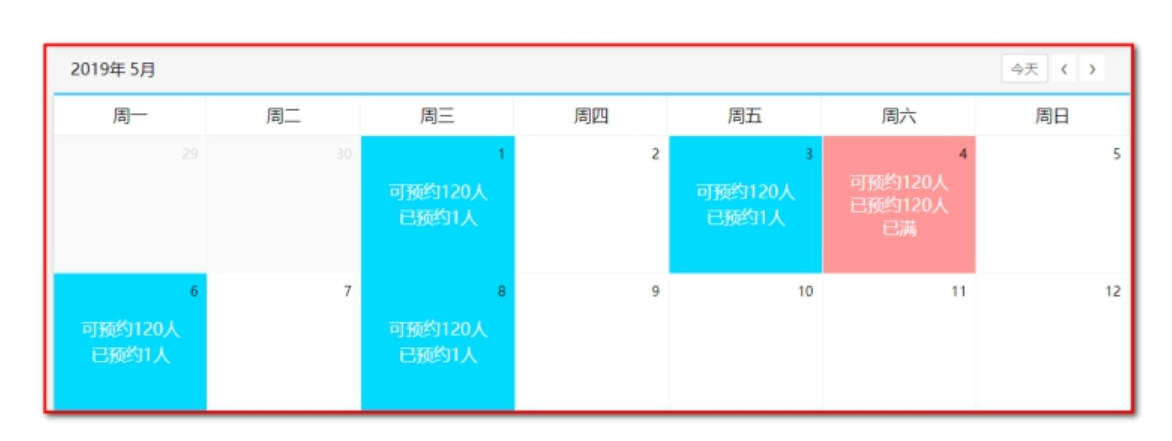
(2) Use the v-for tag of VUE to traverse the leftobj model data above and display it on the calendar:
<template>
    <template v-for="obj in leftobj">
        <template v-if="obj.date  dayobject.day.getDate()">
            <template v-if="obj.number > obj.reservations">
                <div class="usual">
                     <p>Can make an appointment{{obj.number}}people</p>
                     <p>Reserved{{obj.reservations}}people</p>
                </div>
            </template>
            <template v-else>
                <div class="fulled">
                    <p>Can make an appointment{{obj.number}}people</p>
                    <p>Reserved{{obj.reservations}}people</p>
                    <p>already expired</p>
                </div>
            </template>
        </template>
    </template>
    <button v-if="dayobject.day > today" @click="handleOrderSet(dayobject.day)" class="orderbtn">set up</button>
</template>
6.1.2. Sending ajax to get dynamic data
Remove the above static simulation data and send an ajax request instead. Query the database according to the month corresponding to the current page to obtain the reservation setting information, and assign the query result to the leftobj model data
(1) Add in the hook function created:
created: function () {//Called when vue initializes
    this.initData(null);
    // Get appointment setting information of current month
    this.getDataByMonth();
},
(2) Create function getDataByMonth()
Organize the data of this.leftobj and return List
//Send an ajax request to query the reservation setting information according to the month corresponding to the current page
methods: {
    // Obtain appointment setting information by month
    getDataByMonth(){
        axios.get("/ordersetting/getOrderSettingByMonth.do?month=" + this.currentYear+"-" + this.currentMonth).then(res =>{
            this.$message({
                message: res.data.message,
                type: res.data.flag?"success":"error"
            })
            if(res.data.flag){
                // Binding data
                this.leftobj=res.data.data;
            }
        })
    }
    ...
}
(3) after uploading the file successfully, call again to refresh the calendar
//Prompt for successful upload
handleSuccess(response, file) {
    if(response.flag){
        this.$message({
            message: response.message,
            type: 'success'
        });
        //After uploading the file successfully, call again to refresh the calendar
        this.getDataByMonth(this.currentYear+"-" + this.currentMonth);
    }else{
        this.$message.error(response.message);
    }
    //console.log(response, file);
}
6.2. Background code
[path]
1.OrderSettingController.java
2.OrderSettingServiceImpl.java
// 1. The organization queries the Map. dateBegin indicates the start time of the month and dateEnd indicates the end time of the month
// 2. Query the reservation settings of the current month
// 3. Organize list < ordersetting > into list < Map >
3.OrderSettingDao.java
Query the reservation settings of the current month
4.OrderSettingDao.xml
Query the appointment settings of the current month (use between and)
6.2.1. Controller
Provide getOrderSettingByMonth method in OrderSettingController to query reservation setting information according to month
/**
 * Query the reservation setting data according to the date (obtain the reservation setting data of the month where the specified date is located)
 * @param date
 * @return
 */
@RequestMapping("/getOrderSettingByMonth")
public Result getOrderSettingByMonth(String date){//Parameter format: 2019-03
    try{
        List<Map> list = orderSettingService.getOrderSettingByMonth(date);
        //Successfully obtained reservation setting data
        return new Result(true,MessageConstant.GET_ORDERSETTING_SUCCESS,list);
    }catch (Exception e){
        e.printStackTrace();
        //Failed to get reservation setting data
        return new Result(false,MessageConstant.GET_ORDERSETTING_FAIL);
    }
}
6.2.2. Service interface
Extend the method getOrderSettingByMonth in the OrderSettingService service interface
List<Map> getOrderSettingByMonth(String date); //Parameter format: 2019-03
6.2.3. Service implementation class
Implement the method getOrderSettingByMonth in the ordersettingsserviceimpl service implementation class
//Query reservation setting data according to date
public List<Map> getOrderSettingByMonth(String date) {//2019-03
    // 1. The organization queries the Map. dateBegin indicates the start time of the month and dateEnd indicates the end time of the month
    String dateBegin = date + "-1";//2019-03-1
    String dateEnd = date + "-31";//2019-03-31
    Map map = new HashMap();
    map.put("dateBegin",dateBegin);
    map.put("dateEnd",dateEnd);
    // 2. Query the reservation settings of the current month
    List<OrderSetting> list = orderSettingDao.getOrderSettingByMonth(map);
    List<Map> data = new ArrayList<>();
    // 3. Organize list < ordersetting > into list < Map >
    for (OrderSetting orderSetting : list) {
        Map orderSettingMap = new HashMap();
        orderSettingMap.put("date",orderSetting.getOrderDate().getDate());//Date of acquisition (date)
        orderSettingMap.put("number",orderSetting.getNumber());//Number of people who can make an appointment
        orderSettingMap.put("reservations",orderSetting.getReservations());//Number of people booked
        data.add(orderSettingMap);
    }
    return data;
}
6.2.4. Dao interface
Extend the method getOrderSettingByMonth in the OrderSettingDao interface
List<OrderSetting> getOrderSettingByMonth(Map map);
6.2.5. Mapper mapping file
Extend SQL in the OrderSettingDao.xml file
<!--Query reservation setting information according to month-->
<select id="getOrderSettingByMonth"
        parameterType="hashmap"
        resultType="com.itheima.health.pojo.OrderSetting">
    select * from t_ordersetting where orderDate between #{dateBegin} and #{dateEnd}
</select>
You can also use the sql statement: SELECT * FROM t_ordersetting WHERE orderDate LIKE ‘2019-08-%’
6.3. Initialize data of next month and last month

(1) Click event
<div class="choose">
    <span @click="goCurrentMonth(currentYear,currentMonth)" class="gotoday">today</span>
    <span @click="pickPre(currentYear,currentMonth)">❮</span>
    <span @click="pickNext(currentYear,currentMonth)">❯</span>
</div>
(2) Initialization date data (today, last month, next month):
//Switch to current month
goCurrentMonth: function (year, month) {
  	var d = new Date();
  	this.initData(this.formatDate(d.getFullYear(), d.getMonth() + 1, 1));
  	this.getDataByMonth();
},
//Previous month
pickPre: function (year, month) {
    // setDate(0);  Last day of last month
    // setDate(-1);  The penultimate day of last month
    // The setDate(dx) parameter dx is the dx days before and after the last day of the previous month
    var d = new Date(this.formatDate(year, month, 1));
    d.setDate(0);
    this.initData(this.formatDate(d.getFullYear(), d.getMonth() + 1, 1));
    this.getDataByMonth();
},
//One month back
pickNext: function (year, month) {
    var d = new Date(this.formatDate(year, month, 1));
    d.setDate(35);Gets the date after the specified day
    this.initData(this.formatDate(d.getFullYear(), d.getMonth() + 1, 1));
    this.getDataByMonth();
},
Execute this.getDataByMonth() respectively to obtain the month data.
[summary]
1: Foreground code
(1) Debugging with static data
The model data corresponding to the reservation setting data is leftobj, and the leftobj model data is assigned at the end of the initData method:
this.leftobj = [
    { date: 1, number: 120, reservations: 1 },
    { date: 3, number: 120, reservations: 1 },
    { date: 4, number: 120, reservations: 120 },
    { date: 6, number: 120, reservations: 1 },
    { date: 8, number: 120, reservations: 1 }
];
Where date represents the date, number represents the number of people who can be reserved, and reservations represents the number of people who have been reserved
Use the v-for tag of VUE to traverse the leftobj model data above and display it on the calendar:
<template>
    <template v-for="obj in leftobj">
        <template v-if="obj.date  dayobject.day.getDate()">
            <template v-if="obj.number > obj.reservations">
                <div class="usual">
                     <p>Can make an appointment{{obj.number}}people</p>
                     <p>Reserved{{obj.reservations}}people</p>
                </div>
            </template>
            <template v-else>
                <div class="fulled">
                    <p>Can make an appointment{{obj.number}}people</p>
                    <p>Reserved{{obj.reservations}}people</p>
                    <p>already expired</p>
                </div>
            </template>
        </template>
    </template>
    <button v-if="dayobject.day > today" @click="handleOrderSet(dayobject.day)" class="orderbtn">set up</button>
</template>
(2) Send ajax to get dynamic data
2: Background code
Business:
- On the page, use the calendar to display the appointment setting information
(1)OrderSettingController.java(Controller)
Then encapsulate the data format conforming to the front end
(2) OrderSettingService.java (service interface)
(3) OrderSettingServiceImpl.java (service implementation class)
(4) OrderSettingDao.java (Dao interface)
(5) OrderSettingDao.xml (Mapper mapping file)
Query the reservation settings of the current month (the front end transmits the current year month: 2019-06)
SELECT * FROM t_ordersetting WHERE orderDate LIKE '2019-06-%'
perhaps
SELECT * FROM t_ordersetting WHERE orderDate BETWEEN '2019-06-01' AND '2019-06-31'
For the data required by the page, use list < map < string, integer > > [] - > list {} = > entity map [{key: [key2: {}]}] = > List < map < key, list > >
[
    {date: 1, number: 120, reservations: 1},
    {date: 3, number: 120, reservations: 1},
    {date: 4, number: 120, reservations: 120},
    {date: 6, number: 120, reservations: 1},
    {date: 8, number: 120, reservations: 1}
]
3: Initialize data of next month and last month
7. Reservation setting based on calendar
[Objective]
The calendar displays the reservation setting information. Click the [setting] button to set the current time and set the maximum number of people that can be reserved
[path]
1: Foreground code
(1) Set button binding events for
(2) The appointment setting window pops up. Click OK to send an ajax request, transfer the currently set date and the quantity filled in by the user, encapsulate it in the json{orderDate:, number:} object, and then submit the json object
2: Background code
Business:
- On the page, reservation settings are realized based on calendar
(1) OrderSettingController.java (Controller) is encapsulated in the OrderSetting object
(2) OrderSettingService.java (service interface)
(3) OrderSettingServiceImpl.java (service implementation class)
Determine whether reservation settings exist by date?
- Presence:
- Judge whether the number of people who have made an appointment is greater than the maximum number of people who can make an appointment to be updated. If reversions > the number passed in, it cannot be updated and an error should be reported
- Reversions < = the number passed in, the maximum number that can be reserved should be updated
- non-existent:
- Add appointment setting information
[explanation]
[requirements]
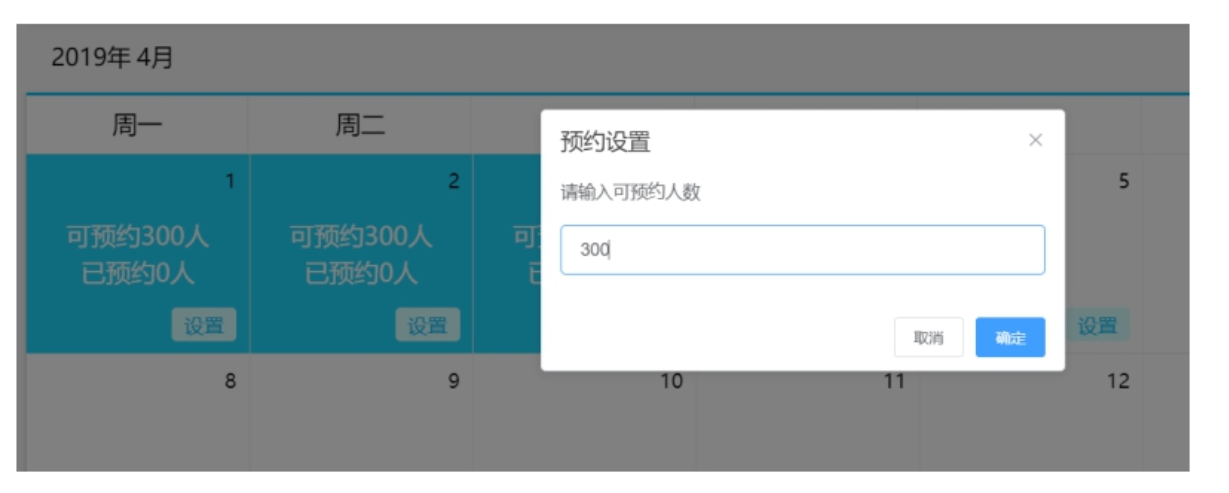
The function to be completed in this chapter is to set the number of people that can be reserved on the corresponding date by clicking the setting button in the calendar. The effects are as follows:
7.1. Foreground code
7.1.1. Binding events for setting buttons
(1) Bind the click event for the settings button in the calendar, with the current date as the parameter
<button v-if="dayobject.day > today" @click="handleOrderSet(dayobject.day)" class="orderbtn">set up</button>
(2) handleOrderset() method
//Reservation settings
handleOrderSet(day){
    alert(day);
},
7.1.2. Pop up appointment setting window and send ajax request
Improve the handleOrderSet method to pop up the reservation setting window. The user clicks the OK button to send an ajax request
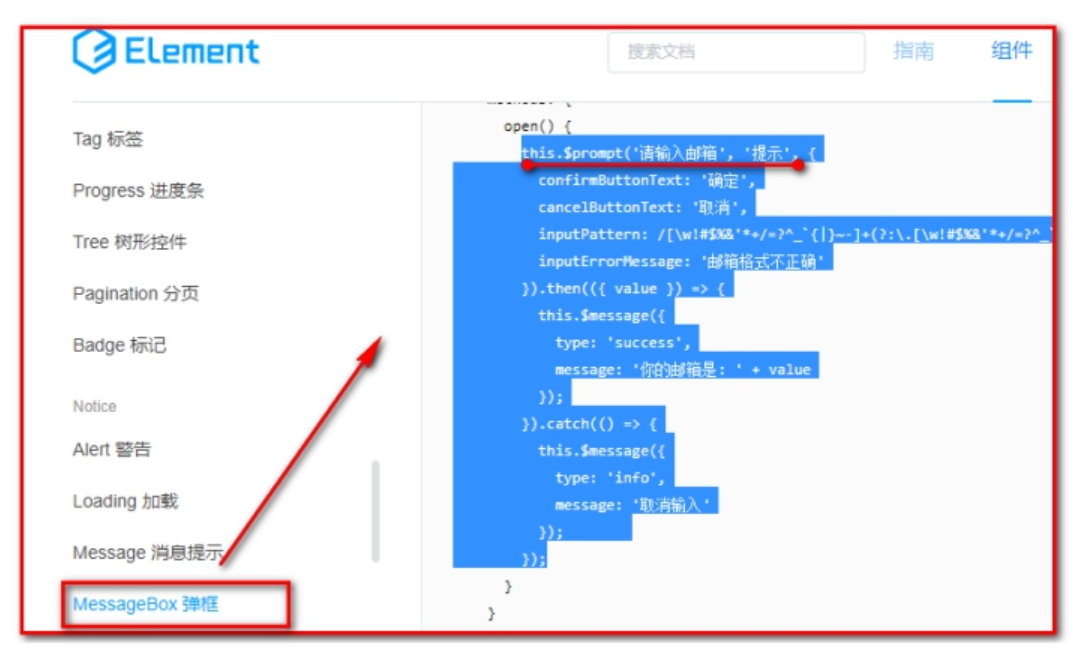
Reference: $prompt
//Reservation settings
handleOrderSet(day){
    //alert(day);
    this.$prompt('Please enter the maximum number of reservations', 'Tips', {
        confirmButtonText: 'determine',
        cancelButtonText: 'cancel',
        inputPattern: /^[1-9][0-9]{0,2}/,
        inputErrorMessage: 'Incorrect quantity, Quantity must be a positive integer'
    }).then(({ value }) => {
        // Value is the entered value
        var orderDate = this.formatDate2(day);
        // The data to be submitted must contain the setting date and value. After submitting data, it is received with OrderSetting,
        // The attribute name (key) in submitData must be consistent with the attribute name in OrderSetting entity class
        var submitData = {orderDate: orderDate, number: value}
        axios.post('/ordersetting/editNumberByDate.do',submitData).then(res=>{
            this.$message({
                message: res.data.message,
                type: res.data.flag?"success":"error"
            })
            // If successful, refresh the calendar and load the data
            if(res.data.flag){
                this.getDataByMonth(day.getFullYear() + "-" + (day.getMonth() + 1));
            }
        })
    }).catch(() => {

    });
}

stay methods Add method in formatDate2
// Returns a string similar to 2016-01-02 format
formatDate: function (year, month, day) {
    var y = year;
    var m = month;
    if (m < 10) m = "0" + m;
    var d = day;
    if (d < 10) d = "0" + d;
    return y + "-" + m + "-" + d
},
// Returns a string similar to 2016-01-02 format
formatDate2: function (date) {
    var y = date.getFullYear();
    var m = date.getMonth() + 1;
    if (m < 10) m = "0" + m;
    var d = date.getDate();
    if (d < 10) d = "0" + d;
    return y + "-" + m + "-" + d
}
7.2. Background code
7.2.1. Controller
Provide the method editNumberByDate in OrderSettingController
/**
 * Calendar based appointment settings
 */
@PostMapping("/editNumberByDate")
public Result editNumberByDate(@RequestBody OrderSetting orderSetting){
    // Call service update
    orderSettingService.editNumberByDate(orderSetting);
    return new Result(true, MessageConstant.ORDERSETTING_SUCCESS);
}
5.2.2. Service interface
Provide the method editNumberByDate in the OrderSettingService service interface
// The number of people can be reserved by modifying the date. A user-defined exception will be thrown here
void editNumberByDate(OrderSetting orderSetting) throws HealthException;
7.2.3. Service implementation class
Implement editNumberByDate in the ordersettingsserviceimpl service implementation class
/**
 * Set appointment information by date
 * @param orderSetting
 */
@Override
public void editNumberByDate(OrderSetting orderSetting) {
    //Determine whether reservation settings exist by date?
    OrderSetting os = orderSettingDao.findByOrderDate(orderSetting.getOrderDate());
    //-Presence:
    if(null != os) {
        // Judge whether the number of people who have made an appointment is greater than the maximum number of people who can make an appointment to be updated. If reversions > the number passed in, it cannot be updated and an error should be reported
        if(orderSetting.getNumber() < os.getReservations()){
            // The number of people who have made an appointment is higher than the maximum number of people. It is not allowed
            throw new HealthException("The maximum number of bookings cannot be less than the number of bookings!");
        }
        // Reversions < = the number passed in, the maximum number that can be reserved should be updated
        orderSettingDao.editNumberByOrderDate(orderSetting);
    }else {
        //-Does not exist:
        //  -Add appointment setting information
        orderSettingDao.add(orderSetting);
    }
}
[summary]
1: Foreground code
(1) Set button binding events for
(2) The appointment setting window pops up, encapsulates it into a json object, and then sends an ajax request
2: Background code
Business:
- On the page, reservation settings are realized based on calendar
(1) OrderSettingController.java (Controller) receives json with ordersetting
(2) OrderSettingService.java (service interface)
(3) OrderSettingServiceImpl.java (service implementation class)
(4) OrderSettingDao.java (Dao interface)
(5) OrderSettingDao.xml (Mapper mapping file)
8. Mobile terminal development
8.1. Mobile terminal development mode
[Objective]
Understand common mobile terminal development methods
[path]
- Development based on mobile phone API
- Development based on mobile browser
- Mixed development
With the rise of mobile Internet and the popularity of mobile phones, mobile applications have become more and more important and become a must for all businesses. For example, we can use mobile phones to shop, pay, take a taxi, play games, book hotels, buy tickets, etc. previously, things that could only be completed through the PC can now be realized through the mobile phone, which is more convenient. All these need the support of mobile terminal development. How to carry out mobile terminal development?
There are three main ways to develop mobile terminals:
1. Based on mobile phone API development (native APP apk, ios), it is installed by mobile phone
2. Development based on mobile browser (mobile web)
3. Hybrid development (hybrid APP) is equivalent to browser installation of app+web
[explanation]
8.1.1. Development based on mobile phone API
The mobile terminal uses mobile API s, such as Android and ios for development, and the service terminal is just a data provider. The mobile terminal requests the server to obtain data (json, xml format) and display it in the interface. This method is equivalent to the C/S mode in traditional development, that is, a client software needs to be installed on the mobile phone.
This method needs to be developed separately for different mobile phone systems. At present, there are mainly the following platforms:
1. Apple ios system version, the development language is Objective-C
2. Android version of Android system, and the development language is Java
3. Microsoft Windows phone System Version, the development language is C#
4. symbian Symbian system version, the development language is C++
Examples of mobile phone Taobao, jitter, tiktok, public comment are given.
8.1.2. Development based on mobile browser
Applications that survive in browsers can basically be said to be touch-screen web applications. This development method is equivalent to the B/S mode in traditional development, that is, there is no need to install additional software on the mobile phone and access it directly based on the browser on the mobile phone. This requires that the html page we write needs to be adjusted adaptively according to the size of different mobile phones. At present, the more popular is html5 development. In addition to accessing directly through mobile phone browsers, you can also embed pages into some applications, such as accessing html5 pages through WeChat official account.
This development method does not need to be developed separately for different mobile phone systems. Only one version needs to be developed, which can be accessed normally on different mobile phones.
This project will be developed by embedding our html5 pages in WeChat official account.
8.1.3. Mixed development
It is a semi-native and semi Web hybrid App. It needs to be downloaded and installed. It looks like a native App. The content accessed is a Web page. In fact, it is to embed HTML5 pages into a native container.
[summary]
-
Development based on mobile API: native App
- Advantages: the user experience is particularly good and it is convenient to call mobile phone hardware. Obtain system permissions and personal privacy
- Disadvantages: not cross platform. Each system needs to be developed independently, which wastes cost. Each time it is restarted, it has to download new software and waste traffic. CS
-
Development based on mobile browser: webApp B/S
- Advantages: cross platform, only one set needs to be developed to save cost. When the server is updated, the client does not need to be updated, and there is a built-in browser.
- Disadvantages: the user experience is not particularly good, and it is inconvenient to call mobile phone hardware. Unable to obtain updated system permissions and personal information
-
Mixed development: native + webApp
Bottom layer of the framework: APP obtains more system information and personal information
Page presentation: WebApp, B/S
8.2. WeChat official account development
[Objective]
Understand the development process of WeChat official account
[path]
- Account classification
- Registered account
- Customize menu
- Online requirements
[explanation]
To develop WeChat official account, first we need to visit WeChat public platform. https://mp.weixin.qq.com/.
8.2.1. Account classification
On the wechat public platform, you can see that there are four account types: service number, subscription number, applet and enterprise wechat (original enterprise number).

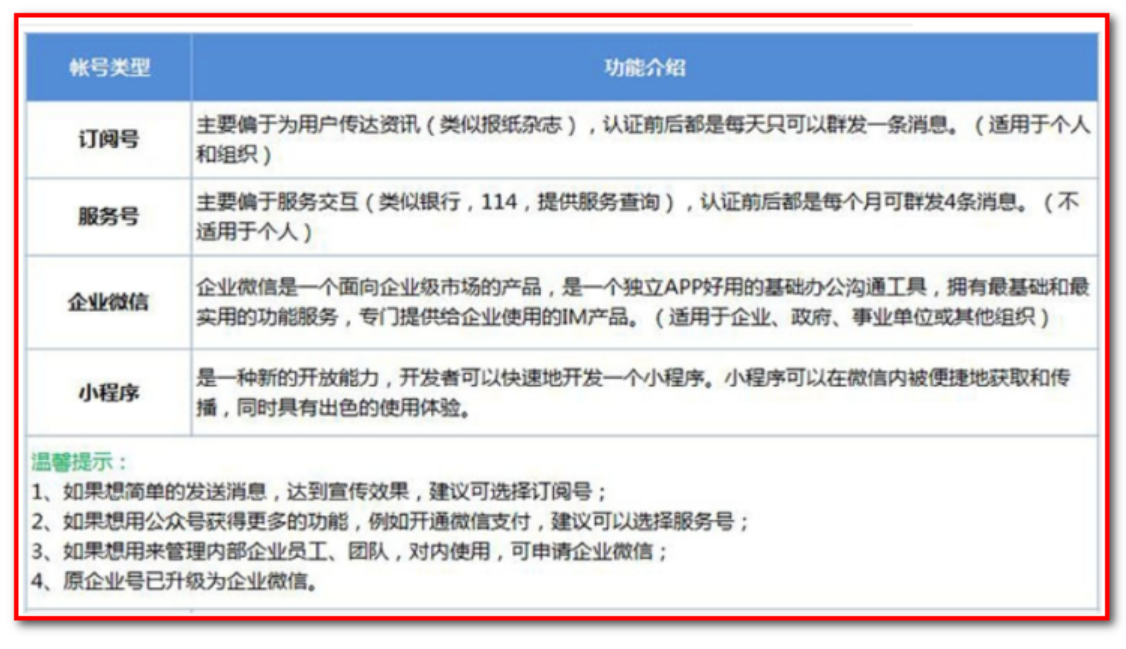
This project will choose public subscription number in this way to develop official account.
8.2.2. Registered account
To develop WeChat official account, first you need to register as a member, then you can login to WeChat public platform to customize the menu settings.
Registration page: https://mp.weixin.qq.com/cgi-bin/registermidpage?action=index&lang=zh_CN&token=
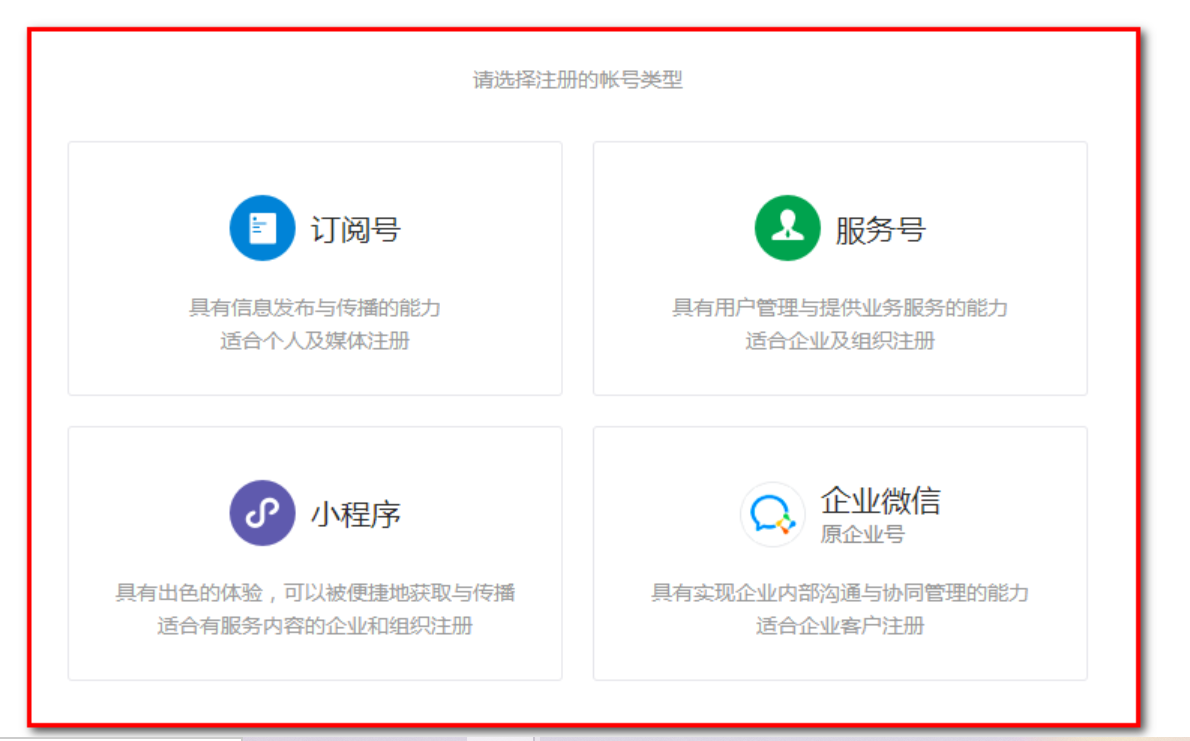
Select a subscription number to register:
Register with mailbox.
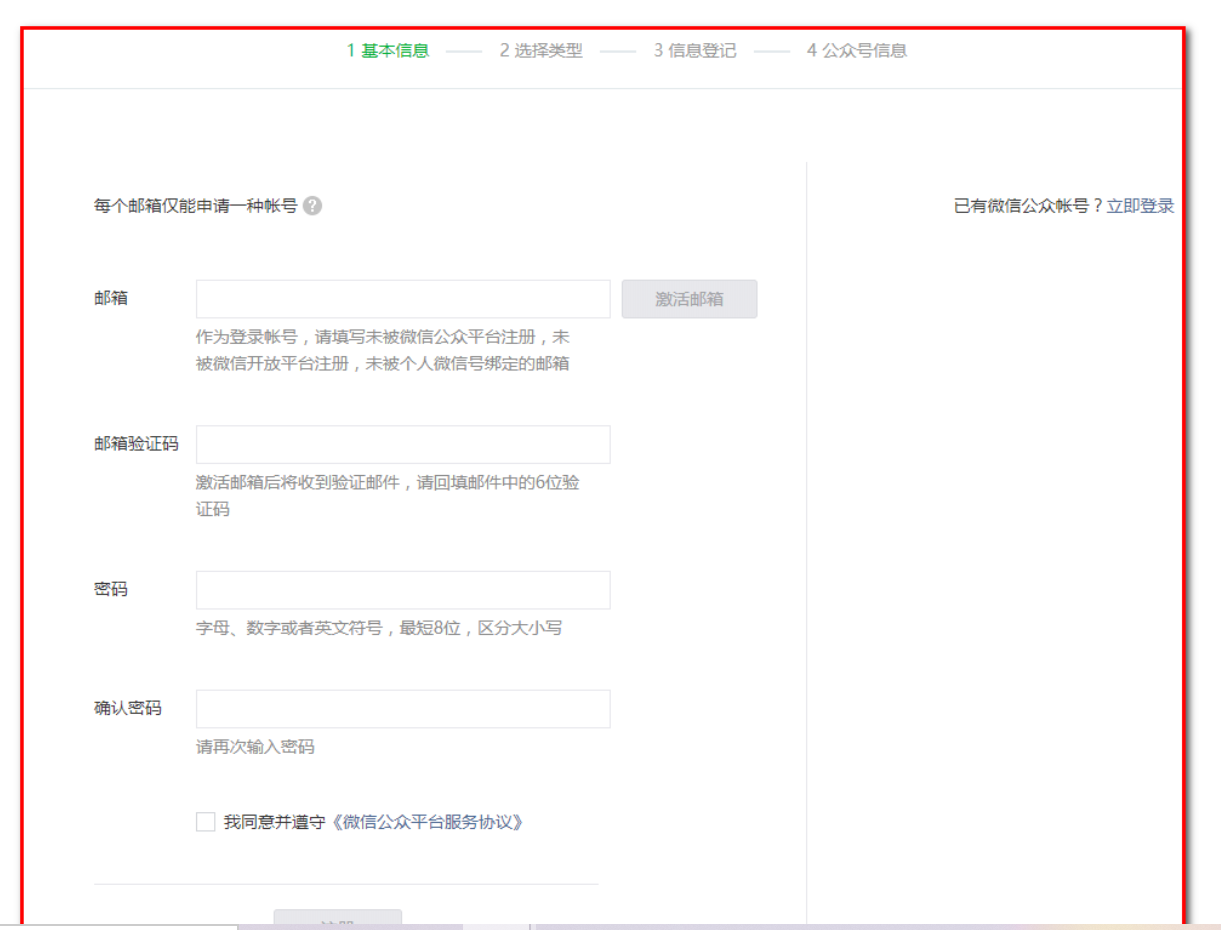
Enter email, email verification code, password, confirmation password, etc. and register according to the page process
8.2.3. User defined menu
After successful registration, you can log in using the registered mailbox and the set password. After successful login, click "custom menu" on the left to enter the custom menu page
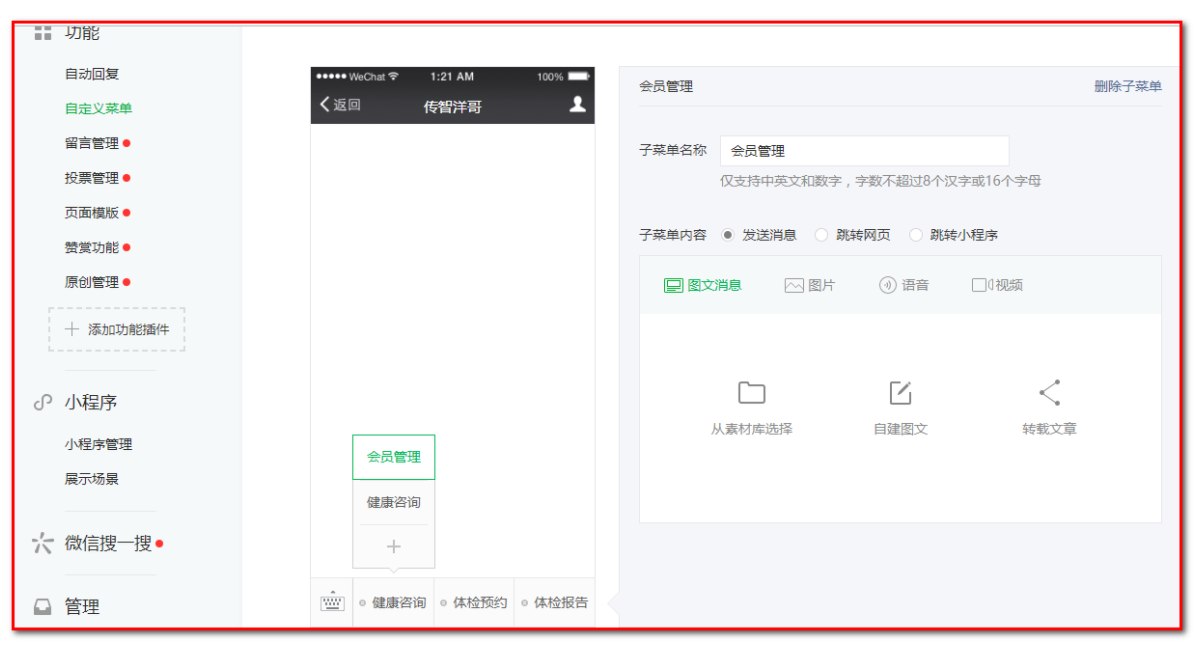
On the user-defined menu page, you can create primary and secondary menus according to your needs. You can create up to 3 primary menus and up to 5 secondary menus under each primary menu. Each menu consists of menu name and menu content. The menu content has three forms: sending message (video, language, text and picture), jumping to web page and jumping to applet.
Jump page: http://www.helloitcast.xin/

WeChat official account
8.2.4. Online requirements (understand)
If it is a subscription number registered as an individual user, the menu content of the customized menu cannot jump to the web page, because the individual user does not support wechat authentication, and the jump to the web page requires wechat authentication.
If you are an enterprise user, you need to conduct wechat authentication first, and then you can jump to the web page. The address of the jump web page must have a domain name, and the domain name needs to be filed and passed.
[summary]
- The registered subscription number is personal.
- The official account is not selected by the small program (identity number is only one, or small program, or official account).
- Custom menu (enterprise): jump to web page (url:http://xxx.com, xxx domain name should be filed (enterprise) - 1500. Deploy the project)
- Project public network deployment
- Projects to be deployed on ECS servers (Huawei, Tencent, Alibaba, and) include Centos7, mysql, Tomcat, and JDK
- Apply for domain name, domain name resolution (ip address of domain name mapping server)
- ECS service opening security settings (mysql port (modified), port 80, inbound and outbound)
- Domain name filing (enterprise information, 15 working days, find platform personnel to do) can be accessed for up to 30 days, and the website will be closed later. It will be closed within a week
- There is also an overseas server that does not need to be filed
- Project public network deployment
- Online requirements
- Enterprise certification
- Setting the URL of the menu requires domain name filing