Project component generalization based on CooaPods
Introduction
In the field of mobile development, it is not as hot as the previous two years. Previously, companies could have several mobile developers. At present, most companies have only one or two developers, but there are several projects. Among company projects, many parts are common. Before that, one part was modified, and other parts need to be revised again. This is not only troublesome, but also easy to make mistakes.
We have been seeking a better way to manage multi-project common components, so what we are thinking about now is to privatize components based on CooaPods, and then through Pod into all projects to achieve a single modification, unified use of the effect.
Catalog
Create a common Pod library through github | gitlab
- Registration of CocoaPods account information
- Create a shared file and file repository locally
- Upload to public warehouse github | gitlab
- tag and upload to public warehouse
- Edit. podspec file
- Publish your. podspec file to CocoaPods
- Update maintenance. podspec file
- pod search
It's starting to work.
1. Registration of CocoaPods account information
iOS development, should be familiar with pod, by default your computer has installed Cocoa Pods. The subsequent commands are executed in terminal.
# Mail address: generally github|gitlab address
# Register CocoaPods
 pod trunk register mailbox address'username'-- verbose
After registration, an email will be received in the mailbox, which needs to be activated by clicking on a link in the mail.
View your own pod registration information, and view your own published open source pod Library
# Pod registration information, open source pod Library
pod trunk me
As follows, mine
- Name:     beyond-GH
  - Email:    beyondaverage0908@gmail.com
  - Since:    July 3rd, 19:40
  - Pods:
    - LPSToolUtil
  - Sessions:
    - July 3rd, 19:40 - November 9th, 01:17. IP: 118.242.18.199
2. Create shared files and file repositories
Create a shared library from scratch to make the whole creation process clearer. Create a brand new project in terminal.
New library name of pod lib create
When creating libraries, you will be asked about some requirements for new libraries, according to their own requirements to configure OK, you can refer to Using Pod Lib Create
Here's a brief introduction to the directory structure of the new project
.
├── Example
│   ├── LPSToolUtil
│   ├── LPSToolUtil.xcodeproj
│   ├── LPSToolUtil.xcworkspace
│   ├── Podfile
│   ├── Podfile.lock
│   ├── Pods
│   └── Tests
├── LICENSE
├── LPSToolUtil
│   ├── Assets
│   └── Classes
├── LPSToolUtil.podspec
├── README.md
└── _Pods.xcodeproj -> Example/Pods/Pods.xcodeproj
Example is a Pod Common Component Test Project
LPSToolUtil is a common component library. Classes contains files that need to be pod, Assets puts some resource files.
The LPSToolUtil.podspec file is needed for the configuration file, and the component library is upgraded by updating the file every time.
3. Upload to public warehouse github | gitlab
After that, push the new project to the remote server github | gitlab. The specific operation needs to create an empty repo on github and submit it using the command line. Things like iOS development using Git
4. tag and upload to public warehouse
After uploading to github | gitlab, you need to tag the current uploaded version
# The current tag number of'0.1.1'needs to be consistent with the podsepc
git tag -m "tag describe" '0.1.1'

# push tag to github|gitlab
git push --tag
5. Editing. podspec files
Editing. podspec files, usually in a simple text editor, ensures that there will be no coding errors and other error information. I usually use vim for editing. Under the current document
vim LPSToolUtil.podspec
Editing documents
#
# Be sure to run `pod lib lint LPSToolUtil.podspec' to ensure this is a
# valid spec before submitting.
#
# Any lines starting with a # are optional, but their use is encouraged
# To learn more about a Podspec see http://guides.cocoapods.org/syntax/podspec.html
#

Pod::Spec.new do |s|
      s.name             = 'LPSToolUtil'
      s.version          = '0.1.2'
      s.summary          = 'A Tool Util for MySelf.'

# This description is used to generate tags and improve search results.
#   * Think: What does it do? Why did you write it? What is the focus?
#   * Try to keep it short, snappy and to the point.
#   * Write the description between the DESC delimiters below.
#   * Finally, don't worry about the indent, CocoaPods strips it!

      s.description      = <<-DESC
TODO: Add long description of the pod here.
                   DESC

      s.homepage         = 'https://github.com/beyondverage0908/LPSToolUtil'
      # s.screenshots     = 'www.example.com/screenshots_1', 'www.example.com/screenshots_2'
      s.license          = { :type => 'MIT', :file => 'LICENSE' }
      s.author           = { 'beyondverage0908' => 'beyondaverage0908@gmail.com' }
      s.source           = { :git => 'https://github.com/beyondverage0908/LPSToolUtil.git', :tag => s.version.to_s }
      # s.social_media_url = 'https://twitter.com/<TWITTER_USERNAME>'

      s.ios.deployment_target = '8.0'

      s.source_files = 'LPSToolUtil/Classes/**/*'

      # s.resource_bundles = {
      #   'LPSToolUtil' => ['LPSToolUtil/Assets/*.png']
      # }

      # s.public_header_files = 'Pod/Classes/**/*.h'
      # s.frameworks = 'UIKit', 'MapKit'
      # s.dependency 'AFNetworking', '~> 2.3'
end
The annotations here are very clear. The only points that are emphasized are
- The version here in s.version must be consistent with the tag submitted to github
- The path specified by s.source_files must be the path of the component library that you need to publish.
- s.dependency If your component library relies on third-party component libraries, you need to specify
6. Publish your own. podspec file to CocoaPods
When you have edited your. podspec file, you need to check that it is correct.
pod lib lint LPSToolUtil.podspec
LPSToolUtil passed validation. prompt
7. Update and maintenance. podspec file
After checking out the. podspec file, you need to submit the. podspec file to cocoapods
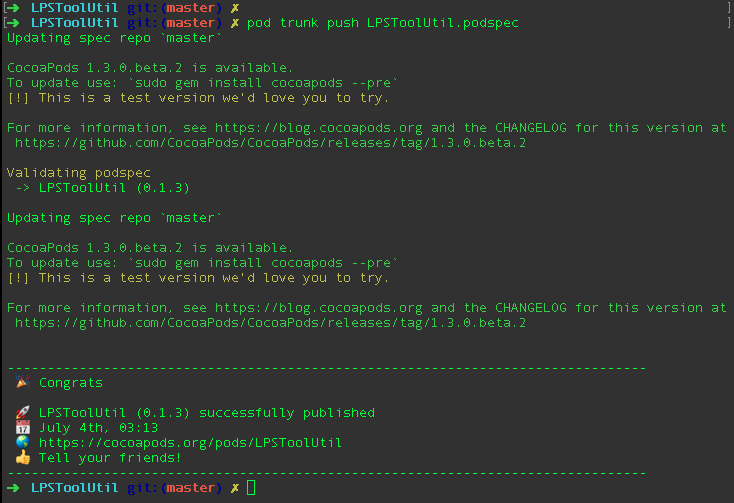
pod trunk push LPSToolUtil.podspec
In this process, the validity of. podspec is checked again, and some column operations such as commit, push, etc. are performed.
Following is the success:
8. pod search
To complete all the above steps, we need to see if we have succeeded.
pod search LPSToolUtil
Appearance - > Success
-> LPSToolUtil (0.1.2)
   A Tool Util for MySelf.
   pod 'LPSToolUtil', '~> 0.1.2'
   - Homepage: https://github.com/beyondverage0908/LPSToolUtil
   - Source:   https://github.com/beyondverage0908/LPSToolUtil.git
   - Versions: 0.1.2, 0.1.1 [master repo]
Note:
It was mentioned that step 7 had been successful, but pod search could not be used to solve the problem.
After success, the waiting time is uncertain. At present, it is generally faster. Generally, pod setup and pod search are used to check whether they are available. I try pod setup and pod search'your component library'every day for one week after I create this library. I can't find my own library. After searching for information, I find a solution:
1. The ~/Library/Caches/CocoaPods/search_index.json file generated after the success of pod setup is the index file for searching. The terminal input:
rm ~/Library/Caches/CocoaPods/search_index.json
Delete the search_index.json file in the ~/Library/Caches/CocoaPods directory and execute after deletion: pod search library name, wait for output: Creating search index for spec repo'master'.. Done! You'll get the result you want in a moment.~