App development often has this requirement: to wake up APP in browsers or text messages, if installed, or to boot downloads. For Android, the main technology involved here is deeplink, which can also be simply regarded as scheme. Android has always supported scheme. However, due to the open source nature of Android, different mobile phone manufacturers or browser manufacturers deal with a variety of strange things, some can pull up, some can not. This article simply analyses the principles of link, including deeplink, and Android 6.0. After AppLink. In fact, I think AppLink is a special deep plink, but it has a similar verification mechanism. If the verification passes, it will be opened by default. If the verification fails, it will degenerate into deep plink. If viewed from the APP side alone, the difference is mainly android:autoVerify="true" in the Manifest file, as follows.
APPLINK only has one more verification during installation. Like previous deeplink, if it fails to verify without networking, it behaves the same as previous deeplink.
Deplink configuration (unlimited http/https)
<intent-filter>
    <data android:scheme="https" android:host="test.example.com"  />
    <category android:name="android.intent.category.DEFAULT" />
    <action android:name="android.intent.action.VIEW" />
    <category android:name="android.intent.category.BROWSABLE" />
</intent-filter>

 (Unlimited http/https)
 <intent-filter>
        <data android:scheme="example" />
        <!-- The following lines must also be set -->
        <category android:name="android.intent.category.DEFAULT" />
        <action android:name="android.intent.action.VIEW" />
        <category android:name="android.intent.category.BROWSABLE" />
</intent-filter>
Application NK configuration (http/https only)
<intent-filter android:autoVerify="true">
    <data android:scheme="https" android:host="test.example.com"  />
    <category android:name="android.intent.category.DEFAULT" />
    <action android:name="android.intent.action.VIEW" />
    <category android:name="android.intent.category.BROWSABLE" />
</intent-filter>
In Android's native implementation of APPLink, two-way validation between APP and server is needed to make APPLink effective. If the validation fails, APPLink will completely degenerate into deep Link, which is why APPLINK is a special deep Link. So it is easy to understand APPLink by analyzing deep Link and deep Link.
DepLink Principle Analysis
Deplink's scheme can be divided into two kinds: one is that only one APP can correspond to each other, the other is that multiple APPs can correspond to each other. For example, if the deepLink of http scheme type is configured for an APP's Activity, when the link is aroused by short message or other means, there will usually be a pop-up window for the user to choose, because generally speaking, the system will bring a browser. It also corresponds to such schemes, such as the following examples:
>adb shell am start -a android.intent.action.VIEW   -c android.intent.category.BROWSABLE  -d "https://test.example.com/b/g"

<intent-filter>
    <data android:scheme="https" android:host="test.example.com"  />
    <category android:name="android.intent.category.DEFAULT" />
    <action android:name="android.intent.action.VIEW" />
    <category android:name="android.intent.category.BROWSABLE" />
</intent-filter>
If a private app is set up and it is not duplicated with other apps, it will be opened directly, such as the following:
>adb shell am start -a android.intent.action.VIEW   -c android.intent.category.BROWSABLE  -d "example://test.example.com/b/g"

 <intent-filter>
        <data android:scheme="example" />
        <!-- The following lines must also be set -->
        <category android:name="android.intent.category.DEFAULT" />
        <action android:name="android.intent.action.VIEW" />
        <category android:name="android.intent.category.BROWSABLE" />
</intent-filter>
Of course, if the private scheme duplicates with other APPs, it will still evoke an APP selection interface (actually a Resolver Activity). Now let's see how scheme matches and pulls up the corresponding APP.
Start Activity Entry and Resolver Activity
Whether APPLink or DeepLink is actually a jump in the interface by calling up an Activity, whether from the outside of APP: such as text messages, browsers, or within APP. Look at the implementation by simulating the jump inside APP. Write an H5 interface and load it through Webview. However, Webview does not have any settings, so the jump requires system parsing and deep plink.
<html>
<body>
    <a href="https://Test.example.com/a/g">Scheme jump</a>
</body>
</html>
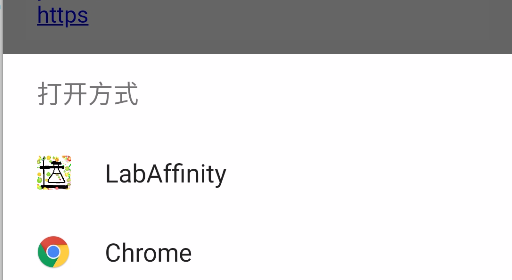
Click on Scheme to jump, which will generally evoke the following interface, allowing users to choose how to open it:
If you print a log through adb, you will find that Activity Manager Service prints such a log:
> 12-04 20:32:04.367 887 9064 I ActivityManager: START u0 {act=android.intent.action.VIEW dat=https://test.example.com/... cmp=android/com.android.internal.app.ResolverActivity (has extras)} from uid 10067 on display 0
Actually, the selection dialog you see is Resolver Activity, but let's first see how this scheme can evoke the App Selection Interface. When they encounter a scheme in a text message or Web view, they usually send out the corresponding Intent (of course, third-party APP may be blocked, such as Wechat can't replace APP). In fact, the above function is very important. The result is the same as the following code:
    val intent = Intent()
    intent.setAction("android.intent.action.VIEW")
    intent.setData(Uri.parse("https://test.example.com/a/g"))
    intent.addCategory("android.intent.category.DEFAULT")
    intent.addCategory("android.intent.category.BROWSABLE")
    startActivity(intent)
All that's left is to look at startActivity. In the 6.0 source code, startActivity finally calls the startActivityMayWait of the ActivityStatckSupervisor through the ActivityManagerService.
ActivityStatckSUpervisor
 final int startActivityMayWait(IApplicationThread caller, int callingUid, String callingPackage, Intent intent, String resolvedType, IVoiceInteractionSession voiceSession, IVoiceInteractor voiceInteractor, IBinder resultTo, String resultWho, int requestCode, int startFlags, ProfilerInfo profilerInfo, WaitResult outResult, Configuration config, Bundle options, boolean ignoreTargetSecurity, int userId, IActivityContainer iContainer, TaskRecord inTask) {
    ...
    boolean componentSpecified = intent.getComponent() != null;
    //Create new Intent objects, even if intent is modified
    intent = new Intent(intent);
     //Collect Active Information pointed to by Intent and pop up resolve Activity directly to the user when there are multiple alternative activities [see 2.7.1]
    ActivityInfo aInfo = resolveActivity(intent, resolvedType, startFlags, profilerInfo, userId);
    ...

    }
startActivityMayWait will first find the target Activity through resolveActivity. In this process, it may find multiple matching activities, which is the entry of ResolverActivity:
  ActivityInfo resolveActivity(Intent intent, String resolvedType, int startFlags,
        ProfilerInfo profilerInfo, int userId) {
    // Collect information about the target of the Intent.
    ActivityInfo aInfo;
    try {
        ResolveInfo rInfo =
            AppGlobals.getPackageManager().resolveIntent(
                    intent, resolvedType,
                    PackageManager.MATCH_DEFAULT_ONLY
                                | ActivityManagerService.STOCK_PM_FLAGS, userId);
        aInfo = rInfo != null ? rInfo.activityInfo : null;
    } catch (RemoteException e) {
        aInfo = null;
    }
It can be assumed that all four components are registered in the Package Manager Service. To find these classes, you must consult the Package Manager Service.
PackageManagerService
@Override
public ResolveInfo resolveIntent(Intent intent, String resolvedType,
        int flags, int userId) {
    if (!sUserManager.exists(userId)) return null;
    enforceCrossUserPermission(Binder.getCallingUid(), userId, false, false, "resolve intent");
    List<ResolveInfo> query = queryIntentActivities(intent, resolvedType, flags, userId);
    return chooseBestActivity(intent, resolvedType, flags, query, userId);
}
Package Manager Service will find all suitable activities through query Intent Activities, and then provide the right to choose through chooseBest Activity. There are three situations as follows:
- Just find one, start it directly
- Find multiple, and set one of them as the default boot, then start the corresponding Acitivity directly.
- Find more than one and start ResolveActivity without setting default startup for users to choose
As for how to query, matching is not detailed here. Just look at how to arouse the selection page, or open it by default. The key is chooseBest Activity.
private ResolveInfo chooseBestActivity(Intent intent, String resolvedType,
        int flags, List<ResolveInfo> query, int userId) {
             <!--Best query Activity-->
            ResolveInfo ri = findPreferredActivity(intent, resolvedType,
                    flags, query, r0.priority, true, false, debug, userId);
            if (ri != null) {
                return ri;
            }
            ...
}

    ResolveInfo findPreferredActivity(Intent intent, String resolvedType, int flags,
        List<ResolveInfo> query, int priority, boolean always,
        boolean removeMatches, boolean debug, int userId) {
    if (!sUserManager.exists(userId)) return null;
    // writer
    synchronized (mPackages) {
        if (intent.getSelector() != null) {
            intent = intent.getSelector();
        }

        <!--If the user has chosen to open by default APP,So what we return here is the corresponding APP Medium Activity-->
        ResolveInfo pri = findPersistentPreferredActivityLP(intent, resolvedType, flags, query,
                debug, userId);
        if (pri != null) {
            return pri;
        }
        <!--look for Activity-->
        PreferredIntentResolver pir = mSettings.mPreferredActivities.get(userId);
        ...
                    final ActivityInfo ai = getActivityInfo(pa.mPref.mComponent,
                            flags | PackageManager.GET_DISABLED_COMPONENTS, userId);
        ...
}


@Override
public ActivityInfo getActivityInfo(ComponentName component, int flags, int userId) {
    if (!sUserManager.exists(userId)) return null;
    enforceCrossUserPermission(Binder.getCallingUid(), userId, false, false, "get activity info");
    synchronized (mPackages) {
        ...
        <!--Get one ResolveActivity Of ActivityInfo-->
        if (mResolveComponentName.equals(component)) {
            return PackageParser.generateActivityInfo(mResolveActivity, flags,
                    new PackageUserState(), userId);
        }
    }
    return null;
}
In fact, the above process is more complex, here is just a simple guess of the process, after finding the target Activity, whether it is the real target Acitiviy or ResolveActivity, will continue to start the process through the StartActivity Locked, where you will see the previously printed Log information:
ActivityStatckSUpervisor
final int startActivityLocked(IApplicationThread caller...{
    if (err == ActivityManager.START_SUCCESS) {
        Slog.i(TAG, "START u" + userId + " {" + intent.toShortString(true, true, true, false)
                + "} from uid " + callingUid
                + " on display " + (container == null ? (mFocusedStack == null ?
                        Display.DEFAULT_DISPLAY : mFocusedStack.mDisplayId) :
                        (container.mActivityDisplay == null ? Display.DEFAULT_DISPLAY :
                                container.mActivityDisplay.mDisplayId)));
    }
If it is ResolveActivity, it will also persist some settings locally based on the information selected by the user, so that next time it can start the user preference App directly. In fact, the above is the principle of deep plink, to put it plainly: scheme is to implicitly start Activity, if you can find the only or set target Acitivity, then directly start, if you find more than one, then provide an APP selection interface.
AppLink Principle
Generally speaking, every APP wants to be aroused by its own scheme, which is the Applink. When analyzing deep plink, it mentioned Resolve Activity as a selection process, and AppLink is to automatically help users complete the selection process, and the scheme chosen is the most suitable one (from the developer's point of view). So what we need to analyze about AppLink is how to complete the default selection process.
At present, Android source code provides a two-way authentication scheme: when the APP is installed, the client configures according to the APP as the server requests. If the condition is satisfied, the scheme matches the server configuration, then the default startup option is set for the APP. So this scheme is obvious, it needs to be connected to the Internet when installing, otherwise it will not be validated at all, that is the ordinary dee. Plink, since it's validated at installation time, let's see how PackageManagerService handles this process:
PackageManagerService
private void installPackageLI(InstallArgs args, PackageInstalledInfo res) {
    final int installFlags = args.installFlags;
    <!--Start validation applink-->
    startIntentFilterVerifications(args.user.getIdentifier(), replace, pkg);
    ...

    }

private void startIntentFilterVerifications(int userId, boolean replacing,
        PackageParser.Package pkg) {
    if (mIntentFilterVerifierComponent == null) {
        return;
    }

    final int verifierUid = getPackageUid(
            mIntentFilterVerifierComponent.getPackageName(),
            (userId == UserHandle.USER_ALL) ? UserHandle.USER_OWNER : userId);

    mHandler.removeMessages(START_INTENT_FILTER_VERIFICATIONS);
    final Message msg = mHandler.obtainMessage(START_INTENT_FILTER_VERIFICATIONS);
    msg.obj = new IFVerificationParams(pkg, replacing, userId, verifierUid);
    mHandler.sendMessage(msg);
}
startIntentFilterVerifications sends a message to open validation, and then calls verifyIntentFiltersIfNeeded for validation.
 private void verifyIntentFiltersIfNeeded(int userId, int verifierUid, boolean replacing,
        PackageParser.Package pkg) {
        ...
        <!--Check if there is any Activity Set up AppLink-->
        final boolean hasDomainURLs = hasDomainURLs(pkg);
        if (!hasDomainURLs) {
            if (DEBUG_DOMAIN_VERIFICATION) Slog.d(TAG,
                    "No domain URLs, so no need to verify any IntentFilter!");
            return;
        }
        <!--Whether or not? autoverigy-->
        boolean needToVerify = false;
        for (PackageParser.Activity a : pkg.activities) {
            for (ActivityIntentInfo filter : a.intents) {
            <!--needsVerification Whether to set up autoverify -->
                if (filter.needsVerification() && needsNetworkVerificationLPr(filter)) {
                    needToVerify = true;
                    break;
                }
            }
        }
      <!--If there is a collection to verify Activity Information and scheme information-->
        if (needToVerify) {
            final int verificationId = mIntentFilterVerificationToken++;
            for (PackageParser.Activity a : pkg.activities) {
                for (ActivityIntentInfo filter : a.intents) {
                    if (filter.handlesWebUris(true) && needsNetworkVerificationLPr(filter)) {
                        if (DEBUG_DOMAIN_VERIFICATION) Slog.d(TAG,
                                "Verification needed for IntentFilter:" + filter.toString());
                        mIntentFilterVerifier.addOneIntentFilterVerification(
                                verifierUid, userId, verificationId, filter, packageName);
                        count++;
                    }    }   } }  }
   <!--Start validation-->
    if (count > 0) {
        mIntentFilterVerifier.startVerifications(userId);
    }
}
It can be seen that there are three steps in verification: inspection, collection and verification. In the checking phase, first see if there is an Activity for setting http/https scheme, and whether it satisfies the requirements of setting Intent.ACTION_DEFAULT and Intent.ACTION_VIEW. If not, there is no need to verify at all.
 * Check if one of the IntentFilter as both actions DEFAULT / VIEW and a HTTP/HTTPS data URI
 */
private static boolean hasDomainURLs(Package pkg) {
    if (pkg == null || pkg.activities == null) return false;
    final ArrayList<Activity> activities = pkg.activities;
    final int countActivities = activities.size();
    for (int n=0; n<countActivities; n++) {
        Activity activity = activities.get(n);
        ArrayList<ActivityIntentInfo> filters = activity.intents;
        if (filters == null) continue;
        final int countFilters = filters.size();
        for (int m=0; m<countFilters; m++) {
            ActivityIntentInfo aii = filters.get(m);
            // Intent.ACTION_VIEW must be set, ACTION_DEFAULT must be set, SCHEME_HTTPS or SCHEME_HTTP must be set, one can be found.
            if (!aii.hasAction(Intent.ACTION_VIEW)) continue;
            if (!aii.hasAction(Intent.ACTION_DEFAULT)) continue;
            if (aii.hasDataScheme(IntentFilter.SCHEME_HTTP) ||
                    aii.hasDataScheme(IntentFilter.SCHEME_HTTPS)) {
                return true;
            }
        }
    }
    return false;
}
The second step of the inspection is to try to see if autoverify has been set up. Of course, some of them have been set up. Whether the user has chosen the operation is more complex and not analyzed, but it does not affect the understanding of the process.
public final boolean needsVerification() {
    return getAutoVerify() && handlesWebUris(true);
}

public final boolean getAutoVerify() {
    return ((mVerifyState & STATE_VERIFY_AUTO) == STATE_VERIFY_AUTO);
}
Once you find an Activity that meets the above criteria, start validating. If you want to open the application nk, the configuration in Manifest must look like the following
    <intent-filter android:autoVerify="true">
        <data android:scheme="https" android:host="xxx.com" />
        <data android:scheme="http" android:host="xxx.com" />
        <!--external intent Open, such as text messages, text editing, etc.-->
        <action android:name="android.intent.action.VIEW" />
        <category android:name="android.intent.category.DEFAULT" />
    </intent-filter>
Collecting is actually collecting intentfilter information. Let's look directly at the verification process.
@Override
    public void startVerifications(int userId) {
        ...
            sendVerificationRequest(userId, verificationId, ivs);
        }
        mCurrentIntentFilterVerifications.clear();
    }

    private void sendVerificationRequest(int userId, int verificationId,
            IntentFilterVerificationState ivs) {

        Intent verificationIntent = new Intent(Intent.ACTION_INTENT_FILTER_NEEDS_VERIFICATION);
        verificationIntent.putExtra(
                PackageManager.EXTRA_INTENT_FILTER_VERIFICATION_ID,
                verificationId);
        verificationIntent.putExtra(
                PackageManager.EXTRA_INTENT_FILTER_VERIFICATION_URI_SCHEME,
                getDefaultScheme());
        verificationIntent.putExtra(
                PackageManager.EXTRA_INTENT_FILTER_VERIFICATION_HOSTS,
                ivs.getHostsString());
        verificationIntent.putExtra(
                PackageManager.EXTRA_INTENT_FILTER_VERIFICATION_PACKAGE_NAME,
                ivs.getPackageName());
        verificationIntent.setComponent(mIntentFilterVerifierComponent);
        verificationIntent.addFlags(Intent.FLAG_RECEIVER_FOREGROUND);

        UserHandle user = new UserHandle(userId);
        mContext.sendBroadcastAsUser(verificationIntent, user);
    }
At present, the implementation of Android is verified by sending a broadcast. That is to say, this is an asynchronous process. Verification is time-consuming (network request), so it usually takes several seconds for the application to take effect after installation. The receiver of the broadcast is: Intent Filter Verification Receiver.
public final class IntentFilterVerificationReceiver extends BroadcastReceiver {
    private static final String TAG = IntentFilterVerificationReceiver.class.getSimpleName();
...

    @Override
    public void onReceive(Context context, Intent intent) {
        final String action = intent.getAction();
        if (Intent.ACTION_INTENT_FILTER_NEEDS_VERIFICATION.equals(action)) {
            Bundle inputExtras = intent.getExtras();
            if (inputExtras != null) {
                Intent serviceIntent = new Intent(context, DirectStatementService.class);
                serviceIntent.setAction(DirectStatementService.CHECK_ALL_ACTION);
               ...
                serviceIntent.putExtras(extras);
                context.startService(serviceIntent);
            }
After the IntentFilterVerification Receiver receives the authentication message, it verifies it by start ing a DirectStatement Service, and then goes around to verifyOneSource that finally calls IsAssociated Callable.
private class IsAssociatedCallable implements Callable<Void> {

     ...
    private boolean verifyOneSource(AbstractAsset source, AbstractAssetMatcher target,
            Relation relation) throws AssociationServiceException {
        Result statements = mStatementRetriever.retrieveStatements(source);
        for (Statement statement : statements.getStatements()) {
            if (relation.matches(statement.getRelation())
                    && target.matches(statement.getTarget())) {
                return true;
            }
        }
        return false;
    }
IsAssociated Callable validates intentfilter s one by one, specifically through the retrieve Statements of DirectStatement Retriever:
@Override
public Result retrieveStatements(AbstractAsset source) throws AssociationServiceException {
    if (source instanceof AndroidAppAsset) {
        return retrieveFromAndroid((AndroidAppAsset) source);
    } else if (source instanceof WebAsset) {
        return retrieveFromWeb((WebAsset) source);
    } else {
       ..
               }
}
Android AppAsset is like another set of Google's assetlink classes. It seems to be used in places like APP web landing information sharing. Look at retrieveFromWeb directly. From the name, you can see that this is to get the configuration of the server's application and get it followed by local validation. If it passes, it is successful to start the application:
private Result retrieveStatementFromUrl(String urlString, int maxIncludeLevel,
                                        AbstractAsset source)
        throws AssociationServiceException {
    List<Statement> statements = new ArrayList<Statement>();
    if (maxIncludeLevel < 0) {
        return Result.create(statements, DO_NOT_CACHE_RESULT);
    }

    WebContent webContent;
    try {
        URL url = new URL(urlString);
        if (!source.followInsecureInclude()
                && !url.getProtocol().toLowerCase().equals("https")) {
            return Result.create(statements, DO_NOT_CACHE_RESULT);
        }
        <!--Getting configuration through network request-->
        webContent = mUrlFetcher.getWebContentFromUrlWithRetry(url,
                HTTP_CONTENT_SIZE_LIMIT_IN_BYTES, HTTP_CONNECTION_TIMEOUT_MILLIS,
                HTTP_CONNECTION_BACKOFF_MILLIS, HTTP_CONNECTION_RETRY);
    } catch (IOException | InterruptedException e) {
        return Result.create(statements, DO_NOT_CACHE_RESULT);
    }

    try {
        ParsedStatement result = StatementParser
                .parseStatementList(webContent.getContent(), source);
        statements.addAll(result.getStatements());
        <!--If there is a one-to-many situation, or a "proxy" is set, the configuration is retrieved iteratively.-->
        for (String delegate : result.getDelegates()) {
            statements.addAll(
                    retrieveStatementFromUrl(delegate, maxIncludeLevel - 1, source)
                            .getStatements());
        }
        <!--Sending result-->
        return Result.create(statements, webContent.getExpireTimeMillis());
    } catch (JSONException | IOException e) {
        return Result.create(statements, DO_NOT_CACHE_RESULT);
    }
}
In fact, the server configuration is obtained through UrlFetcher, and then sent to the previous receiver for verification:
    public WebContent getWebContentFromUrl(URL url, long fileSizeLimit, int connectionTimeoutMillis)
        throws AssociationServiceException, IOException {
    final String scheme = url.getProtocol().toLowerCase(Locale.US);
    if (!scheme.equals("http") && !scheme.equals("https")) {
        throw new IllegalArgumentException("The url protocol should be on http or https.");
    }

    HttpURLConnection connection = null;
    try {
        connection = (HttpURLConnection) url.openConnection();
        connection.setInstanceFollowRedirects(true);
        connection.setConnectTimeout(connectionTimeoutMillis);
        connection.setReadTimeout(connectionTimeoutMillis);
        connection.setUseCaches(true);
        connection.setInstanceFollowRedirects(false);
        connection.addRequestProperty("Cache-Control", "max-stale=60");
         ...
        return new WebContent(inputStreamToString(
                connection.getInputStream(), connection.getContentLength(), fileSizeLimit),
            expireTimeMillis);
    }
Seeing the HttpURLConnection here, we can see why the application needs to be networked at installation time to be effective. It's almost understandable here. In fact, the following is to verify the configuration with the configuration of App itself. If it is successful, it can be validated by setting default boot and persistence.
adb shell dumpsys package d
View the results:
  Package: com.xxx
  Domains: xxxx.com
  Status: always : 200000002
After verification, it is persisted to settings information through PackageManagerService, thus completing the application verification process.
summary
In fact, there are several special points about application:
- applink is only validated once in the first place. Why not start the motion detection every time when installing it? Maybe it's for users to choose how to leave the back door.
- applink validation needs to be networked. Can a non-networked solution work? Personal understanding, not networking should also be possible, as long as in the installation, only local verification, but obviously there is no two-way authentication security, because two-way verification proves that the site and app are one-to-one, so as to ensure security, prevent third-party packaging tampering.
Reference document
Author: Little Snail Reading
Principles of Android DEPPLINK and APPLink
For reference only, correction is welcome.