Premium Purchase - Day 2
Learning Objectives
Goal 1: Common instructions for using the Angular JS front-end framework
Goal 2: Complete the list function of brand management
Goal 3: Complete Brand Management Paging List
Goal 4: Complete the added function of brand management
Goal 5: Complete the modification function of brand management
Goal 6: Complete the deletion function of brand management
Goal 7: Complete the conditional query function of brand management
Target N: Universal Mapper
Chapter 1 Introduction to the Front End Framework AngularJS
1.1 Introduction to Angular JS rJS
Angular JS was created in 2009 by Misko Hevery and others and acquired by Google.It is an excellent front-end JS framework that has been used in many products of Google.Angular JS has many features, the core of which are MVC, modularization, automatic two-way data binding, dependency injection and so on.
1.2 Four characteristics of Angular JS
1.2.1 MVC mode
Angular follows the MVC pattern of software engineering and encourages loosely coupled presentation, data, and logical components. By dependency injection, Angular brings traditional service-side services to client-side Web applications, such as view-independent control.As a result, the backend reduces many of the burden and produces lighter Web applications.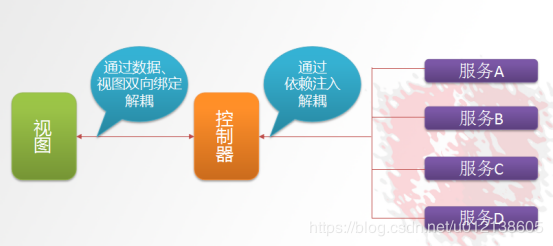
Model: Data is actually an angular variable ($scope.XX);
View: Data rendering, Html+Directive;
Controller: Operational data is function, data addition or deletion check;
1.2.2 Binding
Angular JS is built on the belief that declarative programming should be used to build user interfaces and write software builds, while instructional programming is well suited to represent business logic.The framework uses and extends traditional HTML to accommodate dynamic content through two-way data binding, which allows automatic synchronization between models and views.Therefore, Angular JS makes DOM operations less important and improves testability.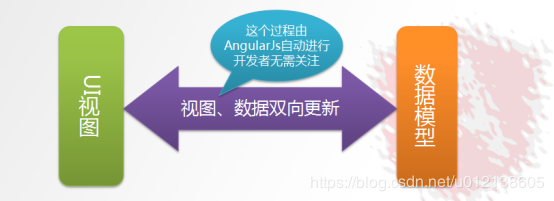
1.2.3 Dependent Injection
Dependency Injection (DI) is a design pattern in which other objects on which an object depends are not created manually but simply "roar" when it is created. The objects on which the object depends are automatically created and injected by the framework, which is actually the rule of least knowledge. All service and provider objects in a module can be named according to the parameter names.Implement DI.
1.2.4 Modular Design
High cohesion and low coupling rule
1) Official modules ng, ngRoute, ngAnimate
2) User-defined module angular.module('module name', [])
1.3 Getting Started Small Demo
1.3.1 expression
<html>
<head>
    <title>Getting Started Small Demo-1</title>
    <script src="angular.min.js"></script>
</head>
<body ng-app>
{{100+100}}
</body>
</html>
The results are as follows:
The expression is written as {{Expression}} The expression can be a variable or an expression
The ng-app directive tells child elements that the following directives belong to angular Js, which recognize them
The ng-app directive defines the root element of an Angular JS application.
The ng-app directive automatically boots (initializes) the application when the page is loaded.
1.3.2 Binding
<html>
<head>
    <title>Getting Started Small Demo-1  Binding in both directions</title>
    <script src="angular.min.js"></script>
</head>
<body ng-app>
//Please enter your name: <input ng-model="myname">
<br>
{{myname}},Hello
</body>
</html>
The results are as follows:
The ng-model directive binds variables so that what the user enters in the text box is bound to the variable, and the expression outputs the variable in real time.
1.3.3 Initialization Instructions
If you want some variables to have initial values, you can use the ng-init directive to initialize the variables:
<html>
<head>
    <title>Getting Started Small Demo-3  Initialization</title>
    <script src="angular.min.js"></script>
</head>
<body ng-app   ng-init="myname='Chen Dahai'">
//Please enter your name: <input ng-model="myname">
<br>
{{myname}},Hello
</body>
</html>
1.3.4 Controller
<html>
<head>
    <title>Getting Started Small Demo-3  Initialization</title>
    <script src="angular.min.js"></script>
    <script>
        var app=angular.module('myApp',[]); //A module called myApp is defined
        //Define Controller
        app.controller('myController',function($scope){
            $scope.add=function(){
                return parseInt($scope.x)+parseInt($scope.y);
            }
        });
    </script>
</head>
<body ng-app="myApp" ng-controller="myController">
x:<input ng-model="x" >
y:<input ng-model="y" >
//Operation result: {{add()}}
</body>
</html>
The results are as follows:
ng-controller is used to specify the controller used.
Understand $scope:
The use of $scope runs through the entire Angular JS App application and is associated with the data model as well as the context in which the expression is executed.With $scope, a channel is established between the view and the controller that updates the $scope as soon as the data is modified based on the scope view, and the view is re-rendered as soon as the $scope changes.
1.3.5 Event directives
<html>
<head>
    <title>Getting Started Small Demo-5  Event directives</title>
    <script src="angular.min.js"></script>
    <script>
        var app=angular.module('myApp',[]); //A module called myApp is defined
        //Define Controller
        app.controller('myController',function($scope){
            $scope.add=function(){
                $scope.z= parseInt($scope.x)+parseInt($scope.y);
            }
        });
    </script>
</head>
<body ng-app="myApp" ng-controller="myController">
x:<input ng-model="x" >
y:<input ng-model="y" >
<button ng-click="add()">operation</button>
//Result: {{z}}
</body>
</html>
Run result:
ng-click is one of the most common click event directives that triggers a controller when clicked
1.3.6 Loop Array
<html>
<head>
    <title>Getting Started Small Demo-6  Cyclic data</title>
    <script src="angular.min.js"></script>
    <script>
        var app=angular.module('myApp',[]); //A module called myApp is defined
        //Define Controller
        app.controller('myController',function($scope){
            $scope.list= [100,192,203,434 ];//Define Array
        });
    </script>
</head>
<body ng-app="myApp" ng-controller="myController">
<table>
<tr ng-repeat="x in list">
    <td>{{x}}</td>
</tr>
</table>
</body>
</html>
The ng-repeat directive here is used to loop array variables.
The results are as follows:
1.3.7 Looping Object Array
<html>
<head>
    <title>Getting Started Small Demo-7  Loop Object Array</title>
    <script src="angular.min.js"></script>
    <script>
        var app=angular.module('myApp',[]); //A module called myApp is defined
        //Define Controller
        app.controller('myController',function($scope){
            $scope.list= [
                {name:'Zhang San',shuxue:100,yuwen:93},
                {name:'Li Si',shuxue:88,yuwen:87},
                {name:'King Five',shuxue:77,yuwen:56}
            ];//Define Array
        });
    </script>
</head>
<body ng-app="myApp" ng-controller="myController">
<table>
<tr>
    <td>Full name</td>
    <td>Mathematics</td>
    <td>Chinese</td>
</tr>
<tr ng-repeat="entity in list">
    <td>{{entity.name}}</td>
    <td>{{entity.shuxue}}</td>
    <td>{{entity.yuwen}}</td>
</tr>
</table>
</body>
</html>
The results are as follows: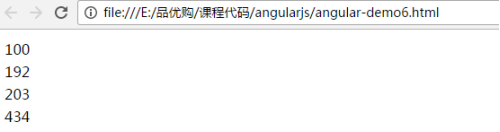
1.3.8 Built-in Services
We usually get our data from the back end, so how do we get it?We typically use the built-in service, $http.Note: The following code needs to be run in tomcat.
<html>
<head>
    <title>Getting Started Small Demo-8  Built-in Services</title>
    <meta charset="utf-8" />
    <script src="angular.min.js"></script>
    <script>
        var app=angular.module('myApp',[]); //A module called myApp is defined
        //Define Controller
        app.controller('myController',function($scope,$http){
            $scope.findAll=function(){
                $http.get('data.json').success(
                    function(response){
                        $scope.list=response;
                    }
                );
            }
        });
    </script>
</head>
<body ng-app="myApp" ng-controller="myController" ng-init="findAll()">
<table>
<tr>
    <td>Full name</td>
    <td>Mathematics</td>
    <td>Chinese</td>
</tr>
<tr ng-repeat="entity in list">
    <td>{{entity.name}}</td>
    <td>{{entity.shuxue}}</td>
    <td>{{entity.yuwen}}</td>
</tr>
</table>
</body>
</html>
Create file data.json
[
    {"name":"Zhang San","shuxue":100,"yuwen":93},
    {"name":"Li Si","shuxue":88,"yuwen":87},
    {"name":"King Five","shuxue":77,"yuwen":56},
    {"name":"Zhao Six","shuxue":67,"yuwen":86}
]
Chapter 2 General Mapper
2.1 Introduction to Universal Mapper
Universal Mapper provides some common methods, which are provided in the form of interfaces. It simplifies the form operation problems that we often do in our work, and makes MyBatis from process-oriented to object-oriented. Of course, writing SQL process-oriented operations and general Mapper object-oriented operations can coexist.
For testing purposes, we introduced the log log package in the parent project with the following versions:
<slf4j.version>1.6.6</slf4j.version>
<log4j.version>1.2.12</log4j.version>
The package was introduced as follows:
<!-- log start -->
<dependency>
    <groupId>log4j</groupId>
    <artifactId>log4j</artifactId>
    <version>${log4j.version}</version>
</dependency>

<dependency>
    <groupId>org.slf4j</groupId>
    <artifactId>slf4j-api</artifactId>
    <version>${slf4j.version}</version>
</dependency>

<dependency>
    <groupId>org.slf4j</groupId>
    <artifactId>slf4j-log4j12</artifactId>
    <version>${slf4j.version}</version>
</dependency>
<!-- log end -->
log4j.properties
log4j.rootLogger=DEBUG,Console
log4j.appender.Console=org.apache.log4j.ConsoleAppender
log4j.appender.Console.layout=org.apache.log4j.PatternLayout
log4j.appender.Console.layout.ConversionPattern=%d [%t] %-5p [%c] - %m%n
log4j.logger.org.apache=DEBUG
2.2 Configuration Introduction
Using a generic generic Mapper first requires the introduction of dependent packages.
<!--currency Mapper-->
<dependency>
    <groupId>tk.mybatis</groupId>
    <artifactId>mapper</artifactId>
</dependency>
Replace the package scan bean for MyBatis integrated Spring and modify the spring-mybatis.xml in the pinyougou-mapper project
Before replacement:
<bean class="org.mybatis.spring.mapper.MapperScannerConfigurer"
   p:basePackage="com.pinyougou.mapper"
     p:sqlSessionFactoryBeanName="sqlSessionFactoryBean" />
After replacement:
<bean class="tk.mybatis.spring.mapper.MapperScannerConfigurer"
     p:basePackage="com.pinyougou.mapper"
     p:sqlSessionFactoryBeanName="sqlSessionFactoryBean">
   <!--Common Interface-->
   <property name="properties">
      <value>
         mappers=tk.mybatis.mapper.common.Mapper
      </value>
   </property>
</bean>
2.3 MyBatis+Universal Mapper+Spring Integration Test
Writing test classes in pinyougou-sellergoods-service
package com.pinyougou;
import org.junit.Before;
import org.junit.Test;
import org.springframework.context.ApplicationContext;
import org.springframework.context.support.ClassPathXmlApplicationContext;
public class MapperTest {
    private ApplicationContext act;
    @Before
    public void init(){
        act = new ClassPathXmlApplicationContext("classpath:spring/spring.xml");
    }
    @Test
    public void testSpring(){
        String[] names = act.getBeanDefinitionNames();

        for (String name : names) {
            System.out.println(name);
        }
    }
}
test result
addressMapper
areasMapper
brandMapper
citiesMapper
contentCategoryMapper
contentMapper
freightTemplateMapper
goodsDescMapper
goodsMapper
itemCatMapper
itemMapper
orderItemMapper
orderMapper
payLogMapper
provincesMapper
seckillGoodsMapper
seckillOrderMapper
sellerMapper
specificationMapper
specificationOptionMapper
typeTemplateMapper
userMapper
Here you can see that each interface produces a proxy object and is injected into the Spring container, and each interface inherits the Mapper interface, so it's preliminary to conclude that inheriting the generic Mapper succeeds, and then we'll use the generic Mapper for add-delete check.
2.4 Use of Universal Mapper
2.4.1 Add Operation
2.4.1.1 Do not ignore null-insert
/***
 * Add data
 * Do not ignore null values
 */
@Test
public void testInsert(){
    Brand brand = new Brand();
    brand.setName("Shenzhen Black Horse Training Camp");
    //brand.setFirstChar("C");
    int acount = brandMapper.insert(brand);
    System.out.println(acount);
}
Journal:
When Brand's id and firstChar are empty, the SQL statement still performs the insert operation.
==>  Preparing: INSERT INTO tb_brand ( id,name,first_char ) VALUES( ?,?,? )
==> Parameters: null, Shenzhen Black Horse Training Camp(String), null
1.4.1.2. Ignore null-insertSelective
/***
 * Add data
 * Ignore null values
 */
@Test
public void testInsertSelective(){
    Brand brand = new Brand();
    brand.setName("Wise Podcast-Black Horse Training Camp");
    //brand.setFirstChar("C");
    int acount = brandMapper.insertSelective(brand);
    System.out.println(acount);
}
Journal:
When Brand's id and firstChar are empty, the SQL statement does not perform an insert operation.
==>  Preparing: INSERT INTO tb_brand ( name ) VALUES( ? )
==> Parameters: Podcast-Black Horse Training Camp (String)
2.4.2 Modification Operations
2.4.2.1 Modify data based on primary key - do not ignore null values
/**
 * Action needs to be changed
 * Do not ignore null values
 */
@Test
public void testUpdateByPrimaryKey(){
    Brand brand = new Brand();
    brand.setId(25L);
    //Brand.setName (Shenzhen Black Horse Training Camp);
    brand.setFirstChar("S");
    //Modify data based on primary key
    int mcount = brandMapper.updateByPrimaryKey(brand);
    System.out.println(mcount);
}
Journal:
When the name is empty, the SQL statement still performs the modification.
==>  Preparing: UPDATE tb_brand SET name = ?,first_char = ? WHERE id = ?
==> Parameters: null, S(String), 25(Long)
2.4.2.2. Modify data based on primary key - ignore null values
/**
 * Action needs to be changed
 * Ignore null values
 */
@Test
public void testUpdateByPrimaryKeySelective(){
    Brand brand = new Brand();
    brand.setId(25L);
    brand.setName("Shenzhen Black Horse Training Camp");
    //brand.setFirstChar("S");
    //Modify data based on primary key
    int mcount = brandMapper.updateByPrimaryKeySelective(brand);
    System.out.println(mcount);
}
Journal:
The SQL statement does not perform modifications when the name is empty.
1
2
3
sql
==>  Preparing: UPDATE tb_brand SET name = ? WHERE id = ?
==> Parameters: Shenzhen Black Horse Training Camp(String), 25(Long)
2.4.2.3 Construction Conditions Modify Data - Do not Ignore Nulls
/**
 * Construct Conditions Execute Modifications
 * Do not ignore null values
 */
@Test
public void testUpdateByExample(){
    //firstChar=S
    Brand brand = new Brand();
    brand.setName("Shenzhen Black Horse Training Camp");

    //Create Example Object
    Example example = new Example(Brand.class);

    //Criteria is used to construct constraints
    Example.Criteria criteria = example.createCriteria();

    //The first parameter is the property corresponding to Brand, and the second parameter is the property constraint value equivalent to where firstChar=S
    criteria.andEqualTo("firstChar","S");

    //Conditional Modification Data
    int mcount = brandMapper.updateByExample(brand,example);
    System.out.println(mcount);
}
Journal:
criteria.andEqualTo("firstChar", "S"); converted to the SQL statement where(first_char=?), where firstChart is empty, but the SQL statement still executes the modifications.
1
2
==>  Preparing: UPDATE tb_brand SET name = ?,first_char = ? WHERE ( first_char = ? )
==> Parameters: Shenzhen Black Horse Training Camp(String), null, S(String)
2.4.2.4 Construction Conditions Modify Data - Ignore Null Values
/**
 * Construct Conditions Execute Modifications
 * Ignore null values
 */
@Test
public void testUpdateByExampleSelective(){
    //firstChar=S
    Brand brand = new Brand();
    brand.setFirstChar("S");
    //Create Example Object
    Example example = new Example(Brand.class);
    //Criteria is used to construct constraints
    Example.Criteria criteria = example.createCriteria();

    //The first parameter is the attribute corresponding to Brand, and the second parameter is the attribute constraint value equivalent to where name='Shenzhen Black Horse Training Camp'
    criteria.andEqualTo("name","Shenzhen Black Horse Training Camp");

    //Conditional Modification Data
    int mcount = brandMapper.updateByExampleSelective(brand,example);
    System.out.println(mcount);
}
Journal:
The name here is empty and the SQL statement has not been modified.
==>  Preparing: UPDATE tb_brand SET first_char = ? WHERE ( name = ? )
==> Parameters: S(String), Shenzhen Black Horse Training Camp(String)
2.4.3 Query Operations
1.4.3.1. Query by primary key
/***
 * Query by Primary Key
 */
@Test
public void testSelectByPrimaryKey(){
    long id = 25L;
    Brand brand = brandMapper.selectByPrimaryKey(id);
    System.out.println(brand);
}
Journal:
==>  Preparing: SELECT id,name,first_char FROM tb_brand WHERE id = ?
==> Parameters: 25(Long)
Brand{id=25, name='Shenzhen Black Horse Training Camp', firstChar='S'}
2.4.3.1 Query Single Record
/***
 * Query individual records
 */
@Test
public void testSelectOne(){
    Brand brand = new Brand();
    brand.setId(25L);
    brand.setName("Shenzhen Black Horse Training Camp");
    Brand brand1 = brandMapper.selectOne(brand);
    System.out.println(brand1);
}
Journal:
==>  Preparing: SELECT id,name,first_char FROM tb_brand WHERE id = ? AND name = ?
==> Parameters: 25(Long), Shenzhen Black Horse Training Camp(String)
Brand{id=25, name='Shenzhen Black Horse Training Camp', firstChar='S'}
Be careful:
It is important to note that the data for this condition must be <=1 in the database, and if it is greater than 1, an error will be reported.
TooManyResultsException: Expected one result (or null) to be returned by selectOne(), but found: 3
2.4.3.2 Query by Conditions-Example
/***
 * Execute queries based on conditions
 */
@Test
public void testExample(){
    Example example = new Example(Brand.class);
    Example.Criteria criteria = example.createCriteria();
    //id IN(1,2,5,6)
    List<Long> ids = new ArrayList<Long>();
    ids.add(1L);
    ids.add(2L);
    ids.add(5L);
    ids.add(6L);

    //The second parameter is a collection object. Note that the type corresponding to the collection object here, although Object, is the same as the type corresponding to your database.
    criteria.andIn("id",ids);

    //Execute Query
    List<Brand> brands = brandMapper.selectByExample(example);

    for (Brand brand : brands) {
        System.out.println(brand);
    }
}
Journal:
==>  Preparing: SELECT id,name,first_char FROM tb_brand WHERE ( id in ( ? , ? , ? , ? ) )
==> Parameters: 1(Long), 2(Long), 5(Long), 6(Long)
Brand{id=1, name='association', firstChar='L'}
Brand{id=2, name='Huawei', firstChar='H'}
Brand{id=5, name='OPPO', firstChar='O'}
Brand{id=6, name='Shenzhen Black Horse Training Camp', firstChar='S'}
2.4.3.3 Conditional Query-JavaBean
/***
 * Query by condition
 * Include: JavaBean
 */
@Test
public void testSelect(){
    Brand brand = new Brand();
    brand.setId(25L);
    brand.setName("Shenzhen Black Horse Training Camp");
    //Use brand as a query condition, and null values are ignored here
    List<Brand> brands = brandMapper.select(brand);
    for (Brand bd : brands) {
        System.out.println(bd);
    }
}
Journal:
==>  Preparing: SELECT id,name,first_char FROM tb_brand WHERE id = ? AND name = ?
==> Parameters: 25(Long), Shenzhen Black Horse Training Camp(String)
Brand{id=25, name='Shenzhen Black Horse Training Camp', firstChar='S'}
2.4.3.4 Query All
/***
 * Query all
 */
@Test
public void testSelectAll(){
    //Execute Query
    List<Brand> brands = brandMapper.selectAll();

    for (Brand brand : brands) {
        System.out.println(brand);
    }
}
Journal:
==>  Preparing: SELECT id,name,first_char FROM tb_brand
==> Parameters:
Brand{id=1, name='association', firstChar='L'}
Brand{id=2, name='Huawei', firstChar='H'}
Brand{id=3, name='Shenzhen Black Horse Training Camp', firstChar='S'}
...........................................
2.4.3.5 Statistical Query
/***
 * Statistical Queries - Total Records
 */
@Test
public void testSelectCount(){
    //Total number of records queried
    int count = brandMapper.selectCount(null);
    System.out.println(count);
}
Journal:
==>  Preparing: SELECT COUNT(id) FROM tb_brand
==> Parameters:
25
2.4.4 Delete operation
2.4.4.1 Delete by Primary Key
/***
 * Delete by ID
 */
@Test
public void testDeleteByPrimaryKey(){
    long id = 25;
    int dcount = brandMapper.deleteByPrimaryKey(id);
    System.out.println(dcount);
}
Journal:
==>  Preparing: DELETE FROM tb_brand WHERE id = ?
==> Parameters: 25(Long)
2.4.4.2 Conditional Delete-Example
/***
 * Conditional Delete
 */
@Test
public void testDeleteByExample(){
    Example example = new Example(Brand.class);
    Example.Criteria criteria = example.createCriteria();
    //where id between 23 and 28
    criteria.andBetween("id",23L,28L);
    //Delete by condition
    int dcount = brandMapper.deleteByExample(example);
    System.out.println(dcount);
}
Journal:
==>  Preparing: DELETE FROM tb_brand WHERE ( id between ? and ? )
==> Parameters: 23(Long), 28(Long)
2.4.4.3 Conditional Delete-JavaBean
/***
 * Conditional Delete
 * Include: javaBean
 */
@Test
public void testDelete(){
    Brand brand = new Brand();
    brand.setName("Avatar");
    //Delete by condition
    int dcount = brandMapper.delete(brand);
    System.out.println(dcount);
}
Journal:
==>  Preparing: DELETE FROM tb_brand WHERE name = ?
==> Parameters: Avatar(String)
Chapter 3 Paging Tools
Paging is common when working on projects, but often involves tedious packaging.A universal paging plugin, pagehelper, is provided to meet the basic needs of our work.
3.1 Configuration Introduction
First, you need to introduce corresponding dependencies
<!--Paging Toolkit-->
<dependency>
    <groupId>com.github.pagehelper</groupId>
    <artifactId>pagehelper</artifactId>
</dependency>
Then you need to configure a mybatis interceptor to include the following plug-in code in mybatis.xml of the pinyougou-mapper project
<plugins>
    <!-- com.github.pagehelper by PageInterceptor Package name in which the class resides -->
    <plugin interceptor="com.github.pagehelper.PageInterceptor">
        <property name="reasonable" value="true"/>
    </plugin>
</plugins>
The above configuration can be either not configured in mybatis.xml or in the SqlSessionFactoryBean of spring-mybatis.xml with the following code:
<!-- SqlSessionFactoryBean -->
<bean id="sqlSessionFactoryBean" class="org.mybatis.spring.SqlSessionFactoryBean">
    <property name="configLocation" value="classpath:mybatis/mybatis.xml" />
    <property name="typeAliasesPackage" value="com.pinyougou.model" />
    <property name="mapperLocations">
        <list>
            <value>classpath:com/pinyougou/mapper/*Mapper.xml</value>
        </list>
    </property>
    <property name="dataSource" ref="dataSource" />

    <!--Paging Plugin Configuration-->
    <property name="plugins">
        <array>
            <bean class="com.github.pagehelper.PageInterceptor">
                <!--Configure Paging Properties-->
                <property name="properties">
                    <props>
                        <!--Specify database dialect-->
                        <prop key="helperDialect">mysql</prop>
                        <!--Rationalize Paging Operations-->
                        <prop key="reasonable">true</prop>
                    </props>
                </property>
            </bean>
        </array>
    </property>
</bean>
3.2 Paging Class Introduction
The PageInfo class contains both paging information in our work and collection objects for paging queries, so it is useful as follows:
public class PageInfo<T> implements Serializable {
    private static final long serialVersionUID = 1L;
    //Current Page
    private int pageNum;
    //Number of pages per page
    private int pageSize;
    //Number of current pages
    private int size;
    //Line number of the first element of the current page in the database
    private int startRow;
    //The row number of the last element of the current page in the database
    private int endRow;
    //Total Records
    private long total;
    //PageCount
    private int pages;
    //Result Set
    private List<T> list;
    //next page before
    private int prePage;
    //next page
    private int nextPage;
    //Is it the first page
    private boolean isFirstPage = false;
    //Is it the last page
    private boolean isLastPage = false;
    //Is there a previous page
    private boolean hasPreviousPage = false;
    //Is there a next page
    private boolean hasNextPage = false;
    //Number of navigation pages
    private int navigatePages;
    //All navigation page numbers
    private int[] navigatepageNums;
    //First page on navigation bar
    private int navigateFirstPage;
    //Last page on navigation bar
    private int navigateLastPage;
     //........Omitted
}
3.3 Use of Paging Plugins
Paging plug-ins are simple to use. Once configured, paging can be achieved by calling PageHelper's static method startPage directly. Other queries can be written normally. Note that the method calling startPage must be written before executing the query selectAll(), otherwise paging is invalid.
/**
 * Paging Test
 */
@Test
public void testPage(){
    //How many pages the current page size shows per page
    int page = 1,size=10;
    //Paging is done by simply calling the PageHelper.startPage static method.S
    PageHelper.startPage(page,size);

    //query
    List<Brand> brands = brandMapper.selectAll();

    //Get the paging information, notice that the brands collection object is passed in here
    PageInfo<Brand> pageInfo = new PageInfo<Brand>(brands);
    System.out.println(pageInfo);
}
Journal:
==>  Preparing: SELECT count(0) FROM tb_brand
==> Parameters:
------------------------------------------------------------------------------------------------------------------------------------------------
==>  Preparing: SELECT id,name,first_char FROM tb_brand LIMIT ?
==> Parameters: 10(Integer)
------------------------------------------------------------------------------------------------------------------------------------------------
PageInfo{pageNum=1, pageSize=10, size=10, startRow=1, endRow=10, total=22, pages=3, list=Page{count=true, pageNum=1, pageSize=10, startRow=0, endRow=10, total=22, pages=3, reasonable=true, pageSizeZero=false}, prePage=0, nextPage=2, isFirstPage=true, isLastPage=false, hasPreviousPage=false, hasNextPage=true, navigatePages=8, navigateFirstPage=1, navigateLastPage=3, navigatepageNums=[1, 2, 3]}
Chapter 4 Implementation of Brand List
Brand paging implementation, remember to introduce paging packages in pinyougou-sellergoods-interface
<!--Paging Toolkit-->
<dependency>
    <groupId>com.github.pagehelper</groupId>
    <artifactId>pagehelper</artifactId>
</dependency>
4.1 Demand Analysis
Implement a query of the brand list (without paging and conditional queries) as follows:
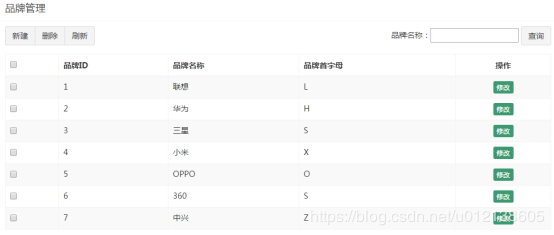
4.2 Front End Code
4.2.1 Copy Resources
Copy page resources under Resource/Static Prototype/Operator Management Background to pinyougou-manager-web
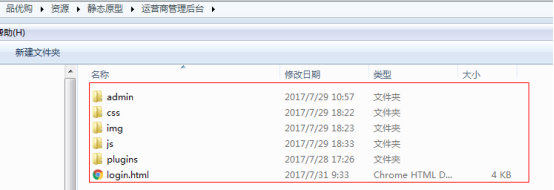
The plugins folder contains common front-end libraries such as angular JS, bootstrap, JQuery, and so on, which we will use in our project
4.2.2 Introduction of JS
Modify brand.html to introduce JS
<script src="/plugins/angularjs/angular.min.js"></script>
Specify modules and controllers
<body ng-app="pinyougou" ng-controller="brandController" class="hold-transition skin-red sidebar-mini">
The name of the module is defined in the ng-app directive
The ng-controller directive is used to add a controller to your application.
In the controller, you can write code, make functions and variables, and use scope objects to access them.
4.2.3 Writing JS code
<script>
   /******
   * 1,Introducing angular JS
   * 2,Send Request
   * 3,Display data
   *****/

   //Define a module
   var app = angular.module("pinyougou",[]);

   /*****
    * Define a controller
    * Send an HTTP request to get data from the background
    ****/
   app.controller("brandController",function($scope,$http){
      //Create a method
      //Get all the brand information
      $scope.getPage=function(page,size){
         //Send a request for data
         $http.post("/brand/list.shtml?page="+page+"&size="+size).success(function(response){
            //Collection data
            $scope.list = response.list;
         });
      }
   });
</script>
4.3.4 Cyclic display of tabular data
<tbody>
<tr ng-repeat="entity in list">
   <td><input  type="checkbox" ng-model="id" ></td>
   <td>{{entity.id}}</td>
   <td>{{entity.name}}</td>
   <td>{{entity.firstChar}}</td>
   <td class="text-center">
      <button type="button" class="btn bg-olive btn-xs" data-toggle="modal" data-target="#EditModal "> Modify </button>
   </td>
</tr>
</tbody>
4.3.5 Initialization Call
<body ng-app="pinyougou" ng-controller="brandController" ng-init="getPage(1,10)" class="hold-transition skin-red sidebar-mini">
Chapter 5 Realization of Brand List Paging
5.1 Demand Analysis
Place Paging Bar under Brand Management for Paging
5.2 Backend Code
5.2.1 Service Interface Layer
Add method definition in BrandService.java of pinyougou-sellergoods-interface
/***
 * Paging Back to List
 * @param pageNum
 * @param pageSize
 * @return
 */
public PageInfo<Brand> getAll(int pageNum, int pageSize);
5.2.2 Service Implementation Layer
Implement this method in BrandServiceImpl.java of pin y ougou-sellergoods-service:
public PageInfo<Brand> getAll(int pageNum, int pageSize) {
    //Execute Paging
    PageHelper.startPage(pageNum,pageSize);
    //List<Brand> all = brandMapper.getAllBrand();
    List<Brand> all = brandMapper.selectAll();

    PageInfo<Brand> pageInfo = new PageInfo<Brand>(all);
    return pageInfo;
}
PageHelper is MyBatis Paging Plugin
5.2.3 Control Layer
New method for BrandController.java in pinyougou-manager-web project
/***
 * Paging Query Data
 * Getting JSON data
 * @return
 */
@RequestMapping(value = "/list")
public PageInfo<Brand> list(@RequestParam(value = "page", required = false, defaultValue = "1") int page,
                            @RequestParam(value = "size", required = false, defaultValue = "10") int size) {
    return brandService.getAll(page, size);
}
5.3 Front End Code Control Layer
5.3.1 HTML
Introducing paging components in brand.html
<!--Paging related introduction-->
<link rel="stylesheet" href="/plugins/angularjs/pagination.css">
<script src="/plugins/angularjs/pagination.js"></script>
Introducing pagination module when building app module
//Define a module
var app = angular.module("pinyougou",["pagination"]); //Introducing Paging Modules
Place the paging component under the table of the page
<!--paging-->
<tm-pagination conf="paginationConf"></tm-pagination>
5.3.2 JS Code
Add the following code to the brandController
/***
 * Paging Control Configuration
 * currentPage:Current Page
 * totalItems:How many records are there
 * itemsPerPage:pagesize
 * perPageOptions:How many option bars per page
 * onChange:Execute when parameters change
 * */
$scope.paginationConf = {
   currentPage: 1,
   totalItems: 10,
   itemsPerPage: 10,
   perPageOptions: [10, 20, 30, 40, 50],
   onChange: function(){
      $scope.reloadList();//Reload
   }
};
//Reload
$scope.reloadList=function(){
   $scope.getPage($scope.paginationConf.currentPage,$scope.paginationConf.itemsPerPage);
}
Remove the call to the ng-init instruction from the body element of the page
<body ng-app="pinyougou" ng-controller="brandController" class="hold-transition skin-red sidebar-mini">
5.3.3 Complete Code
<script>
/******
* Step analysis:
* 1,Introducing angular JS
* 2,Send Request
* 3,Display data
*****/
//Define a module
var app = angular.module("pinyougou",["pagination"]);
/*****
* Define a controller
* Send an HTTP request to get data from the background
****/
app.controller("brandController",function($scope,$http){
/***
* Paging Control Configuration
* currentPage:Current Page
* totalItems:How many records are there
* itemsPerPage:pagesize
* perPageOptions:How many option bars per page
* onChange:Execute when parameters change
* */
$scope.paginationConf = {
currentPage: 1,
totalItems: 10,
itemsPerPage: 10,
perPageOptions: [10, 20, 30, 40, 50],
onChange: function(){
$scope.reloadList();//Reload
}
};
//Create a method
//Get all the brand information
$scope.getPage=function(page,size){
//Send a request for data
$http.post("/brand/list.shtml?page="+page+"&size="+size).success(function(response){
//Collection data
$scope.list = response.list;
//Paging data
$scope.paginationConf.totalItems=response.total;
});
}
//Reload
$scope.reloadList=function(){
$scope.getPage($scope.paginationConf.currentPage,$scope.paginationConf.itemsPerPage);
}
});
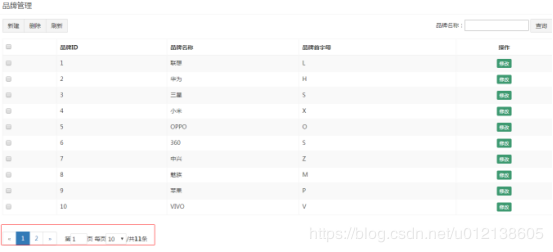
</script>5.3.4 Effect

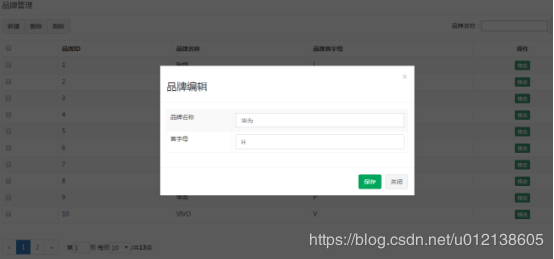
Chapter 6 Brand Increase
6.1 Demand Analysis
Implement Brand Add Function
6.2 Backend Code
6.2.1 Control Layer
Add the add method to the BrandController of pinyougou-manager-web, along with the corresponding JSON data.
/***
 * Increase Brand Data
 * @param brand
 * Response data:success
 *                  true:Success false: failure
 *           message
 *                  Response message
 *
 */
@RequestMapping(value = "/add",method = RequestMethod.POST)
public Map<String,Object> add(@RequestBody Brand brand){
    //Store response messages
    Map<String,Object> dataMap = new HashMap<String,Object>();

    try {
        //Execution increase
        int acount = brandService.add(brand);

        if(acount>0){
            //Increase Success
            dataMap.put("success",true);
            dataMap.put("message","Increase Brand Success");
        }
    } catch (Exception e) {
        e.printStackTrace();
        dataMap.put("success",false);
        dataMap.put("message","Failed to increase brand");
    }
    return dataMap;
}
6.2.2 Service Interface Layer
New method definition in BrandService.java for pinyougou-sellergoods-interface
/***
 * Increase brand information
 * @param brand
 * @return
 */
int add(Brand brand);
6.2.3 Service Implementation Layer
Implement this method in BrandServiceImpl.java at com.pinyougou.sellergoods.service.impl
@Override
public int add(Brand brand) {
    return brandMapper.insertSelective(brand);
}
6.3 Front End Code
6.3.1 js code
//Add brand approach
$scope.save = function(){
//Send Http requests, increase execution
$http.post("/brand/add.shtml",$scope.entity).success(function(response){
//Judging execution status
if(response.success){
//Reload new data
$scope.reloadList();
}else{
//Print error message
alert(response.message);
}
});
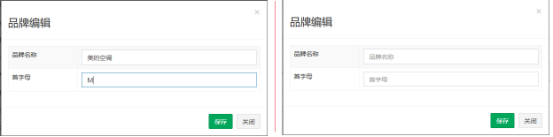
}6.3.2 html code
Bind form elements, we use ng-model directives, bind button click events, we use ng-click
<!-- Edit window -->
<div class="modal fade" id="editModal" tabindex="-1" role="dialog" aria-labelledby="myModalLabel" aria-hidden="true">
<div class="modal-dialog" >
<div class="modal-content">
<div class="modal-header">
<button type="button" class="close" data-dismiss="modal" aria-hidden="true">×</button>
<h3 id="myModalLabel">Brand Editor</h3>
</div>
<div class="modal-body">
<table class="table table-bordered table-striped" width="800px">
<tr>
<td>Brand name</td>
<td><input ng-model="entity.name" class="form-control" placeholder="Brand name" > </td>
</tr>
<tr>
<td>Initials</td>
<td><input ng-model="entity.firstChar" class="form-control" placeholder="Initials"> </td>
</tr>
</table>
</div>
<div class="modal-footer">
<button ng-click="save()" class="btn btn-success" data-dismiss="modal" aria-hidden="true">Preservation</button>
<button class="btn btn-default" data-dismiss="modal" aria-hidden="true">Close</button>
</div>
</div>
</div>
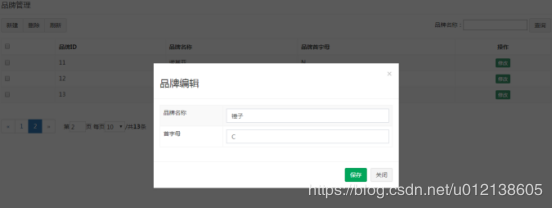
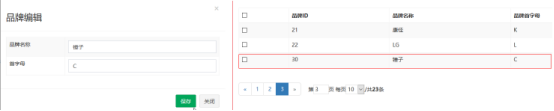
</div>6.3.3 Effect
6.4 Increase Cache Resolution
In order that each time the window opens without leaving the last data, we can modify the New button to empty the entity variable
<button ng-click="entity={}" type="button" class="btn btn-default" title="Newly build" data-toggle="modal" data-target="#EditModal "><i class=" fa-file-o "></i>New </button>Effect
6.5 Encapsulate response message body
Introduction to 6.5.1 Packaging
We write a Map in response to the message body. Every time we need to use it, we create the Map object repeatedly, assign values to the specified key, there is a lot of duplicate code, and each key is easy to write incorrectly, so we can consider encapsulating it as an entity Bean, called Result, and directly new Result() each time.
6.5.2 Create Result
Since Result may be used in many projects, we can consider putting it in the pinyougou-common project and creating a Result class in pinyougou-common
package com.pinyougou.http;
import java.io.Serializable;
public class Result implements Serializable {

    private boolean success;

    private String message;

    public Result(boolean success, String message) {
        this.success = success;
        this.message = message;
    }

    public Result(boolean success) {
        this.success = success;
    }

    public Result(String message) {
        this.message = message;
    }

    public Result() {
    }

    //get.. set.. toString..
}
6.5.3 Dependency Analysis
No matter which project is directly or indirectly dependent on pinyougou-pojo, it makes sense for POJO to depend on pinyougou-common, maven to depend on transitivity, all projects will depend on pinyougou-common, and pinyougou-common is mainly used to write some commonly used toolkits, so it makes sense for any project to depend on him.
Add dependencies to pinyougou-pojo's pom.xml
<!--rely on pinyougou-common-->
<dependency>
    <artifactId>pinyougou-common</artifactId>
    <groupId>com.pinyougou</groupId>
    <version>1.0-SNAPSHOT</version>
</dependency>
6.5.4 Modify Controllerl
Modify the add method of BrandController in pinyougou-manager-web:
/***
 * Increase Brand Data
 * @param brand
 * Response data:success
 *                  true:Success false: failure
 *           message
 *                  Response message
 *
 */
@RequestMapping(value = "/add",method = RequestMethod.POST)
public Result add(@RequestBody Brand brand){
    try {
        //Execution increase
        int acount = brandService.add(brand);

        if(acount>0){
            //Increase Success
           return new Result(true,"Increase Brand Success");
        }
    } catch (Exception e) {
        e.printStackTrace();
    }
    return new Result(false,"Failed to increase brand");
}
CHAPTER 7 REVISION OF BRAND
7.1 Demand Analysis
Click the Modify button of the list, pop-up window, and then click "Save" after modifying the data to perform the save operation, which is roughly divided into two steps.
First: Query out brand data based on ID and show it.
Second, save data according to user modifications.
7.2 Backend Code
7.2.1 Control Layer
Include methods to query and modify brands based on IDS in BrandController of pinyougou-manager-web
/***
 * Modify brand information
 * @param brand
 * @return
 */
@RequestMapping(value = "/update",method = RequestMethod.POST)
public Result modify(@RequestBody Brand brand){
    try {
        //Modify brand information based on ID
        int mcount = brandService.updateBrandById(brand);
        if(mcount>0){
            return new Result(true,"Brand Modification Successful");
        }
    } catch (Exception e) {
        e.printStackTrace();
    }
    return new Result(false,"Brand Modification Failed");
}

/***
 * Query brand information based on ID
 * @param id
 * @return
 */
@RequestMapping(value = "/{id}",method = RequestMethod.GET)
public Brand getById(@PathVariable(value = "id")long id){
    //Query brand information based on ID
    Brand brand = brandService.getOneById(id);
    return brand;
}
7.2.2 Service Interface Layer
New method definition in BrandService.java for pinyougou-sellergoods-interface
/***
 * Query brand information based on ID
 * @param id
 * @return
 */
Brand getOneById(long id);

/***
 * Modify brand information based on ID
 * @param brand
 * @return
 */
int updateBrandById(Brand brand);
7.2.3 Service Implementation Layer
New method implementation in BrandServiceImpl.java for pinyougou-sellergoods-service
@Override
public Brand getOneById(long id) {
    return brandMapper.selectByPrimaryKey(id);
}

@Override
public int updateBrandById(Brand brand) {
    return brandMapper.updateByPrimaryKeySelective(brand);
}
7.3 Front End Code
7.3.1 Implementing Data Query
Add JS code;
//Query brand information based on ID
$scope.getById=function(id){
   $http.get("/brand/"+id+".shtml").success(function(response){
      //Bind background data to foreground
      $scope.entity=response;
   });
}
Modify the Modify button in the list to invoke this method to query entities
<button ng-click="getById(entity.id)" type="button" class="btn bg-olive btn-xs" data-toggle="modal" data-target="#EditModal ">Modify </button>
7.3.2 Saving Data
Modify JS save method
//Add or modify brand approach
$scope.save = function(){
//Send Http requests, increase execution
var url="/brand/add.shtml";
if($scope.entity.id!=null){
//Perform Modification Data
url="/brand/update.shtml";
}
//Perform operation
$http.post(url,$scope.entity).success(function(response){
//Judging execution status
if(response.success){
//Reload new data
$scope.reloadList();
}else{
//Print error message
alert(response.message);
}
});
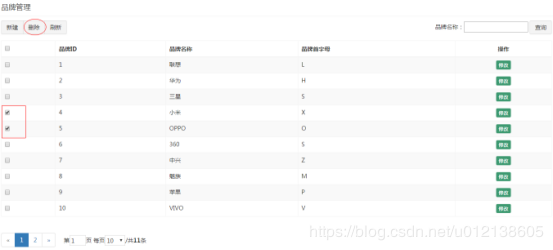
}Chapter 8 Delete Brand
8.1 Demand Analysis
Click the check box in front of the list, click the Delete button, and delete the selected brand.
8.2 Backend Code
8.2.1 Control Layer
Add Delete Method to BrandController
/***
 * Bulk Delete Based on ID
 * @param ids
 * @return
 */
@RequestMapping(value = "/delete")
public Result delete(@RequestBody List<Long> ids){
    try {
        //Delete data based on ID
        int dcount = brandService.deleteByIds(ids);

        if(dcount>0){
            return new Result(true,"Brand Delete Success");
        }
    } catch (Exception e) {
        e.printStackTrace();
    }
    return new Result(false,"Brand Deletion Failed");
}
8.2.2 Service Interface Layer
BrandService.java interface definition method in pinyougou-sellergoods-interface
/***
 * Delete brand information in batch based on ID
 * @param ids
 * @return
 */
int deleteByIds(List<Long> ids);
8.2.3 Service Implementation Layer
Implement this method in BrandServiceImpl.java of pinyougou-sellergoods-service
@Override
public int deleteByIds(List<Long> ids) {
    //Create an Example to build Delete Data by ID
    Example example = new Example(Brand.class);
    Example.Criteria criteria = example.createCriteria();

    //The required SQL statement is similar to delete from tb_brand where id in(1,2,5,6)
    criteria.andIn("id",ids);
    return brandMapper.deleteByExample(example);
}
8.3 Front End Code
8.3.1 js
Main idea: We need to define an array to store the selected ID. When we click on the check box, we decide whether to select or deselect, add it to the array if it is selected, and remove it from the array if it is unselected.This ID-stored array is needed when you click the Delete button.
Here we add some JS knowledge about Array Operations
push method for arrays: add elements to arrays
Array splice method: Removes a specified number of elements from a specified position in the array, with parameter 1 as the position and parameter 2 as the number of displacements
checked property of check box: Used to determine if it is selected:
//Define a variable to store the brand ID to be deleted
$scope.selectids=[];

//Determine if the current click will delete the corresponding brand
$scope.updateSelection=function($event,id){
   //Determine if the current action is checked
   if($event.target.checked){
      //If the check box is checked, the id is added to the array
      $scope.selectids.push(id);
   }else{
      //Cancel deletion, remove the id from the array
      var idx = $scope.selectids.indexOf(id);   //Get the subscript for the id
      $scope.selectids.splice(idx, 1);//Delete the data corresponding to the subscript, 1 indicating the number of deletions
   }
}


//Bulk Delete
$scope.delete=function(){
   $http.post("/brand/delete.shtml",$scope.selectids).success(function(response){
      //Determine Deletion Status
      if(response.success){
         $scope.reloadList();
      }else{
         alert(response.message);
      }
   });
}
8.3.2 HTML
Check box to modify list
<input type="checkbox" ng-click="updateSelection($event,entity.id)" >
Modify Delete Button
<button ng-click="delete()" type="button" class="btn btn-default" title="delete" ><i class="fa fa-trash-o"></i> delete</button>
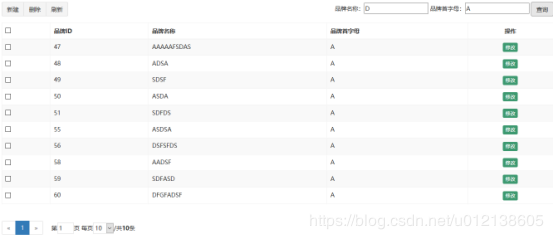
Chapter 9 Brand Conditions Query
9.1 Demand Analysis
Implement brand condition query function, enter brand name, first letter and then query, and page.
9.2 Backend Code
9.2.1 Control Layer
Modify the list method in BrandController
/***
 * Paging Query Data
 * Getting JSON data
 * @return
 */
@RequestMapping(value = "/list")
public PageInfo<Brand> list(@RequestBody Brand brand,@RequestParam(value = "page", required = false, defaultValue = "1") int page,
                            @RequestParam(value = "size", required = false, defaultValue = "10") int size) {
    return brandService.getAll(brand,page, size);
}
9.2.2 Service Interface Layer
BrandService.java method adds method definition in pinyougou-sellergoods-interface project
/***
 * Paging Back to List
 * @param pageNum
 * @param pageSize
 * @return
 */
public PageInfo<Brand> getAll(Brand brand,int pageNum, int pageSize);
9.2.3 Service Implementation Layer
Implement this method in the pinyougou-sellergoods-service project BrandServiceImpl.java
public PageInfo<Brand> getAll(Brand brand,int pageNum, int pageSize) {
    //Execute Paging
    PageHelper.startPage(pageNum,pageSize);

    //Conditional Query
    Example example = new Example(Brand.class);
    Example.Criteria criteria = example.createCriteria();

    if(brand!=null){
        //Name Ambiguous Search
        if(StringUtils.isNotBlank(brand.getName())){
            criteria.andLike("name","%"+brand.getName()+"%");
        }

        //Initial search
        if(StringUtils.isNotBlank(brand.getFirstChar())){
            criteria.andEqualTo("firstChar",brand.getFirstChar());
        }
    }
    //Execute Query
    List<Brand> all = brandMapper.selectByExample(example);
    PageInfo<Brand> pageInfo = new PageInfo<Brand>(all);


    //======================================================================
    //List<Brand> all = brandMapper.getAllBrand();
    /*List<Brand> all = brandMapper.selectAll();

    PageInfo<Brand> pageInfo = new PageInfo<Brand>(all);*/
    return pageInfo;
}
9.3 Front End Code
Modify brand.html for pinyougou-manager-web
9.3.1 Add Search Block
Add a search code block and bind a search object.Increase the click event and call the search method.
<div class="has-feedback">
   Brand name: <input ng-model="searchEntity.name">
   Brand initials: <input ng-model="searchEntity.firstChar">
   <button ng-click="getPage(1,10)" class="btn btn-default">query</button>
</div>
9.3.2 js
Define a search object that matches the search criteria and modify the original search method.
//Conditional Query Object Definition
$scope.searchEntity={};

//Get all the brand information
$scope.getPage=function(page,size){
   //Send a request for data
   $http.post("/brand/list.shtml?page="+page+"&size="+size,$scope.searchEntity).success(function(response){
      //Collection data
      $scope.list = response.list;

      //Paging data
      $scope.paginationConf.totalItems=response.total;
   });
}
9.3.3 Effect
Needed the next day Data Files